

src
index.tsx
import React from 'react';
import ReactDOM from 'react-dom/client';
import { BrowserRouter } from 'react-router-dom';

import './index.css';
import App from './App';
import { AuthContextProvider } from './store/auth-context';

const root = ReactDOM.createRoot(
  document.getElementById('root') as HTMLElement
);
root.render(
  <AuthContextProvider>
    <BrowserRouter>
        <App />
    </BrowserRouter>
  </AuthContextProvider>
);
URL의 이동을 토큰이 존재하냐 안하냐의 여부로 제어할 것이기 때문에 'react-router-dom의 BrowserRouter를 App위에 덮어주었고
그 위에 Context 적용을 위해 AuthContextProvider를 덮어주었다.
App.tsx
import React, { useContext } from 'react';
import { Routes, Route, Navigate } from 'react-router-dom';

import CreateAccountForm from './components/Auth/CreateAccountForm';
import Layout from './components/Layout/Layout';
import AuthPage from './pages/AuthPage';
import HomePage from './pages/HomePage';
import ProfilePage from './pages/ProfilePage';
import AuthContext from './store/auth-context';

function App() {

  const authCtx = useContext(AuthContext);

  return (
    <Layout>
      <Routes>
        <Route path="/" element={<HomePage />} />
        <Route path="/signup/" element={authCtx.isLoggedIn ? <Navigate to='/' /> : <CreateAccountPage />} />
        <Route path="/login/*"
          element={authCtx.isLoggedIn ? <Navigate to='/' /> : <AuthPage />}
        />
        <Route path="/profile/" element={!authCtx.isLoggedIn ? <Navigate to='/' /> : <ProfilePage />} />
      </Routes>
    </Layout>
  );
}

export default App;
내비게이션과 메인페이지라는 기본 레이아웃이 전체적으로 다 적용이 되기 때문에 맨 위에 Layout컴포넌트를 덮었다.
그 안에 Routes를 통해 다양한 Route 컴포넌트를 배치해놨다.
이 중, 로그인, 회원가입의 컴포넌트인 AuthPage와 CreateAccountPage은 로그인이 되어있는 경우 자동으로 홈페이지로 이동하게 되고,
반대로 ProfilePage는 로그인이 되어 있지않은데 해당 url로 이동하면 자동으로 홈페이지로 이동하게 된다.
pages
/pages/AuthPage.tsx
import AuthForm from "../components/Auth/AuthForm";

const AuthPage = () => {
  return <AuthForm />;
};

export default AuthPage;
/pages/CreateAccountPage.tsx
import CreateAccountForm from "../components/Auth/CreateAccountForm";

const CreateAccountPage = () => {
  return <CreateAccountForm />
}

export default CreateAccountPage;
/pages/HomePage.tsx
import StartingPage from "../components/StratingPage/StartingPage";

const HomePage = () => {
  return <StartingPage />
};

export default HomePage;
/pages/ProfilePage.tsx
import { Fragment } from "react";
import { ChangeUsername } from "../components/Profile/ChangeUsername";
import { ChangePassword } from "../components/Profile/ChangePassword";

const ProfilePage = () => {
  return (
    <Fragment>
      <ChangePassword />
      <ChangeUsername />
    </Fragment>
  );
};

export default ProfilePage;
단순히 컴포넌트를 반환하는 함수지만, ProfilePage의 경우처럼, 나중가서 복수의 컴포넌트를 사용하는 등, 재사용성을 높이기 위해 만들어 줬다.
components
Layout
/components/Layout/Layout.tsx
import React from "react";

import { Fragment } from "react";
import MainNavigation from "./MainNavigation";

type Props = {
  children?: React.ReactNode
}

const Layout: React.FC<Props> = (props) => {


  return (
    <Fragment>
      <MainNavigation />
      <main>{props.children}</main>
    </Fragment>
  )
};

export default Layout;
앞서 말한듯이 전체적인 Layout 을 잡아주는 컴포넌트다.
맨 위에 MainNavigation을 배치하고, 아래에 main으로 감싼 다음, 컴포넌트가 나타나게 한다.
참고로 TypeScript에서 Props를 쓰기 위해서 원래 아래와 같은 식으로 작성하면 되었지만,
import * as React from 'react';

type Props = {};
const Component: React.FC<Props> = ({children}) => {...}
React가 18버전이 되면서 React.FC Type에 암묵적인 children 선언을 제거해버려서, 아래의 로직으로 바꿔써야 했다.
import * as React from 'react';

type Props = {
  children?: React.ReactNode
};
const Component: React.FC<Props> = ({children}) => {...}
이렇게 변한 이유는, React.FC를 사용할때 children 노드를 사용할 것인지 아닌지 하는, Type의 입장에서는 까다로운 문제가 생기기 때문에 없앴다고 한다.
MainNavigation
/components/Layout/MainNavigation.tsx
import { useContext, useEffect, useState } from 'react';
import { Link } from 'react-router-dom';

import classes from './MainNavigation.module.css';
import AuthContext from '../../store/auth-context';


const MainNavigation = () =>{

  const authCtx = useContext(AuthContext);
  const [nickname, setNickname] = useState('');
  let isLogin = authCtx.isLoggedIn;
  let isGet = authCtx.isGetSuccess;

  const callback = (str:string) => {
    setNickname(str);
  }

  useEffect(() => {
    if (isLogin) {
      console.log('start');
      authCtx.getUser();
    }
  }, [isLogin]);

  useEffect(() => {
    if (isGet) {
      console.log('get start');
      callback(authCtx.userObj.nickname);
    }
  }, [isGet]);


  const toggleLogoutHandler = () => {
    authCtx.logout();
  }


  return(
    <header className={classes.header}>
      <Link to='/'><div className={classes.logo}>Home</div></Link>
      <nav>
        <ul>
          <li>{!isLogin && <Link to='/login'>Login</Link>}</li>
          <li>{!isLogin && <Link to='signup'>Sign-Up</Link>}</li>
          <li>{isLogin && <Link to='/profile'>{nickname}</Link>}</li>
          <li>{isLogin && <button onClick={toggleLogoutHandler}>Logout</button>}</li>
        </ul>
      </nav>
    </header>
  );
};

export default MainNavigation;
메인 네비게이션 바를 나타내는 컴포넌트다.
useContext를 통해 Context를 호출하고 있으며, nickname을 state로 보관하고 있다.
여기서 isLoggedIn과 isGetSuccess을 Context를 통해 불러오며, 이 값이 변하면, 자동으로 네비게이션의 컴포넌트가 변할 수 있게 useEffect를 사용한다.
따라서 isLogin과 isGet은 useEffect의 종속변수다.
여기서 왜 2가지를 분리했냐고 질문이 나올 수 있는데 왜냐하면, getUser의 실행과정이 비동기적이기 때문이다.
따라서 getUserObj를 한다음 nickname의 state를 바로 정해버리면, 절차적이 아니라 비동기적으로 진행되기 때문에, Context내부의 비어있는 userObj객체를 불러올 수도 있게 된다.
따라서 auth-context.tsx내부에 있는 getUserHandler의 setIsGetSuccess(true)가 실행된다면, userObj객체 값도 있다는 것이 보장되기 때문에, getSuccess의 값이 true일때만 nickname의 state를 정하는 useEffect를 하나 더 만든다.
Auth
CreateAccountForm
import React, { useState, useRef, useContext } from 'react';
import { useNavigate } from 'react-router-dom';
import AuthContext from '../../store/auth-context';
import classes from './CreateAccountForm.module.css';

const CreateAccountForm = () => {

  let navigate = useNavigate();
  const authCtx = useContext(AuthContext);
  const emailInputRef = useRef<HTMLInputElement>(null);
  const passwordInputRef = useRef<HTMLInputElement>(null);
  const nicknameInputRef = useRef<HTMLInputElement>(null);


  const submitHandler = (event: React.FormEvent) => {
    event.preventDefault();

    const enteredEmail = emailInputRef.current!.value;
    const enteredPassword = passwordInputRef.current!.value;
    const enteredNickname = nicknameInputRef.current!.value;

    authCtx.signup(enteredEmail, enteredPassword, enteredNickname);

    if (authCtx.isSuccess) {
      return navigate("/", { replace: true });

    }

  }

  return (
    <section className={classes.auth}>
      <h1>Create Account</h1>
      <form onSubmit={submitHandler}>
        <div className={classes.control}>
          <label htmlFor='email'>Your email</label>
          <input type='email' id='email' required ref={emailInputRef}/>
        </div>
        <div className={classes.control}>
          <label htmlFor="password">Your password</label>
          <input type='password' id='password' required ref={passwordInputRef}/>
        </div>
        <div className={classes.control}>
          <label htmlFor="nickname">NickName</label>
          <input type='text' id='nickname' required ref={nicknameInputRef}/>
        </div>
        <div className={classes.actions}>
          <button type='submit'>Submit</button>
        </div>
      </form>
    </section>
  );
};

export default CreateAccountForm;
컴포넌트 form값에 onSubmit을 통해 React.FormEvent type의 데이터를 받고, 받은 데이터를 통해, Formevent의 기본동작(새로고침)을 막는다.
또한 useRef를 통해 Form에 있는 값을 추출해내어, useContext로 불러온 회원가입 함수에 넣어 실행시킨다
이후 홈페이지로 리다이렉트한다.
AuthForm
import React, { useState, useRef, useContext } from 'react';
import { useNavigate } from 'react-router-dom';
import AuthContext from '../../store/auth-context';
import classes from './AuthForm.module.css';

const AuthForm = () => {

  const emailInputRef = useRef<HTMLInputElement>(null);
  const passwordInputRef = useRef<HTMLInputElement>(null);

  let navigate = useNavigate();
  const [isLoading, setIsLoading] = useState(false);
  const authCtx = useContext(AuthContext);

  const submitHandler = async (event: React.FormEvent) => {
    event.preventDefault();

    const enteredEmail = emailInputRef.current!.value;
    const enteredPassword = passwordInputRef.current!.value;

    setIsLoading(true);
    authCtx.login(enteredEmail, enteredPassword);
    setIsLoading(false);

    if (authCtx.isSuccess) {
      navigate("/", { replace: true });
    }

}

    return (
      <section className={classes.auth}>
        <h1>Login</h1>
        <form onSubmit={submitHandler}>
          <div className={classes.control}>
            <label htmlFor='email'>Your email</label>
            <input type='email' id='email' required ref={emailInputRef}/>
          </div>
          <div className={classes.control}>
            <label htmlFor="password">Your password</label>
            <input type='password' id='password' required ref={passwordInputRef}/>
          </div>
          <div className={classes.actions}>
            <button type='submit'>Login</button>
            {isLoading && <p>Loading</p>}
            <p>Create Account</p>
          </div>
        </form>
      </section>
    );
  }

export default AuthForm;
회원가입과 비슷한 로직이다.
Profile
ChangeUsername
import React, { useContext, useRef } from 'react';
import { useNavigate } from 'react-router-dom';
import AuthContext from '../../store/auth-context';

import classes from './ChangeUsername.module.css';

const ChangeUsername = () => {

  let navigate = useNavigate();

  const authCtx = useContext(AuthContext);
  const nicknameInputRef = useRef<HTMLInputElement>(null);


  const submitHandler = (event: React.FormEvent) => {
    event.preventDefault();
    const enteredNickname = nicknameInputRef.current!.value;
    console.log('change nickname start!');
    authCtx.changeNickname(enteredNickname);
    if (authCtx.isSuccess) {
      alert("변경 되었습니다.");
      authCtx.getUser();
      navigate("/", { replace: true });
    }
  }

  return (
    <form onSubmit={submitHandler} className={classes.form}>
      <div className={classes.control}>
        <label htmlFor='username'>New Nickname</label>
        <input type='text' id='username'minLength={3} required ref={nicknameInputRef}/>
      </div>
      <div className={classes.action}>
        <button type='submit'>Change Username</button>
      </div>
    </form>
  );
}

export { ChangeUsername };
이것도 위와 로직이 유사하다.
ChangePassword
import React, { useContext, useRef } from 'react';
import { useNavigate } from 'react-router-dom';
import AuthContext from '../../store/auth-context';
import classes from './ChangePassword.module.css';

const ChangePassword = () => {

  let navigate = useNavigate();

  const authCtx = useContext(AuthContext);
  const exPasswordInputRef = useRef<HTMLInputElement>(null);
  const newPasswordInputRef = useRef<HTMLInputElement>(null);
  const newPasswordAgainInputRef = useRef<HTMLInputElement>(null);

  const submitHandler = (event: React.FormEvent) => {
    event.preventDefault();
    const enteredExPassword = exPasswordInputRef.current!.value;
    const enteredNewPassword = newPasswordInputRef.current!.value;
    const enteredNewPasswordAgain = newPasswordAgainInputRef.current!.value;
    if (enteredNewPassword !== enteredNewPasswordAgain) {
      alert("Password Write Correct!");
      return;
    }
    console.log('change pw start!');
    authCtx.changePassword(enteredExPassword, enteredNewPassword);
    console.log(authCtx.isSuccess);
    if (authCtx.isSuccess) {
      alert("다시 로그인 하세요.")
      authCtx.logout();
      navigate("/", { replace: true });
    }
  }

  return (
    <form className={classes.form} onSubmit={submitHandler}>
      <div className={classes.control}>
      <label htmlFor='ex-password'>Old Password</label>
        <input
          type='password'
          id='ex-password'
          minLength={8}
          ref={exPasswordInputRef}
        />
        <label htmlFor='new-password'>New Password</label>
        <input
          type='password'
          id='new-password'
          minLength={8}
          ref={newPasswordInputRef}
        />
        <label htmlFor='new-password'>New Password Again</label>
        <input
          type='password'
          id='new-password'
          minLength={8}
          ref={newPasswordAgainInputRef}
        />
      </div>
      <div className={classes.action}>
        <button type='submit'>Change Password</button>
      </div>
    </form>
  );
}

export { ChangePassword };
이 또한 로직이 유사하나, 다만 새로운 패스워드를 2번 입력하며 검증하는 로직을 추가했으며, 다 패스워드 변경이 끝난 경우 자동으로 로그아웃을 시킨다.
모든 과정이 끝났으며, 실행을 해보자.
실행
먼저 회원가입부터 해보자.
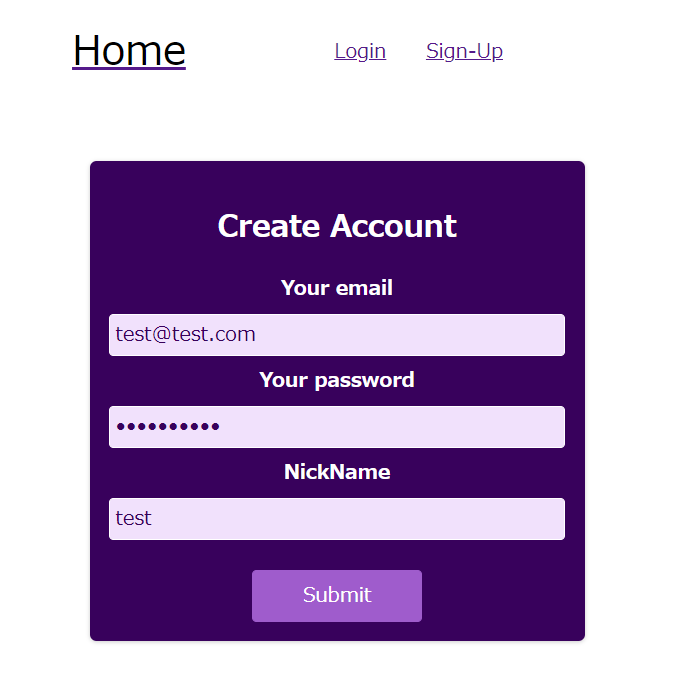
이제 이걸 submit하면?
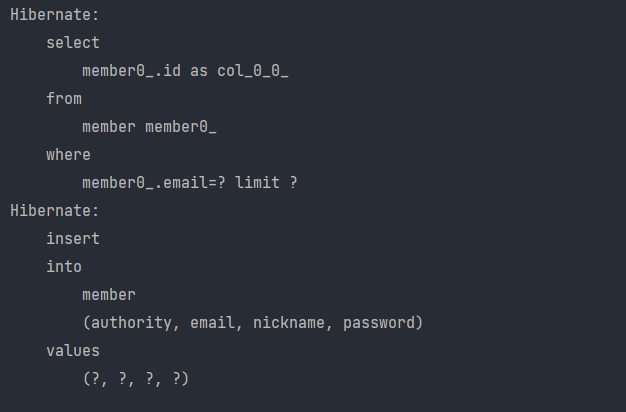
backend Spring에서 제대로 insert를 한다.
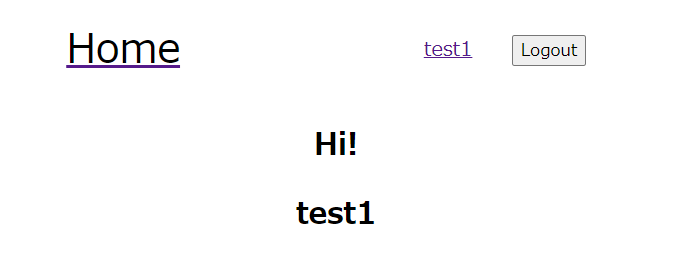
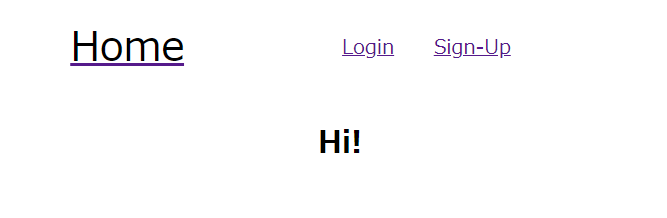
이후 로그인을 하면?

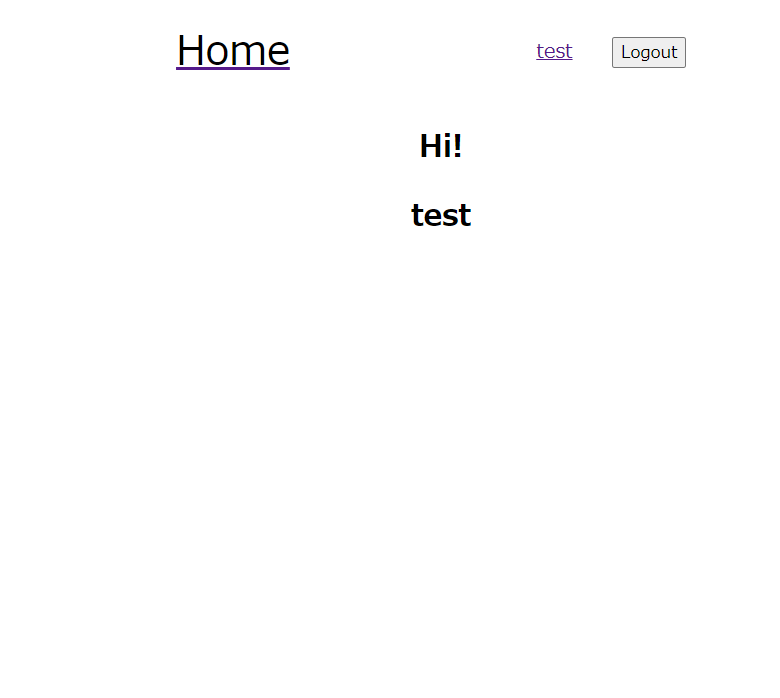
네비게이션 바가 바뀌며, 회원의 nickname도 홈화면과 네비게이션 바에 제대로 떠있는 모습을 볼 수 있다.
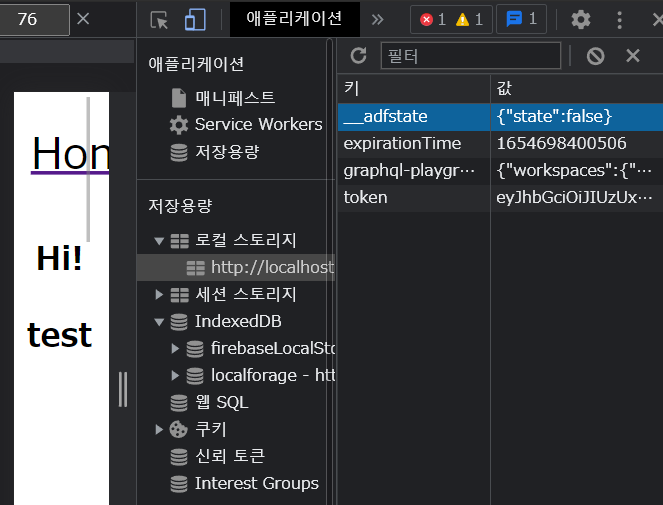
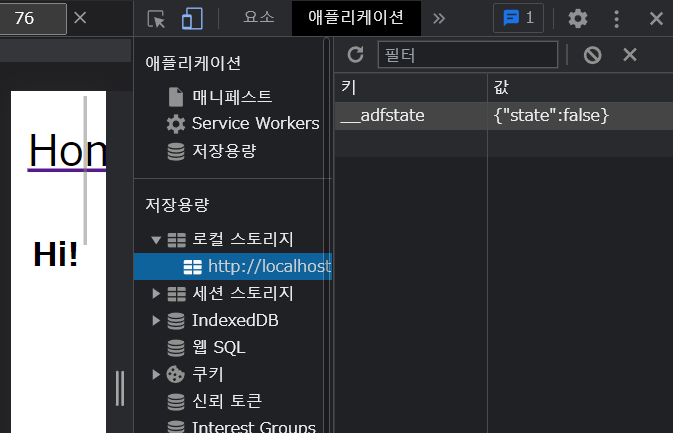
마찬가지로 token과 expirationTime도 제대로 localStorage에 저장되어 있음을 알 수 있다.
이제 닉네임을 바꿔보자

이걸 submit하면?
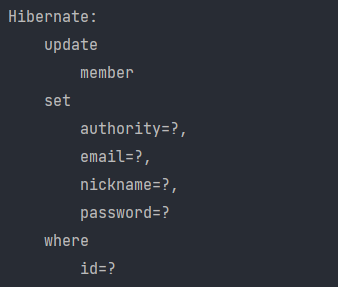
백엔드에서 update가 이루어지게 된다.
이 후 홈화면으로 로딩되면서 자연스럽게 닉네임도 바뀌게 된다.
이제 패스워드를 바꿔보자. 먼저 패스워드를 다르게 치는 경우를 실행해보자.
이러면 프론트 단에서 먼저 비밀번호가 일치하지 않다고 alert을 하며 다시 입력하게 한다.
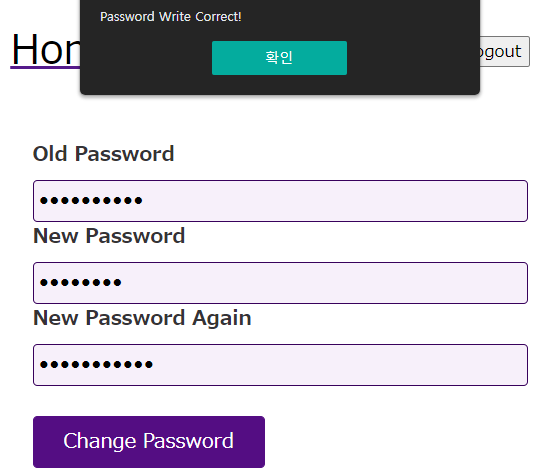
그럼 이제 제대로 입력해보자.
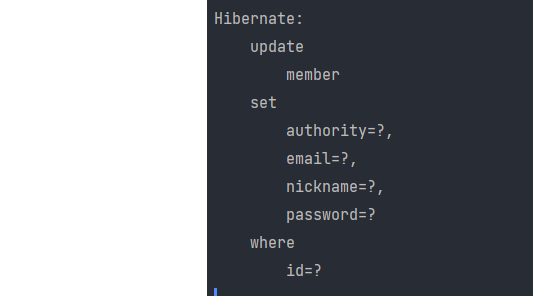
마찬가지로 백엔드에서 update가 이루어지고
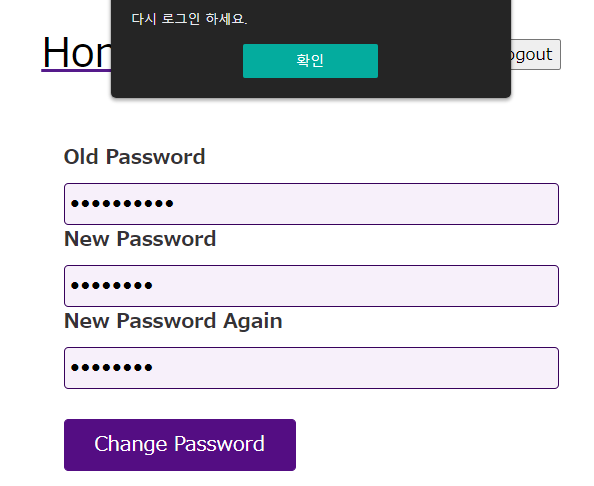
수정이 제대로 되면서 로그아웃이 된다.
토큰값 역시 지워진 상태다.
이렇게 모든 로그인에 관련된 부분은 백엔드, 프론트엔드 모두 구현했다.
이제 이 로그인 로직을 기초로 게시판을 구현해보자.

선생님 안녕하세요 선생님 블로그를 보면서 JWT와 리액트 사용법을 공부하고 있습니다.
하나하나 친절하게 설명까지 적어주셔서 쉽게 공부하고 있습니다. 이 점에 대해서는 정말 감사합니다.
그러던 와중에 감사하지만 더 이상 진행 할 수 없는 문제점이 발생하여 이렇게 댓글을 남겨 봅니다.ㅜ
일단 css지식이 없어서 혹시 ./xx.module.css 라는 이름의 각 컴포넌트 마다 있는 이 css파일들을 올려 주 실 수 있으신가용??ㅜ
이전 글의 https://velog.io/@juno0713/Spring-Security-JWT-React-w3wpg5yi 에서 memberService에서 닉네임과 비밀번호를 바꾸는 changeMemberNickname(String email, String nickname), changeMemberPassword(String email, String exPassword, String newPassword) 메서드는 email을 넘겨주지 않고 있어서 에러가 납니다. 비밀번호를 바꾸는 메소드는 시큐리티컨텍스트에서 아이디를 가져와 괜찮지만 닉네임을 바꾸는 메서드는 계속 email is null 쿼리를 발생시켜 예외가 터집니다. 그래서
@Transactional
public MemberResponseDto changeMemberNickname(String nickname) {
Member member =
memberRepository.findById(SecurityUtil.getCurrentMemberId()).orElseThrow(()
-> new RuntimeException("로그인 유저 정보가 없습니다"));
member.setNickname(nickname);
return MemberResponseDto.of(memberRepository.save(member));
}
이런식으로 바꿨는데 맞게 한것일까요?