애플리케이션 계층 확인
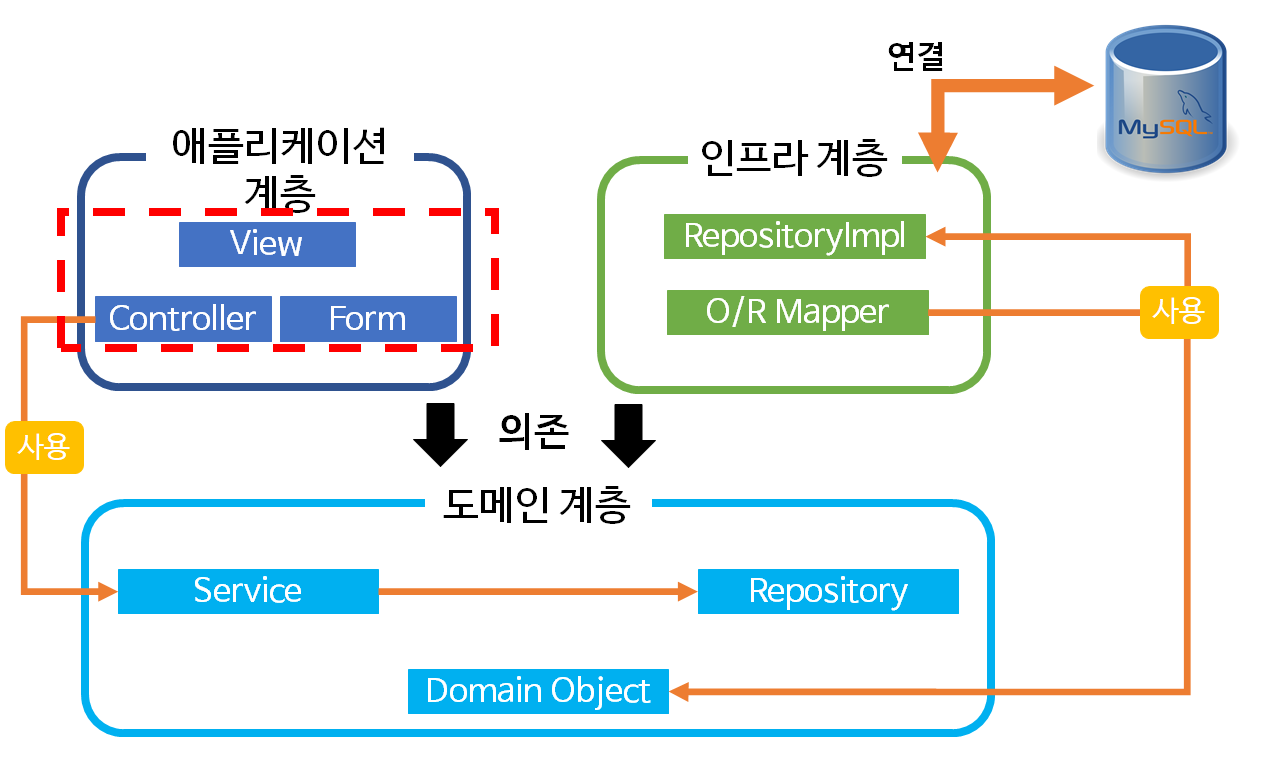
이번에 작성해야할 부분
| 레이어 | 구성요소 | 명칭 | 비고 |
|---|---|---|---|
| 애플리케이션 계층 | View | html파일들 | 외형, 화면 담당 |
| 애플리케이션 계층 | Controller | QuizController | 제어의 역할을 담당함 |
| 애플리케이션 계층 | Form | QuizForm | 입력양식을 표현함 |
View - html
View의 영역에서, html 파일로 구성이 되어 있는데 2가지 html 파일로 구성할 예정이다.
첫번째는 crud.html으로 회원정보의 등록, 변경, 삭제, 목록 기능을 담당한다.
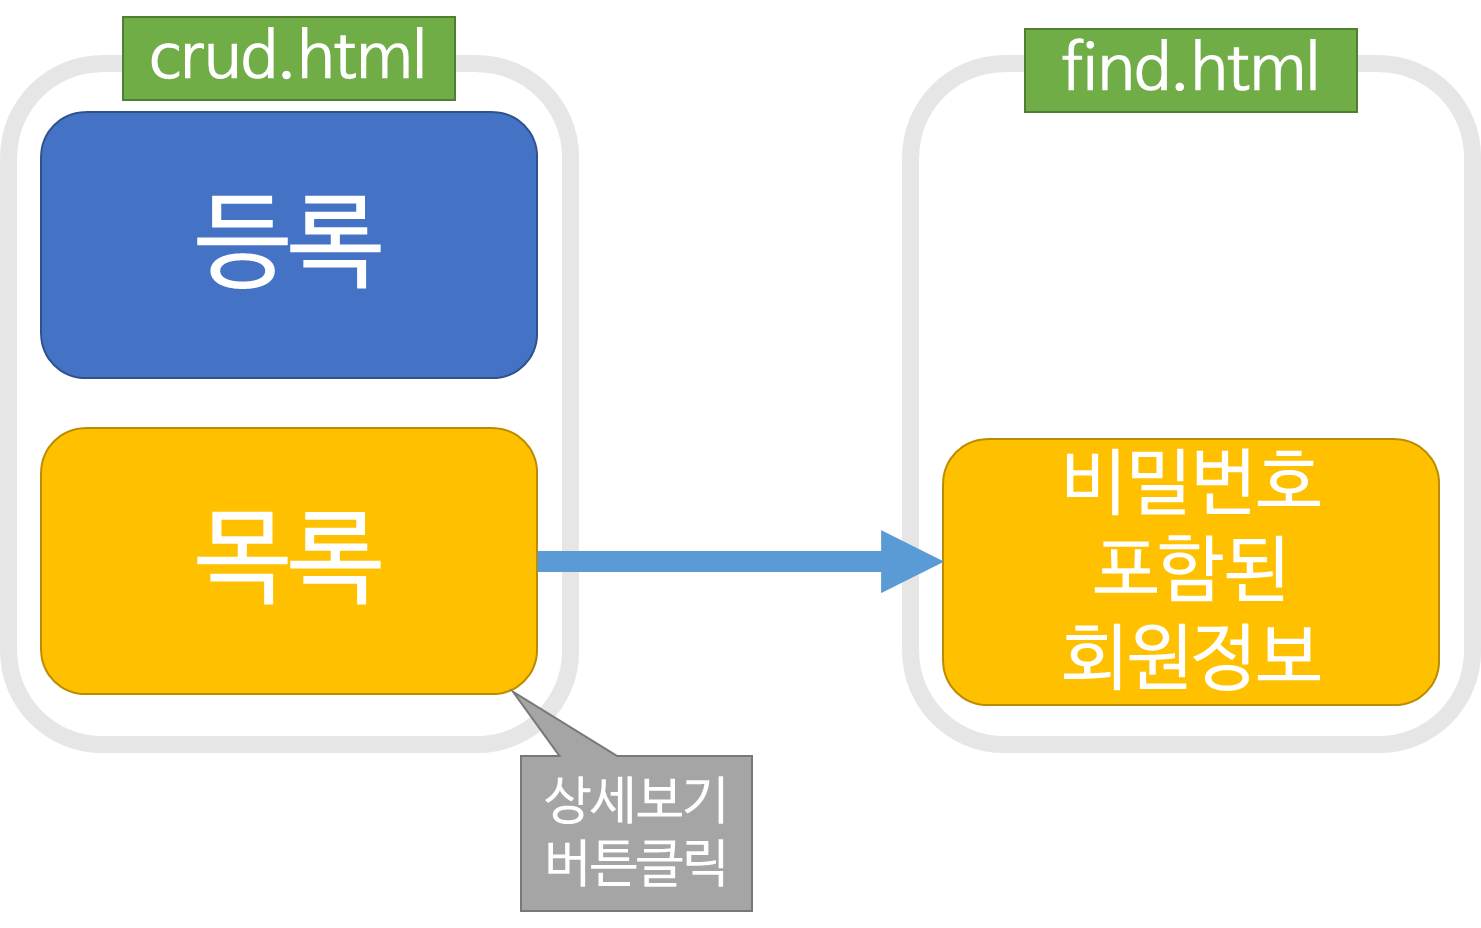
두번째는 find.html이며, 회원정보에서 비밀번호를 포함한 상세정보를 표시하는 역할을 담당한다.
등록과 변경은 입력항목이 같기 때문에 1개로 정리할 수 있기 때문에 이러한 방식으로 작성하는 것이 더 효율적이다.
다만 등록화면은 초기 입력값이 공백이고, 변경화면은 화면 표시시 입력항목의 초기 입력값이 등록 되어 있게 설정을 해야한다.
목록
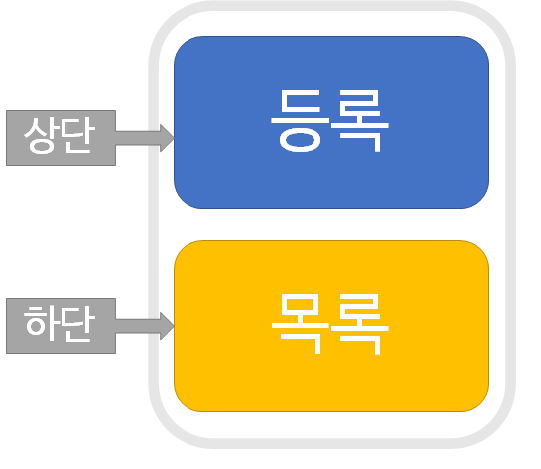
전체적으로 등록/변경은 하단에 위치하게 하고, 목록은 하단에 위치하는 구조로 한다.
목록의 부분은 등록된 회원정보 데이터가 있으면 화면 하단에 회원정보목록을 표시하고 등록되어 있지 않는 경우에는 경고문을 표시하는 형식이다.
단 회원의 비밀번호는 표시하지 않으며, 이는 나중에 구현할 find.html에서 확인할 수 있도록 한다.
전체적인 구조는 아래와 같다.
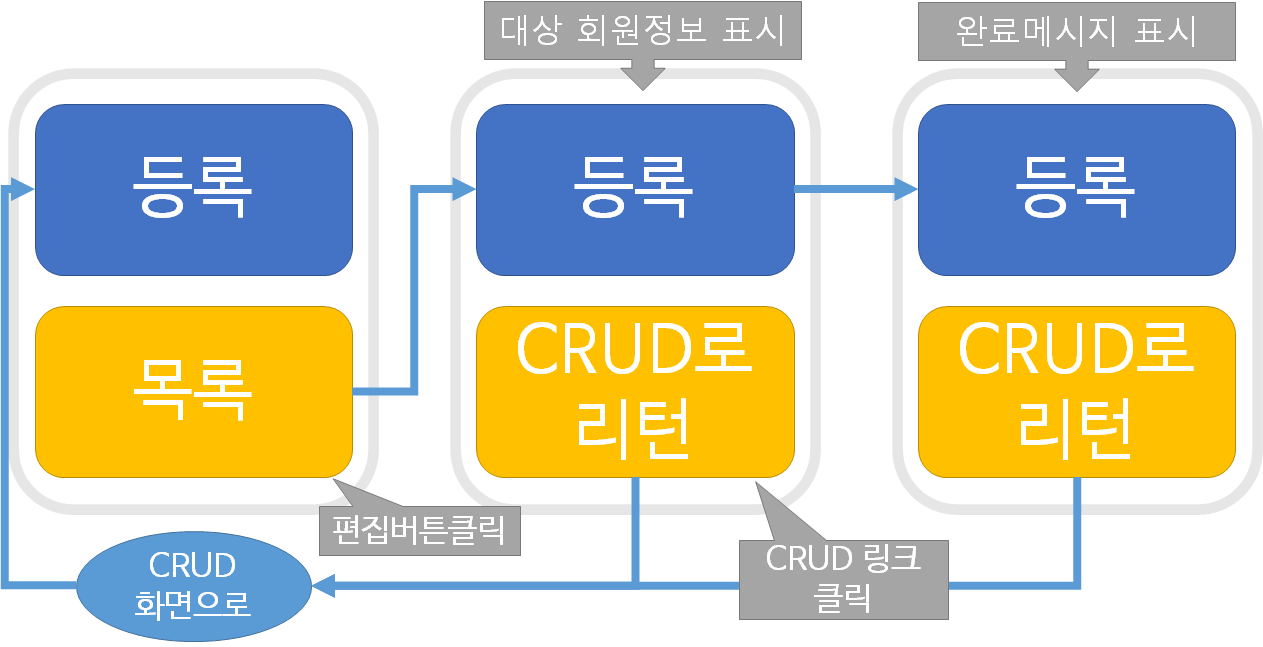
등록
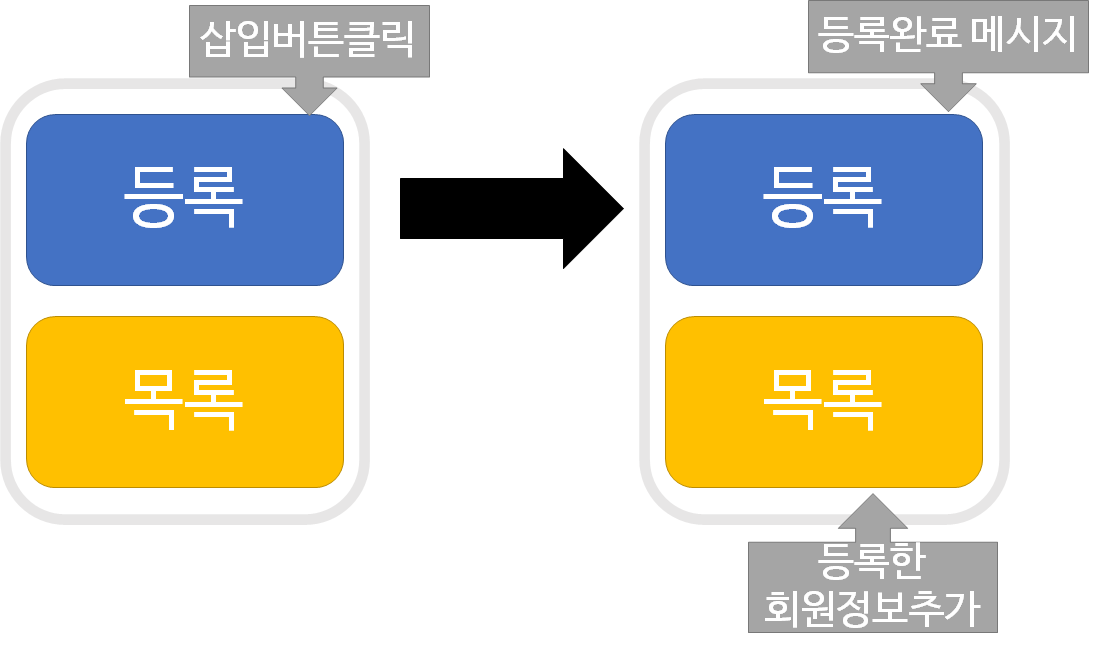
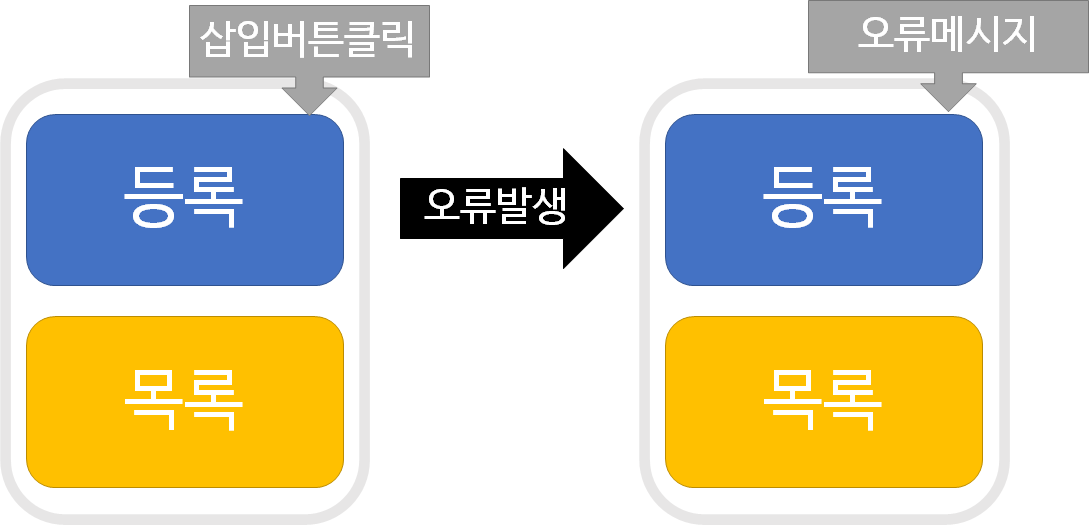
등록 실행시 목록표시에 등록한 레코드가 늘어난다. 등록과 변경을 할때 입력체크가 있기 때문에, 입력 오류가 있으면 오류 메시지가 표시가 된다.
등록구조는 아래와 같다.
변경 / 삭제
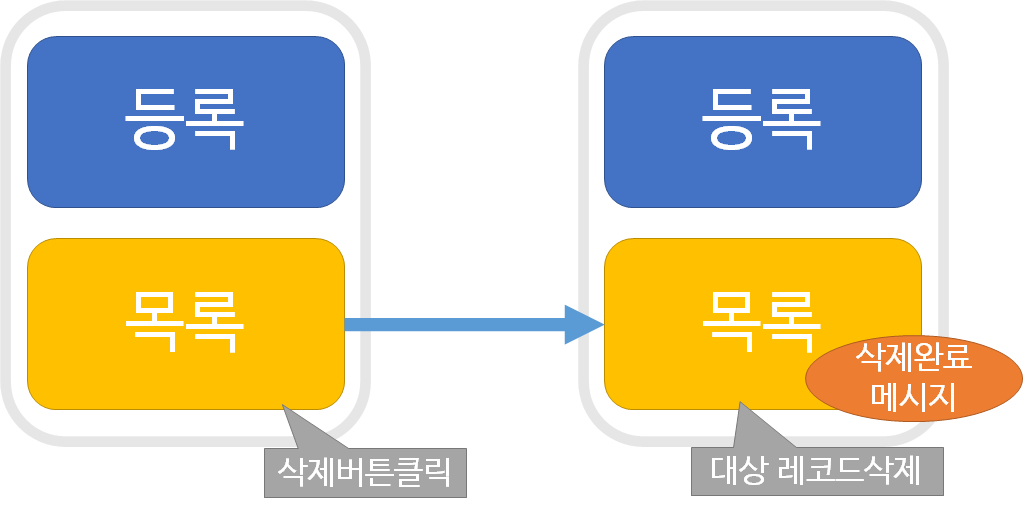
회원정보목록의 레코드 끝에 대상 레코드에 대한 편집, 삭제를 수행하는 버튼과 상세정보를 수행하는 링크를 추가한다.
편집버튼을 누르면, 등록 및 목록표시가 사라지고 등록 부분이 변경 부분으로 전환된다.
마찬가지로 삭제버튼을 누르면 목록 표시의 삭제대상 레코드가 사라진다.
상세보기
회원정보 목록에서 상세정보 링크를 누르면, crud.html에서find.html로 옮겨가면서 회원정보에서 비밀번호가 포함된 회원정보로 옮겨지게 된다.
애플리케이션 계층 생성
Form 생성
Form은 화면 입력양식을 표현한다.
src/main/java/form 패키지를 추가한 다음 AccountForm클래스를 생성해준다.
AccountForm.java
package com.example.account.form;

import lombok.AllArgsConstructor;
import lombok.Data;
import lombok.NoArgsConstructor;

import javax.validation.constraints.NotBlank;

@Data
@NoArgsConstructor
@AllArgsConstructor
public class AccountForm {
    // 식별 Key
    private Integer key;
    // 회원 Id
    @NotBlank
    private String id;
    // 회원 이름
    @NotBlank
    private String name;
    // 회원 이메일
    private String mail;
    // 회원 비밀번호
    @NotBlank
    private String password;
    // 등록 변경 판정용
    private Boolean newAccount;

}NotBlank는 단일 항목 체크를 해주는 어노테이션이다.
crud.html은 등록과 변경시 입력칸에 표시하는 내용을 변경할 필요가 있으므로, 등록 또는 변경 판정용의 Boolean 필드를 작성한다.
true인 경우 등록, false인 경우 변경이다.
Controller 작성
Controller는 요청 핸들러 메소드(Request Handler Methods)를 설명한다.
src/main/java/controller 패키지명을 추가하고 AccountController클래스를 추가한다.
AccountController.java
package com.example.account.Controller;

import com.example.account.entity.Account;
import com.example.account.form.AccountForm;
import com.example.account.service.AccountService;

import org.springframework.beans.factory.annotation.Autowired;
import org.springframework.stereotype.Controller;
import org.springframework.ui.Model;
import org.springframework.validation.BindingResult;
import org.springframework.validation.annotation.Validated;
import org.springframework.web.bind.annotation.*;
import org.springframework.web.servlet.mvc.support.RedirectAttributes;

import java.util.Optional;

/**
 * Account 컨트롤러
 */
@Controller
@RequestMapping("/account")
public class AccountController {
    /**
     * DI 주입
     */
    @Autowired
    AccountService service;

    @GetMapping
    public String showList(AccountForm accountForm, Model model) {
        // 신규 등록 보기
        accountForm.setNewAccount(true);
        // 목록 얻기
        Iterable<Account> list = service.selectAll();
        // 뷰 용 모델에 저장
        model.addAttribute("list", list);
        model.addAttribute("tilte", "등록입력양식");
        return "crud";
    }
}
@Controller로 인스턴스를 생성한다.
@RequestMapping(“/account")의 클래스 요청 핸들러 메소드를 호출하는 경우, URL에 account를 넣는다.
@Autowired로 AccountService를 주입한다.
accountForm.setNewAccount(true); 로 등록화면을 표시하도록 하고 있다.
crud.html 작성
src/main/resource/templates 디렉토리를 생성한 후 crud.html파일을 생성한다.
crud.html
<!DOCTYPE html>
<html lang="ko" xmlns:th="http://www.thymeleaf.org">
<head>
    <meta charset="UTF-8">
    <title>회원정보 관리 시스템</title>
</head>
<body>
<h1>회원정보 관리 시스템:CRUD</h1>
<h3 th:text="${title}">제목</h3>
<!--/* 등록 및 변경 주석 */-->
<p th:if="${complete}" th:text="${complete}" style="color: blue"></p>
<!--/* *** Form *** */-->
<form method="POST"th:action="${accountForm.newAccount}? @{/account/insert} : @{/account/update}"th:object="${accountForm}">
    <label>회원 아이디 :</label><br>
    <input type="text" th:field="*{id}" />
    <br>
    <div th:if="${#fields.hasErrors('id')}" th:errors="*{id}"style="color: red"></div>
    <label>회원 이름 :</label><br>
    <input type="text" th:field="*{name}" />
    <br>
    <div th:if="${#fields.hasErrors('name')}" th:errors="*{name}"style="color: red"></div>
    <label>이메일 :</label><br>
    <input type="text" th:field="*{mail}" />
    <br>
    <div th:if="${#fields.hasErrors('mail')}" th:errors="*{mail}"
         style="color: red"></div>
    <label>비밀번호 :</label><br>
    <input type="text" th:field="*{password}" />
    <br>
    <div th:if="${#fields.hasErrors('password')}" th:errors="*{password}"
         style="color: red"></div>
    <input th:if="${key}" type="hidden" th:field="*{key}">
    <input type="submit" value="등록">
</form>
<!--/* *** Form End *** */-->
<br>
<!--/* ========== 여기까지 상단 영역 ========== */-->
<hr>
<!--/* ========== 여기까지 하단 영역 ========== */-->
<!--/* *** 신규등록시에만 표시 *** */-->
<div th:if="${accountForm.newAccount}" style="margin: 10px">
    <h3>등록퀴즈목록:</h3>
    <!--/* 삭제완료 메시지 */-->
    <p th:if="${delcomplete}" th:text="${delcomplete}" style="color:blue"></p>
    <p th:if="${msg}" th:text="${msg}" style="color: red"></p>
    <!--/* *** 퀴즈정보 1 건이라면 표시 *** */-->
    <table border="1" width="100%" th:unless="${#lists.isEmpty(list)}" style="tablelayout: fixed">
        <tr>
            <th>No.</th>
            <th>아이디</th>
            <th>이름</th>
            <th>이메일</th>

            <th>편집</th>
            <th>삭제</th>
            <th>개별정보</th>
        <tr th:each="obj : ${list}" align="center">
            <td th:text="${obj.key}"></td>
            <td th:text="${obj.id}"></td>
            <td th:text="${obj.name}"></td>
            <td th:text="${obj.mail}"></td>

            <!--/* 편집버튼 */-->
            <td>
                <form method="GET"th:action="@{/account/{key}(key=${obj.key})}">
                    <input type="submit" value="편집">
                </form>
            </td>
            <!--/* 삭제버튼 */-->
            <td>
                <form method="POST" th:action="@{/account/delete}">
                    <input type="hidden" name="key" th:value="${obj.key}">
                    <input type="submit" value="삭제">
                </form>
            </td>
            <td>
                <form method="GET" th:action="@{/account/find/{key}(key=${obj.key})}">
                    <input th:onclick="@{/account/find}" type="submit" value="개별정보">
                </form>
            </td>
        </tr>
    </table>
    <!--/* *** 회원정보가 1 건이라면 표시 End *** */-->
    <!--/* *** 회원정보가 1 건도 없는 경우 표시 *** */-->
    <p th:if="${#lists.isEmpty(list)}">등록된 회원정보가 없습니다.</p>
    <!--/* △** 퀴즈정보가 1 건도 없는 경우 End *** */-->
</div>
<!--/* *** 신규 등록시에만 표시 *** */-->
<!--/* *** 신규 등록시가 아닐 때만 표시 *** */-->
<p th:unless="${accountForm.newAccount}">
    <a href="#" th:href="@{/account}">CRUD 화면으로</a>
</p>
<!--/* *** 신규 등록시가 아닐 때만 표시 End *** */-->
</body>
</html><form method="POST" th:action="${accountForm.newAccount}? @{/account/insert} : @{/account/update}" th:object="${accountForm}">
${accountForm.newAccount}? @{/account/insert} : @{/account/update}로 등록과 변경으로 처리를 분리한다.
th:object 속성을 설정하여 form submit을 할때 form의 데이터가 th:object에 설정한 Model이 저장된 accountForm 객체로 받아진다.
또한 th:field 설정을 해서 각각 필드를 매핑해주고, 설정한 값으로 th:object에서 설정해준 accountForm 객체의 내부의 Model과 매칭해준다.
<div th:if="${accountForm.newAccount}" style="margin: 10px">
th:if=”${quizForm.newQuiz}”을 사용하여 회원 정보가 등록 되었을 시에만 표시하는 하위 영역을 작성한다.
등록시 표시되는 하위영역은 목록이 됨.
    <table border="1" width="100%" th:unless="${#lists.isEmpty(list)}" style="tablelayout: fixed">
    ```
th:unless="${#lists.isEmpty(list)}"을 사용하여 회원정보가 1건이라도 있으면 목록을 표시한다.
<p th:if="${#lists.isEmpty(list)}">등록된 회원정보가 없습니다.</p>
th:if=”${#lists.isEmpty(list)}”를 사용하여 회원정보가 1건도 없는 경우 “등록된 회원정보가 없습니다”라는 메시지를 표시한다.
실행 확인
잘 실행이 되었는지 확인해본다.
AccountApplication.java를 실행한다.
이후 http://localhost:8080/account/에 접속해보자.
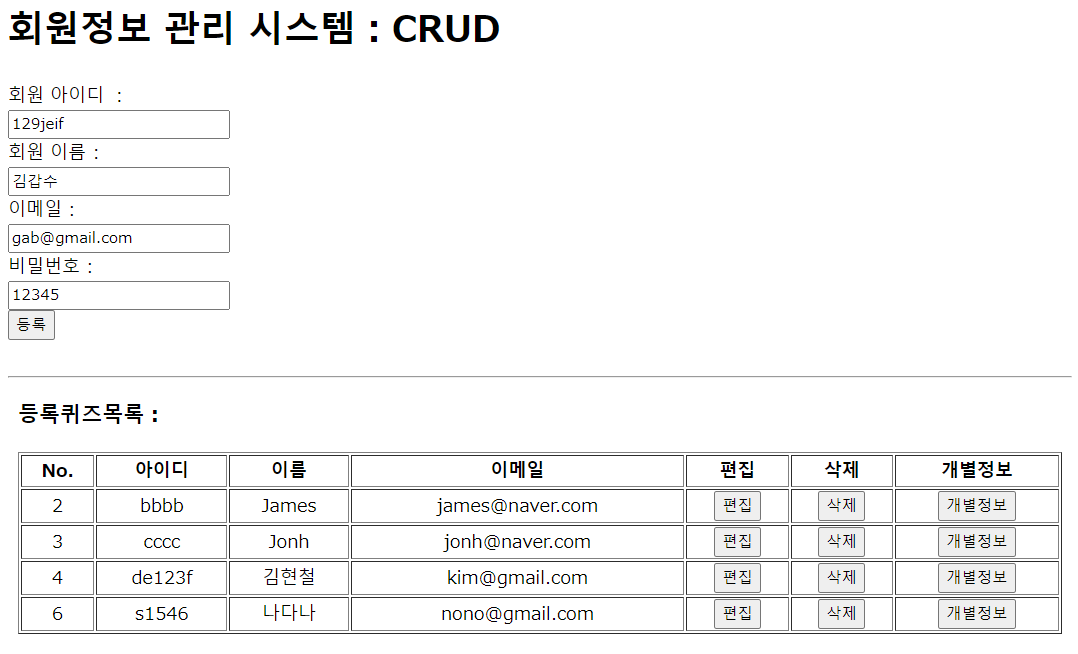
정상적으로 잘 실행이 되고 있음을 알 수 있다.
이후 등록, 편집, 삭제, 상세보기는 다음편에 진행하도록 하자.
