
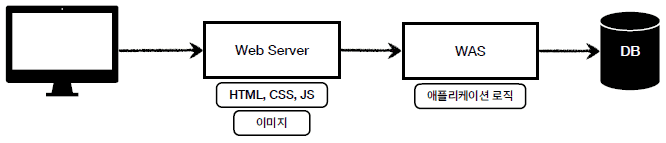
웹서버와 WAS
웹서버
: 정적인 파일(HTML, CSS, 이미지 등)을 제공하는 역할, 동적인 요청이 들어왔을 때 WAS로 요청을 넘긴다.
Apache, Nginx 등
WAS(Web Application Server)

: 동적인 콘텐츠를 생성, 데이터 처리
- 웹서버가 하는 일을 모두 할 수 있지만 분리해야 한다.
-
WAS는 DB와 연결되어 동적인 데이터 처리에 초점을 가져야 한다.
-
Apache Tomcat 등
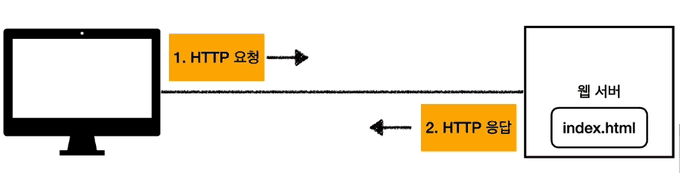
서버란?
| A server is a computer that provides information to other computers called "clients" on computer network.Strictly speaking, the term server refers to a computer program or process (running program). (위키백과)
컴퓨터 네트워크를 통해 클라이언트에게 정보를 제공하는 역할을 한다.
- DB서버, 파일 서버, 메일 서버, 프린트 서버, 웹 서버 등이 있다.
서버는 프로세스라 볼 수 있다. 클라이언트 또한 프로세스이다. 따라서 이들의 통신은 IPC이며 소켓을 통한 IPC를 사용한다.
Django에서의 배포
managy.py runserver
Django는 웹 어플리케이션 프레임워크이다. 웹 서버가 아니다. Django에서 runserver를 하게 되면 Django내 구현된 WSGI의 구현체를 통해 동작하게 된다. 해당 위치에는 배포 환경에서 runserver를 사용하지 말라고 되어있다.
# django/core/servers/basehttp.py
"""
HTTP server that implements the Python WSGI protocol (PEP 333, rev 1.21).

Based on wsgiref.simple_server which is part of the standard library since 2.5.

This is a simple server for use in testing or debugging Django apps. It hasn't
been reviewed for security issues. DON'T USE IT FOR PRODUCTION USE!
"""
WSGI
Web Server Gateway Interface의 약자이다. WSGI는 CGI로 부터 시작되었다. CGI는 서버와 어플리케이션 간의 데이터를 주고받는 양식(Common Gateway Interface)이다. 이를 통해 웹 서버와 외부 프로그램의 통신을 가능하게 한다. CGI를 통해 동적인 페이지를 보여줄 수 있다.

즉, 웹서버로 부터 동적인 요청이 오면 WSGI(CGI)를 통해 파이썬 어플리케이션(Django 등)을 호출하고 그 결과를 웹서버에 반환하게 된다.
WSGI는 2가지 측면을 가진다.
- server/gateway side
- 아파치나 Nginx처럼 웹서버의 역할을 할 수 있다.
- 웹서버와 통신하는 경량
application server의 역할을 할 수 있다.
- application/framework side
- 파이썬 프로그램 또는 프레임 워크를 호출할 수 있다.
Gunicorn

gunicorn은 파이썬 WSGI HTTP 서버이다. WSGI는 웹 서버의 HTTP요청을 받아 파이썬(django 등)을 호출하고 이 결과를 다시 웹서버에 반환한다. 즉 WSGI 또한 서버이다.
❓ WAS는 어디에 있나요?
동적이 요청이 오면 Django등 파이썬 어플리케이션을 통해 요청을 수행하고 결과를 반환하게 된다. 이때 이 요청의 수행을 위해 파이썬 코드의 호출이 이뤄지는 부분은 WSGI에서 이뤄지게 된다.
WSGI는 하나의 서버이지만 Django등의 어플리케이션과 묶어 하나의 WAS라 볼 수 있다.
| 영어권에서는 WAS를 Application Server라고 부른다고 합니다.
Gunicorn의 동작 방식
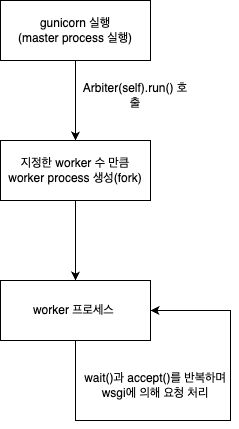
gunicorn은 프로세스 기반의 처리를 진행한다. master process와 worker process로 구성된다. gunicorn을 실행하면 해당 프로세스 자체가 master process가 된다. 이후 설정에 의해 부여된 worker 수대로 worker process를 fork를 통해 생성한다.
gunicorn이 실행되면 gunicorn/app/base.py 의 Application 클래스의 run()이 실행된다.
import sys

from gunicorn.arbiter import Arbiter

class BaseApplication(object):
		...

    def run(self):
        try:
            Arbiter(self).run()
        except RuntimeError as e:
            print("\nError: %s\n" % e, file=sys.stderr)
            sys.stderr.flush()
sys.exit(1)Arbiter클래스의 run()을 호출하게 되는데 해당 클래스는 worker를 관리하는 역할을 한다.
class Arbiter(object):
		...
		def start(self):
        """\
        Initialize the arbiter. Start listening and set pidfile if needed.
        """
        ...

        if not self.LISTENERS:
            ...

						# 소켓 설정
            self.LISTENERS = sock.create_sockets(self.cfg, self.log, fds)

        ...


		 def run(self):
        "Main master loop."
        self.start()
        util._setproctitle("master [%s]" % self.proc_name)

        try:
						# worker를 상태 관리
            self.manage_workers()

						# 무한 루프를 돌며 worker확인
            while True:
                self.maybe_promote_master()

                # 큐를 통한 상태 확인
                sig = self.SIG_QUEUE.pop(0) if self.SIG_QUEUE else None
                if sig is None:
                    self.sleep()
                    self.murder_workers()
                    self.manage_workers()
                    continue

                if sig not in self.SIG_NAMES:
                    self.log.info("Ignoring unknown signal: %s", sig)
                    continue

                signame = self.SIG_NAMES.get(sig)
                handler = getattr(self, "handle_%s" % signame, None)
                if not handler:
                    self.log.error("Unhandled signal: %s", signame)
                    continue
                self.log.info("Handling signal: %s", signame)
                handler()
                self.wakeup()

				# 예외 및 인터럽트에 대한 처리
        except (StopIteration, KeyboardInterrupt):
        ...

		 def spawn_worker(self):
        self.worker_age += 1
				# worker 생성
        worker = self.worker_class(self.worker_age, self.pid, self.LISTENERS,
                                   self.app, self.timeout / 2.0,
                                   self.cfg, self.log)
        self.cfg.pre_fork(self, worker)
        pid = os.fork()
        if pid != 0:
            worker.pid = pid
            self.WORKERS[pid] = worker
            return pid
무한 루프를 통해 worker의 상태를 manage_workers()로 관리한다.
worker는 gunicorn을 설정할 때 지정한 app을 참조하며 이를 호출한다.
class Worker(object):

    def __init__(self, age, ppid, sockets, app, timeout, cfg, log):
        """\
        This is called pre-fork so it shouldn't do anything to the
        current process. If there's a need to make process wide
        changes you'll want to do that in ``self.init_process()``.
        """
        self.age = age
        self.pid = "[booting]"
        self.ppid = ppid
        self.sockets = sockets
				# gunicorn에서 실행할 앱
        self.app = app
        self.timeout = timeout
        self.cfg = cfg
        ...
    ...
worker에서는 run()을 통해 소켓의 개수에 따라 run_for_one()또는 run_for_multiple()을 실행한다.
# gunicorn/workers/sync.py SyncWorker class

class SyncWorker(base.Worker):
		...
    def run(self):
        # if no timeout is given the worker will never wait and will
        # use the CPU for nothing. This minimal timeout prevent it.
        timeout = self.timeout or 0.5

        # self.socket appears to lose its blocking status after
        # we fork in the arbiter. Reset it here.
        for s in self.sockets:
            s.setblocking(0)

        if len(self.sockets) > 1:
            self.run_for_multiple(timeout)
        else:
            self.run_for_one(timeout)
		...
소켓의 개수와 상관없이 무한 루프를 돌며 notify()를 호출해 timeout이 되지 않도록 한다. 이후 accept()과 wait()을 반복한다.
accept()를 통해 TCP를 사용하고 있음을 알 수 있다.
def run_for_one(self, timeout):
    listener = self.sockets[0]
    while self.alive:
        self.notify()

        # Accept a connection. If we get an error telling us
        # that no connection is waiting we fall down to the
        # select which is where we'll wait for a bit for new
        # workers to come give us some love.
        try:
            self.accept(listener)
            # Keep processing clients until no one is waiting. This
            # prevents the need to select() for every client that we
            # process.
            continue

        except EnvironmentError as e:
            ...
        try:
            self.wait(timeout)
            ...

def run_for_multiple(self, timeout):
    while self.alive:
        self.notify()

        try:
            ready = self.wait(timeout)
        except StopWaiting:
            return

        if ready is not None:
            for listener in ready:
                if listener == self.PIPE[0]:
                    continue

                try:
                    self.accept(listener)
                    ...
wait() 에서는 클라이언트의 연결을 기다린다. select.select()를 사용하여 클라이언트의 연결이 들어올 때까지 블로킹된다.
def wait(self, timeout):
    try:
        self.notify()
        ret = select.select(self.wait_fds, [], [], timeout)
        if ret[0]:
            if self.PIPE[0] in ret[0]:
                os.read(self.PIPE[0], 1)
            return ret[0]
accept() 에서는 클라이언트의 연결을 수락한다. listener.accept()를 호출하여 클라이언트 소켓과 주소를 가져온 뒤 클라이언트 소켓을 블로킹 모드로 설정하고, util.close_on_exec(client)를 호출하여 클라이언트 소켓이 자식 프로세스에 상속되지 않도록 한다. 마지막으로 self.handle(listener, client, addr)를 호출하여 클라이언트 요청을 처리한다.
def accept(self, listener):
    client, addr = listener.accept()
    client.setblocking(1)
    util.close_on_exec(client)
self.handle(listener, client, addr)handle()에서는 ssl에 대한 처리를 한다. 이후 HTTP요청을 http.RequestParser를 사용하여 클라이언트의 요청을 파싱하고, self.handle_request(listener, req, client, addr)를 호출하여 요청을 처리한다.
def handle(self, listener, client, addr):
    req = None
    try:
        if self.cfg.is_ssl:
            client = sock.ssl_wrap_socket(client, self.cfg)
        parser = http.RequestParser(self.cfg, client, addr)
        req = next(parser)
        self.handle_request(listener, req, client, addr)
...handle_request()는 wsgi.create()를 통해 wsgi 환경 변수를 설정한 뒤 self.wsgi()를 통해 어플리케이션을 실행하고 결과를 반환받는다. 이 결과를 소켓에 write()한 뒤 연결을 종료한다.
def handle_request(self, listener, req, client, addr):
    environ = {}
    resp = None
    try:
        self.cfg.pre_request(self, req)
        request_start = datetime.now()
        resp, environ = wsgi.create(req, client, addr,
                                    listener.getsockname(), self.cfg)
        # Force the connection closed until someone shows
        # a buffering proxy that supports Keep-Alive to
        # the backend.
        resp.force_close()
        self.nr += 1
        if self.nr >= self.max_requests:
            self.log.info("Autorestarting worker after current request.")
            self.alive = False
        respiter = self.wsgi(environ, resp.start_response)
        try:
            if isinstance(respiter, environ['wsgi.file_wrapper']):
                resp.write_file(respiter)
            else:
                for item in respiter:
                    resp.write(item)
            resp.close()
        finally:
            request_time = datetime.now() - request_start
            self.log.access(resp, req, environ, request_time)
            if hasattr(respiter, "close"):
                respiter.close()
         ...
간단하게 정리하면 다음과 같다.
Gunicorn의 사용
gunicorn app.wsgi:application --bind 0.0.0.0:8000 --reload --env DJANGO_SETTINGS_MODULE=config.settings.prod --access-logfile -gunicorn을 실행할 때 호출할 앱을 wsgi_app을 통해 호출할 수 있다.
https://docs.djangoproject.com/en/5.0/howto/deployment/wsgi/gunicorn/
매개변수는 공식문서에서 참고할 수 있다.
—workers: 사용할 worker process의 개수cpu 수에서 2~4를 곱한 개수를 추천한다.
—bind: 바인드할 포트 번호—reload: 코드가 수정되면 즉시 반영한다.배포 환경에서는 사용을 지양하자. 라이브러리가 추가되는 경우 해당 라이브러리를 불러올 수 없어 서버가 중단될 수 있다.
서버를 시작할 때 docker의 컨테이너처럼 코드를 가지고 있다. 따라서 코드 변경 시 wsgi의 재시작이 필요하다.
—access-logfile: 로그를 저장할 위치를 지정한다. -로 설정하는 경우 stdout으로 기록할 수 있다.
참고.
PXD XE Blog | 웹서버와 WAS(Web Application Server)
[개념] Django는 Web Server가 아니라구요!!

와 너무 잘보고 갑니다..!