다음은 SSL 적용을 위한 증명서 발급과
자동으로 증명서를 재발급해주는 Certbot을 구축해보려고 합니다.
원스토어에 앱을 등록하려면 SSL 설정은 필수라고 합니다.
가장 먼저 docker compose 통해서 서트봇 엔진엑스를 띄워놔야 한다 !
서트봇을 통해서 최초 인증서를 발급 받아야 했고, 엔진엑스 즉 리버스 프록시가 있어야 초기 SSL 설정이 가능했기 때문이다 !
먼저 띄우지 않고 사용하려고 하니 많은 어려움이 있었다...
services:
  nginx:
    container_name: nginx
    image: nginx:latest
    restart: always
    volumes:
      - ./nginx/default.conf:/etc/nginx/conf.d/default.conf
      - ./nginx/service-url.inc:/etc/nginx/conf.d/service-url.inc
      - /data/certbot/conf:/etc/letsencrypt
      - /data/certbot/www:/var/www/certbot
    ports:
      - 80:80
      - 443:443
    command: '/bin/sh -c ''while :; do sleep 6h & wait $${!}; nginx -s reload; done & nginx -g "daemon off;"'''

  certbot:
    container_name: certbot
    image: certbot/certbot
    restart: unless-stopped
    volumes:
      - /data/certbot/conf:/etc/letsencrypt
      - /data/certbot/www:/var/www/certbot
    entrypoint: "/bin/sh -c 'trap exit TERM; while :; do certbot renew; sleep 12h & wait $${!}; done;'"
docker compose -f docker-compose.ymal up -d두개의 컨테이너를 띄운뒤에 아래 스크립트를 실행한다
SSL을 리버스 프록시에 설정한다면
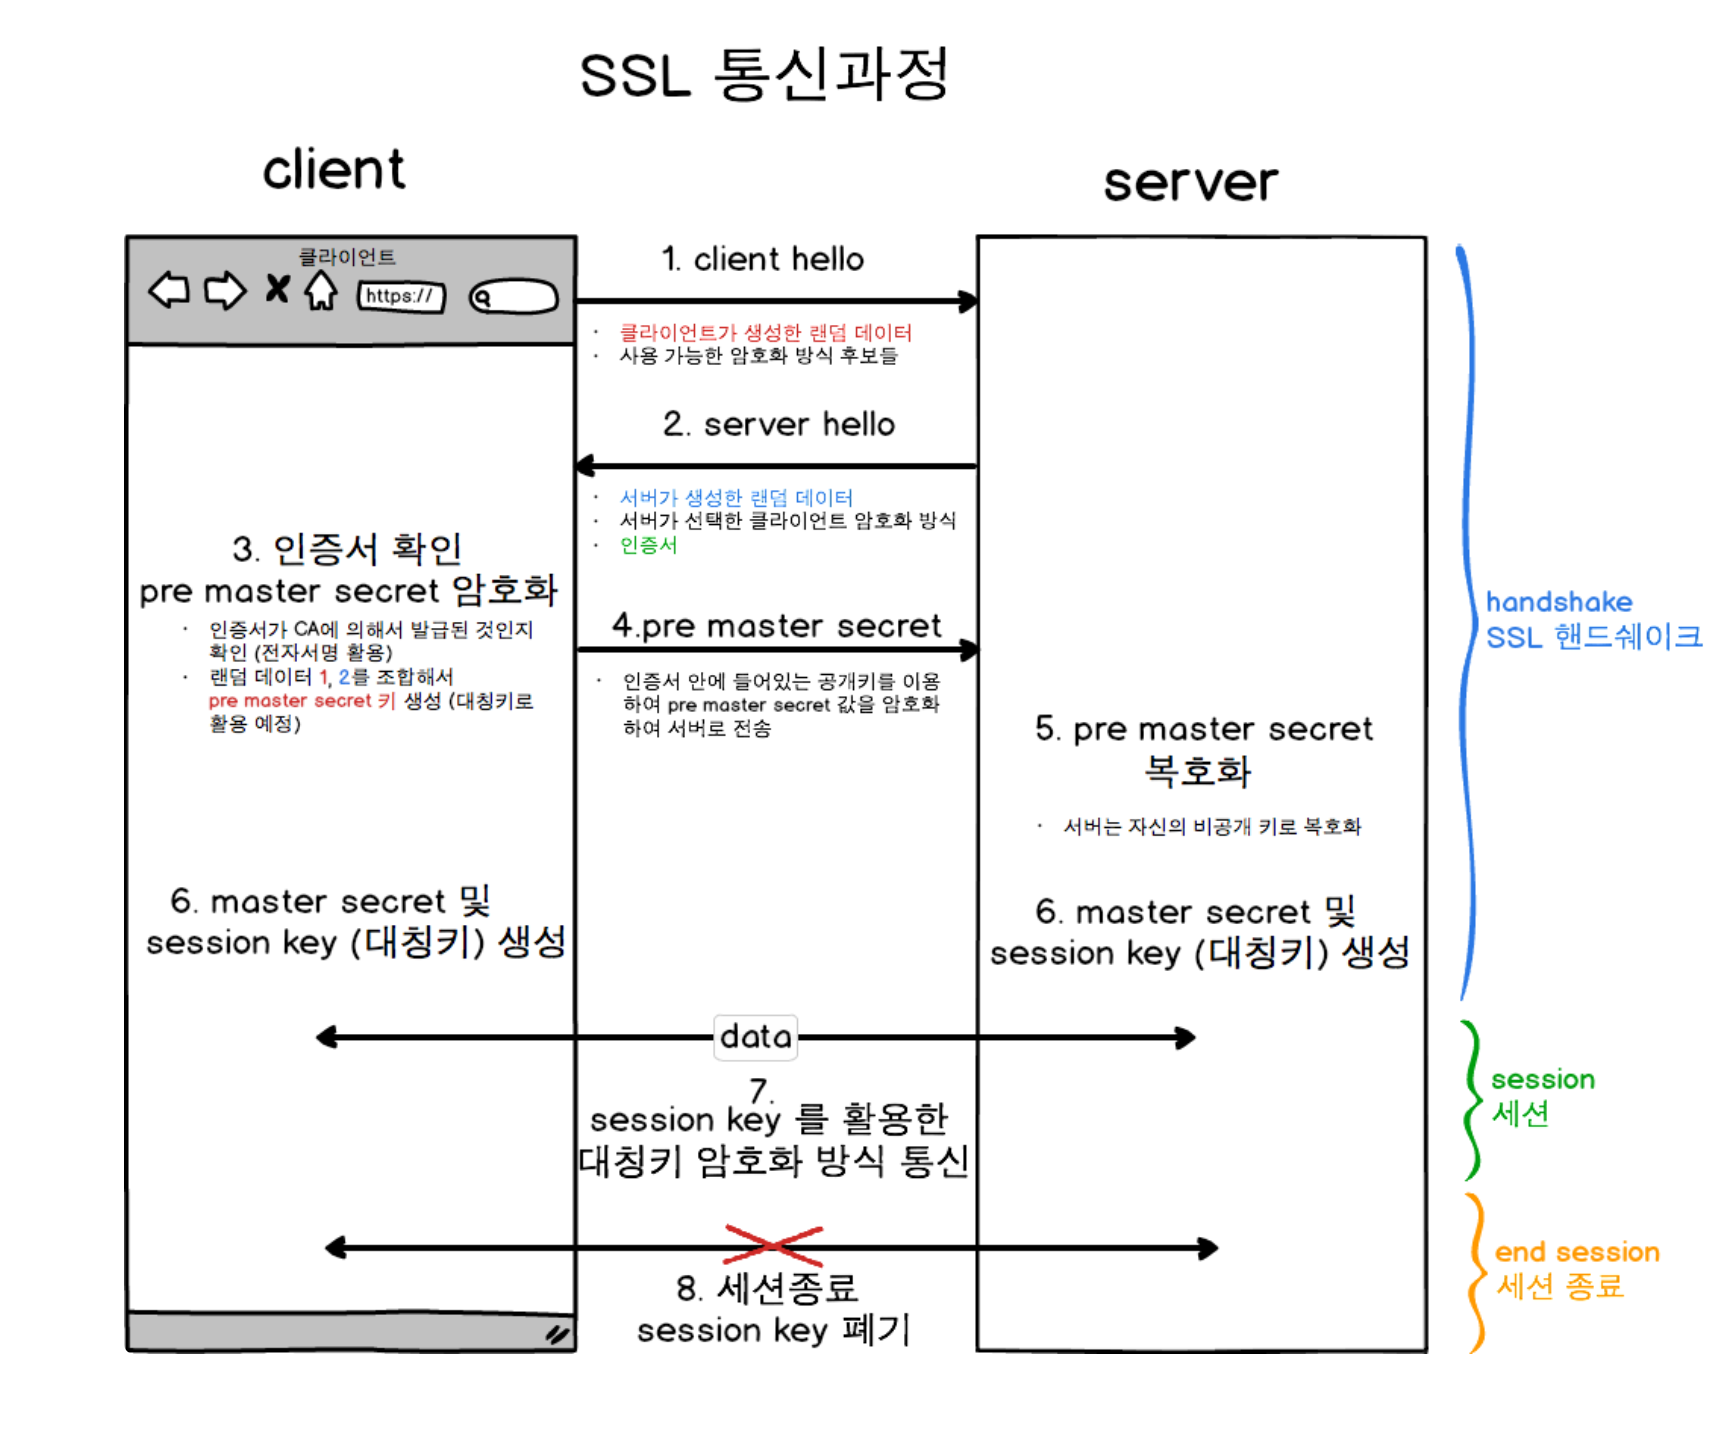
client가 데이터를 요청하기전 핸드쉐이크 과정에서 SSL 인증서와 암호화 방식을 제공받고, 정상적으로 서버와 HTTPS 통신이 가능합니다.
sh 파일을 하나 만들어두고
해당 실행 파일에서 최초 인증서 발급과 Certbot을 띄운다.
최초 SSL 인증서를 발급 받은후에 Certbot 자동 등록이 가능하고
최초 SSL 발급을 위해서 Certbot이 필요했다.
vi init-letsencrpyt.sh#!/bin/bash
domains="[DNS address]"
rsa_key_size=4096
data_path="/data/certbot"
email="[email]" # Adding a valid address is strongly recommended
staging=0 # Set to 1 if you're testing your setup to avoid hitting request limits
if [ -d "$data_path" ]; then
read -p "Existing data found for $domains. Continue and replace existing certificate? (y/N) " decision
if [ "$decision" != "Y" ] && [ "$decision" != "y" ]; then
exit
fi
fi
if [ ! -e "$data_path/conf/options-ssl-nginx.conf" ] || [ ! -e "$data_path/conf/ssl-dhparams.pem" ]; then
echo "### Downloading recommended TLS parameters ..."
mkdir -p "$data_path/conf"
curl -s https://raw.githubusercontent.com/certbot/certbot/master/certbot-nginx/certbot_nginx/_internal/tls_configs/options-ssl-nginx.conf > "$data_path/conf/options-ssl-nginx.conf"
curl -s https://raw.githubusercontent.com/certbot/certbot/master/certbot/certbot/ssl-dhparams.pem > "$data_path/conf/ssl-dhparams.pem"
echo
fi
echo "### Creating dummy certificate for $domains ..."
path="/etc/letsencrypt/live/$domains"
mkdir -p "$data_path/conf/live/$domains"
docker compose run --rm --entrypoint "\
openssl req -x509 -nodes -newkey rsa:$rsa_key_size -days 1\
-keyout '$path/privkey.pem' \
-out '$path/fullchain.pem' \
-subj '/CN=localhost'" certbot
echo
echo "### Starting nginx ..."
docker compose up --force-recreate -d nginx
echo
echo "### Deleting dummy certificate for $domains ..."
docker compose run --rm --entrypoint "\
rm -Rf /etc/letsencrypt/live/$domains && \
rm -Rf /etc/letsencrypt/archive/$domains && \
rm -Rf /etc/letsencrypt/renewal/$domains.conf" certbot
echo
echo "### Requesting Let's Encrypt certificate for $domains ..."
#Join $domains to -d args
domain_args=""
for domain in "${domains[@]}"; do
domain_args="$domain_args -d $domain"
done
# Select appropriate email arg
case "$email" in
"") email_arg="--register-unsafely-without-email" ;;
*) email_arg="--email $email" ;;
esac
# Enable staging mode if needed
if [ $staging != "0" ]; then staging_arg="--staging"; fi
docker compose run --rm --entrypoint "\
certbot certonly --webroot -w /var/www/certbot \
$staging_arg \
$email_arg \
$domain_args \
--rsa-key-size $rsa_key_size \
--agree-tos \
--force-renewal" certbot
echo
echo "### Reloading nginx ..."
docker compose exec nginx nginx -s reload기존 데이터 검사:
스크립트는 /data/certbot 디렉터리에 기존 데이터가 있는지 확인합니다. 만약 데이터가 존재한다면, 사용자에게 기존 인증서를 덮어쓸 것인지 여부를 묻는 메시지를 출력하고, 사용자의 응답에 따라 스크립트를 종료하거나 계속 진행합니다.
TLS 설정 파일 다운로드:
options-ssl-nginx.conf와 ssl-dhparams.pem 파일이 존재하지 않는 경우, 이 파일들을 다운로드하여 적절한 디렉터리에 저장합니다. 이 파일들은 보안 통신을 위한 권장 설정을 포함하고 있습니다.
더미 인증서 생성:
실제 Let's Encrypt 인증서를 받기 전에 임시로 사용할 더미 인증서를 생성합니다. 이 더미 인증서는 openssl을 통해 자체 서명되며, 이는 nginx가 구동될 때 초기 SSL/TLS 설정을 완료할 수 있도록 합니다.
nginx 시작:
docker-compose를 사용하여 nginx 서비스를 시작합니다. --force-recreate 플래그는 변경사항이 있을 때마다 컨테이너를 새로 생성하여 시작합니다.
더미 인증서 삭제:
더미 인증서를 사용하여 nginx를 시작한 후, 해당 인증서는 더 이상 필요하지 않으므로 삭제합니다.
Let's Encrypt 인증서 요청:
실제 Let's Encrypt 인증서를 요청합니다. certbot certonly --webroot 명령을 사용하여 지정된 도메인의 인증서를 발급받습니다. 이 때 추가적인 옵션으로 이메일 주소, 도메인, RSA 키 크기, 동의 조항 확인 등이 포함됩니다.
nginx 설정 리로드:
인증서 발급 및 설치가 완료된 후, nginx를 리로드하여 새로운 인증서 설정을 적용합니다. 이는 nginx -s reload 명령을 통해 수행됩니다.해당 설정을 하며 많은 삽질을 경험했다...
./init-letsencrpyt.sh해당 파일을 실행하면 !
인증서가 발급된다 !
서트봇이 설정된다 !
해당 명령어를 실행하면 ! →
- 최초 ssl 인증서 를 제공해준다 !
- 서트봇을 띄워준다 !
성공적으로 SSL이 등록된것을 확인했다.

라곰