저번에는 날씨 기능을 블로그에 넣어줬다.
이번에는 로그인 기능을 통해 회원만 사용하게 하려고한다.
회원가입
회원가입 Controller
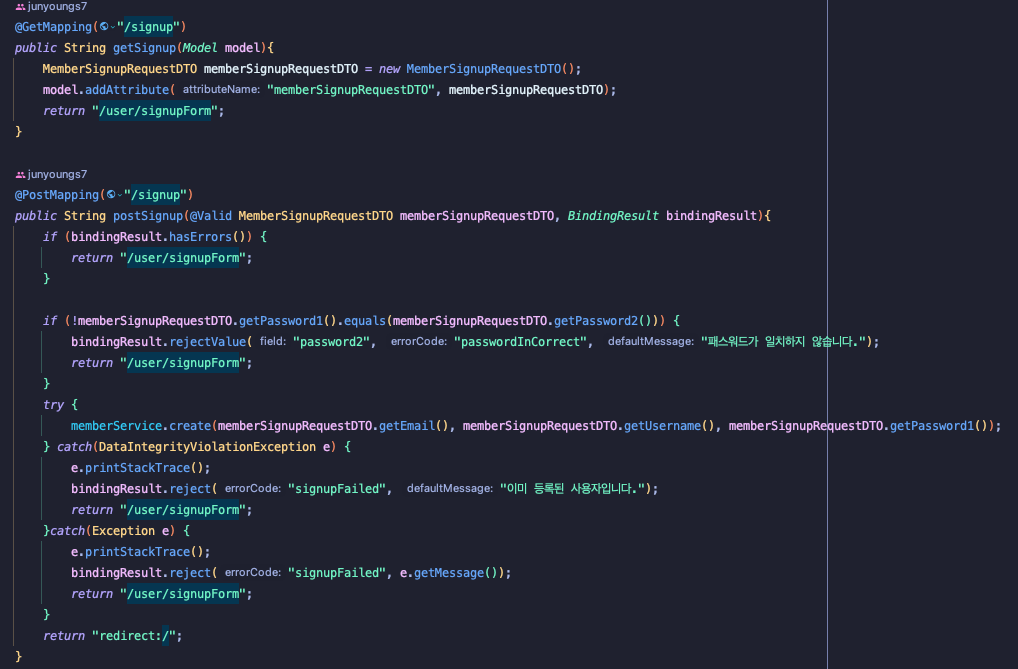
- GET으로 회원가입 페이지를 DTO와 함께 보내준다.
- POST요청이 오면 bindingResult로 검증한다.
- 검증시 오류가 있으면 다시 회원가입 페이지 보내준다.
- 오류가 없으면 password1과 password2를 비교하여 패스워드를 비교한다.
- 회원가입에 아무 이상 없으면 memberService로 값을 넘겨준다.
- 그 후 에러처리를 해준다.
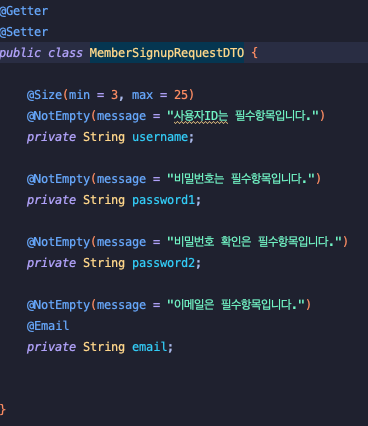
회원가입 DTO
회원가입 Service
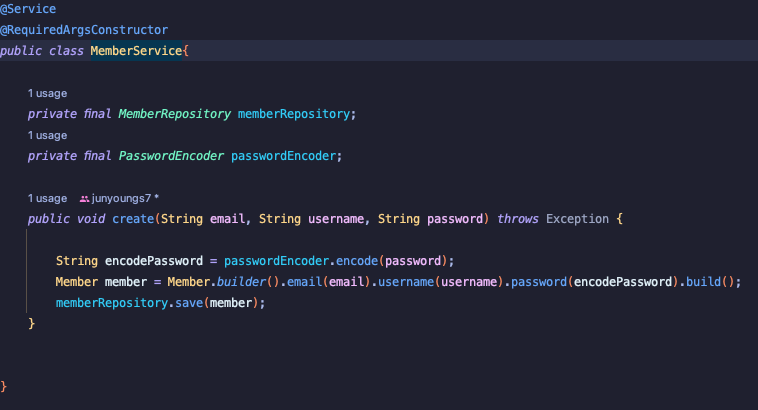
- 비밀번호 인코딩후 저장한다.
회원가입 Form
<!DOCTYPE html>
<html xmlns:th="http://www.thymeleaf.org"
      xmlns:layout="http://www.ultraq.net.nz/thymeleaf/layout"
      layout:decorate="~{layout/layout}">

<div layout:fragment="content">
    <div class="my-3 border-bottom">
        <div>
            <h4>회원가입</h4>
        </div>
    </div>
    <form th:action="@{/auth/signup}" th:object="${memberSignupRequestDTO}" method="post">
        <div th:replace="~{form_errors :: formErrorsFragment}"></div>
        <div class="mb-3">
            <label for="username" class="form-label">사용자ID</label>
            <input type="text" th:field="*{username}" class="form-control">
        </div>
        <div class="mb-3">
            <label for="password1" class="form-label">비밀번호</label>
            <input type="password" th:field="*{password1}" class="form-control">
        </div>
        <div class="mb-3">
            <label for="password2" class="form-label">비밀번호 확인</label>
            <input type="password" th:field="*{password2}" class="form-control">
        </div>
        <div class="mb-3">
            <label for="email" class="form-label">이메일</label>
            <input type="email" th:field="*{email}" class="form-control">
        </div>
        <button type="submit" class="btn btn-primary">회원가입</button>
    </form>

</div>
로그인
로그인 Controller

로그인은 처음 요청시 페이지만 보내주고 POST는 Spring Security가 대신 해준다.
로그인 Form
<!DOCTYPE html>
<html xmlns:th="http://www.thymeleaf.org"
      xmlns:layout="http://www.ultraq.net.nz/thymeleaf/layout"
      layout:decorate="~{layout/layout}">

<th:block layout:fragment="css">
    <style>
        .fieldError {
            color: #bd2130;
        }
    </style>
</th:block>

<div layout:fragment="content">
    <form th:action="@{/auth/login}" method="post">
        <div th:if="${param.error}">
            <div class="alert alert-danger">
                이메일 또는 비밀번호를 확인해 주세요.
            </div>
        </div>
        <div class="mb-3">
            <label for="username" class="form-label">사용자ID</label>
            <input type="text" name="username" id="username" class="form-control">
        </div>
        <div class="mb-3">
            <label for="password" class="form-label">비밀번호</label>
            <input type="password" name="password" id="password" class="form-control">
        </div>
        <button type="submit" class="btn btn-primary">로그인</button>
        <button type="button" class="btn btn-primary" onclick="location.href='/auth/signup'">회원가입</button>
        <input type="hidden" name="${_csrf.parameterName}" value="${_csrf.token}"/>
    </form>

</div>
로그인 폼에서 post형식으로 보내준다.
로그인 Service
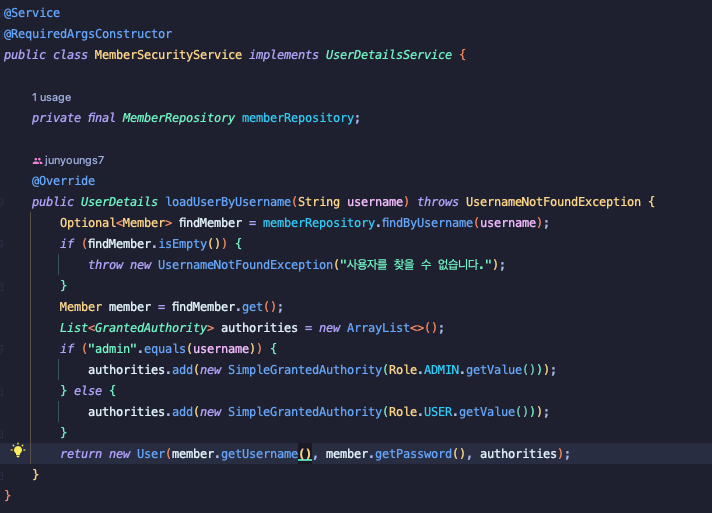
- Security가 제공하는 UserDetailsService를 implments 해준다.
- 레포지토리에서 사용자를 찾은 후 사용자 이름에 따라 역활을 붙여준다.
- 그 후 유저를 반환한다.
SecurityConfig
@Configuration
@EnableWebSecurity
public class SecurityConfig{

    @Bean
    public SecurityFilterChain filterChain(HttpSecurity http) throws Exception {
        http
                .authorizeHttpRequests().requestMatchers(new AntPathRequestMatcher("/**") ).permitAll()
                .and()
                .csrf().ignoringRequestMatchers(new AntPathRequestMatcher("/h2-console/**"), new AntPathRequestMatcher("/chat/**"))
                .and()
                .headers()
                .addHeaderWriter(new XFrameOptionsHeaderWriter(XFrameOptionsHeaderWriter.XFrameOptionsMode.SAMEORIGIN))
                .and()
                .formLogin()
                .loginPage("/auth/login")
                .defaultSuccessUrl("/")
                .and()
                .logout()
                .logoutRequestMatcher(new AntPathRequestMatcher("/auth/logout"))
                .logoutSuccessUrl("/")
                .invalidateHttpSession(true);
        return http.build();
    }

    @Bean
    public BCryptPasswordEncoder passwordEncoder(){
        return new BCryptPasswordEncoder();(https://wikidocs.net/162141)
    }

    @Bean
    AuthenticationManager authenticationManager(AuthenticationConfiguration authenticationConfiguration) throws Exception {
        return authenticationConfiguration.getAuthenticationManager();
    }


}
SecurityConfig에서 csrf().ignoring~ 을 해주지 않으면 요청 시 403에러가 뜬다.
패스워드 인코더 빈으로 등록해주고 인증매니저도 사용자 이름을 가지고 오기위해 빈으로 등록한다.
참조

ㅎㅎ