실용주의 프로그래머님의 인프런 강의를 듣고 작성하였습니다.
출처: https://www.inflearn.com/course/%EC%9E%A5%EA%B3%A0-%ED%95%80%ED%84%B0%EB%A0%88%EC%8A%A4%ED%8A%B8/lecture/62871?tab=note&speed=1.25
웹 서비스 구조
Front-End
Back-End
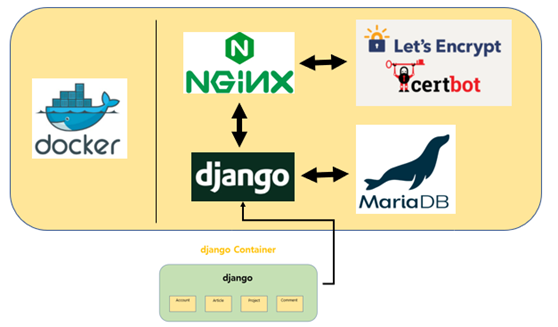
Maria DB(장고 내부적으로 DB에 대한 설정 정보를 넘겨주면, 장고가 대부분 알아서 처리해주기 때문에 직접 건드리진 않을 예정), NGINX(클라이언트로부터 받은 요청을 처리해주는 서버 소프트웨어), Django, docker(배포에 있어서 가장 중요한 기술, 컨테이너들이 하나의 마이크로 서비스가 돼서 서비스에 기여하는 것)
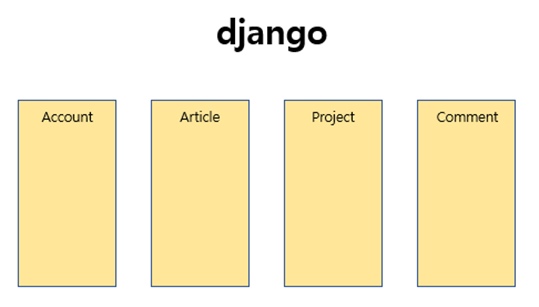
이렇게 하나의 웹 서비스를 만들면 이 장고 서비스 하나가 docker의 하나의 컨테이너가 되는 것이다.
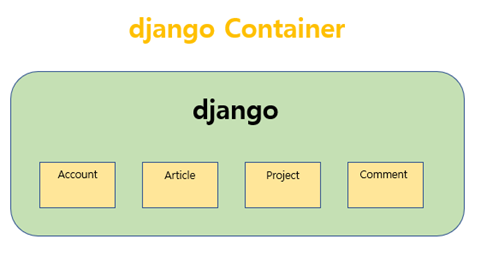
4가지의 컨테이너를 docker 시스템으로 구축한다.
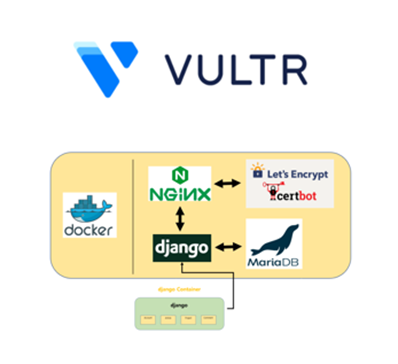
docker 시스템을 구축 후 VULTR라는 실제 서버를 빌려서 우리가 구축한 docker 시스템을 올려서 누구나 볼 수 있도록 한다.
Django 개발 패턴
MVC (Model View Controller)
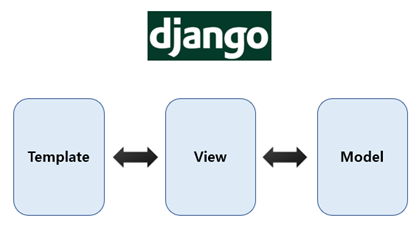
django에서는 Controller가 Template이다. MVT라고도 한다.
Model
Model은 django에서 DB와 통신을 하게 해주는 편리한 도구이다. 유저가 게시글을 쓰면 그 게시글이 새로운 객체가 될 텐데 그 객체를 DB에 간편하게 저장하게 해주는 것이 Model이다.
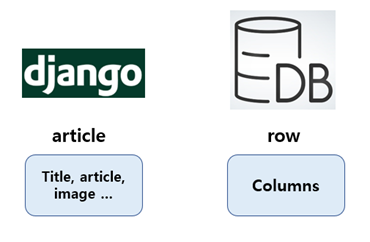
위 그림의 중간 과정을 Model이 해준다. (django가 알아서 해준다.)
View
장고에서 계산 부분을 대부분 담당한다.
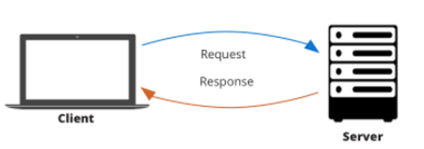
Server는 User에게 Request를 받는다. Server은 요청에 응답하기 위한 절차들을 거친다.
- Check if authenticated. 유저가 제대로 로그인이 되어 있는지 확인하는 과정
- Check request valid. 요청이 유효한 값들인지 확인하는 과정
- Collect data from DB. 유효하다면 DB에서 가져오는 과정
- Render response. response를 만들어서 User에게 돌려주는 과정
- …
Template
JS, HTML, CSS
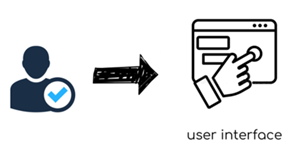
최종
기본 view
Terminal에서 accountapp을 만들어준다.
python manage.py startapp accountapp 그 후 leebook에 settings.py에서 INSTAlLED_APPS 목록에 ‘accountapp’을 추가해준다.
INSTALLED_APPS = [
    'django.contrib.admin',
    'django.contrib.auth',
    'django.contrib.contenttypes',
    'django.contrib.sessions',
    'django.contrib.messages',
    'django.contrib.staticfiles',
    'accountapp',
]
accountapp - migrations - veiws.py 에서 원하는 view를 만든다. 브라우저에서 어떤 경로로 접속하게 되면 hello world를 보여주는 view를 만들어 본다.
from django.http import HttpResponse
from django.shortcuts import render

# Create your views here.

def hello_world(request):
    return HttpResponse('Hello world!')
이 view를 보기 위해서 연결을 시켜줘야 한다. (라우팅) 특정 주소를 접속했을 때 이 view가 보여야 하니까 특정 주소를 만들어줘야 한다.
leebook - urls.py
accountapp 내부에 있는 urls.py를 모두 포함해서 그 하위 디렉토리로 분기를 하도록 include를 사용해 작성한다.
from django.contrib import admin
from django.urls import path, include

urlpatterns = [
    path('admin/', admin.site.urls),
    path('accounts/', include('accountapp.urls')) # /를 꼭 적어야 주소창에서 그 이후의 주소들도 제대로 인식된다.
]
이제 accountapp 내부의 urls.py를 만든다.
from django.urls import path

from accountapp.views import hello_world

app_name = "accountapp"

urlpatterns = [
    path('hello_world/', hello_world, name='hello_world')
    # "127.0.0.1:8000/account/hello_world"
]
이제 직접 확인해보자
python manage.py runserver서버를 구동시키고 "http://127.0.0.1:8000/account/hello_world/"에 들어가서 확인해보자

Git
Version Control 버전 관리 시스템
Git을 설치하고 개발을 하느냐 안하고 개발을 하느냐는 엄청난 차이가 난다.
version을 1.1 1.2 1.3 이렇게 계속 업그레이드 해갈 때 1.3에 ERROR가 생긴다면 1.2로 ROLLBACK을 할 수 있다.

Branch라는 강력한 기능도 있다. 개발 버전이라고 생각하면 되는데 여러 버전을 따로 한꺼번에 main branch에서 관리할 수 있다.
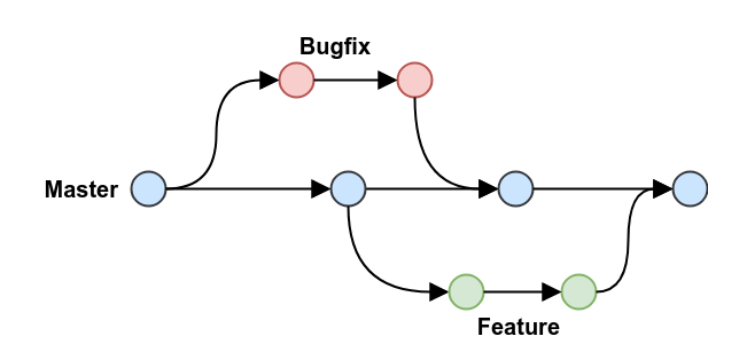
기존 메인 verstion에 영향을 주지 않으면서 추가적인 기능을 개발하고 싶을 때 추가적인 브랜치를 새로 만들어서 개발을 할 수 있다.
이렇게 개발한 것을 Branch Merge를 통해 배포 버전에 병합할 수도 있다.
또한 여러명에서 같이 개발을 할 때 강력한 도구인데 커밋을 누가 했는지 등을 알 수 있다.
Git Command
- add
- commit
- push
- pull
- branch
- checkout
Gitignore 설정, 환경변수 분리, 커밋
https://github.com/github/gitignore/blob/master/Global/JetBrains.gitignore를 보고 gitignore을 설정해준다.
venv와 같은 폴더들은 굳이 git으로 추적하지 않아도 되기 때문에 제외시킨다.
venv/또한 github에 올릴 때 올리지 말아야 할 SECRET_KEY와 같은 것들이 있다. pragmatic/settings.py에 있는데 배포할 때 노출시키지 않고 따로 관리해주어야 한다.
django-environ.readthedocs.io/en/latest/에 들어가면 장고의 환경변수를 위한 라이브러리를 제공해주고 있다.
pip install django-environpragmatic/settings.py에 다음 코드 추가
============ 추가 ===========
import environ
env = environ.Env(
    # set casting, default value
    DEBUG=(bool, False)
)
# reading .env file
environ.Env.read_env()
=========================
.env 파일 생성
SECRET_KEY=your-secret-key
DATABASE_URL=psql://urser:un-githubbedpassword@127.0.0.1:8458/database
SQLITE_URL=sqlite:///my-local-sqlite.db
CACHE_URL=memcache://127.0.0.1:11211,127.0.0.1:11212,127.0.0.1:11213
REDIS_URL=rediscache://127.0.0.1:6379/1?client_class=django_redis.client.DefaultClient&password=ungithubbed-secret
SECRET_KEY값을 복사해서 env 파일에 적어준다.
pragmatic/settings.py 수정
# reading .env file
environ.Env.read_env(
    env_file=os.path.join(BASE_DIR, '.env')
)

# SECURITY WARNING: keep the secret key used in production secret!
SECRET_KEY = env('SECRET_KEY')
.gitignore에서 env 파일을 추적하지 못하도록 한다.
.env이제 SECRET_KEY 노출을 시키지 않을 수 있다.
또한 db.sqlite3 파일과 .idea 폴더도 추적할 필요가 없으니 제외시켜준다.
- Git 활성화 하기
VCS - Enable Version..
git status 터미널이나 git bash에서 git status 명령어를 통해 현재 git 상태를 확인한다.
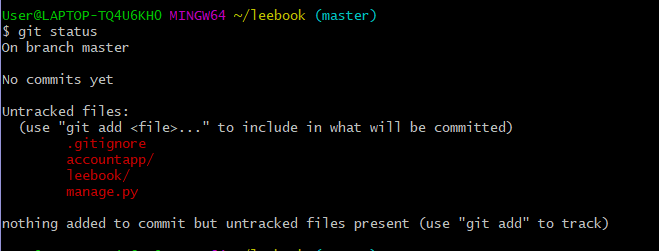
commit을 하기 위해 추적이 되도록 add로 추가시켜준다.
추적이 되지 않는 모든 파일들을 추적되도록 추가시켜주는 명령어인 git add . 을 사용한다.
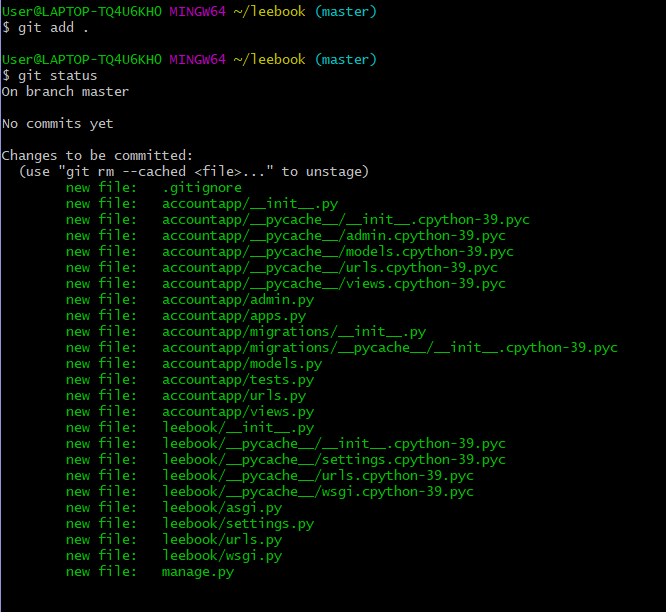
커밋
git commit -m "Initial commit"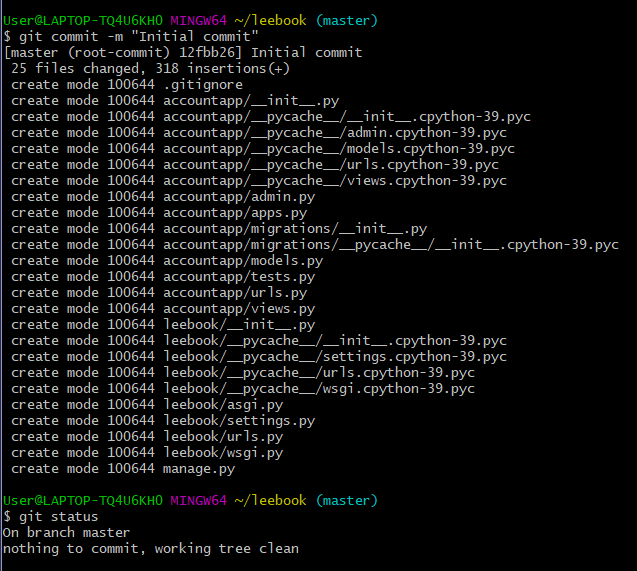
leebook 폴더와 accountapp 폴더 안의 pycache 폴더를 삭제해준 후 add 작업을 통해 commit까지 해준다.
그 후 gitignore에 __pycache__/를 추가하여 제외시켜준다. (나중에 생겼을 경우에도 추적에서 제외시키기 위해)
장고 Template
html을 사용한 장고 Template 사용하기
extends
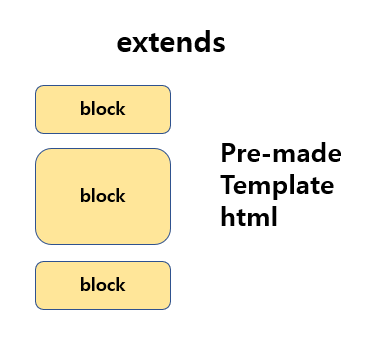
HTML로 미리 만들어진 템플릿을 가져와서 그것을 바탕으로 나머지 block들을 채워나가는 방식이다.
include
조그마한 조각들을 HTML에 채워넣는 방식
extends는 바탕, include는 가져와서 붙이는 느낌
최종 Response View
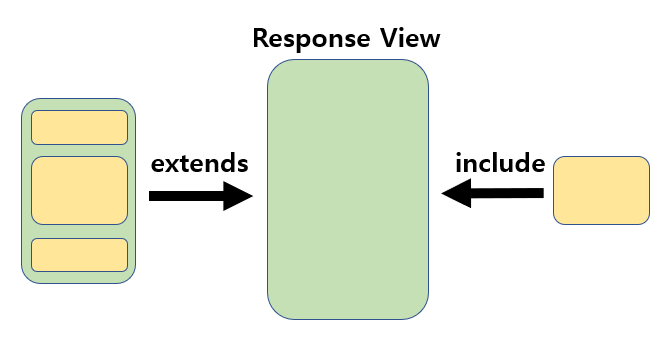
Templates 폴더 생성
Templates 폴더 생성 후 폴더 안에 base.html 파일 생성
views.py에서 render 함수를 이용하여 base.html을 반환하도록 수정
from django.http import HttpResponse
from django.shortcuts import render

# Create your views here.

def hello_world(request):
    return render(request, 'base.html')
leebook - settings.py에서 templates 폴더 경로 추가
'DIRS': [os.path.join(BASE_DIR, 'templates')],사이트 구성
head 위 중간 아래로 구성할 것이다.
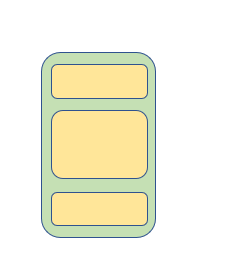
뼈대인 base.html을 생성하고 head.html을 분리해준다.
<!DOCTYPE html>
<html lang="ko">

{% include 'head.html' %}

<body>
    <div style="height: 18rem; background-color: #38df81; border-radius: 1rem; margin: 2rem;">

    </div>
    <div style="height: 20rem; background-color: #38df81; border-radius: 1rem; margin: 2rem;">

    </div>
    <div style="height: 18rem; background-color: #38df81; border-radius: 1rem; margin: 2rem;">

    </div>

</body>
</html><head>
<meta charset="UTF-8">
<title>LeeBook</title>
</head>위쪽과 아래쪽은 배너로 항상 고정시킬 것이기 때문에 중간부분이 핵심이다. 위 아래는 다시 재사용하는 방식으로 할 것이다.
위 아래는 따로 html 파일을 만들고 include를 만들어서 가져오도록 할 것이다.
<!DOCTYPE html>
<html lang="ko">

{% include 'head.html' %}

<body>

    {% include 'header.html' %}

    <!-- enclude를 위한 content block 생성 -->
    <!-- 나머지 부분은 재사용 하고 이 content block만 \
    accountapp 내부에서 자유롭게 설정할 수 있도록 한다. -->
    {% block content %}
    {% endblock %}

    {% include 'footer.html' %}

</body>
</html>
acoountapp/templates/accountapp/hello_world.html
여기서 extends 함수를 이용해 base.html에서 가져와서 content block 부분만 수정할 수 있게 된다.
{% extends 'base.html' %}

{% block content %}
    <div style="height: 20rem; background-color: #38df81; border-radius: 1rem; margin: 2rem;">
        <h1>
            test
        </h1>
    </div>

{% endblock %}
이제 accountapp/veiws.py 에서 이 hello_world.html을 보여줄 수 있도록 수정한다.
def hello_world(request):
    return render(request, 'accountapp/hello_world.html')
Header, Footer 꾸미기
Header 구성
제목, 네비게이션 바, 영역 구분 바
    <div style="text-align: center; margin: 2rem 0;">
        <div>
            <h1 style="font-family: 'Amatic SC', cursive;"> Leebook</h1>
        </div>
        <div>
            <span>nav1</span>
            <span>nav2</span>
            <span>nav3</span>
            <span>nav4</span>
        </div>

    </div>
Footer
    <div style="text-align: center; margin-top: 2rem">

        <div style="font-size: .6rem;">
            <span>공지사항</span> |
            <span>제휴문의</span> |
            <span>서비스 소개</span>
        </div>

        <div style="margin-top: 1rem;">
            <h6 style="margin-top: 1rem; font-family: 'Amatic SC', cursive;">LeeBook</h6>
        </div>

    </div>
부트스트랩 적용
https://getbootstrap.com/docs/5.0/getting-started/introduction/
에서 간단하게 CSS 구문만 복붙하면 적용 가능하다.
head.html에 추가해준다.
<head>
    <meta charset="UTF-8">
    <title>LeeBook</title>

    <!-- BOOTSTRAP LINK -->
    <link href="https://cdn.jsdelivr.net/npm/bootstrap@5.0.0-beta3/dist/css/bootstrap.min.css" rel="stylesheet" integrity="sha384-eOJMYsd53ii+scO/bJGFsiCZc+5NDVN2yr8+0RDqr0Ql0h+rP48ckxlpbzKgwra6" crossorigin="anonymous">
</head>
구글 폰트도 head.html에서 적용한다.
Static 설정
정적이라는 뜻으로 자주 변경되지 않는 파일들을 Static이라고 한다. 이것을 프로젝트 또는 app 별로 따로 관리하도록 한다.
leebook/settings.py에서 Static 설정을 해준다.
BASE_DIR 즉 leebook에서 staticfiles라는 추가적인 폴더에 staticfiles를 다 모으겠다는 선언을 해준다.
추가적으로 특정 앱에 종속되어 있지 않은 프로젝트 전체에서 관리할 수 있는 static 폴더를 따로 만들어준다.
STATIC_ROOT = os.path.join(BASE_DIR, 'staticfiles')

STATICFILES_DIRS = [
    BASE_DIR / "static",
]
static 폴더를 생성하고 base.css 파일을 생성한다.
CSS 파일 분리
html에서 css를 작성했었는데 이것을 분리해서 따로 관리할 수 있도록 분리한다.
생성한 static 폴더의 base.css에 분리시킨다.
head.html 추가

```html
{% load static %}

<head>
    <meta charset="UTF-8">
    <title>LeeBook</title>

    <!-- BOOTSTRAP LINK -->
    <link href="https://cdn.jsdelivr.net/npm/bootstrap@5.0.0-beta3/dist/css/bootstrap.min.css" rel="stylesheet" integrity="sha384-eOJMYsd53ii+scO/bJGFsiCZc+5NDVN2yr8+0RDqr0Ql0h+rP48ckxlpbzKgwra6" crossorigin="anonymous">

    <!-- GOOGLE FONTS LINK -->
    <link rel="preconnect" href="https://fonts.gstatic.com">
    <link href="https://fonts.googleapis.com/css2?family=Amatic+SC:wght@700&display=swap" rel="stylesheet">


    <!-- DEFAULT CSS LINK -->
    <link rel="stylesheet" type="text/css" href="{% static 'base.css' %}">
</head>
base.css에서 class를 만들어 각 html에 적용시킨다.
.leebook_logo {
    font-family: 'Amatic SC', cursive;
}

.leebook_footer_button {
    font-size: .6rem;
}

.leebook_footer {
     text-align: center; margin-top: 2rem
}

.leebook_header {
    text-align: center; margin: 2rem 0;
}
CSS
html을 꾸미기 위한 디자인 도구
DISPLAY Atrribute
- Block: 부모의 최대 width를 모두 가져가면서 형태를 가지는 것
- Inline: just text line height "in" line
- Inline-block
- None

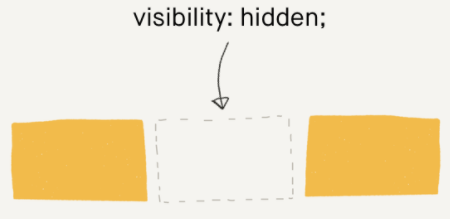
Visiblility Atrribute
- Hidden: display none과는 차이가 있다. 있는데 보이지 않는 것.
SIZE Atrribute
- px
- em
- rem: 주로 사용할 단위. 1rem = 16px
- %
사이트를 Responsive, 즉 반응형 사이트를 만들 것이기 때문에 size가 중요하다.
rem을 주로 사용하는 이유는 Font-size와 관련이 있다.
px는 부모가 커지든 작아지든 정해진 사이즈로 설정된다. em은 부모가 커지면 그 만큼 같이 커진다. 하지만 부모가 여러 개 있을 경우 두 부모가 모두 2배가 되면 em은 4배가 된다. rem은 root html의 기본적으로 적용되어 있는 size가 있는데 이 값에 조정된다. 부모랑은 상관없이 root html이 커지면 rem도 같이 커진다.
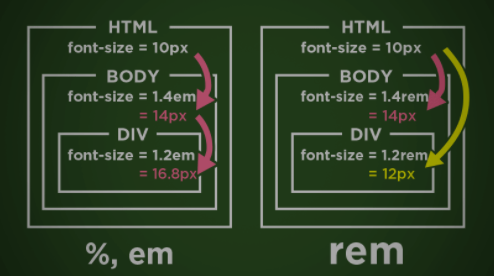
그래서 반응형 사이트를 만들기 위해 rem을 주로 사용한다.
static-base.css에서 불러오는 것 말고 html 구문 안에서 style 태그를 이용해 적용하는 방법도 있다.
css가 적용되는 우선순위가 있는데 먼저 직접적으로 style을 적용한 것이 1번 html 구문안에서 style로 적용한 것이 2번 base.css에서 불러와서 적용하는 style이 3번이다.
Model, DB 연동
python manage.py makeigrationsaccountapp-models.py에 우리가 작성한 모델들을 DB와 연동시킬 파이썬 파일로 만들어주는 작업이다.
from django.db import models

# Create your models here.


class HelloWorld(models.Model):
    text = models.CharField(max_length=255, null=False)
이렇게 모델을 만들면
(venv) C:\Users\User\leebook>python manage.py makemigrations
Migrations for 'accountapp':
  accountapp\migrations\0001_initial.py
    - Create model HelloWorld
accountapp\migrations\0001_initial.py를 만들어준다.
이제 다음 명령어를 실행하면 DB와 연동이 된다.
python manage.py migrate
HTTP Protocol
통신에 사용되는 규약
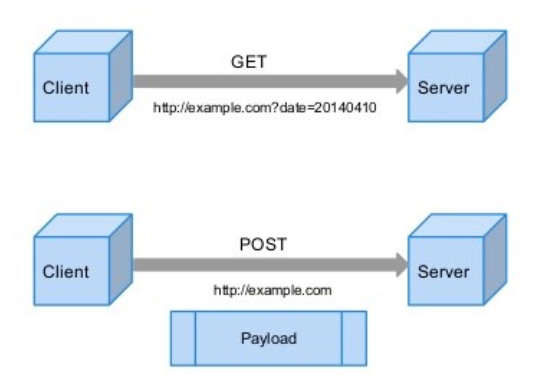
가장 중요한 메서드 2가지 GET POST
GET은 주로 데이터를 읽거나 검색할 때 사용한다.
POST는 새로운 리소스를 생성할 때 사용한다. BODY 안에 데이터를 넣어 보낸다.
POST 보내기
accountapp/templates/accountapp/hello_world.html
{% extends 'base.html' %}

{% block content %}
    <div style="height: 20rem; background-color: #38df81; border-radius: 1rem; margin: 2rem;">
        <h1>
            test
        </h1>

        <form action="/account/hello_world/" method="post">
            {% csrf_token %}
            <input type="submit" class="btn btn-primary" value="POST">
        </form>

        <h1>
            {{ text }}
        </h1>
    </div>

{% endblock %}
accountapp/views.py
from django.http import HttpResponse
from django.shortcuts import render

# Create your views here.

def hello_world(request):

    if request.method == "POST":
        return render(request, 'accountapp/hello_world.html', context={'text': 'POST METHOD!!!'})
    else:
        return render(request, 'accountapp/hello_world.html', context={'text': 'GET METHOD!!!'})
DB SAVE
- Send POST data
- Receive POST data
- Save DB
입력한 데이터 그대로 출력하기
accountapp/templates/accountapp/hello_world.html
<form action="/account/hello_world/" method="post">
            {% csrf_token %}
            <div>
                <input type="text" name="hello_world_input">
            </div>

            <div>
                <input type="submit" class="btn btn-primary" value="POST">
            </div>


        </form>
accountapp/views.py
def hello_world(request):

    if request.method == "POST":

        temp = request.POST.get('hello_world_input')

        return render(request, 'accountapp/hello_world.html', context={'text': temp})
    else:
        return render(request, 'accountapp/hello_world.html', context={'text': 'GET METHOD!!!'})
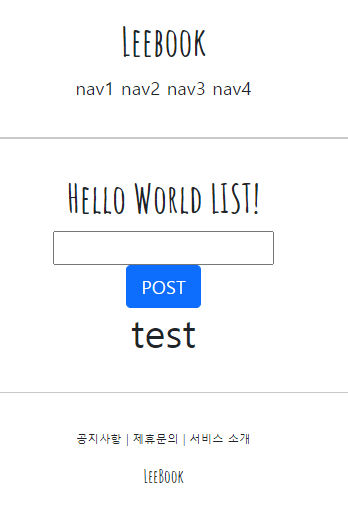
이제 이 데이터를 DB에 저장해야 한다.
아까 만든 모델 HelloWorld를 불러와서 객체를 생성한 후 속성 text를 이용해 저장한다. 그 후 그 객체를 hello_world_output에 내보낸다.
def hello_world(request):

    if request.method == "POST":

        temp = request.POST.get('hello_world_input')

        new_hello_world = HelloWorld()
        new_hello_world.text = temp
        new_hello_world.save(0)

        return render(request, 'accountapp/hello_world.html', context={'hello_world_output': new_hello_world})
    else:
        return render(request, 'accountapp/hello_world.html', context={'text': 'GET METHOD!!!'})
그 hello_world_output을 html에서 확인하고 속성 text를 출력해준다.
        {% if hello_world_output %}
        <h1>
            {{ hello_world_output.text }}
        </h1>
        {% endif %}
아까와 다른 점은 출력되는 문장이 그냥 문장이 아니라 DB에 저장되고 있는 문장이라는 것이다.
DB 정보 접근
DB에 저장된 객체 리스트들을 긁어와서 display할 것이다.
        hello_world_list = HelloWorld.objects.all()

        return render(request, 'accountapp/hello_world.html', context={'hello_world_list': hello_world_list})
    else:
        hello_world_list = HelloWorld.objects.all()
        return render(request, 'accountapp/hello_world.html', context={'hello_world_list': hello_world_list})
        {% if hello_world_list %}
            {% for hello_world in hello_world_list%}
            <h4>
                {{ hello_world.text }}
            </h4>
            {% endfor %}
        {% endif %}
그런데 f5 새로고침을 하면 마지막 POST 작업이 반복된다. f5를 눌렀을 때 GET으로 돌아갈 수 있도록 하자
def hello_world(request):

    if request.method == "POST":

        temp = request.POST.get('hello_world_input')

        new_hello_world = HelloWorld()
        new_hello_world.text = temp
        new_hello_world.save()

        return HttpResponseRedirect(reverse('accountapp:hello_world'))
    else:
        hello_world_list = HelloWorld.objects.all()
        return render(request, 'accountapp/hello_world.html', context={'hello_world_list': hello_world_list})
Pycharm 디버깅
Run - Edit Configuration - Template - Python
-
Select Script
leebook - venv - Scripts -
Parameters
runserver
manage.py 우클릭 후 Debug 'manage' 클릭하면 서버가 구동되는 것을 볼 수 있다.
Account
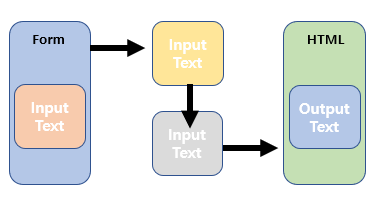
Form으로 입력할 떼 현재는 누구나 anyone 입력할 수 있도록 되어있다. 인증시스템을 구축해서 (Authentication) 최소한의 보안을 구축한다.
Account 앱을 만들고 있으니까 계정은 보안이 필수이므로 꼭 인증시스템을 만들어야 한다.
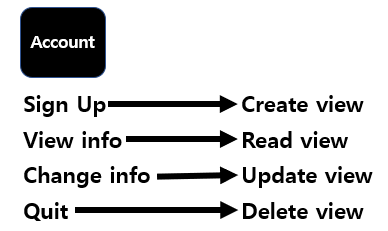
Account
1. Sign Up
2. View info
3. Change info
4. Quit
CRUD
Create Read Update Delete
장고는 CRUD 작업을 쉽게 할 수 있는 view를 제공한다.
Create view
Read view
Update view
Delete view
즉, CBV(Create Based View)를 제공한다. 이 view들을 상속 받아서 해당되는 속성들만 입력해주면 알아서 장고가 작업해준다.
- Create view
class AccountCreateView(generic.CreateView):
    model = User
    from_class = AccountCreateForm
    success_url = reverse_lazy('app:list')
    template_name = 'accountapp/accountapp_create.html'
model: 어떤 모델을 만들 것인지
from_class: from 지정
success_url: 성공했다면 어느 경로로 다시 되돌아 갈 것인지
template_name: 어떤 템플릿을 사용하여 구현할 것인지
이렇게 class를 이용하면 2가지 효과를 얻는다
1. Productivity Readability 생산성, 가독성 증가
2. Complexity Time spending 복잡도, 사용시간 감소
거의 대부분 CRUD 사이클을 사용한다.
