1. Viewing
1.1. Coordinate System
Model Coordinate와 World Coordinate는 기본적으로 오른손 좌표계로, cartesian coordinate system을 이용한다. cartesian 좌표계는 3D 공간을 표현하기 위해 x, y, z 축을 사용해 좌표를 지정하는 표준적인 방법이다. 원점은 화면의 정중앙이다.
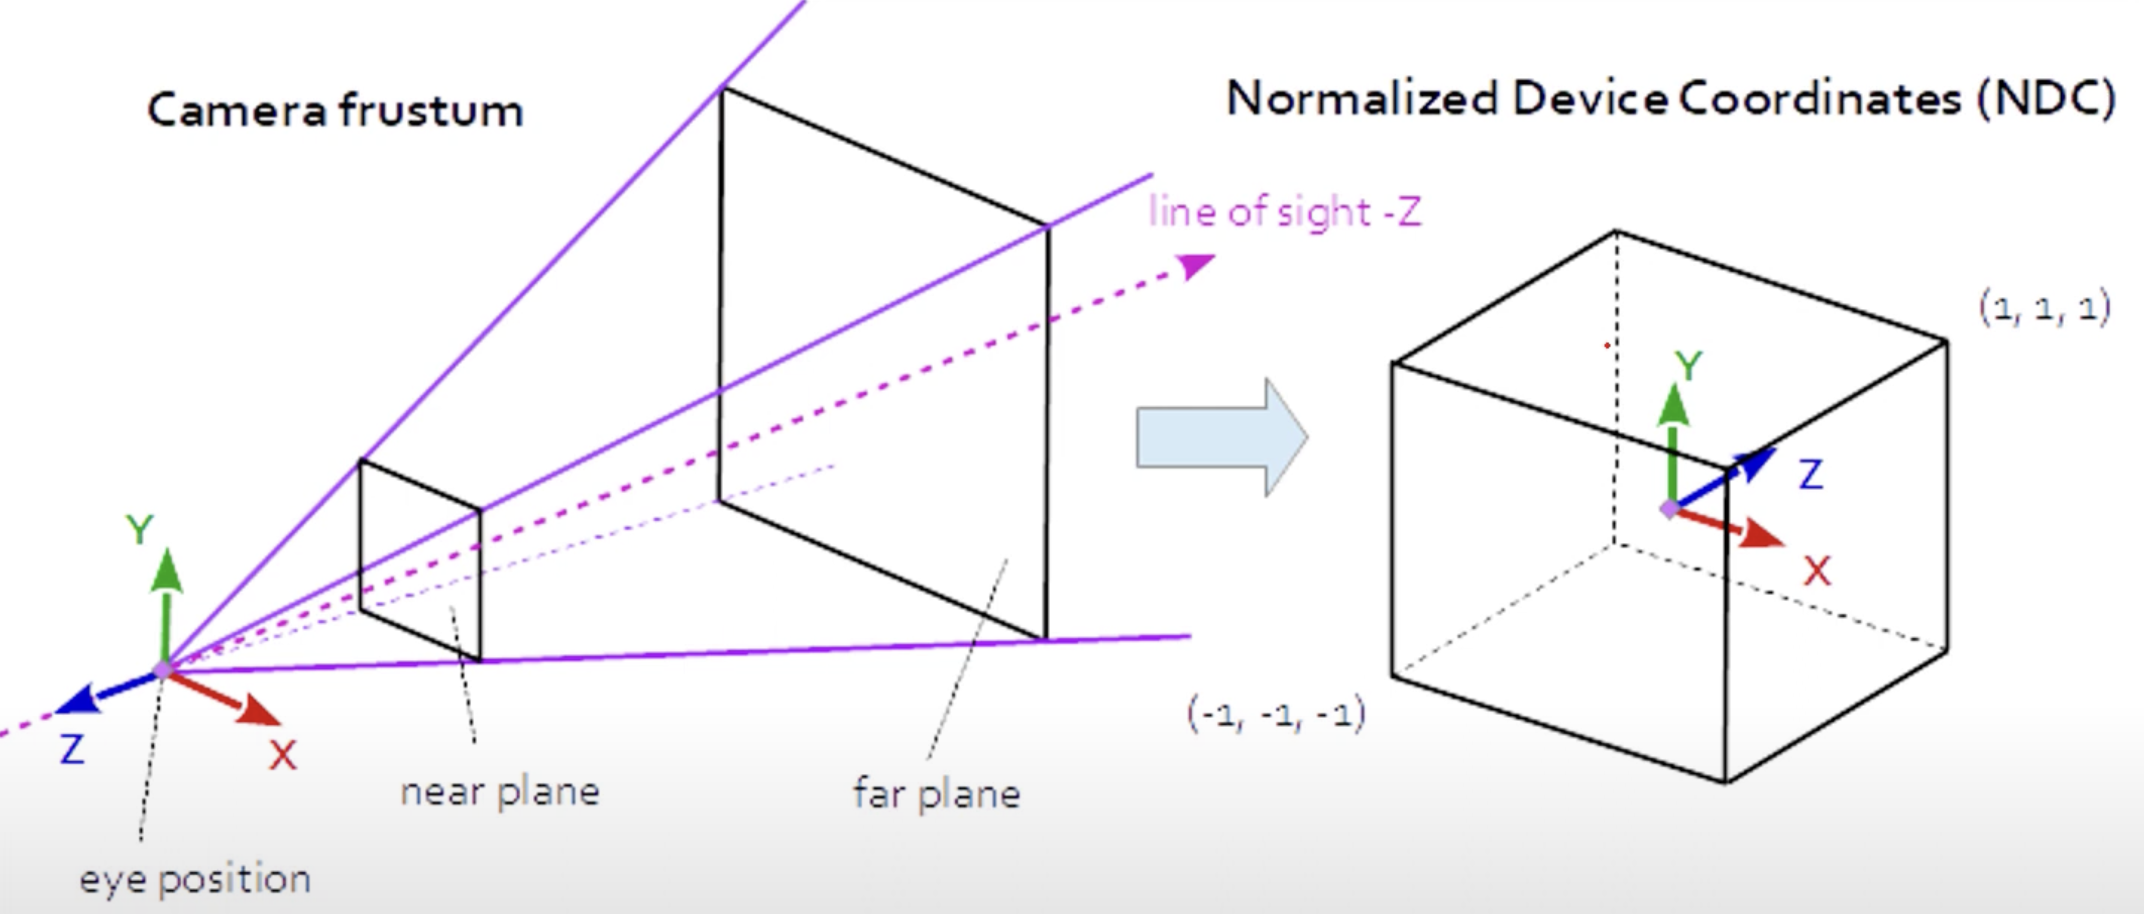
World Coordinate에 View Matrix를 곱해 Camera Coordinate으로 변환하는 과정을 View Transform이라고 한다. 또한 Camera Coordinate를 Projection Transform 시키면 Normalized Coordinate이 되고 이는 각 축의 값을 -1 ~ 1 사이의 값으로 정규화시킨 정규화 좌표계(NDC, Normalized Device Coordinates)의 좌표이다.
참고) 3D Viewing Pipeline

1.2. Degree of Freedom
DOF는 해당 오브젝트가 움직일 수 있는 자유도를 나타낸다. 이는 객체의 변환을 조절할 때 중요한 역할을 하며, translation, rotation, scaling을 할 때, 어느 축을 중심으로 할지 결정하며 이를 통해 다양한 애니메이션과 상호작용을 구현할 수 있다.
카메라 같은 경우, 6개의 DOF가 있다. x, y, z 위치와 x, y, z 방향으로의 회전이 가능하므로 6개의 DOF가 있다고 할 수 있다.
1.3. Camera Parameters
📌 카메라 위치
- 3 DOF Coordinate
📌 카메라 방향
- 3 DOF Angle
📌 Optical Parameters
- Focal Length (초점 거리) - Field of View (시야각)
- Focus Position (초점 위치)
- Iris (조리개)
- Lens Distortion (렌즈 왜곡)
일단 튜토리얼에서는 왜곡 같은 건 다루지 않고 선형적인 것만 다루며, 이론적으로 렌즈의 구경이 0에 가깝다고 가정한 핀홀 카메라만을 다룰 예정이다.
2. Projection
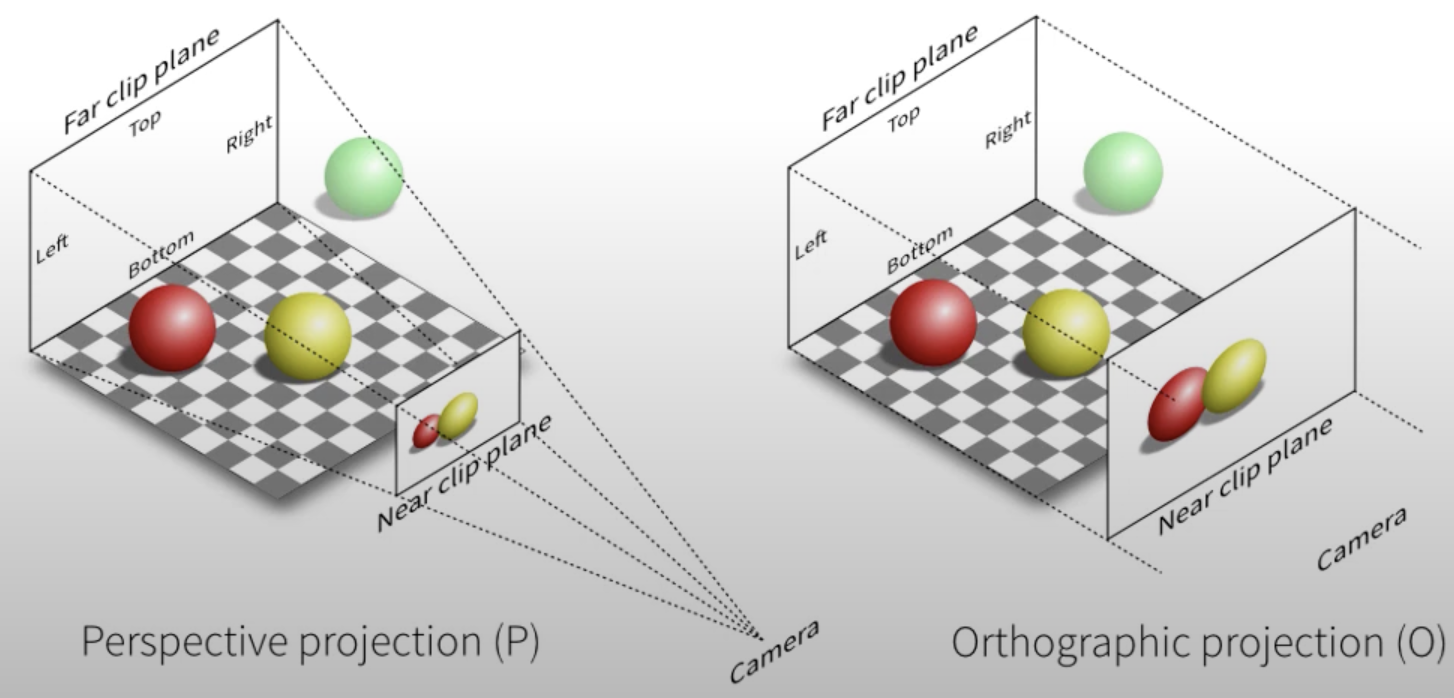
2.1. Perspective projection
- 길이, 거리, 각도 다 바뀜. 실제보다 더 작아짐
- 수렴하는 점을 Center of projection(COP)이라고 부름.
- finite COP
OrthographicCamera(left: Number, right: Number, top: Number, bottom: Number, near: Number, far: Number)
2.2. Parallel projection
- 평행선 끼리 모두 평행하므로 line의 방향만 정하면 됨 ⇒ 그 방향을 Direction of projection(DOP)라 함.
- 모든 점들의 DOP는 모두 같음!!
- infinite COP = DOP
PerspectiveCamera(v_fov: Number, aspect: Number, near: Number, far: Number)
3. Projection Transform
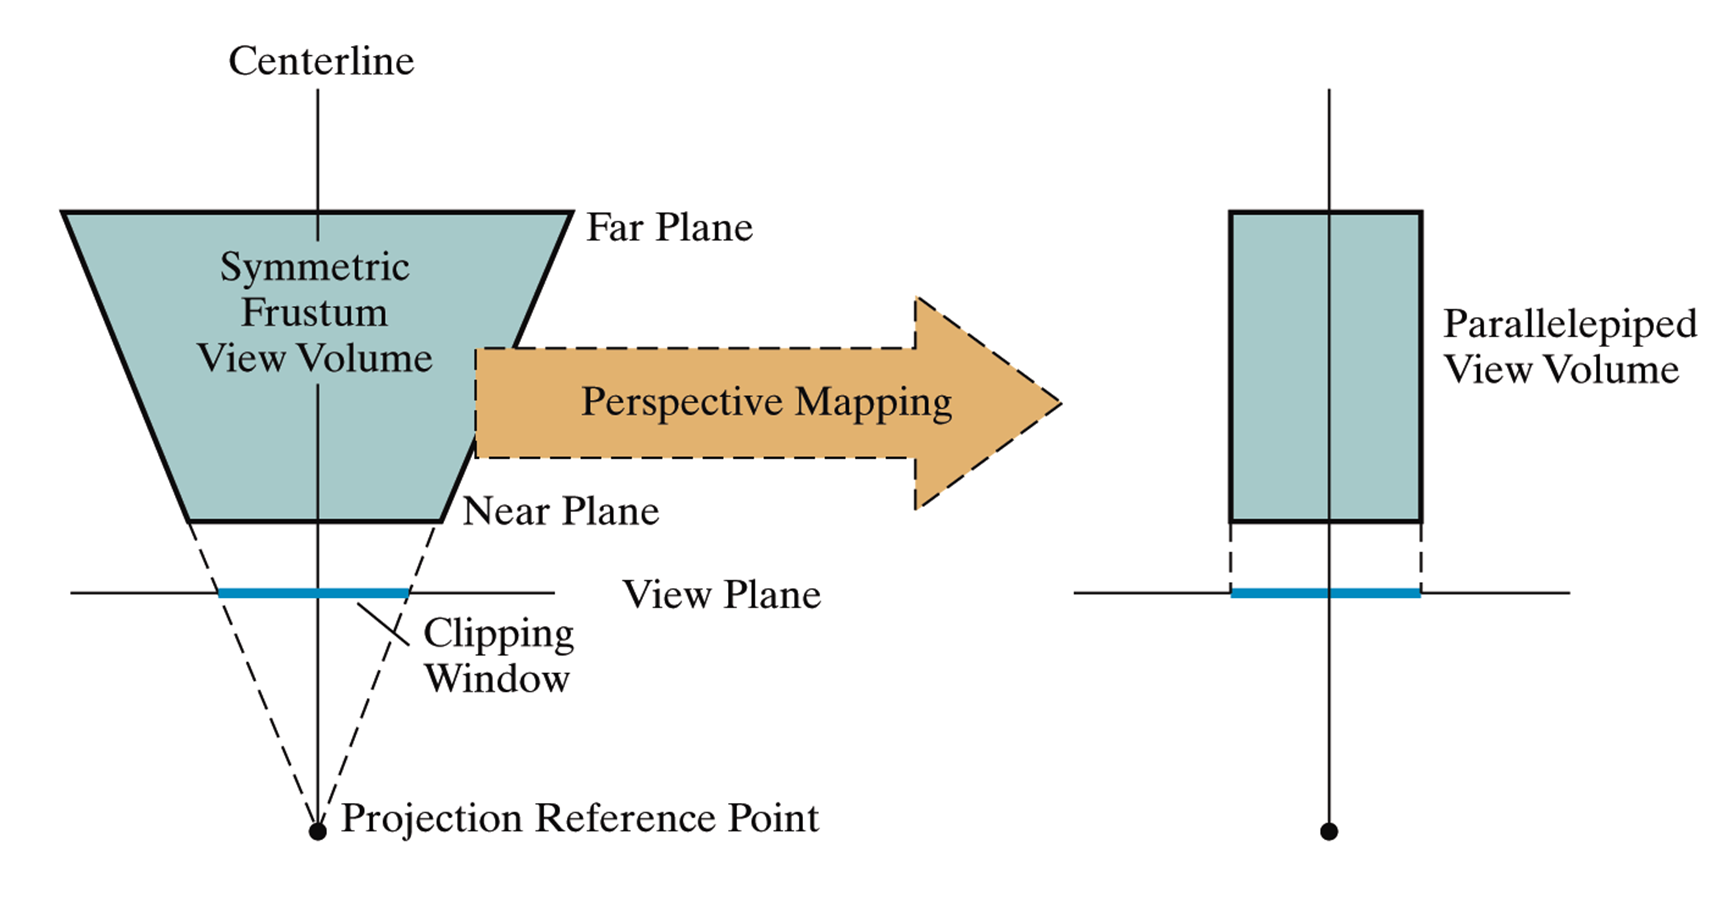
Perspective Projection의 경우 View Volume이 피라미드 위를 잘라서 만든 모양이 되는데 이를 Camera Frustum(각뿔대) 이라고 한다. 이 View Frustum을 Normalized view volume으로 변환하는 것, 즉 Camera Coordinate을 NDC로 변환하는 것이 바로 Projection Transformation이다. 이때 z의 방향이 달라지면서, 오른손 좌표계에서 왼손 좌표계로 바뀐다.
4. Look-At Approach
🤔 카메라의 위치와 방향이 한데, 어떤 값을 가지고 이걸 정할까?
📌 camera position + camera orientation
- 우선 카메라의 위치와 카메라가 바라보는 방향을 정한다.
- 그런데 카메라는 roll(좌우 회전)이 가능하므로 이 둘만 가지고는 카메라의 방향이 고정이 안된다.
📌 View-up vector
- 따라서 위쪽 방향을 나타내는 up vector or rotation angle이 하나 더 필요하다.
카메라의 위치(eye)와 카메라가 바라보는 위치(at)을 이용하면 카메라가 바라보는 방향이 정해지고, 위쪽을 나타내는 점이 있으면 up-vector가 정해진다. 이 3점을 통해 카메라의 위치와 방향을 특정할 수 있다.

5. 예제
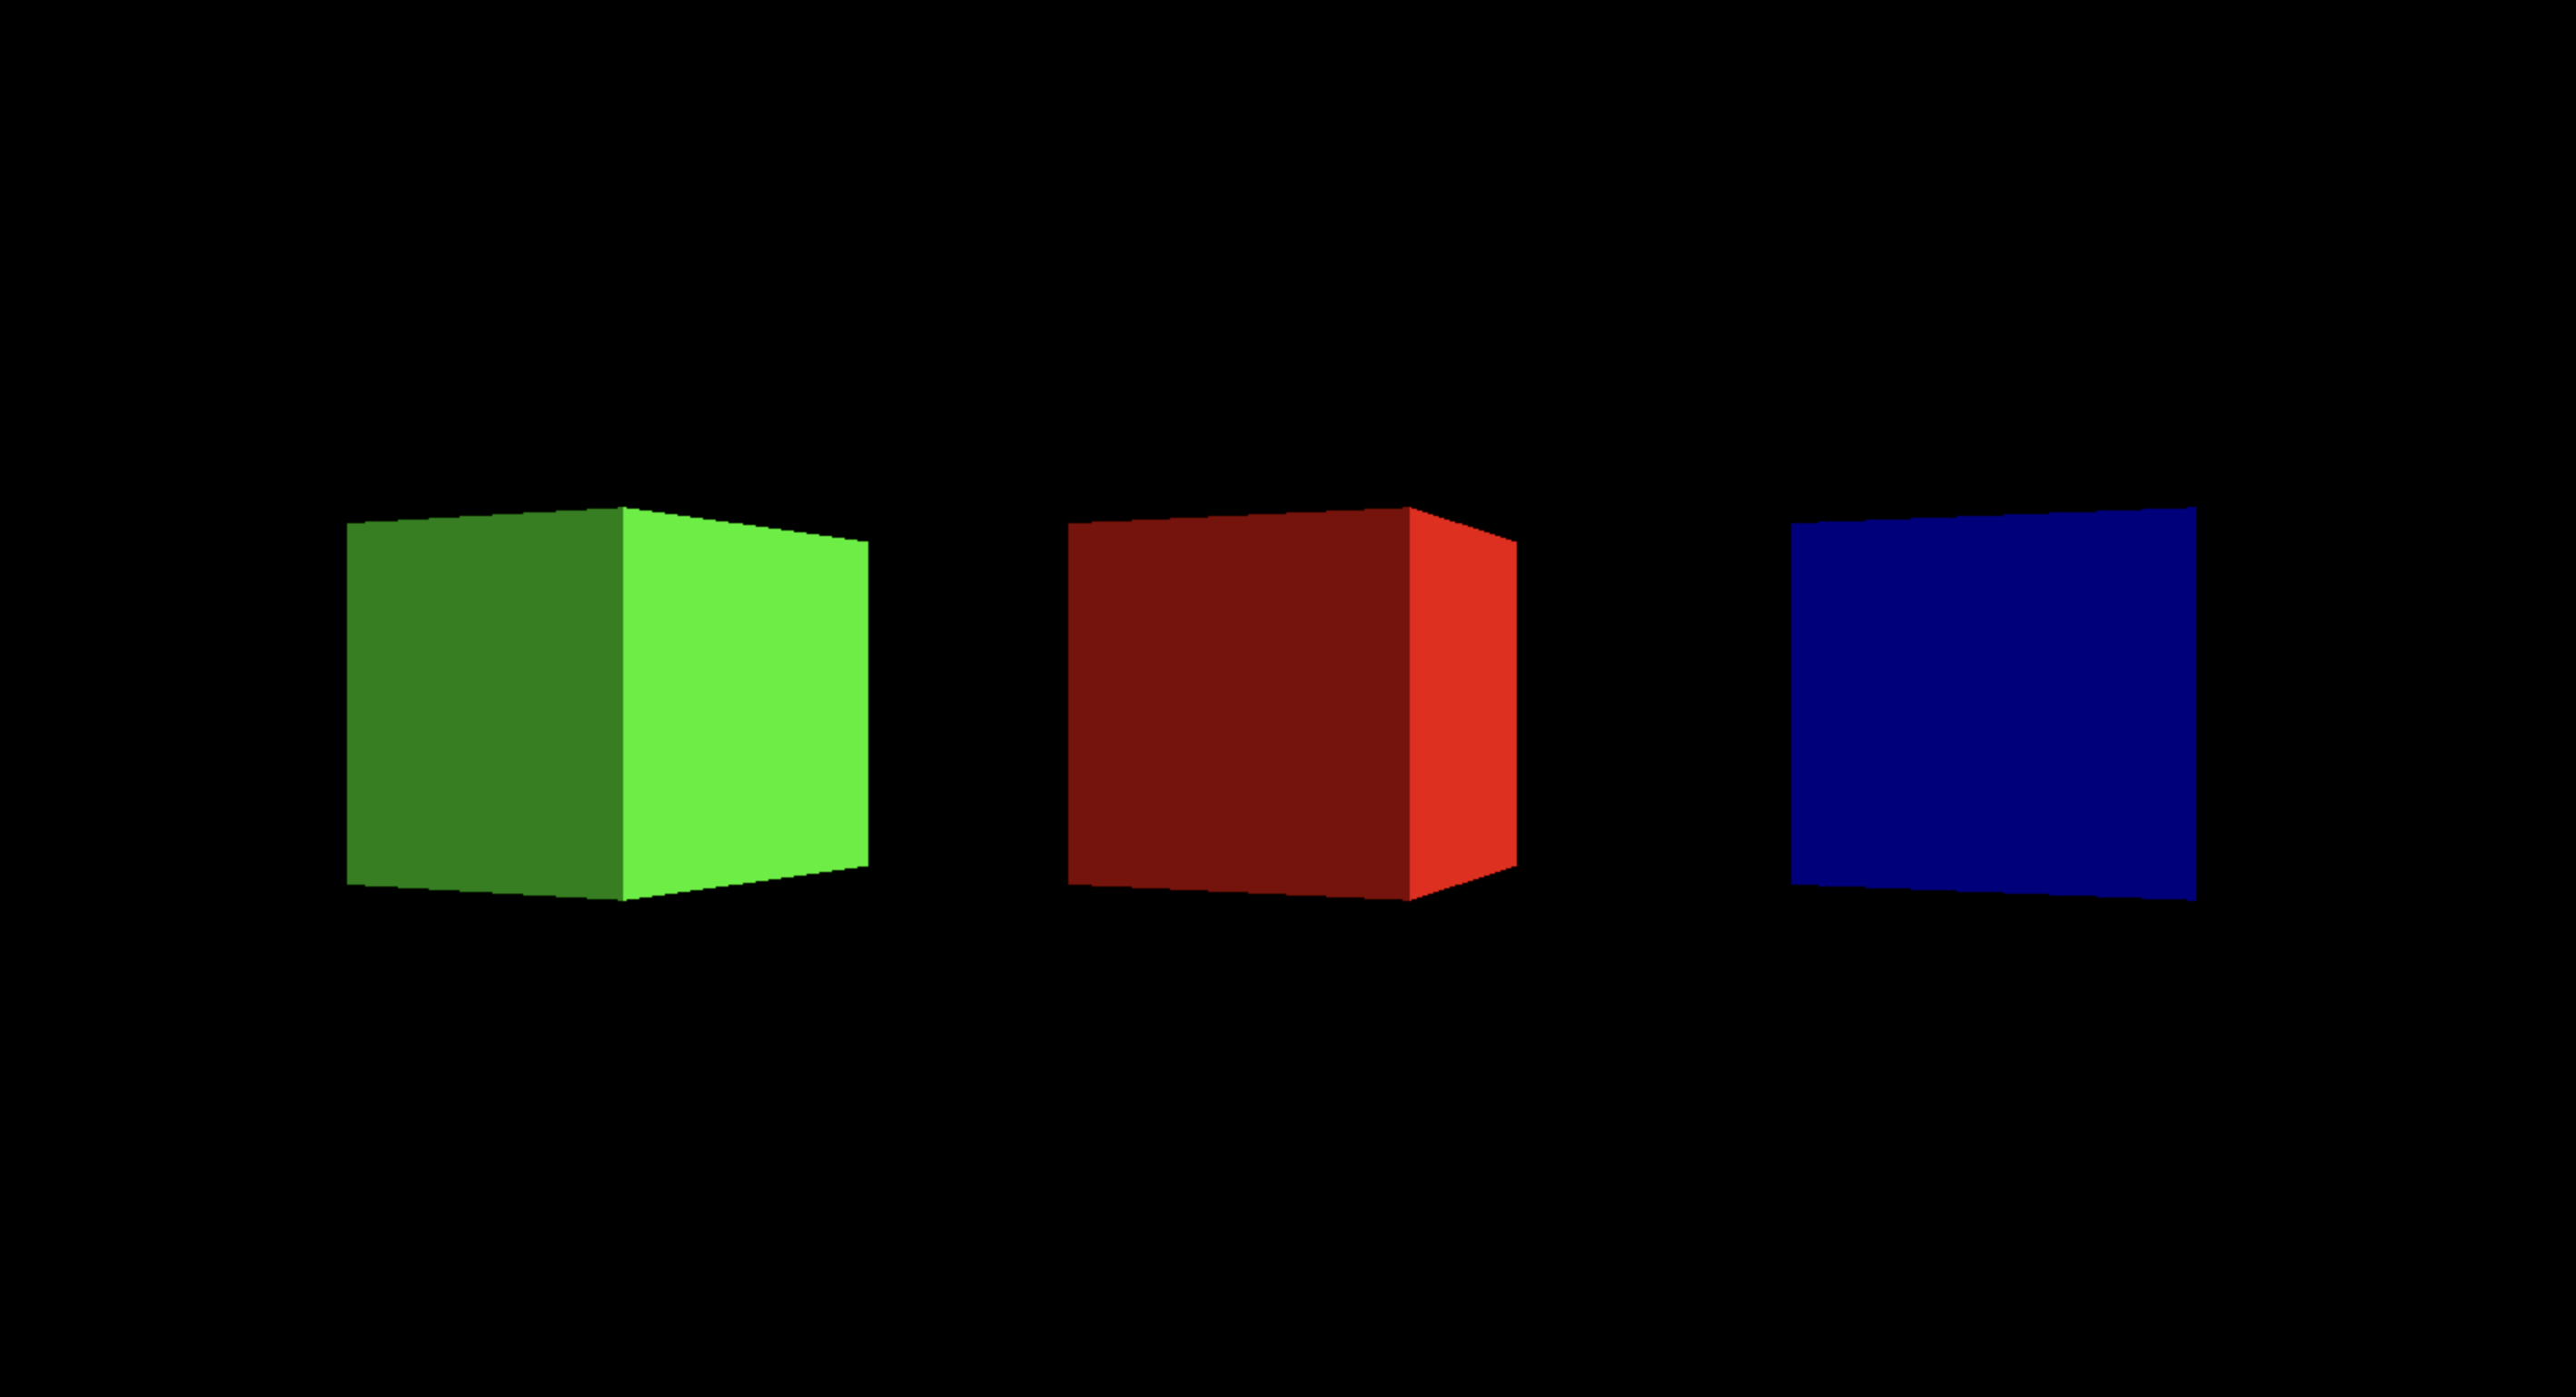
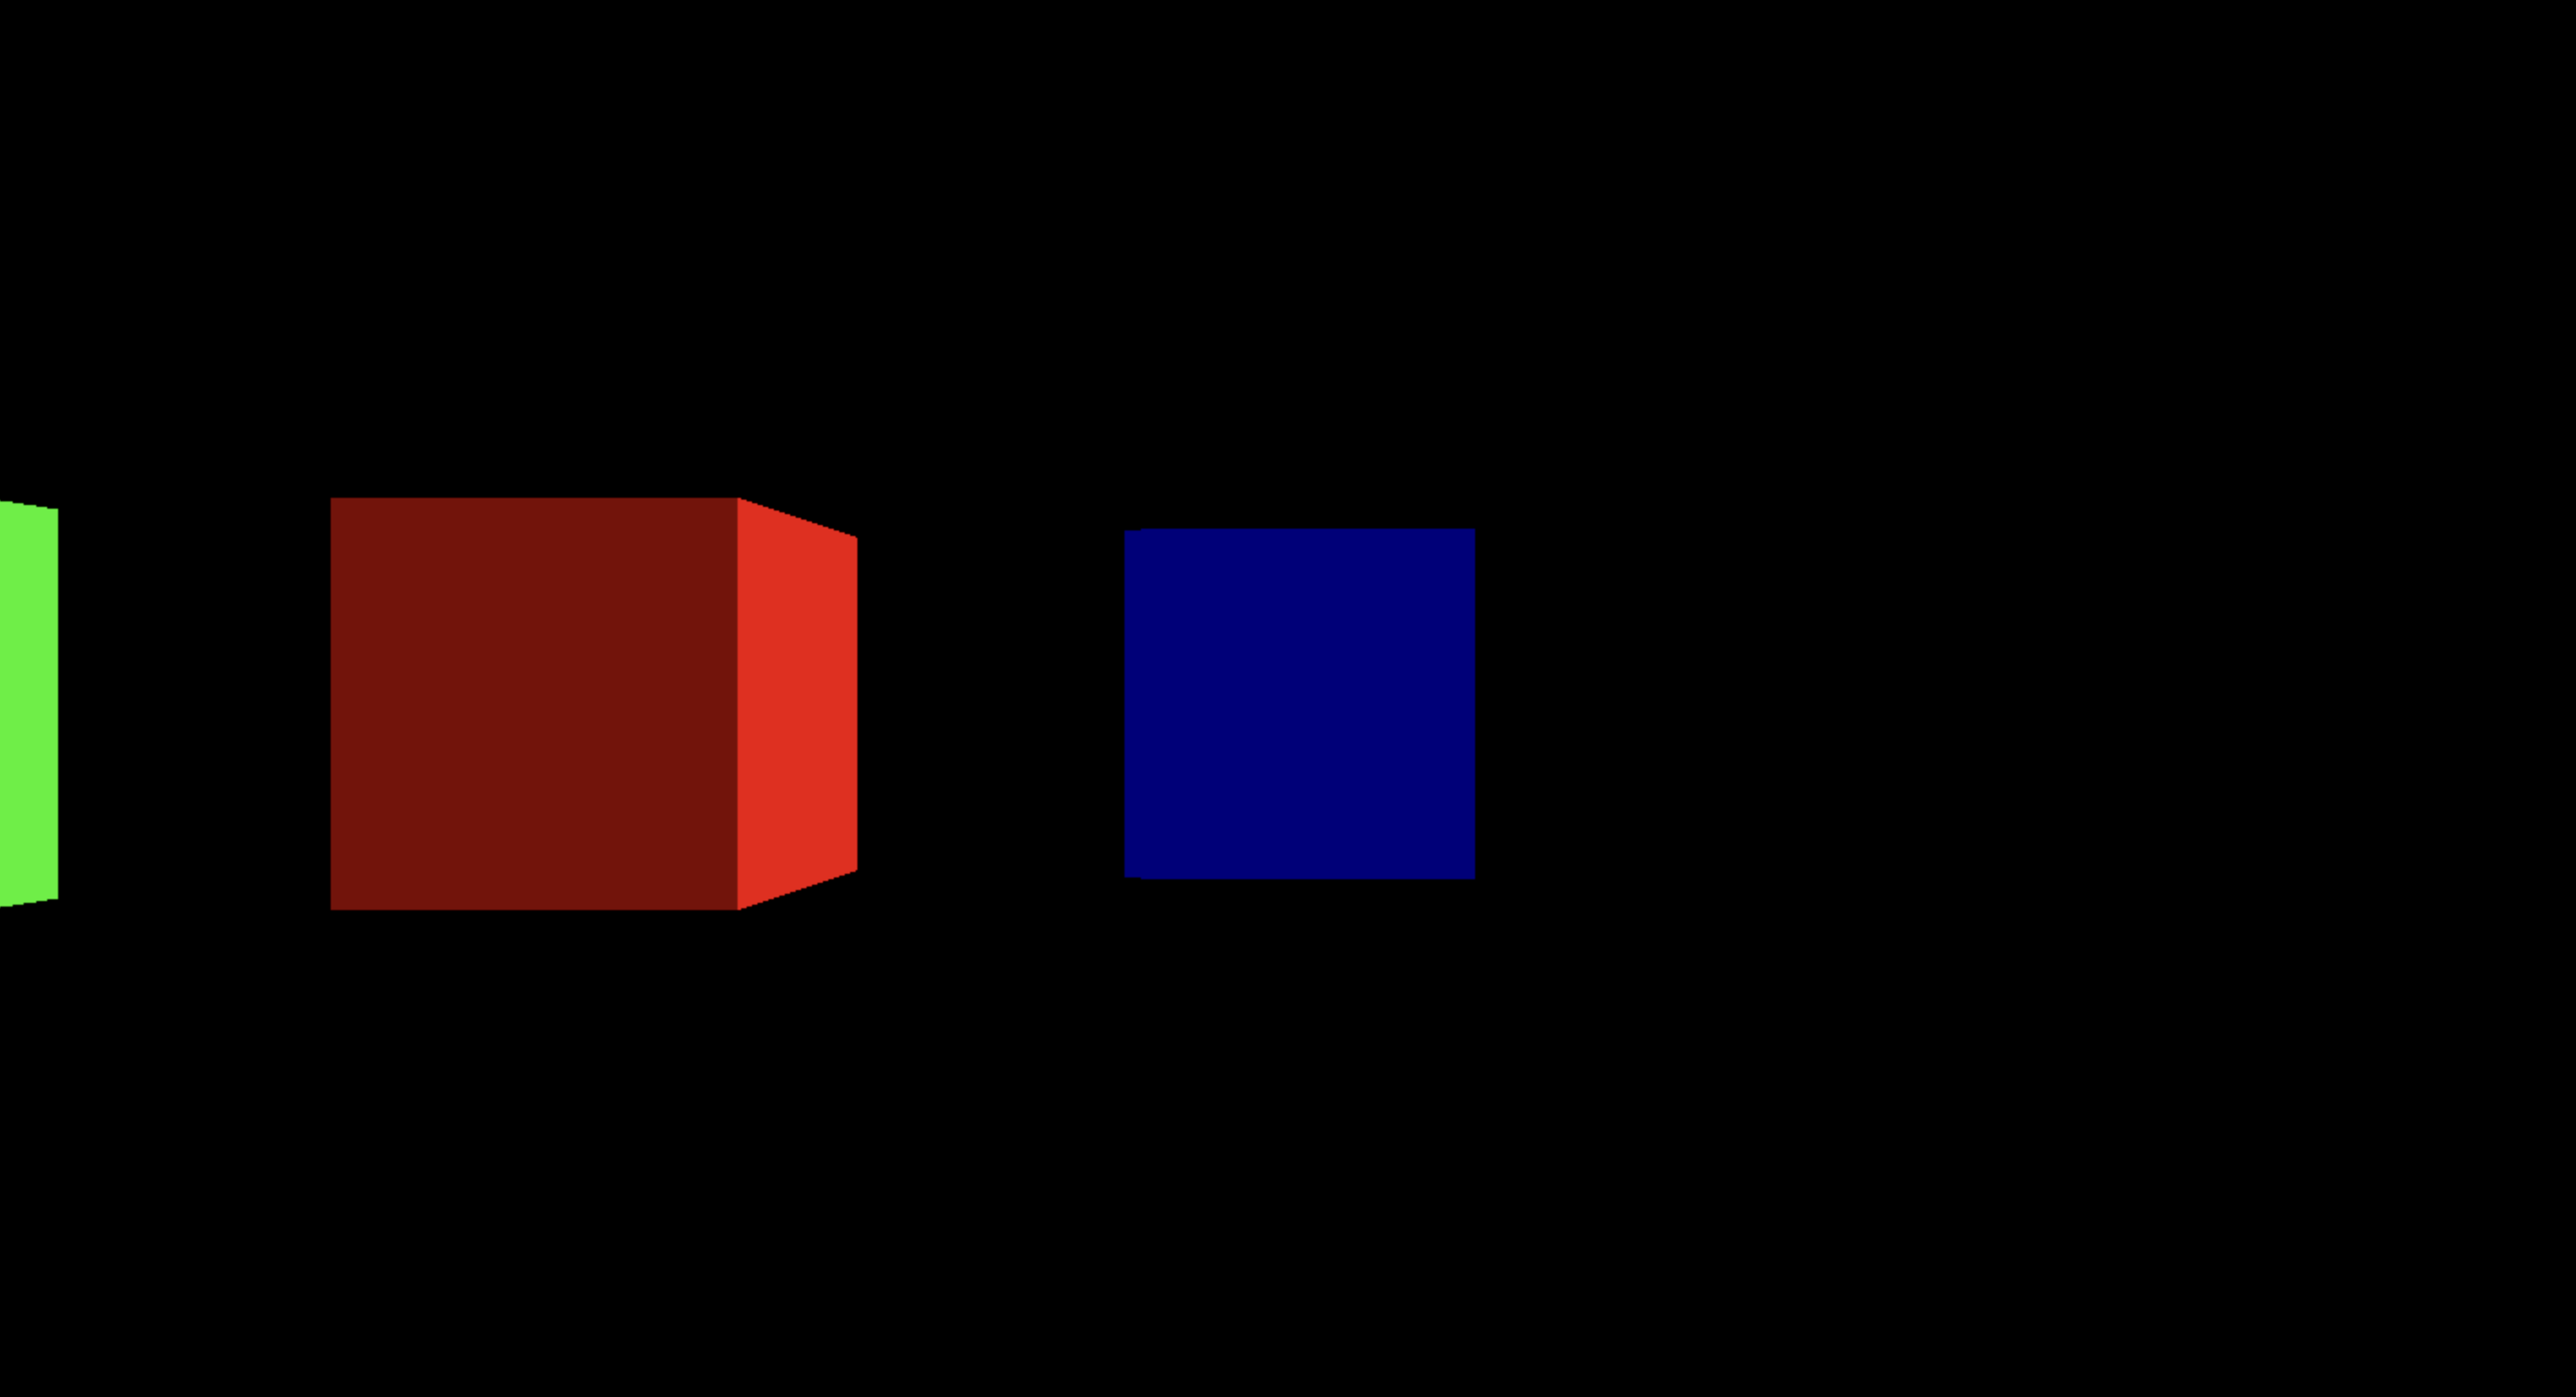
5.1. Look-at 단순 사용 예제
- 예제 전체 코드
const h_scr = window.innerWidth;
const v_scr = window.innerHeight;
const scene = new THREE.Scene();
const camera = new THREE.PerspectiveCamera(45, h_scr/v_scr, 0.1, 1000);
camera.position.z = 5;
camera.lookAt(2,0,0);

const renderer = new THREE.WebGLRenderer({canvas: HelloCanvas});
renderer.setSize( h_scr, v_scr );

const geometry = new THREE.BoxGeometry();
const material1 = new THREE.MeshPhongMaterial( {
		color: 0xff0000, shininess : 90.0 });
const material2 = new THREE.MeshPhongMaterial( {
		color: 0x00ff00, shininess : 90.0 });
const material3 = new THREE.MeshPhongMaterial( {
		color: 0x0000ff, shininess : 90.0 });

const light1 = new THREE.DirectionalLight(0xffffff, 1.0);
light1.position.set (2,2,2);
scene.add( light1 );
const light2 = new THREE.AmbientLight(0x303030);
scene.add( light2 );

const box1 = new THREE.Mesh( geometry, material1 );
const box2 = new THREE.Mesh( geometry, material2 );
const box3 = new THREE.Mesh( geometry, material3 );

scene.add(box1);
scene.add(box2);
scene.add(box3);

box2.position.x = -2;
box3.position.x = 2;
var rot = 0.0;

const animate = function () {
	requestAnimationFrame( animate );

	rot += 0.01;
	box1.rotation.y = rot;
	box2.rotation.y = rot;
	box3.rotation.y = rot;

	renderer.render( scene, camera );
};
animate();
이전 예제에서 추가된 부분은 다음 한 줄 뿐이다.
camera.lookAt(2,0,0);원래 왼쪽처럼 보였던 화면이 오른쪽처럼 보이게 바꼈다.
|
|
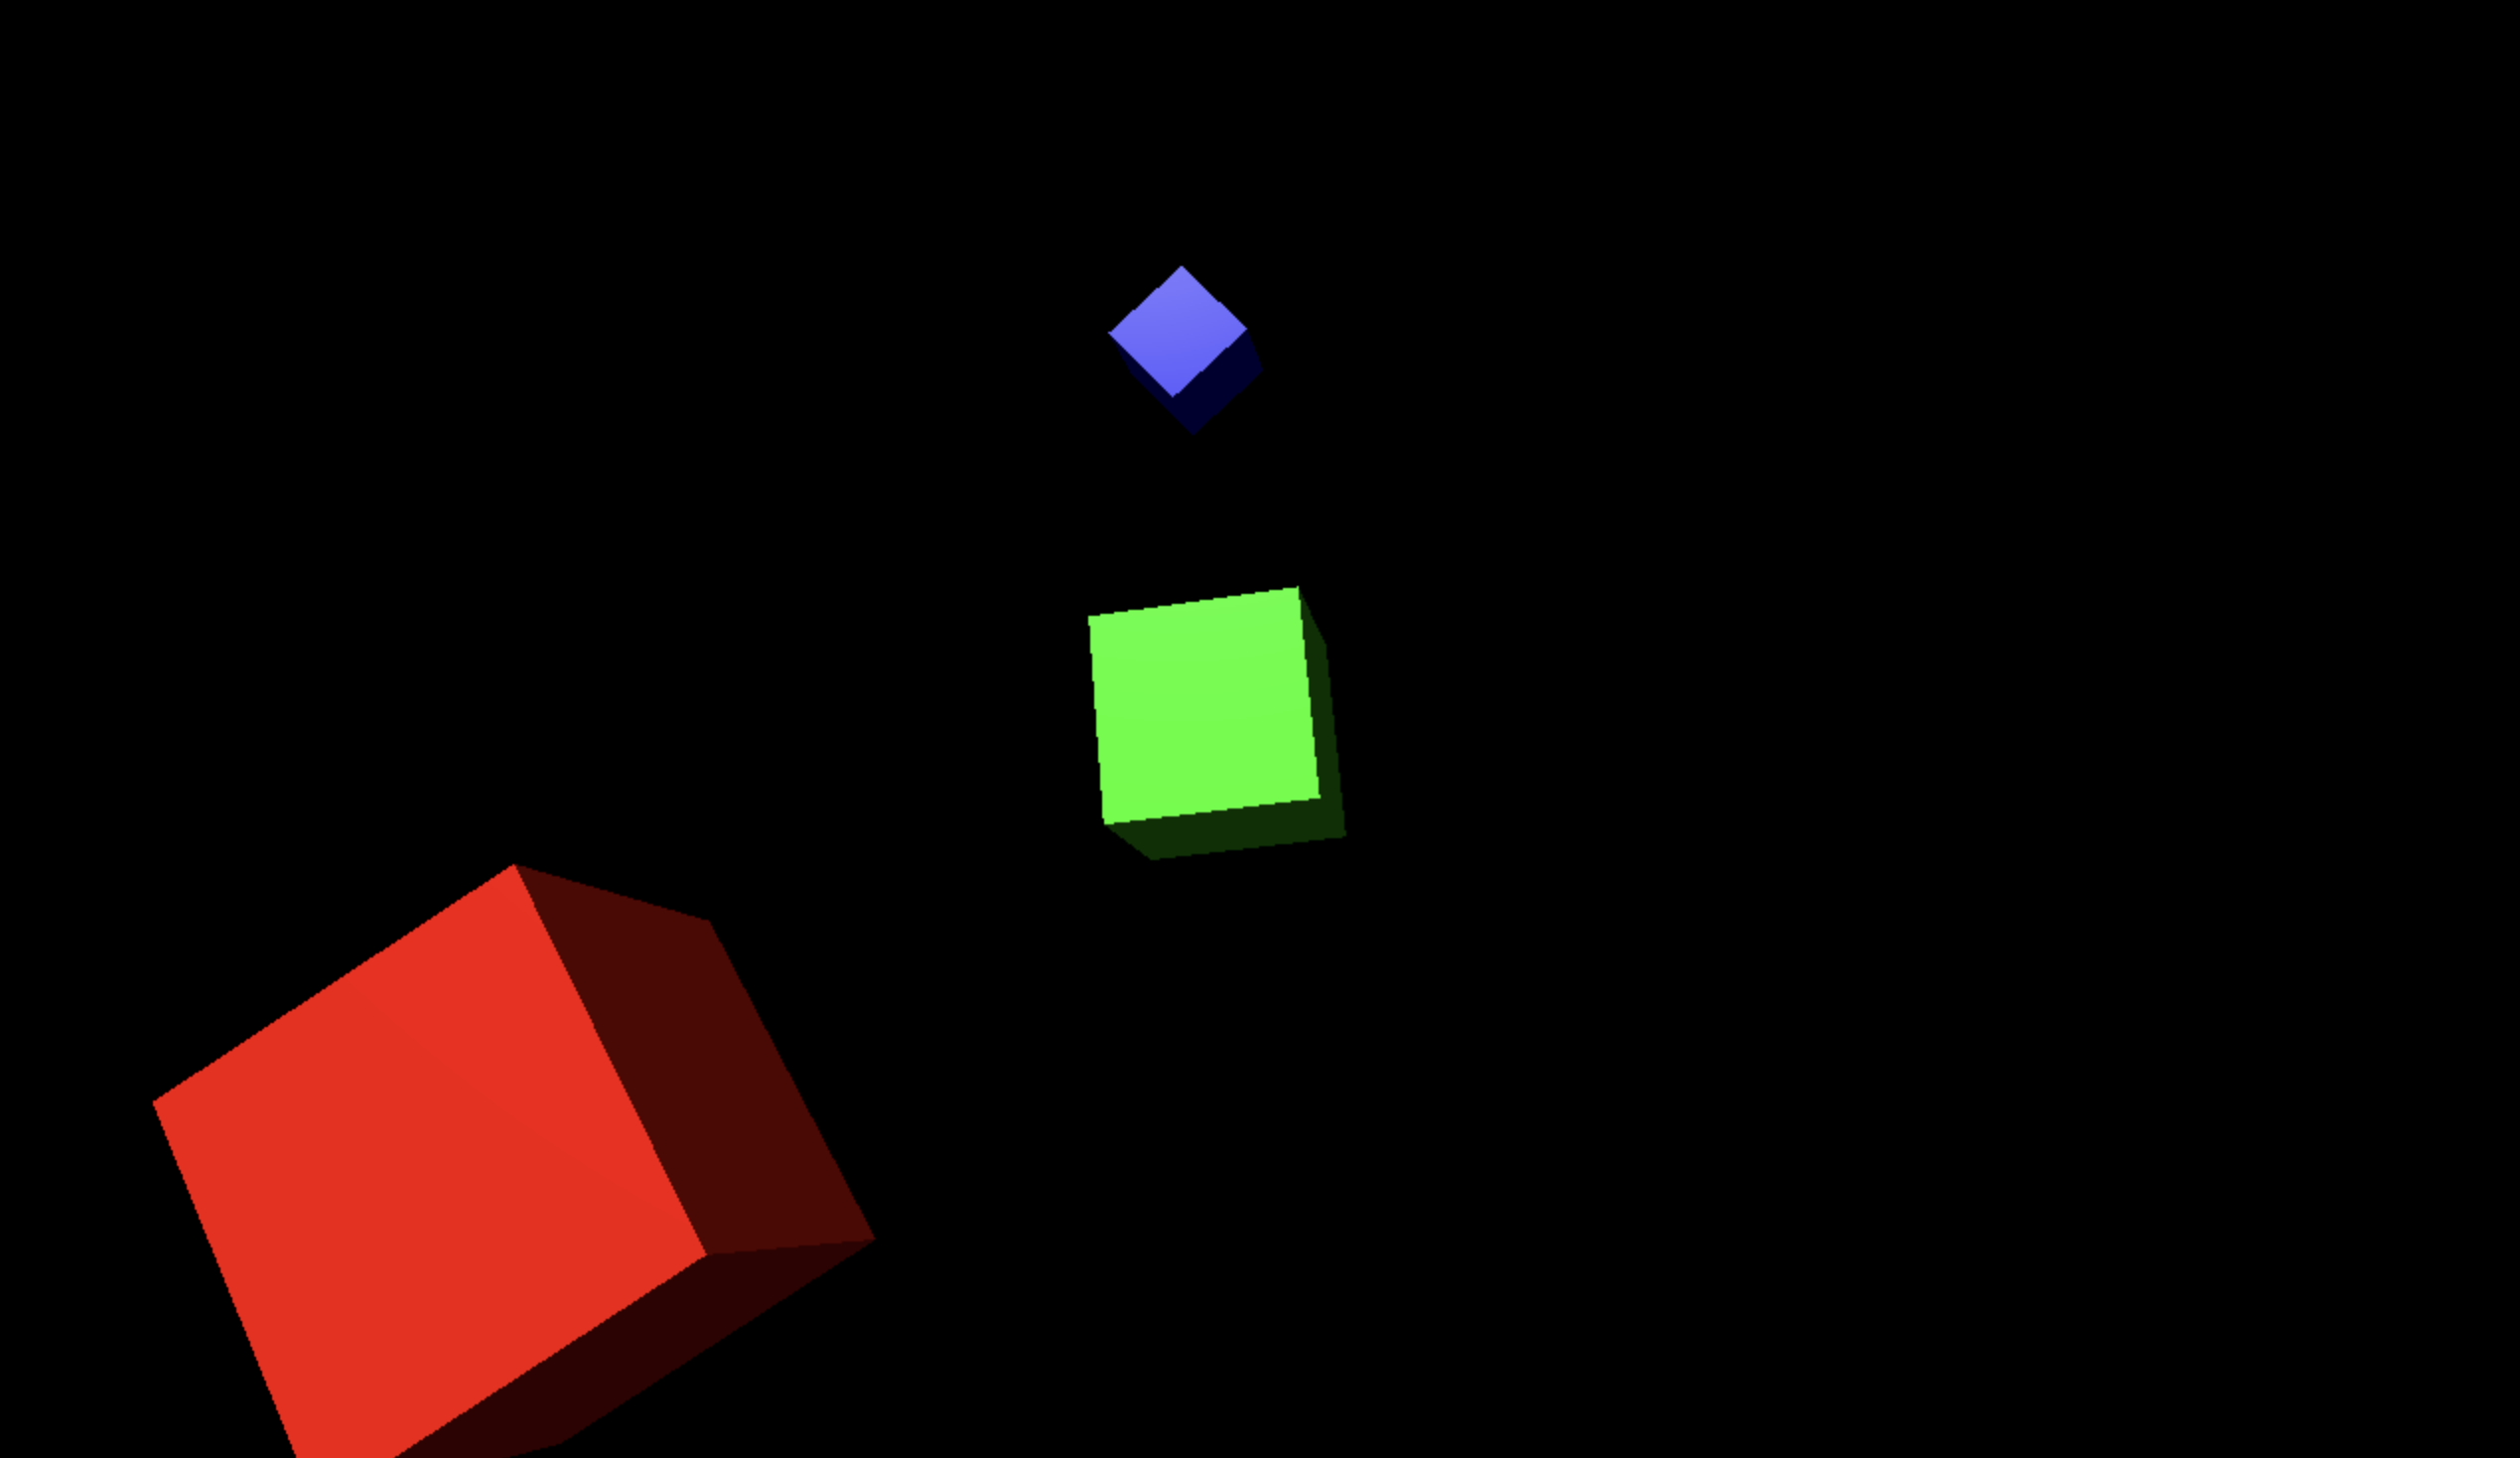
5.2. Look-at을 이용한 camera transformation 예제
- 예제 전체 코드
const h_scr = window.innerWidth;
const v_scr = window.innerHeight;
const scene = new THREE.Scene();
const camera = new THREE.PerspectiveCamera(45, h_scr/v_scr, 0.1, 1000);
// const camera = new THREE.OrthographicCamera(-2, 2, 2*h_scr/v_scr, -2*h_scr/v_scr, 0.1, 100);
camera.position.z = 5;

const renderer = new THREE.WebGLRenderer({canvas: HelloCanvas});
renderer.setSize( h_scr, v_scr );

const geometry = new THREE.BoxGeometry();
const material1 = new THREE.MeshPhongMaterial( {
		color: 0xff0000, shininess : 90.0 });
const material2 = new THREE.MeshPhongMaterial( {
		color: 0x00ff00, shininess : 90.0 });
const material3 = new THREE.MeshPhongMaterial( {
		color: 0x0000ff, shininess : 90.0 });

const light1 = new THREE.DirectionalLight(0xffffff, 1.0);
light1.position.set (2,2,2);
scene.add( light1 );
const light2 = new THREE.AmbientLight(0x303030);
scene.add( light2 );

const box1 = new THREE.Mesh( geometry, material1 );
const box2 = new THREE.Mesh( geometry, material2 );
const box3 = new THREE.Mesh( geometry, material3 );

scene.add(box1);
box1.add(box2);   // Make Hierachy
box2.add(box3);   // Make Hierachy

box2.position.x = -2;
box3.position.x = 2;
box2.scale.set(0.5,0.5,0.5);
box3.scale.set(0.5,0.5,0.5);
var rot = 0.0;

box1.rotation.x = 60 * 3.14 / 180;

const animate = function () {
	requestAnimationFrame( animate );

	rot += 0.01;
	box1.rotation.y = rot;
	box2.rotation.y = rot*2;
	box3.rotation.y = rot*4;

	const center = new THREE.Vector3(0,0,0);
	const up = new THREE.Vector3(0,1,0);
	camera.lookAt(box2.getWorldPosition(center));
	camera.up = up;

	renderer.render( scene, camera );
};
animate();
이 예제는 앞에서 다뤘던 hierarchical 한 3개의 box 예제에서 이어진다.
달라진 부분은 animate() 함수에 아래 부분이 추가됐다는 것이다. box2 의 center 를 world coordinate으로 변환한 후, 카메라가 그 좌표를 LookAt 하도록 했다. 따라서 애니매이션은 box2 가 중심에 있는 것처럼 보일 것이다. 또한 up-vector를 y축 방향으로 설정해주었다.
const animate = function () {
				...

	const center = new THREE.Vector3(0,0,0);
	const up = new THREE.Vector3(0,1,0);
	camera.lookAt(box2.getWorldPosition(center));
	camera.up = up;

				...
};
5.3. Orthographic camera 예제
예제 5.2 와 카메라만 달려졌다.
Orthographic camera는 원래 평행했던 두 개의 직선은 계속 평행이 유지된다는 특징이 있다. orthographic camera는 camera의 z-position을 조절한다고 해서 거리감이 달라지지 않는다. aspect ratio를 바꿔서 조절해야 한다.
// OrthographicCamera(left: Number, right: Number, top: Number, bottom: Number, near: Number, far: Number)
const camera = new THREE.OrthographicCamera(-2, 2, 2*h_scr/v_scr, -2*h_scr/v_scr, 0.1, 100);