MSA & MFA
https://velog.io/@juwon98/MSA-MFA
NestJS와 MSA
NestJS는 Node.js 프레임워크로 기본적으로 Express를 사용해 동작하며, TypeScript를 완벽하게 지원한다.
또한, MSA 구현을 위한 microservices API를 제공하기 때문에 NestJS를 조금 다룰 줄 안다면 MSA 구조를 구현하기에 좋은 도구라고 생각한다.
구현하기
모노레포(Mono Repo) 구조로 만들었으며, 폴리레포(Poly Repo / Multi Remo) 구조로 구현한다면 단순히 프로젝트를 분리하면 됩니다. (Docker를 사용해 각각의 마이크로앱을 빌드할 때 package를 일관되게 관리하기 위해 모노레포 구조를 선택했습니다.
MSA 구조를 처음 공부하고 만들어보기 때문에 많이 부족할 수 있습니다.
NestJS 프로젝트 생성
npm i -g @nestjs/cli # NestJS CLI 설치
nest new nestjs-msa-practice # NestJS 프로젝트 생성

cd nestjs-msa-practice # 생성된 프로젝트 폴더로 이동
code . # VSCode로 열기
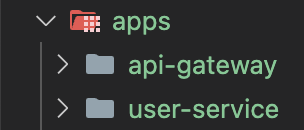
마이크로앱 생성
nest g app api-gateway
nest g app user-service
이런 식으로 필요한 마이크로앱들과 api-gateway를 만들어주면, 아래의 스크린샷처럼 apps 폴더가 구성된다.
(원래 있던 nestjs-msa-practice도 마이크로 앱으로 들어가는데 삭제했다.)
nest-cli.json도 자동으로 아래와 같이 변경된다.
(각 프로젝트별 sourceRoot 속성이 있기 때문에 최상위의 sourceRoot 속성은 삭제했음)
{
  "$schema": "https://json.schemastore.org/nest-cli",
  "collection": "@nestjs/schematics",
  "compilerOptions": {
    "deleteOutDir": true,
    "webpack": true
  },
  "monorepo": true,
  "root": "apps",
  "projects": {
    "api-gateway": {
      "type": "application",
      "root": "apps/api-gateway",
      "entryFile": "main",
      "sourceRoot": "apps/api-gateway/src",
      "compilerOptions": {
        "tsConfigPath": "apps/api-gateway/tsconfig.app.json"
      }
    },
    "user-service": {
      "type": "application",
      "root": "apps/user-service",
      "entryFile": "main",
      "sourceRoot": "apps/user-service/src",
      "compilerOptions": {
        "tsConfigPath": "apps/user-service/tsconfig.app.json"
      }
    }
  }
}
마이크로서비스 생성
먼저, 필요한 패키지를 설치한다.
npm i @nestjs/microservices그 다음은 user-service의 main.ts를 아래와 같이 작성해준다.
// user-service/src/main.ts
import { NestFactory } from '@nestjs/core';
import { MicroserviceOptions, Transport } from '@nestjs/microservices';
import { UserServiceModule } from './user-service.module';

async function bootstrap() {
  // Microservice 생성
  const app = await NestFactory.createMicroservice<MicroserviceOptions>(
    UserServiceModule,
    {
      transport: Transport.TCP, // Redis로 설정하여도 동일함. 상황에 맞게 사용하기
      options: { host: 'localhost', port: 3001 }, // host와 port는 상황에 맞게 설정
    },
  );

  await app.listen();
}
void bootstrap();
마이크로서비스의 api응답 구성하기
module은 수정하지 않고, controller와 service를 작성해서 api 응답을 처리하자.
controller에서는 보통의 NestJS 앱과는 다르게 MessagePattern을 사용한다.
메세지 패턴을 만들어두고 api-gateway에서 보내는 cmd 메세지와 일치하는 패턴(아래 코드의 cmd)의 메세지에 대해 처리하는 방식이다.
// user-service/src/user-service.controller.ts
import { Controller } from '@nestjs/common';
import { MessagePattern, Payload } from '@nestjs/microservices';
import { UserServiceService } from './user-service.service';

@Controller()
export class UserServiceController {
  constructor(private readonly userServiceService: UserServiceService) {}

  @MessagePattern({ cmd: 'get_user' })
  // api-gateway에서 받은 id를 payload로 보내줌
  getUser(@Payload() id: number) {
    return this.userServiceService.findById(id);
  }
}
service도 아래와 같이 수정해준다. (controller에서 findById를 호출한다)
// user-service/src/user-service.service.ts
import { Injectable } from '@nestjs/common';

@Injectable()
export class UserServiceService {
  private users = [
    { id: 1, name: 'John Doe' },
    { id: 2, name: 'Jane Doe' },
    { id: 3, name: 'John Smith' },
  ];

  findById(id: number) {
    return this.users.find((user) => user.id == id);
  }
}
api-gateway에 마이크로서비스 연결하기
main.ts는 보통 NestJS 앱과 동일하다
// api-gateway/src/main.ts
import { NestFactory } from '@nestjs/core';
import { ApiGatewayModule } from './api-gateway.module';

async function bootstrap() {
  const app = await NestFactory.create(ApiGatewayModule);
  await app.listen(3000); // 필요에 따라 포트 변경
}
void bootstrap();
이제, 아까 구성한 마이크로서비스를 api-gateway의 module에 등록해준다.
// api-gateway/src/api-gateway.modules.ts
import { Module } from '@nestjs/common';
import { ConfigModule } from '@nestjs/config';
import { ClientsModule, Transport } from '@nestjs/microservices';
import { ApiGatewayController } from './api-gateway.controller';
import { ApiGatewayService } from './api-gateway.service';

@Module({
  imports: [
    // .env의 환경변수를 사용하기 위한 설정 (@nestjs/common 설치 필요)
    ConfigModule.forRoot({
      isGlobal: true,
    }),
    // 마이크로서비스 등록
    ClientsModule.register([
      {
        name: 'USER_SERVICE',
        // 전송 방식 선택
        transport: Transport.TCP,
        // user-service/src/main.ts에서 생성한 microservice와 동일하게 설정
        options: { host: 'localhost', port: 3001 },
      },
    ]),
  ],
  controllers: [ApiGatewayController],
  providers: [ApiGatewayService],
})
export class ApiGatewayModule {}
controller에서는 실제 api 호출을 받을 경로와 방식(Get,Post)을 설정하고, apiGatewayService의 메소드를 호출한다.
// api-gateway/src/api-gateway.controller.ts
import { Controller, Get, Param } from '@nestjs/common';
import { ApiGatewayService } from './api-gateway.service';

@Controller()
export class ApiGatewayController {
  constructor(private readonly apiGatewayService: ApiGatewayService) {}

  @Get('/user/get/:id')
  getUser(@Param('id') id: string) {
    return this.apiGatewayService.getUser(id);
  }
}
servcie에서는 module에 등록한 USER_SERVICE client를 주입받아서 사용한다.
controller에서 호출하는 함수(getUser)에 반환할 값을 client에 (user-service에서 MessagePattern을 'get_user'로 설정한 부분으로) 메세지를 보내 받아온다.
이 때, send 메소드의 두번째 인수는 payload가 된다.
// api-gateway/src/api-gateway.service.ts
import { Inject, Injectable } from '@nestjs/common';
import { ClientProxy } from '@nestjs/microservices';
import { firstValueFrom } from 'rxjs';

@Injectable()
export class ApiGatewayService {
  constructor(@Inject('USER_SERVICE') private readonly userClient: ClientProxy) {}

  async getUser(id: string): Promise<any> {
    return await firstValueFrom(this.userClient.send({ cmd: 'get_user' }, id));
  }
}
이렇게 MSA 구조 완성!
확인하기
npm run start:dev user-service # 3001번 포트에서 user-service 앱 실행
npm run start:dev api-gateway # 3000번 포트에서 api-gateway 실행
위의 명령어를 통해 마이크로서비스와 api-gateway를 실행한다.
이제, 브라우저에서 아래의 주소로 접속하면 user-service에서 데이터를 가져오는 것을 확인할 수 있다.
http://localhost:3000/user/get/1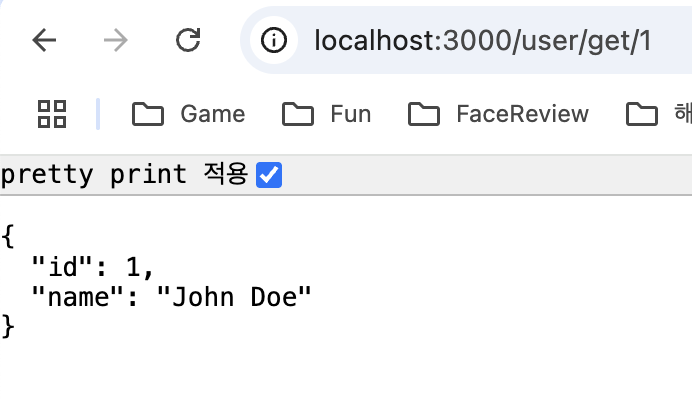
공부하면서 느낀점
이번 기회에 MSA 관련 자료를 정말 많이 찾아봤지만, 모두 다르게 구현하고, 또 구조에 대한 설명이 별로 없는 자료들이 많아서 너무 오래 걸렸다ㅠㅠ
NestJS 공식문서도 많이 참고했지만, 여러 방식으로 구현할 수 있어서 틀을 잡아두지 않은 것 같아서 더 헤맸던 것 같다...
그래도 잘 구성한 듯!
내가 만든 예제 파일을 많은 사람들이 공부하면서 참고하면 뿌듯할 것 같다ㅎㅎ