Notification
- push notification - 서버에서 보내는 알림
- local notification - 앱 자체에서 실행하는 알림
패키지 설치
- pubspec.yaml에
flutter_local_notifications: ^9.1.5추가 후 pub get
Android 셋팅
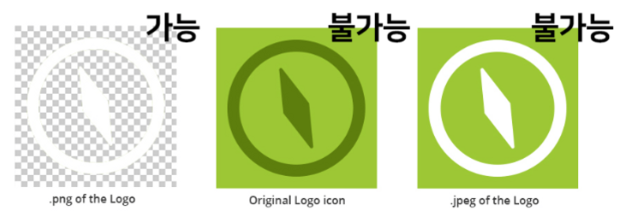
- android/app/src/main/res/drawable 폴더에 알림에 띄울 아이콘 용 넣기
- 흰색 아웃라인만 있는 .png만 허용
iOS 셋팅
- 프로젝트 내의 ios/Runner/AppDelegate.swift 파일에 코드 추가
- GeneratedPluginRegistrant.register(with: self) 이런 코드 윗줄에 복붙
if #available(iOS 10.0, *) {
      UNUserNotificationCenter.current().delegate = self as? UNUserNotificationCenterDelegate
}
알림 띄우려면 실행할 코드
- notifications.initialize() 이런 코드를 한 번 실행해야 알림 서비스가 잘 작동
- notification.dart 파일 만들어서 이런 코드 복붙
import 'package:flutter/material.dart';
import 'package:flutter_local_notifications/flutter_local_notifications.dart';

final notifications = FlutterLocalNotificationsPlugin();

//1. 앱로드시 실행할 기본설정
initNotification() async {

  //안드로이드용 아이콘파일 이름
  var androidSetting = AndroidInitializationSettings('app_icon');

  //ios에서 앱 로드시 유저에게 권한요청하려면
  var iosSetting = IOSInitializationSettings(
    requestAlertPermission: true,
    requestBadgePermission: true,
    requestSoundPermission: true,
  );

  var initializationSettings = InitializationSettings(
      android: androidSetting,
      iOS: iosSetting
  );
  await notifications.initialize(
    initializationSettings,
    //알림 누를때 함수실행하고 싶으면
    //onSelectNotification: 함수명추가
  );
}- local_notification 요즘버전은 IOSInitializationSettings() 부분을 DarwinInitializationSettings() 로 바꿔야 잘될 수 있음
⇒ main.dart 파일에 사용 → import 하기
- MyApp 위젯이 로드될 때 저 함수 안의 내용이 실행됨
import 'notification.dart';
void initState() {
super.initState();
initNotification(); //추가함
getData();
}알림 띄우는 코드
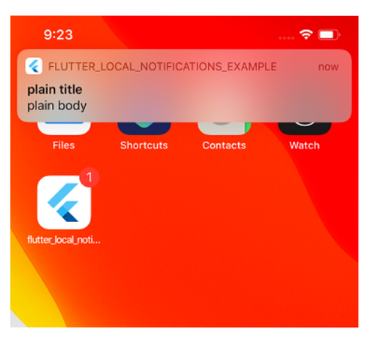
- notifications.show() 코드 쓰면 알림 듬
//2. 이 함수 원하는 곳에서 실행하면 알림 뜸
showNotification() async {

  var androidDetails = AndroidNotificationDetails(
    '유니크한 알림 채널 ID',
    '알림종류 설명',
    priority: Priority.high,
    importance: Importance.max,
    color: Color.fromARGB(255, 255, 0, 0),
  );

  var iosDetails = IOSNotificationDetails(
    presentAlert: true,
    presentBadge: true,
    presentSound: true,
  );

  // 알림 id, 제목, 내용 맘대로 채우기
  notifications.show(
      1,
      '제목1',
      '내용1',
      NotificationDetails(android: androidDetails, iOS: iosDetails)
    );
}
⇒ local_notification 요즘버전은 IOSNotificationDetails를 DarwinNotificationDetails로 바꿔야 잘될 수 있음
-
알림 ID는 알림 채널 ID 만드는 곳인데 비슷한 알림들을 모으는 그룹 같은 거라고 생각하면 되고 알아서 아무 글자나 넣으면 됨
-
알림 설명은 알림 채널 설명 적으면 됩니다. 안드로이드에서 알림 길게 누르면 나오는 문자임
-
color : 파라미터 수정하면 안드로이드에서 알림 아이콘 색상이 변경
-
priority, importance를 수정하면 안드로이드에서 알림 소리, 팝업 띄울지 말지를 결정 가능
-
iosDetails 부분에 presentSound : false로 바꿔주면 iOS 알림 보여줄 때 소리 켤지말지 선택 가능
-
실제 알림 제목, 내용은 notifications.show() 안에서 수정하면 됩니다. 안에 있는 숫자는 개별 알림마다 넣을 유니크한 번호임
전체 코드
import 'package:flutter/material.dart';
import 'package:flutter_local_notifications/flutter_local_notifications.dart';

final notifications = FlutterLocalNotificationsPlugin();

//1. 앱로드시 실행할 기본설정
initNotification(context) async {

  //안드로이드용 아이콘파일 이름
  var androidSetting = AndroidInitializationSettings('app_icon');

  //ios에서 앱 로드시 유저에게 권한요청하려면
  var iosSetting = IOSInitializationSettings(
    requestAlertPermission: true,
    requestBadgePermission: true,
    requestSoundPermission: true,
  );

  var initializationSettings = InitializationSettings(
      android: androidSetting,
      iOS: iosSetting
  );
  await notifications.initialize(
    initializationSettings,
    //알림 누를때 함수실행하고 싶으면
    onSelectNotification: (payload) {
      Navigator.push(
        context,
        MaterialPageRoute(
          builder: (context) => Text('새로운페이지'),
        ),
      );
    }
  );
}

//2. 이 함수 원하는 곳에서 실행하면 알림 뜸
showNotification() async {

  // 안드로이드
  var androidDetails = AndroidNotificationDetails(
    '유니크한 알림 채널 ID',
    '알림종류 설명',
    priority: Priority.high,   // 중요도
    importance: Importance.max,  // 중요도
    color: Color.fromARGB(255, 255, 0, 0),  // 알림 색상
  );

  // ios
  var iosDetails = IOSNotificationDetails(
    presentAlert: true,  // 알림 여부
    presentBadge: true,  // 뱃지 여부
    presentSound: true,  // 소리 여부
  );

  // 알림 id, 제목, 내용 맘대로 채우기
  notifications.show(
      1,
      '제목1',
      '내용1',
      NotificationDetails(android: androidDetails, iOS: iosDetails),
      payload: '부가정보'
  );
}
주기적인 알림
- notification.dart 상단에 추가
import 'package:timezone/data/latest_all.dart' as tz;
import 'package:timezone/timezone.dart' as tz;
특정 시간에 알림 띄우기
- notifications.zonedSchedule() 쓰면 알림 띄워주는데 입력한 시간에 알림 띄워주는 기능
- 타임존에 따른 현재 시간은 tz.TZDateTime.now(tz.local)
- uiLocalNotificationDateInterpretation: 은 iOS 10 미만 기기들 호환을 위한 기능
showNotification2() async {

  tz.initializeTimeZones();

  var androidDetails = const AndroidNotificationDetails(
    '유니크한 알림 ID',
    '알림종류 설명',
    priority: Priority.high,
    importance: Importance.max,
    color: Color.fromARGB(255, 255, 0, 0),
  );
  var iosDetails = const IOSNotificationDetails(
    presentAlert: true,
    presentBadge: true,
    presentSound: true,
  );

// 특정 시간 알림
  notifications.zonedSchedule(
      2,
      '제목2',
      '내용2',
      tz.TZDateTime.now(tz.local).add(Duration(seconds: 5)),
      NotificationDetails(android: androidDetails, iOS: iosDetails),
      androidAllowWhileIdle: true,
      uiLocalNotificationDateInterpretation:
      UILocalNotificationDateInterpretation.absoluteTime
  );
}
주기적 알림
- notifications.periodicallyShow
- RepeatInterval.daily 부분을 맘대로 바꾸면 됨 → weekly, hourly 이런 거 있음
- daily로 설정해놓으면 코드가 실행되는 시점으로부터 정확히 24시간 후 알림 뜸
notifications.periodicallyShow(
    3,
    '제목3',
    '내용3',
    RepeatInterval.daily,
    NotificationDetails(android: androidDetails, iOS: iosDetails),
    androidAllowWhileIdle: true
);
예정된 알림 취소하는 법
- 0은 알림 번호
- 0 자리에 알림 번호 적으면 해당 알림이 취소됨
await notifications.cancel(0);모든 예정된 알림 삭제
await notifications.cancelAll();매일 7시 알림
- matchDateTimeComponents: DateTimeComponents.time 있어야 함
- .time 대신 .dayOfWeekAndTime 이런 파라미터가 있으면 같은 요일, 시간 매주 알림을 띄워줌
- .time 대신 .dayOfMonthAndTime 이런 파라미터가 있으면 같은 날짜, 시간 매달 알림을 띄워줌
- .time 대신 .dateAndTime 이런 파라미터가 있으면 같은 날짜, 시간 매년 알림을 띄워줌
- 함수 생성
makeDate(hour, min, sec){ var now = tz.TZDateTime.now(tz.local); var when = tz.TZDateTime(tz.local, now.year, now.month, now.day, hour, min, sec); if (when.isBefore(now)) { return when.add(Duration(days: 1)); } else { return when; } } - zonedSchedule 안에 넣어서 사용하면 됨
notifications.zonedSchedule(
      2,
      '제목2',
      '내용2',
      makeDate(8,30,0),
      NotificationDetails(android: androidDetails, iOS: iosDetails),
      androidAllowWhileIdle: true,
      uiLocalNotificationDateInterpretation:
      UILocalNotificationDateInterpretation.absoluteTime,
      matchDateTimeComponents: DateTimeComponents.time
);
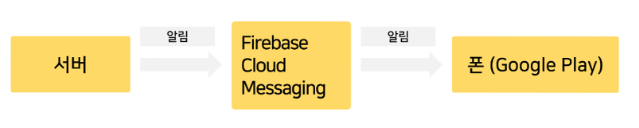
서버가 보내는 Push 알림
- Firebase Cloud Message 로 메시지를 보내서 전송해야 함
전체 코드
- notification.dart
import 'package:flutter/material.dart'; import 'package:flutter_local_notifications/flutter_local_notifications.dart'; import 'package:timezone/data/latest_all.dart' as tz; import 'package:timezone/timezone.dart' as tz; final notifications = FlutterLocalNotificationsPlugin(); //1. 앱로드시 실행할 기본설정 initNotification(context) async { //안드로이드용 아이콘파일 이름 var androidSetting = AndroidInitializationSettings('app_icon'); //ios에서 앱 로드시 유저에게 권한요청하려면 var iosSetting = IOSInitializationSettings( requestAlertPermission: true, requestBadgePermission: true, requestSoundPermission: true, ); var initializationSettings = InitializationSettings( android: androidSetting, iOS: iosSetting ); await notifications.initialize( initializationSettings, //알림 누를때 함수실행하고 싶으면 onSelectNotification: (payload) { Navigator.push( context, MaterialPageRoute( builder: (context) => Text('새로운페이지'), ), ); } ); } //2. 이 함수 원하는 곳에서 실행하면 알림 뜸 showNotification() async { // 안드로이드 var androidDetails = AndroidNotificationDetails( '유니크한 알림 채널 ID', '알림종류 설명', priority: Priority.high, // 중요도 importance: Importance.max, // 중요도 color: Color.fromARGB(255, 255, 0, 0), // 알림 색상 ); // ios var iosDetails = IOSNotificationDetails( presentAlert: true, // 알림 여부 presentBadge: true, // 뱃지 여부 presentSound: true, // 소리 여부 ); // 알림 id, 제목, 내용 맘대로 채우기 notifications.show( 1, '제목1', '내용1', NotificationDetails(android: androidDetails, iOS: iosDetails), payload: '부가정보' ); } // 시간 기능 추가된 알림 showNotification2() async { // 시간 관련 함수 사용 시 있어야 하는 코드 tz.initializeTimeZones(); var androidDetails = const AndroidNotificationDetails( '유니크한 알림 ID', '알림종류 설명', priority: Priority.high, importance: Importance.max, color: Color.fromARGB(255, 255, 0, 0), ); var iosDetails = const IOSNotificationDetails( presentAlert: true, presentBadge: true, presentSound: true, ); // 현재 시간 + ~ /* notifications.zonedSchedule( 2, '제목2', '내용2', tz.TZDateTime.now(tz.local).add(Duration(seconds: 3)), // 시간 NotificationDetails(android: androidDetails, iOS: iosDetails), androidAllowWhileIdle: true, uiLocalNotificationDateInterpretation: UILocalNotificationDateInterpretation.absoluteTime );*/ // 특정 시간 - 매일 8시 30분에 알림 notifications.zonedSchedule( 2, '제목2', '내용2', makeDate(8, 30, 0), // 현재 시간 NotificationDetails(android: androidDetails, iOS: iosDetails), androidAllowWhileIdle: true, uiLocalNotificationDateInterpretation: UILocalNotificationDateInterpretation.absoluteTime, matchDateTimeComponents: DateTimeComponents.time ); // 매주 notifications.periodicallyShow( 3, '제목3', '내용3', RepeatInterval.daily, NotificationDetails(android: androidDetails, iOS: iosDetails), androidAllowWhileIdle: true ); } makeDate(hour, min, sec){ var now = tz.TZDateTime.now(tz.local); var when = tz.TZDateTime(tz.local, now.year, now.month, now.day, hour, min, sec); if (when.isBefore(now)) { return when.add(Duration(days: 1)); } else { return when; } } - main.dart
import 'package:flutter/cupertino.dart';
import 'package:flutter/material.dart';
import './style.dart' as style;
import 'package:http/http.dart' as http;
import 'dart:convert';
import 'package:flutter/rendering.dart';
import 'package:image_picker/image_picker.dart';
import 'dart:io';
import 'package:shared_preferences/shared_preferences.dart';
import 'dart:convert';
import 'package:provider/provider.dart';
import 'notification.dart';
void main() {
runApp(
MultiProvider(
providers: [
ChangeNotifierProvider( create: (c) => Store1()),
ChangeNotifierProvider( create: (c) => Store2()),
],
    child: MaterialApp(
        theme: style.theme,
        home: MyApp()
    ),
  ));
}
class MyApp extends StatefulWidget {
const MyApp({Key? key}) : super(key: key);
@override
State createState() => _MyAppState();
}
class _MyAppState extends State {
var tab = 0; // 1. 현재 상태 저장
var list = [1, 2, 3];
var map = {'name':'john', 'age':20};
var data = [];
var userImage; // 유저가 삽입한 이미지 저장 공간
var userContent; // 유저가 입력한 글 저장 공간
saveData() async {
var storage = await SharedPreferences.getInstance();
var map = {'age' : 20};
storage.setString('map', jsonEncode(map));
var result = storage.getString('map') ?? '업는데요';
print(jsonDecode(result)['age']);
}
addMyData() {
var myData = {
'id': data.length,
'image': userImage,
'likes': 5,
'date': 'July 25',
'content': userContent,
'liked': false,
'user': 'John Kim'
};
setState(() {
data.insert(0, myData);
});
}
setUserContent(a) {
setState(() {
userContent = a;
});
}
addData(a) {
setState(() {
data.add(a);
});
}
getData() async {
var result = await http.get(Uri.parse('https://codingapple1.github.io/app/data.json'));
var result2 = jsonDecode(result.body);
setState(() {
  data = result2;
});
}
@override
void initState() {
super.initState();
initNotification(context);
saveData();
getData();
}
@override
Widget build(BuildContext context) {
return Scaffold(
floatingActionButton: FloatingActionButton(child: Text('+'), onPressed: () {
showNotification2();
},),
appBar: AppBar(
title: Text('Instagram'),
actions: [
IconButton(
icon: Icon(Icons.add_box_outlined),
onPressed: () async {
var picker = ImagePicker();
var image = await picker.pickImage(source: ImageSource.gallery);
if(image != null) {
setState(() {
userImage = File(image.path);
});
}
            Navigator.push(context,
                MaterialPageRoute(builder: (c) => Upload( userImage : userImage, setUserContent : setUserContent, addMyData : addMyData) )
            );
          },
          iconSize: 30,
        )
      ]),
  body: [Home(data : data, addData : addData), Text('샵페이지')][tab],  // 2. state에 따라 tab 보이는 상태 변경
  bottomNavigationBar: BottomNavigationBar(
    showSelectedLabels: false,
    showUnselectedLabels: false,
    onTap: (i){
      setState(() {
        tab = i;
      });
    },
    items: [
      BottomNavigationBarItem(icon: Icon(Icons.home_outlined), label: '홈'),
      BottomNavigationBarItem(icon: Icon(Icons.shopping_bag_outlined), label: '샵')
    ],
  ),
);
}
}
class Home extends StatefulWidget {
const Home({Key? key, this.data, this.addData}) : super(key: key);
final data, addData;
@override
State createState() => _HomeState();
}
class _HomeState extends State {
var scroll = ScrollController();
getMore() async {
var result = await http.get(Uri.parse('https://codingapple1.github.io/app/more1.json'));
var result2 = jsonDecode(result.body);
widget.addData(result2);}
@override
void initState() {
super.initState();
scroll.addListener(() { // 스크롤바 높이 측정 코드
if(scroll.position.pixels == scroll.position.maxScrollExtent) {
getMore();
}
});
}
@override
Widget build(BuildContext context) {
if (widget.data.isNotEmpty) {
  return ListView.builder(
      itemCount: widget.data.length,
      controller: scroll,
      itemBuilder: (c, i) {
        return Column(
          crossAxisAlignment: CrossAxisAlignment.start,
          children: [
            widget.data[i]['image'].runtimeType == String ? Image.network(widget.data[i]['image']) : Image.file(widget.data[i]['image']),
            Container(
              constraints: BoxConstraints(maxWidth: 600),
              padding: EdgeInsets.all(20),
              width: double.infinity,
              child: Column(
                children: [
                  GestureDetector(
                    child: Text(widget.data[i]['user']),
                    onTap: () {
                      Navigator.push(context,
                          PageRouteBuilder(pageBuilder: (c, a1, a2) => Profile(),
                              transitionsBuilder: (c, a1, a2, child) =>
                                  FadeTransition(opacity: a1, child: child)
                          )
                      );
                    },
                  ),
                  Text('좋아요 ${widget.data[i]['likes'].toString()}'),
                  Text(widget.data[i]['date']),
                  Text(widget.data[i]['content'])
                ],
              ),
            )
          ],
        );
      }
  );
} else {
  return Text('로딩중임');
}
}
}
class Upload extends StatelessWidget {
const Upload({Key? key, this.userImage, this.setUserContent, this.addMyData}) : super(key: key);
final userImage, setUserContent, addMyData;
@override
Widget build(BuildContext context) {
return Scaffold(
appBar: AppBar(actions: [
IconButton(onPressed: () {
addMyData();
}, icon: Icon(Icons.send))
],),
body: Column(
crossAxisAlignment: CrossAxisAlignment.start,
children: [
IconButton(
onPressed: (){
Navigator.pop(context);
},
icon: Icon(Icons.close)
),
Image.file(userImage),
Text('이미지업로드화면'),
TextField(onChanged: (text) { // text는 유저가 입력한 글
setUserContent(text); // TextField()에 입력값 변할 때마다 onChanged 안의 함수가 실행됨
},),
],
)
);
}
}
class Store2 extends ChangeNotifier {
var name = 'john kim';
changeName() {
name = 'john park';
notifyListeners(); // 재렌더링
}
}
class Store1 extends ChangeNotifier { // state 보관함
var follower = 0;
var friend = false;
var profileImage = [];
getData() async {
var result = await http.get(Uri.parse('https://codingapple1.github.io/app/profile.json'));
var result2 = jsonDecode(result.body);
profileImage = result2;
notifyListeners();
}
addFollower() {
if(friend == false) {
friend = true;
follower++;
} else {
friend = false;
follower--;
}
notifyListeners();
}
}
class Profile extends StatelessWidget {
const Profile({Key? key}) : super(key: key);
@override
Widget build(BuildContext context) {
return Scaffold(
appBar: AppBar(title: Text(context.watch().name),),
body: CustomScrollView(
slivers: [
SliverToBoxAdapter(
child: ProfileHeader(),
),
SliverGrid(
delegate: SliverChildBuilderDelegate(
(c, i) => Image.network(context.watch().profileImage[i]),
childCount: context.watch().profileImage.length,
),
gridDelegate: SliverGridDelegateWithFixedCrossAxisCount(crossAxisCount: 2))
],
)
);
}
}
class ProfileHeader extends StatelessWidget {
const ProfileHeader({Key? key}) : super(key: key);
@override
Widget build(BuildContext context) {
return Row(
mainAxisAlignment: MainAxisAlignment.spaceAround,
children: [
CircleAvatar(radius: 30, backgroundColor: Colors.grey,),
Text('팔로우 ${context.watch().follower}명'),
ElevatedButton(onPressed: () {
context.read().addFollower();
}, child: Text('팔로우')),
ElevatedButton(onPressed: () {
context.read().getData();
}, child: Text('사진 가져오기')),
]
);
}
}
