💡 이전 시리즈에서는
DiffableDataSource의 등장 배경과 개념에 대해 살펴보았습니다. 이번 포스팅에서는 게시판 앱을 만들어보면서UIDiffableDataSource를 직접 사용해보겠습니다.
게시판 앱
이번에는 DiffableDataSource를 이용해 간단한 게시글 목록을 확인하는 앱을 만들어보겠습니다.
요구사항
- iOS 최소 버전
DiffableDataSource의 최소 지원 버전인 iOS13 부터 지원할 수 있어야합니다.
- 기능
- 게시판 리스트를 순차적으로 조회하고 보여줄 수 있어야 합니다.
- 공지 게시글은 버튼을 눌러 숨길 수 있어야 합니다.
- 스와이프를 통해 게시글을 삭제할 수 있어야 합니다
- 게시글 조회 방법
- (실제 API를 사용할 수 없는 관계로, 함수를 이용해 데이터를 리턴 받는 것으로 대체하겠습니다.)
- 전체 게시글을 조회하는 API가 있다고 가정합니다.
- 공지 게시글을 조회하는 API가 있다고 가정합니다.
- (실제 API를 사용할 수 없는 관계로, 함수를 이용해 데이터를 리턴 받는 것으로 대체하겠습니다.)
전체 게시글 TableView에 표현하기
DataSource를 표현할 모델 만들기
💡 이전 포스팅에서 언급했듯이, Data와 Section은 Hashable 해야 합니다.
Section은 공지를 표현하는 Section과 전체 게시글을 표현하는 Section 두 가지로 분리됩니다.
게시글의 경우 Id, 제목, 소제목, 내용을 API에서 제공한다고 가정하면, 다음과 같은 모델을 작성할 수 있습니다.
enum Section: Hashable  {
	case notice, normal
}

struct Post: Hashable {
  let id: String
  let title: String
  let subTitle: String
  let content: String
}
Swift에서는 모든 요소들이 기본 자료형으로 구성되어 있다면 Hashable 프로토콜을 채택하기만 해도 자동으로 Hashble을 만족합니다. 그러나 여기서 문제가 발생합니다.
어떤 문제가 발생하는지 Post를 표현하는 게시글을 살펴보겠습니다.
유저가 게시글 A를 포스팅했습니다. 이후 A 게시글에서 오타를 발견해서 수정했습니다. 이때 수정 전 게시글과 수정 후 게시글이 다른 게시글일까요? 아니죠! 게시글이 다르다고 판단하는 요소는 id 하나 뿐입니다.
그렇기 때문에 id만 Hashable하도록 == 함수를 재정의해줘야합니다.
struct Post: Hashable {
    let id: String
    let title: String
    let subTitle: String
    let content: String

    static func == (lhs: Post, rhs: Post) {
        lhs.id == rhs.id
    }
}
다음 코드를 보며 조금 더 쉽게 이해해봅시다.
struct Post: Hashable {
    let id: String
    let title: String
    let subTitle: String
		let content: String
}

// 유저가 생성한 글
let post = Post(id: "1", title: "2월 13일", content: "오늘에일기")

// 오타를 발견해서 내용을 수정한 글
let updatedPost = Post(id: "1", title: "2월 13일", content: "오늘의 일기")

// post와 updqtedPost는 다르다고 출력됨.
post == updatedPost // false
import UIKit
struct Post: Hashable {
let id: String
let title: String
let subTitle: String
let content: String
// hashable은 id로만 결정할거야.
**static func == (lhs: Post, rhs: Post) {
lhs.id == rhs.id
}**
}
// 유저가 생성한 글
let post = Post(id: "1", title: "2월 13일", content: "오늘에일기")
// 오타를 발견해서 내용을 수정한 글
let updatedPost = Post(id: "1", title: "2월 13일", content: "오늘의 일기")
post == updatedPost // trueDataSource 적용하기
이제 ViewController에서 DiffableDataSource 를 선언하여 사용해 보겠습니다.
final class ViewController: UIViewController {
		// datasource 원형 선언
    private var dataSource: UITableViewDiffableDataSource<Section, Post>!

		@IBOutlet private weak var tableView: UITableView!

    override func viewDidLoad() {
        super.viewDidLoad()

        setupDataSource()
    }

    private func setupDataSource() {
        dataSource = UITableViewDiffableDataSource(tableView: tableView) { tableView, indexPath, itemIdentifier in
            guard let cell = tableView.dequeueReusableCell(withIdentifier: PostTableViewCell.id, for: indexPath) as? PostTableViewCell else { fatalError("not founc cell class") }
            cell.configure(with: itemIdentifier)

            return cell
        }
    }
}
dataSource는 non-optional 로 선언하였습니다. 따라서 만약 dataSource가 초기화되기 전에 접근하면 앱이 종료됩니다. 따라서 viewDidLoad에서 가장 먼저 dataSource를 초기화해야 합니다.
다음으로, 이전 포스팅에서 언급했던 cellProvider를 사용하여 cell을 초기화해 줍니다.
참고로, cell의 configure 함수는 다음과 같이 작성되었습니다.
func configure(with post: Post) {
    titleLabel.text = post.title
    subTitleLabel.text = post.subTitle
}
cell Provider의 클로저는 tableView, indexPath, itemIdentifier와 같이 정의되어 있습니다. 이는 '어떤 tableView의 indexPath번째 데이터에는 itemIdentifier라는 데이터가 저장되어 있다'는 의미입니다.
이전에 사용했던 dataSource처럼 cell을 초기화해 주는 작업을 수행하면 됩니다.
DataSource에 데이터 삽입하기
💡
Snapshot을 이용해서 dataSource에 데이터를 넣고, UI를 업데이트해보겠습니다.
-
데이터 호출 (API 사용 x)
// 참고: - Post.swift / Post객체의 이니셜라이저
init(id: String) {
    self.id = id
    title = "\(id)번째 게시글 제목"
    subTitle = "\(id)번째 소제목"
    content = "\(id)번째 글 내용"
}
// ViewController, 비동기 x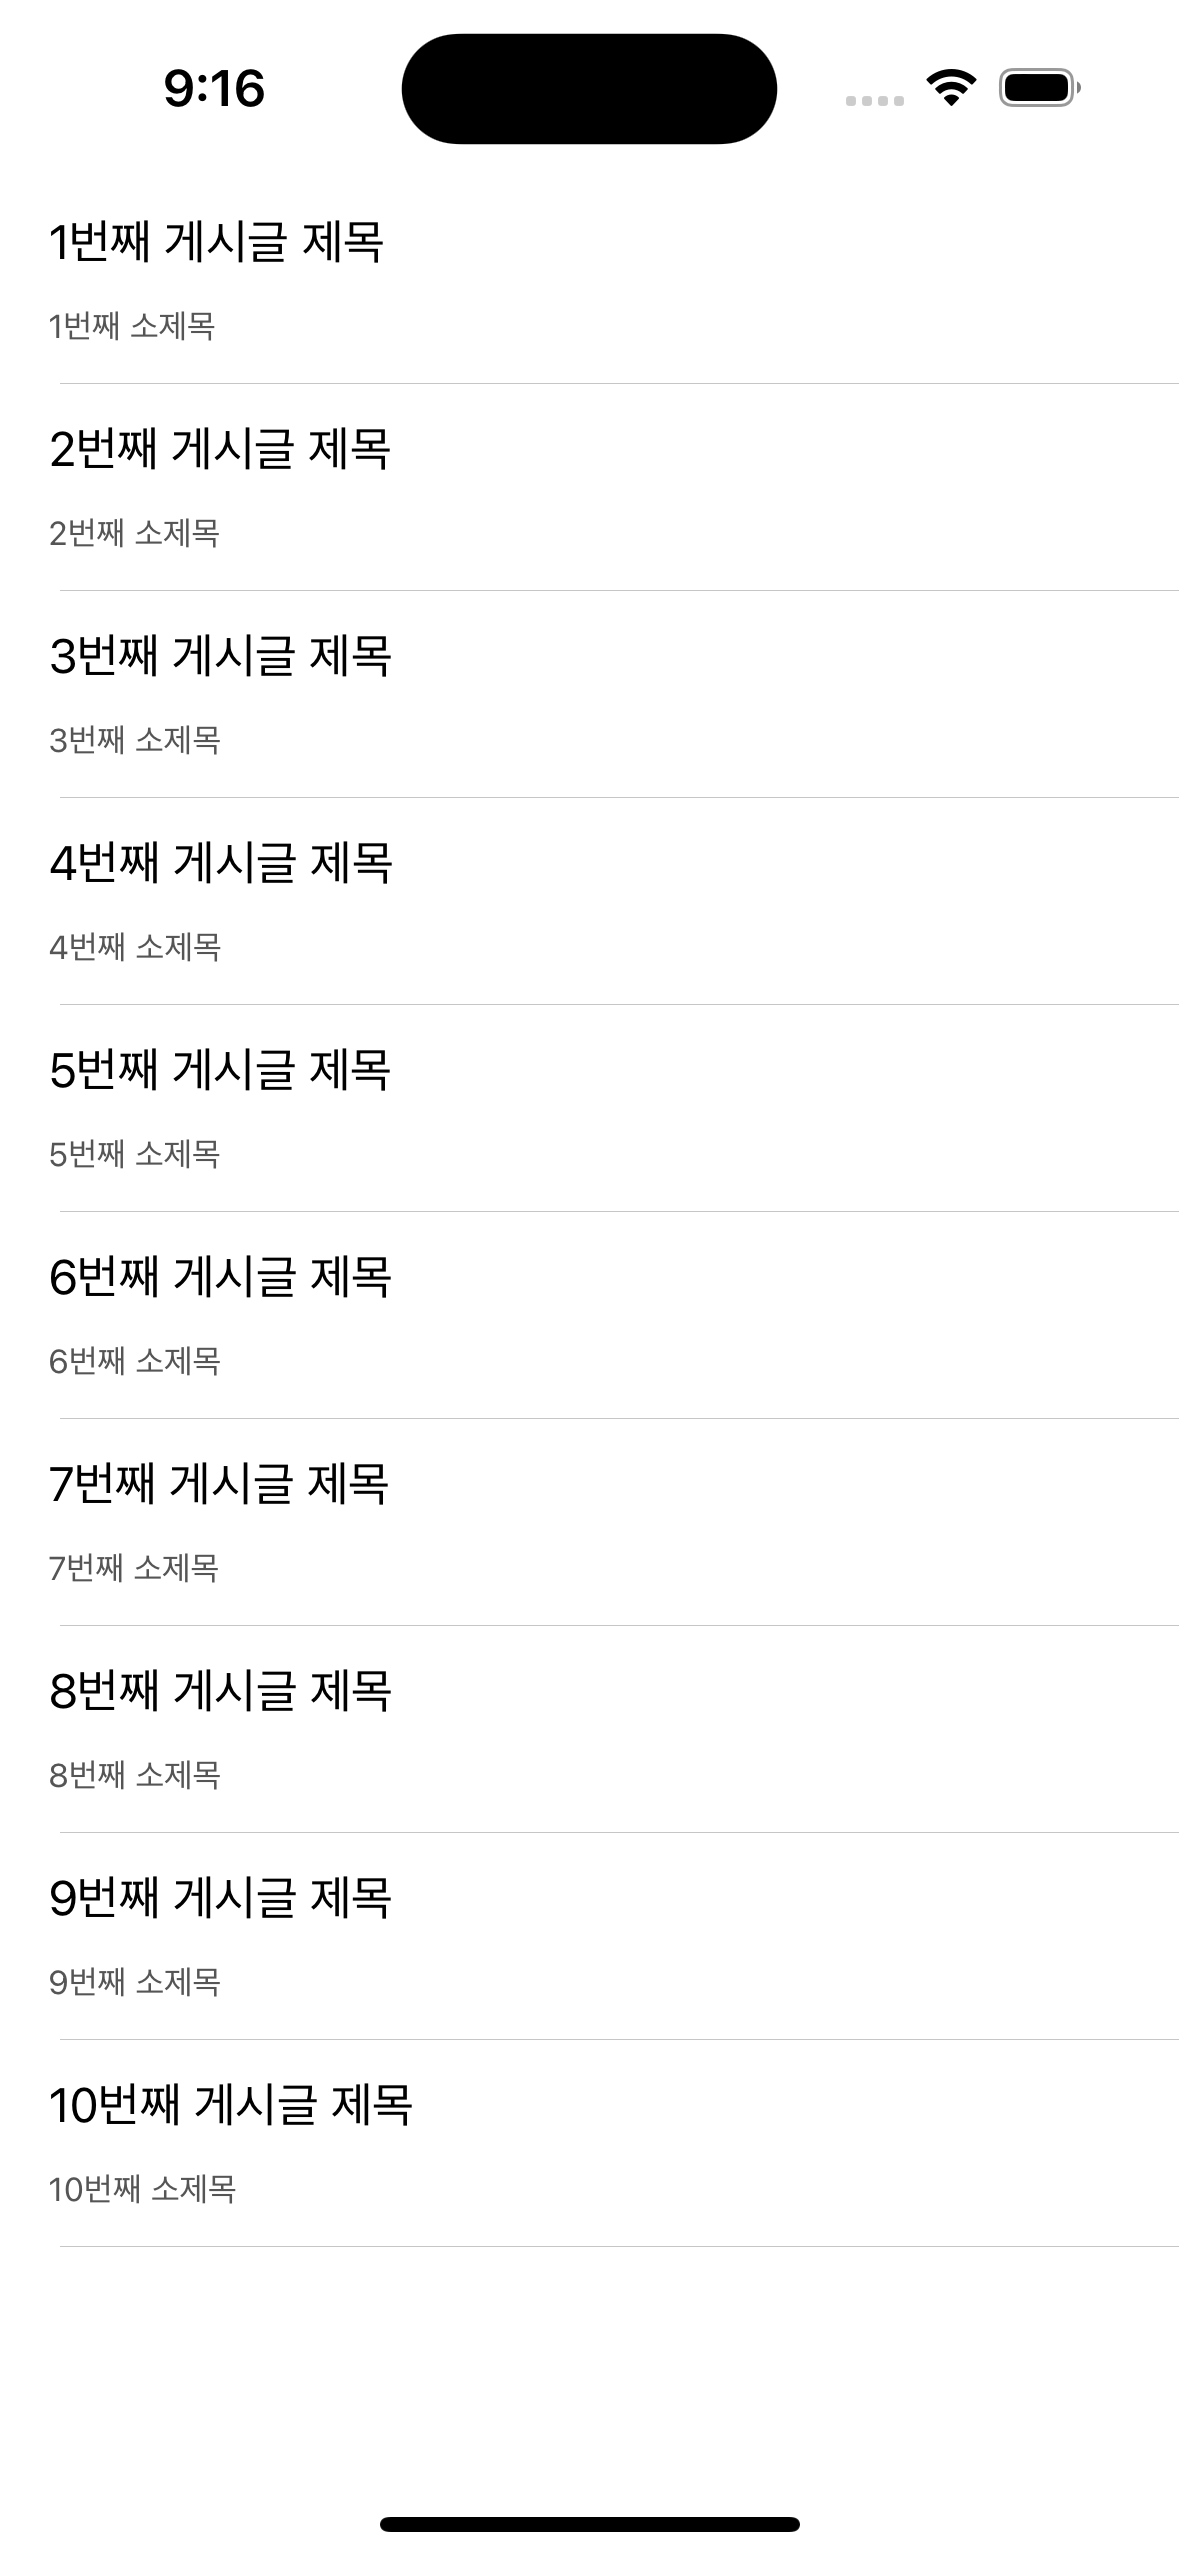 private func getPosts() -> [Post] { (1...10).map { Post(id: String($0))} }위와 같이 Post 객체의 이니셜라이저를 통해 게시글의 id를 입력받아 제목, 소제목, 내용을 생성하고, 이를 이용하여 10개의 Post 객체를 배열로 반환하는
getPosts()함수를 작성하였습니다. 이 함수를 통해 데이터를 호출하고 이를 DataSource에 삽입할 수 있습니다. -
Snapshot을 통한 section 등록
var snapshot = dataSource.snapshot()
snapshot.appendSections([.notice, normal])
dataSource.applySnapshot(snapshot)
이제 우리는 두 개의 섹션을 가진 스냅샷을 만들었습니다. 이를 dataSource에 적용하여 섹션을 등록하였습니다.
-
Snapshot을 통한 item 업데이트
let posts = getPosts()
var snapshot = dataSource.snapshot()
snapshot.appendItems(posts, toSection: .normal)
dataSource.applySnapshot(snapshot)
마지막으로, 게시글을 가져와서 스냅샷에 아이템을 추가하였습니다. 그리고 이를 dataSource에 적용하여 아이템을 업데이트하였습니다. 이제 우리의 게시글이 테이블 뷰에 표시되어야 합니다.
결과

리팩토링
DataSource 선언 방법 수정하기
현재 dataSource는 강제 언래핑을 이용해서 선언되어 있습니다.
viewDidLoad에서 초기화하고 있지만, lazy 키워드를 이용해서 처음 접근했을 때 초기화하도록 수정해보겠습니다.
private lazy var dataSource = getDataSource()
private func getDataSource() -> UITableViewDiffableDataSource<Section, Post> {
    UITableViewDiffableDataSource(tableView: tableView) { tableView, indexPath, itemIdentifier in
        guard let cell = tableView.dequeueReusableCell(withIdentifier: PostTableViewCell.id, for: indexPath) as? PostTableViewCell else { fatalError("not founc cell class") }
        cell.configure(with: itemIdentifier)

        return cell
    }
}
이렇게 수정하면, 처음 dataSource에 접근했을 때 초기화되므로 보다 안전하게 코드를 작성할 수 있습니다.
Section 리팩토링
우선, Section은 특정 ViewController에서만 사용합니다. 이는 네트워킹을 할 때 Section이 필요하지 않기 때문입니다. 따라서 특정 ViewController에서만 접근할 수 있도록 ViewController 내부에 선언하겠습니다.
또한, Snapshot에 데이터를 넣을 때, 해당 Snapshot에 내가 넣고자하는 Section이 없다면, 런타임 에러가 발생하며 앱이 종료됩니다. 심지어 이미 존재하는 Section인데 같은 Section을 넣어도 앱이 종료됩니다.
그래서! 데이터를 넣기 전에 해당 Section이 있는지 확인하고 넣는 것이 좋습니다.
만약 중간에 Section을 삭제하지 않는 프로젝트라면 다음과 같이 활용할 수 있습니다.
// Section에 CaseIterator 프로토콜 채택
enum Section: Hashable, CaseIterable {
    case notice, normal
}

var snapshot = dataSource.snapshot()
if snapshot.sectionIdentifiable.isEmpty() {
	snapshot.appendSections(Section.allCases())
}
// 데이터 삽입
dataSource.apply(snapshot)
그리고 중간에 Section을 삭제하거나 좀 더 안전하게 코드를 작성하고자 한다면 다음과 같이 작성할 수 있습니다. (저는 보통 이 방식을 사용합니다.)
Section의 순서가 중요하기 때문에, Section이 완전히 비어있는 경우에는 차례대로 Section을 추가합니다.
private func applySnapshot(items: [Posts], section: Section) {
	var snapshot = dataSource.snapshot()
	if snapshot.sectionIdentifiers.isEmpty {
      snapshot.appendSections(Section.allCases)
  }

	if !snapshot.sectionIdentifiable.contains(section) {
		snapshot.appendSection([section])
	}
	snapshot.appendItems(items, toSection: section)
	dataSource.apply(snapshot)
}
이런 식으로 런타임 에러가 발생하지 않도록 주의하며 코드를 작성하면 좋습니다.
전체 코드
import UIKit

final class ViewController: UIViewController {
    private lazy var dataSource = getDataSource()

    @IBOutlet private weak var tableView: UITableView!

    override func viewDidLoad() {
        super.viewDidLoad()

        applySnapshot(with: getPosts())
    }

    private func getDataSource() -> UITableViewDiffableDataSource<Section, Post> {
        UITableViewDiffableDataSource(tableView: tableView) { tableView, indexPath, itemIdentifier in
            guard let cell = tableView.dequeueReusableCell(withIdentifier: PostTableViewCell.id, for: indexPath) as? PostTableViewCell else { fatalError("not founc cell class") }
            cell.configure(with: itemIdentifier)

            return cell
        }
    }

    private func applySnapshot(with items: [Post], to section: Section) {
        var snapshot = dataSource.snapshot()

        if snapshot.sectionIdentifiers.isEmpty {
            snapshot.appendSections(Section.allCases)
        }

        if !snapshot.sectionIdentifiers.contains(section) {
            snapshot.appendSections([section])
        }

        snapshot.appendItems(items, toSection: section)
        dataSource.apply(snapshot)
    }

    private func getPosts() -> [Post] {
        (1...10).map { Post(id: String($0))}
    }

    enum Section: Hashable, CaseIterable {
        case notice, normal
    }
}공식 예제
Implementing Modern Collection Views | Apple Developer Documentation