22.06.03
기본 웹 설계 MVC2모델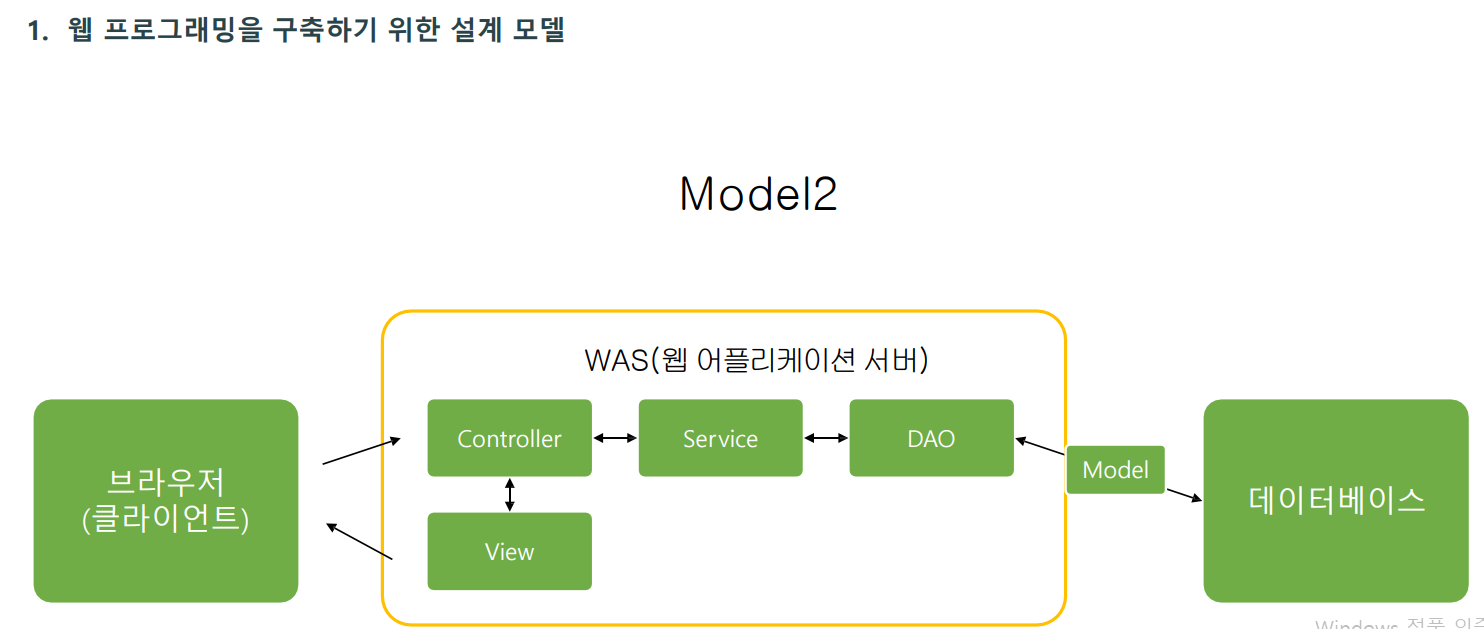
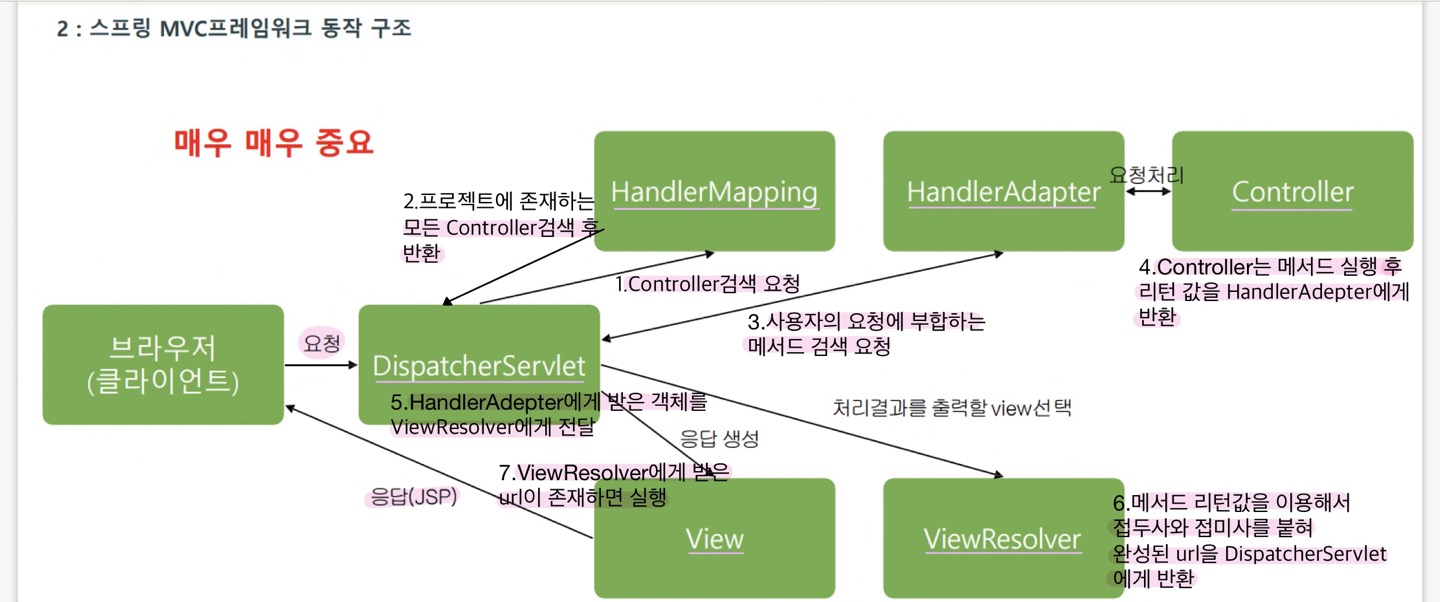
Spring MVC프레임워크 동작 구조(중요)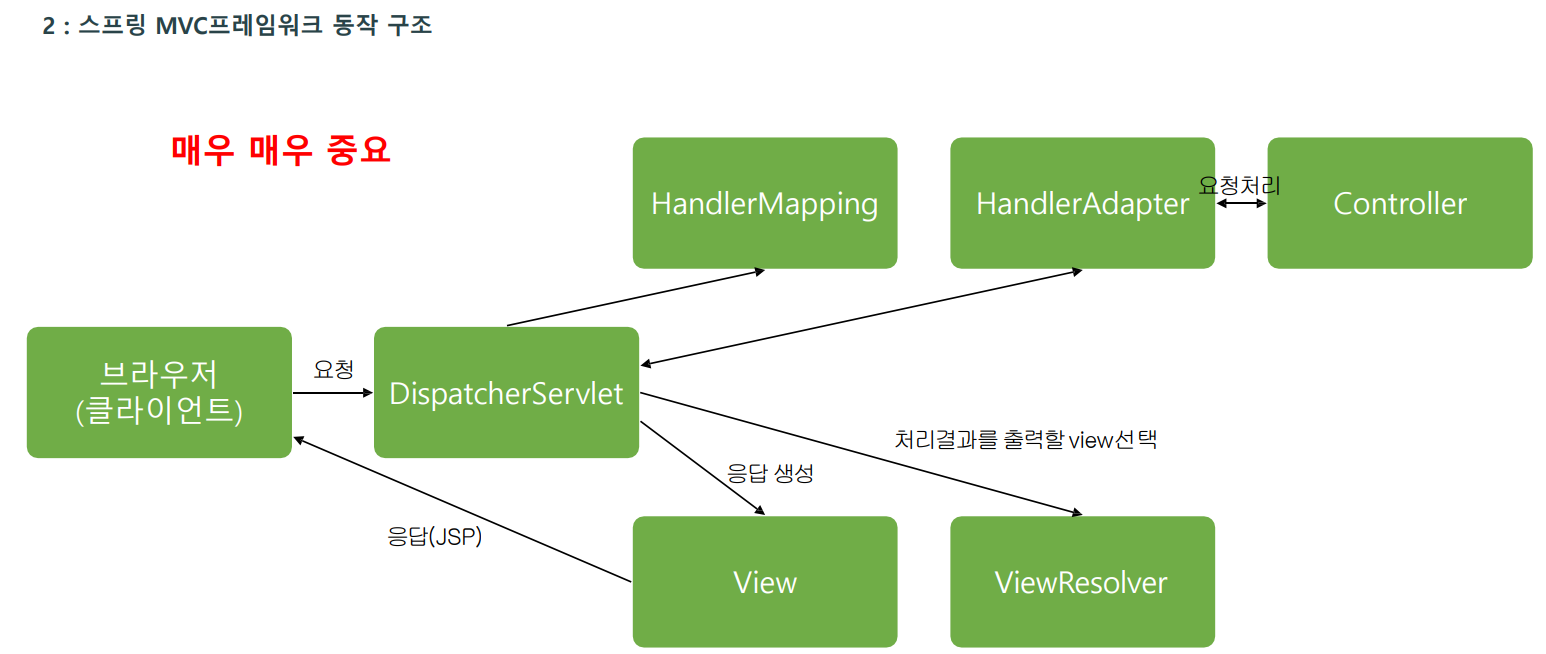
사용자의 모든 요청을 DispatcherServlet이 받은 후 HandlerMapping 객체에 해당요청을 처리 할 수있는 Controller 객체 검색을 요청한다.
그러면 HandlerMapping 객체는 프로젝트에 존재하는 모든 Controller 객체를검색한다.
HandlerMapping 객체가 Controller 객체를 검색해서 DispatcherServlet 객체에 알려주면 DispatcherServlet 객체는 다시 HandlerAdapter 객체에 사용자의 요청에 부합하는 메소드 검색을 요청한다.
그러면 HandlerAdapter 객체는 사용자의 요청에 부합하는 메소드를 찾아서 해당 Controller 객체의 메소드를 실행한다.
Controller 객체의 메소드가 실행된 후 Controller 객체는 HandlerAdapter 객체에(리턴값:파일,폴더이름) ModelAndView 객체를 반환하는데 ModelAndView 객체에는 사용자 응답에 필요한 데이터정보와 뷰정보(JSP파일)가 담겨있다.
ViewResolver는 리턴값을 이용해서 접두사와 접미사를 붙혀 완성된 url을 DispatcherServlet에게 전달.
다음으로 HandlerAdapter 객체는 ModelAndView 객체를 다시DispatcherServlet 객체에 반환한다.
Spring 기본 설정 살펴보기
web.xml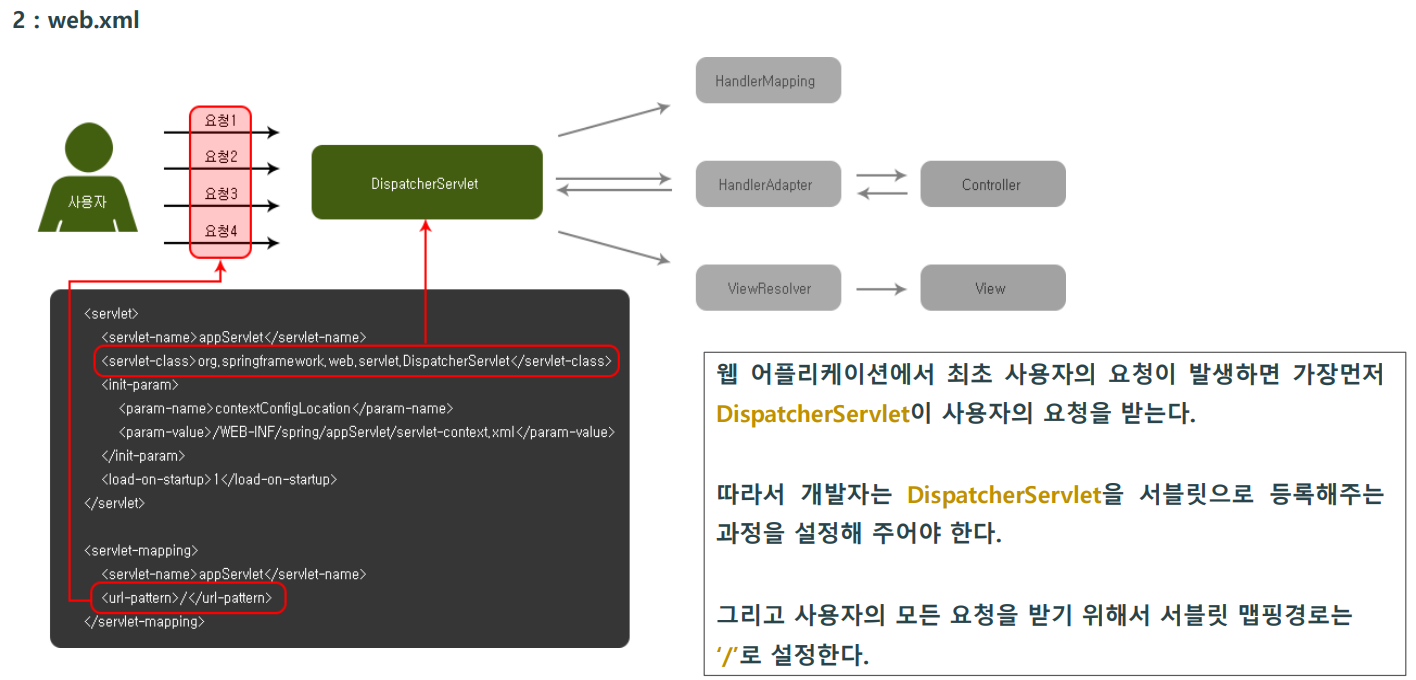
<?xml version="1.0" encoding="UTF-8"?>
<web-app version="2.5" xmlns="http://java.sun.com/xml/ns/javaee"
	xmlns:xsi="http://www.w3.org/2001/XMLSchema-instance"
	xsi:schemaLocation="http://java.sun.com/xml/ns/javaee https://java.sun.com/xml/ns/javaee/web-app_2_5.xsd">

	<!-- MVC와 관련된 스프링 설정 파일의 위치를 저장하는 태그 -->
	<context-param>
		<param-name>contextConfigLocation</param-name>
		<param-value>/WEB-INF/spring/root-context.xml</param-value>
	</context-param>

	<!-- 스프링 프로젝트가 가동을 시작하면서, listnener가 작동하고,
	위에 선언된 root-context.xml로 모든 서블릿에서 공유하도록 스프링 설정 파일로 초기 선언. -->
	<listener>
		<listener-class>org.springframework.web.context.ContextLoaderListener</listener-class>
	</listener>

	<!-- DispatcherServlet을 appServlet으로 선언하고,
	초기 파라미터로 스프링 설정파일을 위치를 선언.
	우선순위도 지정해서 가장 먼저 생성될 수 있도록 설정. -->
	<servlet>
		<servlet-name>appServlet</servlet-name>
		<servlet-class>org.springframework.web.servlet.DispatcherServlet</servlet-class>
		<init-param><!-- 초기파라미터 -->
			<param-name>contextConfigLocation</param-name>
			<param-value>/WEB-INF/spring/appServlet/servlet-context.xml</param-value>
		</init-param>
		<load-on-startup>1</load-on-startup><!--우선순위(가장 첫번째로 로딩되어야하는 객체를 뜻함)-->
	</servlet>

	<!-- 위에 선언된 appServlet을 모든 경로에 대해 맵핑 처리 -->
	<servlet-mapping>
		<servlet-name>appServlet</servlet-name>
		<url-pattern>/</url-pattern><!--'/'모든 요청을 다 받겠다는 뜻-->
	</servlet-mapping>
</web-app>- 앞에서 DispatcherServlet를 서블릿으로 등록하는 과정을 살펴봤습니다
- param-name 은 contextConfigLocation이 등록되어 있는데 이는 스프링 설정파일을 다른이름으로 여러 개 생성 하도록 해줍니다.
- param-value 는 servlet-context.xml로 지정하고 있는데 이때 지정된 servlet-context.xml파일이 스프링 설정의 역할을 하는 파일입니다.
-만약 스프링 설정파일을 여러 개 생성하고 싶다면 <param-value>에 파일경로를 여러 개 적어주면 됩니다.
-그 다음 xml파일로 직정 생성해 주면 됩니다.
root-context.xml
JDBC 관련 빈 등록, 설정 등을 관리하는 파일.
JDBC뿐만 아니라 다양한 라이브러리를 사용할때,
필요한 빈 등록이나 설정 등을 담당하는 파일입니다.
지금은 초반부이기 때문에 여기를 당장 쓸 일은 없다.
<?xml version="1.0" encoding="UTF-8"?>
<beans xmlns="http://www.springframework.org/schema/beans"
	xmlns:xsi="http://www.w3.org/2001/XMLSchema-instance"
	xsi:schemaLocation="http://www.springframework.org/schema/beans https://www.springframework.org/schema/beans/spring-beans.xsd">
</beans>
selvelt-context.xml
스프링 설정 파일은 클래스로부터 객체(빈:bean)를 생성하고 조립하는 역할을 한다고 학습했습니다.
servlet-context.xml에서도 마찬가지로 프로젝트에 필요한 객체(빈:bean) 를 생성하고 조립합니다.
스프링 컨테이너 안에는 HandlerMapping,HandlerAdapter가 생성되어야 한다.
- <annotation-driven />의의미
: 이 태그는 HandlerMapping, HandlerAdapter를 객체로 생성합니다.
스프링어노테이션을 사용할 수 있게합니다.
반드시 선언되어야 합니다.
추후 자동생성 어노테이션을 학습합니다. - <resources mapping="/resources/**" location="/resources/" /> 의 의미
:정적 자원 맵핑
-Css, script 파일들을 사용하기 위한 경로 설정입니다.
-resources폴더에 만들어지는 파일들은 해당 경로로
바로 맵핑되어 보여집니다.
# 뷰 리졸버 설정
뷰 리졸버
-컨트롤러에서 받은 View정보에 /WEB-INF/views/이름.jsp
이름만으로 맵핑하게 해줍니다. - <context:component-scan base-package="com.myweb.xxxx" /> 의 의미
: 스프링 컨테이너에게 자바패키지를 자동으로 스캔해서 아노테이션 되어있으면 자동으로 객체(bean) 생성.
여러개 추가도 가능하다.
<?xml version="1.0" encoding="UTF-8"?>
<beans:beans xmlns="http://www.springframework.org/schema/mvc"
	xmlns:xsi="http://www.w3.org/2001/XMLSchema-instance"
	xmlns:beans="http://www.springframework.org/schema/beans"
	xmlns:context="http://www.springframework.org/schema/context"
	xsi:schemaLocation="http://www.springframework.org/schema/mvc https://www.springframework.org/schema/mvc/spring-mvc.xsd
		http://www.springframework.org/schema/beans https://www.springframework.org/schema/beans/spring-beans.xsd
		http://www.springframework.org/schema/context https://www.springframework.org/schema/context/spring-context.xsd">

	<!-- DispatcherServlet 관련 설정. -->

	<!-- 핸들러 어댑터, 핸들러 매핑 객체가 개발자가 작성한 컨트롤러 등을 찾을 수 있게 설정하는 태그. -->
	<annotation-driven />

	<!-- 정적 자원(html, css, js, img...등)을 절대 경로로 쉽게 맵핑해 주는 태그.
		mapping에 작성된 경로: 외부로 노출되는 경로,
		location: 실제 파일의 경로 -->
	<resources mapping="/resources/**" location="/resources/" />

	<!-- 뷰 리졸버(ViewResolver) 빈 등록 설정. -->
	<!--
		- 컨트롤러가 리턴한 view 문자열을 해석하여 경로를 만들어서
		 파일을 찾아 응답하는 ViewResolver의 빈 등록 코드.
		- prefix(접두어), suffix(접미어) 필드의 setter 주입을 통해
		 컨트롤러에서 리턴된 문자열을 조립해 줍니다.
	 -->
	<beans:bean class="org.springframework.web.servlet.view.InternalResourceViewResolver">
		<beans:property name="prefix" value="/WEB-INF/views/" />
		<beans:property name="suffix" value=".jsp" />
	</beans:bean>

	<!-- - 아노테이션을 사용하여 자동으로 빈 등록을 하게 해 주는 설정 태그.
		 - com.spring.basic으로 경로가 시작되는 모든 클래스에서,
		  아노테이션으로 지정되어 있는 클래스를 찾아 자동으로 빈 등록을 실행합니다. -->
	<context:component-scan base-package="com.spring.basic" />
</beans:beans>
HomeController class
Controller class에서는 class위에 @Controller 설정
메서드에는 @RequestMapping 설정
@Controller
자동으로 스프링 컨테이너에 해당 클래스의 빈을 등록하는 아노테이션.
빈을 등록을 해 놔야 HandlerMapping이 이 클래스의 객체를 검색할 수 있을 것이다.
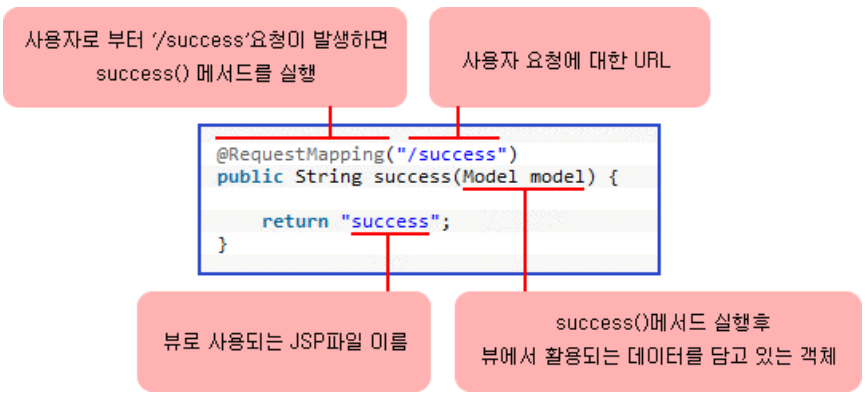
@RequestMapping()
지정한 url("/")로 요청이 들어왔을때 요청에 맞는 메서드를 찾음
<script>
package com.spring.basic;
@Controller
//@Controller - 자동으로 Bean 객체로 등록됨.
public class HomeController {

	private static final Logger logger = LoggerFactory.getLogger(HomeController.class);

	//메서드에 @RequestMapping해놔야함. 지정한 url("/")로 요청이 들어왔을때 요청에 맞는 메서드를 찾음.
	@RequestMapping(value = "/", method = RequestMethod.GET)
	public String home(Locale locale, Model model) {
		logger.info("Welcome home! The client locale is {}.", locale);

		Date date = new Date();
		DateFormat dateFormat = DateFormat.getDateTimeInstance(DateFormat.LONG, DateFormat.LONG, locale);

		String formattedDate = dateFormat.format(date);

		model.addAttribute("serverTime", formattedDate );

		return "home"; //응답하고자 하는 파일 이름 (home.jsp)
	}
}
</script>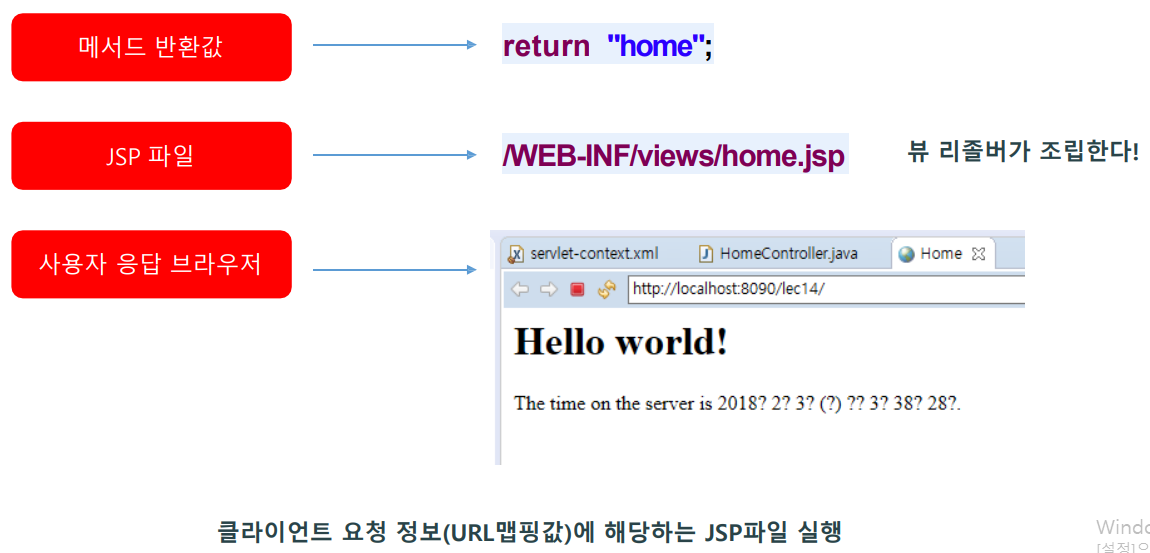
home.jsp
Controller가 "home"을 리턴하면 뷰 리졸버가 url을 만들어서 브라우저에
home.jsp를 띄운다.
<%@ taglib uri="http://java.sun.com/jsp/jstl/core" prefix="c" %>
<%@ page session="false" %>
<html>
<head>
	<title>Home</title>
</head>
<body>
<h1>
	Hello world!
</h1>

<P>  The time on the server is ${serverTime}. </P>
</body>
</html>
Spring MVC웹서비스 구조 연습
Requestcontroller.java
<script>
package com.spring.basic.controller;

@Controller
public class RequestController {

	public RequestController() {
		System.out.println("RequestController 생성!");
	}

	@RequestMapping("/request/test")
	public String testCall() {
		System.out.println("/request/test 요청이 들어옴!");
		return "test";
	}
</script>
Controller가 "test"를 리턴하면 뷰 리졸버가 url 조립해서
/WEB-INF/views/test.jsp 를 실행한다.
GET,POST 요청 따로 설정하기 @GetMapping,@PostMapping
-
스프링 4버전 이전
@RequestMapping(value="/request/basic01", method=RequestMethod.GET)
@RequestMapping(value="/request/basic01", method=RequestMethod.POST) -
스프링 4버전 이후
@GetMapping("/request/basic01")
@PostMapping("/request/basic01")
RequestController.java
@RequestMapping(value="/request/basic01", method=RequestMethod.GET)
	@GetMapping("/request/basic01")//스프링 4버전 이후 사용가능
	public String basicGet() {
		System.out.println("/request/basic01 요청이 들어옴: GET 요청");
		return "request/req-ex01";

	}

//	@RequestMapping(value="/request/basic01", method=RequestMethod.POST)
	@PostMapping("/request/basic01")
	public String basicPost() {
		System.out.println("/request/basic01 요청이 들어옴: POST 요청");
		return "request/req-ex01";
	}
req-ex01.jsp
<h2>Request컨트롤러를 이용한 처리 작업</h2>

	<form action="/basic/request/basic01">
		<input type="submit" value="GET 요청">
	</form>

	<form action="/basic/request/basic01" method="post">
		<input type="submit" value="POST 요청">
	</form>