22.06.06
Model
Model전달자 – 화면에 데이터를 전달하기 위한 객체
1.기본 Model 객체를 사용
- Model타입을 메서드의 파라미터로 주입하게 되면 view로 전달하는 데이터를 담아서 보낼 수 있습니다.
넘어오는 값을 이용하거나 바로 추가도 가능. - request.setAttribute()와 유사한 역할을 합니다.
ex) 메서드(Model model)
ex) addAttribute()
ResponseController.java
<script>
@Controller
@RequestMapping("/response")
public class ResponseController {

	@GetMapping("/res-ex01")
	public void resEx01() {	}

	//1.기본 Model 객체를 사용하여 화면에 데이터를 전송하기.
	@GetMapping("/test")
	public void test (@RequestParam("age") int age, Model model) {
		model.addAttribute("age", age);
		model.addAttribute("nick", "멍멍이");
		//model에 값 담아서 전달 (model이름,값)자동으로 전달됨.
	}
</script>
res-ex01.jsp
<body>
	<h2>Model 객체에 대해서 알아보기</h2>

	<a href="/basic/response/test?age=30">테스트1 페이지로</a>
</body>
test.jsp
EL을 이용해서 값 꺼내오기.
<body>
	<h2>test.jsp 페이지입니다.</h2>
	<p>
		지정된 별명은 ${nick}입니다.
		그리고 나이이는 ${age}세 입니다.
	</p>
</body>
2.@ModelAttribute를 사용
- 전달받은 파라미터를 Model에 담아서 화면까지 전달하려 할 때 사용되는 어노테이션입니다.
ex) @ModelAttribute("받을값") 사용할 변수 - @RequestParam + medel.addAttribute 처럼 작동
- @ModelAttribute를 이용하면 커멘드 객체의 이름을 변경할 수 있고, 이렇게 변경된 이름은 뷰에서 커멘드 객체를 참조할 때 사용된다.
<script>
@GetMapping("/test")
public void test(@ModelAttribute("age") int age, Model model) {
	model.addAttribute("nick","야옹이");
//	model.addAttribute("age",age); 할필요X
}
</script>- @ModelAttribute로 여러개의 값을 처리하기
<script>
@GetMapping("/test2")
public void test2(@ModelAttribute("info") UserVO vo) {
	System.out.println("메서드 내의 콘솔 출력:" + vo);
}
</script>
test2.jsp
<body>
	<h2>@ModelAttribute로 여러 개의 값을 처리하기</h2>
	ID: ${info.userId}<br>
	NAME: ${info.userName}
</body>
3.ModelAndView 객체를 활용
Model객체 데이터 + 사용자에게 보여줄 화면도 컨트롤할 수 있음
ex) addObject(“변수명”, “값”);
ex) setViewName(“페이지명”)
<script>
@GetMapping("/test3")
public ModelAndView test3() {
	ModelAndView mv = new ModelAndView();
	mv.addObject("userName", "김철수"); // == addAtrribute
	mv.addObject("userAge", 30);
	mv.setViewName("/response/test3");
	return mv;
}
</script>
test3.jsp
<body>
	<h2>test3.jsp</h2>
	<p>
		컨트롤러로 부터 전달된 데이터: ${userName},${userAge}
	</p>
</body>
Model&ModelAndView
컨트롤러에서 뷰에 데이터를 전달하기 위해 사용되는 객체로 Model과 ModelAndView가 있다.
두 객체의 차이점은 Model은 뷰에 데이터만을 전달하기 위한 객체이고, ModelAndView는 데이터와 뷰의 이름을 함께 전달하는 객체이다.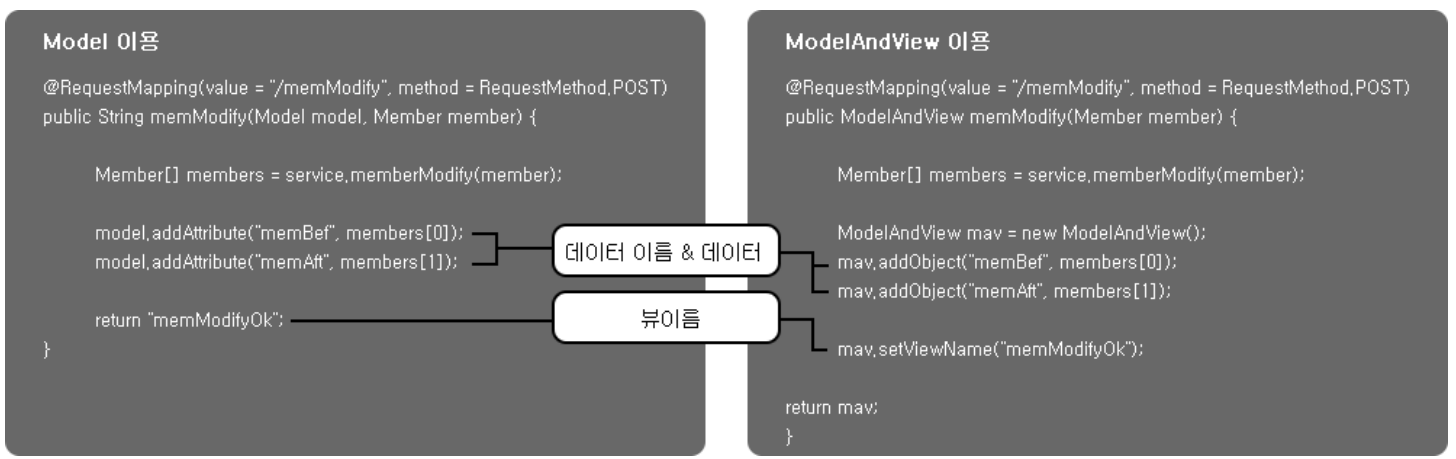
연습1
- res-quiz01 파일의 화면처리를 할 수 있는 메서드부터 생성하세요.
(맵핑url은 res-quiz01로, 메서드 이름은 맘대로) - 폼 태그 작성해서 아이디와 비밀번호를 받으세요.
action: res-login으로 맵핑, POST 전송 - ID:kim123, PW: 1234라면 res-quiz02페이지로 이동해서
"로그인 성공! kim123님 환영합니다!" 를 출력. - 아니라면 res-quiz03페이지로 이동해서
"로그인 실패! '작성한 id'는 회원이 아닙니다."
res-quiz01
<body>
    <form action="/basic/response/res-login" method="post">
    	ID: <input type="text" name="userId"> <br>
    	PW: <input type="password" name="userPw">
    	<input type="submit" value="확인">
    </form>
</body>
ResponseController.java
<script>
//커맨드 객체와 Model을 사용한 방식
@PostMapping("res-login")
public String resLogin(UserVO vo, Model model) {
	String id = vo.getUserId();
	String pw = vo.getUserPw();
	//id는 jsp에서 활용할거라 model에 담아서 전달
	model.addAttribute("userId", id);

	if(id.equals("kim123") && pw.equals("1234")) {
		return "response/res-quiz02";
	} else {
		return "response/res-quiz03";
	}
}

//@ModelAttribute를 사용 id는 전송할거라서 ModelAttribute쓰고
//비밀번호는 확인만 할거라  @RequestParam
@PostMapping("/res-login")
public String resLogin(@ModelAttribute("userId") String id,
					@RequestParam("userPw") String pw) {
	if(id.equals("kim123") && pw.equals("1234")) {
		return "response/res-quiz02";
	} else {
		return "response/res-quiz03";
	}
}
</script>
res-quiz02
<body>
	<h2>로그인 성공! ${userId}님 환영 합니다!</h2>
</body>
연습2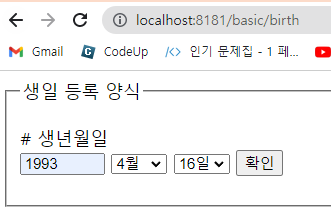
- BirthController를 생성 후, 현재 페이지를 열어주는 메서드를 선언.
(/birth: GET) - 다음 생년월일을 받아서 콘솔에 출력을 진행하는 메서드를 생성. (/birth: POST)
조건) BirthVO 커맨드 객체를 활용.
콘솔창에는 전송된 값을 붙여서 출력합니다. ex) 19921013, 19940604
(한 자리 숫자일 때는 앞에 0이 붙어야 한다는 사실. setter메서드를 조작)
(VO의 연,월,일 타입은 모두 String) - birth-result.jsp 페이지에
"당신의 생일은 XXXX년 XX월 XX일 입니다." 를 브라우저에 출력하세요.
BirthVO.java
<script>
public class BirthVO {

	private String year;
	private String month;
	private String day;

	public String getYear() {
		return year;
	}
	public void setYear(String year) {
		this.year = year;
	}
	public String getMonth() {
		return month;
	}
	public void setMonth(String month) {
		if(Integer.parseInt(month) < 10) {
        //비교를 위해 String -> int로 변경
			this.month = "0" + month;
			return;
		} //10보다 작으면 앞에 0을 붙혀서 저장
		this.month = month;
	}
	public String getDay() {
		return day;
	}
	public void setDay(String day) {
		if(Integer.parseInt(day) < 10) {
			this.day = "0" + day;
			return;
		}
		this.day = day;
	}
}
</script>
birth-form.jsp
<form method="post"> 화면요청 url과 요청보낼 url이 동일하면 action지울 수 있다.
<body>
	<form action="/basic/birth" method="post">
	<!-- <form method="post"> 화면요청 url과 요청보낼 url이 동일하면 action지울 수 있다.-->
		<fieldset>
			<legend>생일 등록 양식</legend>
			<p>
				# 생년월일 <br>
				<input type="text" name="year" size="6" maxlength="4" placeholder="연도(4자리)">

				<select name="month">
					<c:forEach var="m" begin="1" end="12">
						<option value="${m}">${m}월</option>
					</c:forEach>
				</select>

				<select name="day">
					<c:forEach var="d" begin="1" end="31">
						<option value="${d}">${d}일</option>
					</c:forEach>
				</select>

				<input type="submit" value="확인">
			</p>
		</fieldset>
	</form>
</body>
BirthController.java
<script>
@Controller
public class BirthController {

	//생일을 입력하는 폼을 열어주는 메서드
	@GetMapping("/birth")
	public String birthForm() {
		return "birth/birth-form";
	}

	//생일 정보를 result 페이지에 전달하는 요청 메서드
	@PostMapping("/birth")
	public String sendBirth(@ModelAttribute("birth") BirthVO birth) {
		String birthDay = birth.getYear()+birth.getMonth()+birth.getDay();
		System.out.println("완성된 생년월일:"+birthDay);
		return "birth/birth-result";
	}
}
</script>
birth-result.jsp
완성된 생년월일:19930416
<body>
	<h2>당신의 생일은 ${birth.year}년 ${birth.month}월 ${birth.day}일 입니다.</h2>
</body>
RedirectAttributes 객체
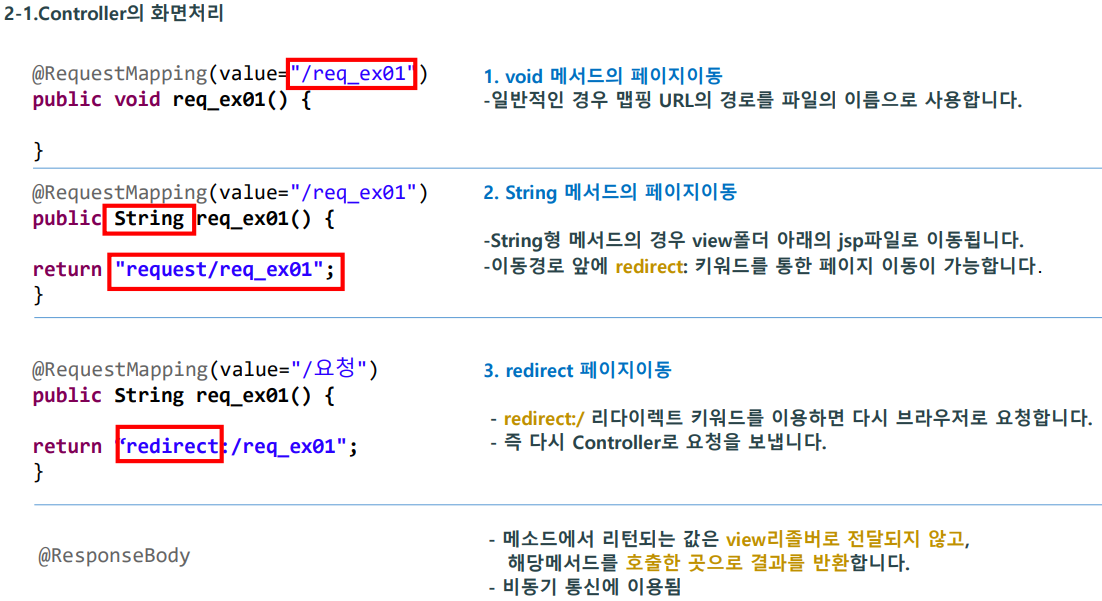
스프링 Redirect 처리
return값에 "redirect:이동 url적기"
리다이렉트 이동시 파라미터 값을 전달하는 방법
ex) addFlashAttribute()
ResponseController.java
<script>
//폼화면을 보여주는 메서드
@GetMapping("/login")
public String login() {
	System.out.println("/login: GET 요청 발생");
	return "response/res-redirect-form";
</script>
res-redirect-form.jsp
form 태그의 action을 작성하지 않으면 마지막 요청(현재 화면을 보기 위해 요청한 url주소) url과 동일하게 서버로 요청이 들어간다.
<body>
	<form method="post"><!-- action="/basic/response/login" 생략가능 -->
      <p>
         # ID: <input type="text" name="userId" size="10"> <br>
         # 비밀번호: <input type="password" name="userPw" size="10"> <br>
         # 비밀번호 확인: <input type="password" name="userPwChk" size="10"> <br>
         <input type="submit" value="로그인">
      </p>
   </form>

   <p style="color:red;">
   		${msg}
   </p>
</body>
ResponseController.java
redirect 상황에서 model 객체를 사용하게 되면
model 내부의 데이터가 재 요청이 들어올 때 파라미터 값으로 붙어서 들어온다.
데이터가 url 주소 뒤에 ?와 함께 노출되어 전달이 되기 때문에
res-redirect-form.jsp에서는 값을 확인 할 수 없다.
<script>
@PostMapping("/login")
public String login(@RequestParam("userId") String id,
					@RequestParam("userPw") String pw,
					@RequestParam("userPwChk") String pwChk,
					Model model) {
	System.out.println("ID:" + id + ",PW:" + pw + ",CHK:" + pwChk);

	if(id.equals("")) {
		model.addAttribute("msg","아이디는 필수값이에요!");
		return "redirect:/response/login"; //Redirect 처리
	}
</script>
그렇기 때문에 RedirectAttributes 객체를 사용한다.
addFlashAttribute()
redirect 상황에서 일회성으로 데이터를 전송할 때 사용하는 메서드
url뒤에 데이터가 붙지 않는다. 한번 이용 후에는 알아서 소멸한다.
<script>
@PostMapping("/login")
public String login(@RequestParam("userId") String id,
					@RequestParam("userPw") String pw,
					@RequestParam("userPwChk") String pwChk,
					RedirectAttributes ra) {
	System.out.println("ID:" + id + ",PW:" + pw + ",CHK:" + pwChk);

	if(id.equals("")) {
		ra.addFlashAttribute("msg", "아이디는 필수값이에요!");
		return "redirect:/response/login"; //Redirect 처리
	} else if(!pw.equals(pwChk)){
		ra.addFlashAttribute("msg", "비밀번호 확인란을 체크하세요.");
		return "redirect:/response/login";
	} else {
		return null;
	}
}
</script>
EL
EL은 컨트롤러에서 비즈니스 로직을 실행한 결과를 JSP 문서 내에서 출력하기 위한 용도로 사용.
EL의 표현방법은 ${ } 사이에 표현식.
표현식에는 Scope 변수를 이용하여 Scope 변수에 바인딩 되어 있는 객체의 메서드를 호출.
Scope 변수는 request, session, application을 의미.
만일 request 객체에 회원 객체(member)가 바인딩 되어 있을 경우 회원의 이름(name)을 출력하기 위해 ${member.name} 또는 ${member["name"]}을 이용
JSTL
JSTL은 표준화된 태그 라이브러리들을 제공함으로써 보다 편리하게 웹 응용프로그램을 개발할 수 있도록 지원.
메이븐 pom.xml에 추가 되어있으므로 별다른 다운 없이 사용가능.
# Core
<%@ taglib prefix="c" uri="http://java.sun.com/jsp/jstl/core" %>
- c:catch 예외처리에 사용
- c:out JspWriter에 내용 출력
- c:set
- JSP 에서 사용될 변수 설정
<c:set value="value" target="targetObjectName" property="propertyName" /> - c:remove 설정한 변수 제거
- c:if 조건처리
- c:choose 다중 조건 처리
- c:when 조건에 맞을 때
- c:otherwise 맞는 조건이 없을 경우
- c:forEach 컬렉션이나 Map 의 각 항목 처리
- c:import URL 을 사용하여 다른 자원의 결과를 삽입