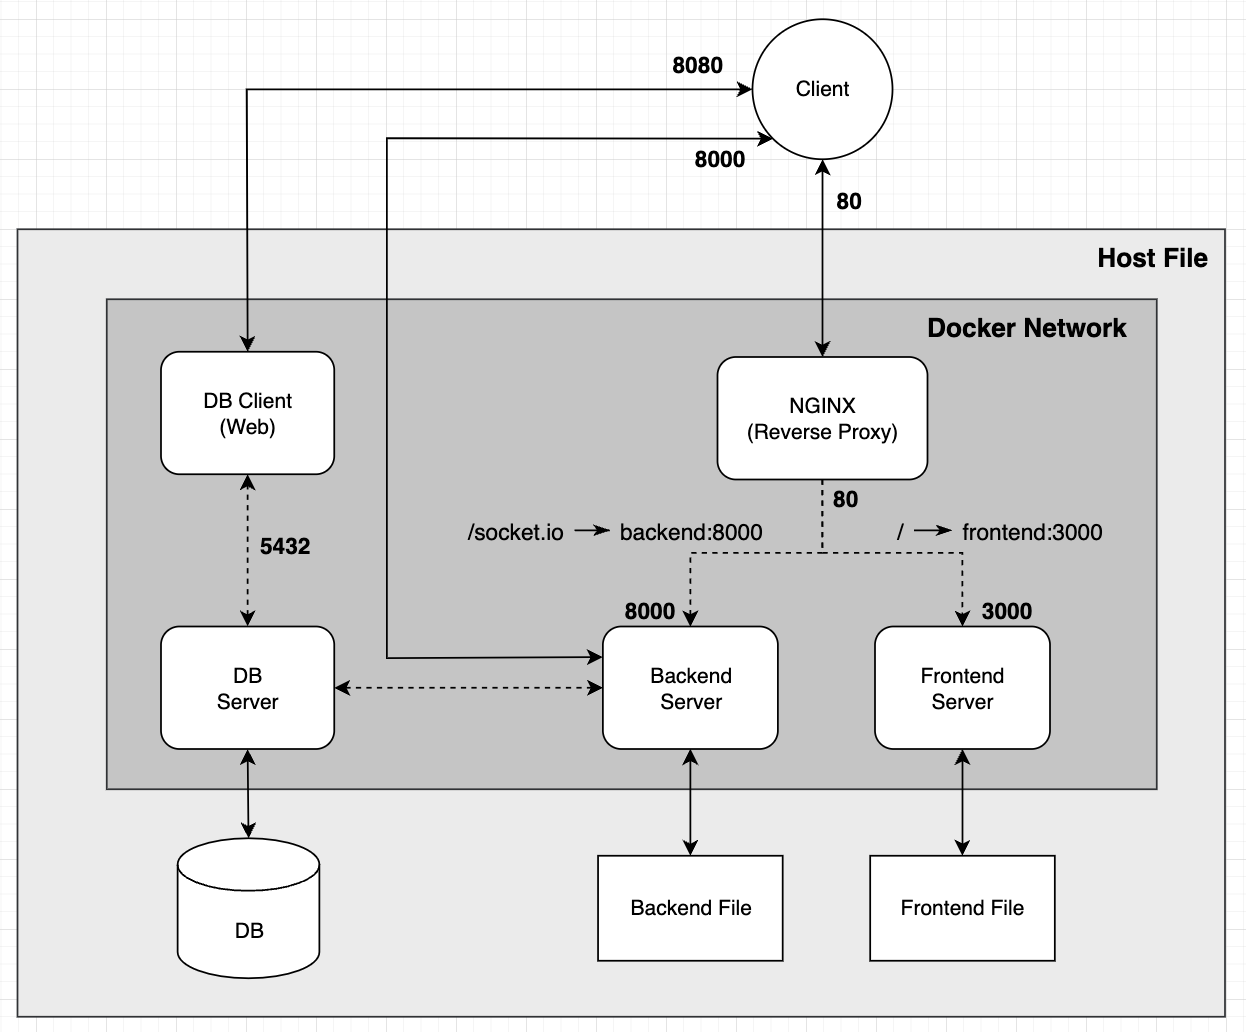
도커 컨테이너 다이어그램
NestJS
패키지 설치
npm i --save @nestjs/websockets @nestjs/platform-socket.io데코레이터
@WebSocketGateway(8080, { transports: ['websocket'] })- 첫번째 인수는
port.
설정을 해주지 않으면Gateway는http서버와 동일한 포트에서 수신 대기 한다. transports옵션의 디폴트 값은['polling', 'websocket']이다.
디폴트 값을 이용하게 되면polling연결 후,websocket으로 방식이 바뀌게 된다. 하지만 이때websocket연결이 실패할 경우,polling방식으로 재연결된다. 위 예제처럼 작성할 경우websocket방식으로만 연결하겠다는 의미가 된다.
프로젝트 구조
./src
├── api
├── core
├── enum
├── events
│   ├── events.gateway.ts
│   └── events.module.ts
├── app.controller.spec.ts
├── app.controller.ts
├── app.module.ts
├── app.service.ts
├── main.ts
├── typeorm-ex.decorator.ts
└── typeorm-ex.module.ts
events.gateway.ts
import {
  MessageBody,
  OnGatewayConnection,
  OnGatewayDisconnect,
  OnGatewayInit,
  SubscribeMessage,
  WebSocketGateway,
  WebSocketServer,
} from '@nestjs/websockets';
import { Server, Socket } from 'socket.io';

@WebSocketGateway({ transports: ['websocket'] })
export class EventsGateway
  implements OnGatewayConnection, OnGatewayDisconnect, OnGatewayInit
{
  @WebSocketServer()
  server: Server;

  afterInit(server: Server) {
    console.count('Init');
  }

  handleDisconnect(client: Socket) {
    console.log('disconnect');
  }

  handleConnection(client: Socket) {
    console.log('connect');
  }

  @SubscribeMessage('hello')
  findAll(@MessageBody() data: string) {
    console.log(data);
  }
}
events.module.ts
import { Module } from '@nestjs/common';
import { EventsGateway } from './events.gateway';

@Module({
  providers: [EventsGateway],
})
export class EventsModule {}app.module.tsimport목록에EventsModule추가
Nest.js
함수
io("http://localhost:80", { transports: ["websocket"], path: "/event" })path옵션은 소켓 통신을 연결할 경로를 적어준다. 첫번째 인수http://localhost:80뒤의 경로를 적어주며, 디폴트 값은/socket.io이다.
프로젝트 구조
./pages
├── _app.tsx
├── api
│   └── hello.ts
├── clients.tsx
├── dm.tsx
├── index.tsx
└── login.tsx
clients.tsx
import Router, { useRouter } from "next/router";
import { useEffect } from "react";
import { io, Socket } from "socket.io-client";

export let socket: Socket;
export default function Client() {
  let router = useRouter();
  function useEffectHandler() {
    socket = io("http://localhost", { transports: ["websocket"] });
    console.log(socket);
  }
  useEffect(useEffectHandler, []);

  return (
    <div>
      <h1>Socket.io</h1>
    </div>
  );
}path를설정해주지 않았으므로 디폴트 값인/socket.io로 통신하게 된다.
NGINX
설정
백엔드가 프론트와 웹소켓 통신을 하기 위해서는 아래와 같은 설정을 해야한다. 아래와 같은 설정을 하지 않아도 socket.io 의 polling 방식으로 통신할 수 있으나, transport: ['websocket'] 옵션을 사용한다면, 필수적으로 nginx.conf 설정을 추가해주어야 한다.
# 소켓통신을 받는 경로
location /socket.io {
	proxy_pass         http://web-backend;
	proxy_http_version 1.1;
	proxy_set_header Upgrade $http_upgrade;
	proxy_set_header Connection 'upgrade';
	proxy_set_header Host $host;
	proxy_cache_bypass $http_upgrade;
}
nginx.conf
user				nginx;
worker_processes	auto;
error_log			/var/log/nginx/error.log warn;
pid					/var/run/nginx.pid;

events {
	worker_connections  1024;
}

http {
    include       /etc/nginx/mime.types;
    default_type  application/octet-stream;

	# 백엔드 upstream 설정
	upstream web-backend {
		server backend:8000;
	}

	# 프론트엔드 upstream 설정
	upstream web-frontend {
		server frontend:3000;
	}

	server {
		listen 80;

		# 소켓통신을 받는 경로
		location /socket.io {
			proxy_pass         http://web-backend;
			proxy_http_version 1.1;
			proxy_set_header Upgrade $http_upgrade;
			proxy_set_header Connection 'upgrade';
			proxy_set_header Host $host;
			proxy_cache_bypass $http_upgrade;
		}

		# / 경로로 오는 요청을 프론트엔드 upstream 의 / 경로로 포워딩
		location / {
			proxy_pass         http://web-frontend/;
			proxy_http_version 1.1;
			proxy_set_header Upgrade $http_upgrade;
			proxy_set_header Connection 'upgrade';
			proxy_set_header Host $host;
			proxy_cache_bypass $http_upgrade;
		}
	}

	log_format  main  '$remote_addr - $remote_user [$time_local] "$request" '
						'$status $body_bytes_sent "$http_referer" '
						'"$http_user_agent" "$http_x_forwarded_for"';

	access_log  /var/log/nginx/access.log  main;

	sendfile			on;
	keepalive_timeout	65;
}
다이어그램이 있어서 이해하기 편하네요~~