Tool Info
Xcode 13.3
Swift 5.6
SnapKit 5.0.1
RxSwift 6.0.0
RxCocoa 6.0.0
Declaration
지난번 Bottom Alert View 제작하기 에 이어서 앱에서 커스텀한 BottomAlertView를 해제하는 과정과 키보드가 올라왔을때 대처 방법에 대해서 적어 봤습니다.
Release
우선 release가 작동할 곳을 지정해 주어야 합니다.
alertView의 뒷 화면 backgroundView를 탭 했을때 혹은 직접 함수를 호출하여 해제할 수 있도록 하면 됩니다.
override func viewDidLoad() {
	super.viewDidLoad()

    ~

    /// 백그라운드 화면의 색상 지정과 UITapGestureRecognizer를 등록해준다.
    self.backgroundView.backgroundColor = self.backgrounColor
    let gesture = UITapGestureRecognizer(
        target: self, action: #selector(self.didTapBackground(_:))
    )
    self.backgroundView.addGestureRecognizer(gesture)
    self.backgroundView.isUserInteractionEnabled = true

    /// alertView가 추가되기 이전에 viewDidLoad에서 backgrounView를 먼저 추가한다.
    self.view.addSubview(self.backgroundView)
    self.backgroundView.snp.makeConstraints({
        $0.top.bottom.left.right.equalTo(self.view)
    })
}

/// 외부에서 호출할 수 있는 함수를 새로 만들어준다.
public func dispose(animated: Bool = true, completionHandler: (() -> Void)? = nil) {
   self.release(animated: animated, completionHandler: completionHandler)
}

/// 백그라운드 화면을 tap 했을 때 실행할 내용을 적어준다.
@objc
fileprivate func didTapBackground(_ gesture: UITapGestureRecognizer) {
    self.release(animated: true)
}

/// release 함수는 외부에서 건드릴 수 없는 함수로 만들어준다.
fileprivate func release(animated: Bool = true, completionHandler: (() -> Void)? = nil) {

}
이제 release(animated:completionHandler:) 함수의 내용을 작성해주면 됩니다.
기존에 topConstraint의 inset 값을 0으로 수정해주고 layoutIfNeeded를 통해 적용하면
alertView가 아래로 내려가는듯한 animate를 적용할 수 있습니다.
모든 animate가 종료된 이후에는 dimiss(animated:completionHandler:)를 호출하여 viewController 자체를 deinit 시켜주면 됩니다.
fileprivate func release(animated: Bool = true, completionHandler: (() -> Void)? = nil) {
guard let topConstraint = self.topConstraint else { return }
/// 1. 기존에 적용해두었던 topConstraint의 inset을 0으로 수정한다.
topConstraint.layoutConstraint[0].constant = 0
/// 2. 모든 animate가 종료된 이후에 동작할 handler를 작성합니다.
let animateHandler: () -> Void = { [weak self] in
guard let self = self else { return }
self.contentView.removeFromSuperview()
self.topConstraint = nil
self.dismiss(animated: false, completion: completionHandler)
}
/// 3. animated 여부에 따라서 분기를 주고 animate 효과를 넣을지를 결정한다.
if animated {
UIView.animate(withDuration: 0.5, animations: { [weak self] in
guard let self = self else { return }
self.view.layoutIfNeeded()
self.view.alpha = 0.0
}, completion: { _ in
animatedHandler()
})
} else {
CATransaction.begin()
CATransaction.setCompletionBlock {
animatedHandler()
}
self.view.layoutIfNeeded()
self.view.alpha = 0.0
CATransaction.commit()
}
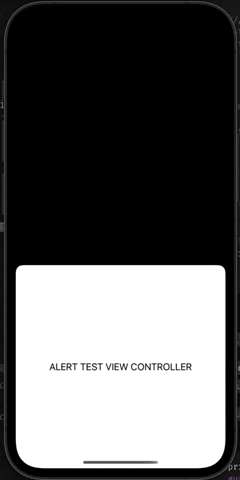
}Result
Keyboard
다음은 키보드가 올라올 때, 내려갈 때 대처 방법에 대해서 적어 보도록 하겠습니다.
우선 키보드가 올라올 때, 내려갈 때 상황에 대해서 알림을 받아야 하므로 NotificationCenter를 활용하도록 합니다.
overrdie func viewDidLoad() {
	~

    NotificationCenter.default.addObserver(
    	self,
        selector: #selector(self.willKeyboardShowUp(_:)),
        name: UIResponder.keyboardWillShowNotification,
        object: nil
    )
    NotificationCenter.default.addObserver(
    	self,
        selector: #selector(self.willKeyboardHideDown(_:)),
        name: UIResponder.keyboardWillHideNotification,
        object: nil
    )
}

@objc
fileprivate func willKeyboardShowUp(_ notification: Notification) { }

@objc
fileprivate func willKeyboardHideDown(_ notification: Notification) { }
그리고 키보드가 올라오거나 내려올때 alertView의 위치를 키보드의 높이에 따라서 조정을 할 수 있는 함수를 만들어 주고
해당 함수를 willKeyboardShowUp(_:) 함수와 willKeyboardHideDown(_:) 함수에서 실행하도록 합니다.
var isKeyboardUprise: Bool = false

fileprivate func setAlertViewOffset(_ offest: CGFloat) {
	/// 1. offset의 값이 0보다 크면 keyboard가 올라와 있다는 의미이다.
	self.isKeyboardUprise = offset > 0

    /// 2. offset의 값에 alertView의 높이를 더해야 topConstraint의 위치를 구할 수 있다.
    let yOffset = offset + self.alertHeight

	UIView.animate(withDuration: 0.5) { [weak self] in
    	/// 3. topConstraint의 기준이 view의 바닥이기 때문에
        /// offset + alertHeight 값을 마이너스 해줘야 view의 바닥으로부터
        /// 키보드 높이만큼 올라가는 효과를 볼 수 있다.
    	self?.topConstraint?.layoutConstraints[0].constant = -yOffset
        self?.view.layoutIfNeeded()
    }
}

@objc
fileprivate func willKeyboardShowUp(_ notification: Notification) {
	/// Keyboard의 높이는 notification의 userInfo 값 안에 담겨져서 들어온다.
    /// key값은 UIResponder.keyboardFrameEnduserInfoKey로 세팅하면 된다.
	guard let height = notification.userInfo?[UIResponder.keyboardFrameEndUserInfoKey] as? NSValue else { return }

    self.setAlertViewOffset(height.cgRectValue.height)
}

@objc
fileprivate func willKeyboardHideDown(_ notification: Notification) {
	self.setAlertViewOffset(0.0)
}
여기까지 하면 키보드가 올라오고 내려가는것에 대처하는것에는 큰 문제 없이 잘 작동시킬 수 있습니다.
하지만 textField에 커서가 활성화 됐을 때 키보드가 자동으로 올라오지만, 다른곳을 탭 했을때 자동으로 키보드를 내려주지는 않습니다.
그래서 alertView 또는 backgroundView를 탭 했을 때 keyboard가 내려가도록 해주기 위해서는 한가지 작업을 더 해줘야 합니다.
/// 1. backgroundView를 탭 했을때 keyboard가 올라와있는 경우
/// endEditing을 하여 keyboard가 먼저 내려가도록 한다.
@objc
fileprivate func didTapBackground(_ gesture: UITapGestureRecognizer) {
    guard !self.isKeyboardUprise else {
    	self.isKeyboardUprise = false
        self.contentView.endEditing(true)
        return
    }

    self.release(animated: true)
}

/// 2. alertView를 탭 했을때 keyboard가 내려가도록 한다.
fileprivate func setAlertViewTapGesture(_ alertView: AlertView) {
	alertView.rx.tapGesture(configuration: { rec, delegate in
    	/// TapGesture가 View의 객체로 전달되도록 허용
        rec.cancelsTouchesInView = false
        /// touchReceptionPolicy는 gestureRecognizer(_:shouldReceive:)와 같은 역할을 한다.
        delegate.touchReceptionPolicy = .custom { gesture, touch in
        	/// touch한 view가 UITextField가 아닐 때에만
            /// view에 gesture를 전달하도록 한다.
            return !(touch.view is UITextField)
        }
    })
    .when(.recognized)
    .subscribe(onNext: { [weak self] recognizer in
    	self?.isKeyboardUprise = false
    	self?.contentView.endEditing(true)
    })
    .disposed(by: self.disposeBag)
}

/// 3. rx관련 함수는 retain 될 때 작동하여 subscribe하도록 넣어준다.
fileprivate retain(animated: Bool = true) {
	<-- skip --/>

    if animated {
    	UIView.animated(withDuration: 0.5, animations: { [weak self] in
        	self?.view.layoutIfNeeded()
        }, completion: { [weak self] _ in
        	guard let self = self else { return }

            self.setAlertViewTapGesture(self.contentView)
        })
    } else {
    	CATransaction.begin()
        CATransaction.setCompletionBlock { [weak self] in
            guard let self = self else { return }

            self.setAlertViewTapGesture(self.contentView)
        }
        self.view.layoutIfNeeded()
        CATransaction.commit()
    }

}
마지막으로 등록했던 notification을 deinit에서 제거하도록 합니다.
deinit {
NotificationCenter.default.removeObserver(
self,
name: UIResponder.keyboardWillShowNotification,
object: nil
)
NotificationCenter.default.removeObserver(
self,
name: UIResponder.keyboardWillHideNotification,
object: nil
)
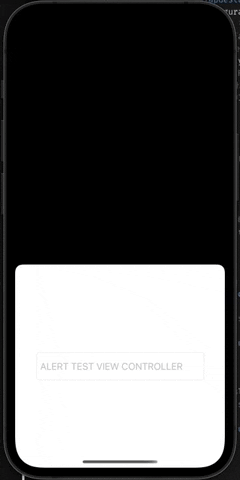
}Result
Review
지난번 BottomAlertView 만들기에 이어서 이번에도 매우 간단한 내용들이지만
기본적으로 AlertView에 들어가야 할 내용들이기에 작성해보았다.
나중에는 간단하지만 이런 기본적인 모듈을 만들어본 경험을 기반 삼아서
gitHub에 원하는 멋진 모듈을 제작하여 올리는 날이 올수도 있지 않을까 하는 생각을 해본다 ㅎㅎ