최근 OAuth2.0을 구현하면서 각 제공자마다 이메일 정보를 제공하는 위치가 달라서 어려움을 겪었다.
이 문제를 해결하기 위해 여러 시도를 해봤고, 그 중 디버깅을 통해 그 위치를 찾아내는 방법이 효과적이었다.
이 글에서는 그 과정을 자세히 소개하고자 한다.
우선 OAuth를 어떻게 구현했는지부터 소개하도록 하겠다.
OAuth 구현한 방법
SimpleUrlAuthenticationSuccessHandler를 상속받는 새로운 핸들러를 생성했다.
이 핸들러에서는 onAuthenticationSuccess 메서드를 오버라이드하여 인증이 성공했을 때 사용자 정보를 나타내는 Authentication 객체를 활용한다.
여기서 SimpleUrlAuthenticationSuccessHandler는 AuthenticationSuccessHandler 인터페이스를 구현한 클래스로, 인증이 성공했을 때의 동작을 정의하는 역할을 한다.
하지만 SimpleUrlAuthenticationSuccessHandler는 AuthenticationSuccessHandler보다 더욱 확장된 기능을 제공한다. 특히, 인증 성공 후 사용자를 특정 URL로 리다이렉트하는 기능이 추가되어 있어, 이를 상속받아 사용함으로써 인증 성공 후의 행동을 더욱 간편하게 제어할 수 있게 된다.
onAuthenticationSuccess 메서드
    @Override
    public void onAuthenticationSuccess(HttpServletRequest request, HttpServletResponse response, Authentication authentication) throws IOException, ServletException {
        var oAuth2User = (OAuth2User)authentication.getPrincipal();
        Map<String, Object> attributes = oAuth2User.getAttributes();

        OAuth2AuthenticationToken oauthToken = (OAuth2AuthenticationToken) authentication;
        String clientRegistrationId = oauthToken.getAuthorizedClientRegistrationId();

    	OAuthHandler handler;

    	switch (clientRegistrationId) {
        	case "naver":
            	handler = new NaverOAuthHandler();
            	break;
        	case "kakao":
            	handler = new KakaoOAuthHandler();
            	break;
       	 	default: // "google","facebook"
            	handler = new GoogleOAuthHandler();
            	break;
    	}

    	String email = handler.getEmail(attributes);

        ~~~~ 그 외 로직 ~~~~
}-
var oAuth2User = (OAuth2User)authentication.getPrincipal(); : 인증된 사용자의 기본적인 정보를 가져오는 부분. getPrincipal() 메서드는 인증된 사용자의 정보를 반환한다. OAuth2에서는 이 정보를 OAuth2User 형태로 가져온다.
-
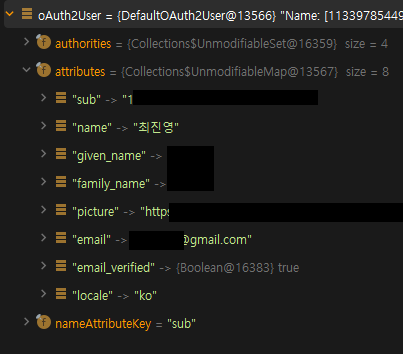
Map<String, Object> attributes = oAuth2User.getAttributes(); : 인증된 사용자가 가진 속성(예: 이름, 이메일 등)을 Map 형태로 가져오는 부분.
-
OAuth2AuthenticationToken oauthToken = (OAuth2AuthenticationToken) authentication; : 인증 객체를 OAuth2 인증 토큰으로 변환하는 부분. OAuth2 인증 토큰은 OAuth2 인증에 필요한 정보를 가지고 있다.
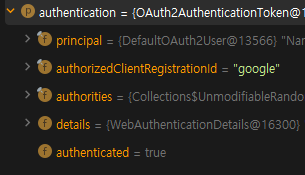
- String clientRegistrationId = oauthToken.getAuthorizedClientRegistrationId(); : OAuth2를 통해 인증한 클라이언트(예: Google, Facebook 등)의 등록 ID를 가져오는 부분. 이 정보를 통해 어떤 OAuth2 제공자를 통해 인증되었는지 확인할 수 있다.
이렇게 가져온 clientRegistrationId를 활용한다
각 OAuth 제공자 처리하기
먼저 인터페이스를 정의한다
public interface OAuthHandler {
    String getEmail(Map<String, Object> attributes);
}
-> GoogleOAuthHandler, NaverOAuthHandler, KakaoOAuthHandler 등의 클래스를 만들어 각 제공자를 별도로 처리할 수 있게 할 수 있다.
이렇게 하면 새로운 제공자를 추가할 때마다 새로운 클래스를 만들면 되므로 코드 수정 없이 확장성을 높일 수 있다.
구현 클래스 만들기
여러 OAuth 제공자 (Google, Naver, Kakao 등)를 지원하는 서비스에서는 각 제공자마다 사용자 정보를 제공하는 방식이 다를 수 있기에 제공자마다 다른 로직을 적용 하는 것이다.
구글
public class GoogleOAuthHandler implements OAuthHandler {
    @Override
    public String getEmail(Map<String, Object> attributes) {
        String email = (String) attributes.get("email");
        if (email == null) {
            throw new IllegalArgumentException("Email not found in attributes");
        }
        return email;
    }
}
네이버

public class NaverOAuthHandler implements OAuthHandler {
    @Override
    public String getEmail(Map<String, Object> attributes) {
        Map<String, Object> response = (Map<String, Object>) attributes.get("response");
        String email = (String) response.get("email");
        if (email == null) {
            throw new IllegalArgumentException("Email not found in attributes");
        }
        return email;
    }
}
카카오
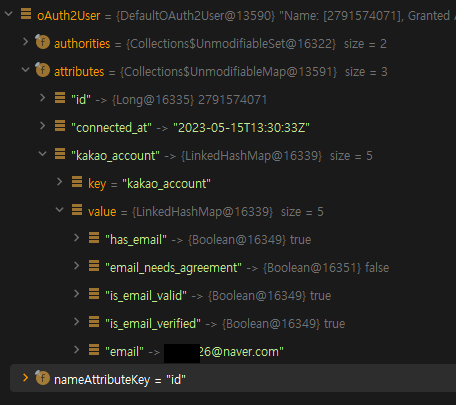
public class KakaoOAuthHandler implements OAuthHandler {
    @Override
    public String getEmail(Map<String, Object> attributes) {
        Map<String, Object> kakaoAccount = (Map<String, Object>) attributes.get("kakao_account");
        String email = (String) kakaoAccount.get("email");
        if (email == null) {
            throw new IllegalArgumentException("Email not found in attributes");
        }
        return email;
    }
}
이후에 이러한 핸들러들을 사용하여 onAuthenticationSuccess 메서드에 적용한다.
위에서 작성한 코드에서
    	OAuthHandler handler;

    	switch (clientRegistrationId) {
        	case "naver":
            	handler = new NaverOAuthHandler();
            	break;
        	case "kakao":
            	handler = new KakaoOAuthHandler();
            	break;
       	 	default: // "google","facebook"
            	handler = new GoogleOAuthHandler();
            	break;
    	}

    	String email = handler.getEmail(attributes);
지금까지 OAuth2.0에서 각 제공자가 이메일 정보를 제공하는 위치를 찾는 방법에 대해 알아보았다.