
dynamic web
web server 측에서 web client가 요청한 program을 실행한 후 그 결과를 HTTP Response를 돌려준다.
CGI(Common Gateway Interface)
- (웹페이지 내용을 만드는) 외부 프로그램과 통신하는 방법을 말한다.
- process 단위 → thread 단위
이로 인해 언어마다 여러가지 기술들이 나오게 된다.
- MS : ASP, PHP
- JAVA : Servlet, JSP
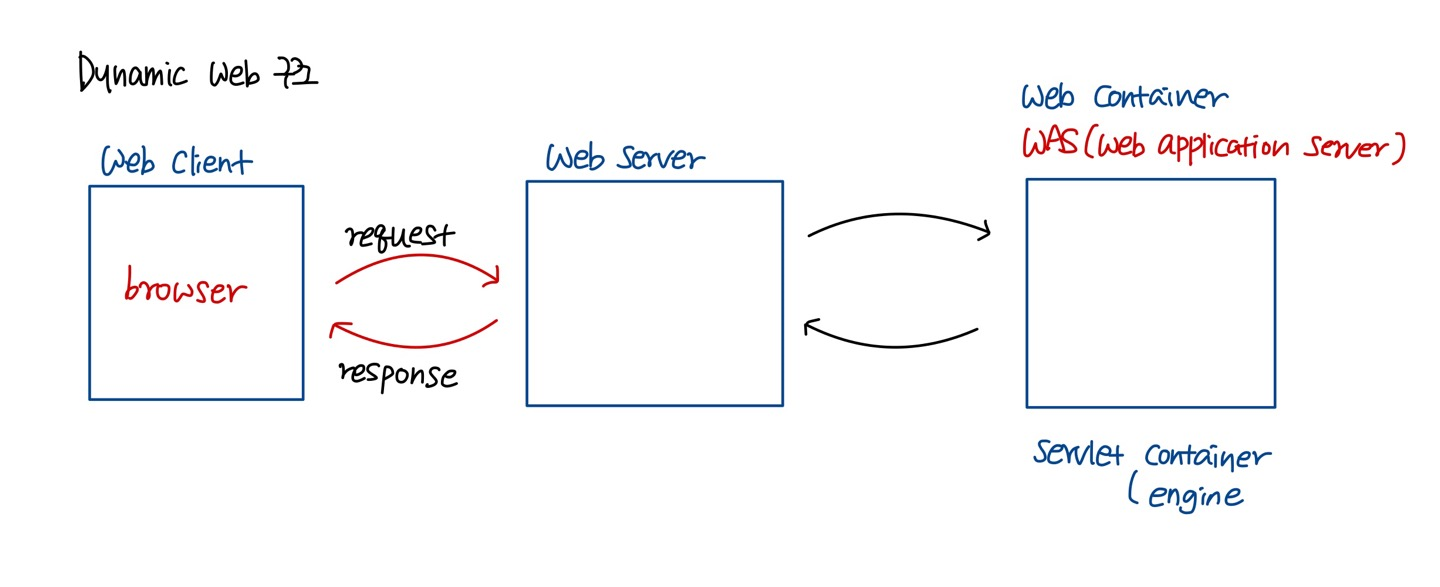
🐈 Apache Tomcat (Http Server + servlet container) 🐈
Web 상에서 동작하는 Java Program을 만들기 위한 규칙이다.
Servlet → HTTPServlet → 상속해서 구현 → eclipse의 도움을 받아서 servlet을 생성
dynamic web project
- project 이름 : eclipse에서 project를 식별하기 위한 이름
- context-root : 우리 project가 client에 의해서 지칭되는 이름
( 우리 project 웹 상에서 사용되는 논리적인 이름 )
Project를 생성하고 코드를 구현
-
Web Server에게 우리 project의 존재를 알려줘야 한다.
-
server - add and remove
- Web server를 통해서 우리 project를 web에 deploy해준다.
- Client를 통해서 접속할 수 있게 된다.
-
browser에서 URL을 이용해 request를 보낸다.
URL : HTTP://localhost:8080/html/index.html- html은 context-root
간단한 static web application 구현 ⚙
-
HTML (태그, 속성)
-
CSS
-
Javascript
-
form
client가 서버에 데이터를 전달하는 목적으로 사용한다.-
action - 입력된 내용을 가지고 요청을 보낼 서버 쪽 프로그램에 대한 URL에 해당된다.
-
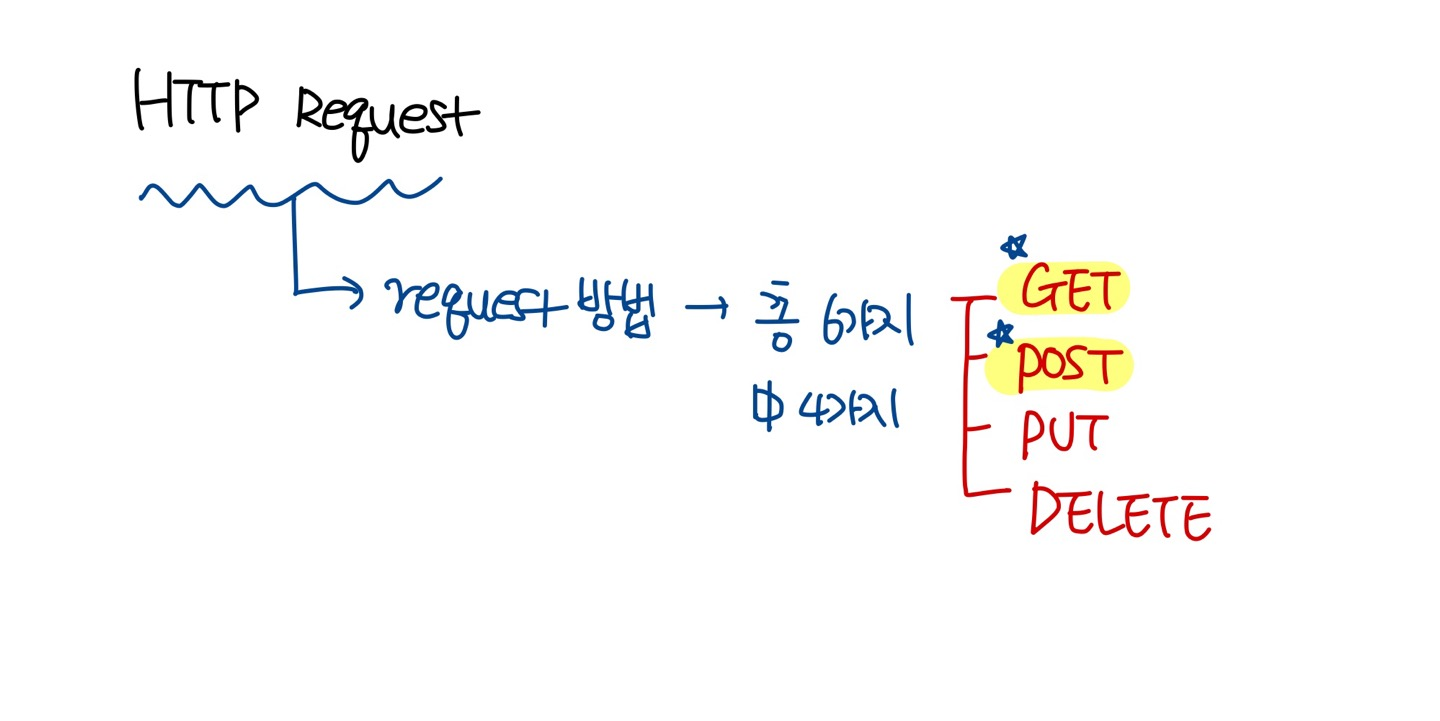
request method - 클라이언트가 서버에 Request를 보내는 방법을 지정한다. 총 6개 존재. 이중 4개만 사용. 일반적으로는 2개만 이용 (생략 가능. 만약 생략되면 "GET")
-
GET, POST, PUT, DELETE
✔ GET
Query String을 이용
Query String 단점 😡
- 보내려는 데이터가 URL에 노출
- Reqeuest URL의 길이에 제한이 있기 때문에 데이터에 대한 제한이 있음
( 많은 양의 데이터를 보내지 못함, 대용량 데이터 X )
- browser 주소창에 URL 입력하고 enter → request 전달
- hypertext(링크)를 이용해서 request
a href = " " 를 이용 click해서 request 전달 - Form 태그 이용 → method가 GET인 경우, 이 form을 이용해 request
✔ POST
Query String을 사용하지 않고, request header에 데이터를 포함시킨다.
- URL의 노출이 되지 않된다.
( 보안성이 있다라고 하긴 힘들지만 보안성 측면에서 그나마 나은 경우에 해당된다. ) - 길이 제한이 없다.
- Form 태그 이용 → method가 POST인 경우, 이 form을 이용해서 request
Form 태그를 이용할 경우 거의 예외없이 "POST" 방식 사용하는 것을 선호한다.
왜? GET 방식과 비교했을 때 POST 방식이 더 나은 방식이기 때문이다. ( Query String 단점 )
-
아래 결과는 GET 방식을 통해 데이터 전달한 경우이다.
( URL을 확인해보면 Query문에 전달 데이터가 노출되는 것을 확인할 수 있다 )

                                Client ---------------> Server
                                        request
                                           + 사용자 데이터
Dynamic Web ( Servlet )
- Servlet 선택
- package와 class를 지정
- package : lecture0725
- class : TestServlet
- URL mapping
- client가 우리 servlet을 식별할 때 사용하는 이름
- /hello

Servlet 매커니즘 🔧
- 웹 서버가 client로부터 servlet에 대한 request를 받으면 컨테이너에게 이 request를 넘긴다.
- 해당 요청을 넘겨받은 컨테이너는 servlet을 찾아 필요한 method를 호출한다.
- container는 사용자로부터 요청을 받을 때마다 요청을 처리할 thread를 생성한다.
- 그 thread에서 필요한 servlet method를 호출하게 된다.
- 여기서, thread를 무제한 생성하는 것이 아니라 컨테이너 내부에 thread pool에 thread를 저장하고, 필요할 때 사용하게 된다.
HttpServletRequest, HttpServletResponse 객체를 생성한 컨테이너는 요청에 알맞은 servlet을 찾게 되는데, servlet을 찾기 위해서는 개발자가 servlet을 매핑해주어야 한다.
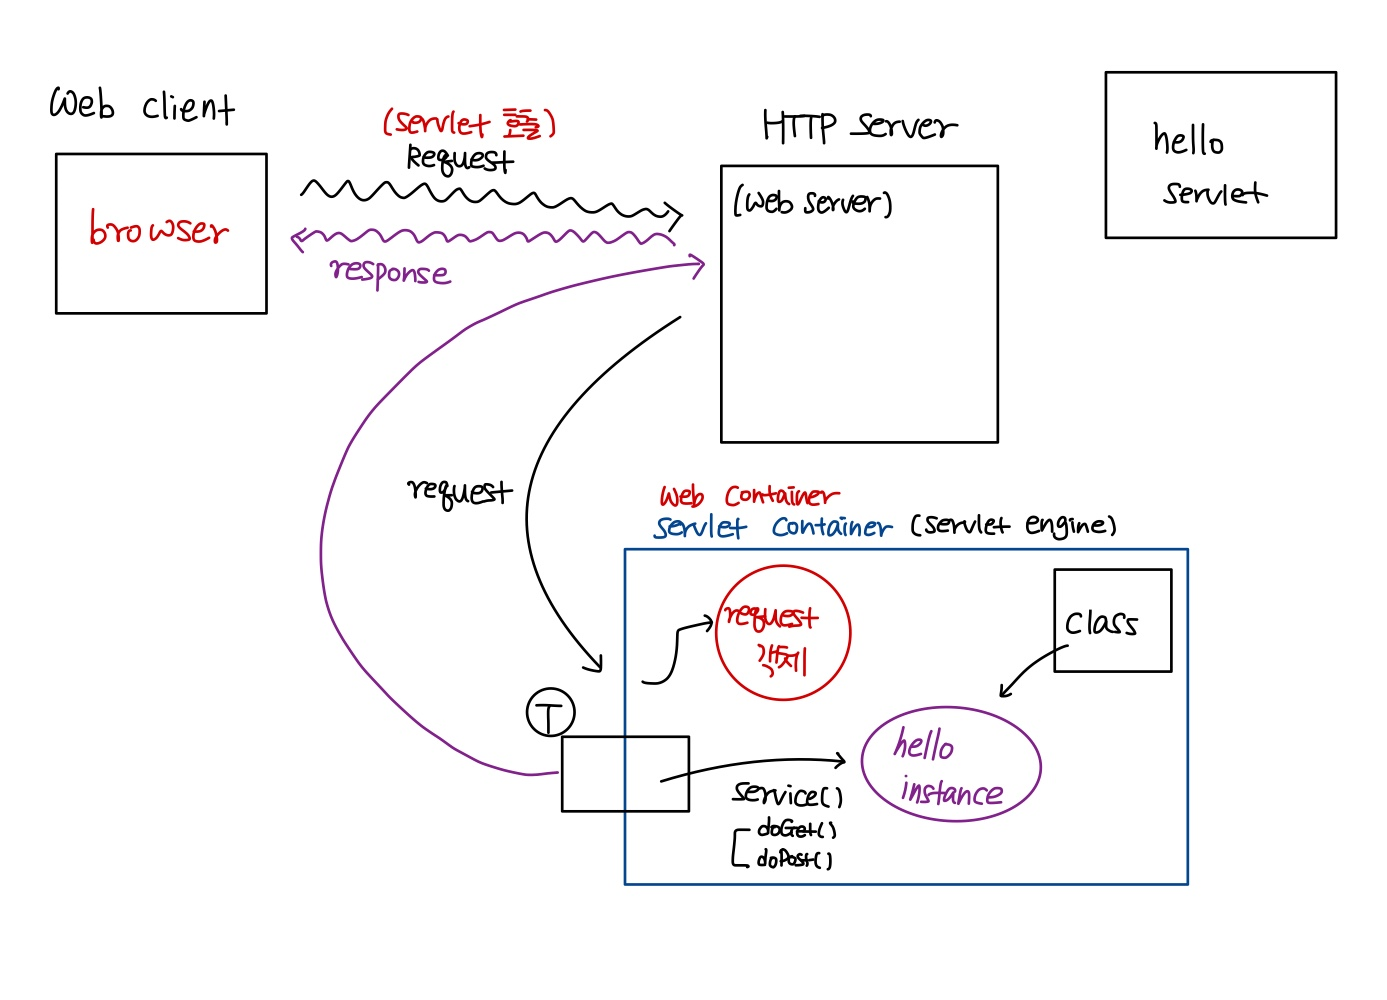
Servlet Container의 동작 방식 📖
-
client가 URL을 통해 HTTP request를 보내면 HTTP server가 이 request를 받고 해당 HTTP Request를 servlet container(WAS)로 보낸다.
( request - "Hello" servlet을 실행시켜 주세요! ) -
HTTP Request를 전송받은 Servlet Container는 HttpServletRequest, HttpServletResponse 두 객체를 생성한다.
-
Servlet Container는 요청한 URL을 분석하여 어느 servlet에 대한 요청인지 찾고, 없으면 Java class로부터 해당 servlet 인스턴스를 생성한다.
-
Servlet Container는 요청을 처리할 thread를 하나 생성한다.
(요청이 들어올 때마다 thread를 생성 → thread 기반) -
해당 servlet에서 service 메서드를 호출한 후 POST, GET 여부에 따라 doGet( ) 또는 doPost( )를 호출한다.
(인자 - HttpServletRequest, HttpServletResponse) -
doGet( ) 혹은 doPost( ) 메서드는 동적 페이지를 생성한 후 HttpServletResponse 객체에 응답을 보낸다.
-
응답이 끝나면 HttpServeltRequest, HttpServletResponse 두 객체를 소멸시킨다.
💡 여기서 잠깐!
servlet은 thread의 공용 객체이다. 그러므로 servlet field는 모든 thread에 대해서 공유된다는 점 주의하자!🧐
Servlet은 싱글톤 패턴!
객체의 인스턴스가 오직 1개만 생성되는 패턴에 해당된다.
✔ 기본 Servlet 코드
/**
 * Servlet implementation class TestServlet
 */
@WebServlet("/hello")
public class TestServlet extends HttpServlet {
	private static final long serialVersionUID = 1L;

    /**
     * @see HttpServlet#HttpServlet()
     */
    public TestServlet() {
        super();
        // TODO Auto-generated constructor stub
    }

	/**
	 * @see HttpServlet#doGet(HttpServletRequest request, HttpServletResponse response)
	 */
	protected void doGet(HttpServletRequest request,
			HttpServletResponse response) throws ServletException, IOException {


	}

	/**
	 * @see HttpServlet#doPost(HttpServletRequest request, HttpServletResponse response)
	 */
	protected void doPost(HttpServletRequest request, HttpServletResponse response) throws ServletException, IOException {
		// TODO Auto-generated method stub
		doGet(request, response);
	}

}
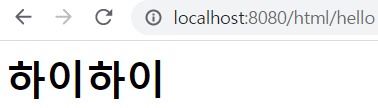
✔ doGet( )
protected void doGet(HttpServletRequest request,
			HttpServletResponse response) throws ServletException, IOException {
		// 1. 입력을 받는다.
		// 2. 로직처리 한다.
		// 3. 클라이언트에게 결과를 출력해요!
		//    클라이언트에게 특정 문자열을 출력해야 되기 때문에 OutputStream이 필요하다

		// Response header
		response.setContentType("text/html; charset=UTF-8");
		// Response body
		PrintWriter out = new PrintWriter(response.getOutputStream());
		out.println("<html><head><body><H1>하이하이</H1></body></head></html>");
		out.close();

	}
✔ 로그인 처리
Get방식의 한글처리를 위한 변경
만약 한글 데이터를 전달받으려면 약간의 처리를 해 주어야 한다!
만약 GET방식인 경우, Tomcat의 입력 stream의 encoding을 변경해줘야 한다.
( server-tomcat-server.xml-아래 코드와 같이 변경해주어야 한다 )

✅ 코드1
protected void doGet(HttpServletRequest request, HttpServletResponse response) throws ServletException, IOException {
		// 1. 입력받고 (request 객체를 받아야 함)
		// 한가지 주의해야 할 점은... 입력을 받을 때 사용되는 Stream의 encoding이 ISO-8859-1 (한글이 깨짐)
		// 만약 한글 데이터를 전달받으려면 약간의 처리를 해 주어야 해요!
		// - 만약 GET방식인 경우, Tomcat의 입력 stream의 encoding을 변경해줘야 한다. (server-tomcat-server.xml 수정)
		// - 만약 POST방식인 경우,
//		request.setCharacterEncoding("EUC-KR");
		String email = request.getParameter("userEmail");
		String pw = request.getParameter("userPassword");

		System.out.println(email+ ", "+ pw);
		// 2. 로직처리
		// 3. 출력처리
	}
✅ 결과1

@WebServlet("/login")
public class LoginServlet extends HttpServlet {
	private static final long serialVersionUID = 1L;
    // 여러 thread에 의해 공용된다. (필드는 공용됨)
    /**
     * @see HttpServlet#HttpServlet()
     */
    public LoginServlet() {
    	try {
    		Class.forName("com.mysql.cj.jdbc.Driver");
		} catch (Exception e) {
			// TODO: handle exception
		}
        // TODO Auto-generated constructor stub
    }

	/**
	 * @see HttpServlet#doGet(HttpServletRequest request, HttpServletResponse response)
	 */
	protected void doGet(HttpServletRequest request, HttpServletResponse response) throws ServletException, IOException {
		// 1. 입력받고 (request 객체를 받아야 함)
		// 한가지 주의해야 할 점은... 입력을 받을 때 사용되는 Stream의 encoding이 ISO-8859-1 (한글이 깨짐)
		// 만약 한글 데이터를 전달받으려면 약간의 처리를 해 주어야 해요!
		// - 만약 GET방식인 경우, Tomcat의 입력 stream의 encoding을 변경해줘야 한다. (server-tomcat-server.xml 수정)
		String email = request.getParameter("userEmail");
		String pw = request.getParameter("userPassword");
		// 2. 로직처리
		// 입력된 email과 password가 database table에 존재하는지 확인!
		// JDBC code
		String jdbcURL = "jdbc:mysql://localhost:3306/sqldb?characterEncoding=UTF-8&serverTimezone=UTC&useSSL=false";
		Connection con = null;
		PreparedStatement pstmt = null;
		ResultSet rs = null;
		boolean loginStatus = false;
		try {
			con = DriverManager.getConnection(jdbcURL, "root", "test1234");
			String sql = "SELECT * FROM tmpuser where email=? and password=?";

			pstmt = con.prepareStatement(sql);
			pstmt.setString(1, email);
			pstmt.setString(2, pw);

			rs = pstmt.executeQuery();

			if (rs.next()) {
				loginStatus = true;
			}
		} catch (Exception e) {
			// TODO: handle exception
		} finally {
			// close 처리 진행
			try {
				rs.close();
				pstmt.close();
				con.close();
			} catch (Exception e2) {
				// TODO: handle exception
			}
		}

		// 3. 출력처리
		response.setContentType("text/html; charset=UTF-8");
		PrintWriter out = new PrintWriter(response.getOutputStream());
		if (loginStatus) {
			out.println("환영합니다!"); }
		else {
			out.println("로그인에 실패했습니다");
		}
		out.close();
	}
✅ 결과2
해당 데이터베이스가 없으므로 실패로 뜹니다..!

💡 Servlet을 어떻게 동작하나요?
위 코드 작성의 문제점
- Layerd Architecture의 적용이 필요하다 → MVC pattern
- Servlet의 데이터 공유
- 출력문제 → Java 코드 내에 HTML을 포함시켜야 해요!
- 해결방법 1 : JSP 이용
- 해결방법 2 : front-end 자체처리 ( JSON )
- HTTP Protocol은 Stateless protocol
(클라이언트가 하는 일을 지속적으로 tracking 하려면?)
Servlet 데이터 공유 - ServletContext
- 객체 → 모든 servlet이 공유하는 객체
- 우리 context root 안에 servlet context 객체는 1개만 만들어서 사용한다.

servleta
protected void doGet(HttpServletRequest request, HttpServletResponse response) throws ServletException, IOException {
		// 1. 입력
		// 2. 로직
		// ServletContext를 사용해보아요!
		// ServletContext 객체를 얻어와요! ( 공유객체에 대한 Reference를 획득)
		ServletContext context = getServletContext();
		// 획득한 ServletContext에 특정 정보를 저장해 보아요!
		context.setAttribute("product", "냉장고");
		// 3. 출력

	}
servletb
protected void doGet(HttpServletRequest request, HttpServletResponse response) throws ServletException, IOException {
// 1. 입력
// 2. 로직
ServletContext context = getServletContext();
String product = (String)context.getAttribute("product");
// 3. 출력
response.setContentType("text/html; charset=UTF-8");
PrintWriter out = new PrintWriter(response.getOutputStream());
out.println("얻어온 결과는 : " + product);
out.close();
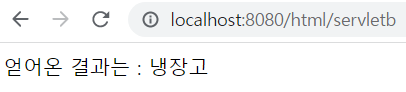
}servleta & servletb 실행 결과
http://localhost:8080/html/servletb 먼저 실행
( 얻어온 결과는 : null )
http://localhost:8080/html/servleta 실행
( 냉장고 문자열 저장 )
http://localhost:8080/html/servletb 실행
( 얻어온 결과는 : 냉장고 )
Stateless protocol
- HTTP Protocol은 무상태 protocol(stateless)이다.
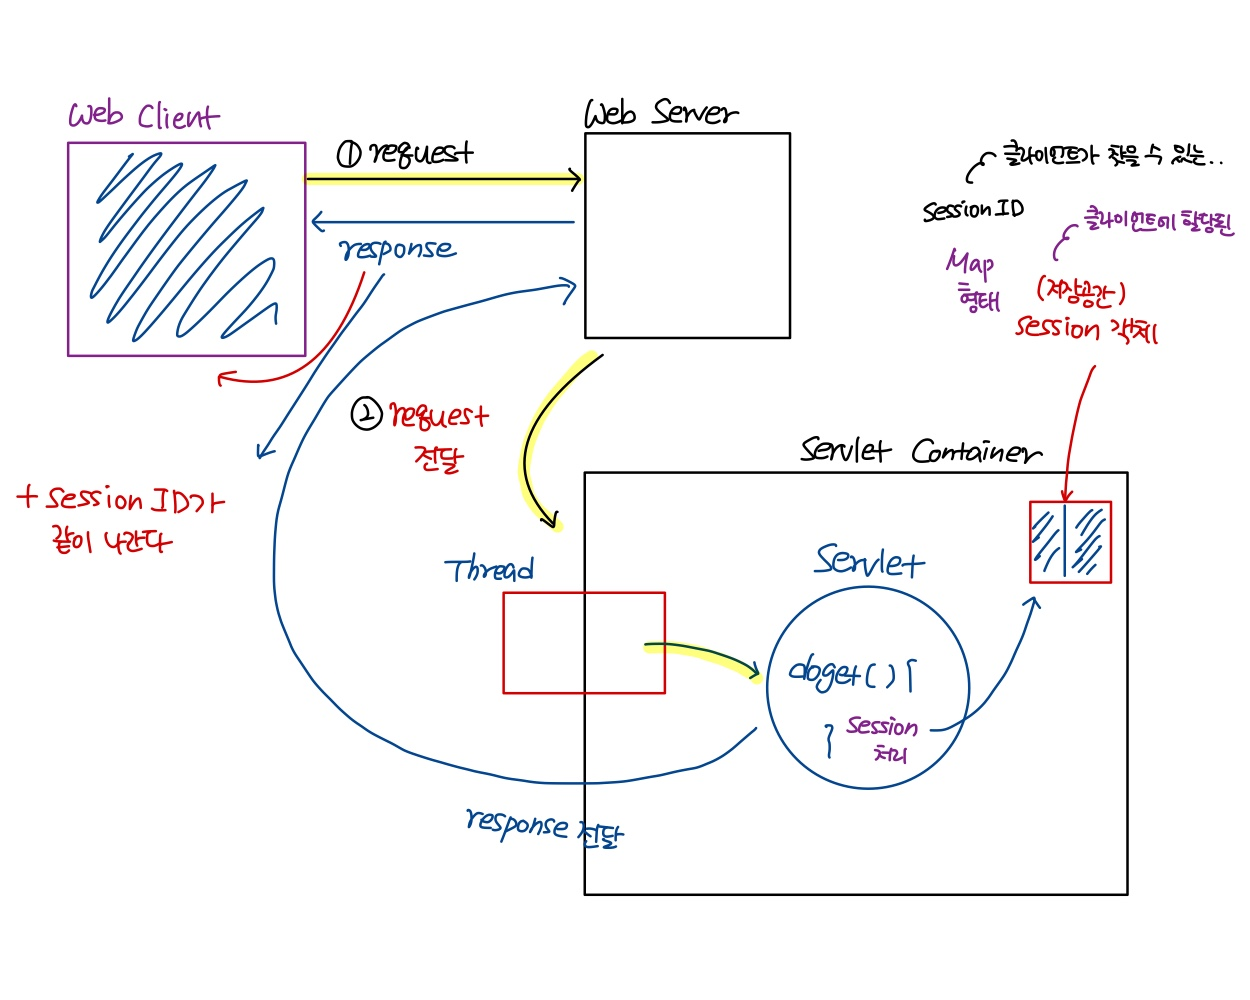
- session 처리를 통해서 이 문제를 해결해 보아요!
Session ⏰
- session은 분 단위의 시간 설정을 해줄 수 있고, 타임아웃되면 객체를 사용할 수 없는 상태가 된다.
- 웹 컨테이너는 기본적으로 한 웹 브라우저마다 한 세션을 생성한다.
- 웹 브라우저마다 세션이 따로 존재하기 때문에, 세션은 웹 브라우저와 관련된 정보를 저장하기에 알맞은 장소이다.
mysession 코드
protected void doGet(HttpServletRequest request, HttpServletResponse response) throws ServletException, IOException {
		// 1. 입력
		String id = request.getParameter("myID");
		// 2. 로직
		//    해당 client에게 session을 할당하거나 할당된 session을 찾아와요!
		HttpSession session = request.getSession();
		session.setAttribute("id", id);
		// 3. 출력
	}
usesession 코드
// 1. 입력
		// 2. 로직
		HttpSession session = request.getSession();
		String result = (String)session.getAttribute("id");
		// 3. 출력
		response.setContentType("text/html; charset=UTF-8");
		PrintWriter out = new PrintWriter(response.getOutputStream());
		out.println("얻어낸 결과는 : "+result);
		out.close();
session에 데이터를 저장
http://localhost:8080/html/mysession?myID=kim
session에서 데이터를 추출
http://localhost:8080/html/usesession
얻어낸 결과는 : kim다른 브라우저에서 usesession을 불러오면, null로 뜬다.
즉, 한 웹 브라우저마다 한 세션을 생성한다.