이 글은 CloudNet@팀의 AWS EKS Workshop Study(AEWS) 3기 스터디 내용을 바탕으로 작성되었습니다.
AEWS는 CloudNet@의 '가시다'님께서 진행하는 스터디로, EKS를 학습하는 과정입니다.
EKS를 깊이 있게 이해할 기회를 주시고, 소중한 지식을 나눠주시는 가시다님께 다시 한번 감사드립니다.
이 글이 EKS를 학습하는 분들께 도움이 되길 바랍니다.
1. Terraform을 활용한 Fargate 실습 환경 구성
1.1 Amazon EKS Blueprints for Terraform 개요
Amazon EKS Blueprints for Terraform는 AWS에서 제공하는 EKS 환경 구성 예제 모음으로, 사용자가 빠르게 EKS 아키텍처를 구성하고 테스트할 수 있도록 설계된 패턴 기반 리소스 정의 템플릿 집합입니다. 해당 프로젝트는 더 이상 공식적으로 업데이트되지 않으며, 현재는 참고 목적으로만 사용이 권장됩니다.
🔗 공식 문서: EKS Blueprints 홈페이지
🔗 FAQ: EKS Blueprints FAQ
사용 시 고려사항
- 해당 프로젝트는 그대로 복사하여 사용하는 것을 목적으로 하지 않습니다.
- 예제는 Terraform 모듈로 설계되지 않았기 때문에, 변수(variables)와 출력값(outputs)이 제한적이며 대부분 local 블록으로 구성되어 있습니다.
- 클러스터와 애드온을 하나의 작업 공간에 정의했지만, HashiCorp는 리소스 구성과 클러스터 정의를 분리할 것을 권장하고 있습니다.
- 실습을 단순화하기 위해 패턴은 VPC 생성까지 포함하며, 대부분의 사용자가 이미 갖고 있는 기존 VPC와는 별도로 신규 VPC를 배포합니다.
1.2 환경 구성 개요
Terraform을 이용하여 AWS EKS 클러스터를 Fargate 기반으로 배포하는 과정입니다. 이를 통해 서버리스 환경에서 컨테이너를 관리하는 방법을 익힙니다. 실습 환경은 terraform-aws-eks-blueprints 모듈을 사용하여 구성하며, 다음 주요 단계를 포함합니다.
AWS EKS Fargate 아키텍처 (추정 포함)
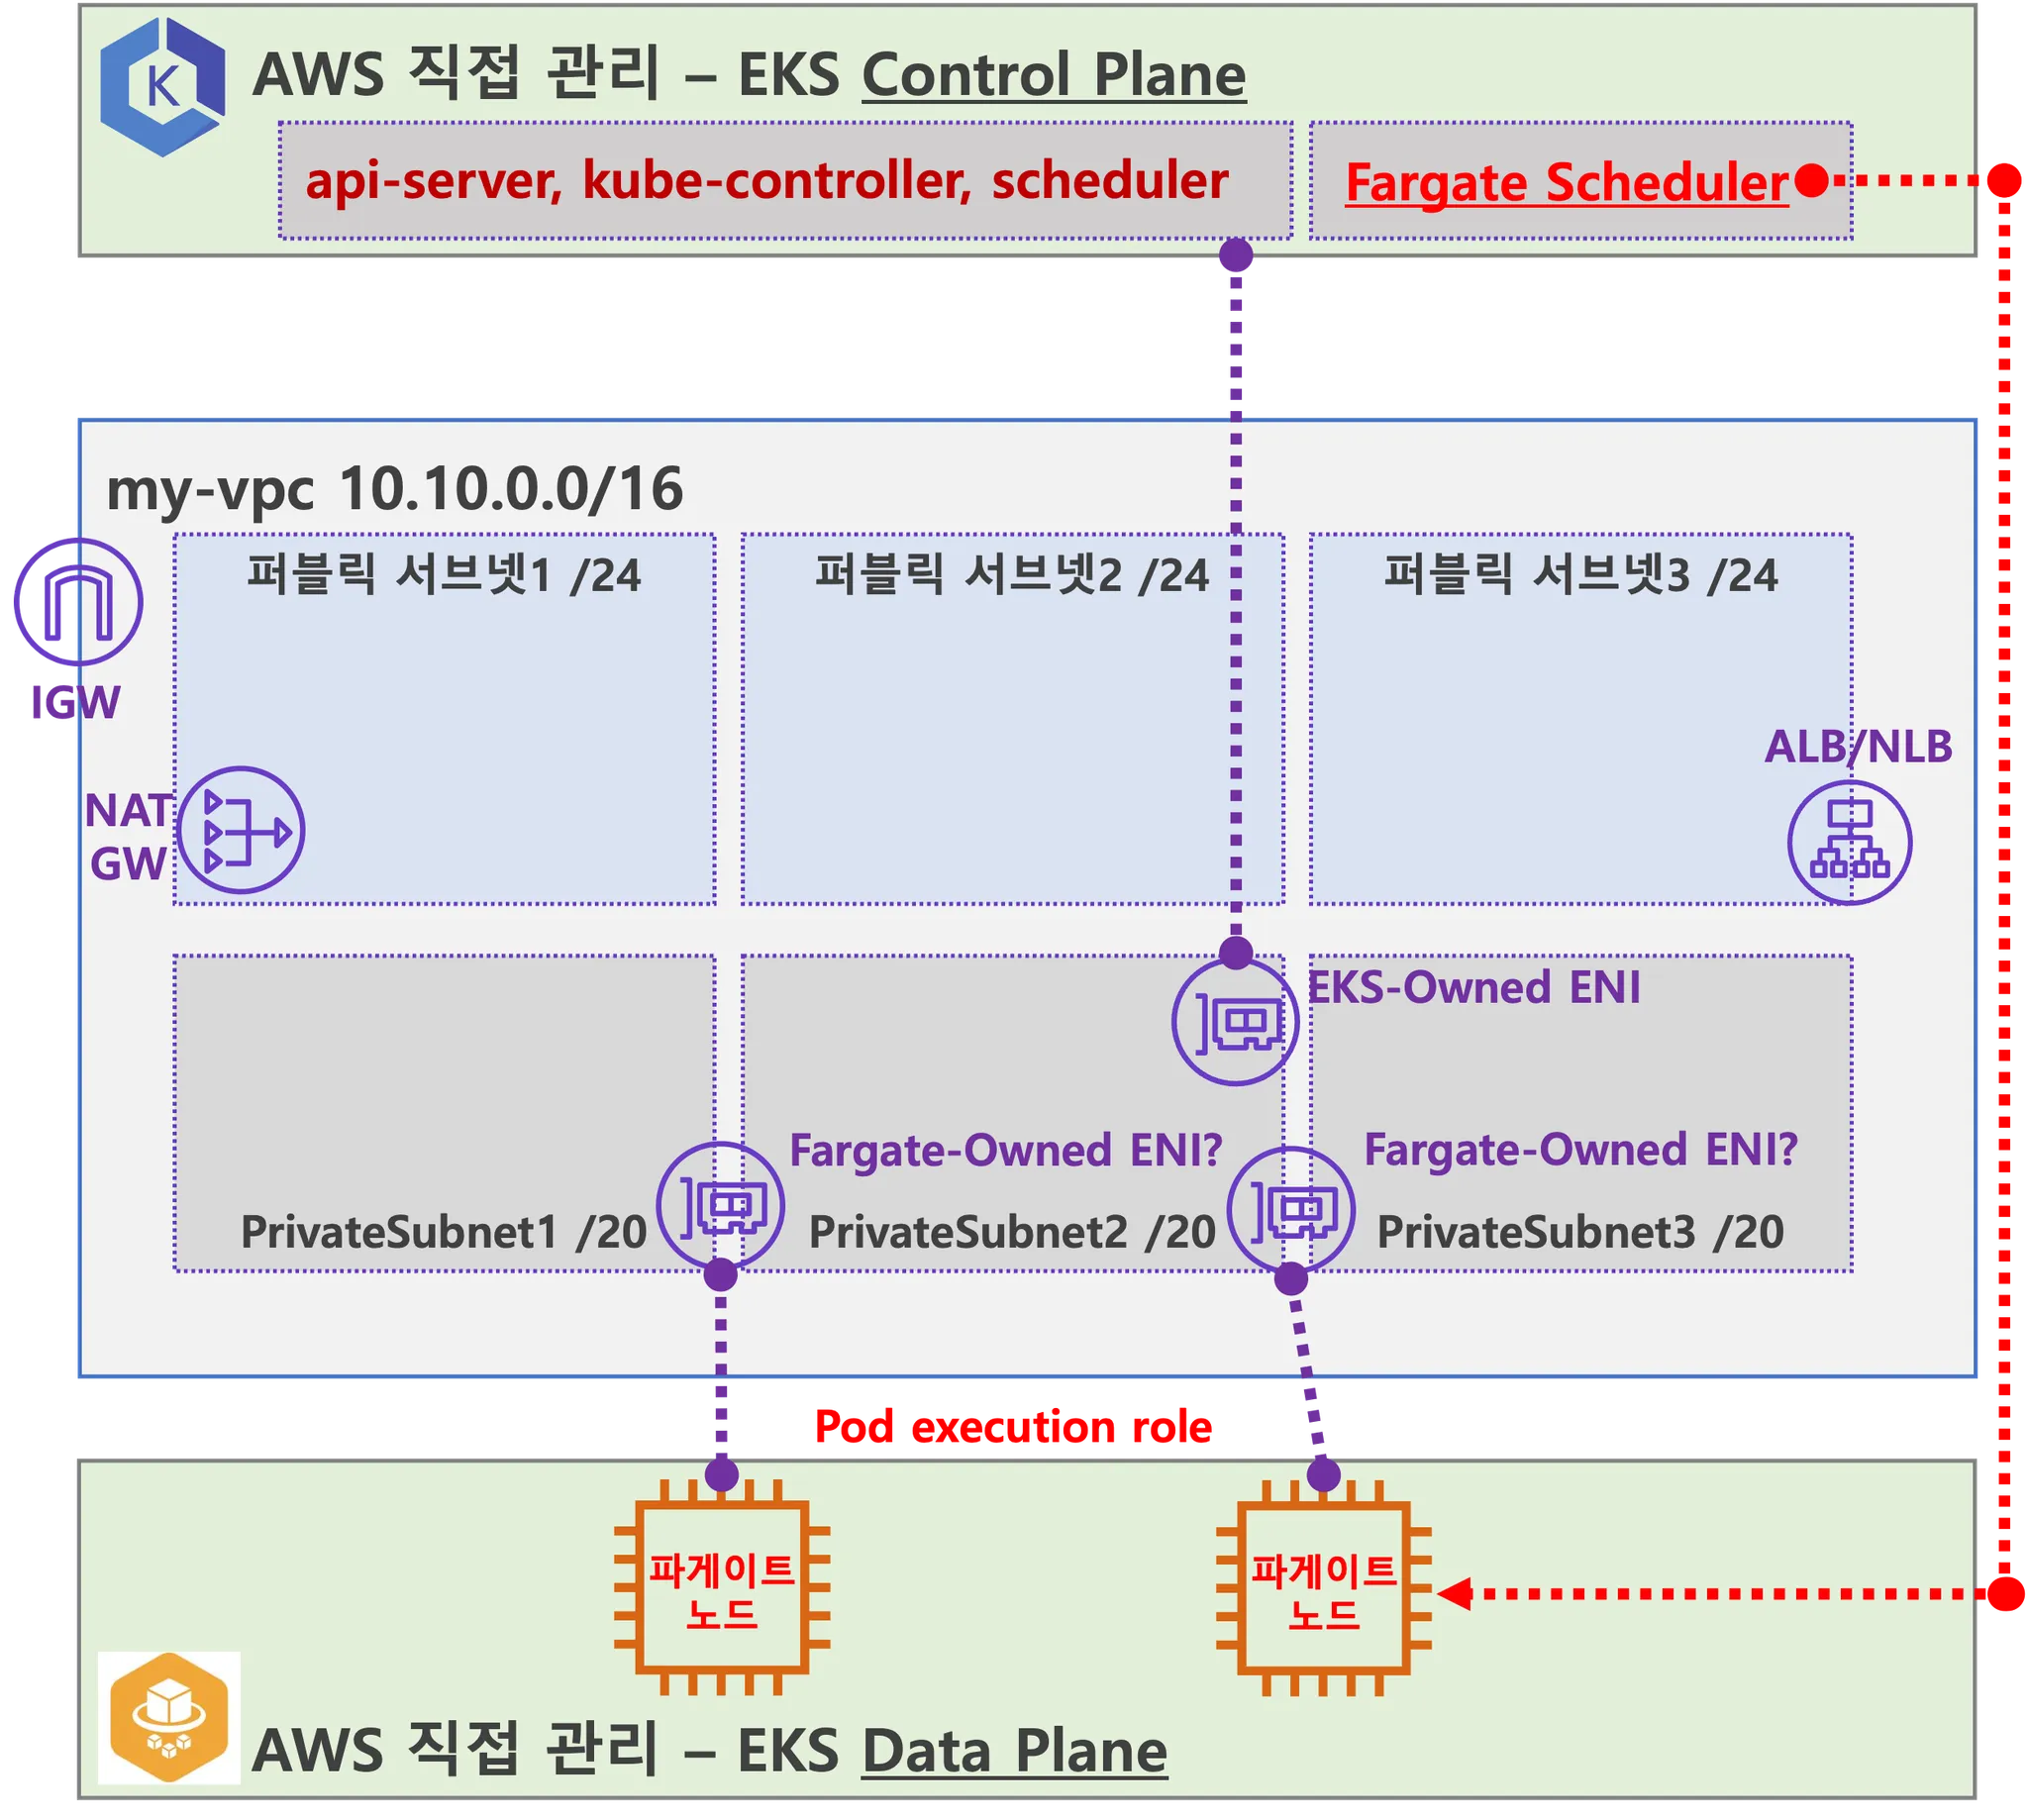
주요 구성 요소:
- EKS 클러스터 (Fargate 기반)
- Fargate 프로파일 (study-*, kube-system 네임스페이스에 적용)
- VPC 및 서브넷 자동 설정
- EKS Add-ons 설치 (CoreDNS, VPC-CNI, Kube-Proxy 등)
- AWS Load Balancer Controller 적용
- Fargate FluentBit 로깅 활성화
1.3 코드 다운로드 및 환경 설정
1.3.1 코드 가져오기
Terraform 코드를 포함하는 GitHub 저장소를 클론하고, Fargate 관련 실습 디렉토리로 이동합니다.
git clone https://github.com/aws-ia/terraform-aws-eks-blueprints
tree terraform-aws-eks-blueprints/patterns
cd terraform-aws-eks-blueprints/patterns/fargate-serverless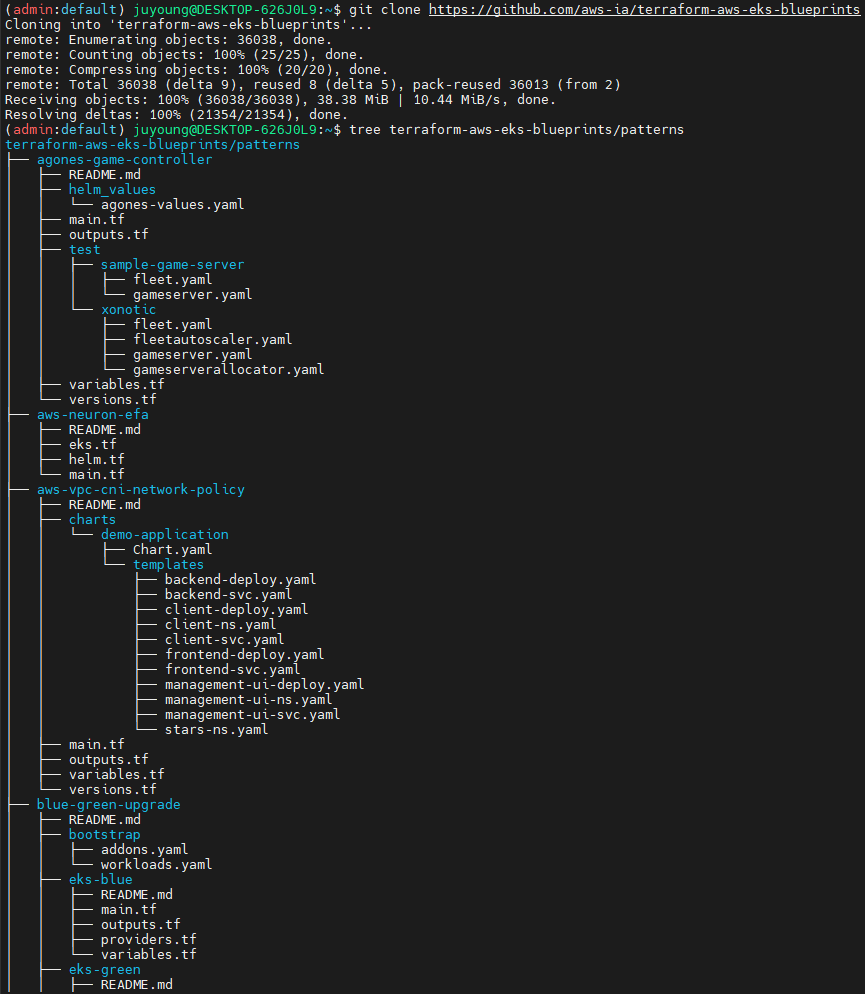
1.4 Terraform 코드 수정 (main.tf)
주요 수정 사항
- AWS 리전 설정:
ap-northeast-2로 지정 - VPC 서브넷 CIDR 변경:
0.10.0.0/16 - Cluster Version 업데이트:
1.30 - Sample App 배포 삭제
- Fargate Profiles 정의:
study-*네임스페이스 포함
provider "aws" {
  region = local.region
}

provider "kubernetes" {
  host                   = module.eks.cluster_endpoint
  cluster_ca_certificate = base64decode(module.eks.cluster_certificate_authority_data)

  exec {
    api_version = "client.authentication.k8s.io/v1beta1"
    command     = "aws"
    # This requires the awscli to be installed locally where Terraform is executed
    args = ["eks", "get-token", "--cluster-name", module.eks.cluster_name]
  }
}

provider "helm" {
  kubernetes {
    host                   = module.eks.cluster_endpoint
    cluster_ca_certificate = base64decode(module.eks.cluster_certificate_authority_data)

    exec {
      api_version = "client.authentication.k8s.io/v1beta1"
      command     = "aws"
      # This requires the awscli to be installed locally where Terraform is executed
      args = ["eks", "get-token", "--cluster-name", module.eks.cluster_name]
    }
  }
}

data "aws_availability_zones" "available" {
  # Do not include local zones
  filter {
    name   = "opt-in-status"
    values = ["opt-in-not-required"]
  }
}

locals {
  name     = basename(path.cwd)
  region   = "ap-northeast-2"

  vpc_cidr = "10.10.0.0/16"
  azs      = slice(data.aws_availability_zones.available.names, 0, 3)

  tags = {
    Blueprint  = local.name
    GithubRepo = "github.com/aws-ia/terraform-aws-eks-blueprints"
  }
}

################################################################################
# Cluster
################################################################################

module "eks" {
  source  = "terraform-aws-modules/eks/aws"
  version = "~> 20.11"

  cluster_name                   = local.name
  cluster_version                = "1.30"
  cluster_endpoint_public_access = true

  # Give the Terraform identity admin access to the cluster
  # which will allow resources to be deployed into the cluster
  enable_cluster_creator_admin_permissions = true

  vpc_id     = module.vpc.vpc_id
  subnet_ids = module.vpc.private_subnets

  # Fargate profiles use the cluster primary security group so these are not utilized
  create_cluster_security_group = false
  create_node_security_group    = false

  fargate_profiles = {
    study_wildcard = {
      selectors = [
        { namespace = "study-*" }
      ]
    }
    kube_system = {
      name = "kube-system"
      selectors = [
        { namespace = "kube-system" }
      ]
    }
  }

  fargate_profile_defaults = {
    iam_role_additional_policies = {
      additional = module.eks_blueprints_addons.fargate_fluentbit.iam_policy[0].arn
    }
  }

  tags = local.tags
}

################################################################################
# EKS Blueprints Addons
################################################################################

module "eks_blueprints_addons" {
  source  = "aws-ia/eks-blueprints-addons/aws"
  version = "~> 1.16"

  cluster_name      = module.eks.cluster_name
  cluster_endpoint  = module.eks.cluster_endpoint
  cluster_version   = module.eks.cluster_version
  oidc_provider_arn = module.eks.oidc_provider_arn

  # We want to wait for the Fargate profiles to be deployed first
  create_delay_dependencies = [for prof in module.eks.fargate_profiles : prof.fargate_profile_arn]

  # EKS Add-ons
  eks_addons = {
    coredns = {
      configuration_values = jsonencode({
        computeType = "Fargate"
        # Ensure that the we fully utilize the minimum amount of resources that are supplied by
        # Fargate https://docs.aws.amazon.com/eks/latest/userguide/fargate-pod-configuration.html
        # Fargate adds 256 MB to each pod's memory reservation for the required Kubernetes
        # components (kubelet, kube-proxy, and containerd). Fargate rounds up to the following
        # compute configuration that most closely matches the sum of vCPU and memory requests in
        # order to ensure pods always have the resources that they need to run.
        resources = {
          limits = {
            cpu = "0.25"
            # We are targeting the smallest Task size of 512Mb, so we subtract 256Mb from the
            # request/limit to ensure we can fit within that task
            memory = "256M"
          }
          requests = {
            cpu = "0.25"
            # We are targeting the smallest Task size of 512Mb, so we subtract 256Mb from the
            # request/limit to ensure we can fit within that task
            memory = "256M"
          }
        }
      })
    }
    vpc-cni    = {}
    kube-proxy = {}
  }

  # Enable Fargate logging this may generate a large ammount of logs, disable it if not explicitly required
  enable_fargate_fluentbit = true
  fargate_fluentbit = {
    flb_log_cw = true
  }

  enable_aws_load_balancer_controller = true
  aws_load_balancer_controller = {
    set = [
      {
        name  = "vpcId"
        value = module.vpc.vpc_id
      },
      {
        name  = "podDisruptionBudget.maxUnavailable"
        value = 1
      },
    ]
  }

  tags = local.tags
}

################################################################################
# Supporting Resources
################################################################################

module "vpc" {
  source  = "terraform-aws-modules/vpc/aws"
  version = "~> 5.0"

  name = local.name
  cidr = local.vpc_cidr

  azs             = local.azs
  private_subnets = [for k, v in local.azs : cidrsubnet(local.vpc_cidr, 4, k)]
  public_subnets  = [for k, v in local.azs : cidrsubnet(local.vpc_cidr, 8, k + 48)]

  enable_nat_gateway = true
  single_nat_gateway = true

  public_subnet_tags = {
    "kubernetes.io/role/elb" = 1
  }

  private_subnet_tags = {
    "kubernetes.io/role/internal-elb" = 1
  }

  tags = local.tags
}
1.5 Terraform 초기화 및 배포
Terraform을 실행하기 전에 초기화(init) 를 진행, 배포 전에 Terraform의 실행 계획을 확인하고 배포를 진행합니다. 배포는 약 13분 소요됩니다.
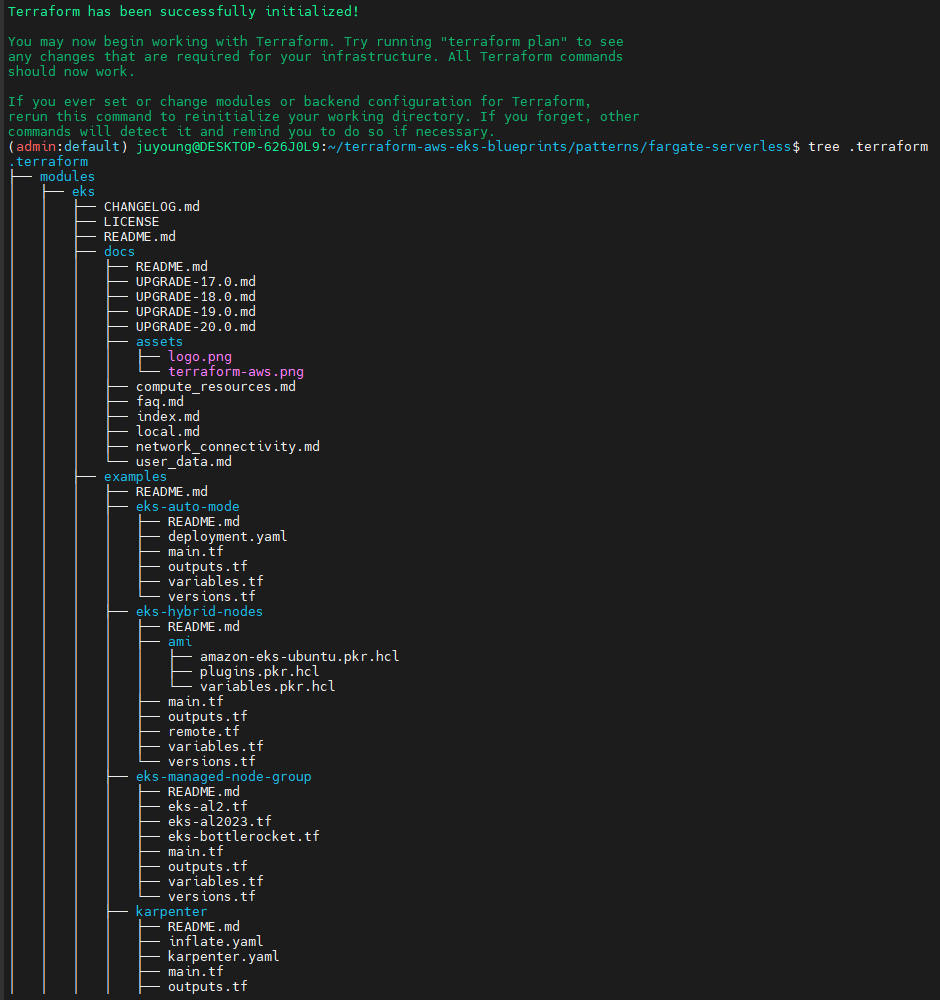
# init 초기화
terraform init
tree .terraform
cat .terraform/modules/modules.json | jq
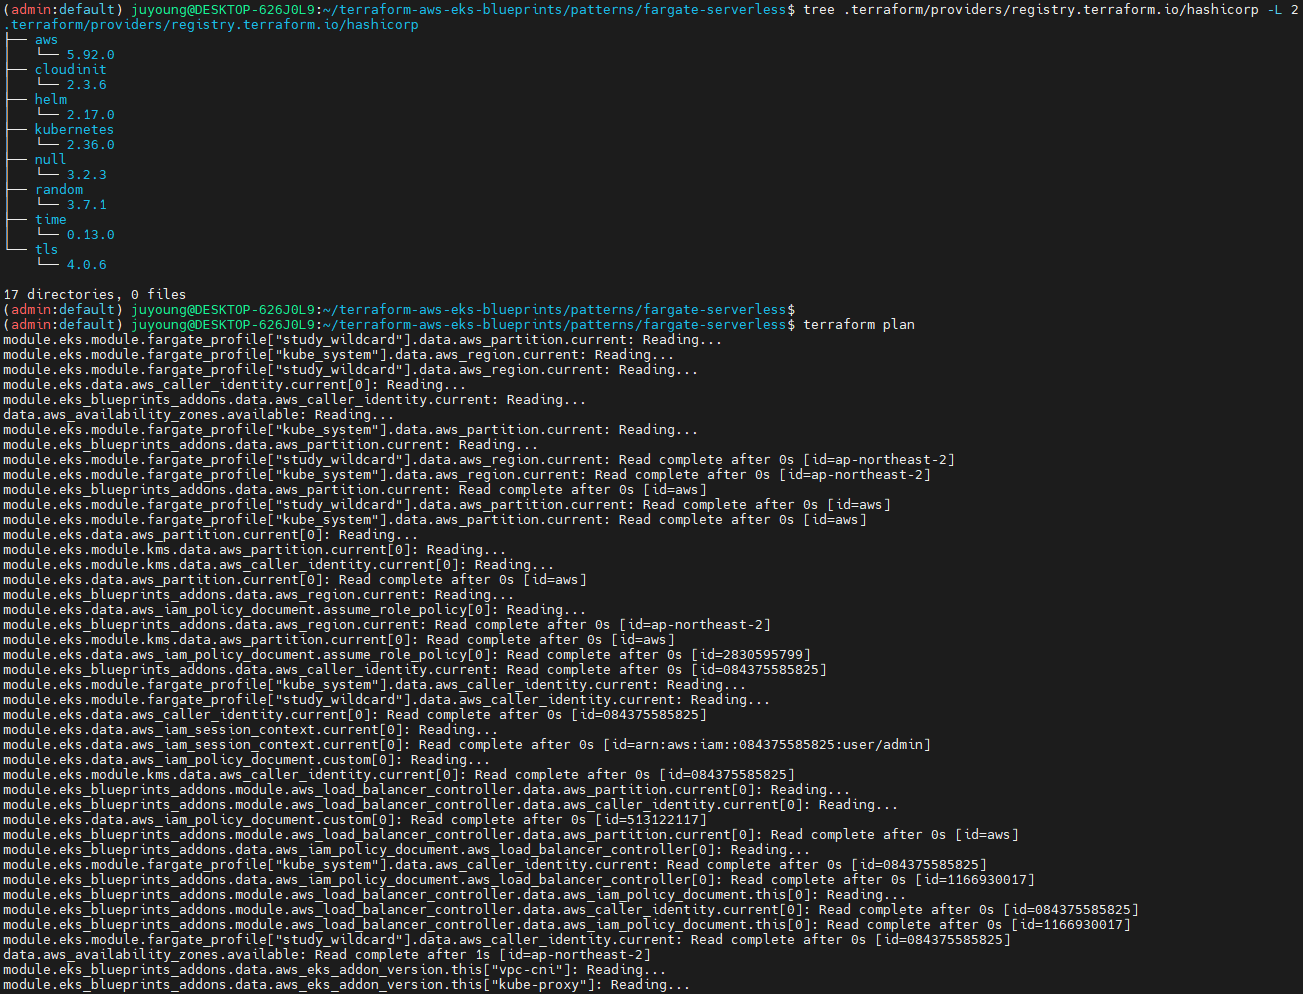
tree .terraform/providers/registry.terraform.io/hashicorp -L 2
# plan 확인
terraform plan
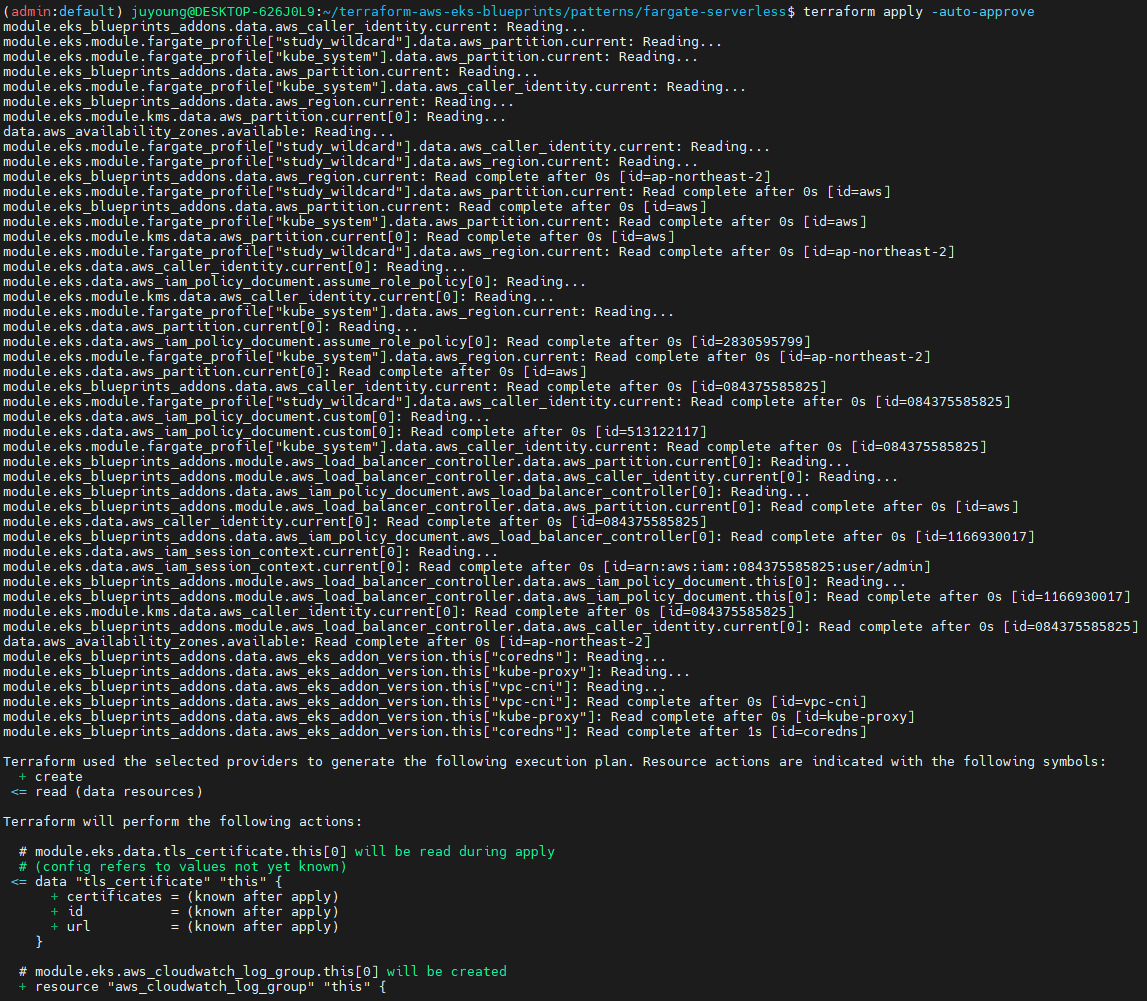
# 배포 : EKS, Add-ons, fargate profile - 13분 소요
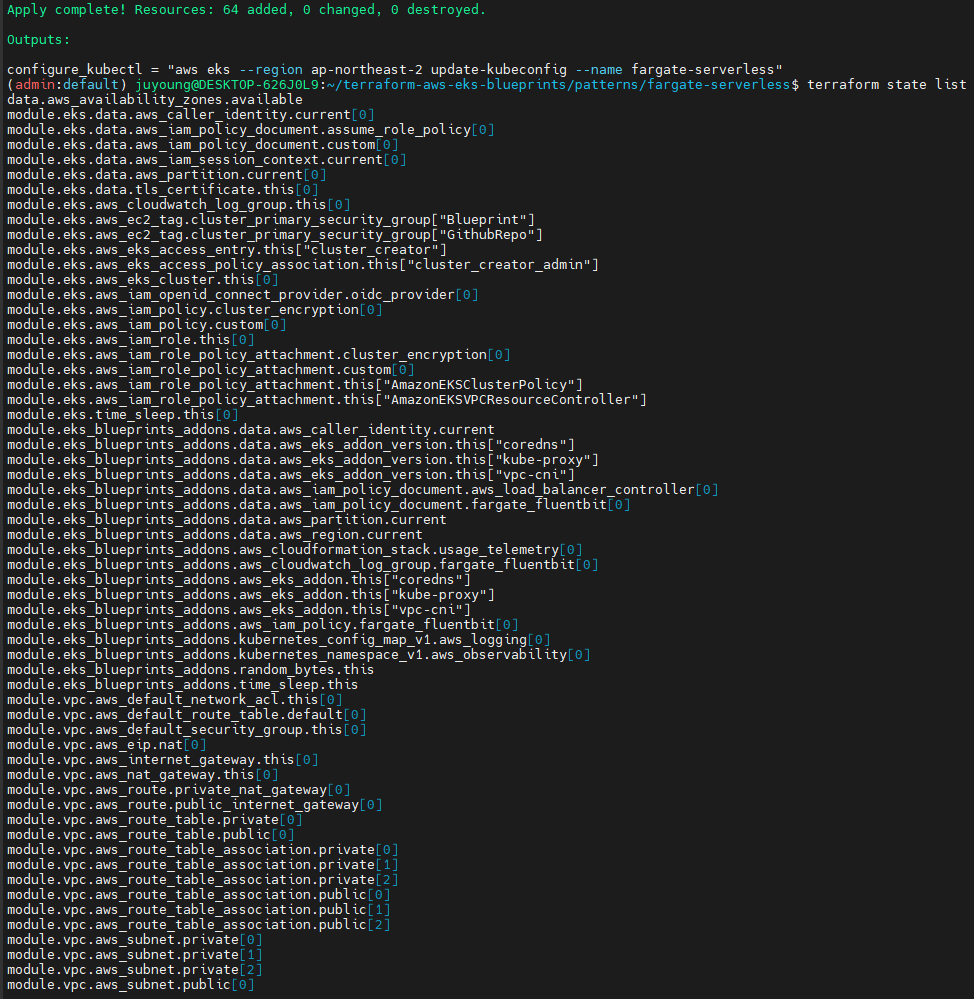
terraform apply -auto-approve
# 배포 완료 후 확인
terraform state list
# 출력 예시
module.eks.data.aws_caller_identity.current
...
terraform output
...

1.6 EKS 클러스터 및 Kubernetes 설정
# EKS 자격증명 설정
$(terraform output -raw configure_kubectl) # aws eks --region ap-northeast-2 update-kubeconfig --name fargate-serverless
cat ~/.kube/config

# Kubernetes Context 변경
kubectl ctx

# context 이름 변경
kubectl config rename-context "arn:aws:eks:ap-northeast-2:$(aws sts get-caller-identity --query 'Account' --output text):cluster/fargate-serverless" "fargate-lab"

# Kubernetes 클러스터 정보 확인
kubectl ns default
kubectl cluster-info
kubectl get node
kubectl get pod -A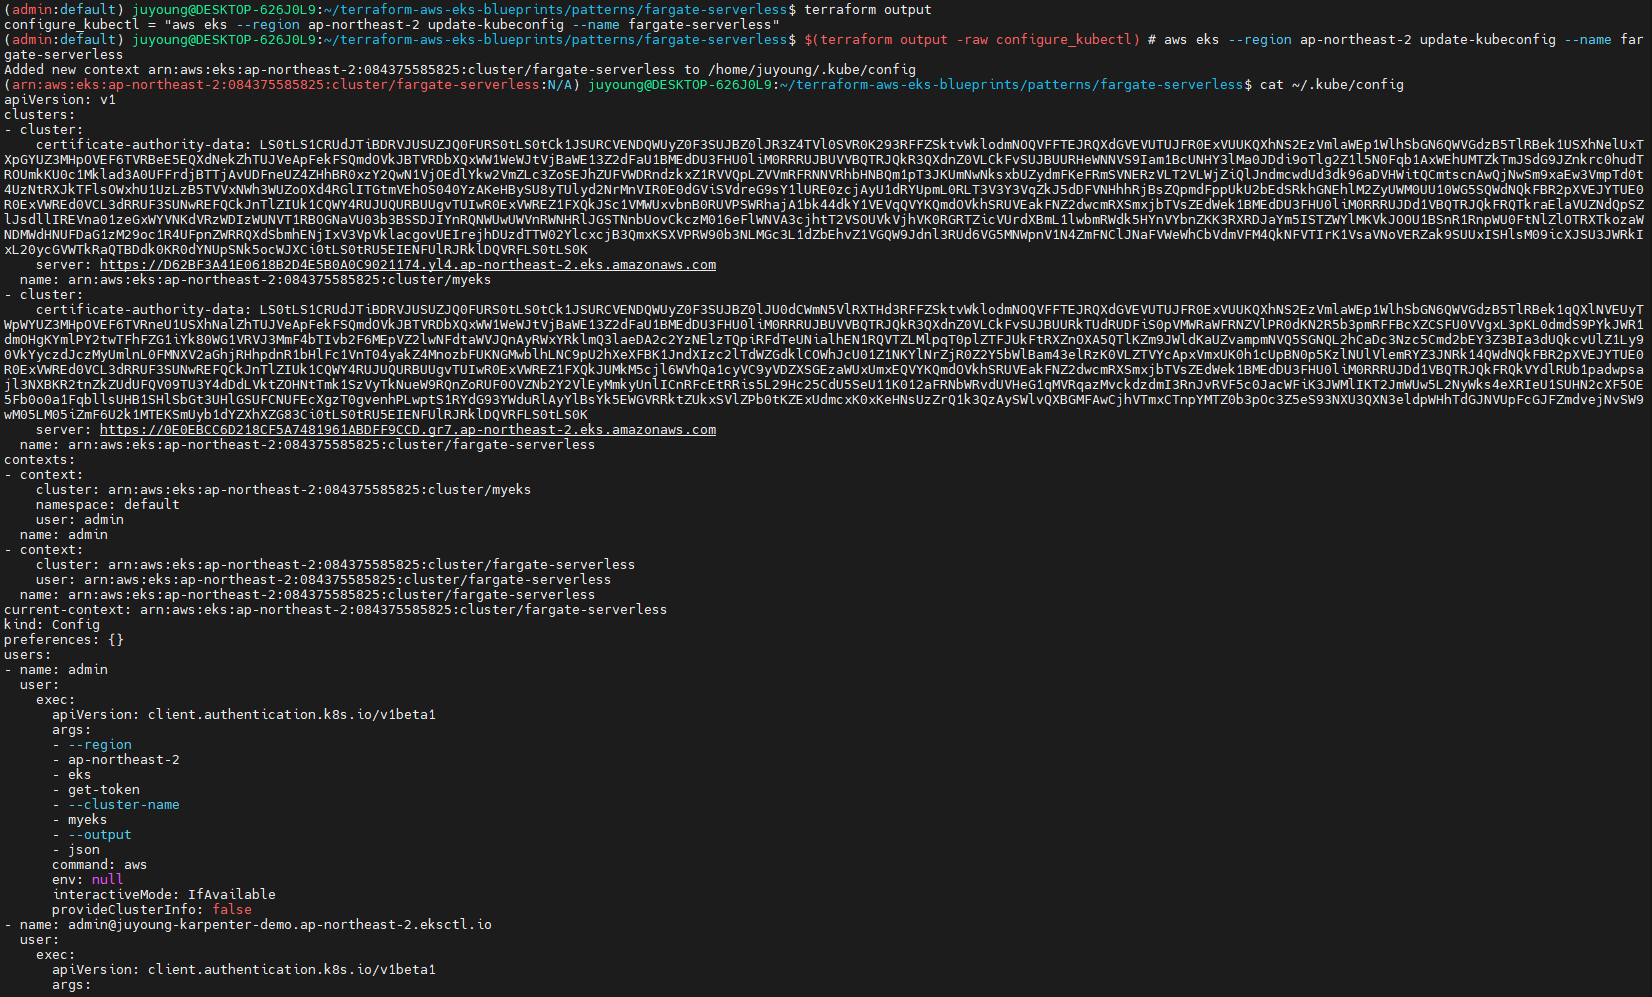
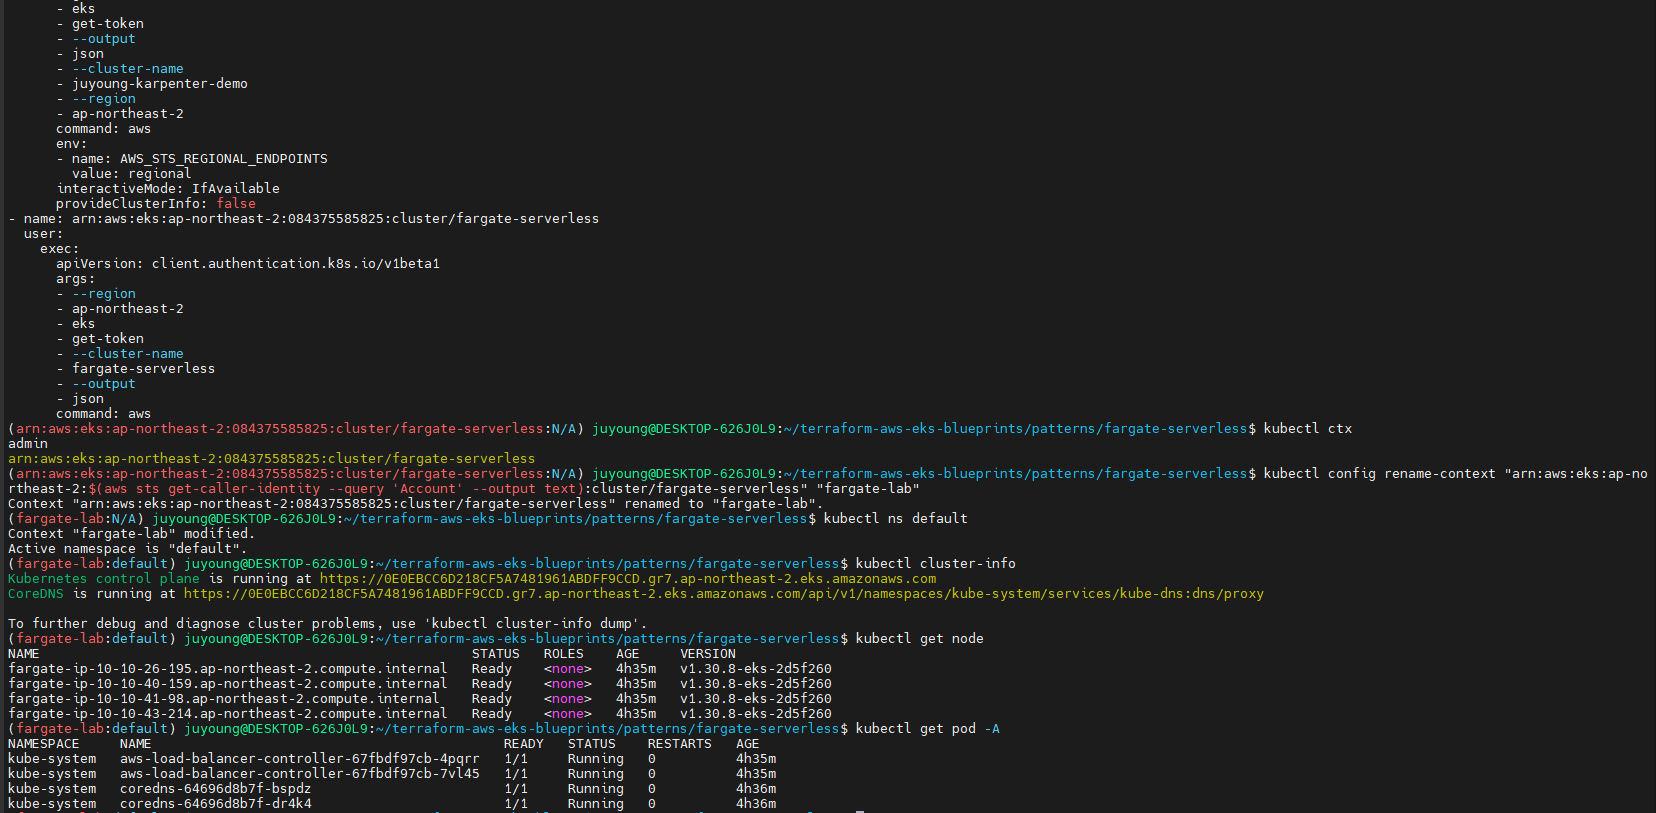
=> Pod도 4개, 노드도 4개인 것을 확인할 수 있습니다.
1.7 배포된 리소스 상세 확인
Terraform을 이용하여 생성된 리소스를 확인합니다.
# 상세 정보 확인
terraform show
...
terraform state list
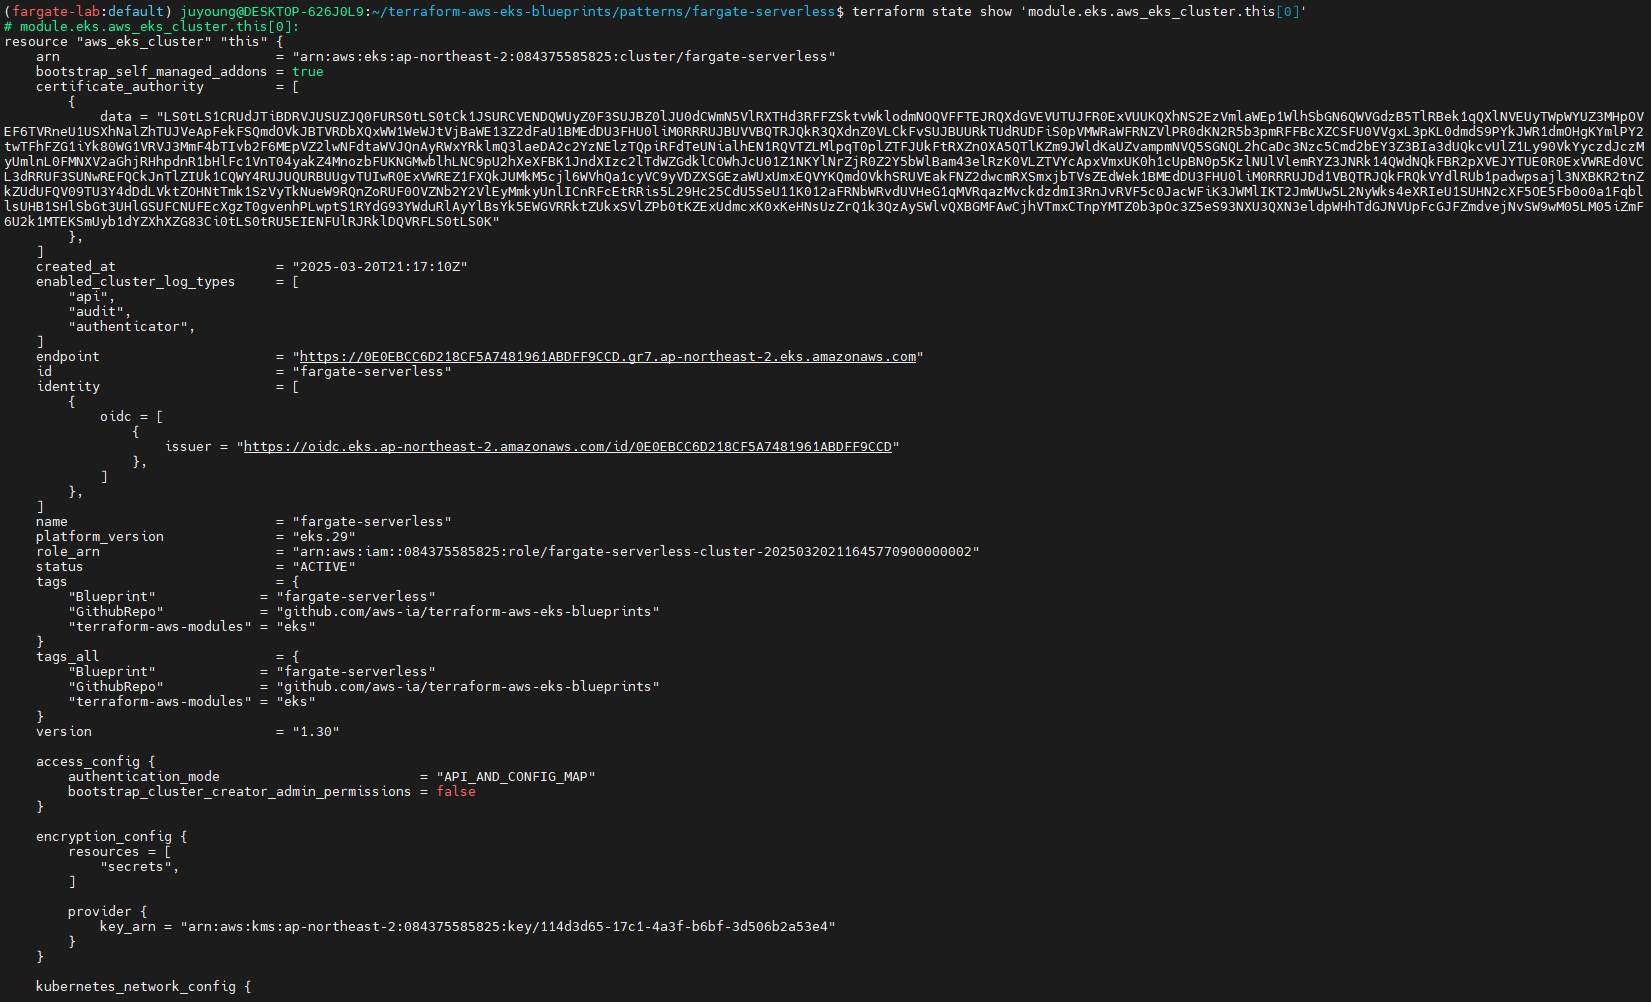
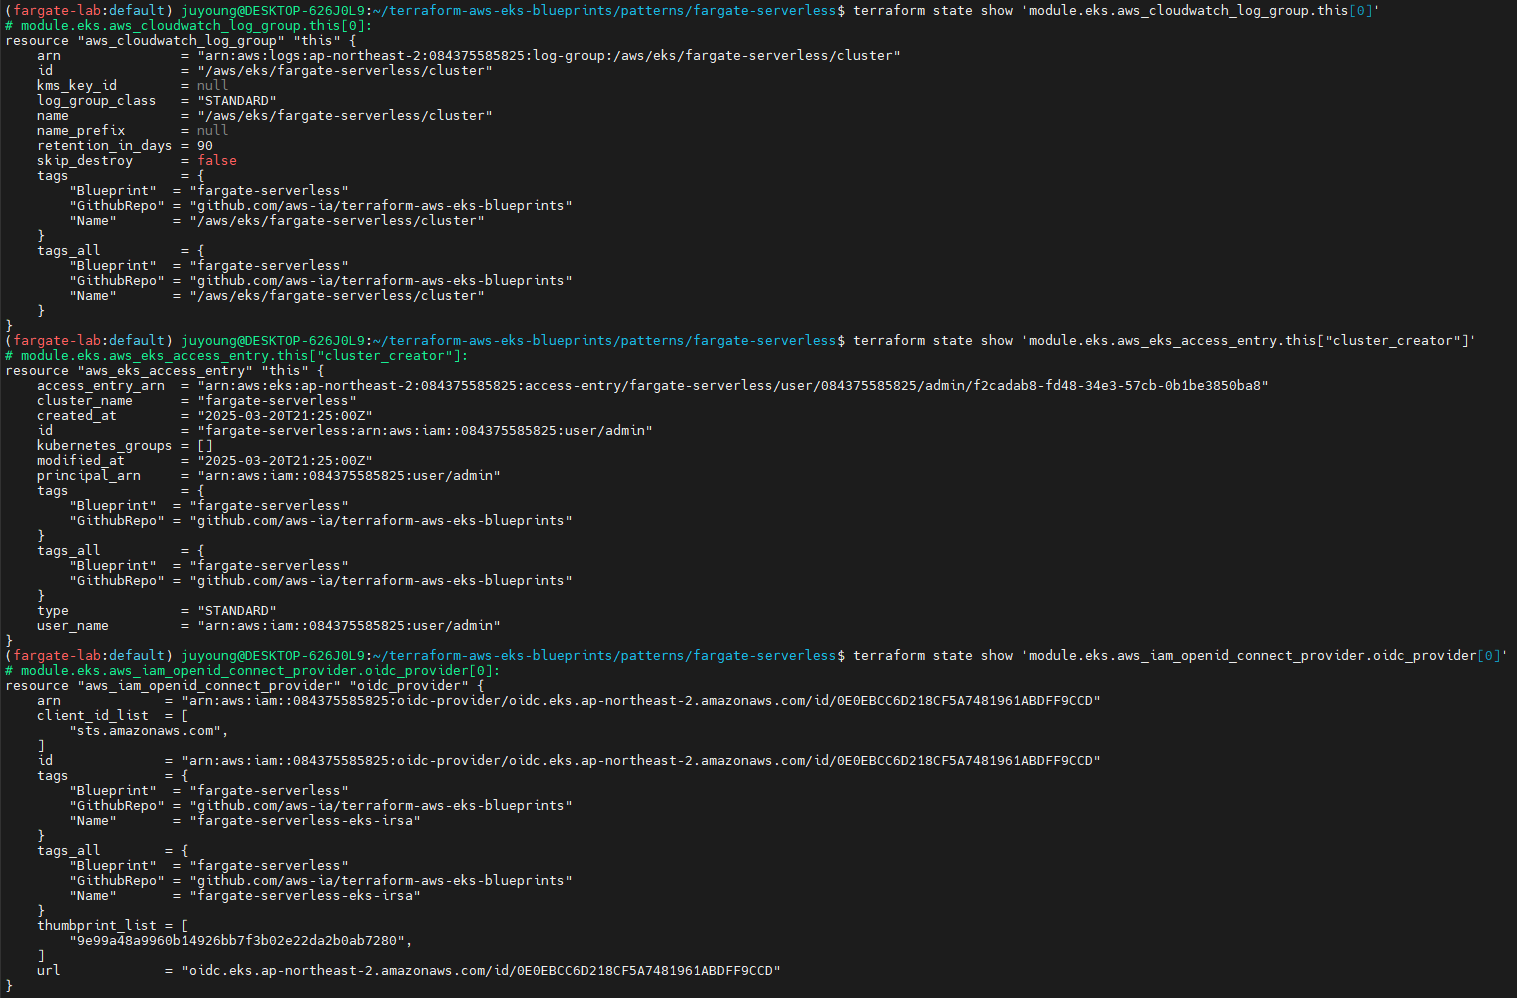
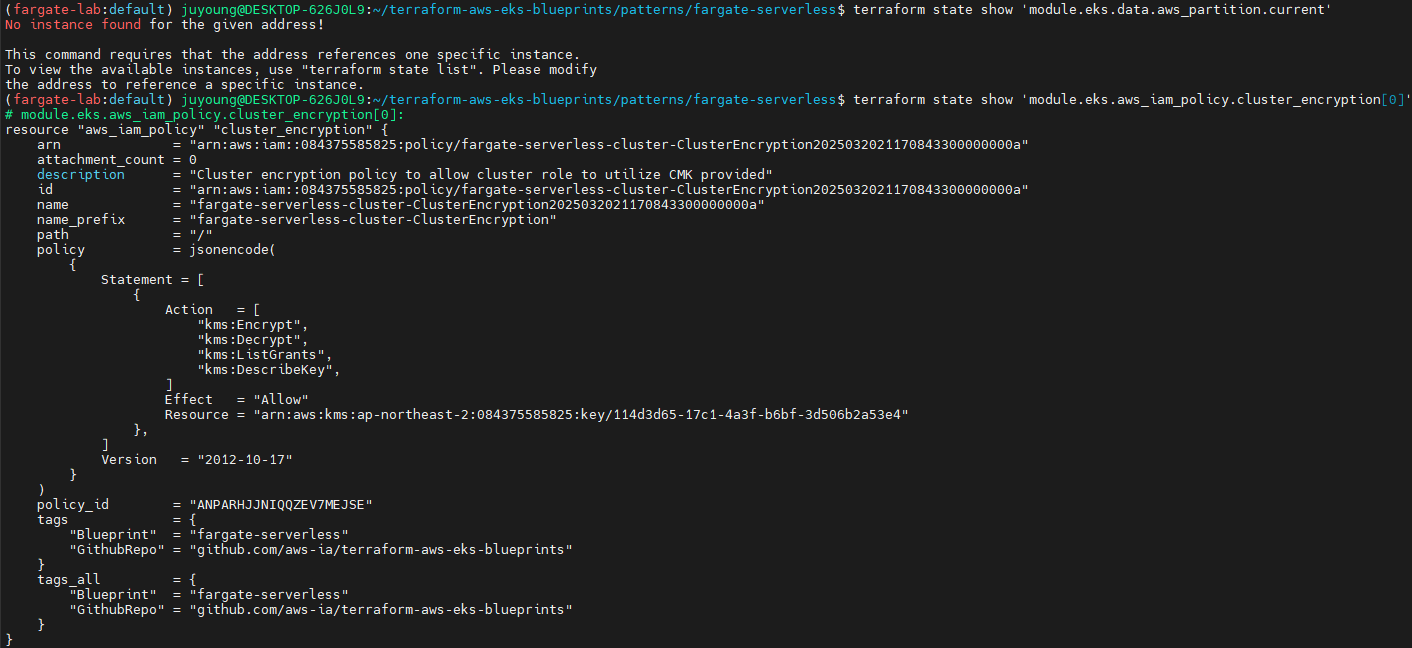
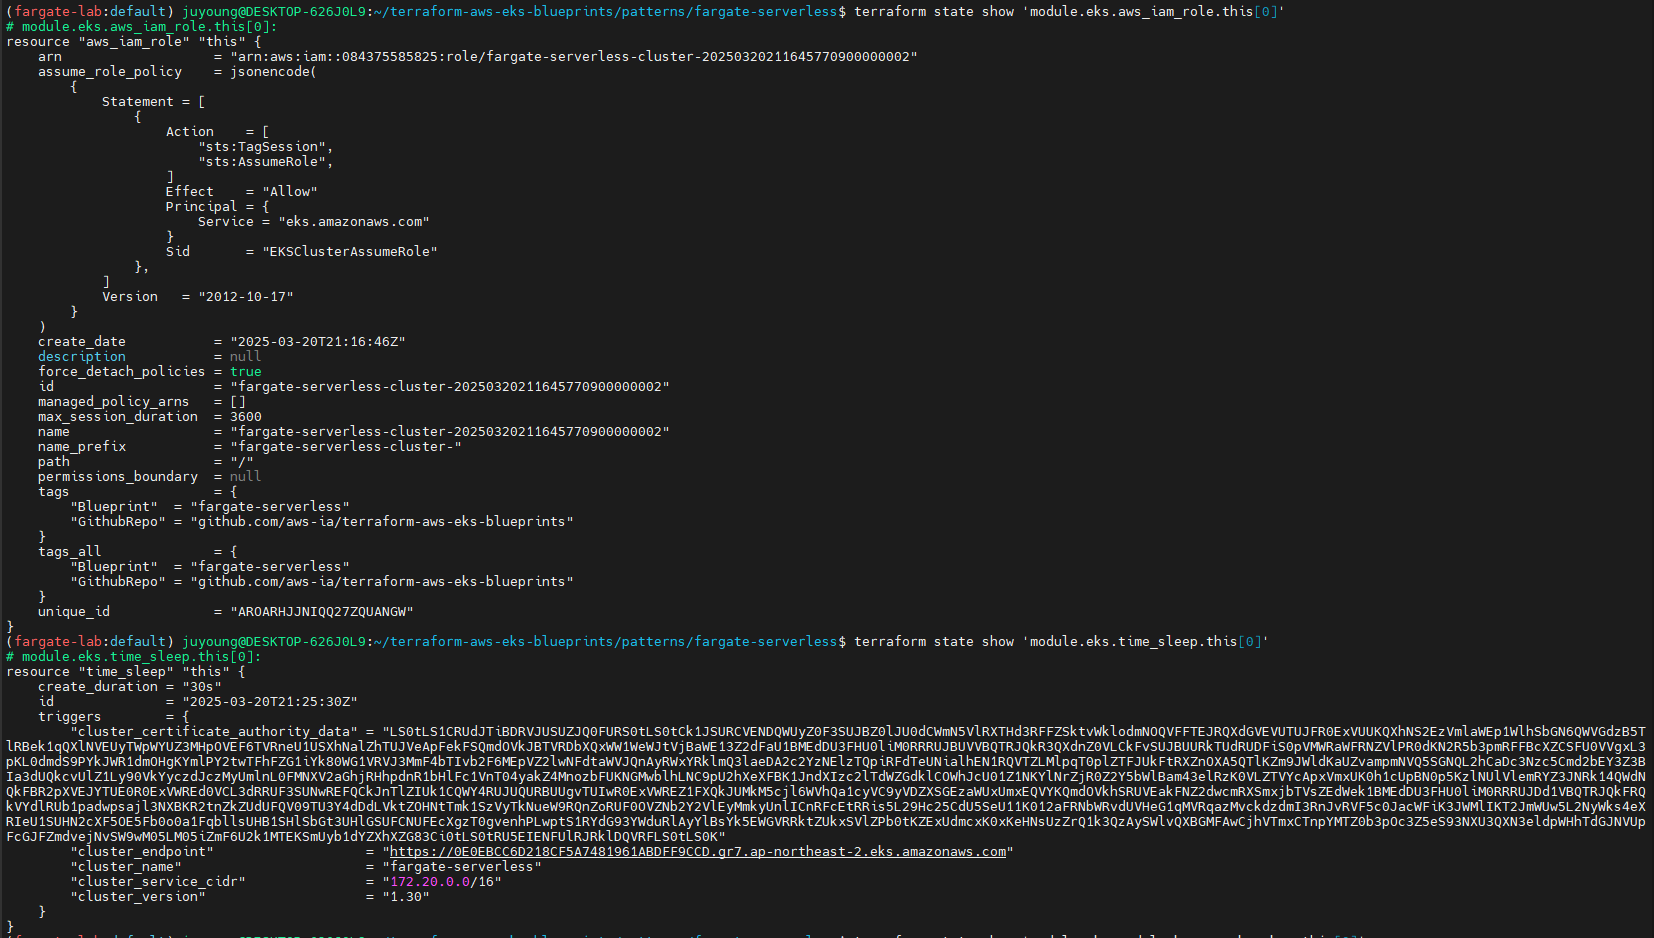
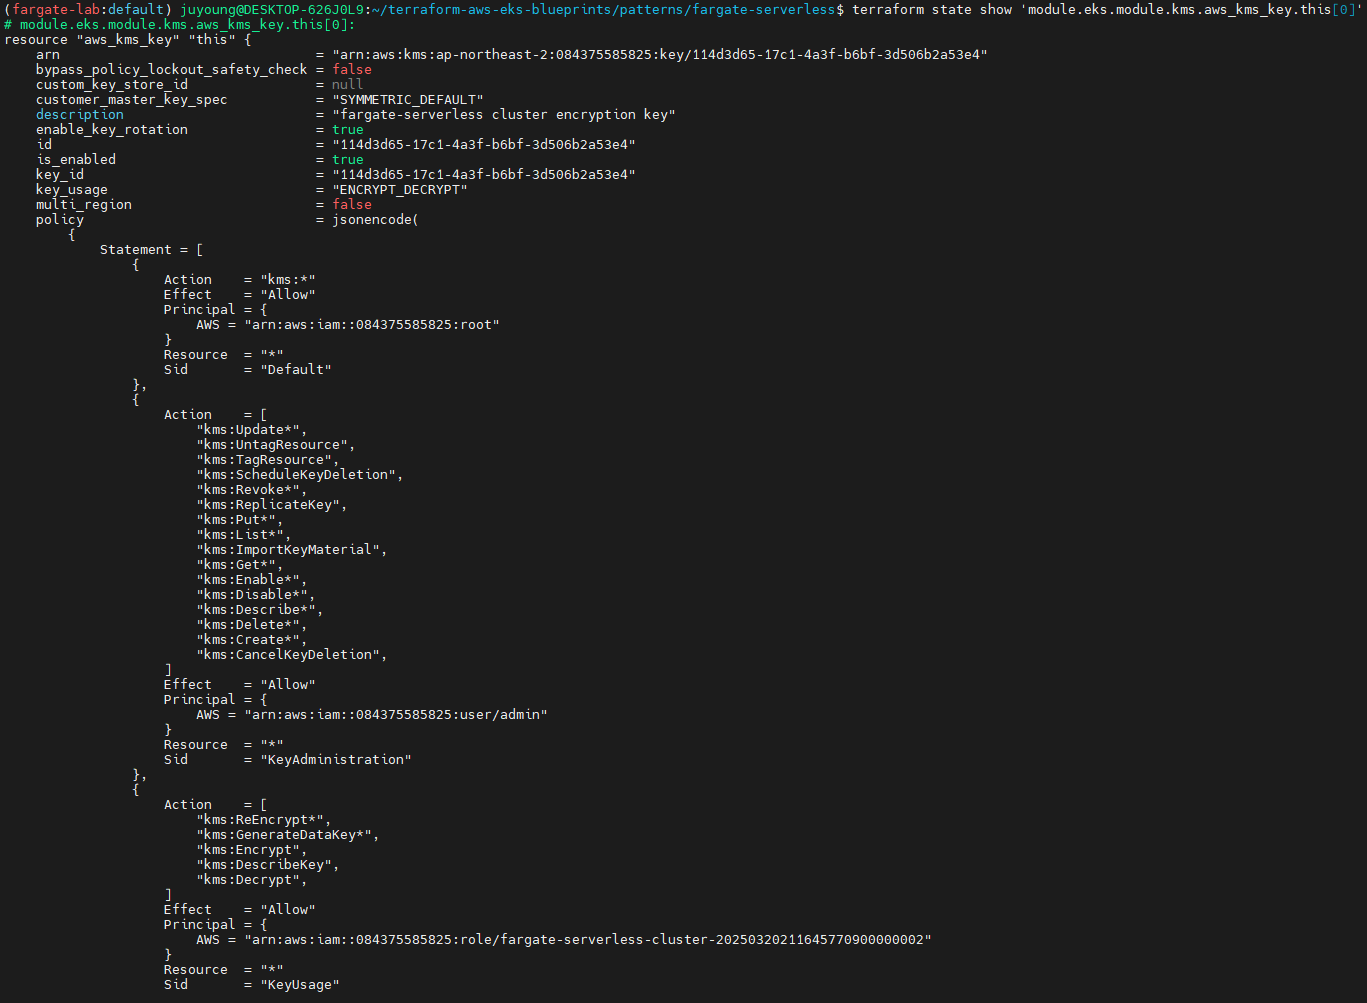
terraform state show 'module.eks.aws_eks_cluster.this[0]'
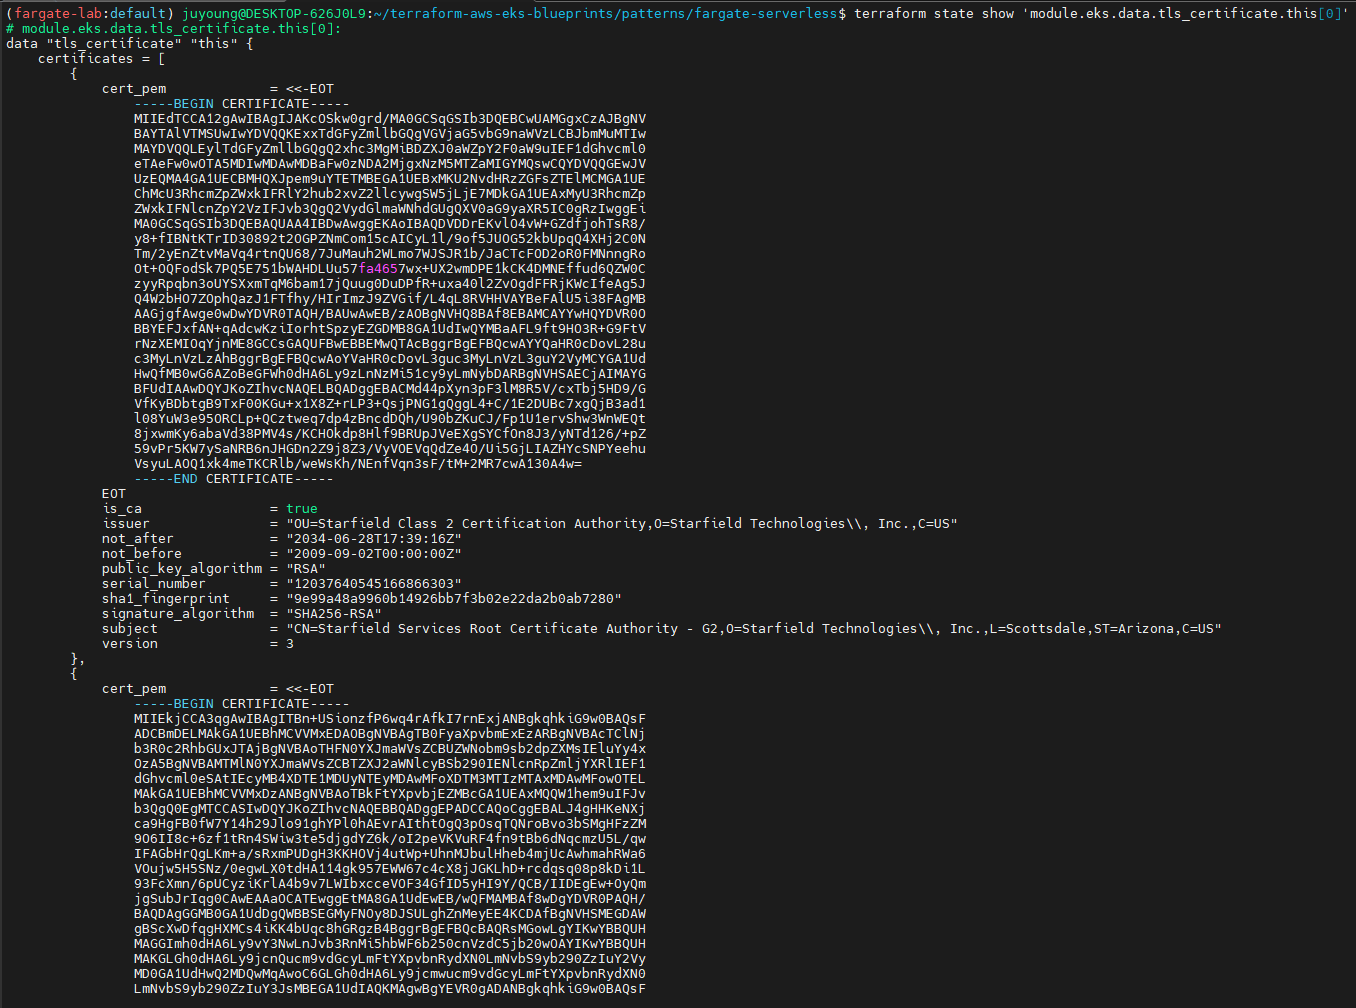
terraform state show 'module.eks.data.tls_certificate.this[0]'
terraform state show 'module.eks.aws_cloudwatch_log_group.this[0]'
terraform state show 'module.eks.aws_eks_access_entry.this["cluster_creator"]'
terraform state show 'module.eks.aws_iam_openid_connect_provider.oidc_provider[0]'
terraform state show 'module.eks.data.aws_partition.current'
terraform state show 'module.eks.aws_iam_policy.cluster_encryption[0]'
terraform state show 'module.eks.aws_iam_role.this[0]'
terraform state show 'module.eks.time_sleep.this[0]'
terraform state show 'module.eks.module.kms.aws_kms_key.this[0]'
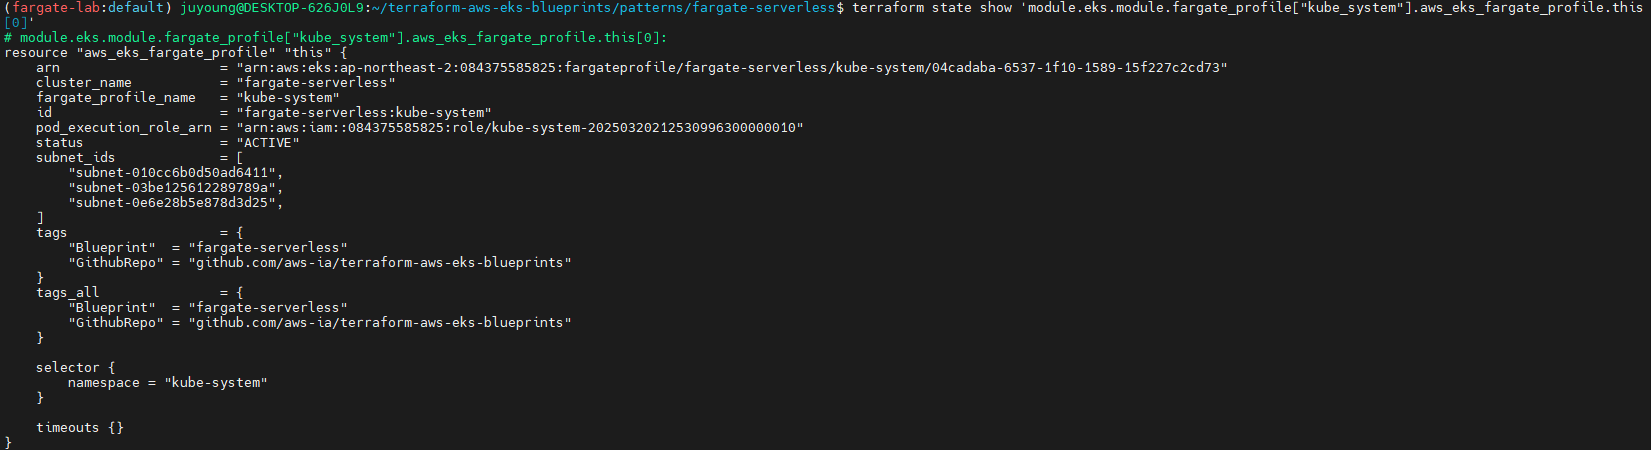
terraform state show 'module.eks.module.fargate_profile["kube_system"].aws_eks_fargate_profile.this[0]'
...
2. EKS Fargate 환경 구성 및 상태 점검 상세 분석
2.1 Kubernetes 리소스 상태 확인
2.1.1 Kubernetes API 서버 정보 확인
# k8s api service 확인 : ENDPOINTS 의 IP는 EKS Owned-ENI 2개
kubectl get svc,ep
NAME                 TYPE        CLUSTER-IP   EXTERNAL-IP   PORT(S)   AGE
service/kubernetes   ClusterIP   172.20.0.1   <none>        443/TCP   42m

NAME                   ENDPOINTS                           AGE
endpoints/kubernetes 10.10.21.253:443,10.10.32.164:443 42mservice/kubernetes는 클러스터 IP172.20.0.1로 노출되어 있으며, 이는 클러스터 내부 통신에 사용됩니다.endpoints/kubernetes는 2개의 IP 주소(ex.10.10.21.253,10.10.32.164)를 가지며, 이는 EKS에서 소유한 ENI(Elastic Network Interface)를 통해 구성된 것으로 보입니다.
➤ EKS Fargate에서 API 서버와 통신하는 ENI는 일반적으로 EKS 컨트롤 플레인이 소유합니다.

2.1.2 노드 상태 확인
# node 확인 : 노드(Micro VM) 4대
kubectl get csr
kubectl get node -owide
# 출력 예시
NAME                                                      STATUS   ROLES    AGE     VERSION               INTERNAL-IP    EXTERNAL-IP   OS-IMAGE         KERNEL-VERSION                  CONTAINER-RUNTIME
fargate-ip-10-10-15-159.ap-northeast-2.compute.internal   Ready    <none>   7m50s   v1.30.8-eks-2d5f260   10.10.15.159   <none>        Amazon Linux 2   5.10.234-225.895.amzn2.x86_64   containerd://1.7.25
fargate-ip-10-10-30-57.ap-northeast-2.compute.internal    Ready    <none>   7m46s   v1.30.8-eks-2d5f260   10.10.30.57    <none>        Amazon Linux 2   5.10.234-225.895.amzn2.x86_64   containerd://1.7.25
fargate-ip-10-10-41-163.ap-northeast-2.compute.internal   Ready    <none>   7m46s   v1.30.8-eks-2d5f260   10.10.41.163   <none>        Amazon Linux 2   5.10.234-225.895.amzn2.x86_64   containerd://1.7.25
fargate-ip-10-10-43-78.ap-northeast-2.compute.internal    Ready    <none>   7m41s   v1.30.8-eks-2d5f260   10.10.43.78    <none>        Amazon Linux 2   5.10.234-225.895.amzn2.x86_64   containerd://1.7.25

kubectl describe node | grep eks.amazonaws.com/compute-type
# 출력 예시
Labels:             eks.amazonaws.com/compute-type=fargate
Taints:             eks.amazonaws.com/compute-type=fargate:NoSchedule
...- 노드는 총 4개 존재하며, 모두 Fargate 기반의 Micro VM으로 구성되어 있습니다.
- 각 노드는 Amazon Linux 2 기반이며,
containerd컨테이너 런타임을 사용하고 있습니다. - 노드의 Internal IP는 10.10.* 대역으로 VPC 서브넷 내에서 할당된 주소입니다.
- 각 노드에는 eks.amazonaws.com/compute-type=fargate 라벨과 fargate:NoSchedule 테인트가 설정되어 있습니다.
- 이는 해당 노드들이 Fargate에서 실행되는 Pod만 수용하도록 제한되어 있음을 의미합니다.

2.1.3 파드 상태 확인
# 파드 확인 : 파드의 IP와 노드의 IP가 같다!
kubectl get pdb -n kube-system
kubectl get pod -A -owide
# 출력 예시
NAMESPACE     NAME                                            READY   STATUS    RESTARTS   AGE   IP             NODE                                                      NOMINATED NODE   READINESS GATES
kube-system   aws-load-balancer-controller-8577658566-5qkr6   1/1     Running   0          30m   10.10.15.159   fargate-ip-10-10-15-159.ap-northeast-2.compute.internal   <none>           <none>
kube-system   aws-load-balancer-controller-8577658566-hl72j   1/1     Running   0          30m   10.10.41.163   fargate-ip-10-10-41-163.ap-northeast-2.compute.internal   <none>           <none>
kube-system   coredns-64696d8b7f-2cvlv                        1/1     Running   0          30m   10.10.43.78    fargate-ip-10-10-43-78.ap-northeast-2.compute.internal    <none>           <none>
kube-system coredns-64696d8b7f-s45g7 1/1 Running 0 30m 10.10.30.57 fargate-ip-10-10-30-57.ap-northeast-2.compute.internal <none> <none>- 각 파드의 IP는 해당 노드의 IP와 일치합니다. ➤ Fargate에서는 파드 단위로 독립된 Micro VM이 생성되므로, 노드와 파드가 1:1 매핑됩니다.

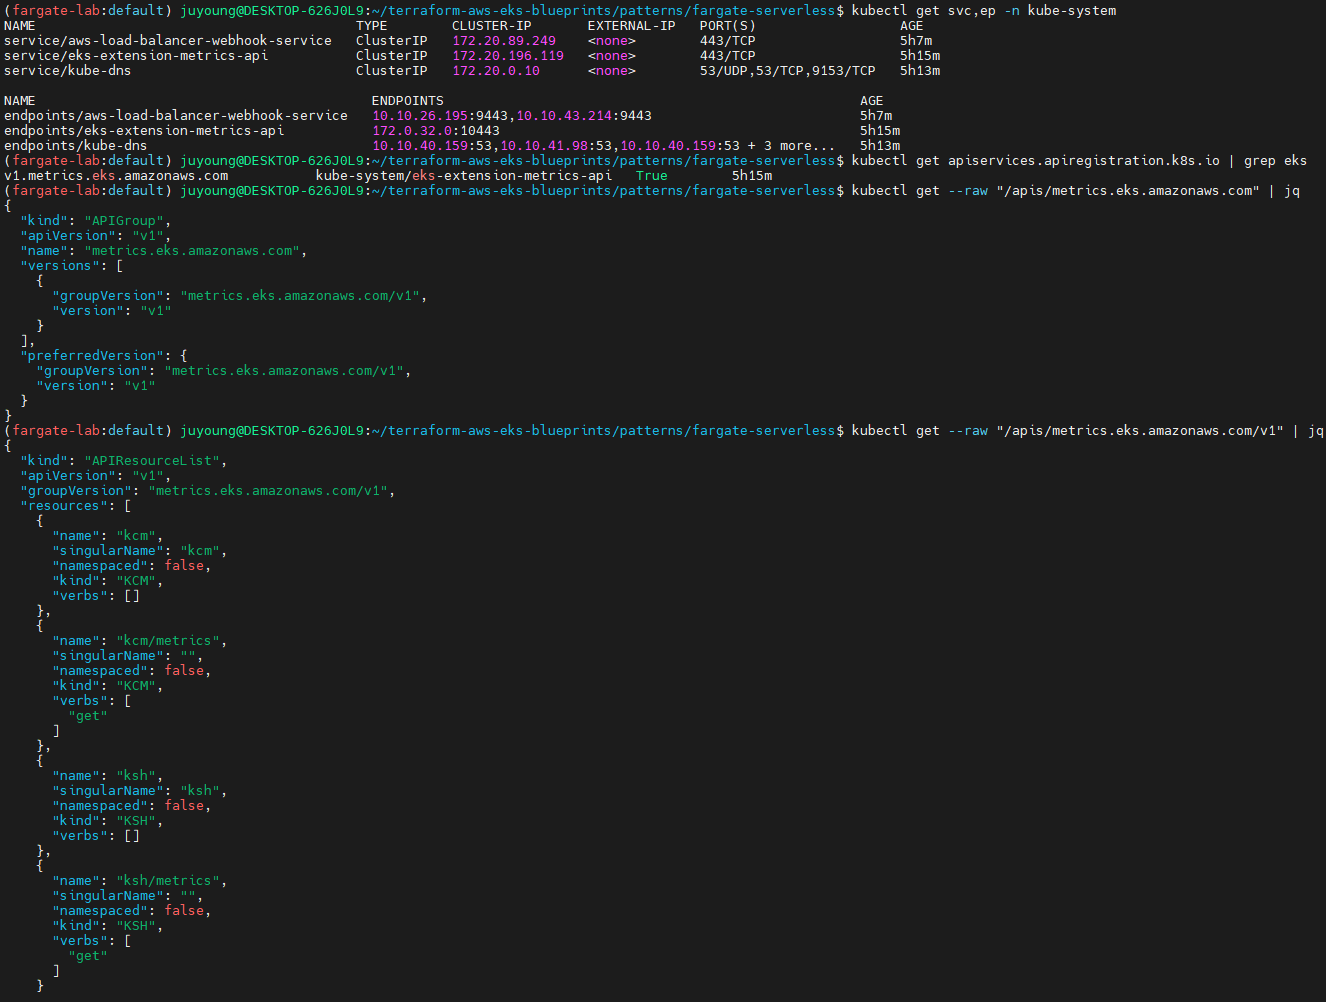
2.1.4 서비스 및 엔드포인트 확인
# aws-load-balancer-webhook-service , eks-extension-metrics-api?
kubectl get svc,ep -n kube-system
# 출력 예시
NAME                                        TYPE        CLUSTER-IP      EXTERNAL-IP   PORT(S)                  AGE
service/aws-load-balancer-webhook-service   ClusterIP   172.20.72.191   <none>        443/TCP                  34m
service/eks-extension-metrics-api           ClusterIP   172.20.173.28   <none>        443/TCP                  42m

# eks-extension-metrics-api?
kubectl get apiservices.apiregistration.k8s.io | grep eks
# 출력 예시
v1.metrics.eks.amazonaws.com           kube-system/eks-extension-metrics-api   True        53m

kubectl get --raw "/apis/metrics.eks.amazonaws.com" | jq
kubectl get --raw "/apis/metrics.eks.amazonaws.com/v1" | jqeks-extension-metrics-api는 EKS에서 메트릭을 수집하기 위한 API 서버 extension입니다.v1.metrics.eks.amazonaws.com은 활성 상태이며, EKS 클러스터의 메트릭 API 엔드포인트로 등록되어 있습니다.
2.2 Kubernetes 구성 요소 설정 확인
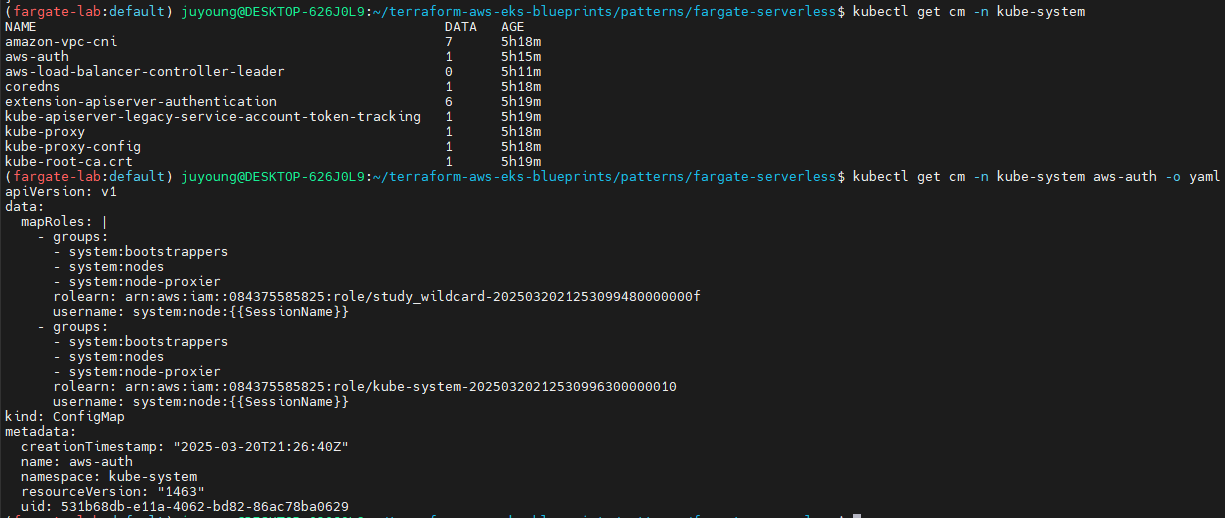
2.2.1 ConfigMap 확인
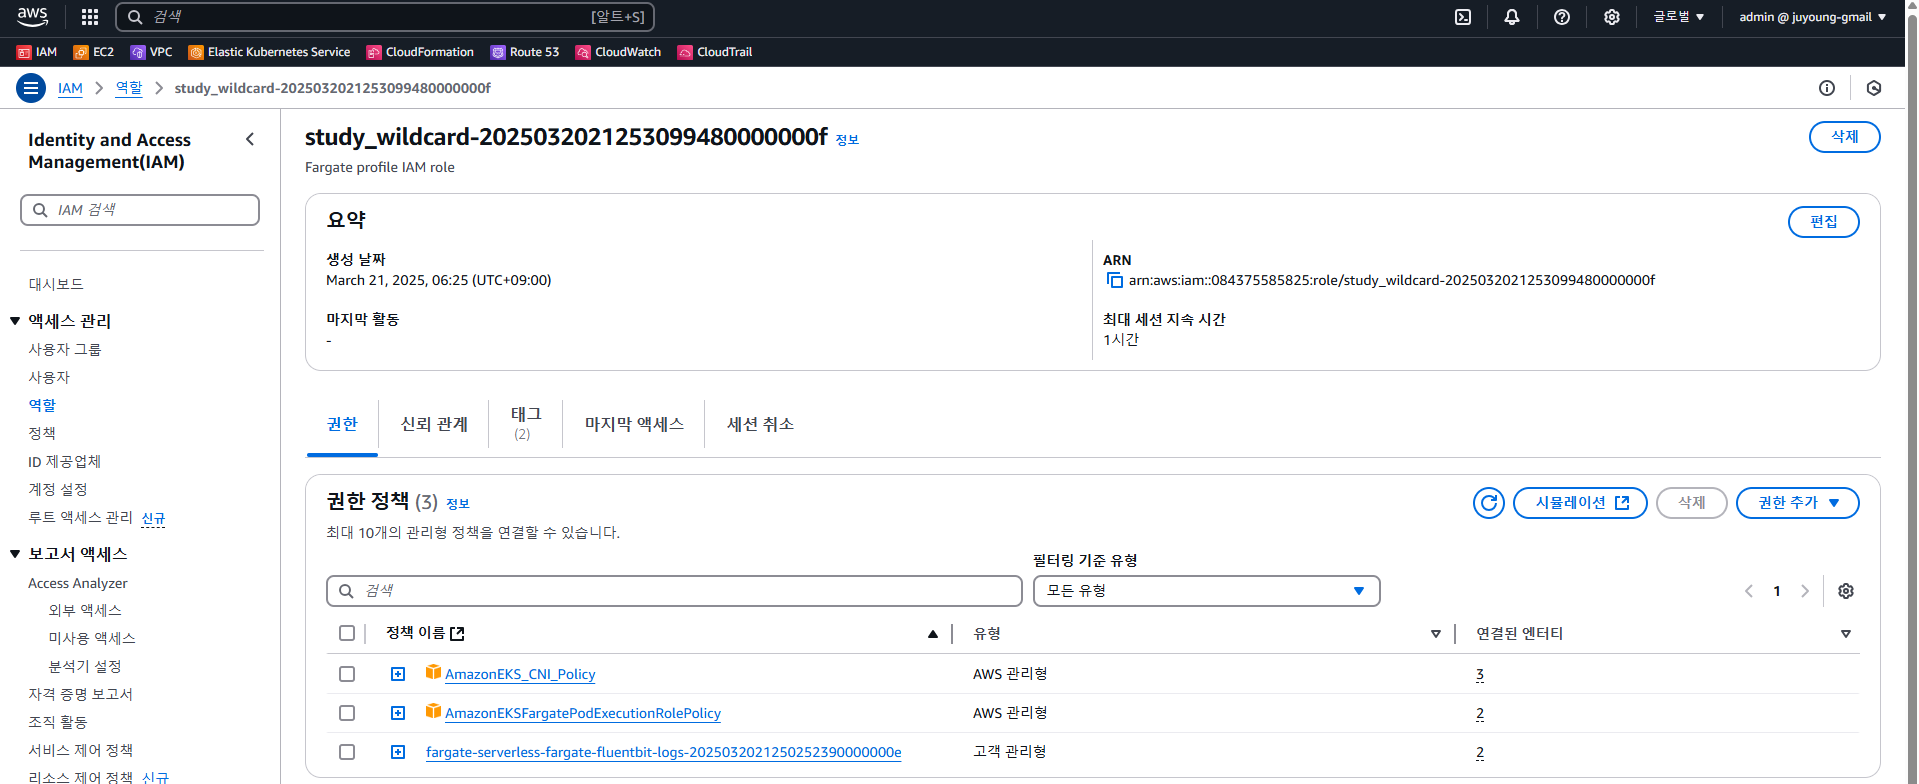
# configmap 확인
kubectl get cm -n kube-system
...

# aws-auth 보다 우선해서 IAM access entry 가 있음을 참고.
# 기본 관리노드 보다 system:node-proxier 그룹이 추가되어 있음.
# fargate profile 이 2개인데, 그 profile 갯수만큼 있음.
kubectl get cm -n kube-system aws-auth -o yaml
# 출력 예시
...
  mapRoles: |
    - groups:
      - system:bootstrappers
      - system:nodes
      - system:node-proxier
      rolearn: arn:aws:iam::911283464785:role/kube-system-2025031115064156060000000f
      username: system:node:{{SessionName}}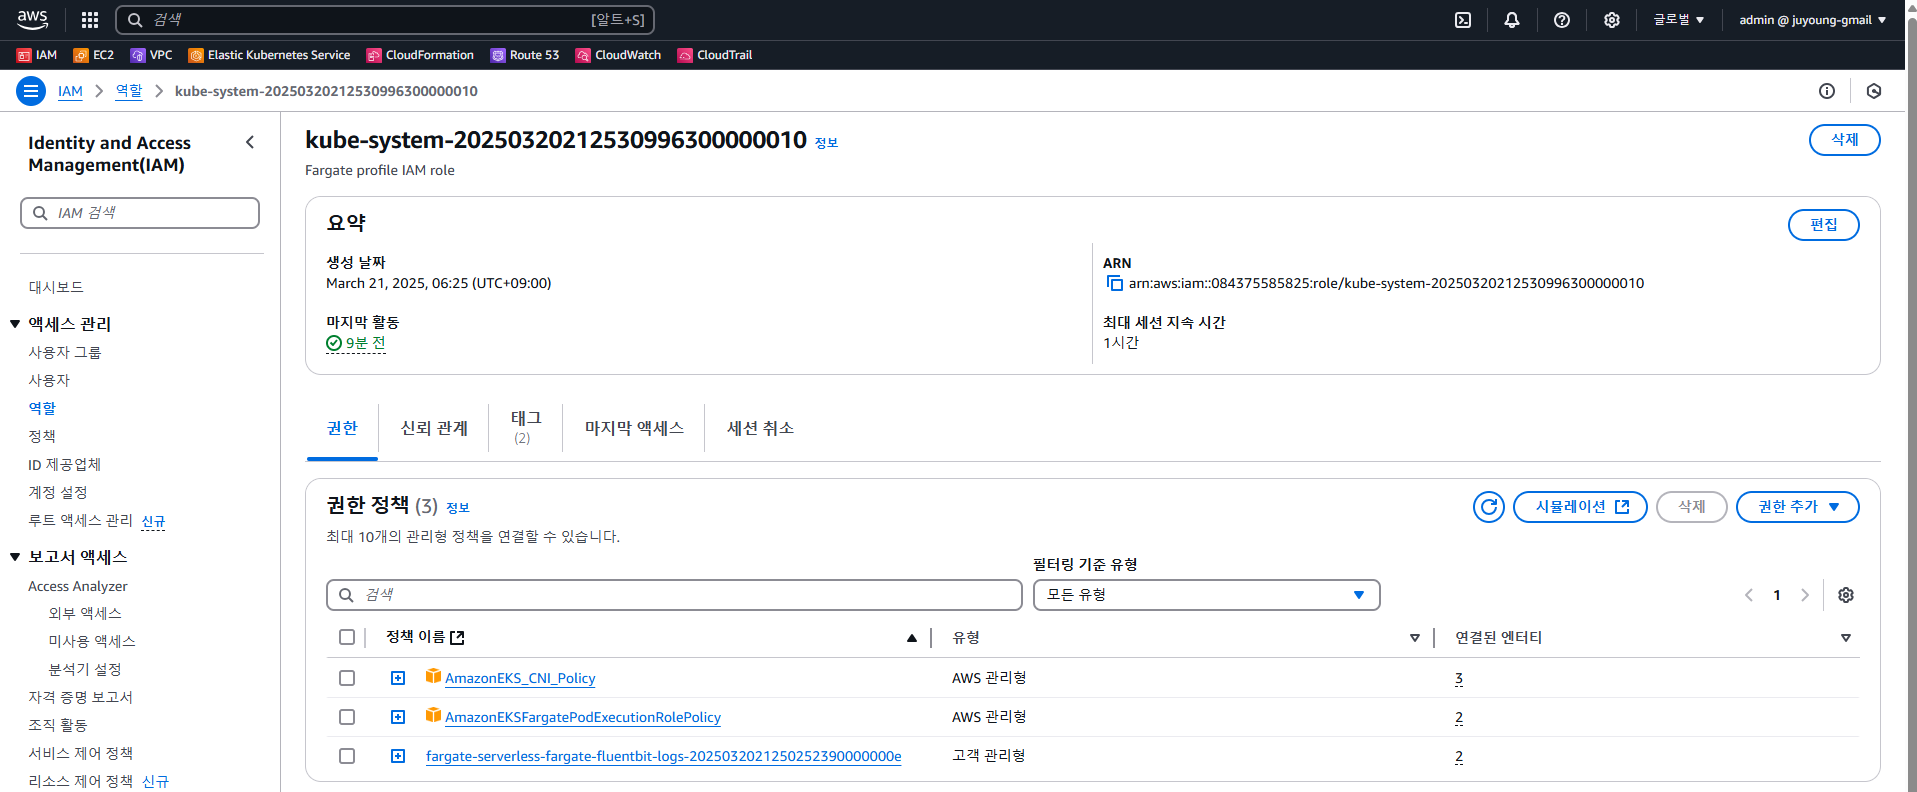
...- IAM Role 기반 접근 제어 정보가 설정되어 있으며,
system:node-proxier그룹이 포함된 Role이 존재합니다. - 이 Role은 각 Fargate Profile 별로 구성된 IAM Role과 연결되어 있습니다.
# amazon-vpc-cni
kubectl get cm -n kube-system amazon-vpc-cni -o yaml
# 출력 예시
apiVersion: v1
data:
branch-eni-cooldown: "60"
minimum-ip-target: "3"
warm-ip-target: "1"
warm-prefix-target: "0"
...
# coredns 설정 내용
kubectl get cm -n kube-system coredns -o yaml
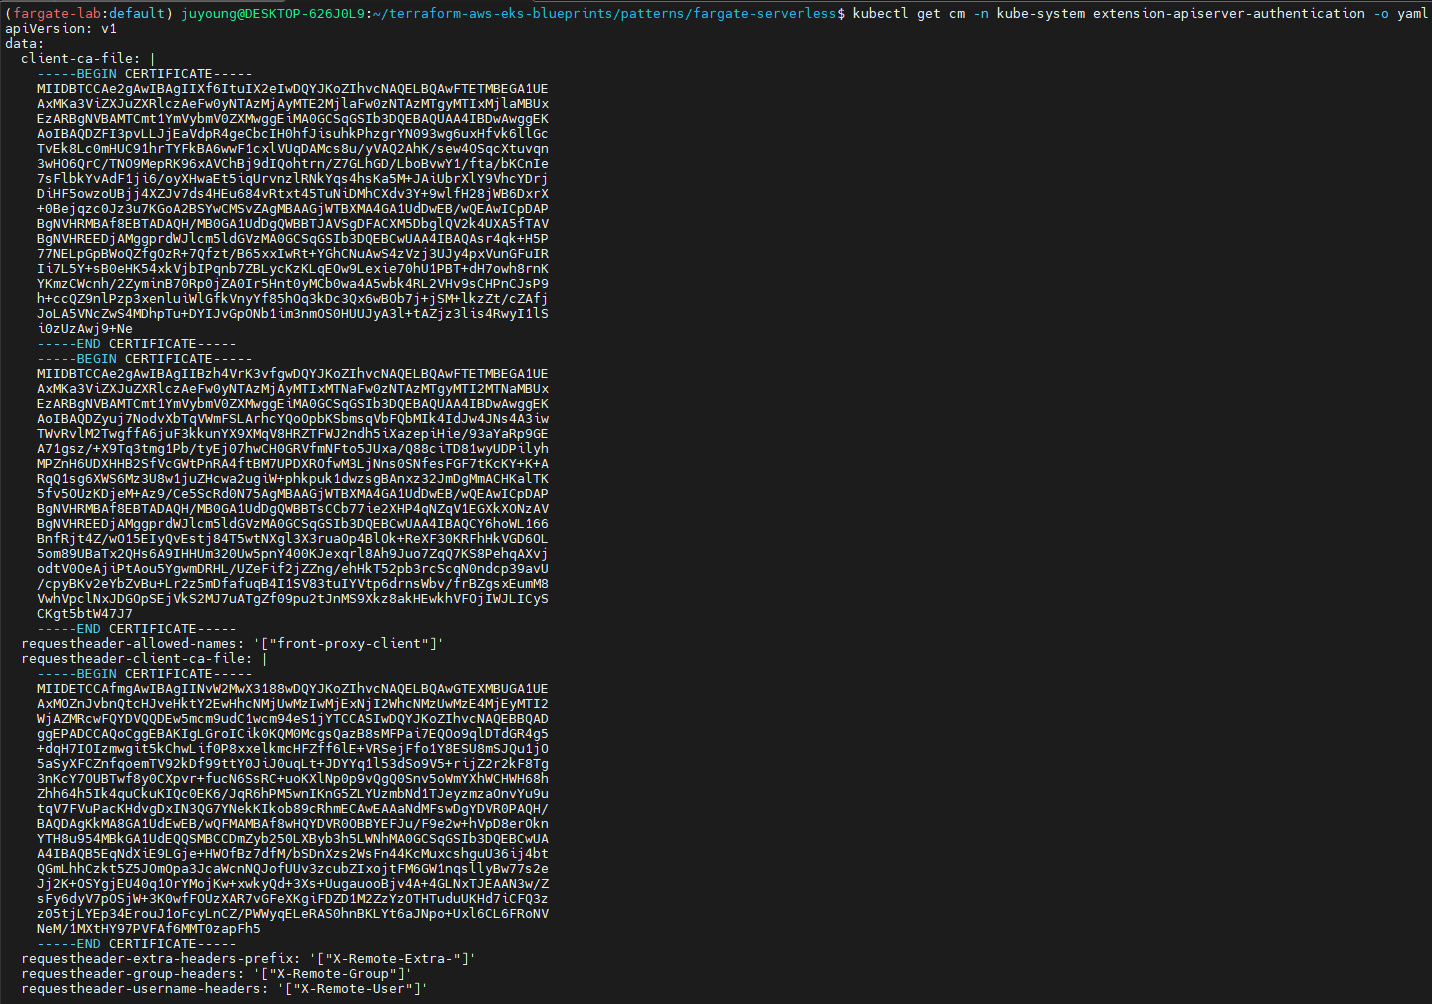
# 인증서 작성되어 있음 : client-ca-file , requestheader-client-ca-file
kubectl get cm -n kube-system extension-apiserver-authentication -o yaml
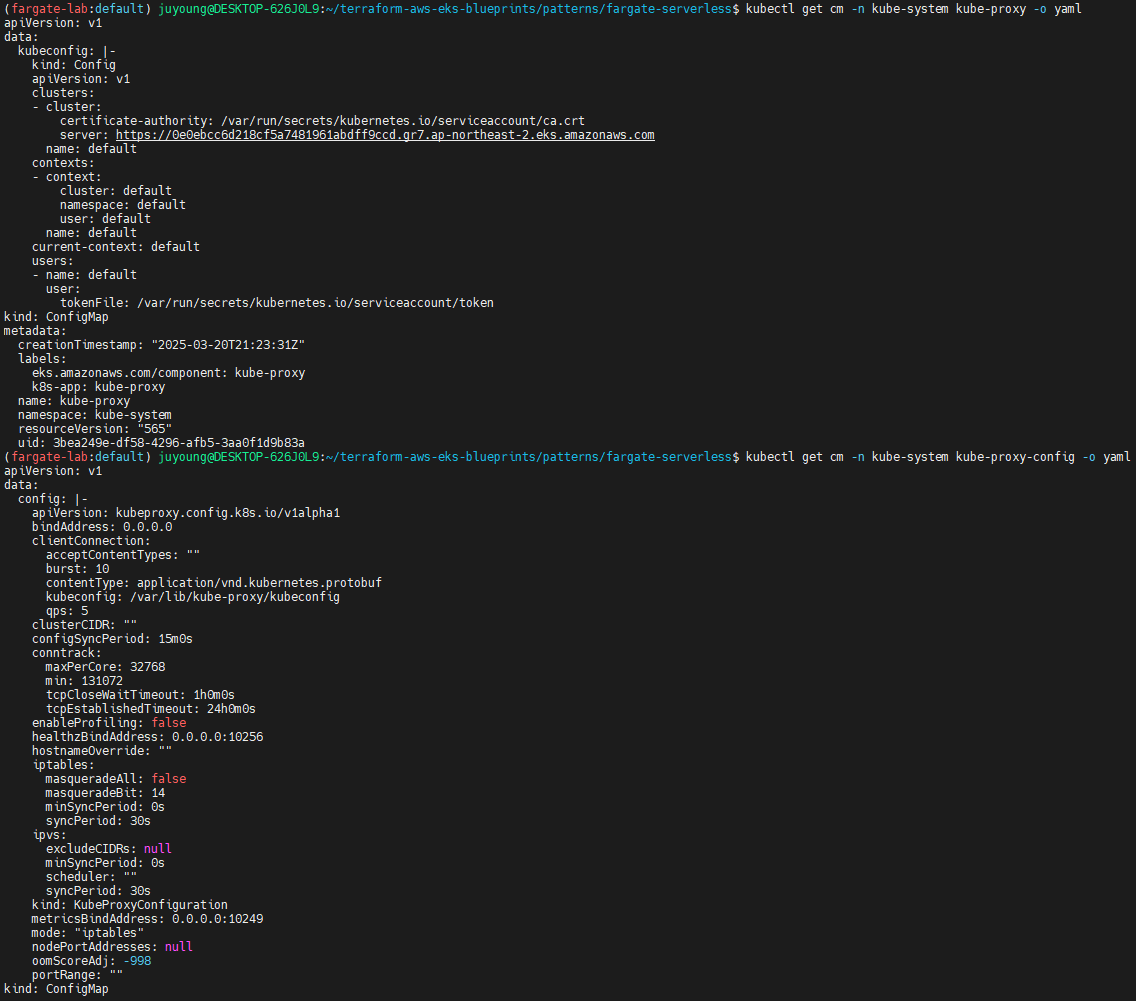
# kube-proxy 및 kube-proxy-config
kubectl get cm -n kube-system kube-proxy -o yaml
kubectl get cm -n kube-system kube-proxy-config -o yaml
# 출력 예시
apiVersion: v1
data:
config: |-
apiVersion: kubeproxy.config.k8s.io/v1alpha1
bindAddress: 0.0.0.0
clientConnection:
acceptContentTypes: ""
burst: 10
contentType: application/vnd.kubernetes.protobuf
kubeconfig: /var/lib/kube-proxy/kubeconfig
qps: 5
clusterCIDR: ""
configSyncPeriod: 15m0s
conntrack:
maxPerCore: 32768
min: 131072
tcpCloseWaitTimeout: 1h0m0s
tcpEstablishedTimeout: 24h0m0s
enableProfiling: false
healthzBindAddress: 0.0.0.0:10256
hostnameOverride: ""
iptables:
masqueradeAll: false
masqueradeBit: 14
minSyncPeriod: 0s
syncPeriod: 30s
ipvs:
excludeCIDRs: null
minSyncPeriod: 0s
scheduler: ""
syncPeriod: 30s
kind: KubeProxyConfiguration
metricsBindAddress: 0.0.0.0:10249
mode: "iptables"
nodePortAddresses: null
oomScoreAdj: -998
portRange: ""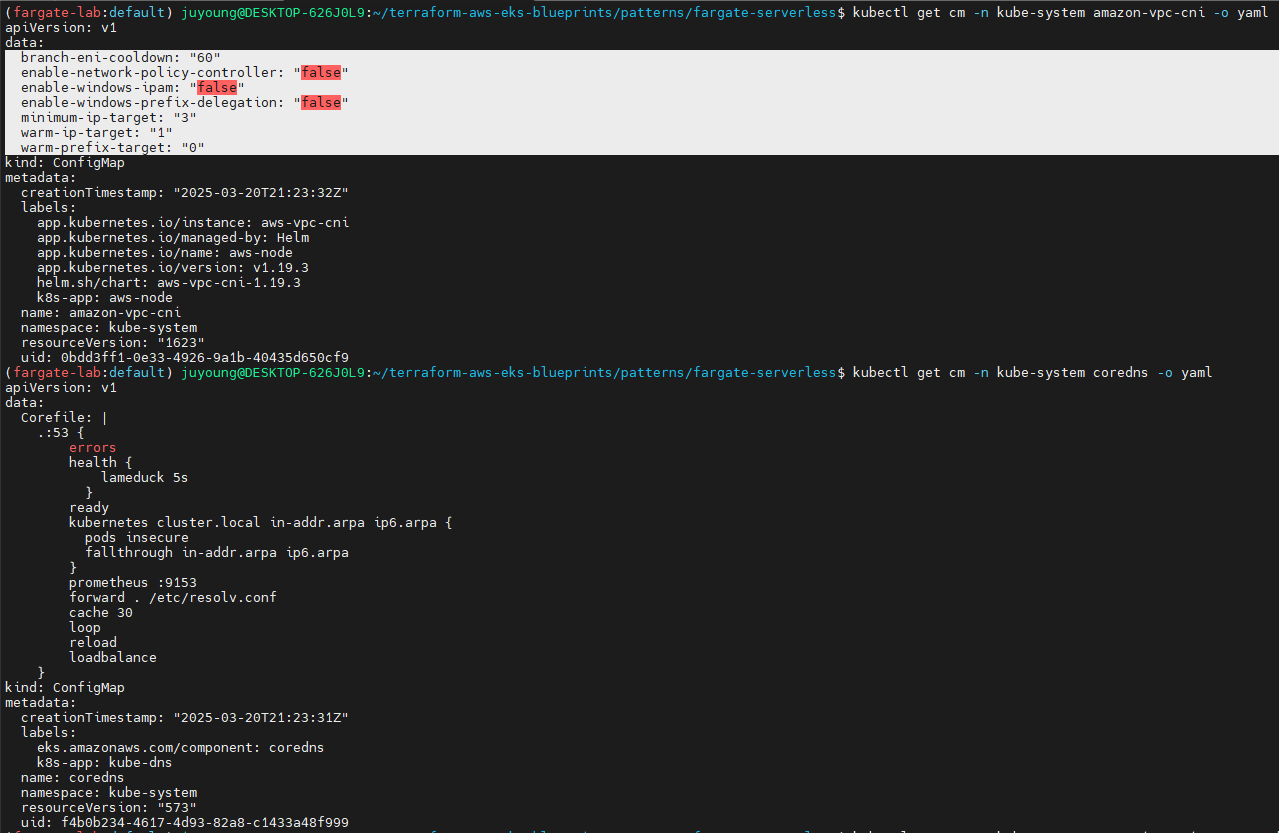
2.2.2 Fargate 파드 스케줄링 및 리소스
# coredns 파드 상세 정보 확인
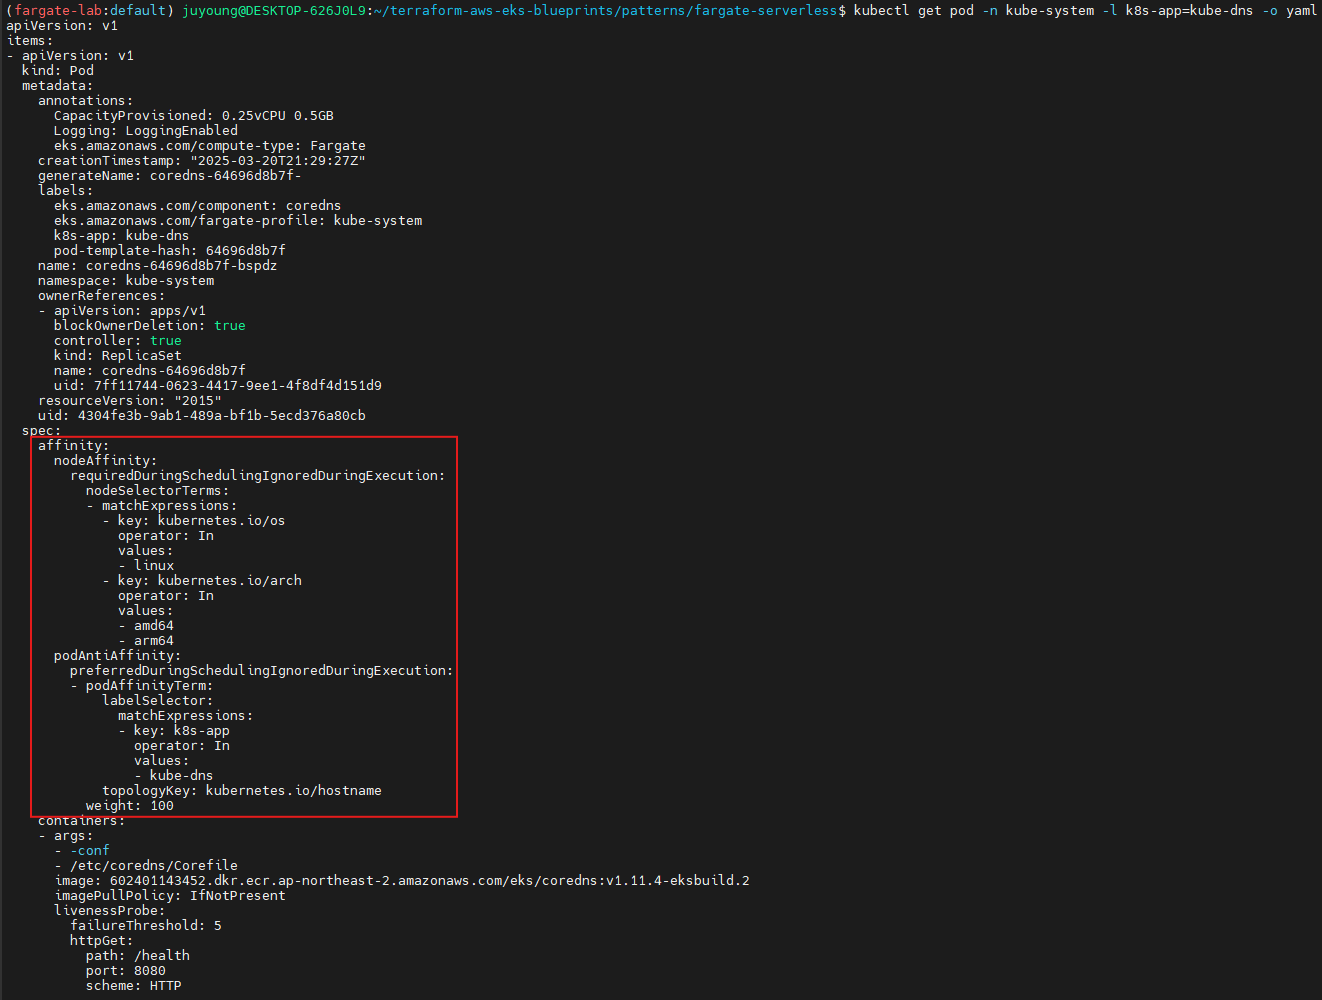
kubectl get pod -n kube-system -l k8s-app=kube-dns -o yaml
# 출력 예시
...
spec:
affinity:
nodeAffinity:
requiredDuringSchedulingIgnoredDuringExecution:
nodeSelectorTerms:
- matchExpressions:
- key: kubernetes.io/os
operator: In
values:
- linux
- key: kubernetes.io/arch
operator: In
values:
- amd64
- arm64
podAntiAffinity:
preferredDuringSchedulingIgnoredDuringExecution:
- podAffinityTerm:
labelSelector:
matchExpressions:
- key: k8s-app
operator: In
values:
- kube-dns
topologyKey: kubernetes.io/hostname
weight: 100
...
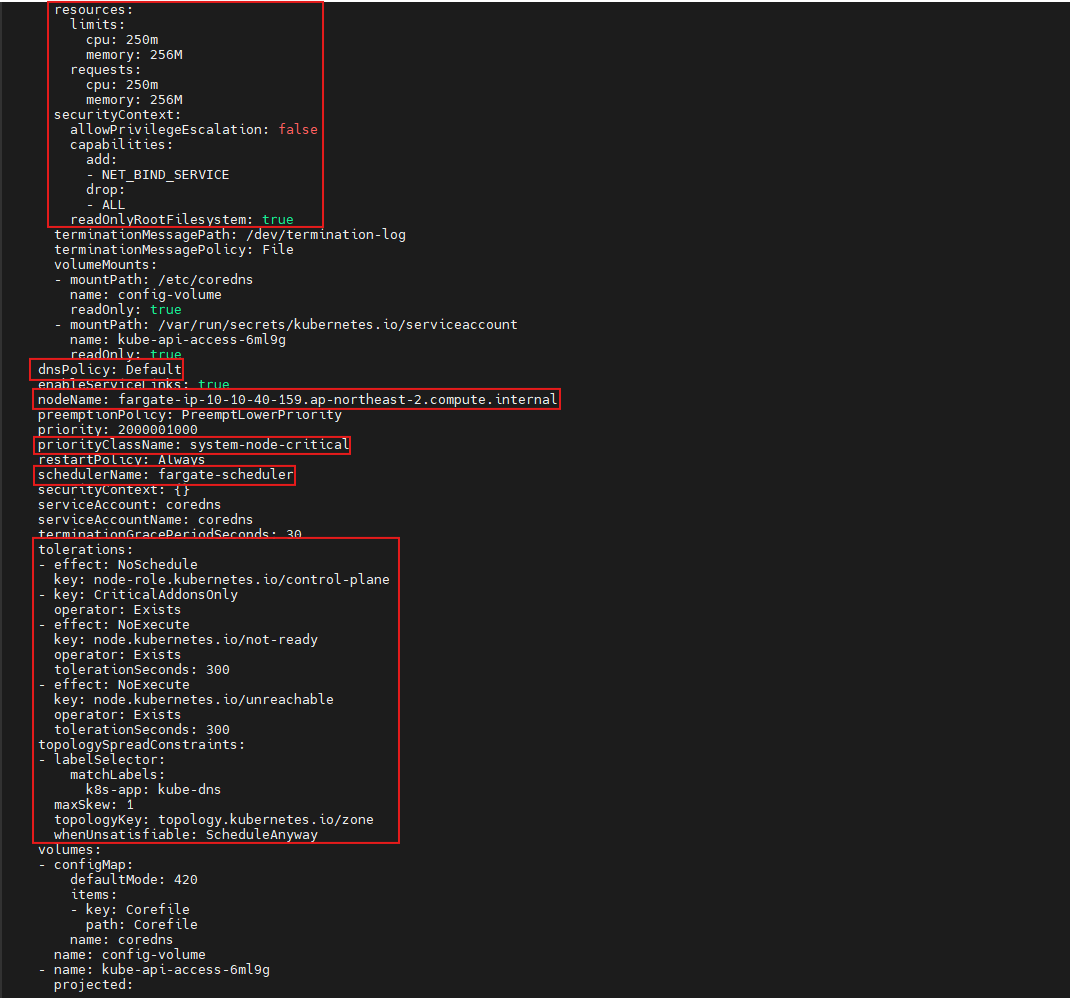
resources:
limits:
cpu: 250m
memory: 256M
requests:
cpu: 250m
memory: 256M
...
securityContext:
allowPrivilegeEscalation: false
capabilities:
add:
- NET_BIND_SERVICE
drop:
- ALL
readOnlyRootFilesystem: true
...
dnsPolicy: Default
enableServiceLinks: true
nodeName: fargate-ip-10-10-34-186.ap-northeast-2.compute.internal
preemptionPolicy: PreemptLowerPriority
priority: 2000001000
priorityClassName: system-node-critical
restartPolicy: Always
schedulerName: fargate-scheduler
securityContext: {}
serviceAccount: coredns
serviceAccountName: coredns
terminationGracePeriodSeconds: 30
tolerations:
- effect: NoSchedule
key: node-role.kubernetes.io/control-plane
- key: CriticalAddonsOnly
operator: Exists
- effect: NoExecute
key: node.kubernetes.io/not-ready
operator: Exists
tolerationSeconds: 300
- effect: NoExecute
key: node.kubernetes.io/unreachable
operator: Exists
tolerationSeconds: 300
topologySpreadConstraints:
- labelSelector:
matchLabels:
k8s-app: kube-dns
maxSkew: 1
topologyKey: topology.kubernetes.io/zone
whenUnsatisfiable: ScheduleAnyway
...
qosClass: GuaranteedschedulerName: fargate-scheduler로 명시되어 있어, 해당 파드는 Fargate에서 실행 중임을 나타냅니다.resources.requests및limits는 각각 CPU 250m, Memory 256MiB로 설정되어 있습니다.
2.2.3 RBAC 관련 정보
kubectl rbac-tool lookup system:node-proxier
# 출력 예시
  SUBJECT             | SUBJECT TYPE | SCOPE       | NAMESPACE | ROLE                | BINDING
----------------------+--------------+-------------+-----------+---------------------+-------------------------
  system:node-proxier | Group        | ClusterRole |           | system:node-proxier | eks:kube-proxy-fargate

kubectl rolesum -k Group system:node-proxier
# 출력 예시
...
Policies:
• [CRB] */eks:kube-proxy-fargate ⟶  [CR] */system:node-proxier
  Resource                         Name  Exclude  Verbs  G L W C U P D DC
  endpoints                        [*]     [-]     [-]   ✖ ✔ ✔ ✖ ✖ ✖ ✖ ✖
  endpointslices.discovery.k8s.io  [*]     [-]     [-]   ✖ ✔ ✔ ✖ ✖ ✖ ✖ ✖
  events.[,events.k8s.io]          [*]     [-]     [-]   ✖ ✖ ✖ ✔ ✔ ✔ ✖ ✖
  nodes                            [*]     [-]     [-]   ✔ ✔ ✔ ✖ ✖ ✖ ✖ ✖
services [*] [-] [-] ✖ ✔ ✔ ✖ ✖ ✖ ✖ ✖ system:node-proxier그룹은eks:kube-proxy-fargateClusterRole Binding을 통해 다음 리소스에 접근 권한을 가집니다:endpoints,endpointslices,events,nodes,services등의 읽기 및 생성 권한
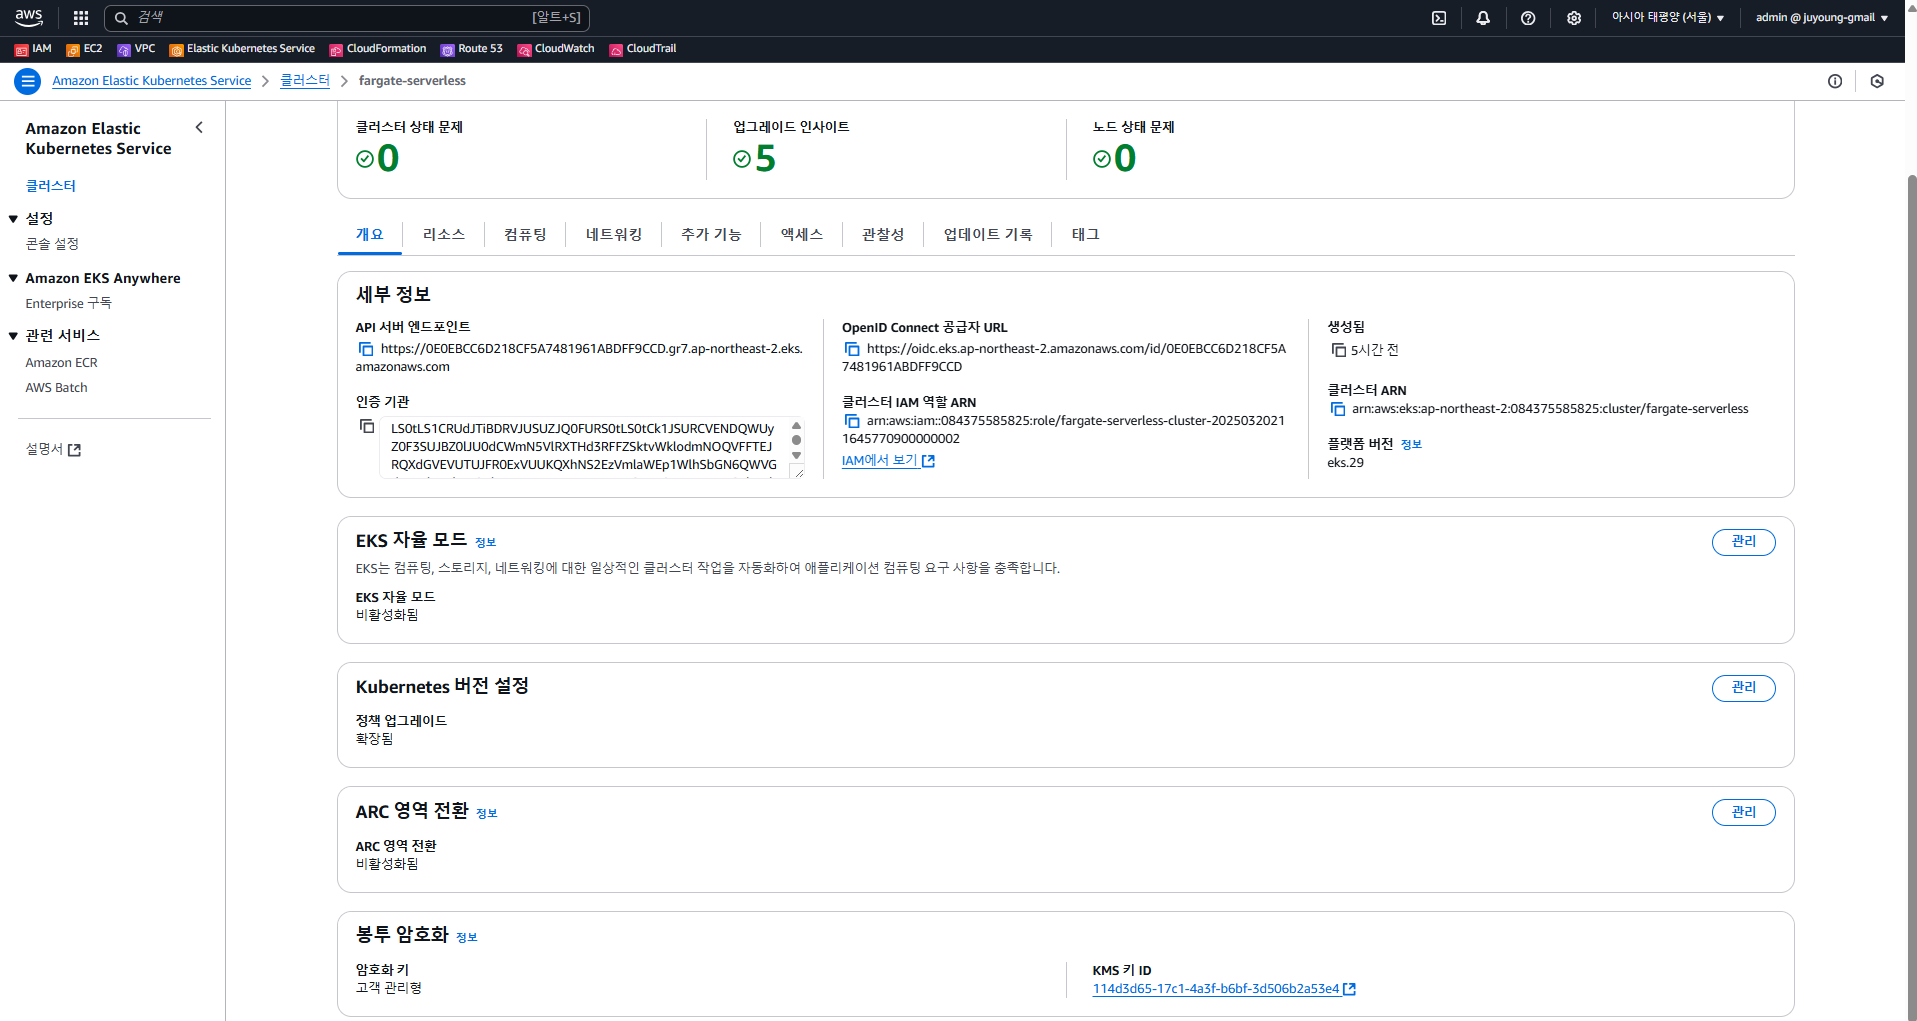
2.3 AWS 콘솔에서 확인
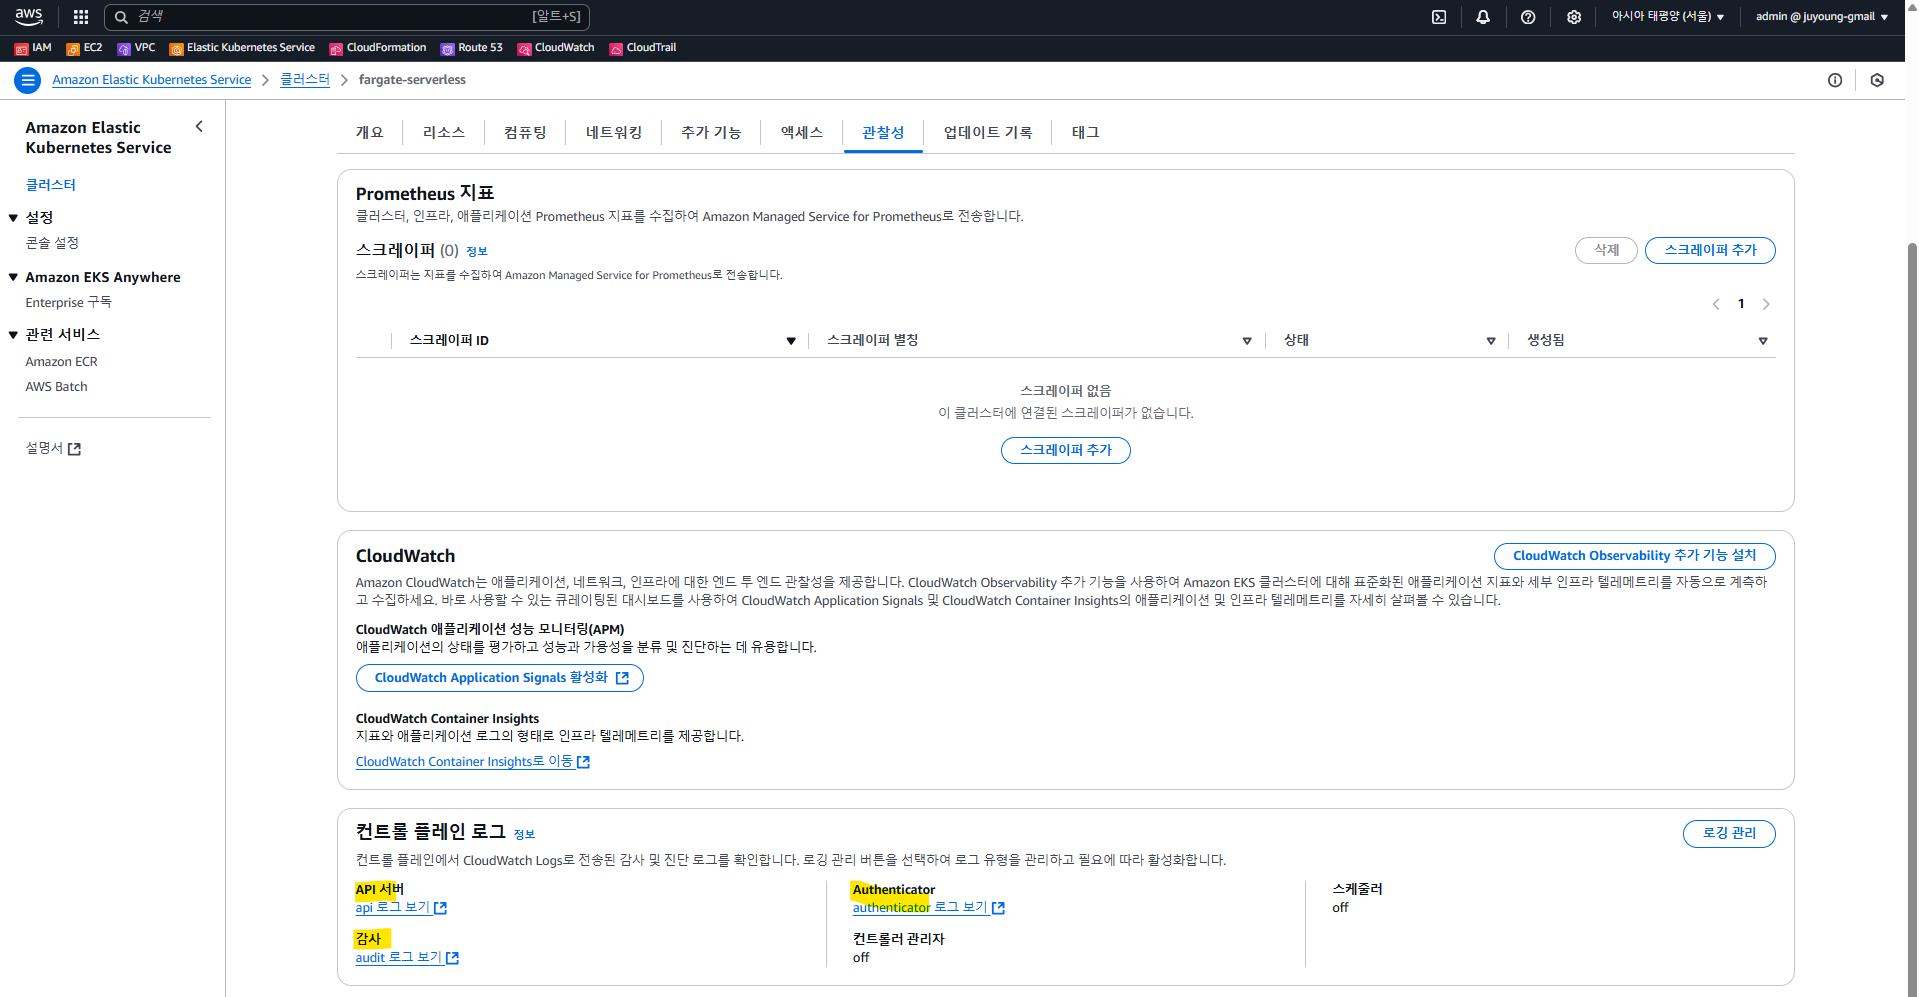
2.3.1 EKS 콘솔
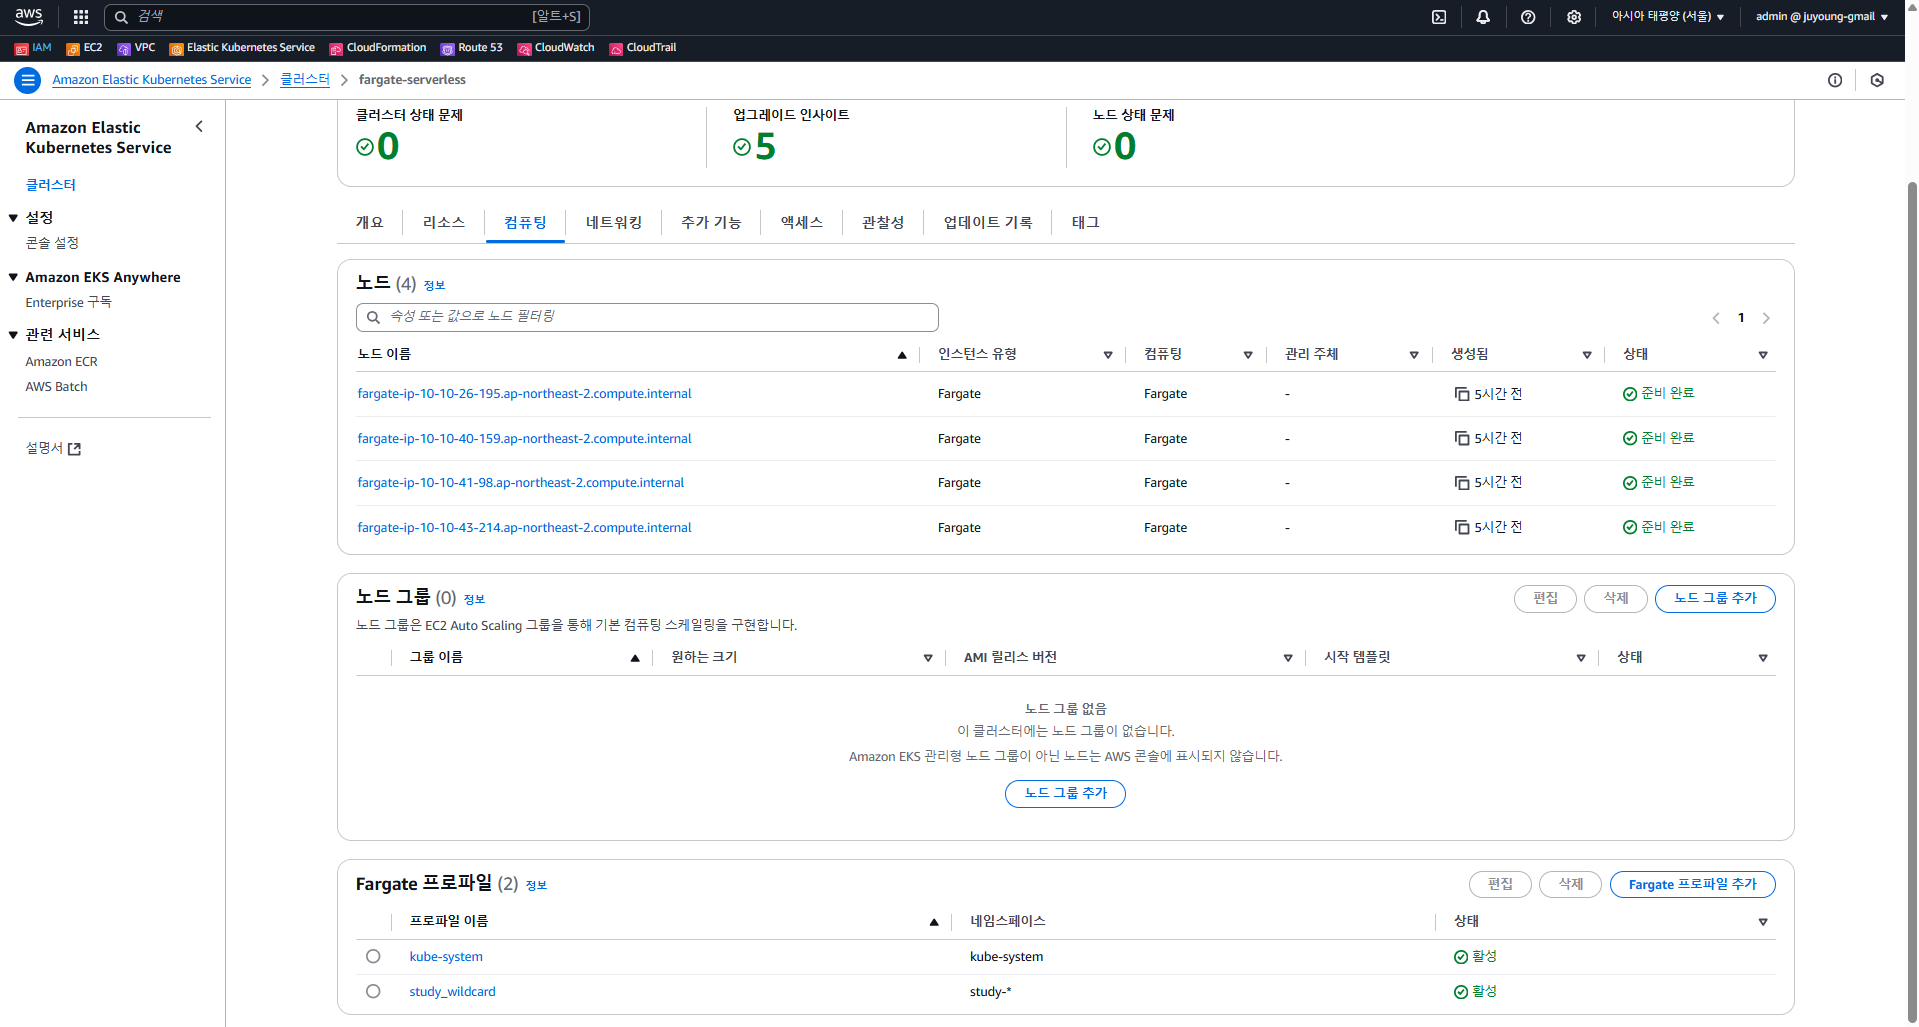
2.3.2 EC2 콘솔

- EC2 인스턴스는 존재하지 않습니다.
2.3.3 VPC 콘솔

- 서브넷 구성:
- Public Subnet:
/24대역 - Private Subnet:
/20대역
- Public Subnet:
3. EKS Fargate 환경에 kube-ops-view 설치 및 동작 확인
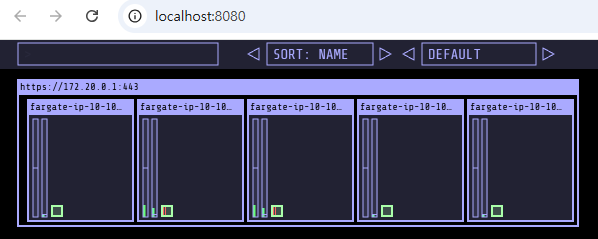
3.1 kube-ops-view란?
kube-ops-view는 클러스터의 노드 및 파드 상태를 시각적으로 확인할 수 있는 오픈소스 웹 UI 도구입니다. Kubernetes 클러스터 내 파드들의 자원 사용 현황과 노드별 배치를 실시간으로 시각화해줍니다.
Fargate 환경에서는 노드가 일반적인 EC2 인스턴스가 아닌, 파드 단위로 생성되는 MicroVM이기 때문에, 이러한 리소스 상태를 확인하기에 적합한 도구입니다.
3.2 kube-ops-view 설치
Helm을 이용하여 kube-ops-view를 kube-system 네임스페이스에 설치합니다.
# helm 배포
helm repo add geek-cookbook https://geek-cookbook.github.io/charts/
helm install kube-ops-view geek-cookbook/kube-ops-view --version 1.2.2 --set env.TZ="Asia/Seoul" --namespace kube-system
Mutating으로 인해 Pending 상태의 파드가 Running 되기까지 약 50초 정도 소요됩니다.
로컬 브라우저에서 접속하기 위해 Kubernetes 포트 포워딩을 설정합니다.
# 포트 포워딩
kubectl port-forward deployment/kube-ops-view -n kube-system 8080:8080 &

# 접속 주소 확인 : 각각 1배, 1.5배, 3배 크기
echo -e "KUBE-OPS-VIEW URL = http://localhost:8080"
echo -e "KUBE-OPS-VIEW URL = http://localhost:8080/#scale=1.5"
echo -e "KUBE-OPS-VIEW URL = http://localhost:8080/#scale=3"

open "http://127.0.0.1:8080/#scale=1.5" # macOS

3.3 리소스 배포 후 상태 점검
# node 확인 : 노드(Micro VM)
kubectl get csr
kubectl get node -owide
kubectl describe node | grep eks.amazonaws.com/compute-type
- 현재 노드는 모두 Fargate 기반이며,
eks.amazonaws.com/compute-type=fargate라벨과 테인트가 설정되어 있습니다.
# kube-ops-view 디플로이먼트/파드 상세 정보 확인
kubectl get pod -n kube-system
kubectl get pod -n kube-system -o jsonpath='{.items[0].metadata.annotations.CapacityProvisioned}'
kubectl get pod -n kube-system -l app.kubernetes.io/instance=kube-ops-view -o jsonpath='{.items[0].metadata.annotations.CapacityProvisioned}'
- 출력 예시:
0.25vCPU 0.5GB - 이는 Fargate가 자동으로 파드에 할당한 리소스이며, 파드 스펙에서 resources 설정이 없어도 Admission Controller에 의해 동적으로 할당됩니다.
# 디플로이먼트 상세 정보
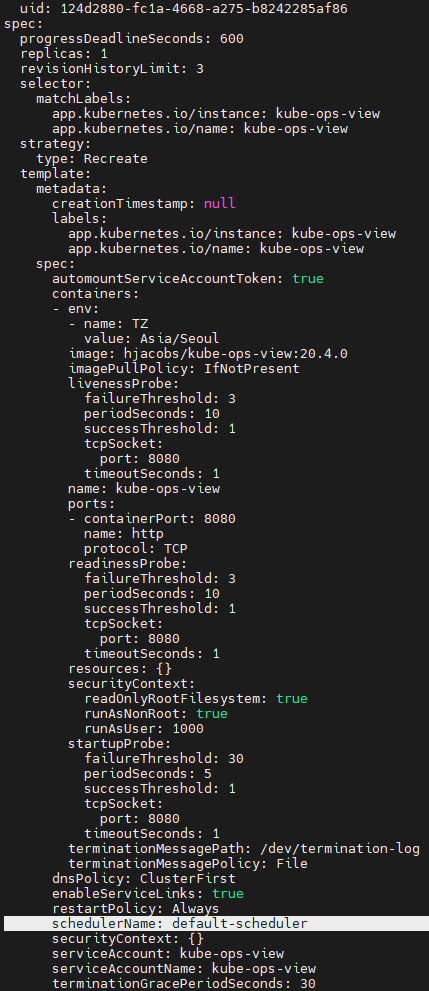
kubectl get deploy -n kube-system kube-ops-view -o yaml
# 출력 예시
...
template:
...
spec:
automountServiceAccountToken: true
containers:
- env:
- name: TZ
value: Asia/Seoul
image: hjacobs/kube-ops-view:20.4.0
imagePullPolicy: IfNotPresent
livenessProbe:
failureThreshold: 3
periodSeconds: 10
successThreshold: 1
tcpSocket:
port: 8080
timeoutSeconds: 1
name: kube-ops-view
ports:
- containerPort: 8080
name: http
protocol: TCP
readinessProbe:
failureThreshold: 3
periodSeconds: 10
successThreshold: 1
tcpSocket:
port: 8080
timeoutSeconds: 1
resources: {}
securityContext:
readOnlyRootFilesystem: true
runAsNonRoot: true
runAsUser: 1000
startupProbe:
failureThreshold: 30
periodSeconds: 5
successThreshold: 1
tcpSocket:
port: 8080
timeoutSeconds: 1
terminationMessagePath: /dev/termination-log
terminationMessagePolicy: File
dnsPolicy: ClusterFirst
enableServiceLinks: true
restartPolicy: Always
schedulerName: default-scheduler
securityContext: {}
serviceAccount: kube-ops-view
serviceAccountName: kube-ops-view
terminationGracePeriodSeconds: 30
...schedulerName: default-scheduler- Deployment는
default-scheduler로 설정되어 있지만, 실제 배포된 파드는 Fargate 전용 스케줄러를 통해 실행됩니다.
# 파드 상세 정보 : admission control 이 동작했음을 알 수 있음
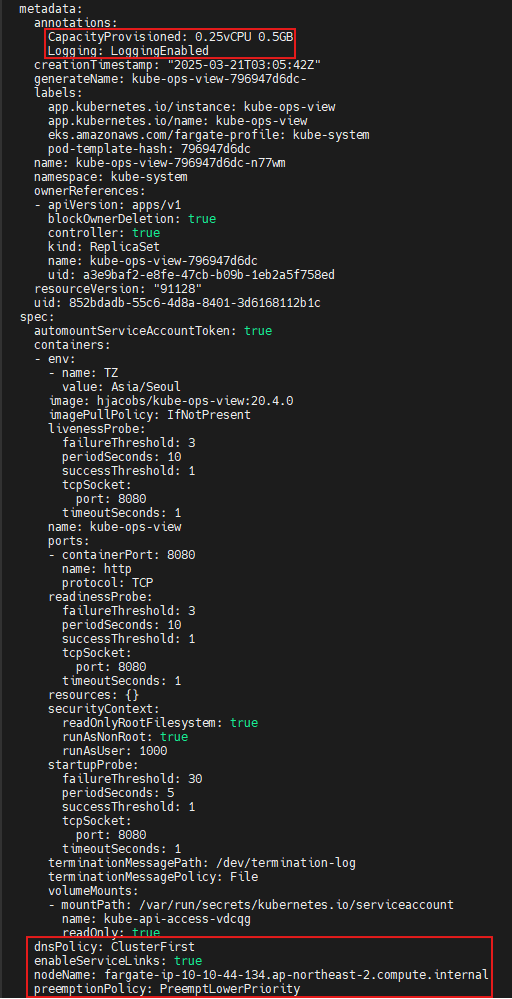
kubectl get pod -n kube-system -l app.kubernetes.io/instance=kube-ops-view -o yaml
...
metadata:
annotations:
CapacityProvisioned: 0.25vCPU 0.5GB
Logging: LoggingEnabled
...
resources: {}
...
dnsPolicy: ClusterFirst
enableServiceLinks: true
nodeName: fargate-ip-10-10-13-36.ap-northeast-2.compute.internal
preemptionPolicy: PreemptLowerPriority
priority: 2000001000
priorityClassName: system-node-critical
restartPolicy: Always
schedulerName: fargate-scheduler
securityContext: {}
serviceAccount: kube-ops-view
serviceAccountName: kube-ops-view
terminationGracePeriodSeconds: 30
tolerations:
- effect: NoExecute
key: node.kubernetes.io/not-ready
operator: Exists
tolerationSeconds: 300
- effect: NoExecute
key: node.kubernetes.io/unreachable
operator: Exists
tolerationSeconds: 300
...
qosClass: BestEffortschedulerName: fargate-scheduler
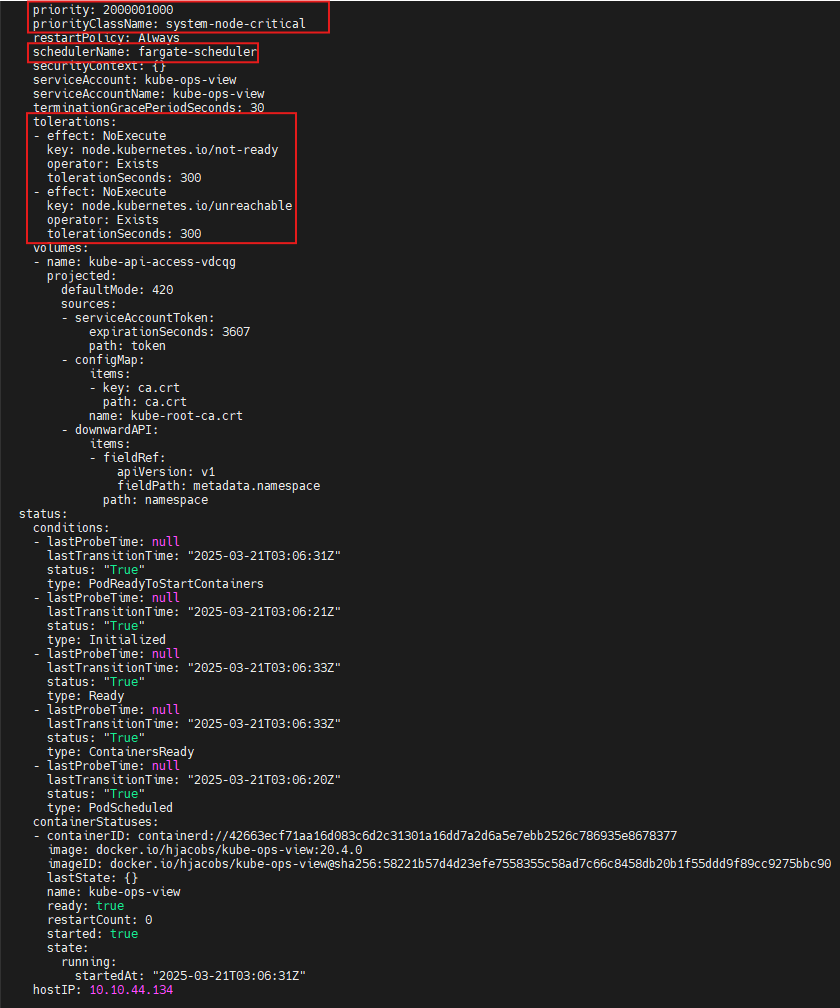
#
kubectl describe pod -n kube-system -l app.kubernetes.io/instance=kube-ops-view | grep Events: -A10
Events:
  Type    Reason          Age   From               Message
  ----    ------          ----  ----               -------
  Normal  LoggingEnabled  22m   fargate-scheduler  Successfully enabled logging for pod
  Normal  Scheduled       21m   fargate-scheduler  Successfully assigned kube-system/kube-ops-view-796947d6dc-vrnjc to fargate-ip-10-10-13-36.ap-northeast-2.compute.internal
...- fargate-scheduler가 해당 파드를 성공적으로 할당 및 로깅 기능을 활성화했음을 확인할 수 있습니다.

4. EKS Fargate 환경에서 netshoot 배포 및 동작 확인
4.1 Fargate의 리소스 할당 조건
EKS Fargate는 파드 단위로 리소스를 할당하며, 정해진 vCPU와 메모리 조합만 지원합니다. 아래는 지원되는 조합의 예시입니다.
| vCPU value | Memory value |
|---|---|
| .25 vCPU | 0.5 GB, 1 GB, 2 GB |
| .5 vCPU | 1 GB, 2 GB, 3 GB, 4 GB |
| 1 vCPU | 2 GB, 3 GB, 4 GB, 5 GB, 6 GB, 7 GB, 8 GB |
| 2 vCPU | Between 4 GB and 16 GB in 1-GB increments |
| 4 vCPU | Between 8 GB and 30 GB in 1-GB increments |
| 8 vCPU | Between 16 GB and 60 GB in 4-GB increments |
| 16 vCPU | Between 32 GB and 120 GB in 8-GB increments |
※ 이 조합 외의 리소스를 요청하면 파드가 배포되지 않으며, CapacityProvisioned 어노테이션에 따라 실제 할당이 결정됩니다.
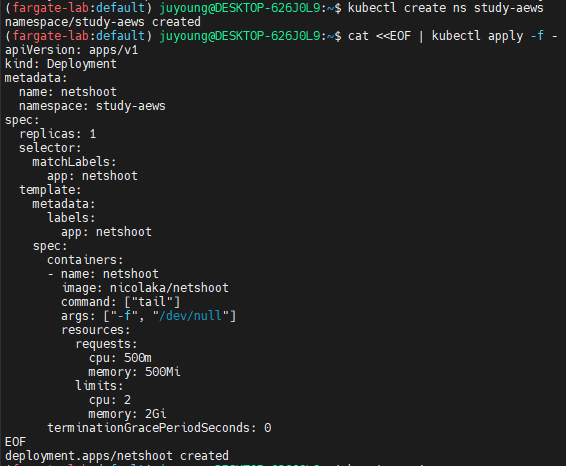
4.2 netshoot 디플로이먼트 생성
# 네임스페이스 생성
kubectl create ns study-aews

# 테스트용 파드 netshoot 디플로이먼트 생성 : 0.5vCPU 1GB 할당되어, 아래 Limit 값은 의미가 없음. 배포 시 대략 시간 측정해보자!
cat <<EOF | kubectl apply -f -
apiVersion: apps/v1
kind: Deployment
metadata:
  name: netshoot
  namespace: study-aews
spec:
  replicas: 1
  selector:
    matchLabels:
      app: netshoot
  template:
    metadata:
      labels:
        app: netshoot
    spec:
      containers:
      - name: netshoot
        image: nicolaka/netshoot
        command: ["tail"]
        args: ["-f", "/dev/null"]
        resources:
          requests:
            cpu: 500m
            memory: 500Mi
          limits:
            cpu: 2
            memory: 2Gi
      terminationGracePeriodSeconds: 0
EOF- resources.requests는 Fargate가 실제 리소스를 판단하는 기준입니다.
- 이 예시에서는
500mCPU와500Mi메모리를 요청했으나, - Fargate의 정책에 따라 0.5 vCPU, 1GB 메모리가 실제로 할당됩니다.
- 이 예시에서는
- limits 값은 무시됩니다. Fargate는 requests만을 기준으로 Capacity를 정합니다.
4.3 이벤트 및 리소스 확인
kubectl get events -w --sort-by '.lastTimestamp'

# 확인 : 메모리 할당 측정은 어떻게 되었는지?
kubectl get pod -n study-aews -o wide
kubectl get pod -n study-aews -o jsonpath='{.items[0].metadata.annotations.CapacityProvisioned}'- 출력 예시:
0.5vCPU 1GB - 이는 Admission Controller가 판단하여 Fargate에 의해 할당된 자원입니다.

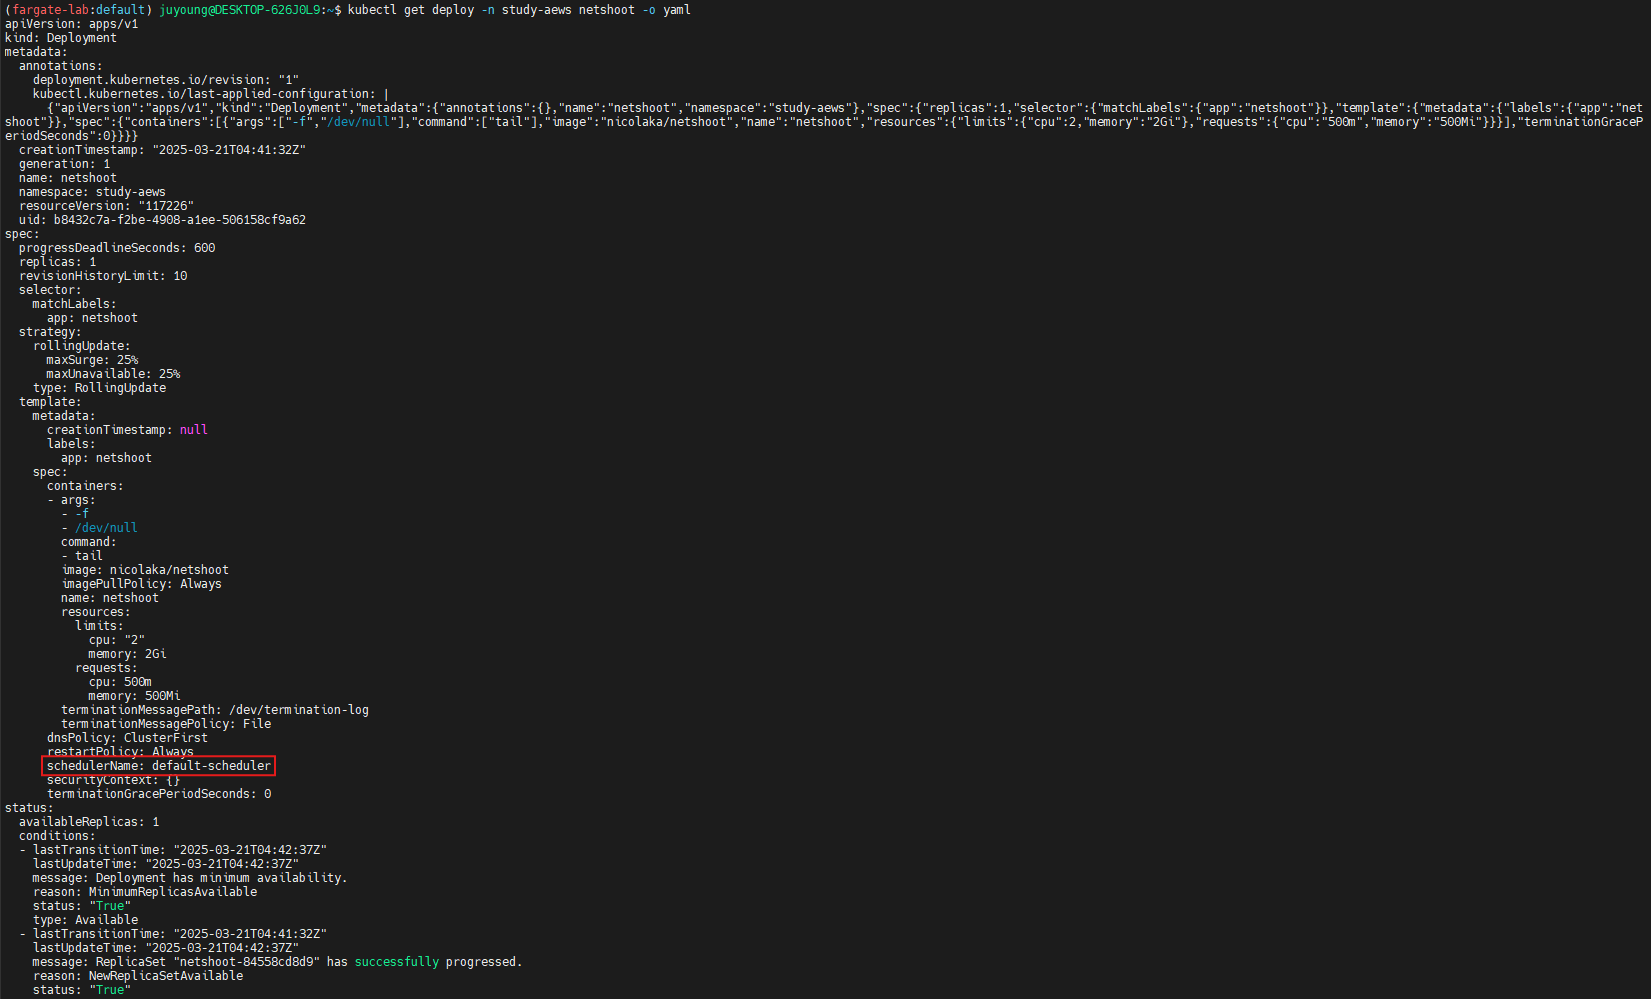
4.4 디플로이먼트 및 파드 설정 확인
# 디플로이먼트 상세 정보
kubectl get deploy -n study-aews netshoot -o yaml
# 출력 예시
...
template:
...
spec:
...
schedulerName: default-scheduler
securityContext: {}
terminationGracePeriodSeconds: 0
...
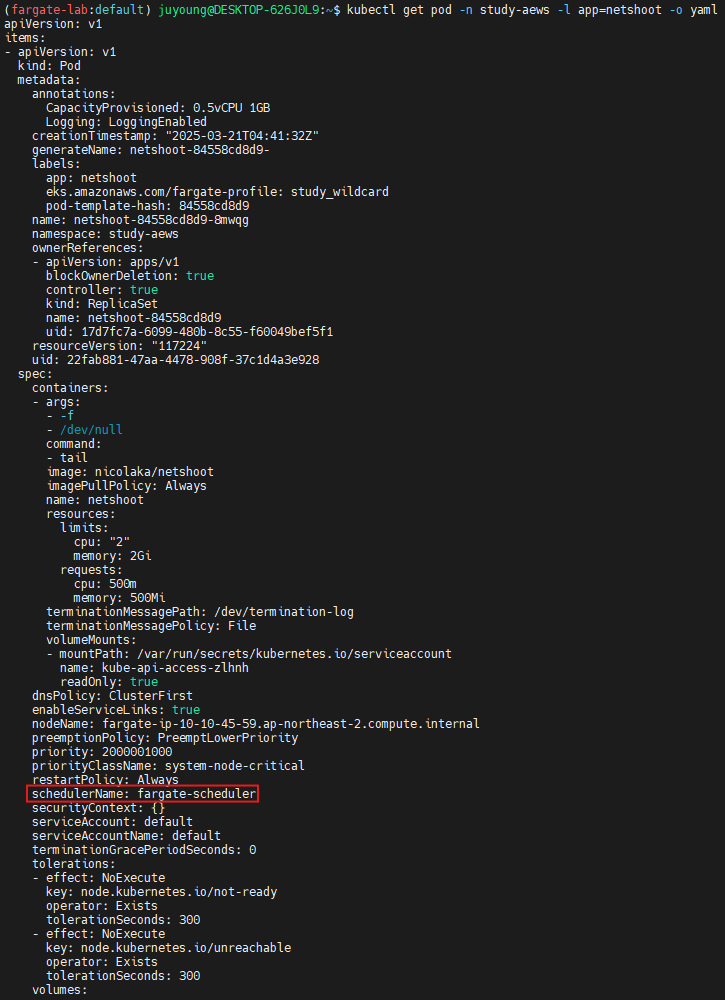
# 파드 상세 정보 : admission control 이 동작했음을 알 수 있음
kubectl get pod -n study-aews -l app=netshoot -o yaml
# 출력 예시
...
metadata:
annotations:
CapacityProvisioned: 0.5vCPU 1GB
Logging: LoggingEnabled
...
preemptionPolicy: PreemptLowerPriority
priority: 2000001000
priorityClassName: system-node-critical
restartPolicy: Always
schedulerName: fargate-scheduler
...
qosClass: Burstable
#
kubectl describe pod -n study-aews -l app=netshoot | grep Events: -A10- Deployment에는
schedulerName: default-scheduler로 설정되어 있지만, - 실제로는 Admission Webhook이
fargate-scheduler로 스케줄링을 재지정하여 파드는schedulerName: fargate-scheduler로 배치됩니다.
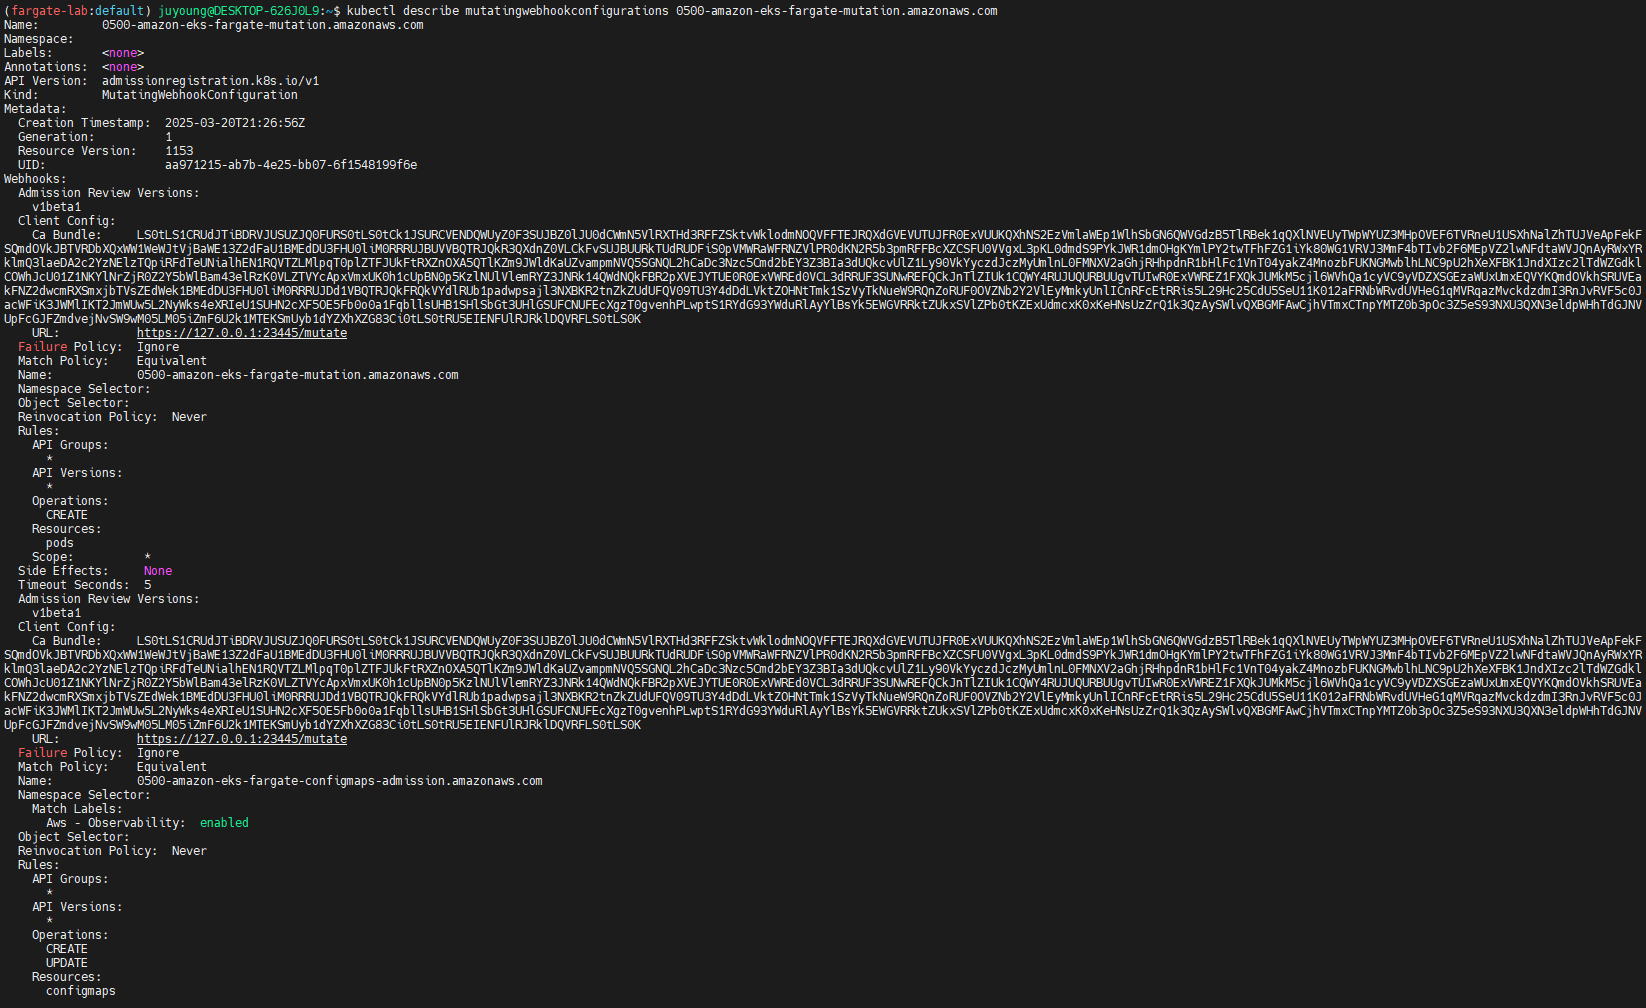
4.5 Admission Controller 확인
Fargate 파드는 AWS EKS의 Mutating Admission Webhook을 통해 Fargate 스케줄러로 전환되고, 적절한 리소스가 할당됩니다.
kubectl get mutatingwebhookconfigurations.admissionregistration.k8s.io
kubectl describe mutatingwebhookconfigurations 0500-amazon-eks-fargate-mutation.amazonaws.com
kubectl get validatingwebhookconfigurations.admissionregistration.k8s.io- 이 Webhook이
schedulerName을fargate-scheduler로 변경하고CapacityProvisioned를 자동 주입합니다.

4.6 파드 내부에서 네트워크 및 환경 확인
Fargate의 네트워크, 파일 시스템, DNS 등을 확인하기 위해 netshoot 파드에 접속합니다.
# 파드 내부에 zsh 접속 후 확인
kubectl exec -it deploy/netshoot -n study-aews -- zsh
-----------------------------------------------------
ip -c a   # 네트워크 인터페이스 확인
cat /etc/resolv.conf   # DNS 확인
curl ipinfo.io/ip # 출력되는 IP는 어떤것? , 어떤 경로를 통해서 인터넷이 되는 걸까?
ping -c 1 <다른 파드 IP ex. coredns pod ip>   # Pod 간 통신 가능 여부 확인
lsblk   # 디스크 블록 장치 확인
df -hT /   # 파일시스템 마운트 확인
cat /etc/fstab   # 파일시스템 부트 구성 확인
exit
-----------------------------------------------------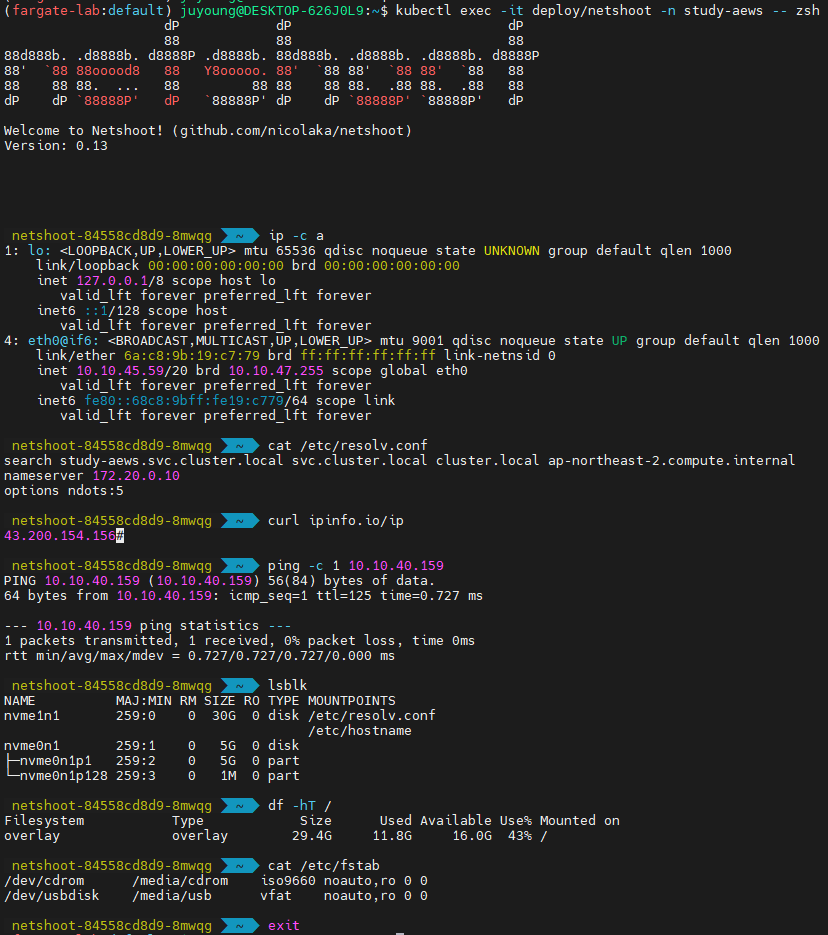
4.6.1 cat /etc/resolv.conf를 통해 출력되는 IP
= kube-dns service IP
$ k get svc -A
NAMESPACE     NAME                                TYPE        CLUSTER-IP       EXTERNAL-IP   PORT(S)                  AGE
kube-system   kube-dns                            ClusterIP   172.20.0.10      <none>        53/UDP,53/TCP,9153/TCP   8h
4.6.2 curl ipinfo.io/ip을 통해 출력되는 IP
= VPC의 NAT Gateway 공인 IP
curl ipinfo.io/ip는 클라이언트가 외부에서 인식되는 공인 IP 주소를 반환합니다.- Fargate 파드는 VPC의 프라이빗 서브넷에 위치하므로, 자체적으로 퍼블릭 IP를 갖고 있지 않습니다.
- 따라서 출력되는 IP는 파드 자체의 IP가 아닌, VPC의 NAT Gateway 또는 인터넷 게이트웨이(IGW)로 변환된 공인 IP입니다.
- 여러 파드가 NAT Gateway를 공유할 경우 동일한 IP를 반환받게 됩니다.

4.6.3 EKS Fargate 파드가 인터넷에 접근하는 경로
EKS Fargate 파드가 인터넷에 접근하는 전체 경로는 아래와 같습니다.
1. 파드의 위치
- Fargate 파드는 VPC의 프라이빗 서브넷에 생성됩니다.
- 이 서브넷에는 퍼블릭 IP가 할당되지 않으며, 라우팅 테이블을 통해 NAT Gateway를 통해 외부로 나감.
2. 기본 인터넷 통신 흐름
[파드(Fargate)]
     │ (Private IP)
     ▼
[VPC 라우팅 테이블]
     ▼
[NAT Gateway]
     ▼
[인터넷 게이트웨이 (IGW)]
     ▼
[인터넷 (ipinfo.io)]- NAT Gateway는 VPC의 퍼블릭 서브넷에 위치하며, 고정된 퍼블릭 IP를 가지고 있습니다.
- 프라이빗 서브넷에서 출발한 모든 아웃바운드 트래픽은 NAT Gateway를 통해 SNAT(Source NAT) 처리되어 인터넷으로 나가게 됩니다.
- 반환되는 응답은 NAT Gateway → 파드 순서로 되돌아옵니다.
5. Fargate 파드를 통한 호스트 탈취 시도 실습 및 Fargate 환경의 보안 제한 확인
Kubernetes 환경에서 권한이 높은 파드(Pod)를 생성하고, 이를 통해 호스트 네임스페이스에 접근하거나 루트 권한으로 노드 내 파일 시스템을 조작하려는 시도는 보안상 매우 중요한 이슈입니다.
이 실습은 악의적 행위 시나리오를 재현하는 데 쓰이며, Fargate 환경에서 보안 제한이 어떻게 적용되는지를 확인하는 목적에 있습니다.
5.1 실습 파드 정의
호스트 네임스페이스 및 파일 시스템을 마운트하여 탈취를 시도하는 파드입니다.
kubectl apply -f - <<EOF
apiVersion: v1
kind: Pod
metadata:
  name: root-shell
  namespace: study-aews
spec:
  containers:
  - command:
    - /bin/cat
    image: alpine:3
    name: root-shell
    securityContext:
      privileged: true
    tty: true
    stdin: true
    volumeMounts:
    - mountPath: /host
      name: hostroot
  hostNetwork: true
  hostPID: true
  hostIPC: true
  tolerations:
  - effect: NoSchedule
    operator: Exists
  - effect: NoExecute
    operator: Exists
  volumes:
  - hostPath:
      path: /
    name: hostroot
EOF
privileged: true
컨테이너가 노드에서 거의 모든 권한을 갖도록 설정hostNetwork: true
컨테이너가 노드의 네트워크 네임스페이스를 공유hostPID: true
호스트의 프로세스 ID 네임스페이스를 공유hostIPC: true
호스트의 IPC 리소스를 공유hostPath.path: /
호스트 루트 파일 시스템을 컨테이너에 마운트 (/host로) (볼륨을 / 루트로 마운트하여 호스트 파일 시스템 접근)
5.2 Fargate 환경에서의 결과
kubectl get pod -n study-aews root-shell
kubectl describe pod -n study-aews root-shell | grep Events: -A 10
# 출력 예시
Events:
  Type     Reason            Age   From               Message
  ----     ------            ----  ----               -------
  Warning  FailedScheduling  48s   fargate-scheduler  Pod not supported on Fargate: fields not supported: HostNetwork, HostPID, HostIPC, volumes not supported: hostroot is of an unsupported volume Type, invalid SecurityContext fields: Privileged

# 출력 메시지
# Pod not supported on Fargate: fields not supported:
# HostNetwork, HostPID, HostIPC, volumes not supported:
# hostroot is of an unsupported volume Type, invalid SecurityContext fields: Privileged
원인 분석
Fargate는 다음과 같은 보안 제약으로 인해 해당 파드 구성을 거부합니다.
| 제한 항목 | 이유 |
|---|---|
| hostNetwork, hostPID, hostIPC | Fargate는 호스트 공유 네임스페이스를 지원하지 않음 |
| hostPath 볼륨 | Fargate는 호스트 파일 시스템 마운트를 지원하지 않음 |
| privileged: true | Fargate에서는 Privileged 컨테이너 실행이 불가능 |
이러한 제약은 Fargate가 노드 인프라를 직접 제어할 수 없고, 격리된 환경에서만 실행되도록 설계되었기 때문입니다.
따라서 해당 파드는 스케줄링되지 않으며, 이벤트 로그에서 거부 사유를 확인할 수 있습니다.
5.3 파드 삭제
# 삭제
kubectl delete pod -n study-aews root-shell
5.4 EC2 기반 노드에서는 가능한가?
Fargate가 아닌 EC2 기반의 Kubernetes 노드에서는 위와 같은 파드를 배포할 수 있으며, 다음과 같은 방법으로 호스트 환경으로 진입이 가능합니다.
kubectl -n kube-system exec -it root-shell -- chroot /host /bin/bashchroot 후 명령어 예시
root@<node>:/# id
uid=0(root) gid=0(root) groups=0(root),...
이 상태는 곧 호스트 OS 내부에서 루트 권한을 획득한 것과 동일한 수준의 권한을 갖게 됩니다. 실제 운영 환경에서는 매우 위험한 상태로 간주됩니다.
이러한 이유로 Fargate는 보안 위협 시나리오에 강한 격리 특성을 제공하며, 운영 환경에서의 컨테이너 보안성을 높일 수 있습니다.
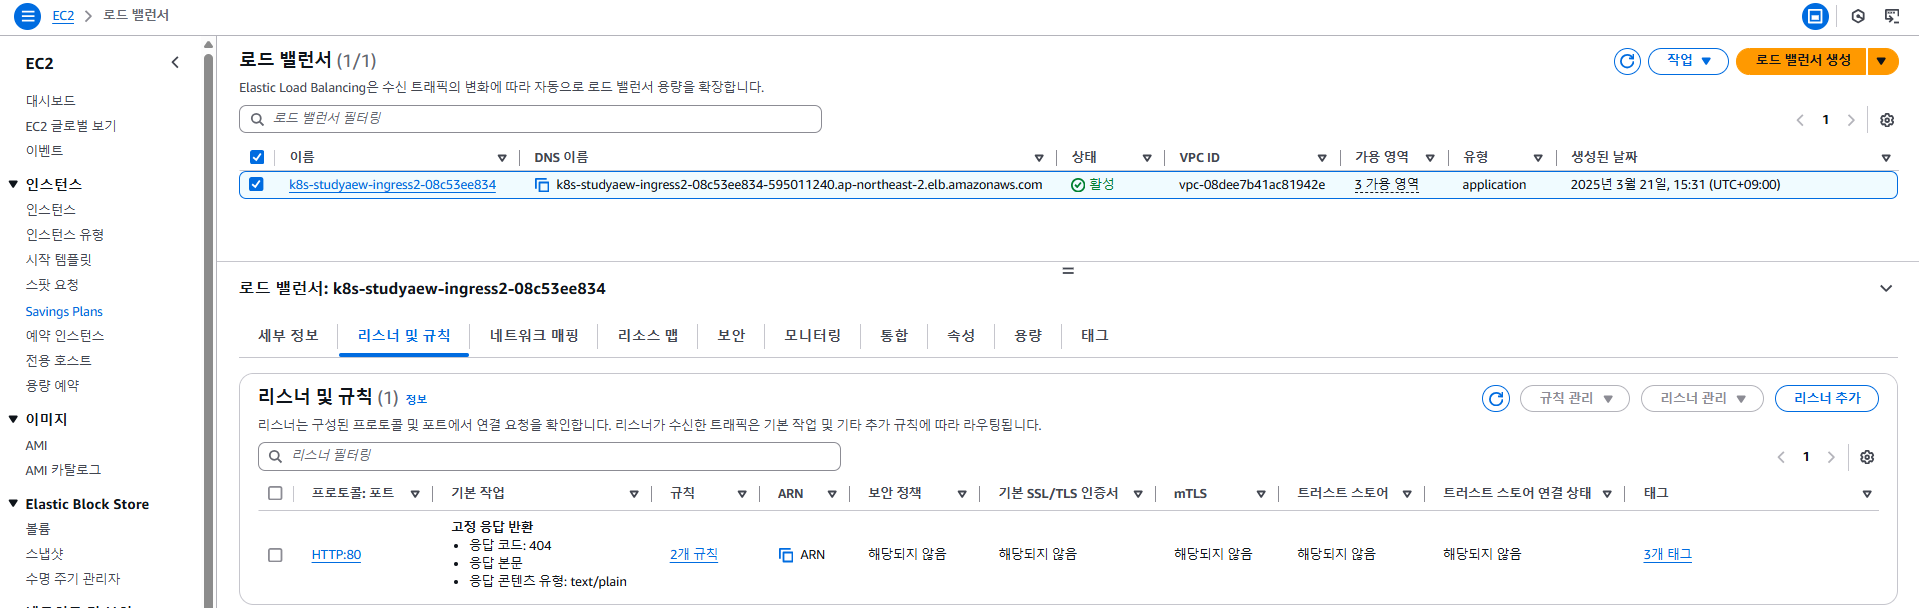
6. AWS ALB Ingress Controller를 이용한 애플리케이션 노출 실습
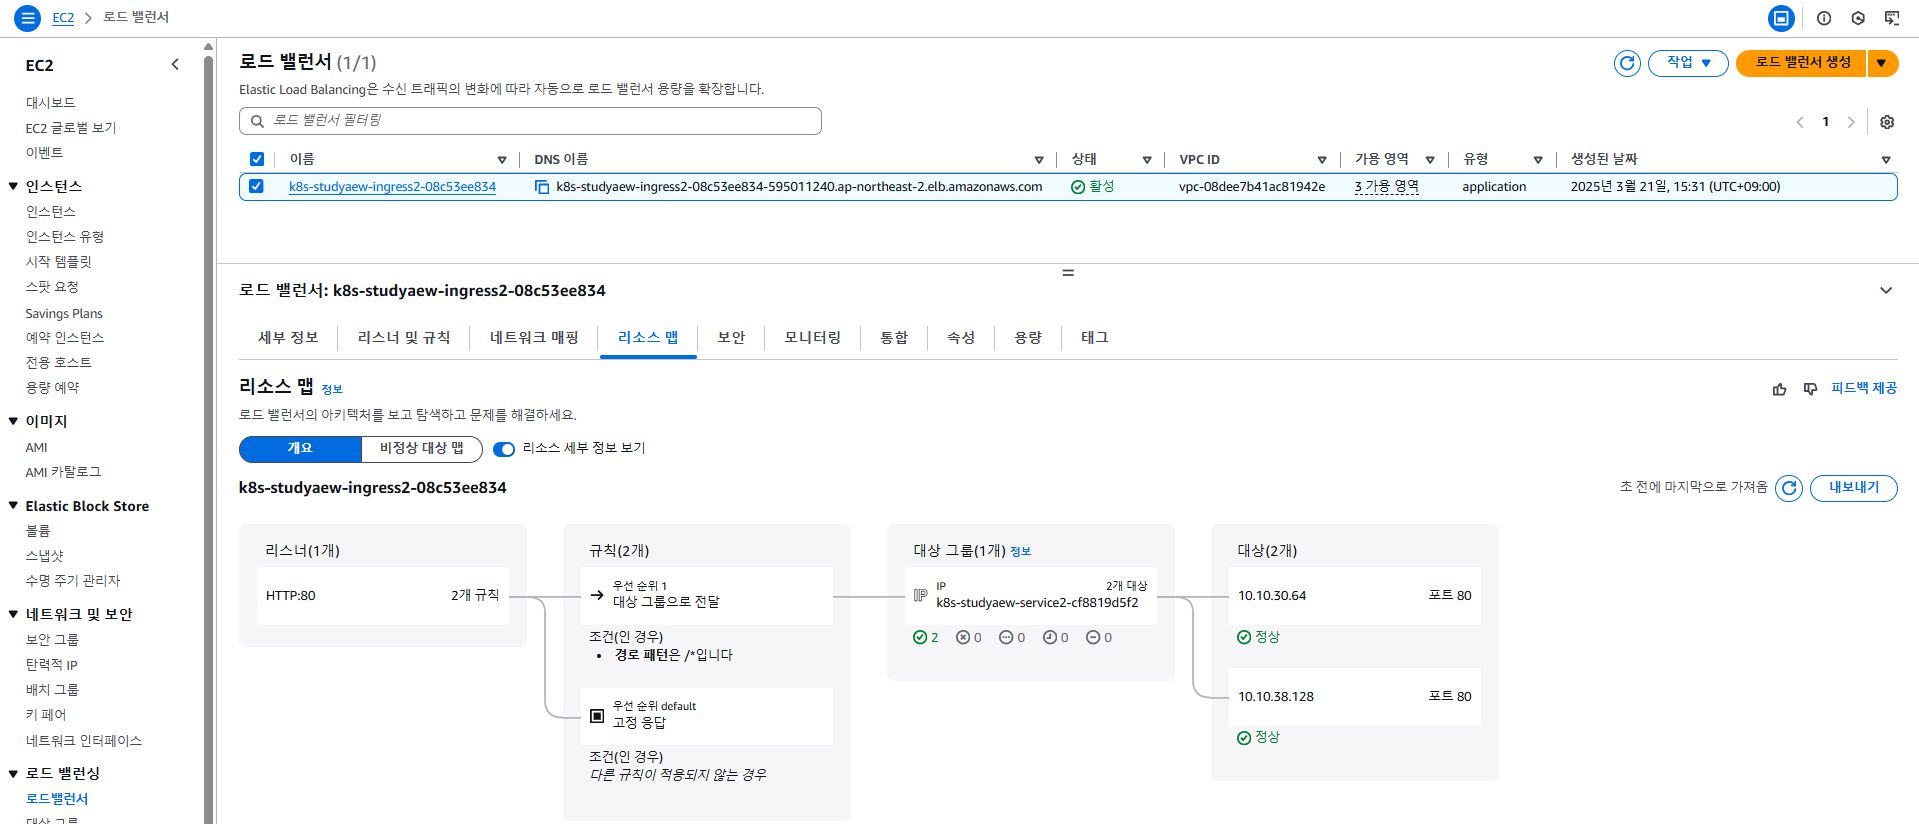
Amazon EKS의 Fargate 환경에서 ALB Ingress Controller를 사용하여, 웹 애플리케이션(2048 게임)을 외부 인터넷에 노출하는 과정입니다. ALB는 Kubernetes Ingress 객체를 통해 자동으로 생성되며, Ingress는 내부적으로 Target Group과 TargetGroupBinding을 생성하여 파드에 트래픽을 전달합니다.
6.1 아키텍처

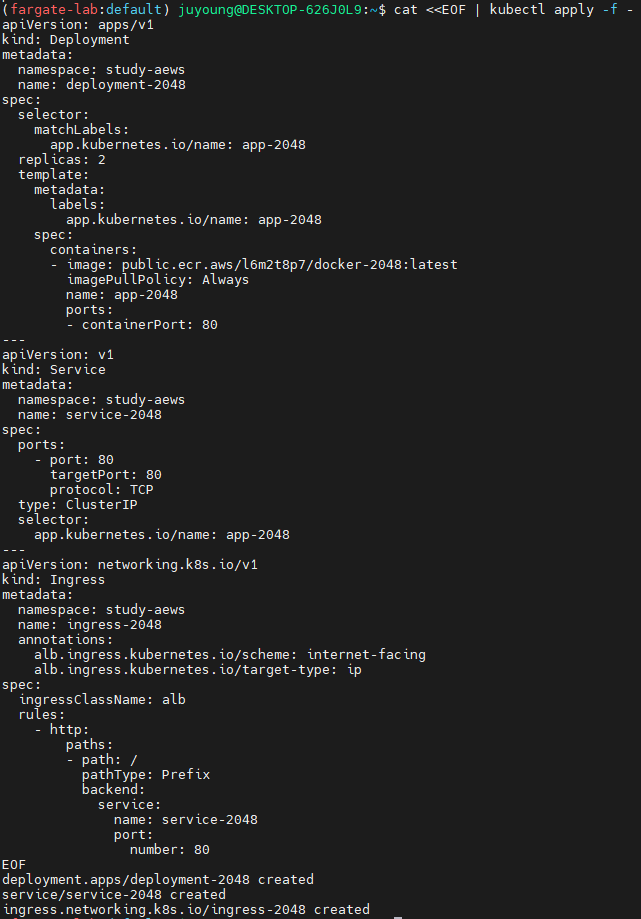
6.2 리소스 생성 (2048 게임 배포)
아래 명령을 통해 Deployment, Service, Ingress 리소스들이 study-aews 네임스페이스에 생성됩니다.
cat <<EOF | kubectl apply -f -
apiVersion: apps/v1
kind: Deployment
metadata:
  namespace: study-aews
  name: deployment-2048
spec:
  selector:
    matchLabels:
      app.kubernetes.io/name: app-2048
  replicas: 2
  template:
    metadata:
      labels:
        app.kubernetes.io/name: app-2048
    spec:
      containers:
      - image: public.ecr.aws/l6m2t8p7/docker-2048:latest
        imagePullPolicy: Always
        name: app-2048
        ports:
        - containerPort: 80
---
apiVersion: v1
kind: Service
metadata:
  namespace: study-aews
  name: service-2048
spec:
  ports:
    - port: 80
      targetPort: 80
      protocol: TCP
  type: ClusterIP
  selector:
    app.kubernetes.io/name: app-2048
---
apiVersion: networking.k8s.io/v1
kind: Ingress
metadata:
  namespace: study-aews
  name: ingress-2048
  annotations:
    alb.ingress.kubernetes.io/scheme: internet-facing
    alb.ingress.kubernetes.io/target-type: ip
spec:
  ingressClassName: alb
  rules:
    - http:
        paths:
        - path: /
          pathType: Prefix
          backend:
            service:
              name: service-2048
              port:
                number: 80
EOFinternet-facing: 외부 인터넷에서 접근 가능target-type: ip: ALB가 파드의 IP에 직접 트래픽 전달
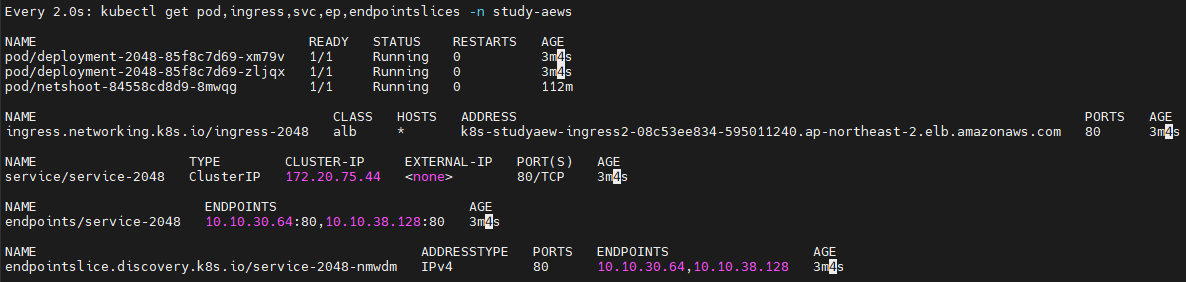
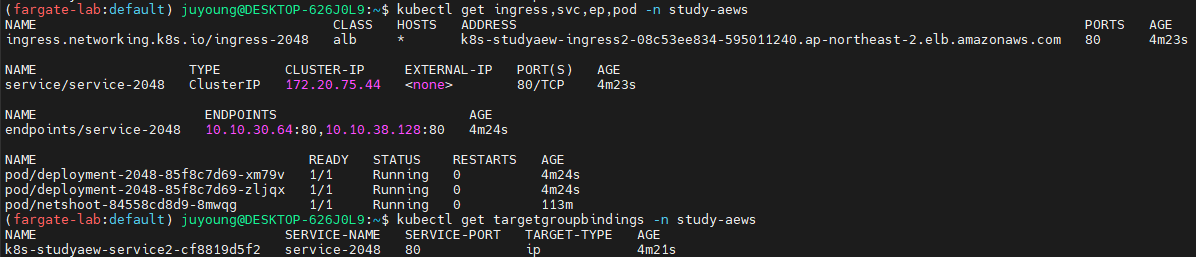
6.3 리소스 생성 확인
# 모니터링
watch -d kubectl get pod,ingress,svc,ep,endpointslices -n study-aews

# 생성 확인
kubectl get-all -n study-aews
kubectl get ingress,svc,ep,pod -n study-aews
kubectl get targetgroupbindings -n study-aewsTargetGroupBinding객체가 생성되어 있는지 확인 → ALB가 대상 파드와 연결된 것을 의미
6.4 ALB Ingress 주소 확인 및 접속
# Ingress 확인
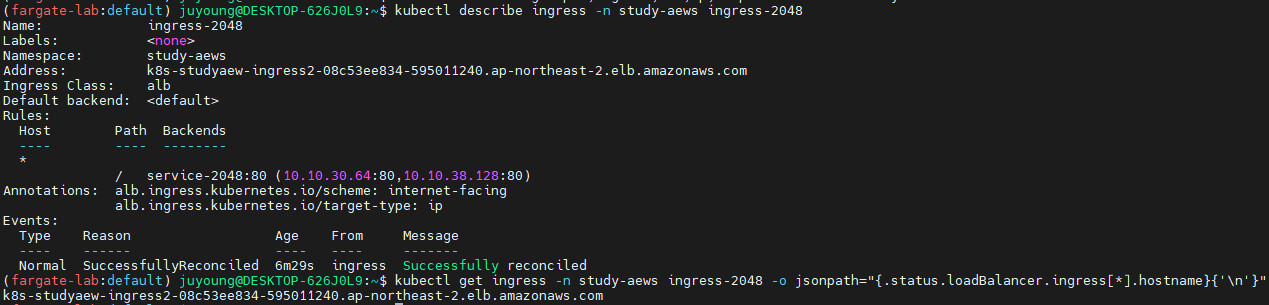
kubectl describe ingress -n study-aews ingress-2048
kubectl get ingress -n study-aews ingress-2048 -o jsonpath="{.status.loadBalancer.ingress[*].hostname}{'\n'}"- 출력된
hostname은 AWS에서 프로비저닝된 ALB의 DNS 주소입니다.
# 게임 접속 : ALB 주소로 웹 접속
kubectl get ingress -n study-aews ingress-2048 -o jsonpath='{.status.loadBalancer.ingress[0].hostname}' | awk '{ print "Game URL = http://"$1 }'

6.5 리소스 상태 및 동작 확인
6.5.1 파드 상태 확인
# 파드 IP 확인
kubectl get pod -n study-aews -owide
6.5.2 파드 수 조정 (스케일 아웃)
# 파드 증가
kubectl scale deployment -n study-aews  deployment-2048 --replicas 4


6.6 리소스 삭제
- ALB와 관련된 모든 리소스가 삭제되며, ALB도 자동으로 삭제됩니다.
- AWS 콘솔에서는 남아 있는 리소스가 없는지 확인하는 것이 좋습니다 (예: Target Group, ALB 등).

7. Fargate 환경에서 Job 실행 실습
EKS Fargate 환경에서 일회성 작업(Job)을 실행하고 이를 관찰하는 과정입니다. Job은 단발성 작업(예: 배치 처리, 테스트 실행 등)에 적합한 Kubernetes 리소스입니다.
이번 실습에서는 다음 두 개의 Job을 생성합니다:
- busybox1: 실행 완료 후 일정 시간이 지나면 자동 삭제되는 Job (
ttlSecondsAfterFinished설정 포함) - busybox2: 수동으로 삭제하지 않으면 유지되는 Job (
ttlSecondsAfterFinished미포함)
7.1 Job 리소스 정의 및 생성
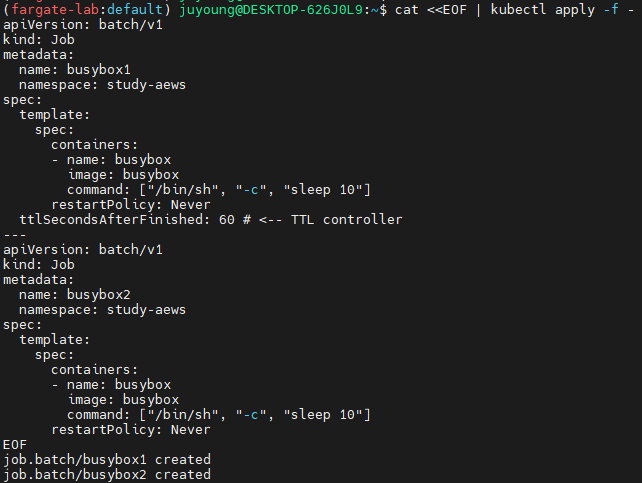
cat <<EOF | kubectl apply -f -
apiVersion: batch/v1
kind: Job
metadata:
  name: busybox1
  namespace: study-aews
spec:
  template:
    spec:
      containers:
      - name: busybox
        image: busybox
        command: ["/bin/sh", "-c", "sleep 10"]
      restartPolicy: Never
  ttlSecondsAfterFinished: 60 # <-- TTL controller
---
apiVersion: batch/v1
kind: Job
metadata:
  name: busybox2
  namespace: study-aews
spec:
  template:
    spec:
      containers:
      - name: busybox
        image: busybox
        command: ["/bin/sh", "-c", "sleep 10"]
      restartPolicy: Never
EOF-
sleep 10 명령어로 10초 동안 대기한 후 종료
-
busybox1은
ttlSecondsAfterFinished: 60설정으로 인해 Job이 종료 후 60초 뒤 자동 삭제됩니다. -
TTL은 Kubernetes TTL Controller에 의해 관리되며, 리소스 정리를 자동화합니다.
-
busybox2는 busybox1과 동일한 작업을 수행하지만 TTL 설정이 없으므로 자동 삭제되지 않습니다.
-
Job 리소스와 관련된 Pod는 수동으로 삭제해야 합니다.
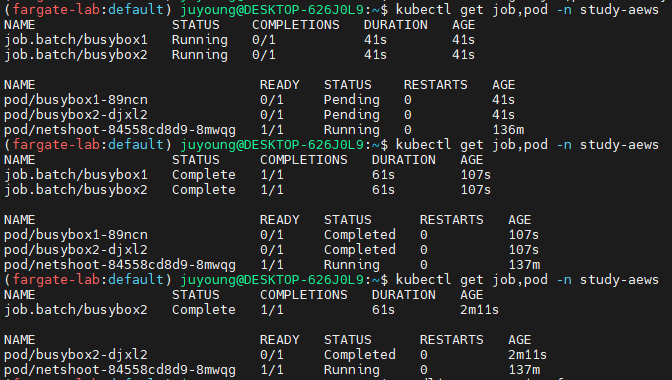
7.2 실행 상태 및 TTL Controller 동작 확인
kubectl get job,pod -n study-aews
kubectl get job -n study-aews -w
kubectl get pod -n study-aews -w
kubectl get job,pod -n study-aews- Pod는
Running상태로 시작된 후, 10초 후Completed상태로 변경됩니다. - Job은 1개의 파드 실행이 성공적으로 완료되면
Complete상태로 표시됩니다. busybox1Job의 경우, 작업이 완료된 후 60초가 지나면 다음 리소스가 자동으로 삭제됩니다.- TTL 컨트롤러는 Job이 종료된 후 자원 정리를 자동화하여 클러스터 리소스를 효율적으로 유지 관리할 수 있게 합니다.
7.3 리소스 삭제
TTL이 없는 busybox2 Job은 수동으로 삭제해야 합니다.
kubectl delete job -n study-aews --all- Job이 삭제되면 해당 Job에 의해 생성된 Pod도 함께 삭제됩니다.
8. Fluent Bit 기반 파드 로그 수집 실습
8.1 EKS Fargate에서의 로그 수집 방식
Fargate는 Fluent Bit 기반의 내장 로그 라우터를 제공합니다. 사용자는 Fluent Bit를 사이드카로 직접 실행할 필요 없이, AWS가 Fluent Bit를 파드 외부에서 자동 실행 및 관리합니다.
주요 특징
- Fluent Bit 로그 라우터가 자동 실행됨
- 사이드카 패턴이 필요 없음
- 단, 전용
Namespace와ConfigMap을 구성해야 로그 라우팅이 가능함 - 로그는 CloudWatch Logs, Amazon OpenSearch, Firehose, S3, Kinesis 등으로 전송 가능
8.2 Fluent Bit 구성 요건
Fargate 로그 수집을 위해서는 특정 조건을 만족하는 ConfigMap을 생성해야 합니다.
| 항목 | 조건 |
|---|---|
| ConfigMap 이름 | aws-logging |
| 네임스페이스 | aws-observability (미리 생성되어 있어야 함) |
| 최대 크기 | 5,300자 이내 |
| 변경 반영 | 기존 파드에는 적용되지 않으며, 신규 파드에만 반영됨 |
| 로그 목적지 | CloudWatch Logs (예시), OpenSearch, Firehose 등 |
| 공식 문서 | aws/aws-for-fluent-bit |
8.3 로그 발생 애플리케이션 배포 (nginx)
cat <<EOF | kubectl apply -f -
apiVersion: apps/v1
kind: Deployment
metadata:
  name: sample-app
  namespace: study-aews
spec:
  replicas: 2
  selector:
    matchLabels:
      app: nginx
  template:
    metadata:
      labels:
        app: nginx
    spec:
      containers:
      - image: nginx:latest
        name: nginx
        ports:
        - containerPort: 80
          name: http
        resources:
          requests:
            cpu: 500m
            memory: 500Mi
          limits:
            cpu: 2
            memory: 2Gi
---
apiVersion: v1
kind: Service
metadata:
  name: sample-app
  namespace: study-aews
spec:
  selector:
    app: nginx
  ports:
  - port: 80
    targetPort: 80
    protocol: TCP
  type: ClusterIP
EOF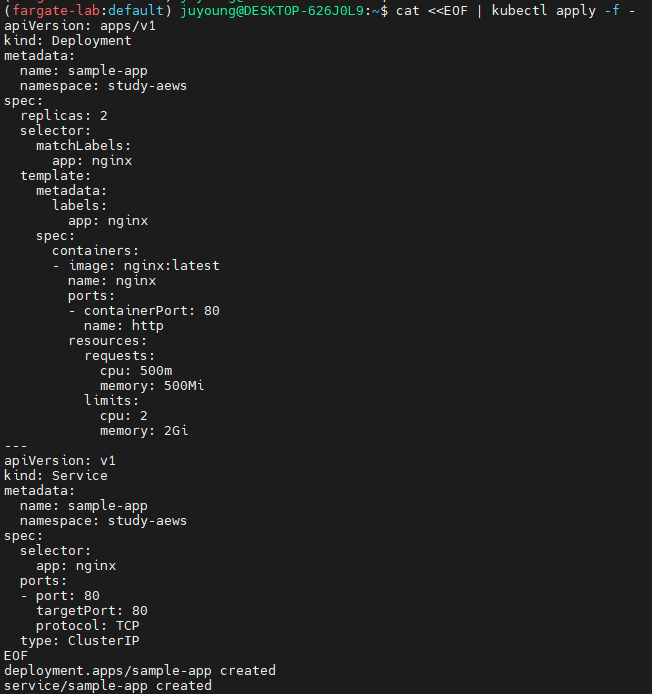
배포 확인
kubectl get pod -n study-aews -l app=nginx
kubectl describe pod -n study-aews -l app=nginx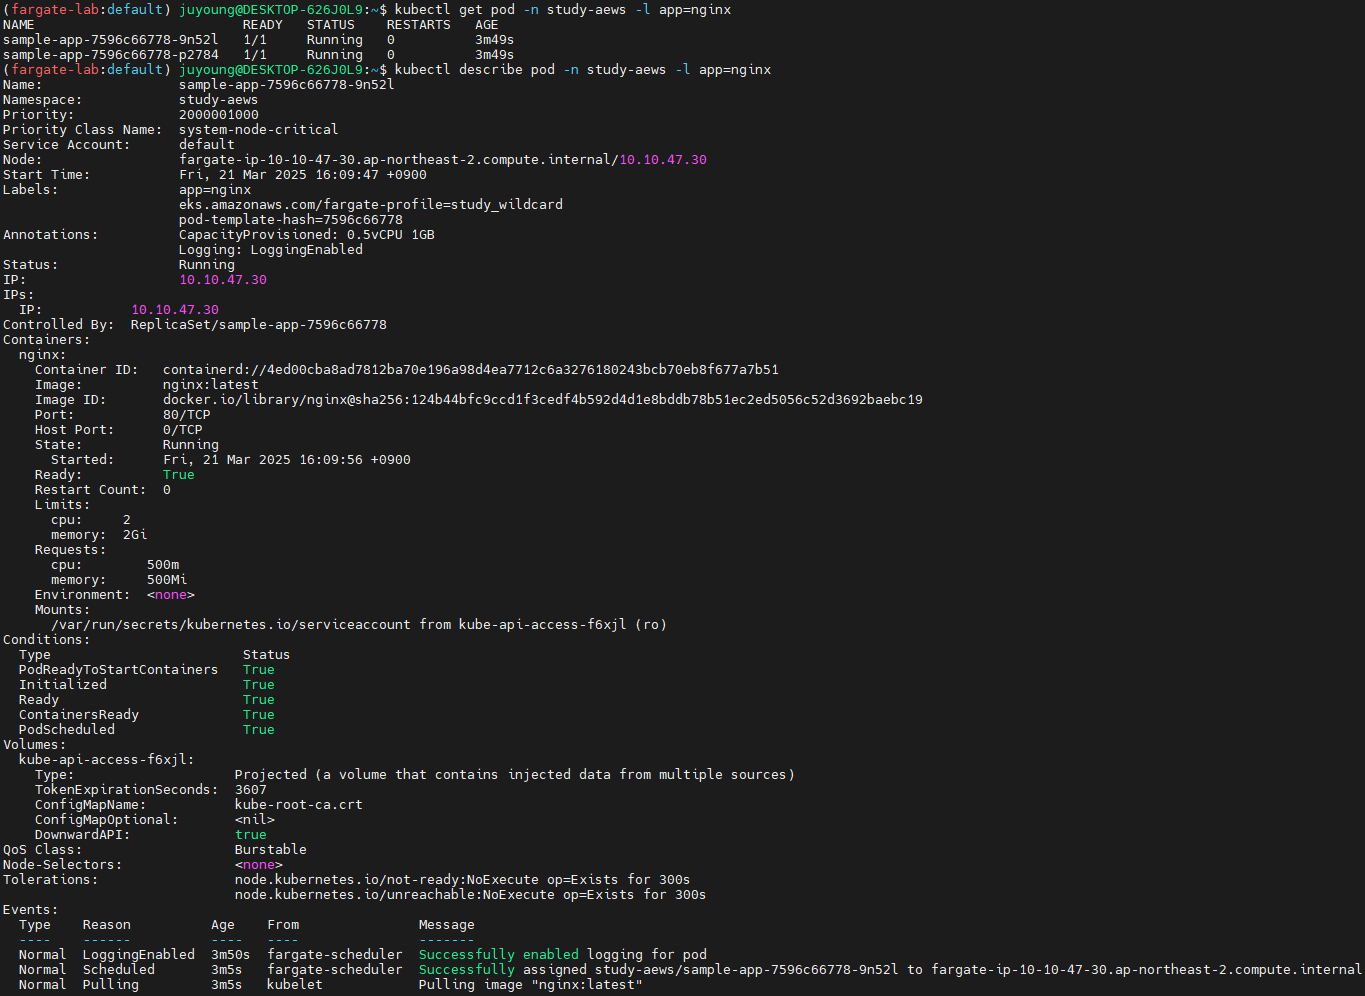
8.4 Fluent Bit 로그 설정 정보 확인
Terraform 예시 (main.tf)
# main.tf
...
  # Enable Fargate logging this may generate a large ammount of logs, disable it if not explicitly required
  enable_fargate_fluentbit = true
  fargate_fluentbit = {
    flb_log_cw = true
  }
...
네임스페이스 및 ConfigMap 확인
# aws-observability라는 이름의 전용 네임스페이스 확인
kubectl get ns --show-labels

# Fluent Conf 데이터 값이 포함된 ConfigMap : 컨테이너 로그를 목적지로 배송 설정
## Amazon EKS Fargate 로깅은 ConfigMap의 동적 구성을 지원하지 않습니다.
## ConfigMap에 대한 모든 변경 사항은 새 포드에만 적용됩니다. 기존 포드에는 변경 사항이 적용되지 않습니다.
kubectl get cm -n aws-observability
kubectl get cm -n aws-observability aws-logging -o yaml
data:
  filters.conf: |
    [FILTER]
      Name parser
      Match *
      Key_name log
      Parser crio
    [FILTER]
      Name kubernetes
      Match kube.*
      Merge_Log On
      Keep_Log Off
      Buffer_Size 0
      Kube_Meta_Cache_TTL 300s
  flb_log_cw: "true"  # Ships Fluent Bit process logs to CloudWatch.
  output.conf: |+
    [OUTPUT]
          Name cloudwatch
          Match kube.*
          region ap-northeast-2
          log_group_name /fargate-serverless/fargate-fluentbit-logs2025031600585521800000000c
          log_stream_prefix fargate-logs-
          auto_create_group true
    [OUTPUT]
          Name cloudwatch_logs
          Match *
          region ap-northeast-2
          log_group_name /fargate-serverless/fargate-fluentbit-logs2025031600585521800000000c
          log_stream_prefix fargate-logs-fluent-bit-
          auto_create_group true

  parsers.conf: |
    [PARSER]
      Name crio
      Format Regex
      Regex ^(?<time>[^ ]+) (?<stream>stdout|stderr) (?<logtag>P|F) (?<log>.*)$
      Time_Key    time
      Time_Format %Y-%m-%dT%H:%M:%S.%L%z
      Time_Keep On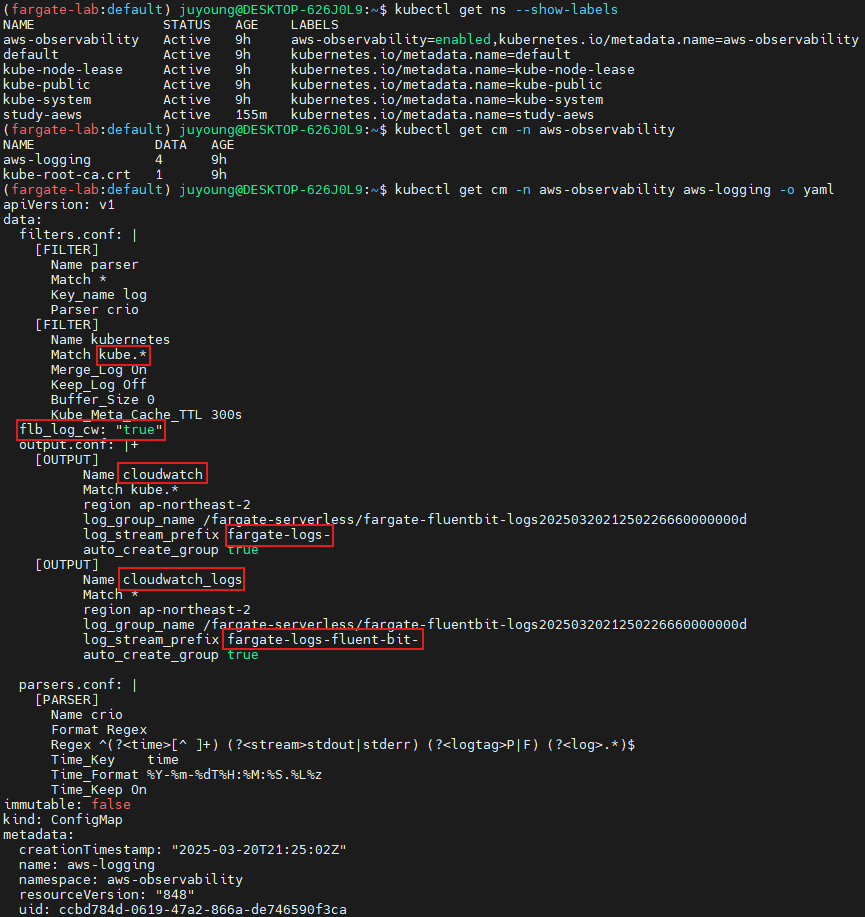
8.5 애플리케이션에 트래픽 유입
netshoot 파드에서 반복적으로 nginx에 요청을 보내 로그를 생성합니다.
# 반복 접속
kubectl exec -it deploy/netshoot -n study-aews -- curl sample-app | grep title
while true; do kubectl exec -it deploy/netshoot -n study-aews -- curl sample-app | grep title; sleep 1; echo ; date; done;
8.6 파드 로그 실시간 확인
stern 명령어를 통해 nginx 파드 로그를 실시간으로 스트리밍합니다.
# 로그 확인
kubectl stern -n study-aews -l app=nginx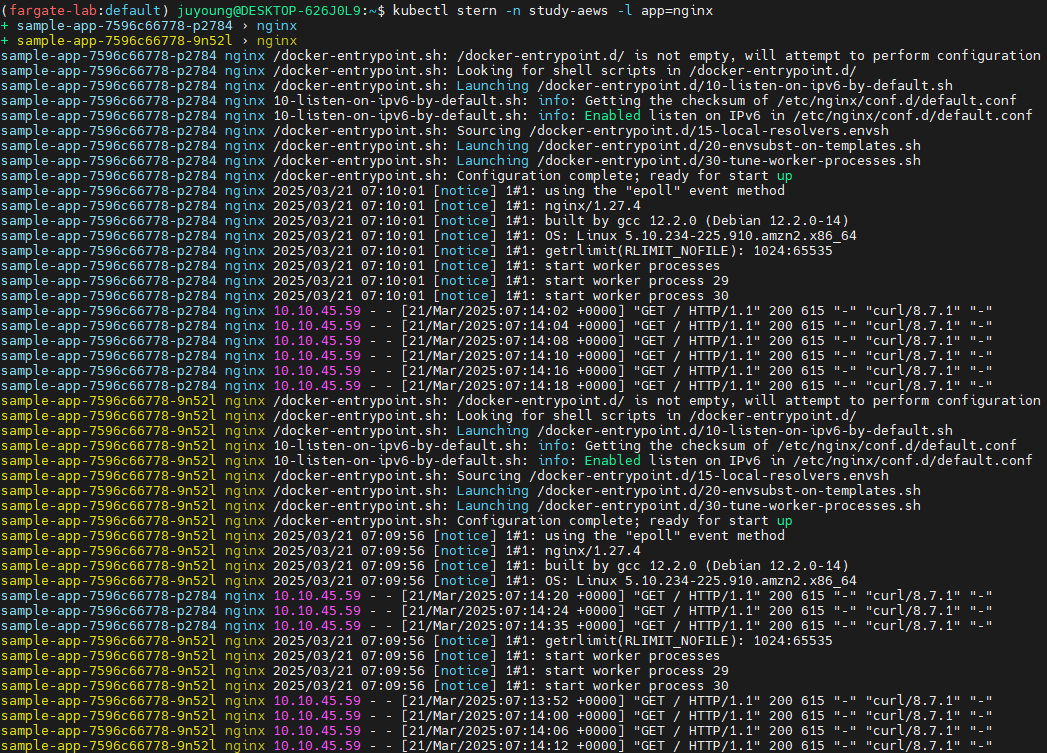
8.7 CloudWatch에서 로그 확인
-
AWS CloudWatch → 로그 그룹 →
/fargate-serverless/fargate-fluentbit-logs…이동 -
로그 스트림에
nginx포함된 항목 필터링 -
마지막 이벤트 시간 최근 순
-
fluent-bit포함 여부 확인
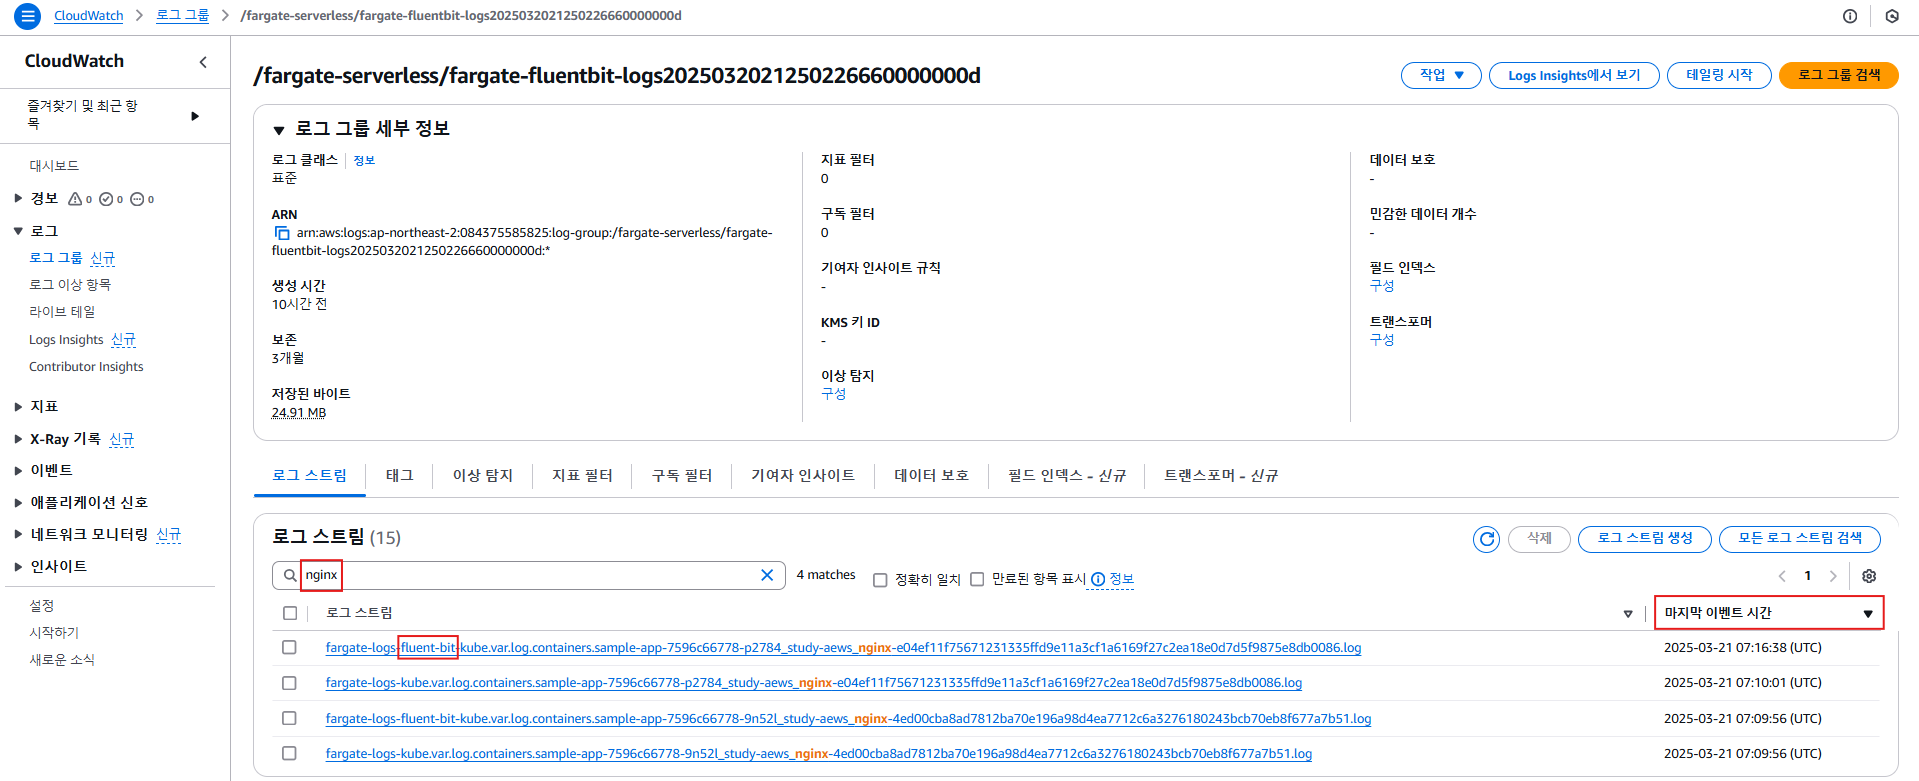
-
curl요청이 반영된 nginx 액세스 로그를 확인 가능
8.8 리소스 삭제
kubectl delete deploy,svc -n study-aews sample-app9. 실습 리소스 전체 삭제
원활한 삭제를 위해 순서대로 삭제해야 합니다. 10분 정도 소요됩니다.
실습 배포 리소스들 먼저 삭제
# 게임 실습 리소스  삭제
kubectl delete ingress ingress-2048 -n study-aews
kubectl delete svc service-2048 -n study-aews && kubectl delete deploy deployment-2048 -n study-aews

# netshoot 삭제
kubectl delete deploy netshoot -n study-aews

# kube-ops-view 삭제
helm uninstall kube-ops-view -n kube-system
테라폼 삭제
# 테라폼 삭제 : vpc 삭제가 잘 안될 경우 aws 콘솔에서 vpc 수동 삭제 -> vnic 등 남아 있을 경우 해당 vnic 강제 삭제
terraform destroy -auto-approve

# VPC 삭제 확인
aws ec2 describe-vpcs --filter 'Name=isDefault,Values=false' --output yaml

# kubeconfig 삭제
rm -rf ~/.kube/config