
이 블로그글은 2019년 조재영(Kevin Jo), 김승수(SeungSu Kim)님의 딥러닝 홀로서기 세미나를 수강하고 작성한 글임을 밝힙니다.
Github 링크 : 실습 코드 링크
Pytorch로 ResNet 구현하기
💡 목표 CIFAR100 이미지를 분류하는 ResNet 구현하기
Cifar 100

- 100개의 클래스로 이루어진 이미지 분류 데이터셋
- 총 6만장의 컬러 이미지(RGB)로 구성된다.
- 100개의 카테고리가 존재한다.
- 각 클래스마다 600장의 이미지가 포함되어 있다.
- 데이터셋은 학습용과 테스트용으로 나뉘어져 있다.
실습
데이터 불러오기
transform_train = transforms.Compose(
    [
    transforms.RandomCrop(32, padding=4),  # 랜덤 크기 조정 + 패딩
    transforms.RandomHorizontalFlip(),  # 랜덤 수평 뒤집기
    transforms.RandomRotation(15),  # 랜덤 회전 (±15도)
    transforms.ToTensor(),
    transforms.Normalize((0.4914, 0.4822, 0.4465), (0.2023, 0.1994, 0.2010)),
    ])

transform_test = transforms.Compose([
    transforms.ToTensor(),
    transforms.Normalize((0.4914, 0.4822, 0.4465), (0.2023, 0.1994, 0.2010)),
])

trainset = torchvision.datasets.CIFAR100(root='./data', train=True,
                                        download=True, transform=transform_train)
trainset, valset = torch.utils.data.random_split(trainset, [40000, 10000])
testset = torchvision.datasets.CIFAR100(root='./data', train=False,
                                       download=True, transform=transform_test)
partition = {'train': trainset, 'val':valset, 'test':testset}- torchvision을 통해 CIFAR-100 데이터를 불러온다.
- 데이터 증강 적용
- CIFAR-100 데이터의 경우 클래스별로 600개의 이미지밖에 존재하지 않는다.
- 더 나은 성능의 학습을 위해 데이터 증강을 적용하였다.
3x3 Conv, 1x1 Conv layer 생성
def conv3x3(in_planes, out_planes, stride=1):
  return nn.Conv2d(in_planes, out_planes, kernel_size=3, stride=stride, padding=1, bias=False)

def conv1x1(in_planes, out_planes, stride=1):
return nn.Conv2d(in_planes, out_planes, kernel_size=1, stride=stride, bias=False)- ResNet에서는 주로 3x3 Conv Layer와 1x1 Conv Layer (bottleneck을 위한)를 사용한다.
- Kernel_size, Padding, Bias는 동일하게 설정되므로, 이를 미리 함수로 생성하여 재사용 가능하도록 하였다.
- 또한, 중간에 MaxPooling 대신 stride 2를 사용하여 크기를 줄이는 레이어가 존재하므로, 기본 stride=1로 설정하고, 필요에 따라 stride 값을 받을 수 있도록 구현하였다.
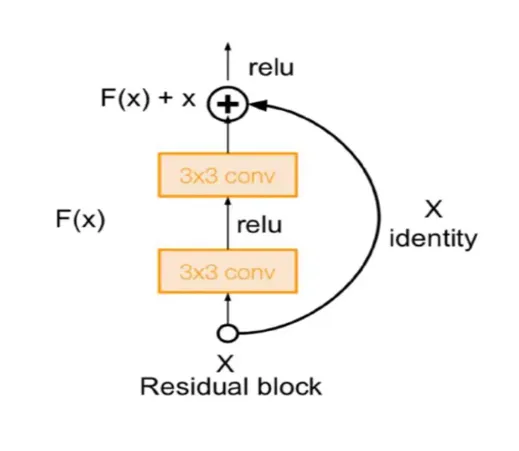
Basic Block 모듈 생성
class BasicBlock(nn.Module):
  expansion = 1

  def __init__(self, inplanes, planes, stride=1, downsample=None):
    super(BasicBlock, self).__init__()
    self.conv1 = conv3x3(inplanes, planes, stride)
    self.bn1 = nn.BatchNorm2d(planes)
    self.relu = nn.ReLU(inplace=True)
    self.conv2 = conv3x3(planes, planes)
    self.bn2 = nn.BatchNorm2d(planes)
    self.downsample = downsample # 나중에 ResNet에서 처리함 (중요)
    self.stride = stride

  def forward(self, x):
    identity = x # 입력값을 나중에 더 해주기 위해 미리 저장

    out = self.conv1(x)
    out = self.bn1(out)
    out = self.relu(out)

    out = self.conv2(out)
    out = self.bn2(out)

    if self.downsample is not None: # downsample : skip connection을 할 때 입력한 depth와 출력의 depth가 다른 경우 depth를 맞춰주기 함
      identity = self.downsample(x)

    out += identity
    out = self.relu(out)

return out- ResNet-18, RestNet-34에 사용되는 모듈이다.
- Downsample은 레이어를 통과하면서 depth가 변경될 경우, 입력 이미지의 depth를 변형하는 데 사용된다. (최종 모델인 ResNet 모듈에서 처리)
- 두 번째 레이어는 stride를 명시적으로 지정하지 않고, 기본값인 stride=1을 사용하도록 설정한다.
Bottleneck 모듈 생성
class Bottleneck(nn.Module):
  expansion = 4

  def __init__(self, inplanes, planes, stride=1, downsample=None):
    super(Bottleneck, self).__init__()
    self.conv1 = conv1x1(inplanes, planes)
    self.bn1 = nn.BatchNorm2d(planes)
    self.conv2 = conv3x3(planes, planes, stride)
    self.bn2 = nn.BatchNorm2d(planes)
    self.conv3 = conv1x1(planes, planes * self.expansion)
    self.bn3 = nn.BatchNorm2d(planes * self.expansion)
    self.relu = nn.ReLU(inplace=True)
    self.downsample = downsample
    self.stride = stride

  def forward(self, x):
      identity = x

      out = self.conv1(x)
      out = self.bn1(out)
      out = self.relu(out)

      out = self.conv2(out)
      out = self.bn2(out)

      out = self.conv3(out)
      out = self.bn3(out)

if self.downsample is not None:- ResNet-50, ResNet-101, ResNet-15에 사용되는 모듈이다.
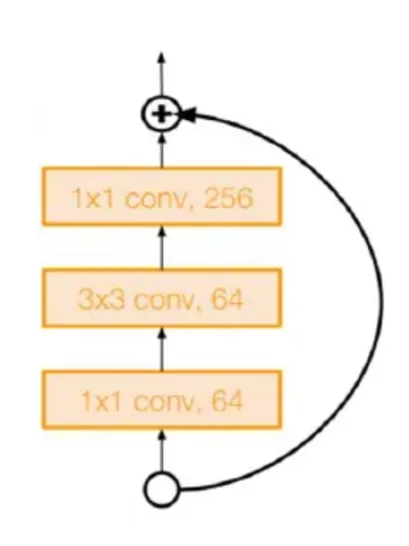
- Bottleneck 모듈 이후에 depth를 4배 늘리는 것은 계산 효율성 측면에서 다소 부담이 될 수 있지만, 실험 결과 성능 향상에 도움이 되었기 때문에 적용하였다.
- 높은 표현력을 얻기 위한 전략으로, 깊이가 늘어나면서 모델의 표현력과 학습 능력이 향상된 것으로 보인다.
ResNet 모듈
class ResNet(nn.Module):

    def __init__(self, block, layers, kernel_size=7, num_classes=1000, zero_init_residual=False):
        super(ResNet, self).__init__()
        self.inplanes = 64
        self.conv1 = nn.Conv2d(3, 64, kernel_size = kernel_size, stride=2, padding=(kernel_size//2),
                               bias=False)
        self.bn1 = nn.BatchNorm2d(64)
        self.relu = nn.ReLU(inplace=True)
        self.maxpool = nn.MaxPool2d(kernel_size=3, stride=2, padding=1)
        self.layer1 = self._make_layer(block, 64, layers[0])
        self.layer2 = self._make_layer(block, 128, layers[1], stride=2)
        self.layer3 = self._make_layer(block, 256, layers[2], stride=2)
        self.layer4 = self._make_layer(block, 512, layers[3], stride=2)
        self.avgpool = nn.AdaptiveAvgPool2d((1, 1))
        self.fc = nn.Linear(512 * block.expansion, num_classes)

        for m in self.modules():
            if isinstance(m, nn.Conv2d):
                nn.init.kaiming_normal_(m.weight, mode='fan_out', nonlinearity='relu')
            elif isinstance(m, nn.BatchNorm2d):
                nn.init.constant_(m.weight, 1)
                nn.init.constant_(m.bias, 0)

        # Zero-initialize the last BN in each residual branch,
        # so that the residual branch starts with zeros, and each residual block behaves like an identity.
        # This improves the model by 0.2~0.3% according to https://arxiv.org/abs/1706.02677
        if zero_init_residual:
            for m in self.modules():
                if isinstance(m, Bottleneck):
                    nn.init.constant_(m.bn3.weight, 0)
                elif isinstance(m, BasicBlock):
                    nn.init.constant_(m.bn2.weight, 0)

    def _make_layer(self, block, planes, blocks, stride=1):
        downsample = None
        if stride != 1 or self.inplanes != planes * block.expansion:
            downsample = nn.Sequential(
                conv1x1(self.inplanes, planes * block.expansion, stride),
                nn.BatchNorm2d(planes * block.expansion),
            )

        layers = []
        layers.append(block(self.inplanes, planes, stride, downsample))
        self.inplanes = planes * block.expansion
        for _ in range(1, blocks):
            layers.append(block(self.inplanes, planes))

        return nn.Sequential(*layers)

    def forward(self, x):
        x = self.conv1(x)
        x = self.bn1(x)
        x = self.relu(x)
        x = self.maxpool(x)

        x = self.layer1(x)
        x = self.layer2(x)
        x = self.layer3(x)
        x = self.layer4(x)

        x = self.avgpool(x)
        x = x.view(x.size(0), -1)
        x = self.fc(x)

return x- 중요 layer
- 첫 번째 layer:
- Convolution → BatchNorm → ReLU → MaxPool
- Residual Block layer (
_make_layer):- BasicBlock 또는 Bottleneck 사용
- Downsample: 필요한 경우 1x1 Convolution으로 차원 맞춤
- Fully Connected Layer:
- AdaptiveAvgPool → FC Layer (클래스 수에 맞춰 출력)
- 첫 번째 layer:
- 최종 구조
- 입력 → Conv1 → ReLU → MaxPool → Residual Block → AdaptiveAvgPool → FC
- (참고) Residual 초기화
- 마지막 BatchNorm의 weight를 0으로 초기화하여, 초기 Residual Block이 Identity처럼 동작하도록 설정
- 이 초기화 방법은 초기 ResNet 논문에는 포함되지 않았고, 이후 연구에서 추가된 개선사항이다.
모델 생성 시 모델별 구성 요소
| 모델 | 블록 유형 | 각 레이어의 블록 수 |
|---|---|---|
| ResNet18 | BasicBlock | [2, 2, 2, 2] |
| ResNet34 | BasicBlock | [3, 4, 6, 3] |
| ResNet50 | Bottleneck | [3, 4, 6, 3] |
| ResNet101 | Bottleneck | [3, 4, 23, 3] |
| ResNet152 | Bottleneck | [3, 8, 36, 3] |

제 글이 유익하셨다면 ♡와 팔로우로 응원 부탁드립니다.