- UIButton이 Label의 글자 크기에 맞추어 크기를 지정해 주었는데, 너무 딱 달라붙어서 양쪽으로 16정도 여백을 주고싶었다.
lazy var connectButton: UIButton = {
        let button = UIButton()
        button.backgroundColor = .blue400
        button.layer.cornerRadius = 25
        button.clipsToBounds = true
        button.setTitleColor(.white, for: .normal)
        button.titleLabel?.font = .semiBold16
        **var config = UIButton.Configuration.plain()
        config.titlePadding = 16
        button.configuration = config**
        return button
}()contentEdgeInsets속성을 사용하여 titleLabel의 양쪽 여백을 설정하였다.

- 원하는대로 여백은 나왔는데, 내가 UIFont를 확장시켜 넣어놓은 .semiBold16 설정이 적용되지 않았다 💥
- UIButton.Configuration 을 사용하는 경우, titleLabel의 폰트는 무시되기 때문이라고 .. ᕙ( ︡’︡益’︠)ง
💫 NSAttributedString
lazy var connectButton: UIButton = {
        let button = UIButton()
        button.backgroundColor = .blue400
        button.layer.cornerRadius = 25
        button.clipsToBounds = true
        button.setTitleColor(.white, for: .normal)
        var config = UIButton.Configuration.plain()
        config.titlePadding = 16
        button.configuration = config

        **let attributedTitle = NSAttributedString(string: "추천 경로 보러가기", attributes: [
            NSAttributedString.Key.font: UIFont.semiBold16,
            NSAttributedString.Key.foregroundColor: UIColor.white
        ])
        button.setAttributedTitle(attributedTitle, for: .normal)**

        return button
}()NSAttributedString를 사용하여 속성화된 문자열을 설정한다.NSAttributedString객체는 문자열에 관련된 속성 (폰트, 문자 사이의 간격 등등)을 이용할 때 필요하다. 텍스트의 일부분의 폰트를 바꾸고 색상을 변경할 수 있다고 한다.
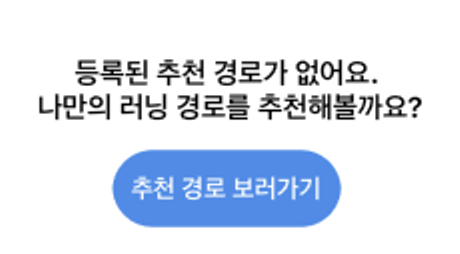
- 원하는 폰트로 나옴 ! (비슷해보이지만 . . semiBold로 설정한 것)
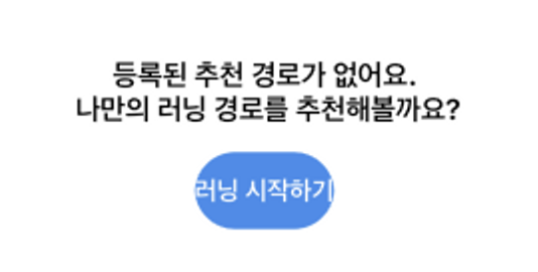
⁺₊ 그런데 나는 UIViewController 두 개에서 해당 버튼이 있는 UIView를 재사용하고 있었으므로 . .
let attributedTitle = NSAttributedString(string: "러닝 시작하기", attributes: [
            NSAttributedString.Key.font: UIFont.semiBold16,
            NSAttributedString.Key.foregroundColor: UIColor.white
        ])
        emptyRecommendView.connectButton.setAttributedTitle(attributedTitle, for: .normal)
컨트롤러에서 이런식으로 접근하여 title을 바꿔주었다 !
후 . . . 복잡하네 🤯 ?