그냥생각나는거
1.ApplicationContext, @Configuration, @Bean, 스프링 빈

ApplicationContext를 스프링 컨테이너라 한다.스프링 컨테이너는 @Configuration이 붙은 class를 설정(구성) 정보로 이용한다.여기서 @Bean이라 적힌 메서드를 모두 호출해서 반환된 객체를 스프링 컨테이너에 등록한다.이렇게 스프링 컨테이너에
2.BeanFactory, ApplicationContext

BeanFactory와 ApplicationContext에 대해서 알아보자.BeanFactory스프링 컨테이너의 최상위 인터페이스다.스프링 빈을 관리하고 조회하는 역할을 담당한다.getBean() 을 제공한다.지금까지 우리가 사용했던 대부분의 기능은 BeanFactor
3.@ComponentScan, @Component, @Autowired
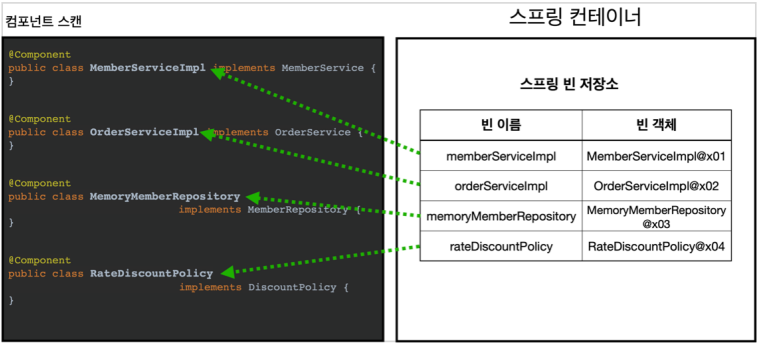
컴포넌트 스캔을 사용하려면 @ComponentScan을 설정 정보에 붙여주면 된다.참고: 컴포넌트 스캔을 사용하면 @Configuration 이 붙은 설정 정보도 자동으로 등록되기 때문에, AppConfig, TestConfig 등 앞서 만들어두었던 설정 정보도 함께
4.다양한 의존관계 주입 방법
link
5.생성자 주입을 해야하는 이유
대부분의 의존관계 주입은 한번 일어나면 애플리케이션 종료시점까지 의존관계를 변경할 일이 없다. 오히려 대부분의 의존관계는 애플리케이션 종료 전까지 변하면 안된다.(불변해야 한다.)수정자 주입을 사용하면, set 메서드를 public으로 열어두어야 한다.누군가 실수로 변
6.@Autowired, @Qualifier, @Primary
타입 매칭을 시도여러 빈이 있으면 필드 이름, 파라미터 이름으로 빈 이름을 추가 매칭빈 등록시 @Qualifier를 붙여 준다.주입시에 @Qualifier를 붙여주고 등록한 이름을 적어준다.생성자 자동 주입 예시수정자 자동 주입 예시직접 빈 등록시에도 @Qualifie
7.빈 스코프
스코프는 번역 그대로 빈이 존재할 수 있는 범위를 뜻한다.싱글톤 : 기본 스코프, 스프링 컨테이너의 시작과 종료까지 유지되는 가장 넓은 범위의 스코프이다.프로토타입 : 스프링 컨테이너는 프로토타입 빈의 생성과 의존관계 주입까지만 관여하고 더는 관리하지 않는 매우 짧은
8.HTTP 요청 메시지 로그로 확인하기
application.properties에logging.level.org.apache.coyote.http11=debug추가
9.로그 레벨 설정
log.debug("data="+data)로그 출력 레벨을 info로 설정해도 해당 코드에 있는 "data="+data가 실제 실행이 되어 버린다.결과적으로 문자 더하기 연산이 발생한다.log.debug("data={}", data)로그 출력 레벨을 info로 설정하면
10.HTTP 메서드
GET: 리소스 조회POST: 요청 데이터 처리, 주로 등록에 사용PUT: 리소스를 대체, 해당 리소스가 없으면 생성PATCH: 리소스 부분 변경DELETE: 리소스 삭제HEAD: GET과 동일하지만 메시지 부분을 제외하고, 상태 줄과 헤더만 반환OPTIONS: 대상
11.@Controller, @RestController
반환 값이 String 이면 뷰 이름으로 인식된다. 그래서 뷰를 찾고 뷰가 랜더링 된다.반환 값으로 뷰를 찾는 것이 아니라, HTTP 메시지 바디에 바로 입력한다.
12.@RequestParam, @PathVariable
@RequestParam : 파라미터 이름으로 바인딩@ResponseBody : View 조회를 무시하고, HTTP message body에 직접 해당 내용 입력@RequestParam의 name(value) 속성이 파라미터 이름으로 사용@RequestParam("us
13.HTTP 요청 설계 예제
회원 목록 조회: GET /mapping/users회원 등록: POST /mapping/users회원 조회: GET /mapping/users/id1회원 수정: PATCH /mapping/u
14.@ModelAttribute, @Data
스프링은 이 과정을 완전히 자동화해주는 @ModelAttribute 기능을 제공@Getter , @Setter , @ToString , @EqualsAndHashCode , @RequiredArgsConstructor 를 자동으로 적용해준다스프링MVC는 @ModelAt
15.HttpEntity
@RequestBody 를 사용하면 HTTP 메시지 바디 정보를 편리하게 조회할 수 있다. 참고로 헤더 정보가 필요하다면 HttpEntity 를 사용하거나 @RequestHeader 를 사용하면 된다.이렇게 메시지 바디를 직접 조회하는 기능은 요청 파라미터를 조회하는
16.@RequestBody, @ResponseBody
@RequestBody 객체 파라미터@RequestBody HelloData data@RequestBody 에 직접 만든 객체를 지정할 수 있다.@RequstBody는 생략 불가능응답의 경우에도 @ResponseBody 를 사용하면 해당 객체를 HTTP 메시지 바디에
17.POST 요청 후 새로고침 시 요청 반복
웹 브라우저의 새로 고침은 마지막에 서버에 전송한 데이터를 다시 전송한다.상품 등록 폼에서 데이터를 입력하고 저장을 선택하면 POST /add + 상품 데이터를 서버로 전송한다.이 상태에서 새로 고침을 또 선택하면 마지막에 전송한 POST /add + 상품 데이터를 서
18.타임리프 문법 정리
1. 타임리프 사용 선언 `` 2. 텍스트 - text, utext `` HTML 테그의 속성이 아니라 HTML 콘텐츠 영역안에서 직접 데이터를 출력하고 싶으면 다음과 같이 [[...]] 를 사용하면 된다. 컨텐츠 안에서 직접 출력하기 = [[${data}]]
19.HTML id, class, name 속성
하나의 요소만 가능(페이지에서 유일함)CSS에서 식별자로 사용 가능(- 자바스크립트의 getElementById를 활용할 때 사용jQuery -> \`$("---여러 요소에 적용 가능CSS에서 식별자로 사용 가능(.클래스명)jQuery -> $(".클래스명")여러 요소
20.@ModelAttribute의 특별한 사용법
등록 폼, 상세화면, 수정 폼에서 모두 서울, 부산, 제주라는 체크 박스를 반복해서 보여주어야 한다. 이렇게 하려면 각각의 컨트롤러에서 model.addAttribute(...) 을 사용해서 체크 박스를 구성하는 데이터를 반복해서 넣어주어야 한다.@ModelAttrib
21.타임리프 메시지 적용
타임리프의 메시지 표현식 렌더링 전<div th:text="렌더링 후상품\`
22.BindingResult 위치
BindingResult bindingResult 파라미터의 위치는@ModelAttribute Item item 다음에 와야 한다
23.세션 관리
세션 관리는 크게 다음 3가지 기능을 제공하면 된다.세션 생성sessionId 생성 (임의의 추정 불가능한 랜덤 값)세션 저장소에 sessionId와 보관할 값 저장sessionId로 응답 쿠키를 생성해서 클라이언트에 전달세션 조회클라이언트가 요청한 sessionId
24.Spring Boot - Datasource
스프링 부트는 DataSource를 스프링 빈으로 자동 등록해준다. 자동 등록되는 스프링 빈의 이름은 dataSource다. 개발자가 직접 DataSource를 빈으로 등록하면, 스프링 부트는 DataSource를 자동으로 등록하지 않는다.스프링 부트는 applicat
25.Spring Application 준비 완료 시 작업 수행, Application 실행 후 파일 내용 변경 감지하여 반영
예제 클래스@EventListener(ApplicationReadyEvent.class) 애노테이션이 붙은 메소드가Application이 준비가 되면 수행register() 메소드 수행TaskScheduler 에 수행할 작업을 등록스프링 컨테이너 종료 직전 onAppl
26.Tomcat War 배포 profile 설정
tomcat/bin/catalina.sh 편집JAVA_OPTS ="$JAVA_OPTS -DSpring.profiles.active=profile명" 추가ex) JAVA_OPTS ="$JAVA_OPTS -DSpring.profiles.active=local"
27.수동 커밋의 의미
자동 커밋 -> 쿼리 실행 직후 커밋 -> 롤백, 커밋 호출하지 않아도 되는 편리함수동 커밋 -> 직접 commit, rollback을 실행해야함 -> 트랜잭션의 시작한다고 볼 수 있음
28.ThreadLocal
해당 쓰레드만 접근 가능한 특별한 저장소.각 쓰레드마다 별도의 내부 저장소를 제공한다.ThreadLocal 사용법저장 : threadLocal.set(...);조회 : threadLocal.get();제거 : threadLocal.remove();
29.어드바이스 순서
어드바이스는 기본적으로 순서를 보장하지 않는다.순서를 지정하고 싶으면 @Aspect 적용 단위로 org.springframework.core.annotation.@Order 애노테이션을 적용해야 한다.문제는 이것을 어드바이스 단위가 아니라 클래스 단위로 적용할 수 있다
30.스프링 컨테이너에서 빈 조회
findAllBean() : 모든 빈 출력하기실행하면 스프링에 등록된 모든 빈 정보를 출력할 수 있다.ac.getBeanDefinitionNames() : 스프링에 등록된 모든 빈 이름을 조회한다.ac.getBean() : 빈 이름으로 빈 객체(인스턴스)를 조회한다.애
31.스프링 부트 port 변경
main/resources/application.properties 파일 내용 추가server.port=9090 -> 기본 8080에서 9090으로 포트 변경
32.스프링 부트 리소스 인식
리소스는 /resources/static 아래에 두면 스프링 부트가 자동으로 인식한다.main/resources/static/basic/hello-form.html
33.Spring Boot thymeleaf page별 내용 동적 변경
'title' 이라는 키 값으로 noTitle이라는 문자열 (head-title 지정용) model에 추가view 라는 키 값으로 index라는 문자열 (html 파일 경로) model에 추가base/main.html 리턴ViewResolver가 'base/main.h
34.Aspect 적용
Aspect의 순서를 정하기 위해선 @Order 애노테이션을 적용해야하는데이것을 어드바이스 단위가 아니라 클래스 단위로 적용할 수 있다그래서 하나의 애스펙트에 여러 어드바이스가 있으면 순서를 보장 받을 수 없다.따라서 애스펙트를 별도의 클래스로 분리해야 한다.@Spri
35.Filter 적용
Filter 구현 HTTP 요청 -> WAS -> 필터 -> 서블릿 -> 스프링 인터셉터 -> 컨트롤러 Filter를 구현한 클래스 작성 return; : 필터를 더는 진행하지 않는다. 이후 필터는 물론 서블릿, 컨트롤러가 더는 호출되지 않는다. 앞서 redirec
36.Interceptor 적용
스프링의 인터셉터를 사용하려면 HandlerInterceptor 인터페이스를 구현한 클래스 작성인터셉터는 컨트롤러 호출 전( preHandle ), 호출 후( postHandle ), 요청 완료 이후( afterCompletion )와 같이 세분화 되어 있다.after
37.@Validated 적용
id는 setter로 변경할 수 없도록 설정제약조건 애노테이션으로 설정@NotBlank : 빈값 + 공백만 있는 경우를 허용하지 않는다.@NotNull : null 을 허용하지 않는다.@Range(min = 1000, max = 1000000) : 범위 안의 값이어야
38.ArgumentResolver 적용
@LogAnnotation가 파라미터에 붙어 있고 ClassType이 User 이면 있으면 구현한 ArgumentResolver 가 동작 supportsParameter()가 true인 경우 컨트롤러 호출 직전에 호출 되어서 필요한 파라미터 정보를 생성해준다.여기서는
39.DispatcherType로 호출 종류 거르기
오류가 발생하면 오류 페이지를 출력하기 위해 WAS 내부에서 다시 한번 호출이 발생이때 필터, 서블릿, 인터셉터도 모두 다시 호출된다. 그런데 이미 한번 필터나, 인터셉터에서 체크를 완료했다. 따라서 서버 내부에서 오류 페이지를 호출한다고 해서 해당 필터나 인터셉트가
40.DataSource, TransactionManager 자동 등록
스프링 부트는 데이터소스( DataSource )를 스프링 빈에 자동으로 등록한다.자동으로 등록되는 스프링 빈 이름: dataSource개발자가 직접 데이터소스를 빈으로 등록하면 스프링 부트는 데이터소스를 자동으로 등록하지 않는다.이때 스프링 부트는 다음과 같이 app
41.프록시 내부 호출 해결
Log 출력 Aspect 문제 상황 CallServiceV0 CallServiceV0Test external() 실행 결과 internal() 실행 결과 > callServiceV0.external() 안에서 internal() 을 호출할 때 문제가 발생한다.
42.log 출력 설정
mybatislogging.level.\[@Mapper interface의 패키지 경로]=debughttplogging.level.org.apache.coyote.http11=debugjdbclogging.level.org.springframework.jdbc=debu
43.[IntelliJ] Could not move temporary workspace 오류 해결
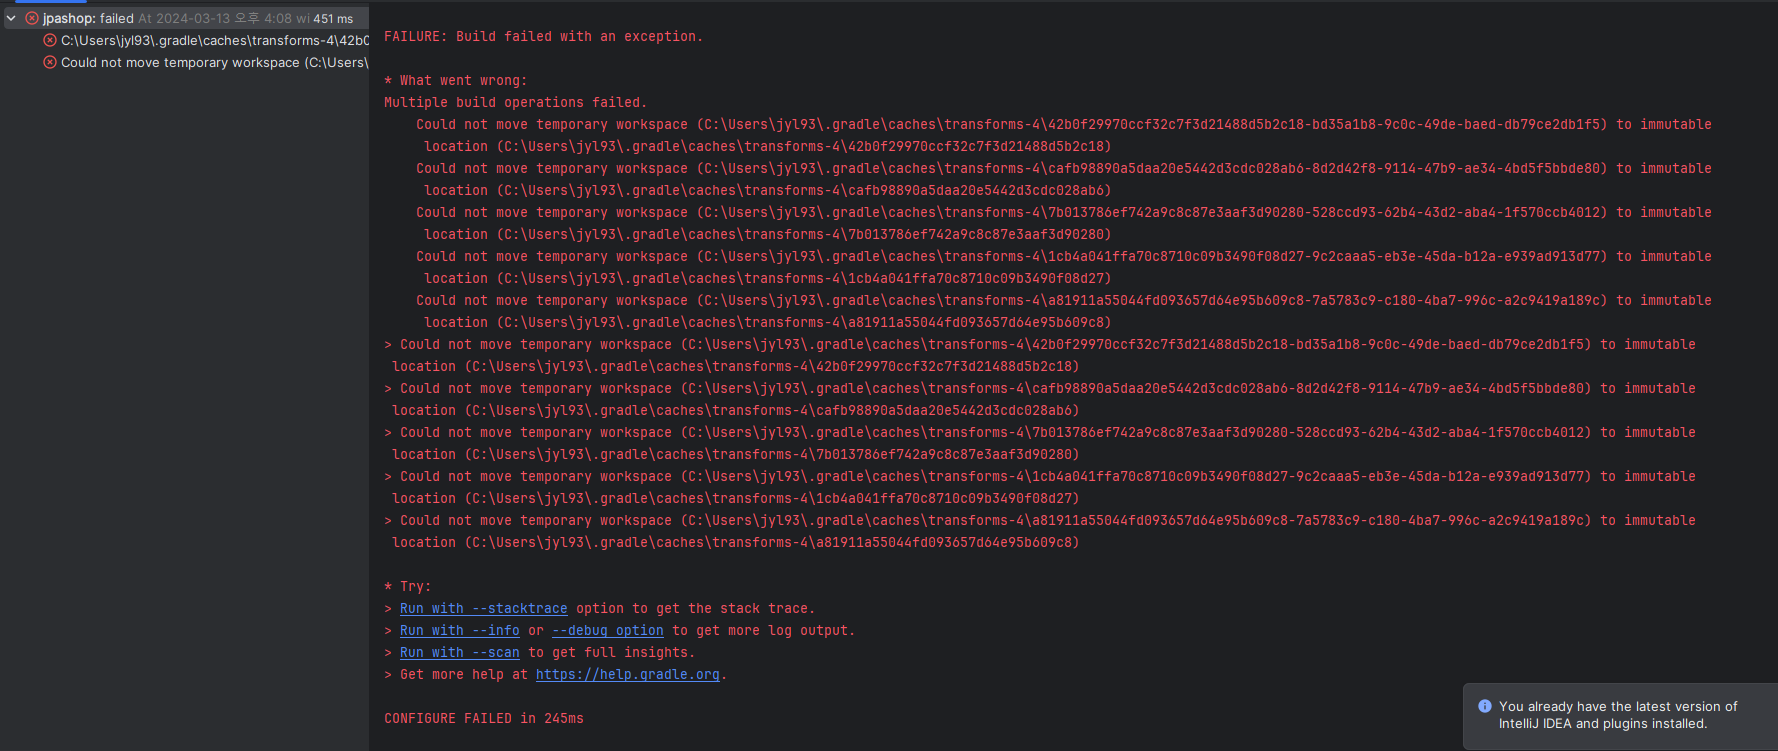
IntelliJ 버전을 2023.3.5 (Ultimate Edition)으로 업데이트 후에 발생 후 새로 프로젝트를 생성하고 실행하였더니 오류가 발생했다.Settings - Build, Execution, Deployment - Build Tools - Gradle 에
44.Spring Test 관련
Spring Test에서 @Transactional 어노테이션을 붙이면 테스트가 끝나고 데이터를 롤백시킨다.롤백을 원하지 않는 테스트 메소드에 @Rollback(false)를 붙여 해당 메소드에서 롤백을 제외시킬 수 있다.
45.도메인 모델 패턴
주문과 주문 취소 메서드를 보면 비즈니스 로직 대부분이 엔티티에 있다.서비스 계층은 단순히 엔티티에 필요한 요청을 위임하는 역할을 한다.이처럼 엔티티가 비즈니스 로직을 가지고 객체 지향의 특성을 적극 활용하는 것을 도메인 모델 패턴(http://martinfo
46.QueryDsl build.gradle 설정
47.Spring Data JPA Paging 1부터 시작하기
MemberController MemberDto http://localhost:8080/members?page=1 호출 시 데이터 page=1 호출했는데 데이터는 6부터 시작 직접 PageRequest(Pageable 구현체)를 생성 MyPage MyPage
48.스프링 구성 정보
49.resources 폴더 접근
50.BeanFactory 사용