- 전통적인 ID/PW 기반의 로그인 처리를 학습합니다.
- 스프링 시큐리티는 다양한 방식으로 사용자 정보를 유지할 수 있는 방법을 제공합니다.
- 이번 장에서는 흔히 '세션(HttpSession)'기반의 예제로 사용자 정보는 서버에서 보관하고, 필요한 경우에 설정을 통하여 제어하도록 구성합니다.
초기설정
build.gradle
plugins {
    id 'org.springframework.boot' version '2.5.2'
    id 'io.spring.dependency-management' version '1.0.11.RELEASE'
    id 'java'
    id 'war'
}

group = 'org.young'
version = '0.0.1-SNAPSHOT'
sourceCompatibility = '11'

configurations {
    compileOnly {
        extendsFrom annotationProcessor
    }
}

repositories {
    mavenCentral()
}

dependencies {
    implementation 'org.springframework.boot:spring-boot-starter-data-jpa'
    implementation 'org.springframework.boot:spring-boot-starter-security'
    implementation 'org.springframework.boot:spring-boot-starter-thymeleaf'
    implementation 'org.springframework.boot:spring-boot-starter-web'
    implementation 'org.thymeleaf.extras:thymeleaf-extras-springsecurity5'

    //추가한 부분
    //mysql 드라이버
    implementation group: 'mysql', name: 'mysql-connector-java', version: '8.0.25'
    //Thymeleaf 확장 플러그인은 화면을 제작할 때 스프링 시큐리티 객체들을 처리하는 용도이다.
    implementation group: 'org.thymeleaf.extras', name: 'thymeleaf-extras-springsecurity5', version: '3.0.4.RELEASE'
    implementation group: 'org.thymeleaf.extras', name: 'thymeleaf-extras-java8time', version: '3.0.4.RELEASE'
    //

    compileOnly 'org.projectlombok:lombok'
    developmentOnly 'org.springframework.boot:spring-boot-devtools'
    annotationProcessor 'org.projectlombok:lombok'
    providedRuntime 'org.springframework.boot:spring-boot-starter-tomcat'
    testImplementation 'org.springframework.boot:spring-boot-starter-test'
    testImplementation 'org.springframework.security:spring-security-test'
}

test {
    useJUnitPlatform()
}
application.properties
spring.datasource.driver-class-name=com.mysql.cj.jdbc.Driver
spring.datasource.url=jdbc:mysql://localhost:3306/springsecurity?serverTimezone=UTC&characterEncoding=UTF-8
spring.datasource.username=root
spring.datasource.password=root

#서버 시작 시점에 DDL 문을 생성하여 DB에 적용한다
spring.jpa.hibernate.ddl-auto=update

#True로 하면 sql문을 보기 좋게 설정한다
spring.jpa.properties.hibernate.format_sql=true

#적용된 sql문을 보여준다.
spring.jpa.show-sql=true

#Thymeleaf 템플릿 캐싱 비활성화
#thymeleaf를 사용하다 수정 사항이 생길 대 수정을 하면
#재시작을 해줘야 한다. cache가 계속 쌓이기 때문이다.
#이를 방지하여 브라우저 새로고침만으로도 수정 사항을 확인하기 위해서 이것을 추가한다.
spring.thymeleaf.cache=false

spring.servlet.multipart.enabled=true
spring.servlet.multipart.location=/Users/YOUNJY/
spring.servlet.multipart.max-request-size=30MB
spring.servlet.multipart.max-file-size=10MB

#업데이트 실시간 반영
spring.devtools.livereload.enabled=true

#시큐리티와 관련된 부분은 좀 더 로그 레벨을 낮게 설정해서 자세한 로그를 확인할 수 있도록 한다.
logging.level.org.springframework.security.web=debug
logging.level.org.young.security=debug- 이 상태에서 어플리케이션이 제대로 작동하나 실행해 본다. 실행하면 아래 사진과 같이 password가 나온다.
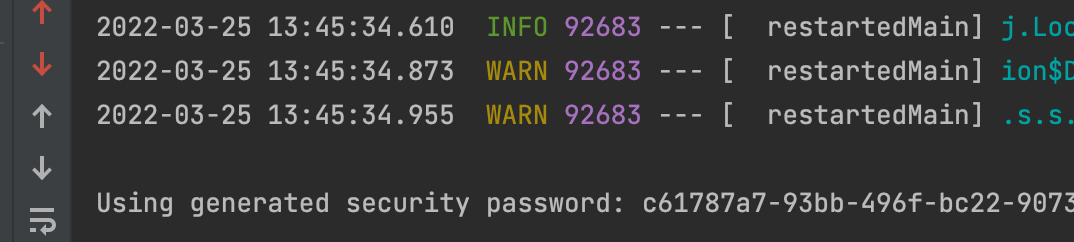
- 프로젝트 초기에 아무 계정도 없을 때 사용할 수 있는 임시 패스워드 역할을 한다. 프로젝트가 정상적으로 실행된다면 ‘http://localhost:8080/login’의 경로로 접근해서 화면에서 ‘user’라는 계정으로 설정하고 위의 패스워드를 입력해서 로그인을 테스트 한다.

시큐리티 설정 클래스 작성
- 스프링 부트가 아닌 스프링만으로 프로젝트를 생성하는 경우에는 web.xml의 설정을 변경하고 복잡한 설정이 필요하다만, 스프링 부트는 자동 설정 기능이 있어 별도의 설정 없이도 일단 연동 처리는 완료 됩니다.
- 하지만 스프링 스큐리티를 이용하는 모든 프로젝트는 프로젝트에 맞는 설정을 추가하는 것이 일반적이므로 이를 위한 별도의 시큐리티 설정 클래스를 사용하는 것이 일반적입니다.
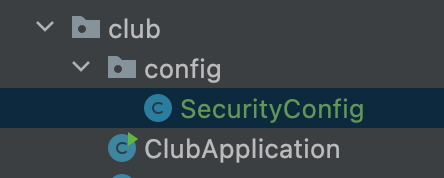
- 프로젝트 내에 config 패키지를 추가하고,SecurityConfig 클래스를 추가해줍니다.
- SecurityConfig클래스는 시큐리티 관련 기능을 쉽게 설정하기 위해서 WebSecurity ConfiurerAdapter라는 클래스를 상속으로 처리합니다.
- WebSequeity Configurer Adapter 클래스는 주로 override를 통해서 여러 설정을 조정하게 됩니다.
SecurityConfig 클래스
import lombok.extern.log4j.Log4j2;
import org.springframework.context.annotation.Configuration;
import org.springframework.security.config.annotation.web.configuration.WebSecurityConfigurerAdapter;

@Configuration
@Log4j2
public class SecurityConfig extends WebSecurityConfigurerAdapter {
}
- SecurityConfig클래스에는 아직 아무런 설정을 조정하지 않았지만, 모든 시큐리티 관련 설정이 추가되는 부분이므로 앞으로 작성하는 예제에서 핵심적인 역할을 하게 됩니다.
확인을 위한 SampleController
- controller 패키지를 생성하고 하위에 SampleController 클래스를 추가해줍니다.
import lombok.extern.log4j.Log4j2;
import org.springframework.stereotype.Controller;
import org.springframework.web.bind.annotation.GetMapping;
import org.springframework.web.bind.annotation.RequestMapping;

@Controller
@Log4j2
@RequestMapping("/sample/")

//시큐리티와 관련된 설정이 정상적으로 돌아가는지 확인하기 위한 간단한 컨트롤러 구성
public class SampleController {

    //로그인을 하지 않은 사용자도 접근할 수 있는 /sample/all
    @GetMapping("/all")
    public void exAll(){
        log.info("exAll.........");
    }

    //로그인한 사용자만이 접근할 수 있는 '/sample/member'
    @GetMapping("/member")
    public void exMember(){
        log.info("exMember.........");
    }

    //관리자(admin) 권한이 있는 사용자만이 접근할 수 있는 '/sample/admin'
    @GetMapping("/admin")
    public void exAdmin(){
        log.info("exAdmin.........");
    }
}-
컨트롤러로 인한 페이지가 표시될 수 있도록 대응되는 html 파일을 구성합니다.

-
만들어진 각 파일은 간단히 해당 파일이 어떤 페이지인지를 구분할 수 있도록 표시하는 수준으로 코드를 작성합니다.
all.html
<!DOCTYPE html>
<html lang="en">
  <head>
    <meta charset="UTF-8" />
    <title>Title</title>
  </head>
  <body>
    <h1>For All</h1>
  </body>
</html>
member.html
<!DOCTYPE html>
<html lang="en">
  <head>
    <meta charset="UTF-8" />
    <title>Title</title>
  </head>
  <body>
    <h1>For Member</h1>
  </body>
</html>
admin.html
<!DOCTYPE html>
<html lang="en">
  <head>
    <meta charset="UTF-8" />
    <title>Title</title>
  </head>
  <body>
    <h1>For Admin</h1>
  </body>
</html>
블로그 이전합니다! https://jyyoun1022.tistory.com/