공식문서 간판에서 TanStack Query는 강력한 상태 관리를 제공한다고 설명한다
TanStack Query를 왜 사용하나?
서버 상태 데이터를 관리하기 위해 사용한다
- 로딩과 에러처리를 쉽게 구현할 수 있는 값들을 제공한다
- 서버 상태 데이터를 최신으로 가져오는 작업을 알아서 해준다
- 내장된 Cache 기능을 제공하여 중복된 데이터 요청을 최소화하고, 더 빠르게 데이터를 가져올 수 있다
- 기존의 상태관리 라이브러리들은 클라이언트 쪽 데이터들을 관리하기에 적합할 순 있어도 서버 쪽의 데이터들을 관리하기에는 적합하지 않은 점들이 있었다
- 코드의 양이 적고, 구조가 단순해서 유지보수에 용이하다
- React Hook과 유사한 인터페이스를 제공하기 때문에 코드 내부에서 사용하기 용이하다
useQuery()
useQuery()는 백엔드로부터 데이터를 받아오는 훅이다
// 사용 예시
import { useQuery } from '@tanstack/react-query';
import { getPosts } from './api';

function HomePage() {
  const result = useQuery({ queryKey: ['posts'], queryFn: getPosts });
  console.log(result);

  return <div>홈페이지</div>;
}

export default HomePage;
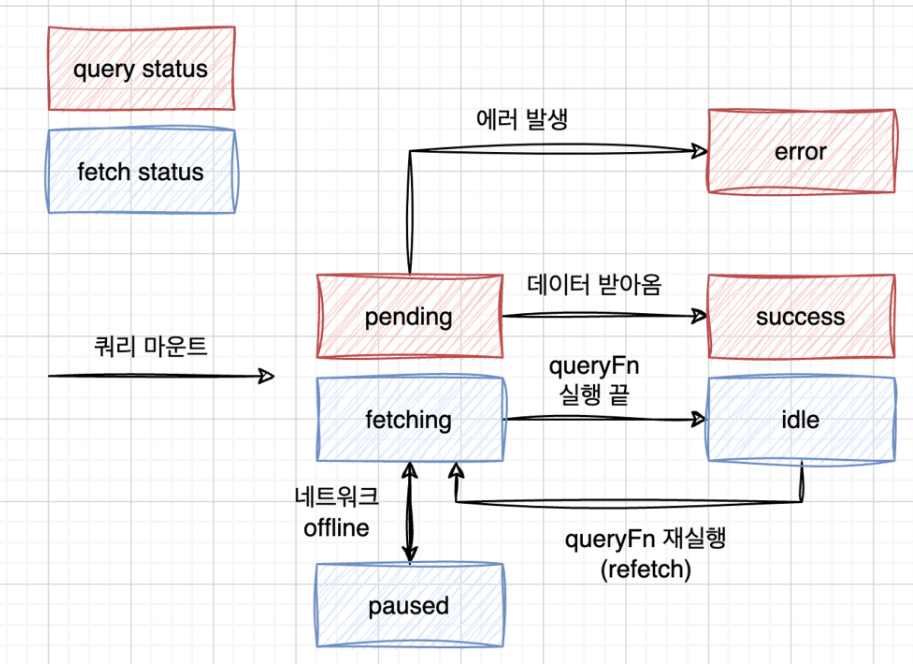
TanStack Query는 Query Status와 Fetch Status, 2가지 status를 가진다
Query Status
Query Status는 실제 받아온 data 값의 유무를 나타내는 상태 값이다
1) pending: 아직 데이터를 받아오지 못한 상태
2) success: 데이터를 성공적으로 받아온 상태
3) error: 데이터를 받아오는 중에 에러가 발생한 상태
Fetch Status
Fetch Status는 queryFn() 함수가 현재 실행되고 있는지의 유무를 나타내는 상태 값이다
1) fetching: 쿼리 함수가 실행 되는 중
2) paused: 쿼리 함수가 시작은 했는데 실제 실행되고 있지 않는 중 (주로 네트워크가 오프라인이 된 경우)
3) idle: 쿼리 함수가 어떤 작업도 하고 있지 않은 상황 (fetching이나 paused가 아닌 상태)
enabled
enabled 값이 true일 때에만 쿼리가 실행되도록 함
// 예시
const { data: user } = useQuery({
  queryKey: ['user', email],
  queryFn: getUserByEmail,
});

const userId = user?.id

const {
  data: projects,
} = useQuery({
  queryKey: ['projects', userId],
  queryFn: getProjectsByUser,
  enabled: !!userId, // userId 값이 true일 때에만 동작한다
});
placeholderData
페이지가 새롭게 바뀔 때 매번 pending 상태가 되지 않고, 이전의 데이터를 유지해서 보여주다가 새로운 데이터가 fetch 되면 자연스럽게 새로운 데이터로 바꿔서 보여준다
- 부드러운 UI 전환을 위해 사용한다
- placeholderData 옵션에 keepPreviousData or (prevData) => prevData를 넣어주면 된다
// 예시
import {
  // ...
  keepPreviousData,
} from '@tanstack/react-query';

const {
  data: postsData,
  isPending,
  isError,
} = useQuery({
    queryKey: ['posts', page],
    queryFn: () => getPosts(page, PAGE_LIMIT),
    placeholderData: keepPreviousData,
   // or placeholderData: (prevData) => prevData,
});
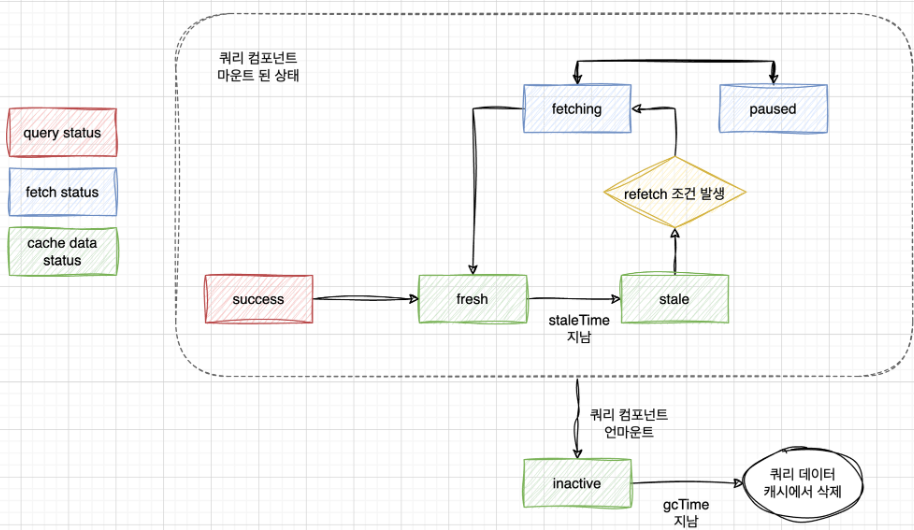
TanStack Query의 캐시
- useQuery() 동작시, 먼저 전달받은 Query Key로 캐시에 저장된 데이터가 있는지 확인한다
- Query Key는 ['~~~']로 저장한다
// A list of todos
useQuery({ queryKey: ['todos'], ... })

// Something else, whatever!
useQuery({ queryKey: ['something', 'special'], ... })- 만일 동일한 Query Key로 저장된 데이터가 캐시에 있으면, 해당 데이터를 fresh 상태로 판단한다
- 이후 stale time(특정 시간)이 지나면 데이터는 stale 상태가 된다
- 데이터가 stale 상태라면 Tanstack Query는 refetch를 진행한다
- 마지막으로 컴포넌트가 언마운트 되면 데이터는 inactive 상태가 된다
Loading, Error 처리
isPending, isError 값을 이용해 처리할 수 있다
// 예시
function HomePage() {
  const {
    data: postsData,
    isPending,
    isError,
  } = useQuery({
    queryKey: ['posts'],
    queryFn: getPosts,
    retry: 0, // retry는 기본으로 3번의 재시도를 하고, 0으로 설정시 에러 화면을 더 빨리 볼 수 있다
  });

  if (isPending) return '로딩 중입니다...';

  if (isError) return '에러가 발생했습니다.';

  const posts = postsData?.results ?? [];

  return (
    <div>
      <ul>
        {posts.map((post) => (
          <li key={post.id}>
            {post.user.name}: {post.content}
          </li>
        ))}
      </ul>
    </div>
  );
}
useMutation()
useMutation()은 DB에 새로운 값을 추가하거나, 수정, 삭제를 진행할시 사용한다
// 예시
const uploadPostMutation = useMutation({
  mutationFn: (newPost) => uploadPost(newPost),
});

const handleSubmit = (e) => {
  e.preventDefault();
  const newPost = { username: 'codeit', content };
  uploadPostMutation.mutate(newPost); // 직접 mutate 함수를 실행해 줘야 한다
  setContent('');
};
invalidateQueries()
useMutation() 훅을 이용해 데이터를 추가한 이후, invalidateQueries() 함수를 사용하여 자동으로 refetch를 하도록 한다
- invalidateQueries() 함수는 캐시에 저장된 모든 쿼리를 무효화(invalidate)해서 무조건 stale 상태로 만들고 데이터를 refetch 하도록 한다
- 원하는 시점에 queryClient.invalidateQueries() 함수를 실행한다
const queryClient = useQueryClient();

// ...

const uploadPostMutation = useMutation({
  mutationFn: (newPost) => uploadPost(newPost),
  // mutation이 성공한 시점에 콜백으로 등록한다
  onSuccess: () => {
    queryClient.invalidateQueries({ queryKey: ['posts'] });
  },
});
useInfiniteQuery
useQuery()는 data가 한 페이지의 정보만 담고 있다면, useInfiniteQuery()는 data.pages에 배열 형태로 모든 페이지의 정보를 담고 있다
pageParam
// 예시
initialPageParam: 0,
getNextPageParam: (lastPage, allPages, lastPageParam, allPageParams) =>
  lastPage.hasMore ? lastPageParam + 1 : undefined,
- initialPageParam은 초기 페이지 설정값으로, 주로 0으로 설정한다
- getNextPageParam() 함수는 다음 페이지의 설정값을 정한다
// pageParam은 쿼리 함수의 파라미터로 전달된다
queryFn: ({ pageParam }) => getPosts(pageParam, PAGE_LIMIT)
fetchNextPage()
- useInfiniteQuery()의 리턴 값 중 하나로, getNextPageParam() 함수의 리턴 값이 undefined나 null이 아닌 경우, 리턴 값을 쿼리 함수의 pageParam으로 전달해 그 다음 페이지 데이터를 가져온다
// 예시
const {
  data: postsData,
  isPending,
  isError,
  fetchNextPage,
} = useInfiniteQuery({
  queryKey: ['posts'],
  queryFn: ({ pageParam }) => getPosts(pageParam, PAGE_LIMIT),
  initialPageParam: 0,
  getNextPageParam: (lastPage, allPages, lastPageParam, allPageParams) =>
    lastPage.hasMore ? lastPageParam + 1 : undefined,
});

// ...

return (
  ...
    <div>
  	  // 버튼 클릭시, 다음 페이지를 불러오도록 onClick 함수로 등록해준다
      <button onClick={fetchNextPage}>더 불러오기</button>
    </div>
  ...
);
hasNextPage, isFetchingNextPage
- 두 옵션을 이용하면 불러올 데이터가 없거나, 데이터를 불러오는 중일 때 특정 컴포넌트의 비활성화를 구현할 수 있다
// 예시
const {
  data: postsData,
  isPending,
  isError,
  hasNextPage,
  fetchNextPage,
  isFetchingNextPage,
} = useInfiniteQuery({
  queryKey: ['posts'],
  queryFn: ({ pageParam }) => getPosts(pageParam, PAGE_LIMIT),
  initialPageParam: 0,
  getNextPageParam: (lastPage, allPages, lastPageParam, allPageParams) =>
    lastPage.hasMore ? lastPageParam + 1 : undefined,
});

// ...

return (
    ...
    <button
      onClick={fetchNextPage}
	  // 이렇게!
      disabled={!hasNextPage || isFetchingNextPage}
    >
      더 불러오기
    </button>
    ...
);
끝!