
🤗 필자는 졸업프로젝트 " 대면편취형 보이스피싱 특화 예방 솔루션 PONITOR"에서 다른 팀원과 함께 BE/AI 두 파트를 담당하고 있다.
따라서 쓸 내용이 조금 많다..! 특히 백엔드의 경우 프로젝트는 완전 처음이었고 AI도 모델 서빙은 이번이 처음이었다! 차근차근 체계적으로 정리해 보도록 하자
💜 PONITOR 관련 백엔드/인공지능 코드는 모두 아래의 깃허브에서 확인하실 수 있습니다
https://github.com/Ponitor
Backend
⚙️ 개발 환경
- IDE :
- IntelliJ- Dependencies:
- JAVA 11
- Springboot 2.7.11
- AWS S3
- h2 database
- lombok
MVC 구조
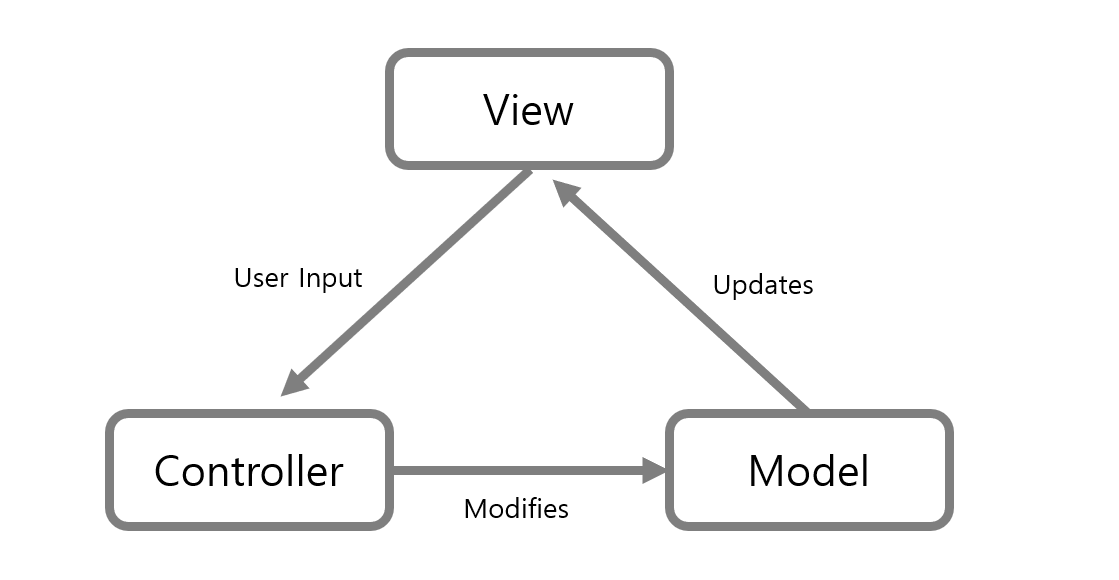
MVC 패턴을 사용해 Api를 개발한다.
- Model : 데이터 & 비즈니스 로직 관리
- View : 레이아웃 & 화면을 처리
- Controller: 명령을 모델과 뷰 부분으로 라우팅
비즈니스 로직과 프레젠테이션 로직, 데이터를 분리함으로써 코드 유지보수가 유리하도록 하기 위해 해당 패턴을 사용하였다.
DB 구조
DB구조를 설명하기 전에
몇가지 고려해야하는 점들이 존재한다!
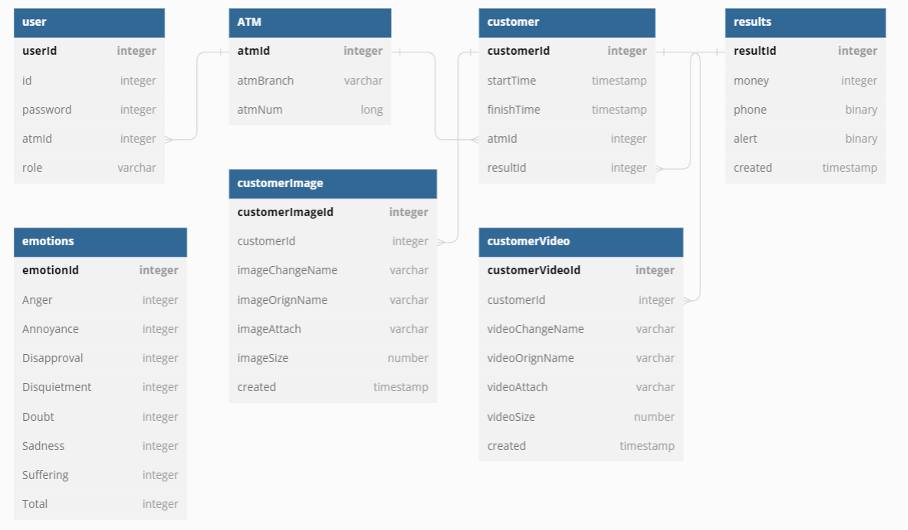
✅ Ponitor는 은행과 제휴를 맺어 해당 은행의 ATM에 탑재되는 서비스이다.
따라서 구현한 클라이언트 화면 모두 ATM에서 동작하는 것이며 ATM에 설치되어있는 카메라로 이미지/영상 인풋을 받을 것이다.
✅ 또한 회원가입의 경우 개인이 하지 않고,
지점별로 핀번호를 할당받아 로그인을 진행한다.
✅고객/관리자는 이 로그인하는 핀번호에 따라 구별된다.
✅ 또한 한 지점당 하나의 관리자 계정을 부여하며,
지점별로 최대 3개의 ATM 핀번호를 부여할 수 있다.
즉, 하나의 관리자 화면에서 최대 3개의 atm에서 온 고객 영상을 모두 확인할 수 있다.
✅ 사용자는 메인화면에서 버튼을 클릭했을 때부터 거래 완료시까지 하나의 사용자로 고려하며, ATM 번호+거래 시작시간으로 구분한다.
위에 내용을 고려한 Ponitor의 DB구조는 다음과 같다.
h2 database 환경 구축
Api를 배포하기 전에 로컬환경에서 잘 작동하고 있는지 확인해야 한다.
필자는 여기서 h2 database를 이용했다.
h2 Database란
- 자바로 작성된 관계형 데이터베이스 관리 시스템
- 별도 설치가 필요 없고, 용량이 매우 가볍다
- 웹용 콘솔 제공하여 개발용 로컬DB로 사용하기 좋다!
▶️ build.gradle
아래 코드를 build.gradle에 추가해서 h2 DB를 사용하자!
implementation 'com.h2database:h2'h2 Console
h2 console을 사용하자!
▶️ application.properties
properties에 다음의 코드를 추가하고,
spring.h2.console.enabled=true
spring.h2.console.path=/h2-console
http://localhost:8080/h2-console 로 접속하면
다음과 같이 콘솔창을 확인할 수 있다.
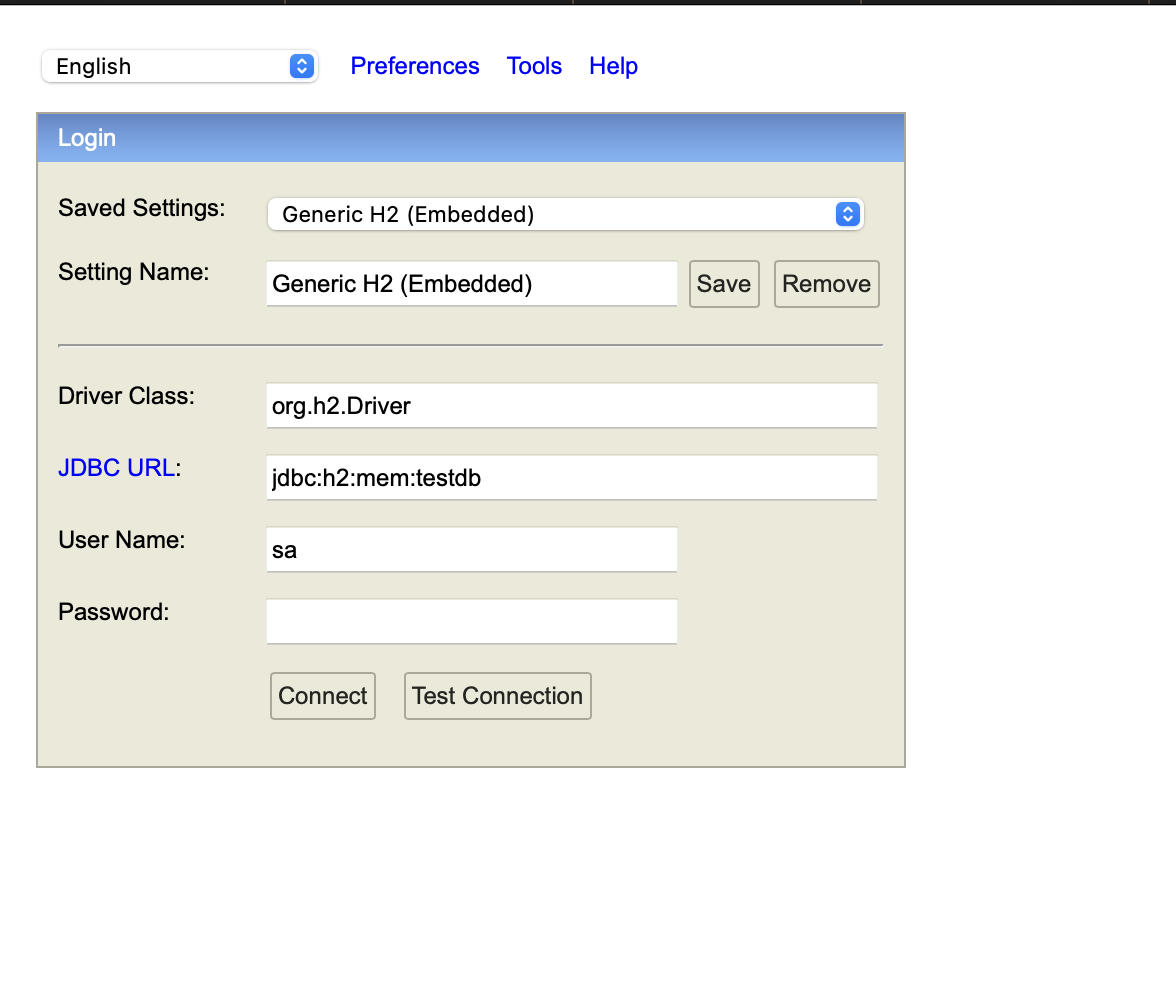
그런데 여기서 connect을 누르면,
다음의 오류가 발생한다.
Database "mem:testdb" not found, either pre-create it or allow remote database creation (not recommended in secure environments) [90149-214] 90149/90149 (Help)에러 메세지를 읽어보면, mem:testdb 데이터베이스가 존재하지 않다고 한다.
그러니 미리 생성을 하면 됨!
즉 ,
application.properties에 다음의 코드를 추가!
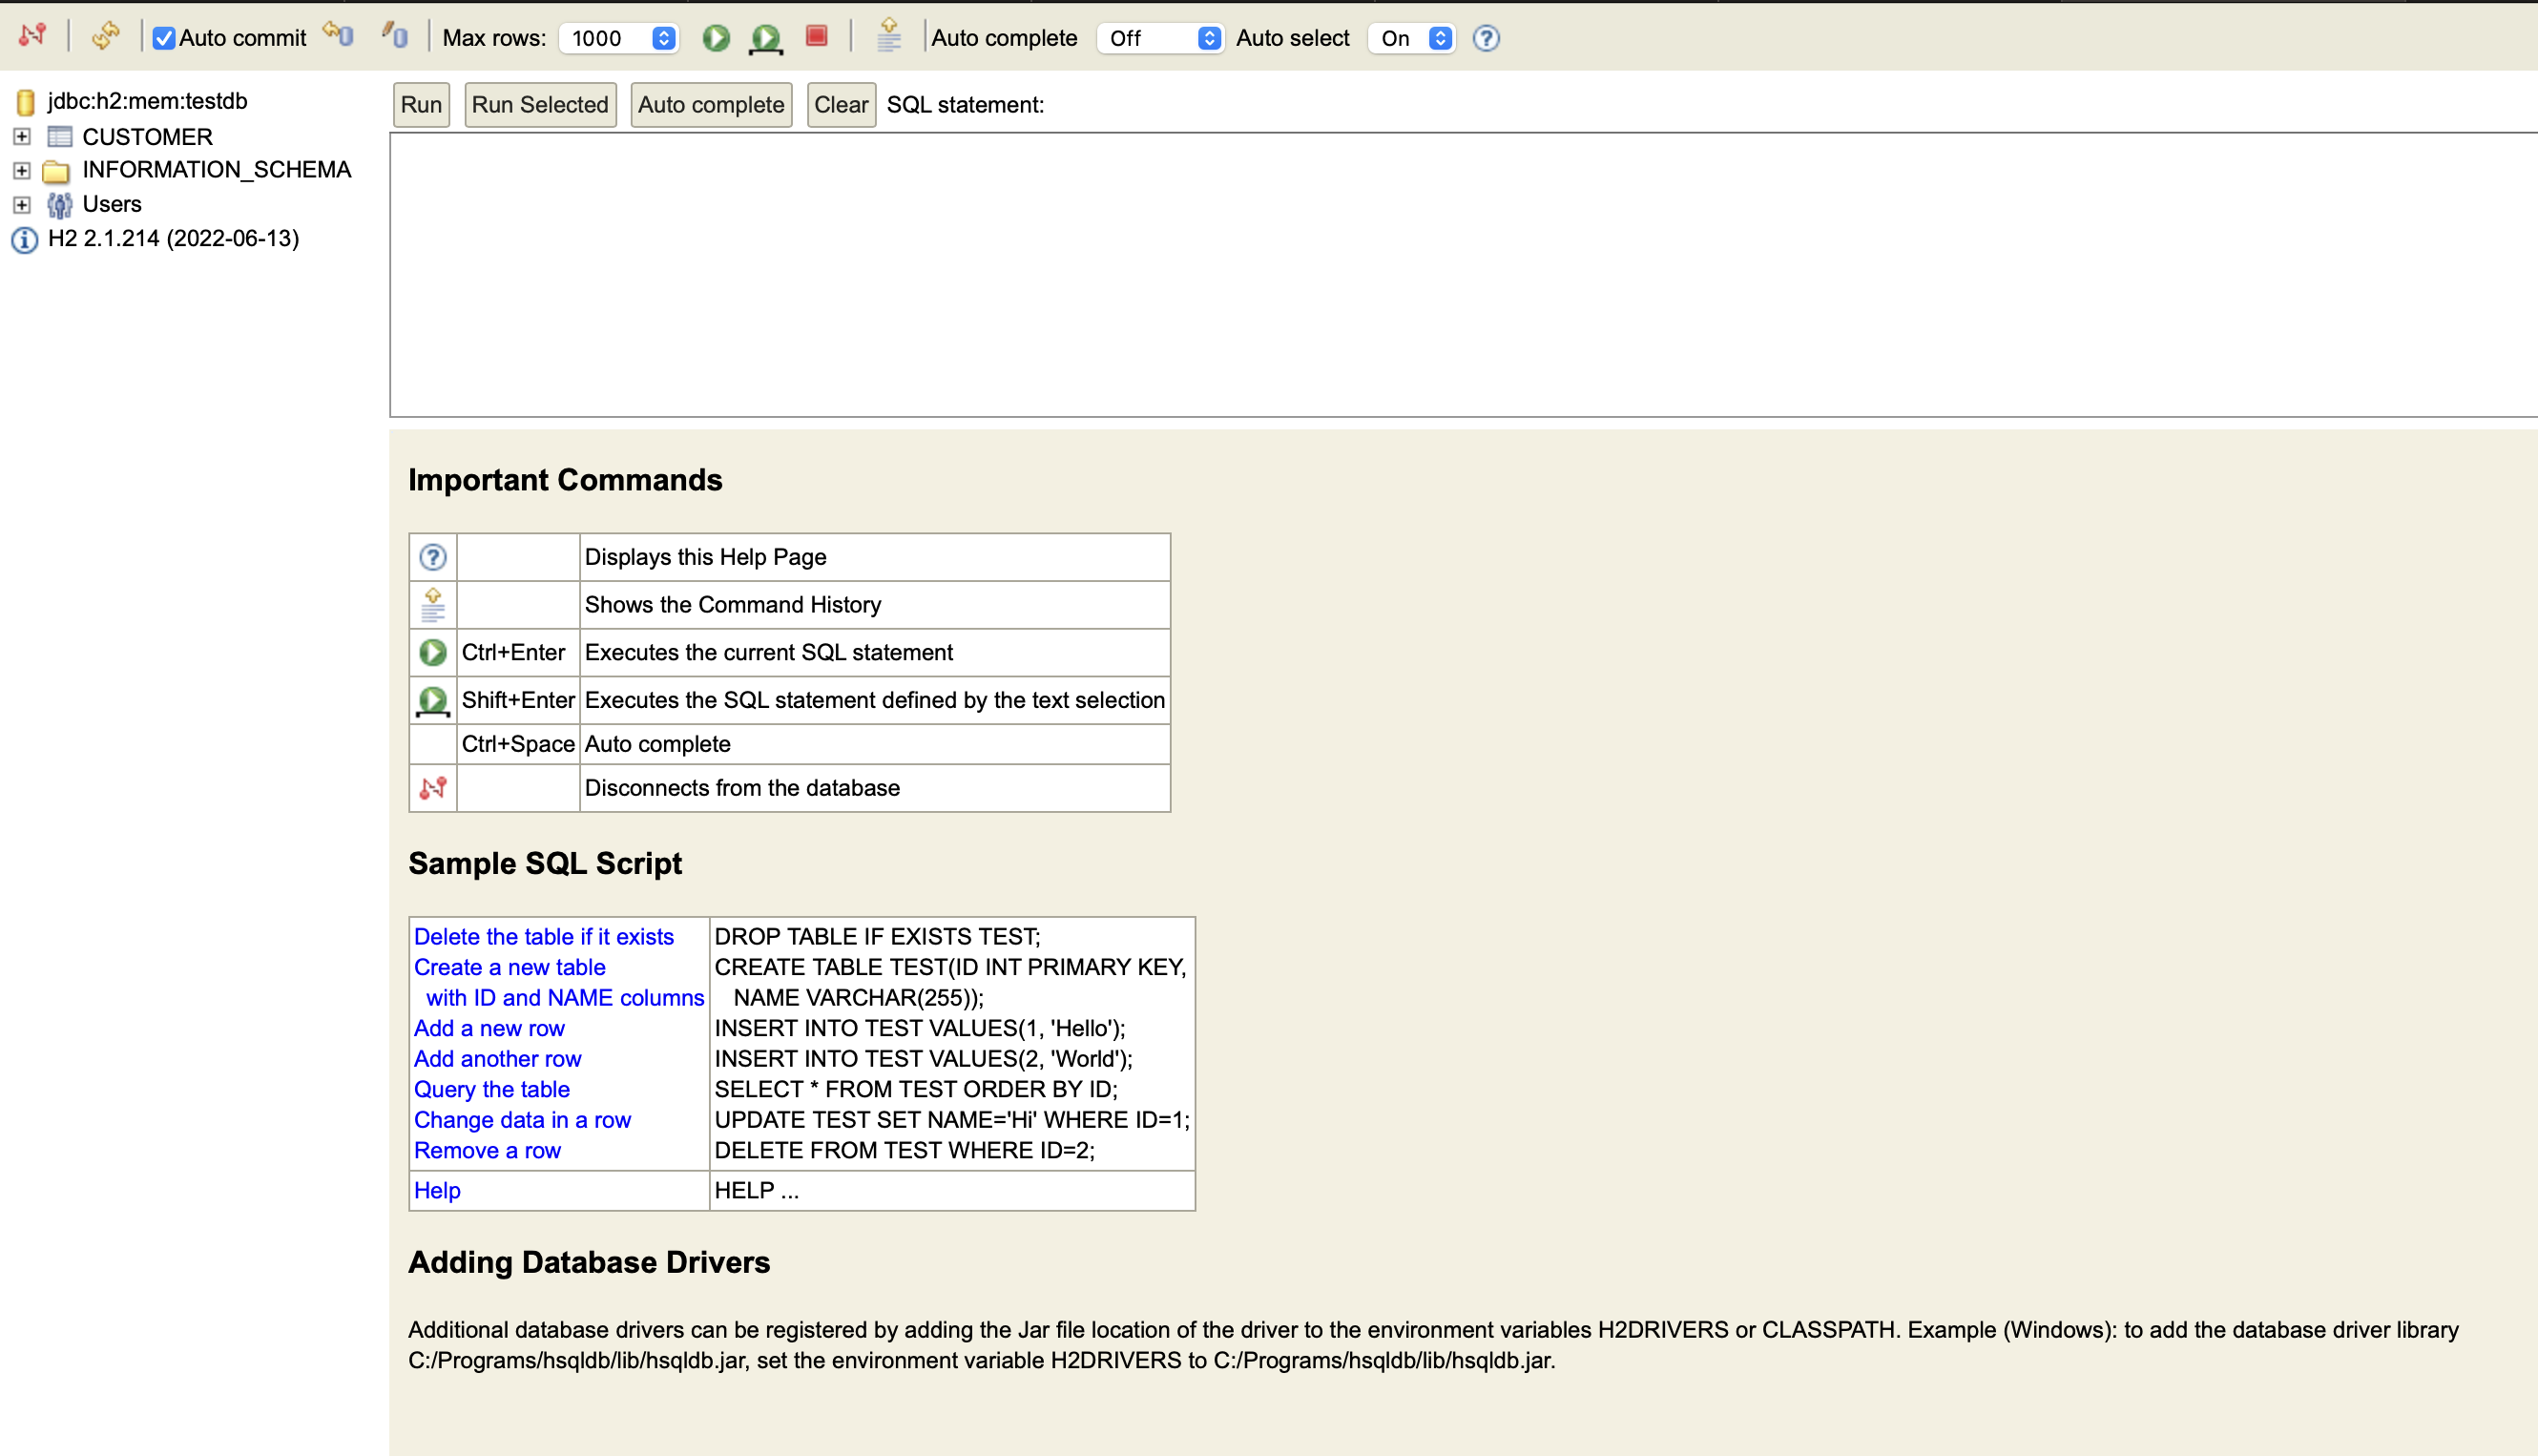
spring.datasource.url=jdbc:h2:mem:testdb그러면 콘솔창이 잘 뜨는 것을 확인할 수 있다!
API 작성
이제 api를 작성해보자.
1. 고객 등록 API
Ponitor에서는 ATM 사용자의 영상이미지를 저장한다.
관리자 계정에서는 이 영상을 조회할 수 있다.
여기서는 ATM 사용자 등록 기능을 구현하자.
Customer Entity
고객이 등록될 고객Entity를 생성한다.
Customer.java
import lombok.Builder;
import lombok.Getter;
import lombok.NoArgsConstructor;
import org.hibernate.annotations.CreationTimestamp;

import javax.persistence.*;
import java.sql.Timestamp;

@Getter// 클래스내 getter 메소드 자동생성
@NoArgsConstructor //기본 생성자 자동추가
@Entity
public class Customer {

    @Id
    @GeneratedValue(strategy = GenerationType.IDENTITY) //고객 id = auto increment
    private Long customerId;

 //   @CreationTimestamp //insert문 실행시 현재시간 적용
    @Column(nullable = false)
    private LocalDateTime startTime; //Timestamp -> LocalDateTime

//    @UpdateTimestamp update쿼리 실행시 자동 업데이트
    @Column(length = 500) //거래완료시간 = timestamp, 추후 update로 값을 채움
    private LocalDateTime endTime; //Timestamp -> LocalDateTime


    @Column(length = 500, nullable = false)  //atm 번호, not NULL
    private String atmId;

    @Builder
    public Customer(Timestamp startTime, Timestamp endTime, String atmId){
        this.startTime = startTime;
        this.endTime = endTime;
        this.atmId = atmId;
    }

}
📝 고객이 버튼을 클릭한 시작시간과 거래가 종료된 종료시간을 프론트에서 timestamp로 넘겨주기로 해서 날짜 관련 자료형을 많이 서칭해보았다.
➡️ JSON파일 자체와 JSON 변환에 대한 이해도가 낮아서 했던 고민들이었다.
➡️ 결론
startTime, endTime 모두 LocalDateTime으로 선언,
JSON 파일이 String만 지원한다고 String으로 받아서 LocalDateTime으로 변환할 필요 없다.
즉, Spring에서 직렬화 가능함
HOW?
관련 DTO의 startTime, endTime에 아래의 어노테이션만 붙여주면 됨
@DateTimeFormat(pattern = "yyyy-MM-dd'T'HH:mm:ss")Entity Repository 생성
CustomerRepository.java
import org.springframework.data.jpa.repository.JpaRepository;
import pebite.Ponitor_BE.model.Customer;

public interface CustomerRepository extends JpaRepository<Customer, Long> {

}
Dto
절대 Entity 클래스를 Request, Response클래스로 사용하면안된다!
여기서 위에 언급했던 JSON변환을 위해 startTime과 endTime에 아래의 어노테이션을 추가했다.
@DateTimeFormat(pattern = "yyyy-MM-dd'T'HH:mm:ss") CustormerSaveRequestDto.java
import lombok.Builder;
import lombok.Getter;
import lombok.NoArgsConstructor;
import pebite.Ponitor_BE.model.Customer;

import java.sql.Timestamp;

@Getter
@NoArgsConstructor
public class CustomerSaveRequestDto {
	@DateTimeFormat(pattern = "yyyy-MM-dd'T'HH:mm:ss")
    private Timestamp startTime;

    @DateTimeFormat(pattern = "yyyy-MM-dd'T'HH:mm:ss")
    private Timestamp endTime;

    private String atmId;

    @Builder
    public CustomerSaveRequestDto(Timestamp startTime,Timestamp endTime, String atmId){
        this.startTime = startTime;
        this.endTime = endTime;
        this.atmId = atmId;
    }

    public Customer toEntity(){
        return Customer.builder()
                .startTime(startTime)
                .endTime(endTime)
                .atmId(atmId).
                build();
    }
}
Service
CustomerService.java
import lombok.RequiredArgsConstructor;
import org.springframework.stereotype.Service;
import org.springframework.transaction.annotation.Transactional;

import pebite.Ponitor_BE.dto.CustomerSaveRequestDto;
import pebite.Ponitor_BE.repository.CustomerRepository;

@RequiredArgsConstructor
@Service
public class CustomerService {
    private final CustomerRepository customerRepository;
    @Transactional
    public Long save(CustomerSaveRequestDto requestDto) {
        return customerRepository.save(requestDto.toEntity()).getCustomerId();
    }
}
Controller
CustomerApiController.java
import lombok.RequiredArgsConstructor;
import org.springframework.web.bind.annotation.PostMapping;
import org.springframework.web.bind.annotation.RequestBody;
import org.springframework.web.bind.annotation.RestController;

import pebite.Ponitor_BE.dto.CustomerSaveRequestDto;
import pebite.Ponitor_BE.service.CustomerService;

@RequiredArgsConstructor
@RestController
public class CustomerApiController {

    private final CustomerService customerService;

    @PostMapping("/users/lists")
    public Long save(@RequestBody CustomerSaveRequestDto requestDto){
        return customerService.save(requestDto);
    }
}
Test
CustomerApiControllerTest.java
import org.junit.After;
import org.junit.Test;
import org.junit.runner.RunWith;
import org.springframework.beans.factory.annotation.Autowired;
import org.springframework.boot.test.context.SpringBootTest;
import org.springframework.boot.test.web.client.TestRestTemplate;
import org.springframework.boot.test.web.server.LocalServerPort;
import org.springframework.http.HttpStatus;
import org.springframework.http.ResponseEntity;
import org.springframework.test.context.junit4.SpringRunner;
import pebite.Ponitor_BE.dto.CustomerSaveRequestDto;
import pebite.Ponitor_BE.model.Customer;
import pebite.Ponitor_BE.repository.CustomerRepository;

import java.sql.Timestamp;
import java.util.List;

import static org.assertj.core.api.AssertionsForClassTypes.assertThat;

@RunWith(SpringRunner.class)
@SpringBootTest(webEnvironment = SpringBootTest.WebEnvironment.RANDOM_PORT)
public class CustomerApiControllerTest {

    @LocalServerPort
    private int port;

    @Autowired
    private TestRestTemplate restTemplate;

    @Autowired
    private CustomerRepository customerRepository;

    @After
    public void tearDown() throws Exception {
        customerRepository.deleteAll();
    }

    @Test
    public void customer_register() throws Exception {

        //given
        Timestamp startTime = Timestamp.valueOf("2023-04-20 03:21:00.000");
        Timestamp endTime = Timestamp.valueOf("2023-04-20 03:25:31.000");
        String atmId = "ewha001";

        CustomerSaveRequestDto requestDto = CustomerSaveRequestDto.builder()
                .startTime(startTime)
                .endTime(endTime)
                .atmId(atmId)
                .build();


        String url = "http://localhost:" + port + "/users/lists";

        //when
        ResponseEntity<Long> responseEntity = restTemplate.postForEntity(url, requestDto, Long.class);

        //then
        assertThat(responseEntity.getStatusCode()).isEqualTo(HttpStatus.OK);
        assertThat(responseEntity.getBody()).isGreaterThan(0L);

        List<Customer> all = customerRepository.findAll();
        assertThat(all.get(0).getEndTime()).isEqualTo(endTime);
        assertThat(all.get(0).getAtmId()).isEqualTo(atmId);
    }


}
요것도 잘 돌아간다!
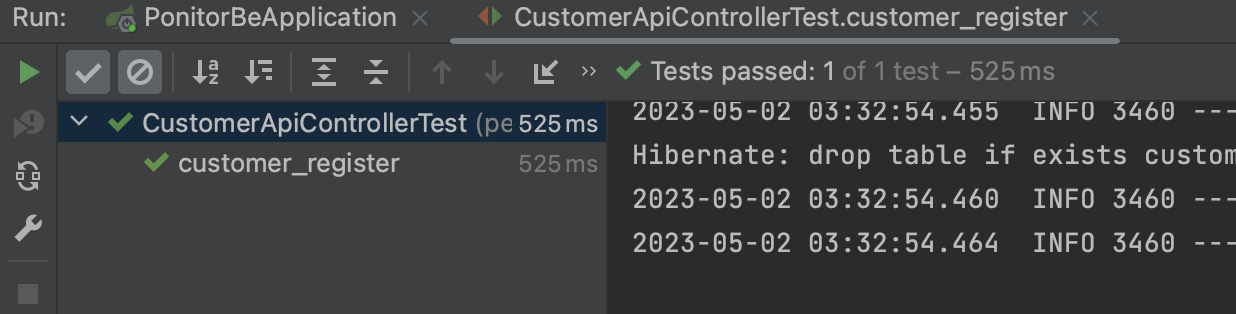
WebEnvironment.RANDOM_PORT로 인한 랜덤 포트 실행이랑

insert 쿼리문 모두 잘 실행된 것을 확인할 수 있다!

이 테스트과정에서 문제가 하나 있었ㄷr...⭐️
customer등록과 맵핑된 url이 원래 "/users/{customer}/lists"이었다.
그런데 restTemplate은 중괄호로 묶인 JSON 데이터를 URI 변수의 자리 표시자로 간주하기 때문에.
즉! url 변수에 대한 값을 제공하지 않아서 url이 완전하지 않기 때문에 오류가 난다...
자세한 건 아래 링크 참조..
Spring RestTemplate Exception: “Not enough variables available to expand”
포스트맨으로 POST를 날려보면!
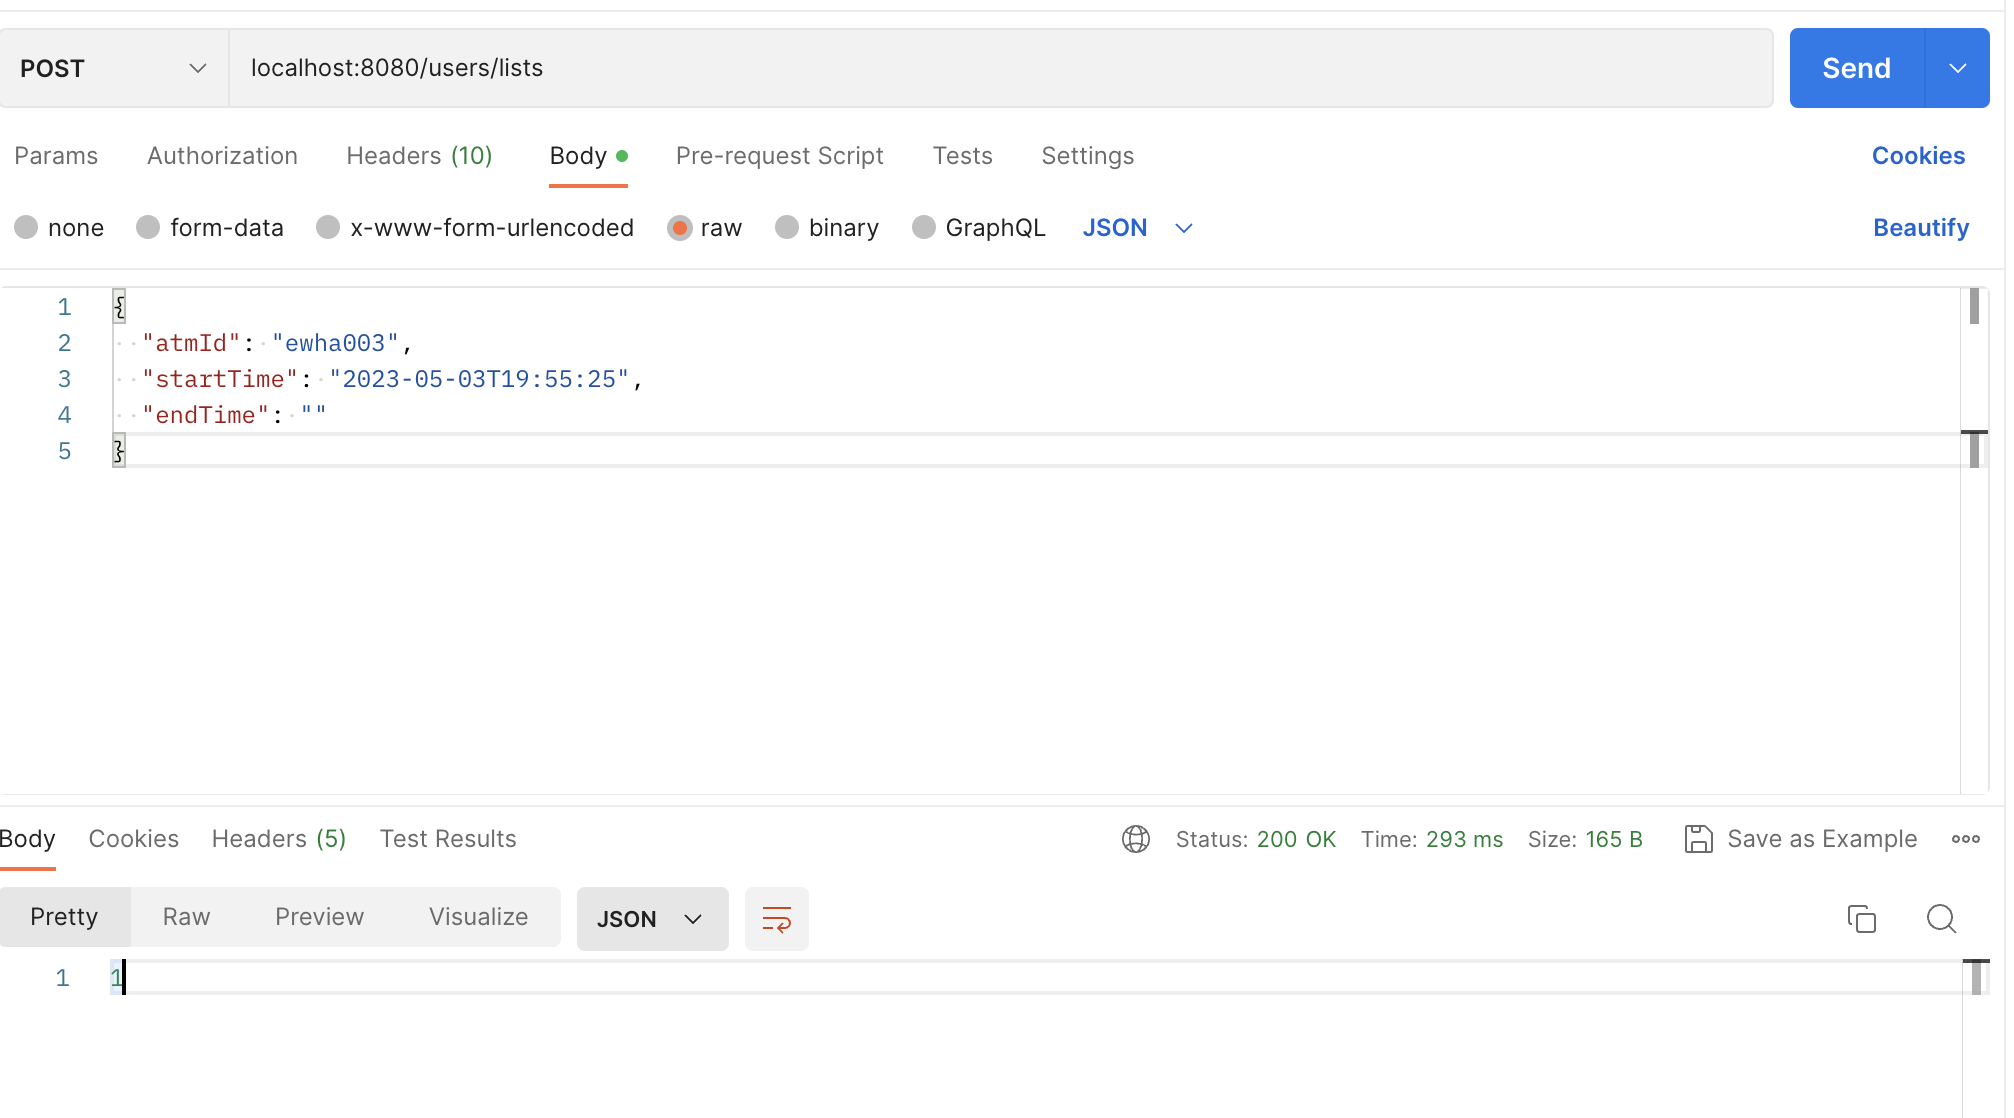
잘 날라가고 있고,
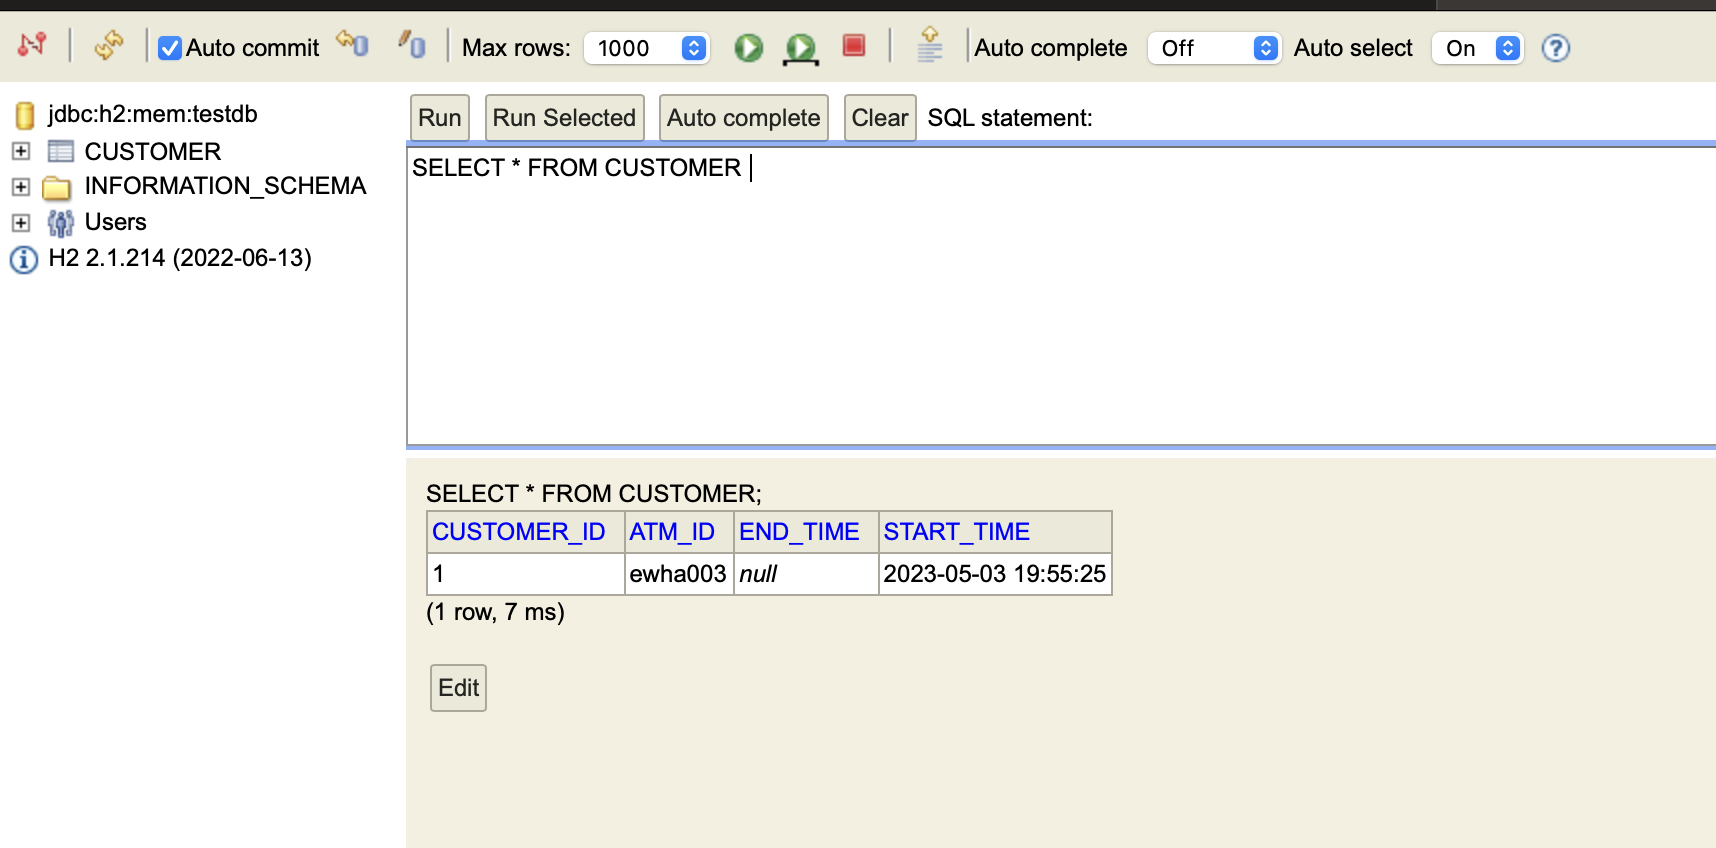
h2 콘솔창을 봐도 잘 저장되고 있는 걸 확인할 수 있다!
2. 거래시간 수정 API
atm에 고객이 등록될 때,
거래 시작시간과 거래 완료시간, 고객이 사용한 atm의 ID가 저장된다.
거래가 시작 되자마자 고객이 등록되기 때문에 거래 완료 시간의 경우 처음은 널값으로 저장한 뒤에 거래 완료시 해당 값을 수정해야한다.
따라서 고객 수정 api를 작성해야한다!
CustomerApiController.java
아래의 코드를 추가한다.
수정하고 싶은 고객의 id를 파라미터로 전달한다!
@PutMapping("/customer/{customerId}")//update
    public Long update(@PathVariable Long customerId, @RequestBody CustomerUpdateRequestDto requestDto){
        return customerService.update(customerId, requestDto);
    }
CustomerService.java
서비스에도 아래의 코드를 추가한다.
    @Transactional
    public Long update(Long customerId, CustomerUpdateRequestDto requestDto) {
        Customer customer = customerRepository.findById(customerId)
                .orElseThrow(()-> new IllegalArgumentException("해당 고객이 존재하지 않습니다. customer_id = "+customerId));

        customer.update(requestDto.getEndTime());
        return customerId;
    }
Customer.java
엔티티 클래스에도 update함수를 추가한다!
    public void update(LocalDateTime endTime){
        this.endTime = endTime;
    }
CustomerUpdateRequestDto.java
파일을 생성하고 아래의 코드를 작성한다.
프론트로부터 수정할 칼럼의 customerId를 받아온다!
@Getter
@NoArgsConstructor
public class CustomerUpdateRequestDto {
    private Long customerId;
    private LocalDateTime endTime;
    @Builder
    public CustomerUpdateRequestDto( LocalDateTime endTime){
        this.endTime = endTime;
    }
}
Test
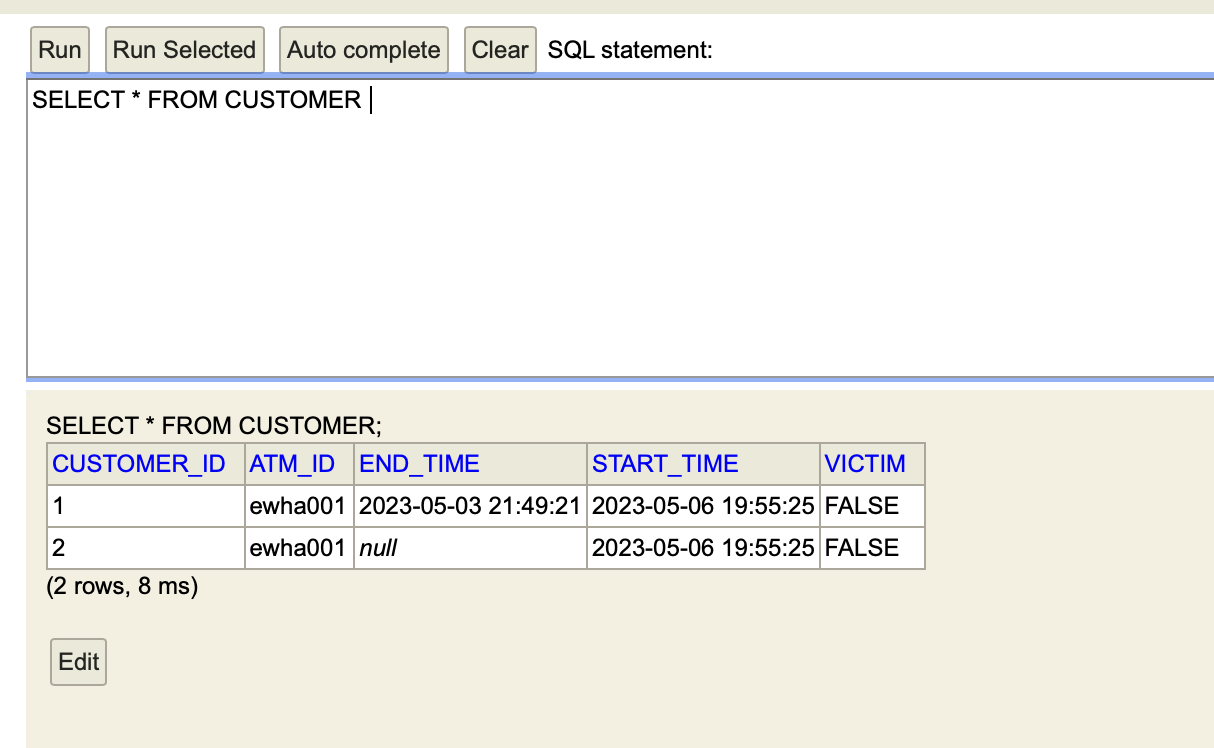
Postman으로 데이터를 보내고
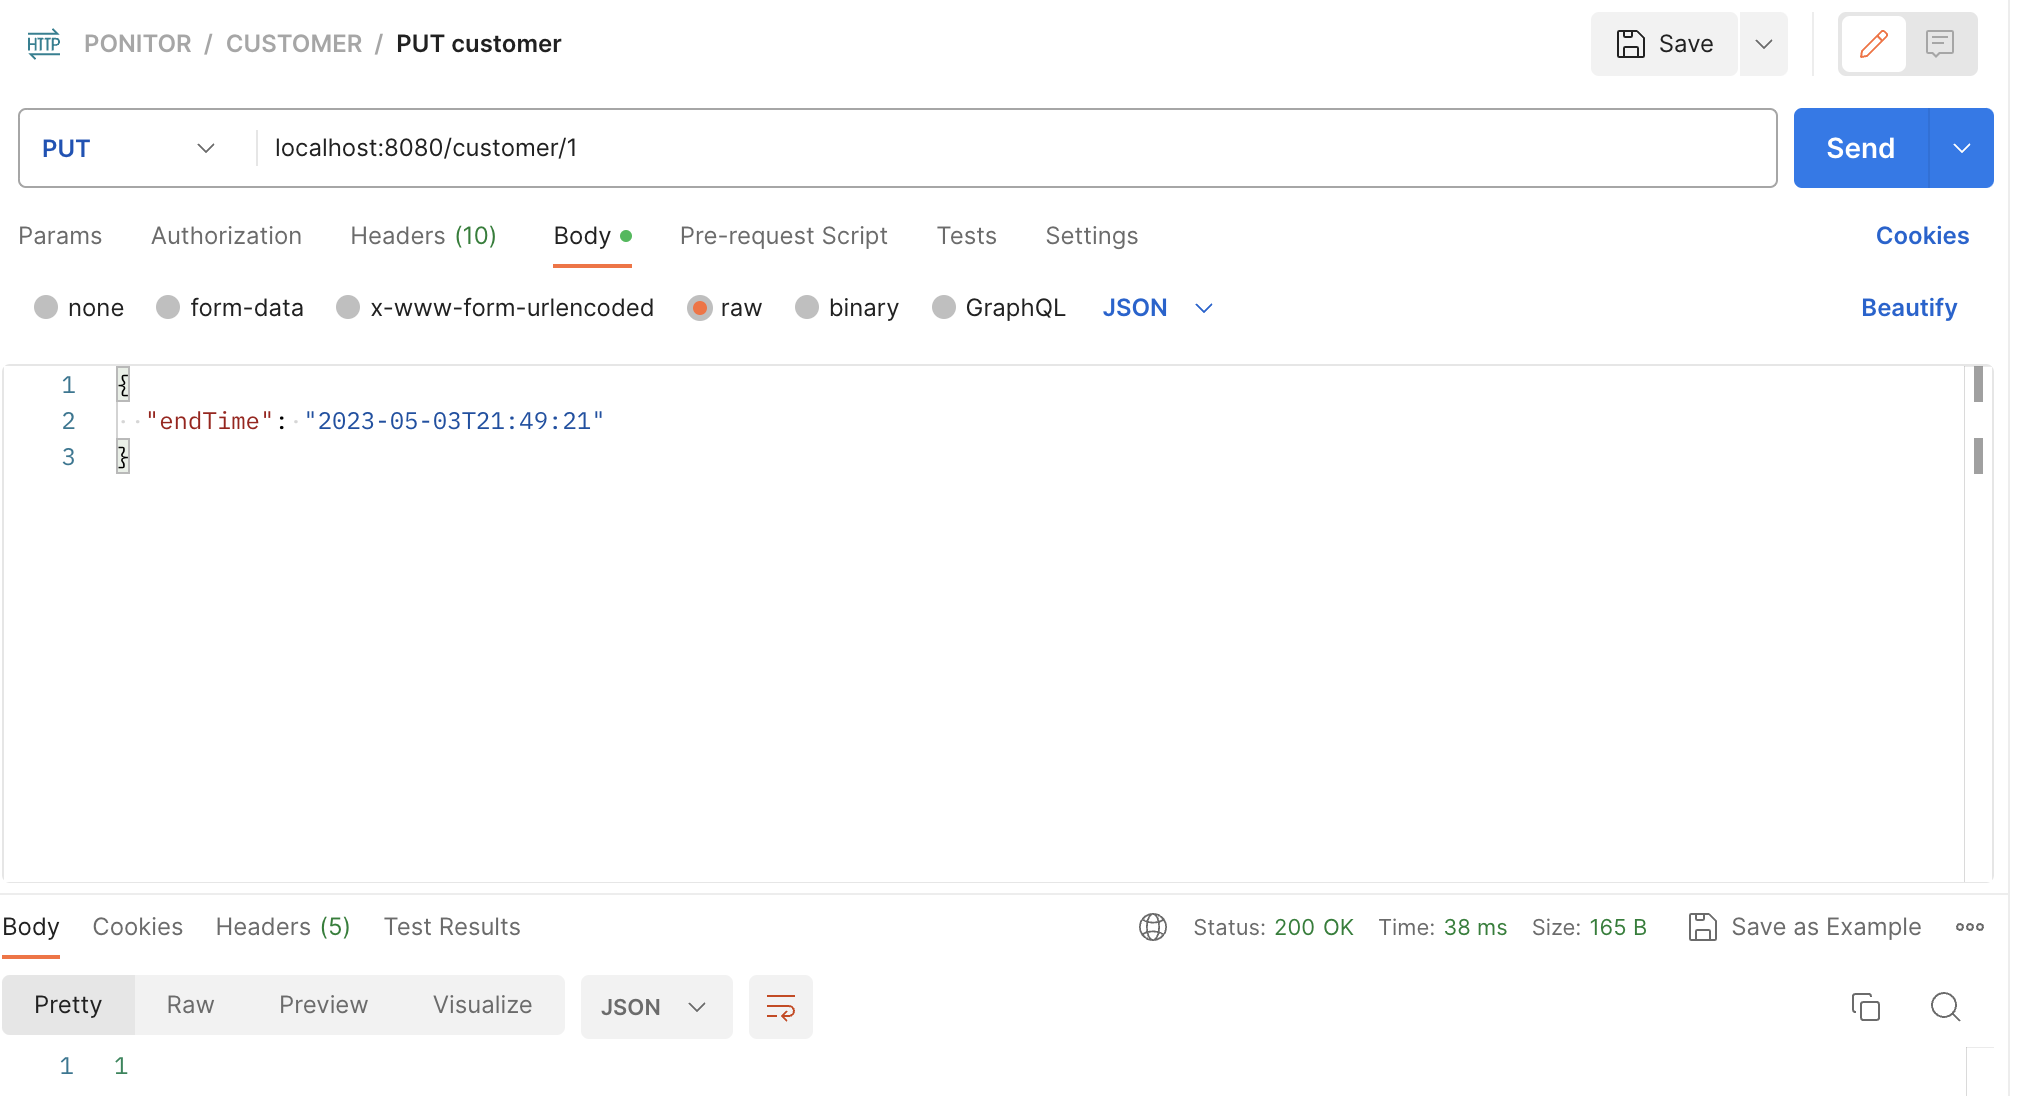
콘솔창에서 확인해보면 다음과 같이 잘 update됨을 확인할 수 있다.
3. 인출금액 등록 API
고객의 인출금액 정보는 판단결과 RESULT 테이블에 들어간다.
인출금액은 만원단위로 저장된다.
Customer 등록 api 개발 흐름 방식과 동일하다
- RESULT Entity 생성
- Result Repository
- Result Controller - PostMapping
- Result DTO
- Result Service
와 같이 구현하면 된다.
이후 POSTMAN으로 테스트를 해보면
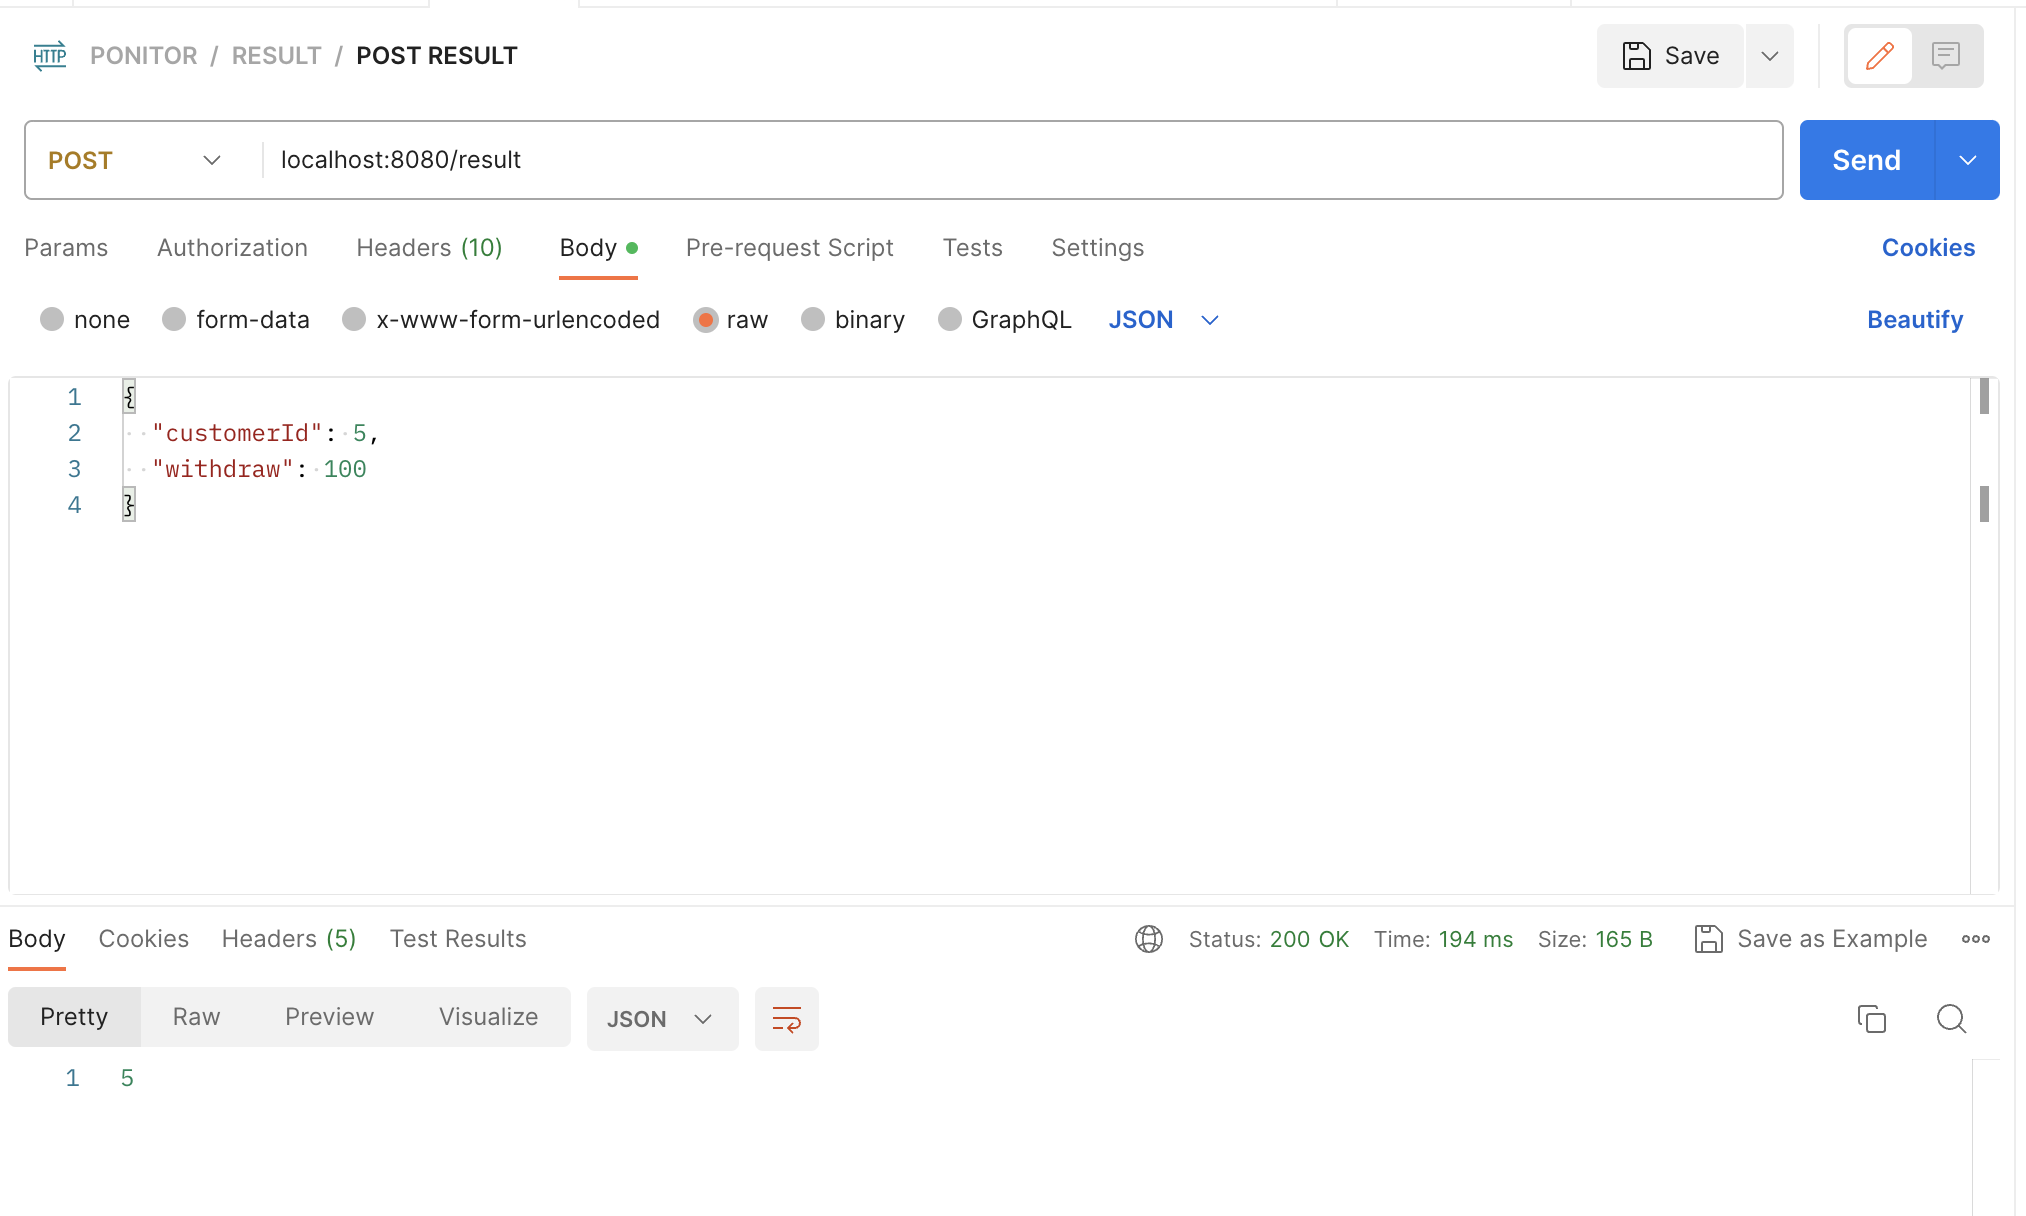
잘 동작하고 있음을 확인할 수 있다.
AWS S3에 이미지 업로드하기
추후 관리자 화면에서는 atm 고객의 영상과 분석 결과를 조회할 수 있어야 하기 때문에 고객의 이미지와 영상을 저장해야한다.
AWS RDS에 각각의 이미지와 영상을 모두 저장하는 것은 너무 비효율적이다.
따라서 별도의 IMAGE Storage인 S3에 이미지를 저장하여 그 url을 RDS에 저장하고자 한다!
(우리는 EC2에 배포할 것이기 때문에 AWS의 S3를 사용했다.)
S3 Bucket 만들기
우선 S3 버킷을 만들자.
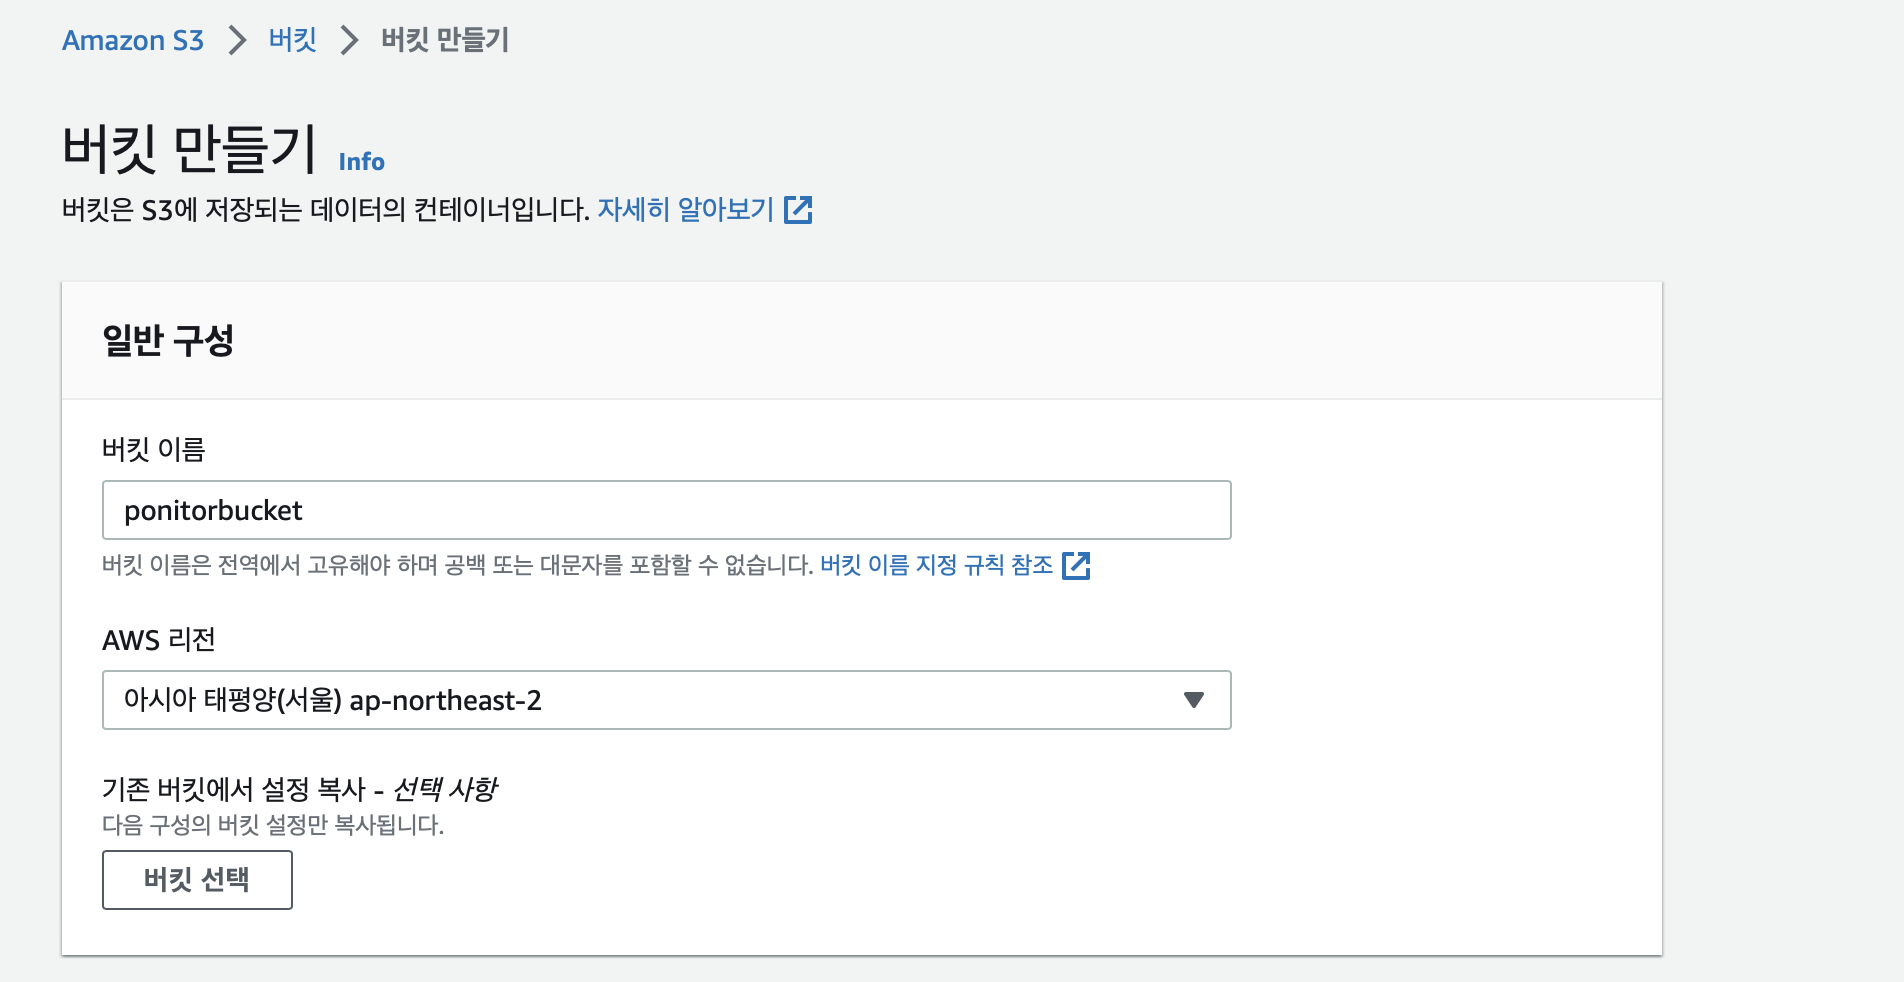
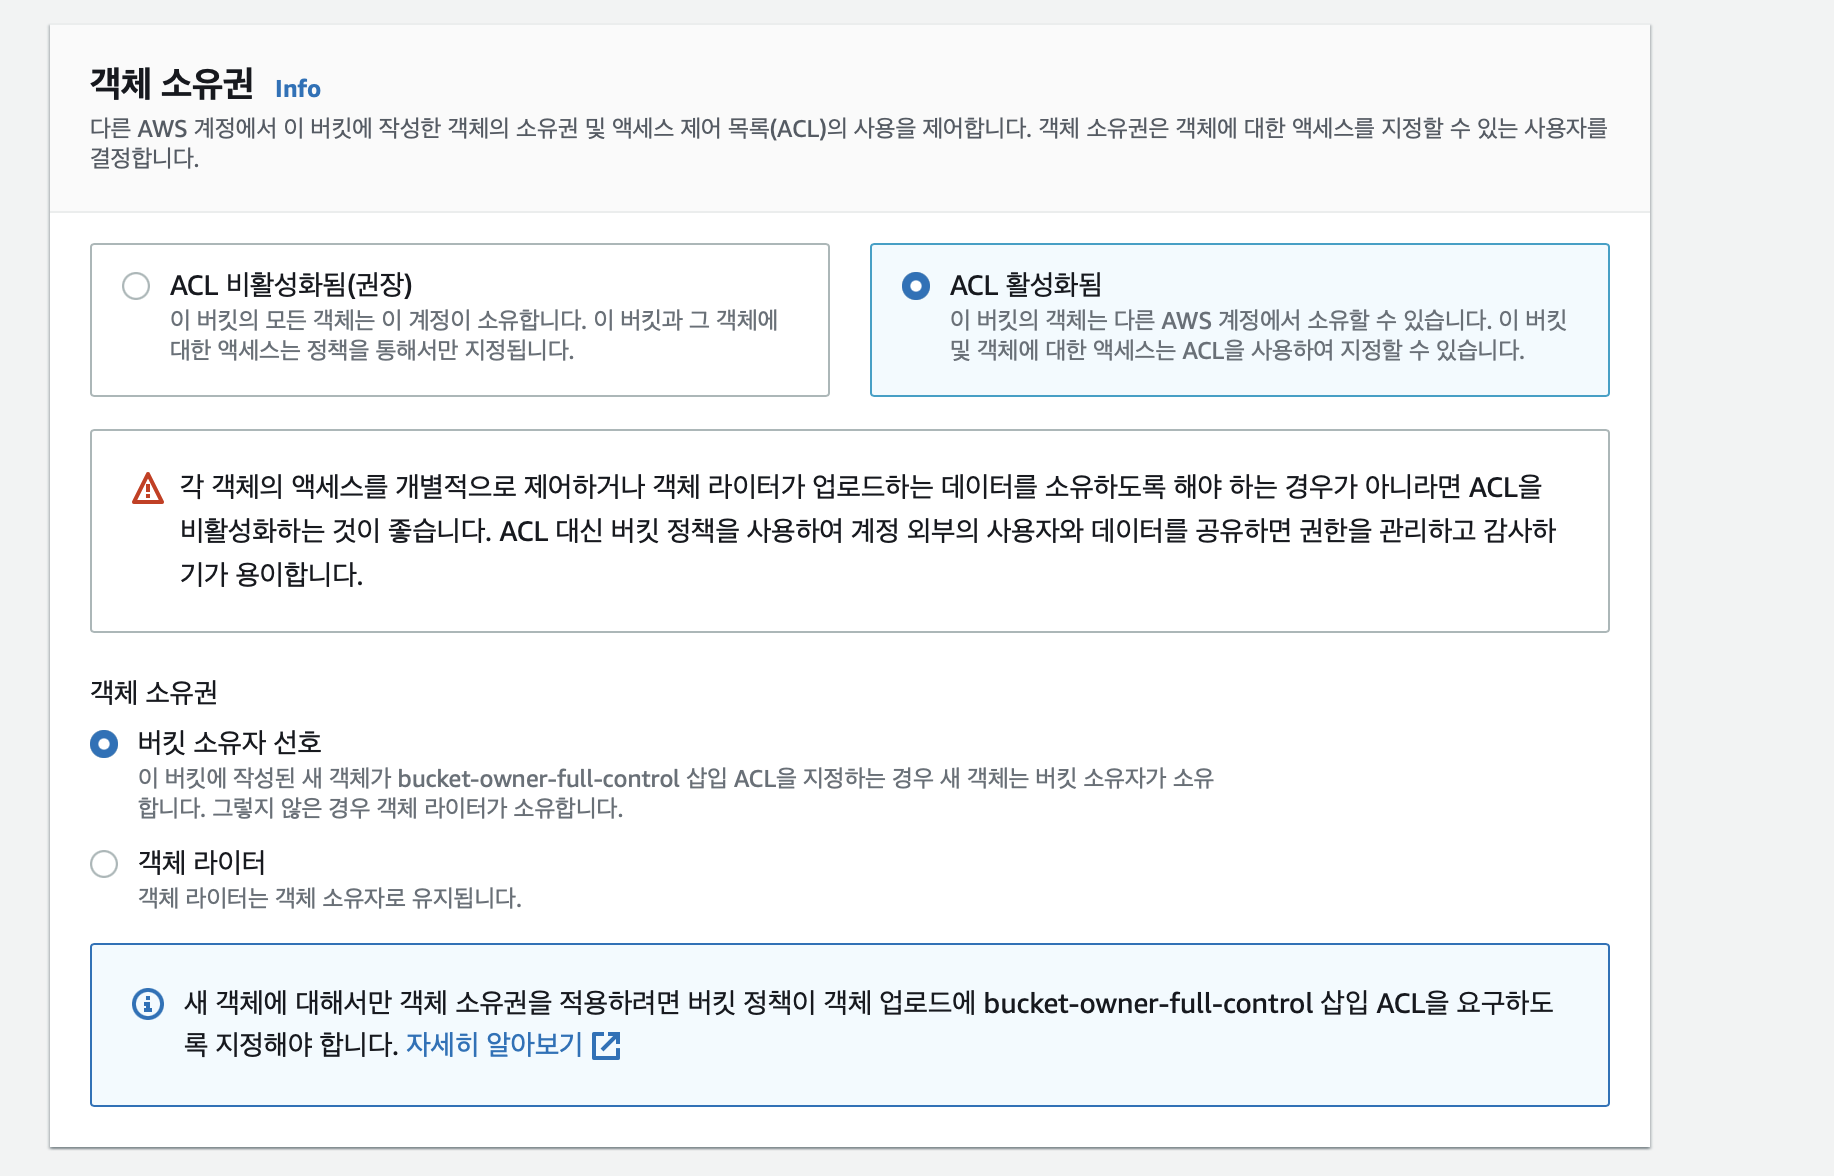
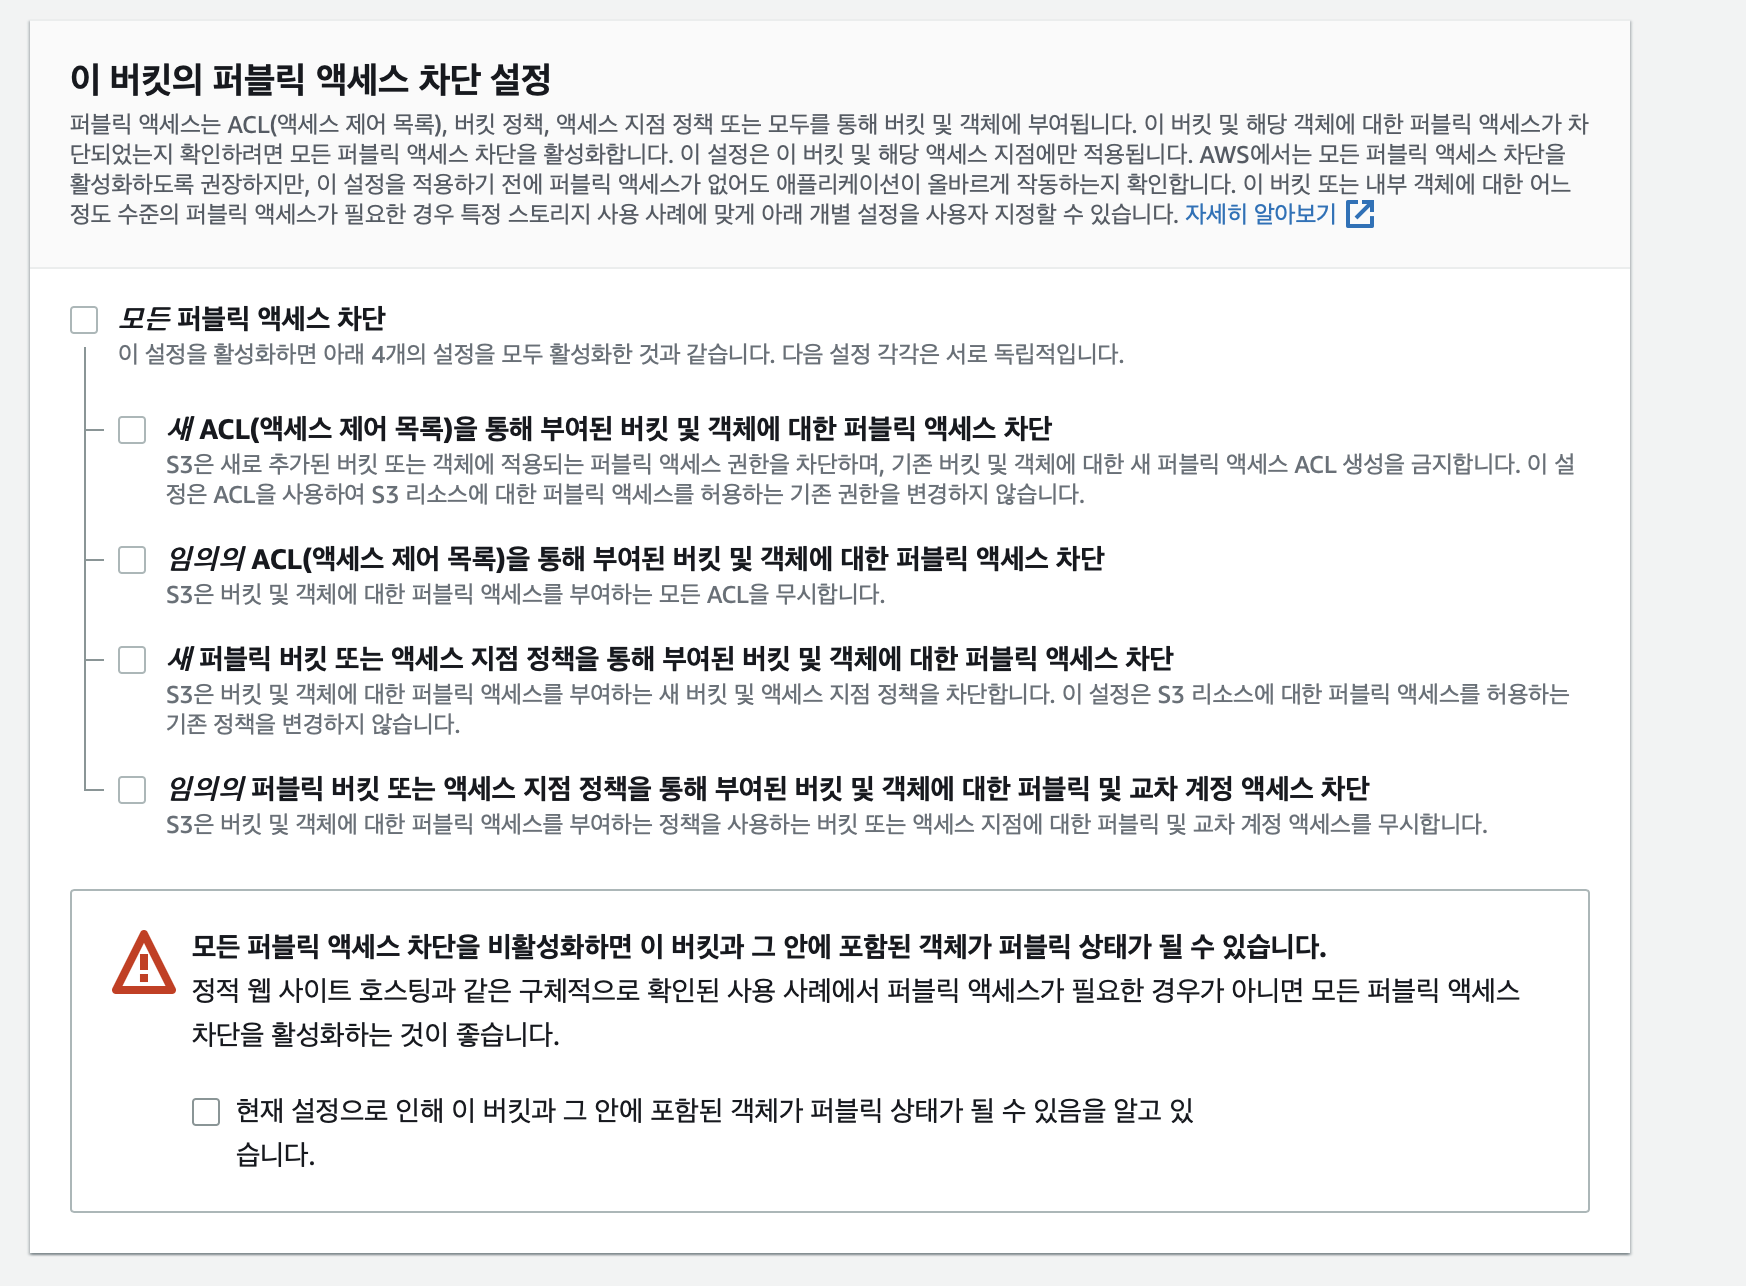

이제 아래와 같이 버킷을 만들면 된다~
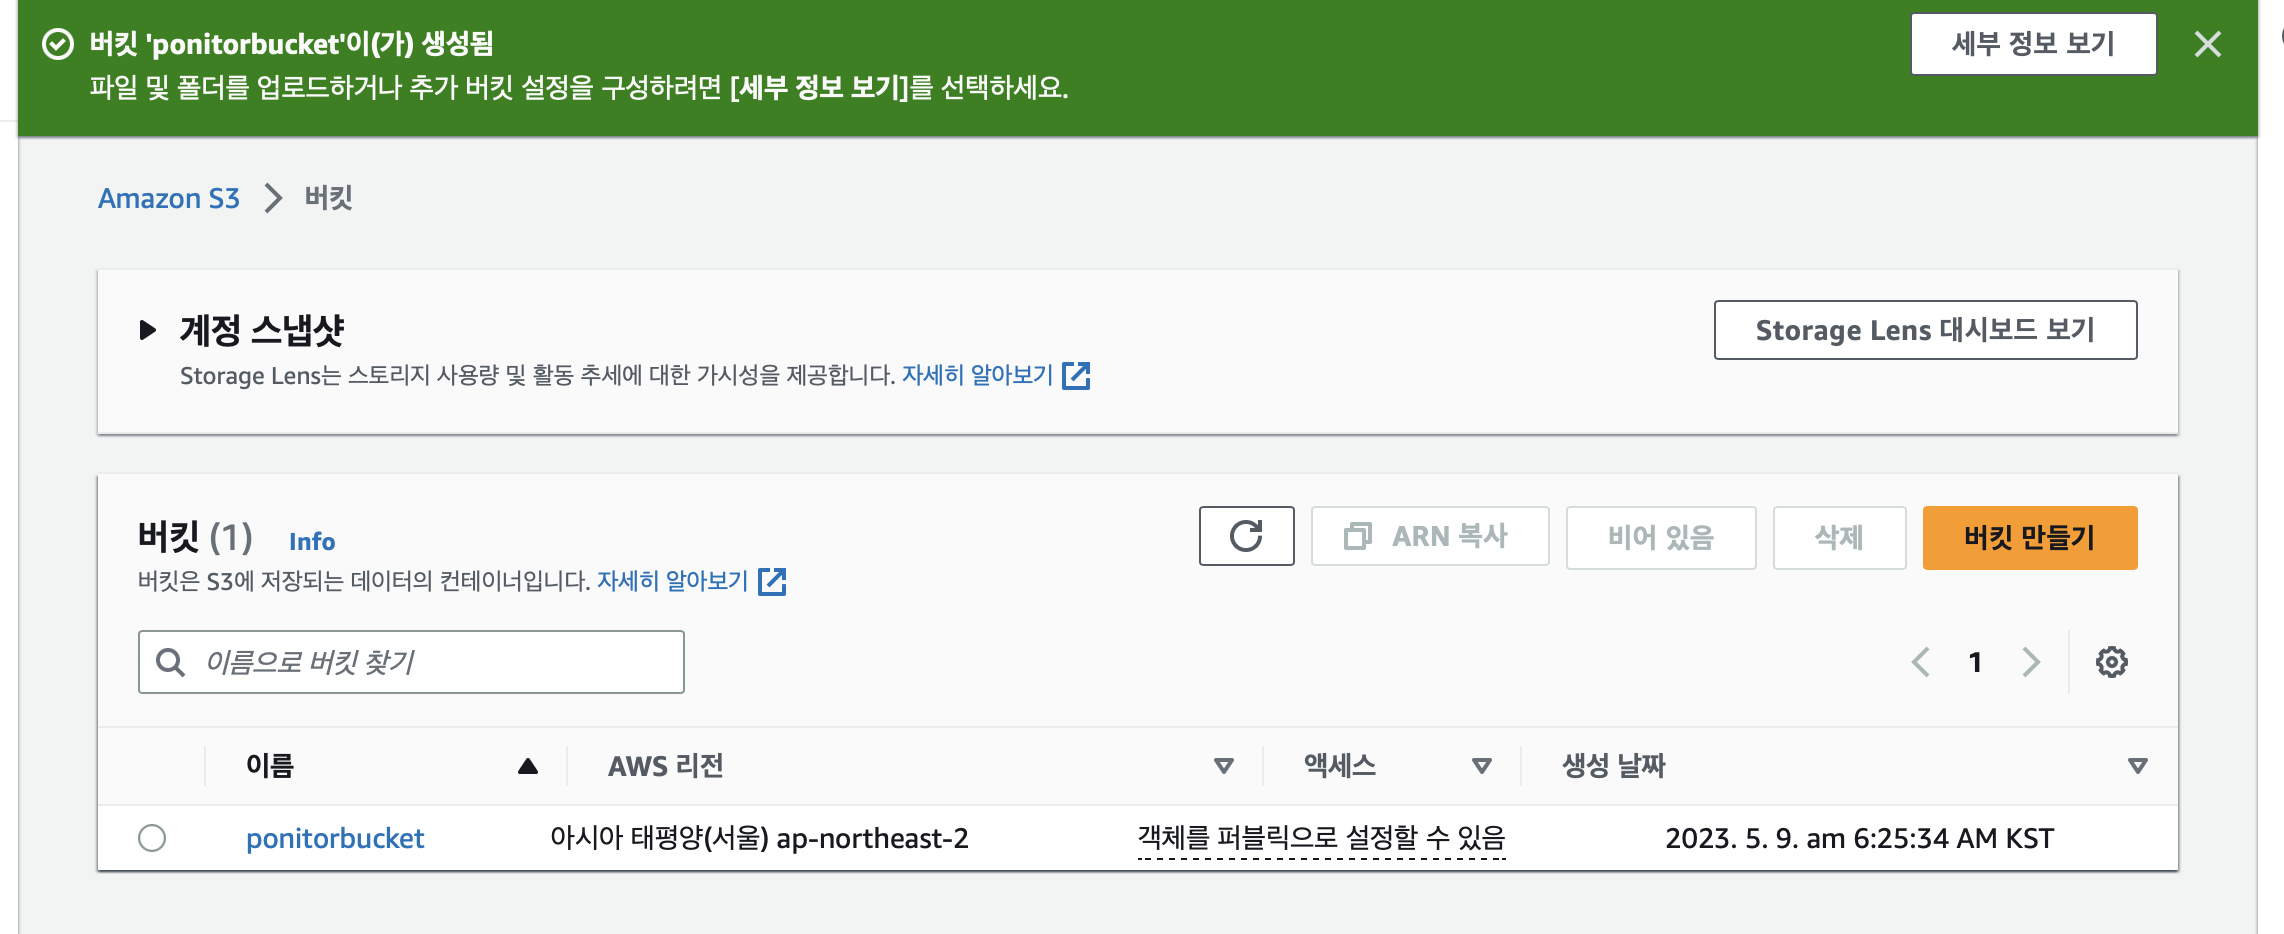
버킷이 성공적으로 만들어졌다!
보안 자격 증명(IAM) 설정(Access Key, Secret Key 발급)
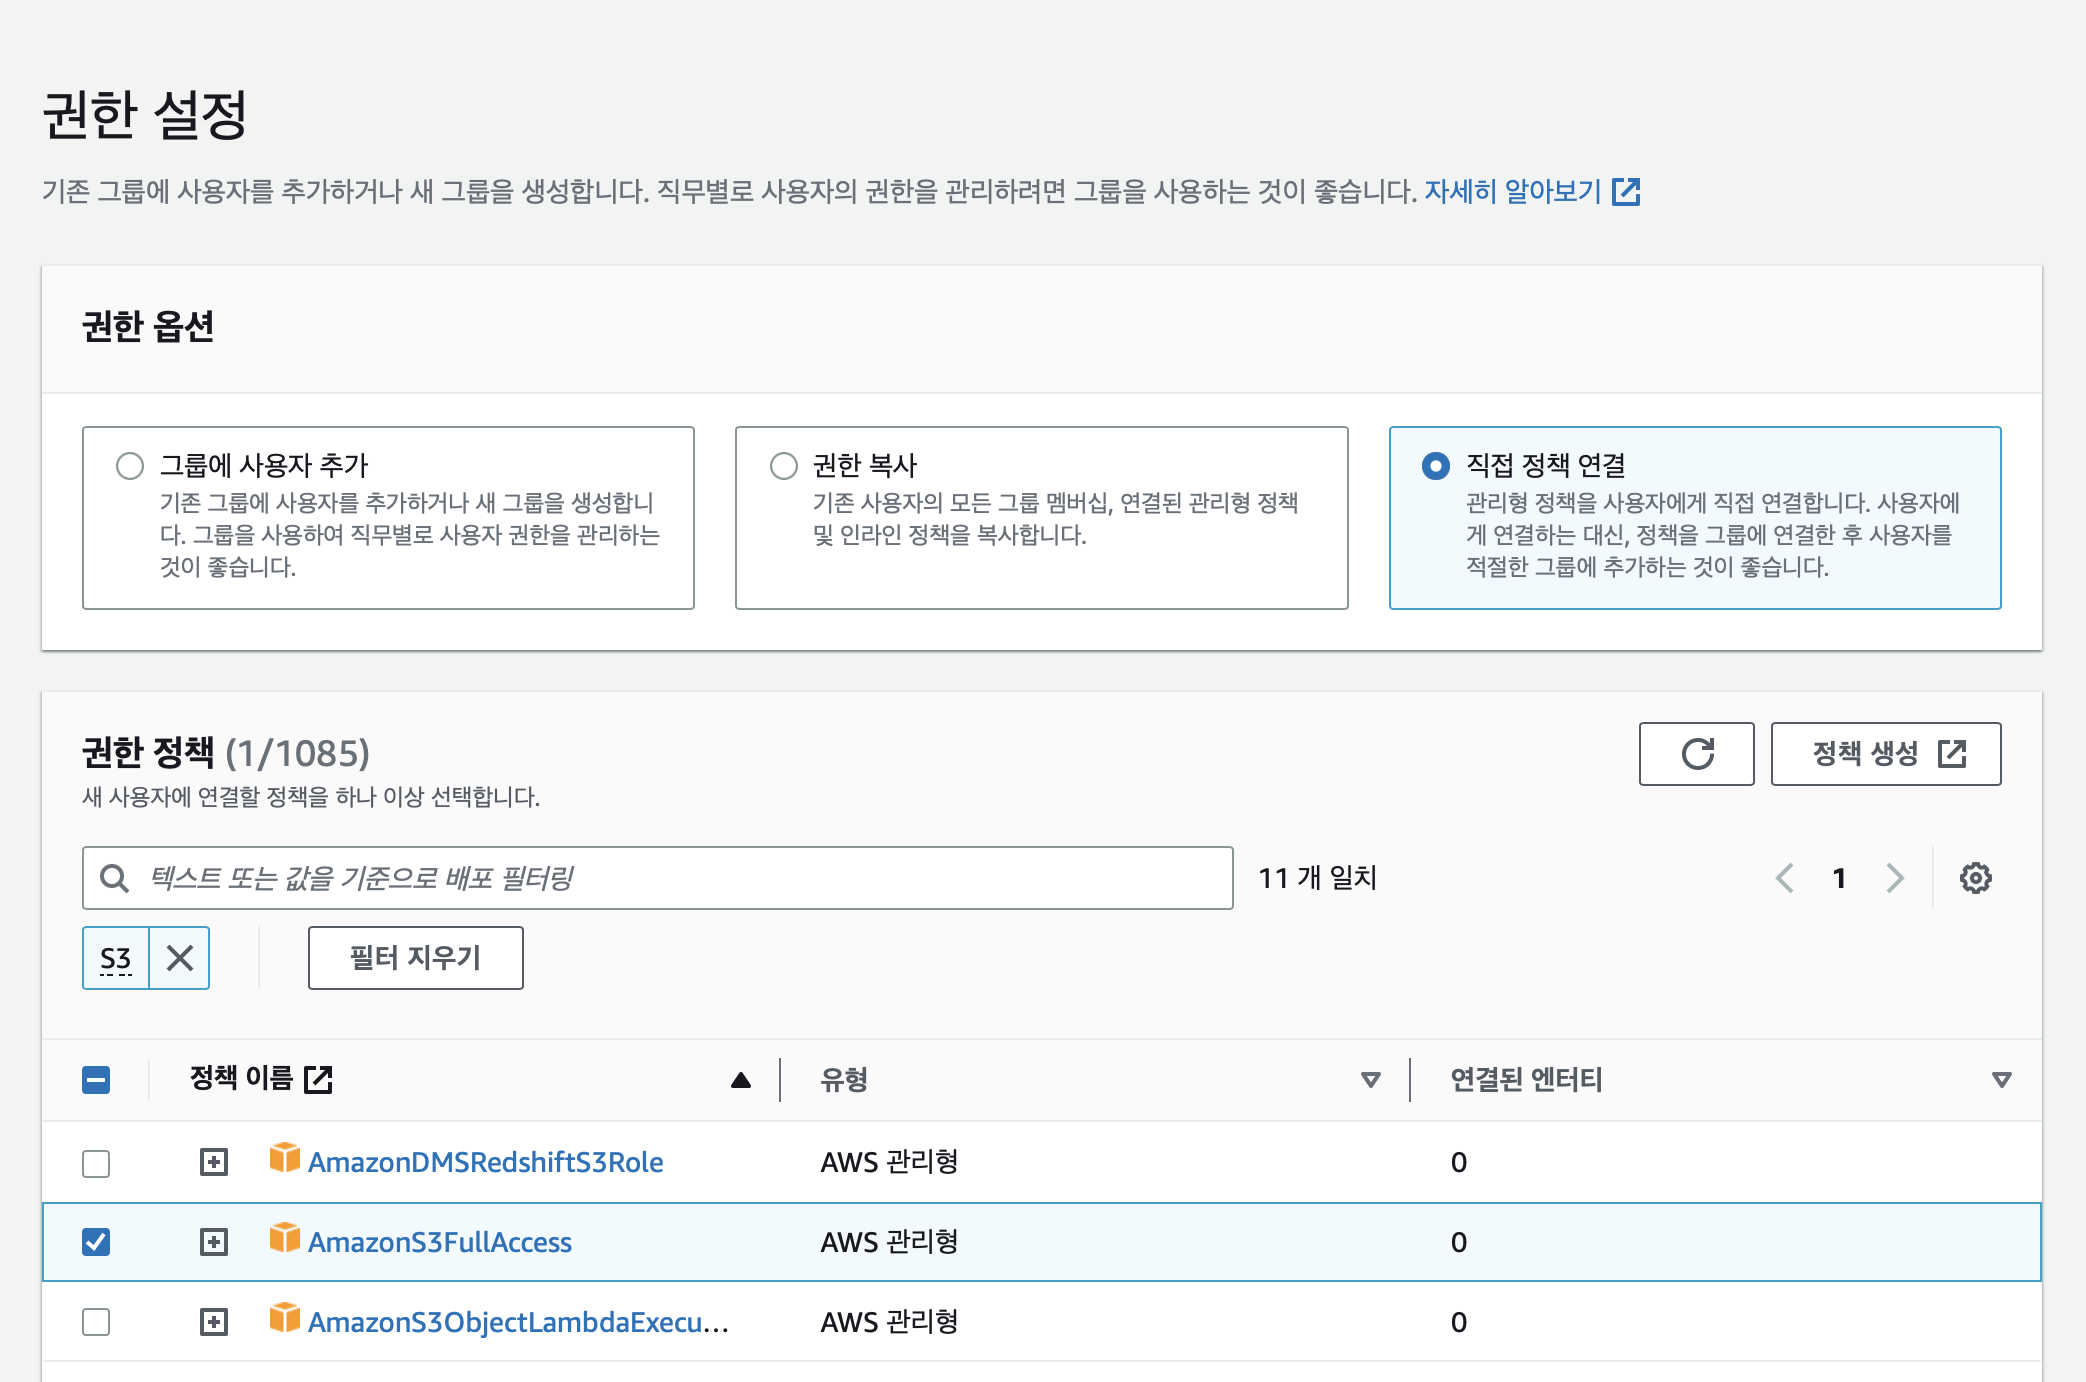
이제 사용자를 생성해준다.
[보안자격증명] → [사용자] → [사용자추가]

여기서 S3에 접근할 수 있는 권한을 추가해준다.
성공적으로 사용자를 추가했다면
마지막 페이지에서 나타나는 액세스 키 ID와 비밀 액세스 키 파일을 준다.
이것을 어딘가에 잘 저장해두어야 한다!
Springboot와 S3 연동하기
Gradle Dependency 추가
implementation 'org.springframework.cloud:spring-cloud-starter-aws:2.2.6.RELEASE'프로퍼티 추가
application.properties
# S3
cloud.aws.credentials.accessKey=
cloud.aws.credentials.secretKey=
cloud.aws.s3.bucket=ponitorbucket
cloud.aws.region.static=ap-northeast-2
cloud.aws.stack.auto-=false
여기서 프로젝트를 깃허브에 올릴 때 어세스키와 시크릿키가 노출되지 않도록 해야한다.
S3config 작성하기
@Configuration
public class S3Config {
    @Value("${cloud.aws.credentials.accessKey}")
    private String accessKey;

    @Value("${cloud.aws.credentials.secretKey}")
    private String secretKey;

    @Value("${cloud.aws.region.static}")
    private String region;

    @Bean
    public AmazonS3 amazonS3Client() {
        AWSCredentials credentials = new BasicAWSCredentials(accessKey, secretKey);

        return AmazonS3ClientBuilder
                .standard()
                .withCredentials(new AWSStaticCredentialsProvider(credentials))
                .withRegion(region)
                .build();
    }

}
따로 config 디렉토리에서 설정 값을 넣기 위해서 AmazonS3Config 설정 클래스를 만들었다. application/properties 파일에 작성한 값들을 읽어와서 AmazonS3Client 객체를 만들어 Bean으로 주입해주는 것이다.
S3 Uploader
파일받아 서버로 업로드는 하는 코드를 작성하자!
@Slf4j
@RequiredArgsConstructor    // final 멤버변수가 있으면 생성자 항목에 포함시킴
@Component
public class S3Uploader {

    private final AmazonS3Client amazonS3Client;

    @Value("${cloud.aws.s3.bucket}")
    private String bucket;

    // MultipartFile을 전달받아 File로 전환한 후 S3에 업로드
    public String uploadFiles(MultipartFile multipartFile, String dirName) throws IOException {
        File uploadFile = convert(multipartFile)
                .orElseThrow(() -> new IllegalArgumentException("MultipartFile -> File 전환 실패"));
        return upload(uploadFile, dirName);
    }

    private String upload(File uploadFile, String dirName) {
        String fileName = dirName + "/" + uploadFile.getName();
        String uploadImageUrl = putS3(uploadFile, fileName);

        removeNewFile(uploadFile);  // 로컬에 생성된 File 삭제 (MultipartFile -> File 전환 하며 로컬에 파일 생성됨)

        return uploadImageUrl;      // 업로드된 파일의 S3 URL 주소 반환
    }

    private String putS3(File uploadFile, String fileName) {
        amazonS3Client.putObject(
                new PutObjectRequest(bucket, fileName, uploadFile)
                        .withCannedAcl(CannedAccessControlList.PublicRead)	// PublicRead 권한으로 업로드 됨
        );
        return amazonS3Client.getUrl(bucket, fileName).toString();
    }

    private void removeNewFile(File targetFile) {
        if(targetFile.delete()) {
            log.info("파일이 삭제되었습니다.");
        }else {
            log.info("파일이 삭제되지 못했습니다.");
        }
    }

    private Optional<File> convert(MultipartFile file) throws  IOException {
        File convertFile = new File(file.getOriginalFilename());
        if(convertFile.createNewFile()) {
            try (FileOutputStream fos = new FileOutputStream(convertFile)) {
                fos.write(file.getBytes());
            }
            return Optional.of(convertFile);
        }
        return Optional.empty();

    }


}
convert() 메소드에서 로컬 프로젝트에 사진 파일이 생성되지만, removeNewFile()을 통해서 바로 지워준다.
Entity 생성
고객의 이미지 정보를 저장할 엔티티를 생성해준다.
@Setter
@Getter
@NoArgsConstructor
@Entity
public class CustomerImages {

    @Id
    @GeneratedValue(strategy = GenerationType.IDENTITY)
    private Long imageId; //자동생성

    @Column(nullable = true)
    private Long customerId;

    // 원본 파일이름과 서버에 저장된 파일경로 를 분리한 이유?
    // 동일한 이름을 가진 파일이 업로드되면 오류발생
    @Column(nullable = true, length = 1000)
    private String originalImageName; //프론트에서 보내는 파일명

    @Column( length = 1000)
    private String storedImageName; //서버 내부에서 관리하는 파일명

    @Column(length = 1000)
    private String imageUrl;

    @Builder
    public CustomerImages(Long customerId, String originalImageName, String storedImageName,String imageUrl){
        this.customerId = customerId;
        this.originalImageName = originalImageName;
        this.storedImageName = storedImageName;
        this.imageUrl = imageUrl;
    }


}
Repository
public interface CustomerImagesRepository extends JpaRepository<CustomerImages, Long> {
}
db와 연결할 레포지토리이다.
DTO
- CustomerImagesSaveRequestDto.java
@Setter
@Getter
@NoArgsConstructor
public class CustomerImagesSaveRequestDto {

    private Long customerId;
    private String originalImageName;
    private String storedImageName;
    private String imageUrl;

    @Builder
    public CustomerImagesSaveRequestDto(Long customerId, String originalImageName, String storedImageName, String imageUrl){
        this.customerId = customerId;
        this.originalImageName = originalImageName;
        this.storedImageName = storedImageName;
        this.imageUrl = imageUrl;

    }

    public CustomerImages toEntity(){
        return CustomerImages.builder()
                .customerId(customerId)
                .originalImageName(originalImageName)
                .storedImageName(storedImageName)
                .imageUrl(imageUrl)
                .build();
    }
}
엔티티에 직접 접근하면 안되기 때문에 DTO를 만들어준다.
Controller
- CustomerImagesApiController
@RequiredArgsConstructor
@RestController
public class CustomerImagesApiController {

    private final CustomerImagesService customerImagesService;

    //  HttpServletRequest request을 사용해주면 알아서 요청으로 들어온값들이 requestDto 안으로 들어감
    @PostMapping(value = "/customerimages", consumes = MediaType.MULTIPART_FORM_DATA_VALUE) //insert
    public Long saveImage(HttpServletRequest request, @RequestParam(value = "image") MultipartFile imageFile, CustomerImagesSaveRequestDto requestDto) {
        Long successId = customerImagesService.saveImage(imageFile, requestDto);
        return successId;
    }

}
POST로 MulitiPartFile 타입의 이미지 객체를 받아온다.
이미지 뿐만 아니라 다른 값들도 저장해야하기 때문에 HttpServletRequest request를 사용한다.
Service
- CustomerImagesService.java
 @RequiredArgsConstructor
@Service
public class CustomerImagesService {
    private final CustomerImagesRepository customerImagesRepository;

    @Autowired
    private S3Uploader s3Uploader;

    @Transactional
    public Long saveImage(MultipartFile imageFile, CustomerImagesSaveRequestDto requestDto){
        if (!imageFile.isEmpty()) {
            try {
                String imageUrl = s3Uploader.uploadFiles(imageFile, "images");
                requestDto.setImageUrl(imageUrl);
            } catch (IOException e) {
                System.out.println(e.getMessage()); }
        }
        return  customerImagesRepository.save(requestDto.toEntity()).getCustomerId();
    }
}
서비스 클래스에서는 요청을 통해 받은 MultipartFile 객체를 S3에 업로드 하고 requestDto에 S3에 저장된 이미지의 url을 넘겨준다. 그리고 디비에 관련 정보를 저장한 이후에 저장된 고객의 id를 반환한다.
이제 api 작성은 끝났다!
TEST
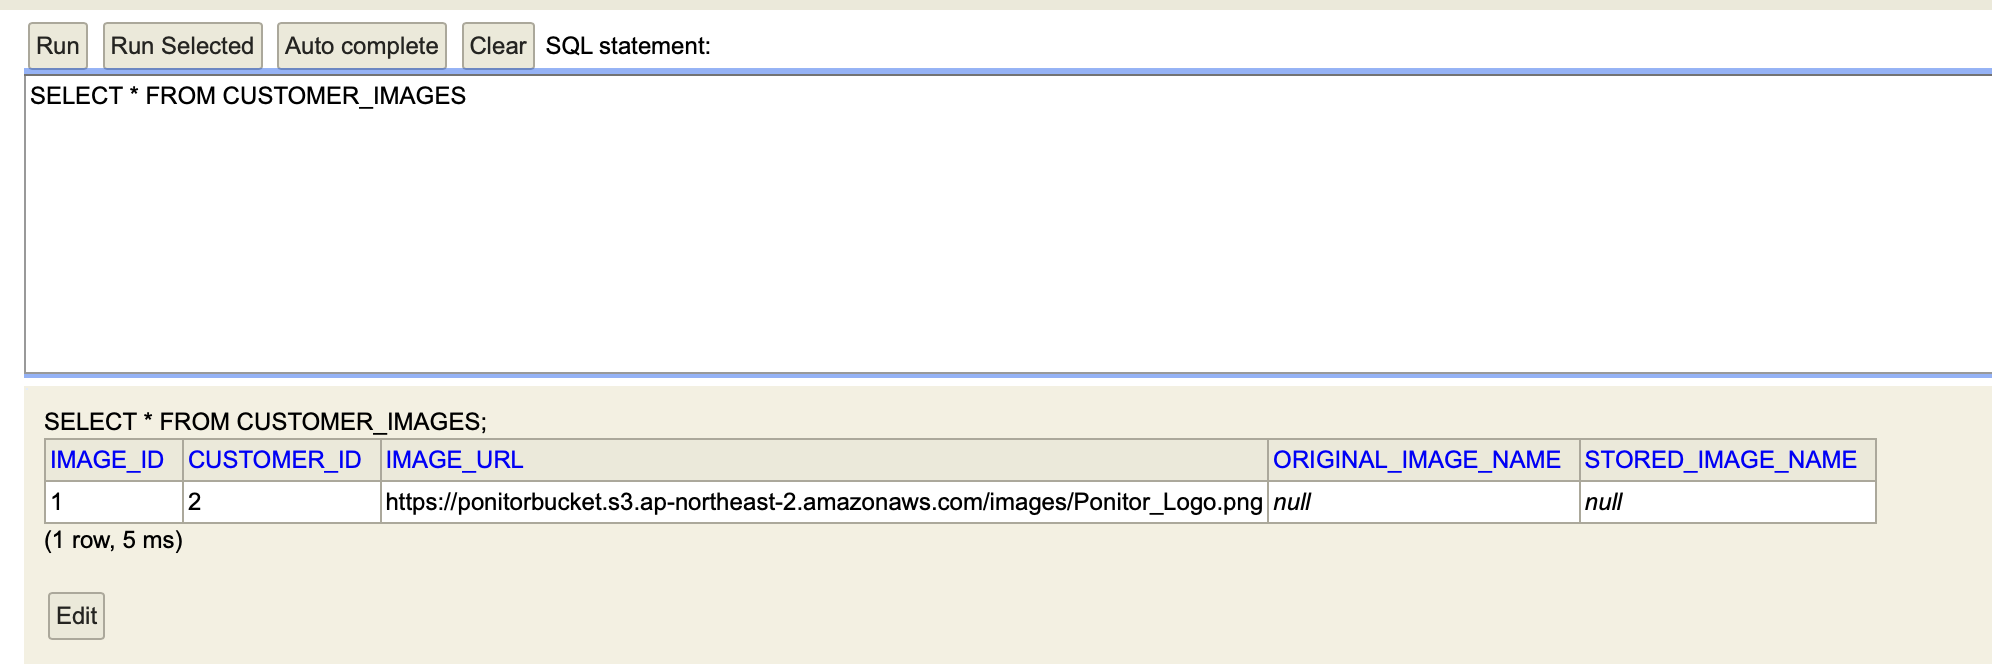
POSTMAN으로 이미지와 고객 id를 보내면

다음과 같이 S3에 이미지가 업로드 되고,
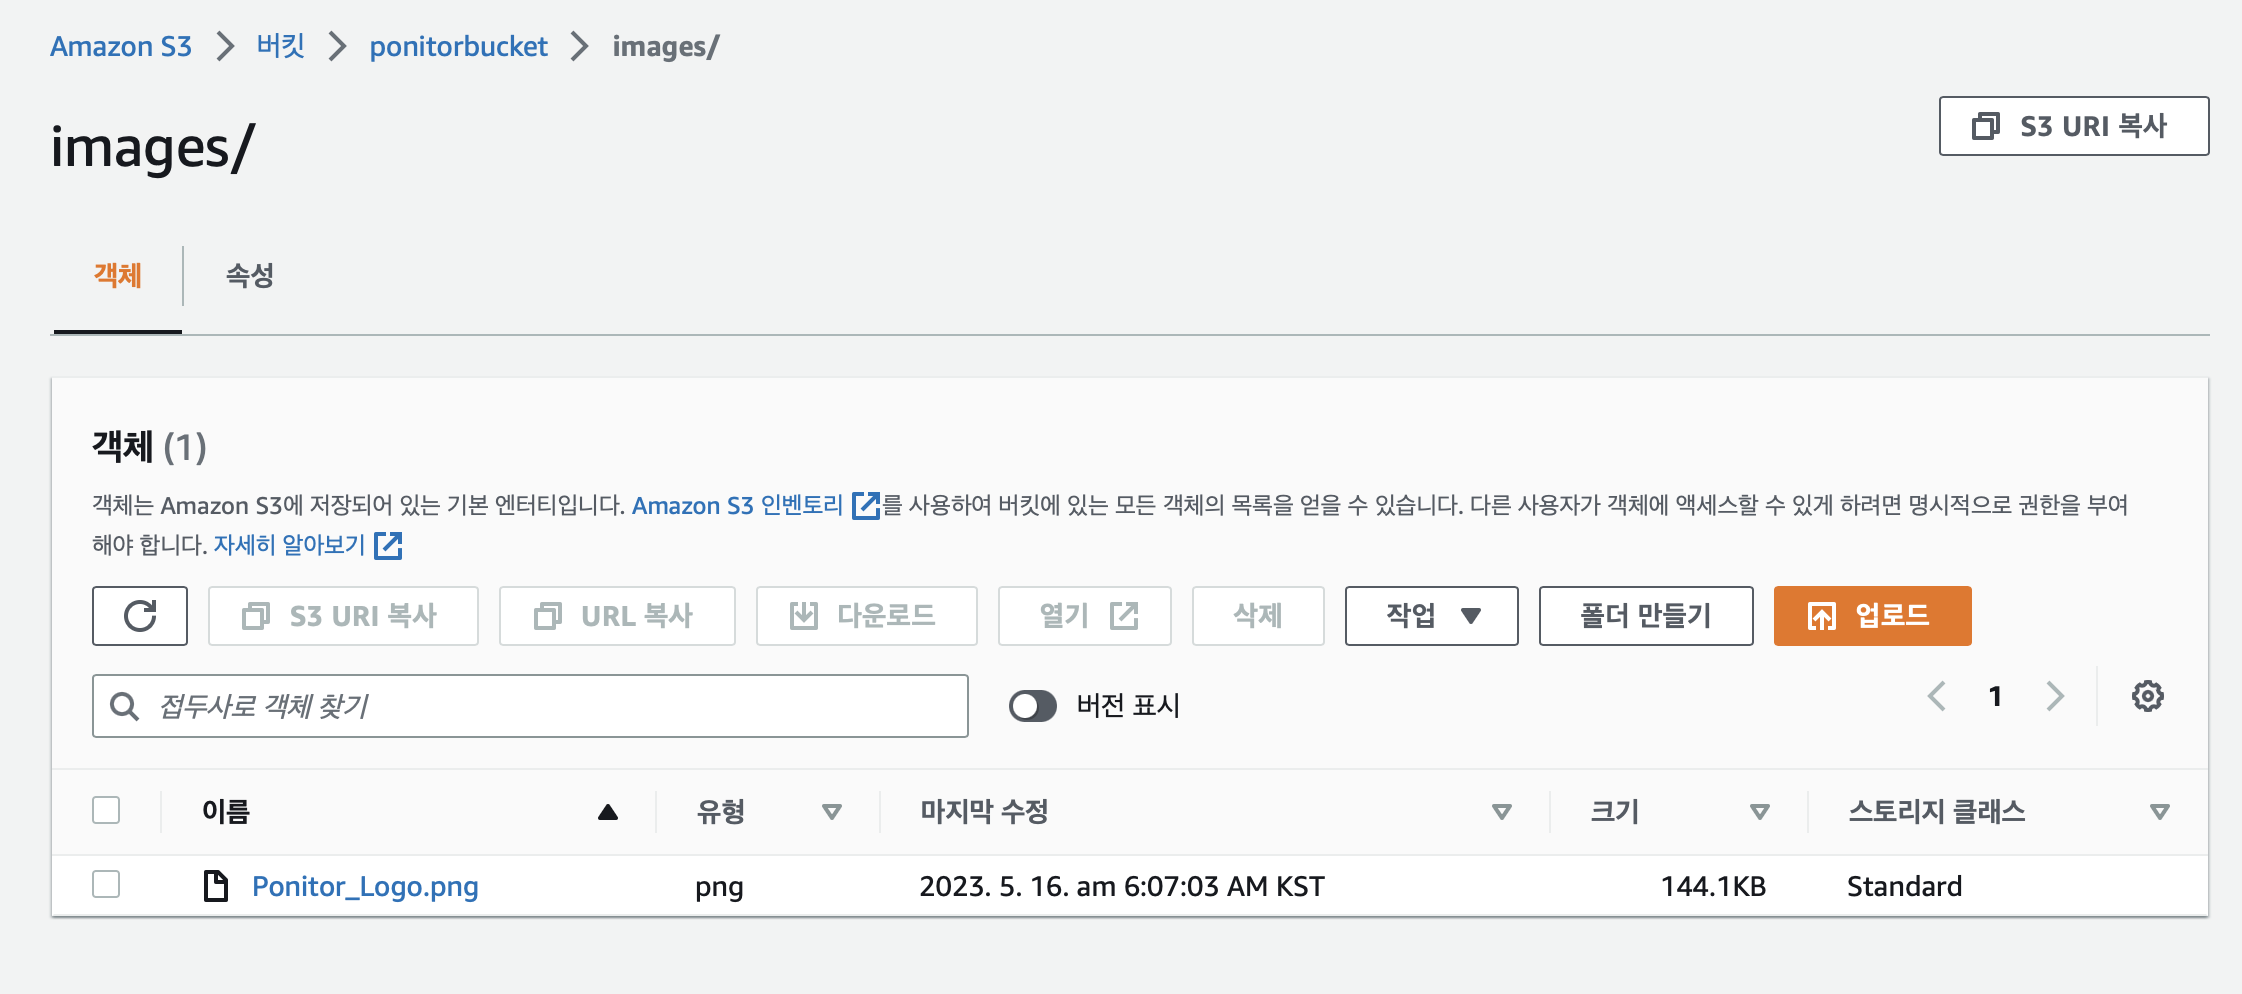
DB에 고객 id와 이미지 주소가 잘 저장되고 있음을 확인할 수 있다!!
AI
⚙️ 개발 환경
- IDE :
- vscode- Dependencies:
- Python 3.11.2
- Pythorch
- YOLOv3
- OpenCV
- numpy
- matplotlib
- FastAPI- Reference
- Source code & Data
Emotion Detection Model - Update
감정 인식 모델은 스타트때 검증을 완료했다.
검증을 완료한 모델을 우리 서비스에 적합한 아웃풋을 낼 수 있도록 약간 수정했다.
모델에 관련한 내용은 스타트때 작성한 포스팅에 있다!
💜[PONITOR] 대면편취형 보이스피싱 예방을 위한 모니터링 서비스
업데이트된 항목을 정리하면 다음과 같다.
✅ 인풋 : 이미지 사용
실시간 모니터링 서비스인만큼 연산시간이 중요했다.
모델 자체를 줄이기에는 지식 + 시간이 부족했기 때문에 인풋을 기존 동영상(초당 24프레임)에서 우선적으로 1초당 1프레임 이미지로 변경하기로 했다.(테스트 기간동안 프레임 수를 늘릴 수 있다.)
✅ 결과 이미지 write 삭제
바운딩 박스, 인식된 감정 카테고리등이 포함된 분석된 이미지를 사용하지 않는다. 따라서 관련 이미지 write 부분을 모두 삭제하였다.
✅ 부정적인 감정 카테고리 설정, 탐지된 부정적인 감정 개수 카운트
여러 사진을 테스팅해 가장 정확도가 높았던 보이스피싱 피해자 판별 기준에 따라 감정 카테고리와 해당 감정 개수를 카운트하는 부분을 추가했다
아래가 업데이트한 핵심 파일이다.
yolo_inference.py
import argparse
import cv2
import numpy as np
import os

import torch
from torchvision import transforms

from EmotionRecognition.emotic import Emotic
from EmotionRecognition.inference import infer
from EmotionRecognition.yolo_utils import prepare_yolo, rescale_boxes, non_max_suppression

def parse_args():
    parser = argparse.ArgumentParser()
    parser.add_argument('--gpu', type=int, default=0, help='gpu id')
    parser.add_argument('--experiment_path', type=str, default="/Users/kang/Documents/Github/BentoML_serving/EmotionRecognition", help='Path of experiment files (results, models, logs)')
    parser.add_argument('--model_dir', type=str, default='models', help='Folder to access the models')
    parser.add_argument('--result_dir', type=str, default='results', help='Path to save the results')
    parser.add_argument('--img_file', type=str, help='Test img file')
    # Generate args
    args = parser.parse_args()
    return args


def get_bbox(yolo_model, device, image_context, yolo_image_size=416, conf_thresh=0.8, nms_thresh=0.4):
  ''' Use yolo to obtain bounding box of every person in context image.
  :param yolo_model: Yolo model to obtain bounding box of every person in context image.
  :param device: Torch device. Used to send tensors to GPU (if available) for faster processing.
  :yolo_image_size: Input image size for yolo model.
  :conf_thresh: Confidence threshold for yolo model. Predictions with object confidence > conf_thresh are returned.
  :nms_thresh: Non-maximal suppression threshold for yolo model. Predictions with IoU > nms_thresh are returned.
  :return: Numpy array of bounding boxes. Array shape = (no_of_persons, 4).
  '''
  test_transform = transforms.Compose([transforms.ToPILImage(),transforms.ToTensor()])
  image_yolo = test_transform(cv2.resize(image_context, (416, 416))).unsqueeze(0).to(device)

  with torch.no_grad():
    detections = yolo_model(image_yolo)
    nms_det  = non_max_suppression(detections, conf_thresh, nms_thresh)[0]
    det = rescale_boxes(nms_det, yolo_image_size, (image_context.shape[:2]))

  bboxes = []
  for x1, y1, x2, y2, _, _, cls_pred in det:
    if cls_pred == 0:  # checking if predicted_class = persons.
      x1 = int(min(image_context.shape[1], max(0, x1)))
      x2 = int(min(image_context.shape[1], max(x1, x2)))
      y1 = int(min(image_context.shape[0], max(15, y1)))
      y2 = int(min(image_context.shape[0], max(y1, y2)))
      bboxes.append([x1, y1, x2, y2])
  return np.array(bboxes)


## image files
def yolo_img(img_file, result_path, model_path, gpu_id):

  #device = torch.device("cuda:%s" %(str(args.gpu)) if torch.cuda.is_available() else "cpu")
  device = torch.device("cuda:%s" %(gpu_id) if torch.cuda.is_available() else "cpu")

  #YOLO 불러오기
  yolo = prepare_yolo(model_path)
  yolo = yolo.to(device)
  yolo.eval()

  #모델 불러오기
  thresholds = torch.FloatTensor(np.load(os.path.join(result_path, 'val_thresholds.npy'))).to(device)
  model_context = torch.load(os.path.join(model_path,'model_context1.pth')).to(device)
  model_body = torch.load(os.path.join(model_path,'model_body1.pth')).to(device)
  emotic_model = torch.load(os.path.join(model_path,'model_emotic1.pth')).to(device)
  model_context.eval()
  model_body.eval()
  emotic_model.eval()
  models = [model_context, model_body, emotic_model]

  print ('Starting testing on img')

  image_context = cv2.cvtColor(cv2.imread(img_file), cv2.COLOR_BGR2RGB)

  try:
    warn_num = 0
    bbox_yolo = get_bbox(yolo, device, image_context)

    for pred_idx, pred_bbox in enumerate(bbox_yolo):
      pred_cat, pred_cont = infer(context_norm, body_norm, ind2cat, ind2vad, device, thresholds, models, image_context=image_context, bbox=pred_bbox, to_print=False)

      # Emotic category
      for i, emotion in enumerate(pred_cat):
        if emotion in warning_cat:
          print(emotion)
          warn_num = warn_num+1
      print(len(pred_cat))

      ## warn Catagory에 해당하는 감정이 4개 이상이면 WARNING 문구 띄우기 - 추후 삭제
      if(warn_num>3):
        print("------!WARNING!-------")

  except Exception:
      pass

  cv2.imwrite(os.path.join(result_path, 'img_%r.jpg' %(idx)), cv2.cvtColor(image_context, cv2.COLOR_RGB2BGR))
  print ('Completed img')


def check_paths(args):
  ''' Check (create if they don't exist) experiment directories.
  :param args: Runtime arguments as passed by the user.
  :return: result_dir_path, model_dir_path.
  '''
  if args.img_file is not None:
    if not os.path.exists(args.img_file):
      raise ValueError('video file does not exist. Please pass a valid video file')
  model_path = os.path.join(args.experiment_path, args.model_dir)
  if not os.path.exists(model_path):
    raise ValueError('model path %s does not exist. Please pass a valid model_path' %(model_path))
  result_path = os.path.join(args.experiment_path, args.result_dir)
  if not os.path.exists(result_path):
    os.makedirs(result_path)
  return result_path, model_path

if __name__=='__main__':
  args = parse_args()

  result_path, model_path = check_paths(args)

  cat = ['Affection', 'Anger', 'Annoyance', 'Anticipation', 'Aversion', 'Confidence', 'Disapproval', 'Disconnection',
          'Disquietment', 'Doubt/Confusion', 'Embarrassment', 'Engagement', 'Esteem', 'Excitement', 'Fatigue', 'Fear','Happiness',
          'Pain', 'Peace', 'Pleasure', 'Sadness', 'Sensitivity', 'Suffering', 'Surprise', 'Sympathy', 'Yearning']

  #보이스피싱 WARNING
  warning_cat = [ 'Anger', 'Annoyance',  'Disapproval', 'Disquietment', 'Doubt/Confusion', 'Sadness', 'Suffering']

  cat2ind = {}
  ind2cat = {}

  for idx, emotion in enumerate(cat):
      cat2ind[emotion] = idx
      ind2cat[idx] = emotion

  vad = ['Valence', 'Arousal', 'Dominance']
  ind2vad = {}
  for idx, continuous in enumerate(vad):
      ind2vad[idx] = continuous

  context_mean = [0.4690646, 0.4407227, 0.40508908]
  context_std = [0.2514227, 0.24312855, 0.24266963]
  body_mean = [0.43832874, 0.3964344, 0.3706214]
  body_std = [0.24784276, 0.23621225, 0.2323653]
  context_norm = [context_mean, context_std]
  body_norm = [body_mean, body_std]

  if args.img_file is not None:
    print ('inference over test video')
    yolo_img(args.img_file, result_path, model_path, gpu_id)
AI 모델 서빙하기
AI model을 배포하기 위해서는 가상머신 환경을 구축하고 api 서버를 개발해야 한다.
여기서 가상머신인 클라우드는 학교에서 제공해주는 GPU 서버인 Tencent를 이용하기로 했다.
api개발에 있어서 BentoML을 이용할 지 FastAPI를 이용할 지 고민을 많이 했다.
각각의 장단점을 비교해 보고 직접 두가지 프레임워크를 모두 써보았다.
결정적으로 FastAPI를 선택한 이유는 다음과 같다.
나에게 있어서
1. FastAPI가 단계별로 테스트 해보기 쉽다고 느껴졌고.
2. bentoml의 도커를 사용해본 적이 없어 헤멜 수 있을 것 같다는 생각이 들었다.
마감까지 많은 시간이 남지 않았기 때문에 빠르게 해결하고 싶어 보다 이해가 잘 됐던 fastapi를 사용하였다.
FastAPI
emotionmodel.py
import numpy as np
import os
import uvicorn


from fastapi import FastAPI, HTTPException, UploadFile, File, Response, Depends, Request
from fastapi.responses import HTMLResponse, JSONResponse
import shutil
from torchvision.transforms import functional as F


from EmotionRecognition.yolo_inference import yolo_img

emotion_app = FastAPI()


model = "D:/fastApi_serving/EmotionRecognition/models/"
result_path = "D:/fastApi_serving/EmotionRecognition/results/"

@emotion_app.post("/infer")
async def infer(file: UploadFile = File(...)):

    UPLOAD_DIR = 'D:/fastApi_serving/EmotionRecognition/resultImage'

    if file != None:
        os.makedirs(UPLOAD_DIR, exist_ok=True)  # 디렉토리 생성
        local_path = os.path.normpath(os.path.join(UPLOAD_DIR, file.filename))
        print("local_path")
        print(local_path)
        with open(local_path, 'wb') as buffer:
            shutil.copyfileobj(file.file, buffer)

    results = yolo_img(local_path,result_path,model,0) #모델에 이미지 넣기

    return results


if __name__ == '__main__':
    app_str = 'emotionmodel:emotion_app'
    uvicorn.run(app_str, host='localhost', port=8000, reload=True, workers=1)
- model : emotion recognition 모델이 저장되어 있는 경로
- result_path : 결과를 도출해내는데 필요한 threshold들의 값이 저장되어 있는 경로
- local_path : 전달받은 이미지가 저장되는 경로
터미널에 다음과 같은 명령어를 입력해 서버를 실행시킨다.
uvicorn emotionmodel:emotion_app —reload- vscode

다음은 emotionmode.py 서버에서 호출하는 모델 함수 yolo_img가 있는yolo_inference.py 이다.
yolo_inference.py
import argparse
import cv2
import numpy as np
import os

import torch
from torchvision import transforms

from EmotionRecognition.emotic import Emotic
from EmotionRecognition.inference import infer
from EmotionRecognition.yolo_utils import prepare_yolo, rescale_boxes, non_max_suppression

def parse_args():
    parser = argparse.ArgumentParser()
    parser.add_argument('--gpu', type=int, default=0, help='gpu id')
    parser.add_argument('--experiment_path', type=str, default="/Users/kang/Documents/Github/BentoML_serving/EmotionRecognition/", help='Path of experiment files (results, models, logs)')
    parser.add_argument('--model_dir', type=str, default='models', help='Folder to access the models')
    parser.add_argument('--result_dir', type=str, default='results', help='Path to save the results')
    parser.add_argument('--img_file', type=str, help='Test img file')
    # Generate args
    args = parser.parse_args()
    return args


def get_bbox(yolo_model, device, image_context, yolo_image_size=416, conf_thresh=0.8, nms_thresh=0.4):
  ''' Use yolo to obtain bounding box of every person in context image.
  :param yolo_model: Yolo model to obtain bounding box of every person in context image.
  :param device: Torch device. Used to send tensors to GPU (if available) for faster processing.
  :yolo_image_size: Input image size for yolo model.
  :conf_thresh: Confidence threshold for yolo model. Predictions with object confidence > conf_thresh are returned.
  :nms_thresh: Non-maximal suppression threshold for yolo model. Predictions with IoU > nms_thresh are returned.
  :return: Numpy array of bounding boxes. Array shape = (no_of_persons, 4).
  '''
  test_transform = transforms.Compose([transforms.ToPILImage(),transforms.ToTensor()])
  image_yolo = test_transform(cv2.resize(image_context, (416, 416))).unsqueeze(0).to(device)

  with torch.no_grad():
    detections = yolo_model(image_yolo)
    nms_det  = non_max_suppression(detections, conf_thresh, nms_thresh)[0]
    det = rescale_boxes(nms_det, yolo_image_size, (image_context.shape[:2]))

  bboxes = []
  for x1, y1, x2, y2, _, _, cls_pred in det:
    if cls_pred == 0:  # checking if predicted_class = persons.
      x1 = int(min(image_context.shape[1], max(0, x1)))
      x2 = int(min(image_context.shape[1], max(x1, x2)))
      y1 = int(min(image_context.shape[0], max(15, y1)))
      y2 = int(min(image_context.shape[0], max(y1, y2)))
      bboxes.append([x1, y1, x2, y2])
  return np.array(bboxes)


## image files
def yolo_img(img_file, result_path, model_path, gpu_id):
  ''' Perform inference on a video. First yolo model is used to obtain bounding boxes of persons in every frame.
  After that the emotic model is used to obtain categoraical and continuous emotion predictions.
  :param img_file: Path of image file.
  :param result_path: Directory path to save the results (output video).
  :param model_path: Directory path to load models and val_thresholds to perform inference.
  :param context_norm: List containing mean and std values for context images.
  :param body_norm: List containing mean and std values for body images.
  :param ind2cat: Dictionary converting integer index to categorical emotion.
  :param ind2vad: Dictionary converting integer index to continuous emotion dimension (Valence, Arousal and Dominance).
  :param args: Runtime arguments.
  '''
  cat = ['Affection', 'Anger', 'Annoyance', 'Anticipation', 'Aversion', 'Confidence', 'Disapproval', 'Disconnection',
          'Disquietment', 'Doubt/Confusion', 'Embarrassment', 'Engagement', 'Esteem', 'Excitement', 'Fatigue', 'Fear','Happiness',
          'Pain', 'Peace', 'Pleasure', 'Sadness', 'Sensitivity', 'Suffering', 'Surprise', 'Sympathy', 'Yearning']

  #보이스피싱 WARNING
  warning_cat = [ 'Anger', 'Annoyance',  'Disapproval', 'Disquietment', 'Doubt/Confusion', 'Sadness', 'Suffering']

  cat2ind = {}
  ind2cat = {}

  for idx, emotion in enumerate(cat):
      cat2ind[emotion] = idx
      ind2cat[idx] = emotion

  vad = ['Valence', 'Arousal', 'Dominance']
  ind2vad = {}
  for idx, continuous in enumerate(vad):
      ind2vad[idx] = continuous

  context_mean = [0.4690646, 0.4407227, 0.40508908]
  context_std = [0.2514227, 0.24312855, 0.24266963]
  body_mean = [0.43832874, 0.3964344, 0.3706214]
  body_std = [0.24784276, 0.23621225, 0.2323653]
  context_norm = [context_mean, context_std]
  body_norm = [body_mean, body_std]


  #device = torch.device("cuda:%s" %(str(args.gpu)) if torch.cuda.is_available() else "cpu")
  device = torch.device("cuda:%s" %(str(gpu_id)) if torch.cuda.is_available() else "cpu")

  #YOLO 불러오기
  yolo = prepare_yolo(model_path)
  yolo = yolo.to(device)
  yolo.eval()

  #모델 불러오기
  thresholds = torch.FloatTensor(np.load(os.path.join(result_path, 'val_thresholds.npy'))).to(device)
  model_context = torch.load(os.path.join(model_path,'model_context1.pth')).to(device)
  model_body = torch.load(os.path.join(model_path,'model_body1.pth')).to(device)
  emotic_model = torch.load(os.path.join(model_path,'model_emotic1.pth')).to(device)


  model_context.eval()
  model_body.eval()
  emotic_model.eval()
  models = [model_context, model_body, emotic_model]

  print ('Starting testing on img')

  image_context = cv2.cvtColor(cv2.imread(img_file), cv2.COLOR_BGR2RGB)
  warn_num = 0
  try:
    bbox_yolo = get_bbox(yolo, device, image_context)

    for pred_idx, pred_bbox in enumerate(bbox_yolo):
      pred_cat, pred_cont = infer(context_norm, body_norm, ind2cat, ind2vad, device, thresholds, models, image_context=image_context, bbox=pred_bbox, to_print=False)
      # Emotic category
      for i, emotion in enumerate(pred_cat):
        if emotion in warning_cat:
          warn_num = warn_num+1
          print(emotion)
      print(len(pred_cat))

      ## warn Catagory에 해당하는 감정이 4개 이상이면 WARNING 문구 띄우기 - 추후 삭제
      if(warn_num>3):
        print("------!WARNING!-------")

  except Exception:
      pass

  return pred_cat, warn_num


def check_paths(args):
  ''' Check (create if they don't exist) experiment directories.
  :param args: Runtime arguments as passed by the user.
  :return: result_dir_path, model_dir_path.
  '''
  if args.img_file is not None:
    if not os.path.exists(args.img_file):
      raise ValueError('video file does not exist. Please pass a valid video file')
  model_path = os.path.join(args.experiment_path, args.model_dir)
  if not os.path.exists(model_path):
    raise ValueError('model path %s does not exist. Please pass a valid model_path' %(model_path))
  result_path = os.path.join(args.experiment_path, args.result_dir)
  if not os.path.exists(result_path):
    os.makedirs(result_path)
  return result_path, model_path
인풋 이미지에 대해 추출된 감정 카테고리와 부정적인 감정 개수를 리턴한다.
/opt/homebrew/bin/uvicorn
#!/opt/homebrew/opt/python@3.11/bin/python3.11
# -*- coding: utf-8 -*-
import re
import sys
from uvicorn.main import main
from EmotionRecognition.emotic import Emotic
if __name__ == '__main__':
    sys.argv[0] = re.sub(r'(-script\.pyw|\.exe)?$', '', sys.argv[0])
    sys.exit(main())
위의 img_yolo를 실행하던 중 emotic_model을 불러오는데 오류가 났다.
uvicorn에서 Emotic을 읽어오지 못해서 난 오류였다.
따라서 uvicorn.py에서
from EmotionRecognition.emotic import Emotic를 추가해주었다.
TEST
테스트한 이미지는 팀원이 촬영한 사진이다.

모델의 아웃풋 이미지는 다음과 같다.
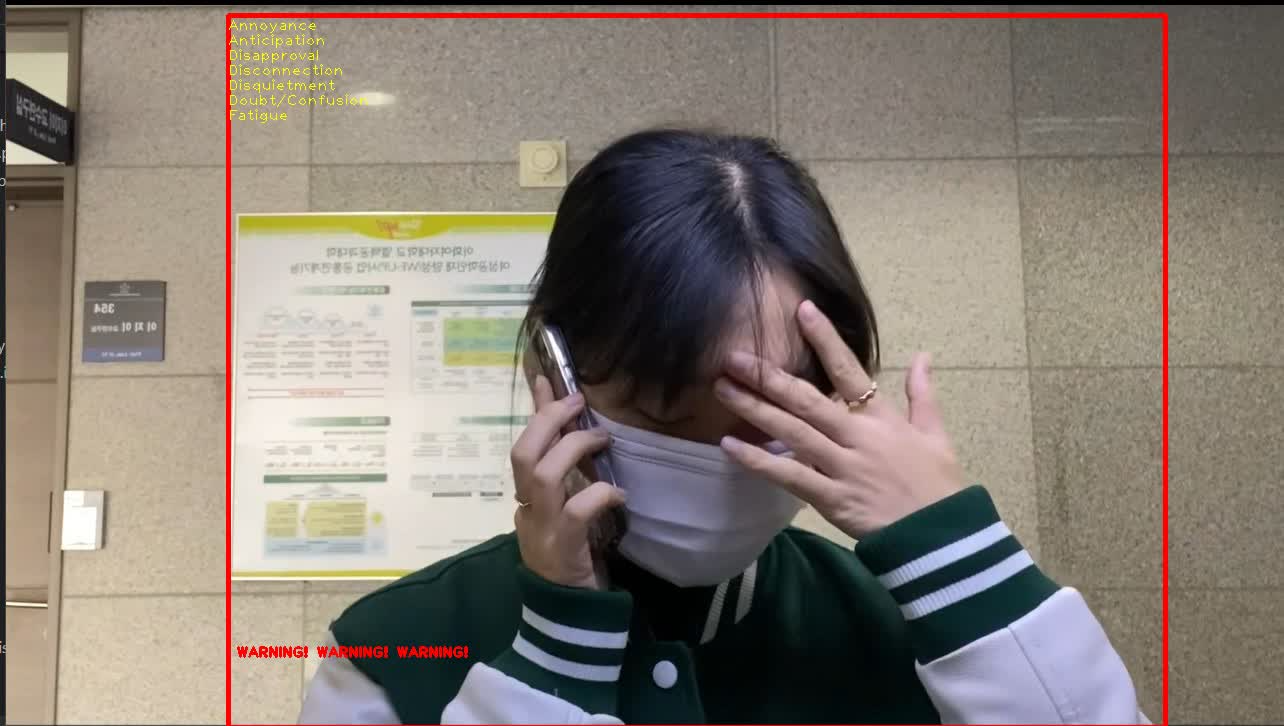
여기서 탐지된 감정 카테고리(좌측 상단 노란색 글씨)와
탐지된 부정적인 감정의 개수를 리턴해야한다.
부정적인 감정 카테고리는 다음과 같다.
[ 'Anger', 'Annoyance', 'Disapproval', 'Disquietment', 'Doubt/Confusion', 'Sadness', 'Suffering']
http://localhost:8000/docs 에서 이미지를 넣고 테스트해보자
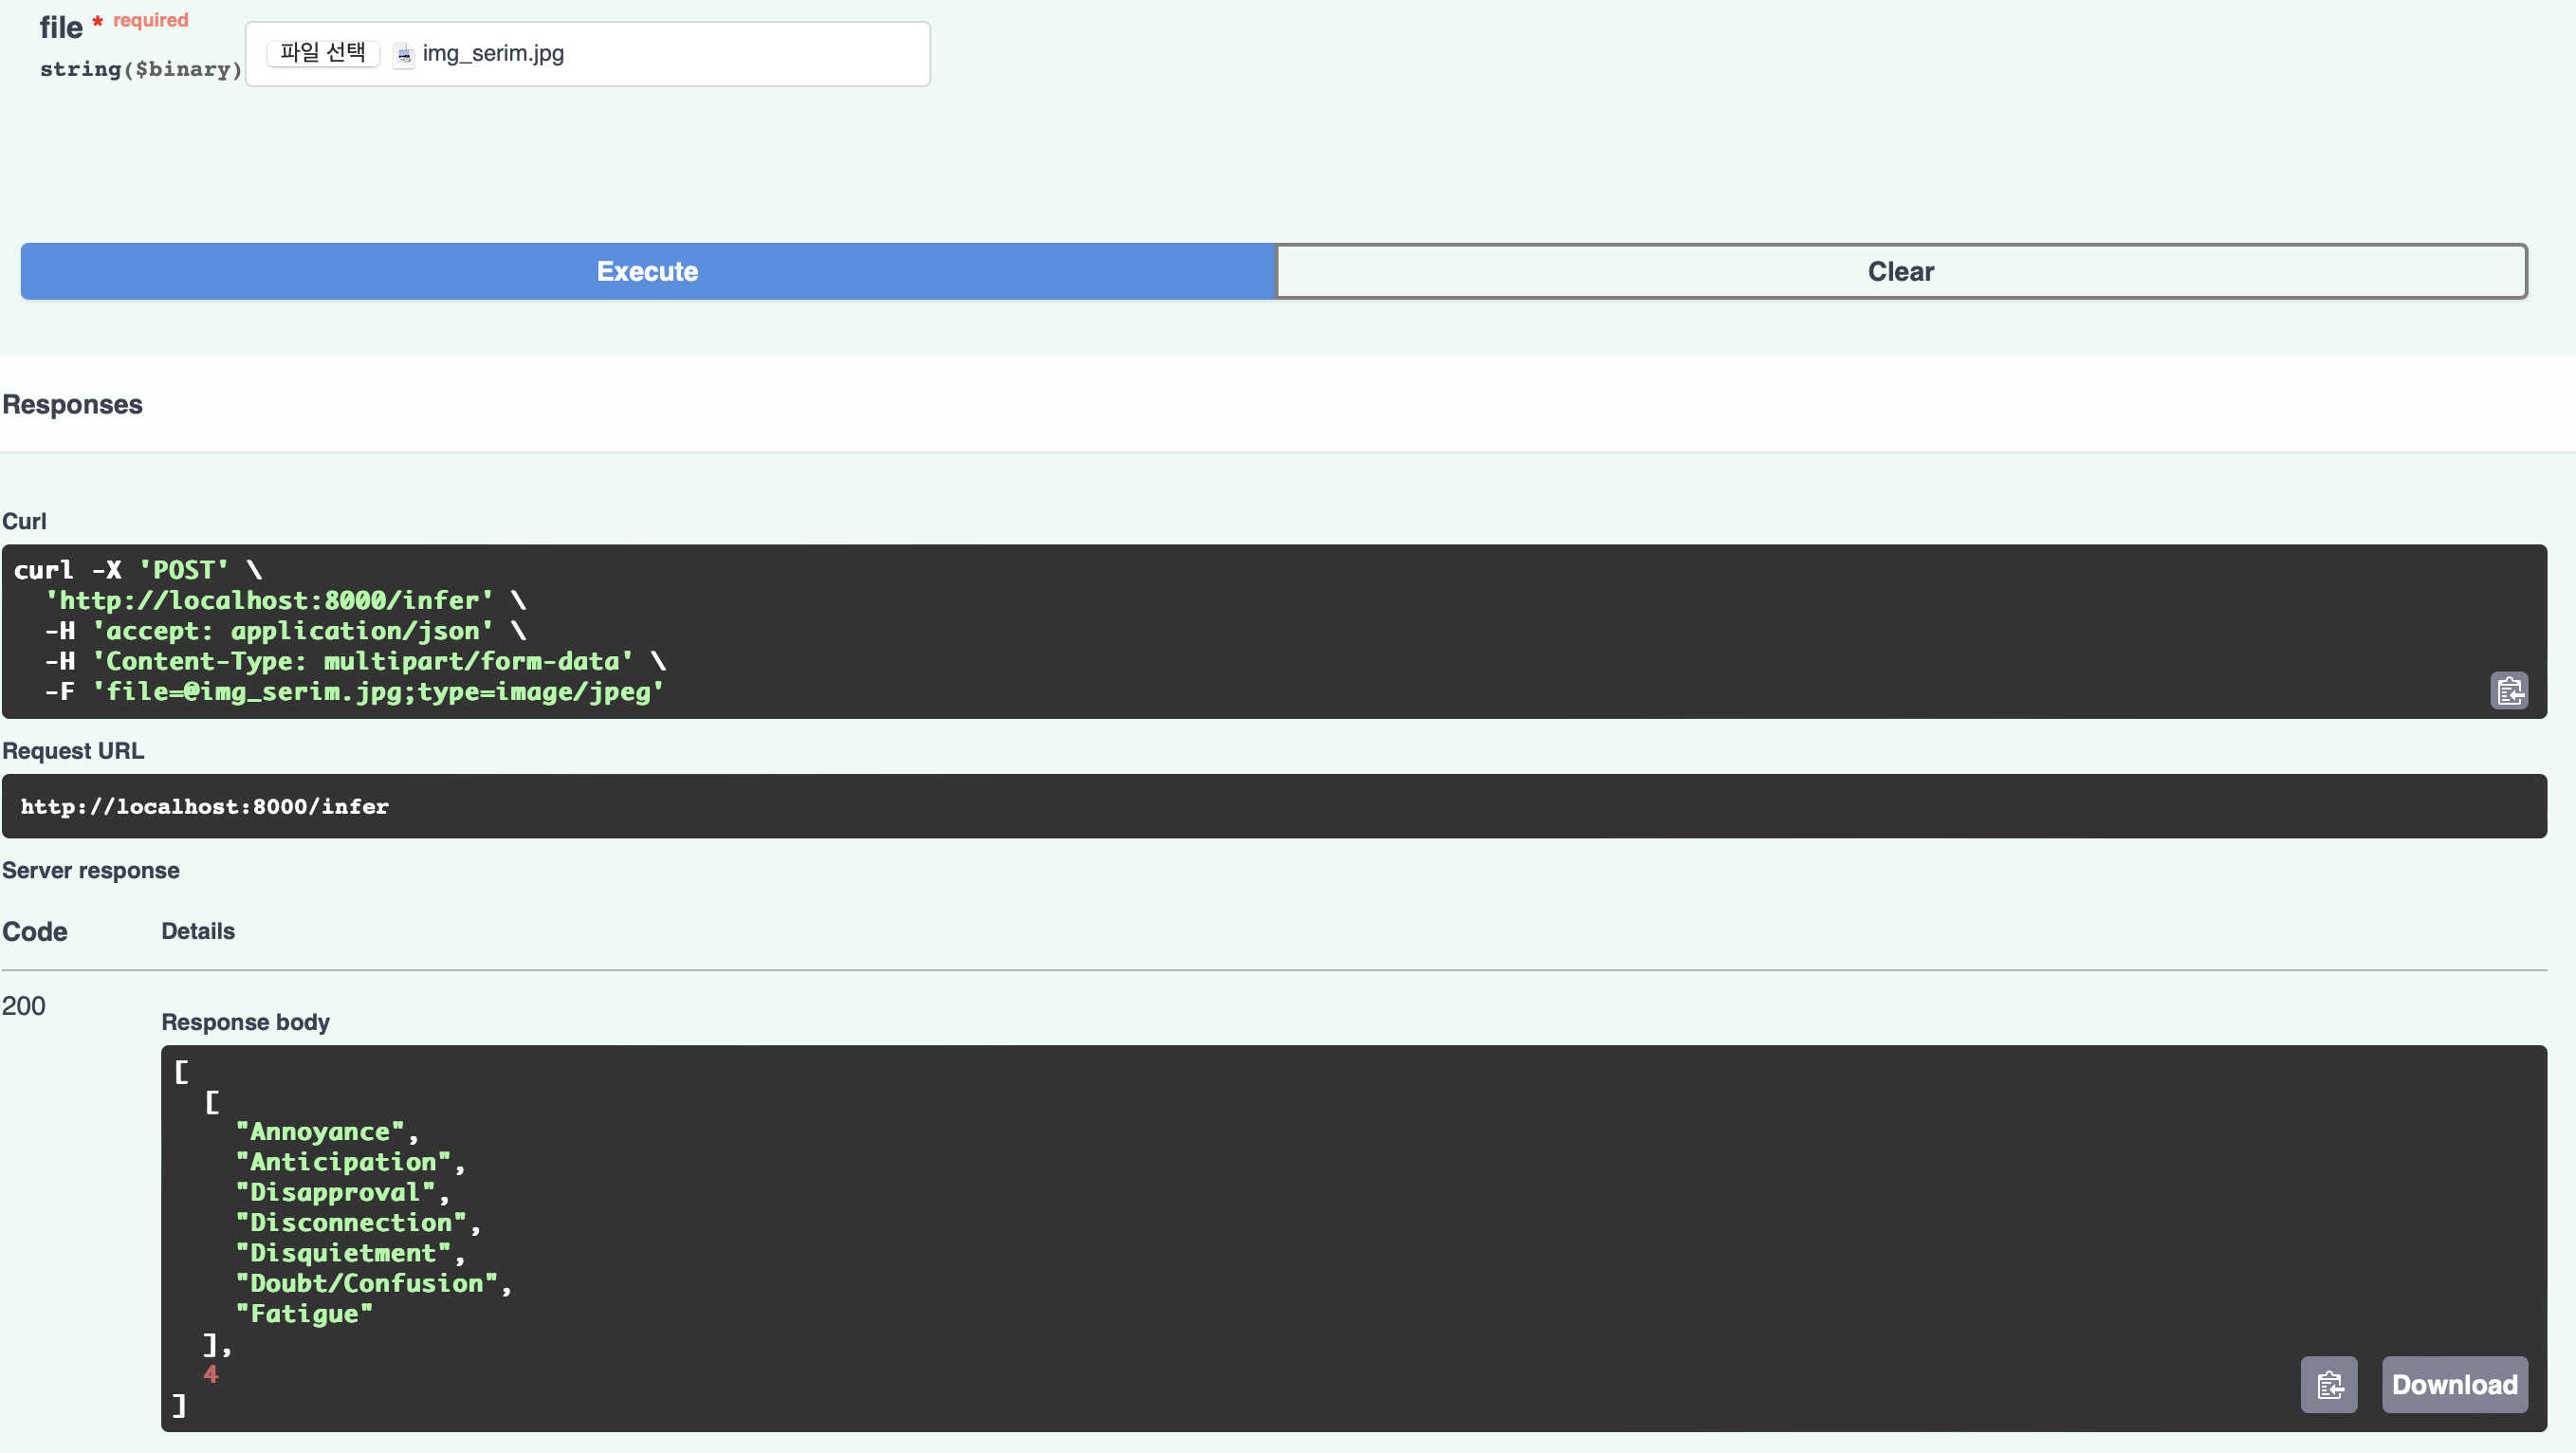
Response body를 보면 api가 잘 작동하고 있음을 확인할 수 있다.