RecyclerView vs ListView
RecyclerView는 ListView의 확장판으로 ListView 보다 향상된 성능을 제공하며, Adpater의 ViewHolder를 이용해 RecyclerView 내의 View를 재활용하여 사용한다.
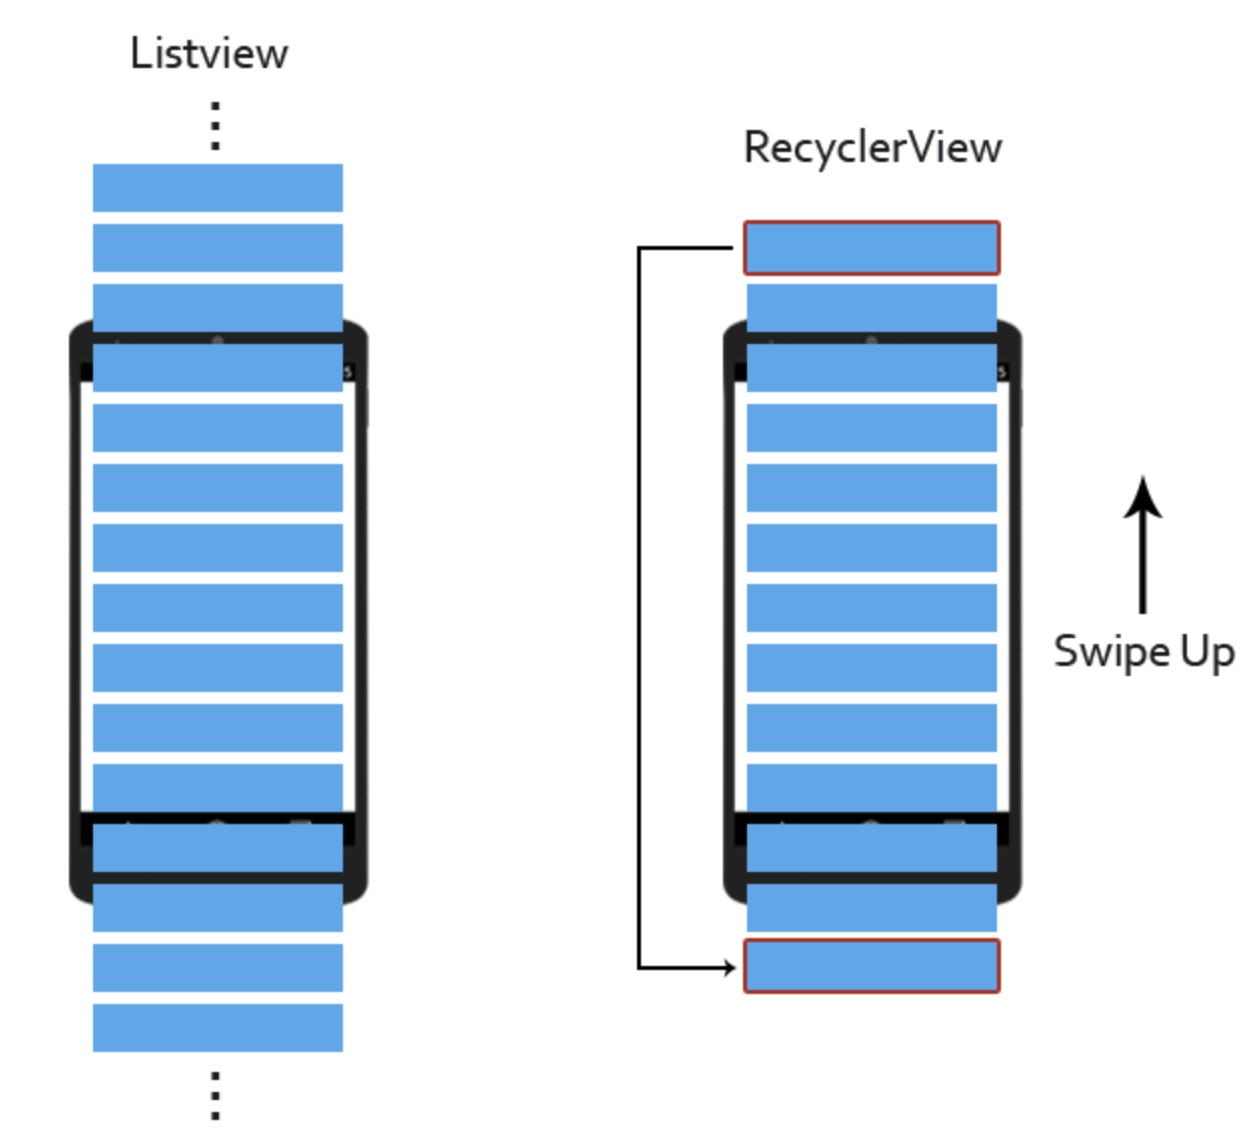
ListView 는 사용자가 스크롤 할 때마다 위에 있던 뷰는 삭제되고, 맨 아래의 뷰는 생성되길 반복하여 cost가 매우 높아지게 되는 반면, RecyclerView에서는 아이템이 100000개를 넘어가더라도 화면에 보이는 정도의 View만 생성하고, 스크롤 할 때마다 삭제하지 않고 가장 아래의 아이템쪽으로 객체를 이동시켜 재사용하게 된다.
RecyclerView는 상하 뿐만 아니라 좌우로도 스크롤이 가능하고(ListView에서는 불가능) 스크롤을 부드럽게 해주고, 동작 시간을 줄여준다. 또한 화면상에 보이는 뷰 객체들만을 생성한뒤 재활용하기 때문에 메모리를 절약할 수 있는 장점이 있다.
Recycler View 구조
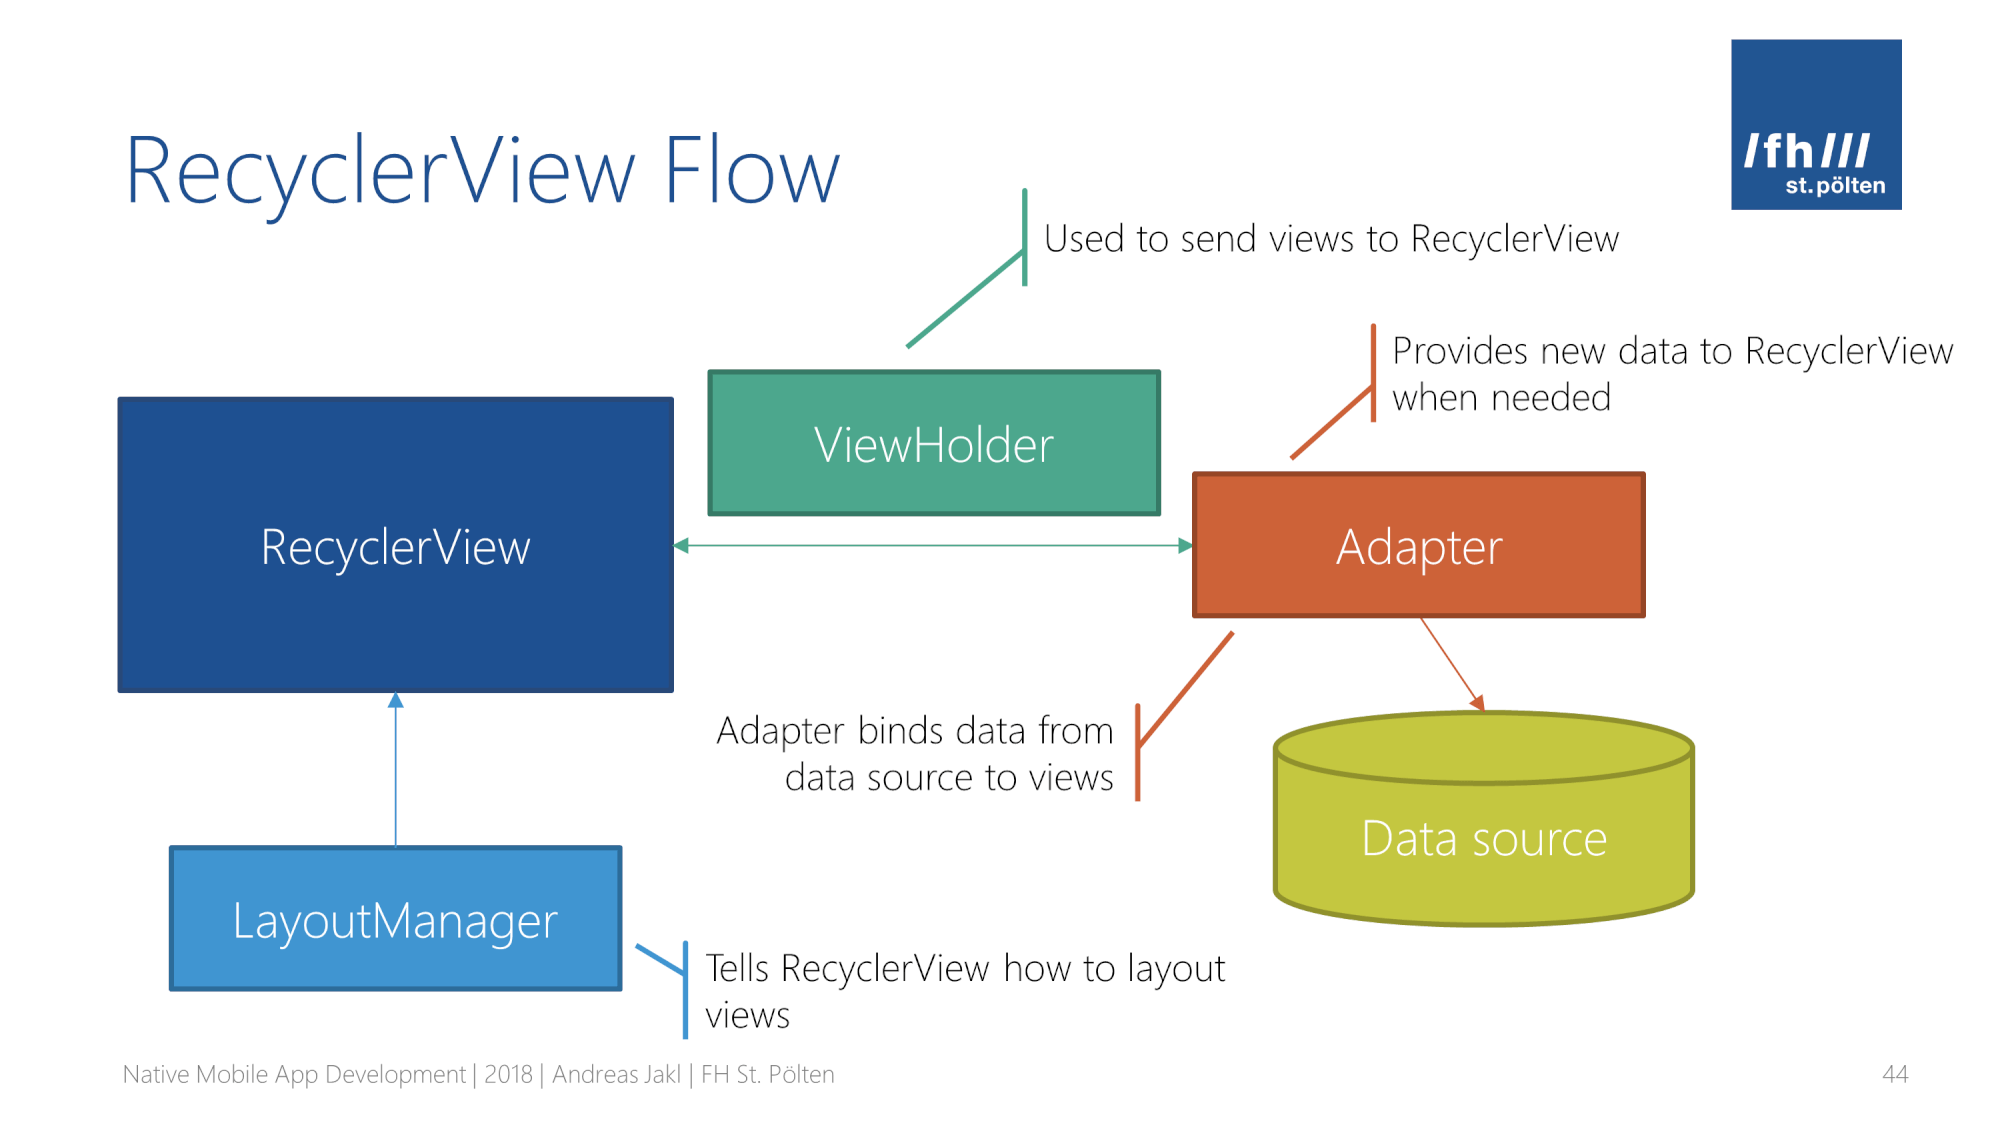
1. ViewHolder
ViewHolder는 화면에 표시될 아이템 뷰를 저장하는 객체이다.
RecyclerView는 몇 개의 뷰의 객체만 생성해서 재사용하는데 그러기 위해서는 반복되는 뷰 객체를 기억하고 있을 객체가 필요하게 된다. 이러한 역학을 하는 것이 ViewHolder이다.
2. Adapter
RecyclerView는 다른 리스트를 표시하는 요소들과 마찬가지로 Adapter를 필요로 한다.
Adapter는 리스트를 화면에 표시하기 위해서 아이템 단위로 View로 생성을 해서 RecyclerView에 바인딩 시키는 작업을 하는 객체입니다. 개발자가 직접 작성하여 RecyclerView에 연결시킨다.
개발자는 RecyclerView.Adapter을 상속받아서 새로운 어댑터를 생성해야 하고, 다음 3개의 메서드를 오버라이드를 해야한다.
- getItemCount: 전체 아이템 개수를 리턴
- onCreateViewHolder: 인자로 받는 viewType 형태의 아이템 뷰를 위한 ViewHolder 객체를 생성하는 함수이다. ViewHolder는 한번에 보여지는 리스트 목록 개수에 약간의 버퍼를 추가한 개수만큼 생성된다.
- onBindViewHolder: 생성된 ViewHolder에 데이터를 바인딩하는 함수이다. 인자로 ViewHolder와 position을 받아서 holder의 데이터를 변경시킨다. 이 함수는 스크롤을 해서 데이터 바인딩이 필요한 만큼 호출된다.
Adapter 함수의 작동 순서는 getItemCount → onCreateViewHolder → onBindViewHolder 이다.
3. LayoutManager
RecyclerView는 아이템 뷰를 수직, 수평, 격자(Grid) 형태의 레이아웃으로 배치할 수 있다. LayoutManager은 이러한 RecyclerView의 레이아웃을 관리하는 역할을 한다.
- LinearLayoutManager : 수평 또는 수직 방향, 일렬(Linear)로 아이템 뷰 배치.
- GridLayoutManager : 바둑판 모양의 격자(Grid) 형태로 아이템 뷰 배치.
- StaggeredGridLayoutManager : 엇갈림 격자(Staggered Grid) 형태로 아이템 뷰 배치.
또한 더이상 화면에 표시되지 않는 아이템 뷰를 재활용하는 시점에 대한 정책도 결정한다.
구현
1. gradle파일에서 dependencies에 recyclerview 추가
dependencies {
  ....
  implementation "androidx.recyclerview:recyclerview:1.0.0"
}
2. 데이터를 관리하는 클래스 추가
뷰에 들어갈 항목들을 자료형에 맞게 지정해준다.
data class Data(val image:Drawable, val id: String, val name: String)3. RecyclerView Layout 구현
<?xml version="1.0" encoding="utf-8"?>
<LinearLayout xmlns:android="http://schemas.android.com/apk/res/android"
    xmlns:app="http://schemas.android.com/apk/res-auto"
    xmlns:tools="http://schemas.android.com/tools"
    android:layout_width="match_parent"
    android:layout_height="match_parent"
    tools:context=".MainActivity">
    <androidx.recyclerview.widget.RecyclerView
        android:id="@+id/recyclerView"
        android:layout_width="match_parent"
        android:layout_height="match_parent"
        tools:listitem="@layout/recycler_item"/>
</LinearLayout>
4. Item Layout 구현
<?xml version="1.0" encoding="utf-8"?>
<LinearLayout xmlns:android="http://schemas.android.com/apk/res/android"
    android:layout_width="match_parent"
    android:layout_height="match_parent"
    android:layout_marginTop="10dp">
    <ImageView
        android:layout_width="50dp"
        android:layout_height="50dp"
        android:layout_marginLeft="20dp"
        android:layout_marginRight="20dp"
        android:background="@color/black"/>
    <LinearLayout
        android:layout_width="wrap_content"
        android:layout_height="wrap_content"
        android:orientation="vertical">
        <TextView
            android:layout_width="wrap_content"
            android:layout_height="wrap_content"
            android:text="id"/>
        <TextView
            android:layout_width="wrap_content"
            android:layout_height="wrap_content"
            android:text="name"/>
    </LinearLayout>
    <View
        android:layout_width="0dp"
        android:layout_height="0dp"
        android:layout_weight="1"/>
    <Button
        android:layout_width="wrap_content"
        android:layout_height="wrap_content"
        android:layout_marginRight="20dp"
        android:text="팔로잉"
        android:layout_gravity=""/>
</LinearLayout>
5. Adapter 클래스 구현
Adapter 클래스 내부에서는 ViewHolder클래스와 onCreateViewHolder, onBindViewHolder, getItemCount 함수를 구현해주어야한다.
- getItemCount : 보여줄 아이템 개수
- onCreateViewHolder : 보여줄 아이탬 개수만큼 뷰 생성
- onBindViewHolder: 생성된 View에 보여줄 데이터를 설정
- ViewHolder: ViewHolder 단위 객체로 View의 데이터를 설정
class Adapter(private val items: ArrayList<Data>): RecyclerView.Adapter<Adapter.ViewHolder>() {
    override fun onBindViewHolder(holder: ViewHolder, position: Int) {
        val item = items[position]
        holder.id.text= item.id
        holder.name.text= item.name
        holder.profile_image.setImageDrawable(item.image)
    }

    override fun getItemCount(): Int {
        return items.size
    }

    override fun onCreateViewHolder(parent: ViewGroup, viewType: Int): ViewHolder {
        val inflatedView = LayoutInflater.from(parent.context).inflate(R.layout.recycler_item, parent, false)
        return ViewHolder(inflatedView)
    }

    inner class ViewHolder(v: View): RecyclerView.ViewHolder(v){
        private var view: View = v
        val name = view.findViewById<TextView>(R.id.name)
        val id = view.findViewById<TextView>(R.id.id)
        val profile_image = view.findViewById<ImageView>(R.id.profile_image)
    }
}
6. adapter와 RecyclerView연결
class MainActivity : AppCompatActivity() {
    override fun onCreate(savedInstanceState: Bundle?) {
        super.onCreate(savedInstanceState)
        setContentView(R.layout.activity_main)

        val recycerView = findViewById<RecyclerView>(R.id.recyclerView)
        val item = ArrayList<Data>()

        item.add(Data(getDrawable(R.drawable.image)!!, "ID", "Name"))
        item.add(Data(getDrawable(R.drawable.image)!!, "ID", "Name"))
        item.add(Data(getDrawable(R.drawable.image)!!, "ID", "Name"))
        item.add(Data(getDrawable(R.drawable.image)!!, "ID", "Name"))
        item.add(Data(getDrawable(R.drawable.image)!!, "ID", "Name"))
        item.add(Data(getDrawable(R.drawable.image)!!, "ID", "Name"))
        item.add(Data(getDrawable(R.drawable.image)!!, "ID", "Name"))
        item.add(Data(getDrawable(R.drawable.image)!!, "ID", "Name"))
        item.add(Data(getDrawable(R.drawable.image)!!, "ID", "Name"))
        item.add(Data(getDrawable(R.drawable.image)!!, "ID", "Name"))
        item.add(Data(getDrawable(R.drawable.image)!!, "ID", "Name"))
        item.add(Data(getDrawable(R.drawable.image)!!, "ID", "Name"))
        item.add(Data(getDrawable(R.drawable.image)!!, "ID", "Name"))
        item.add(Data(getDrawable(R.drawable.image)!!, "ID", "Name"))
        item.add(Data(getDrawable(R.drawable.image)!!, "ID", "Name"))
        item.add(Data(getDrawable(R.drawable.image)!!, "ID", "Name"))
        item.add(Data(getDrawable(R.drawable.image)!!, "ID", "Name"))
        item.add(Data(getDrawable(R.drawable.image)!!, "ID", "Name"))

        val adapter = Adapter(item)
        recycerView.adapter= adapter
    }
}
전체 코드
https://github.com/kang9366/Android_Study/tree/main/AndroidEssential_RecyclerView
RecyclerView 옵션
스크롤 끝 효과 없애기
android:overScrollMode="never" 추가가로 RecyclerView
android:orientation="horizontal" 추가