GPIO
import RPi.GPIO as GPIO # GPIO 모듈 호출Rpi.GPIO 클래스(객체) 안의 모든 변수와 매소드를 출력할 수 있다.
python -c 'import RPi.GPIO as GPIO; print(dir(GPIO))'
import한 모듈의 버전 정보 확인
GPIO.RPI_INFO
GPIO에 관련된 참고자료
https://sourceforge.net/p/raspberry-gpio-python/wiki/Examples/
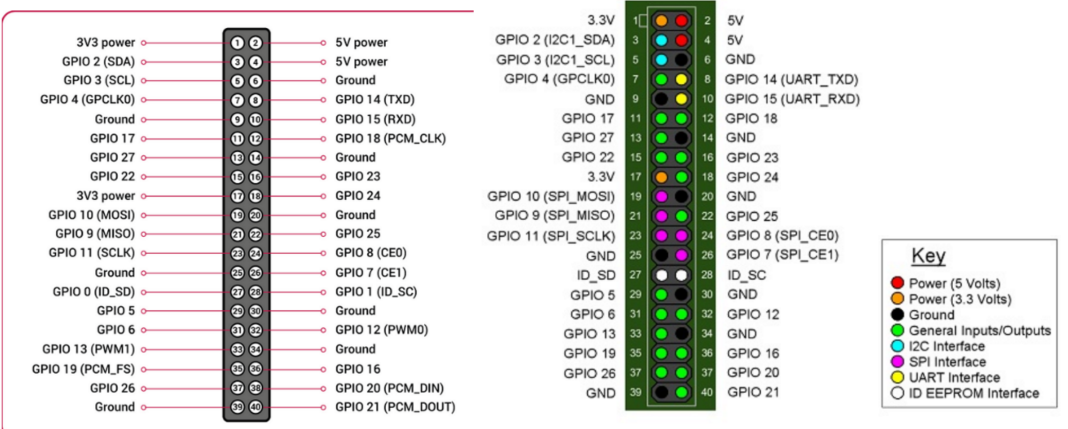
GPIO.setmode(mode)
- 핀번호를 참조하는 방식에 대한 함수(2가지 방법)
- mode 종류
1) GPIO.BCM : 핀 번호를 GPIO모듈 번호로 사용
2) GPIO.BOARD : 핀 번호를 라즈베리파이의 보드 번호를 참조
import RPi.GPIO as GPIO
GPIO.setmode(GPIO.BCM)
GPIO.setmode(GPIO.BOARD)
ex) BOARD 모드의 11번 핀 = BCM모드의 17번 핀
GPIO.setup(핀번호 , 설정 , 세부설정)
- 지정하는 핀의 입출력 모드를 지정하는 함수 (입력 or 출력)
GPIO.setup(pin_number , GPIO.IN)
GPIO.setup(pin_number , GPIO.OUTPUT)
GPIO.setup(pin_number , GPIO.OUTPUT , initail = GPIO.HIGH)
GPIO.setup(핀번호,GPIO.IN,pull_up_down=GPIO.PUD_UP)
GPIO.setup(핀번호,GPIO.IN,pull_up_down=GPIO.PUD_DOWN)- 리스트를 사용하여 다수의 핀 번호를 지정해 줄 수 있다.
pin = [12 ,15]
GPIO.setup(pin , GPIO.OUTPUT)
GPIO.output(핀 번호 , 상태)
- 출력 핀에 대한 상태를 지정해주는 함수
GPIO.output(17 , GPIO.HIGH)
GPIO.output(17 , GPIO.LOW)
GPIO.input(핀 번호)
- 입력핀으로 설정한 핀에 입력되는 값을 읽어온다(디지털 값만 가능)
1) Polling 방식 : 원하는 시점에서 input값을 확인 => 계속해서 입력을 확인해야 하기 때문에 타이밍이 안맞거나 다른 작업 수행 중에 입력값을 놓칠 우려가 있다.
2) Interrupt 방식 : 신호의 HIGH , LOW 가 변경(Edge 변경) 되면 인터럽트 감지
GPIO.input(14) # low값 또는 high 값을 읽어온다.
# 아날로그 값을 읽기 위해서는 DAC 모듈 필요
GPIO.cleanup()
- GPIO모듈의 모든 리소스들을 해제 , GPIO 모듈을 사용한 마지막에 적어준다. (프로그램 종료 전 마지막에)
인터럽트
GPIO.wait_for_edge()
- 입력 핀으로부터 엣지가 발생할 때까지 timeout에 해당하는 시간 동안 기다린다. 엣지가 감지될 떄까지 프로그램 실행을 차단하도록 설계 되어 있다. timeout시간동안 인터럽트 막는 역할
GPIO.wait_for_edge(pin/port number , 상태 , timeout)
GPIO.wait_for_edge(15 , GPIO.FALLING , timeout = 5000)-
pin/port number :
-
상태 : 1) GPIO.FALLING , 2) GPIO.RISING , 3) GPIO.BOTH
-
timeout : 특정 시간동간 기다리려면 값을 입력
GPIO.add_event_detect() , GPIO.event_detected()
-
add_event_detect(pin , 상태 , callback , bouncetime)
해당 핀을 이벤트에 등록하는 함수def button_pressed_callback(): print("인터럽트 발생!) GPIO.add_event_detect(15, GPIO.FALLING, callback=button_pressed_callback, bouncetime=100) #15번 핀의 interrput 발생 조건을 FALLING edge를 감지하면 동작하도록 설정한다 #그리고 FALLING edge 변화를 감지하면 사용자가 정의한 콜백 함수가 동작하게 된다. #콜백 함수를 사용하기 위해서는 callback함수가 먼저 정의되어야 한다. #bouncetime(ms) 보다 짧은 시간에 여러번 인터럽트가 트리거 되는 경우 콜백은 한번만 호출channel = GPIO.wait_for_edge(channel, GPIO_RISING, timeout=5000) if channel is None: print('Timeout occurred') else: print('Edge detected on channel', channel) # event_detected 사용 GPIO.add_event_detect(channel, GPIO.RISING) if GPIO.event_detected(channel): print('Button pressed') #add_event_detect 사용 def my_callback(channel): print('This is a edge event callback function!') print('Edge detected on channel %s'%channel) print('This is run in a different thread to your main program') #add rising edge detection on a channel GPIO.add_event_detect(channel, GPIO.RISING, callback=my_callback) #remove rising edge detection on a channel GPIO.remove_event_detect(channel)
- event_detected(pin_number) : 해당 핀의 엣지가 변하는지 감지하는 함수. while 루프 문에서 사용 가능하다.
GPIO.remove_event_detect()
- GPIO.remove_event_detect(pin_number) : pin_number에 등록한 인터럽트 제거
