
프론트엔드 개발을 위한 웹팩 설정
📌 준비
-
Node.js
미리 설치되어 있어야 함.
-
HTML+CSS+JS 기초
📌 webpack이란
-
다양한 모듈들을 하나의
js파일로 만들어줌. -
보통 작업을 할 때,
index.html을 만들고index.js파일을 만듦.-
index.html<!DOCTYPE html> <html> <head> <meta charset="UTF-8" /> <title>webpack</title> </head> <body> <div id="root"></div> <script src="index.js"></script> </body> </html> -
index.jsdocument.getElementById("root").innerHTML = "코딩앙마";
-
-
원하는 것
-
다양한 모듈을 만들어서 재활용
-
다른 사람들이 만들어 놓은 유용한 오픈소스들을
npm을 통해 설치하고 사용하고 관리 -
빌드 명령어를 통해서 실배포를 위한 파일 제작.
-
개발환경과 리얼 환경을 분리하는 작업.
-
📌 TIPS
-
npm startortest는run생략 가능 -
축약 가능
-
install→i -
--save-dev→-D: 개발용 설치 (devDependencies)
-
-
명령어
- 빌드 :
npm run build
- 빌드 :
📌 과정 (설치 / 설정)
-
시작
-
npm init으로 node 프로젝트를 시작함. -
enter를 연달아 쳐서 끝내면package.json파일이 생성됨.
-
TIPS
-y를 붙이면(npm init -y) → 일일이 enter 칠 필요 없이 기본적으로 일괄 적용.
-
-
웹팩 설치
npm install webpack webpack-cli --save-dev-
webpack-cli커맨드라인으로 실행 할 수 있게 해줌.
-
-
webpack.config.js웹팩 설치 완료 후, 설정을 위한 파일을 생성
웹팩 명령어를 실행했을 때, 여기에 있는 설정들을 자동으로 적용함.
-
코드
const path = require("path"); // 노드에서 제공하는 path 모듈을 활용 module.exports = { entry: "./src/index.js", output: { filename: "main.js", path: path.resolve(__dirname, "dist"), // 의미: 현재 경로 하위에 dist폴더 }, }; -
코드 설명
-
entry시작 파일
- 여기서 시작해서 사용하는 모듈들을 모두 파악
-
output만들어지는 최종 파일을 내보내는 옵션
-
filename파일 명
-
path- 의미 : 폴더
- 제공: 파일이나 폴더의 경로를 작업하기 위한 루트(?)
-
-
-
-
src/util.js- 파일 생성 후, 내부에 함수 생성
const add = (num1, num2) => {
  return num1 + num2;
};

function hello(name) {
  return name;
}

export { add, hello };
- 파일 생성 후, 내부에 함수 생성
-
index.js-
이동 (
src폴더로) -
util파일의 함수들 활용import { add, hello } from "./util"; const text = hello("나는 코딩앙마"); const num = add(1, 2); document.getElementById("root").innerHTML = text + num;
-
-
웹팩 실행
-
package.json-
scripts각종 명령어 제작 가능
-
코드
{
  "name": "webpack-essential-setting",
  "version": "1.0.0",
  "description": "",
  "main": "index.js",
  "scripts": {
    "build": "webpack", // 👈 작성
    "test": "echo \"Error: no test specified\" && exit 1"
  },
  "author": "",
  "license": "ISC",
  "devDependencies": {
    "webpack": "^5.68.0",
    "webpack-cli": "^4.9.2"
  }
}
-
-
터미널
-
npm run build실행→
dist폴더(내부:main.js파일) 생김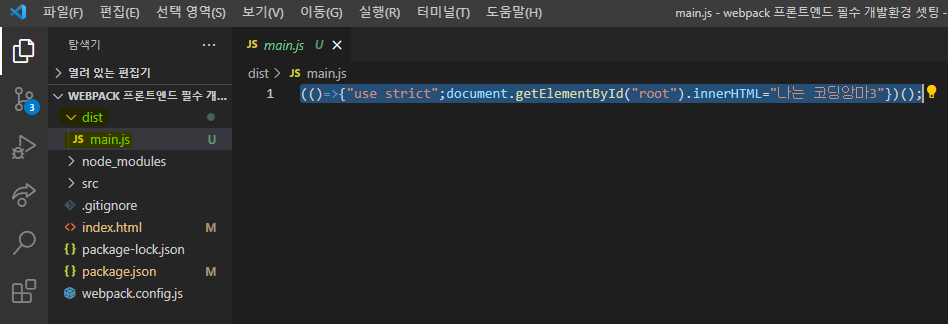
-
결론
이런 식으로 두 개의 파일을 합쳐서 하나의 파일로 만들어주는 것이 웹팩의 역할
-
-
-
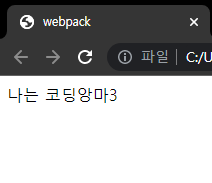
main.js파일을index.html파일에서 사용-
index.html// src를 main.js 경로로 수정 <script src="./dist/main.js"></script> -
브라우저에 만든 내용이 보임.
-
-
👉 html-webpack-plugin
html 파일을 템플릿으로 생성할 수 있게 도와주는 플러그인
🔹 사용 이유
배포 시, dist 폴더를 사용하게 될텐데 js파일만 있으면 안됨.
index.html 파일도 함께 들어있어야 함.
→ 그래야 이 폴더만 배포해도 완벽해짐.
🔹 과정
-
설치
npm i html-webpack-plugin -
webpack.config.js수정const path = require("path"); const HtmlWebpackPlugin = require("html-webpack-plugin"); // 👈 불러옴 module.exports = { entry: "./src/index.js", output: { filename: "main.js", path: path.resolve(__dirname, "dist"), }, plugins: [new HtmlWebpackPlugin()], // 👈 추가 }; -
빌드
dist폴더에index.html파일 생성됨.<!-- dist/index.html --> <!DOCTYPE html> <html> <head> <meta charset="utf-8" /> <title>Webpack App</title> <!-- 👈 title 다름 --> <meta name="viewport" content="width=device-width,initial-scale=1" /> <script defer="defer" src="main.js"></script> <!-- 👈 src="main.js" 포함됨 --> </head> <body></body> </html>index.html에 작성했던 내용 포함 안되어 있음.-
title다름 -
id=”root”인div도 없음
-
src="main.js"가 포함된 것만 볼 수 있음.
-
-
webpack.config.js수정 후, 재빌드-
webpack.config.js수정 사항const path = require("path"); const HtmlWebpackPlugin = require("html-webpack-plugin"); module.exports = { (...생략) plugins: [ new HtmlWebpackPlugin({ template: "./index.html", // 👈 수정 }), ], };-
옵션으로
template설정 -
template기존에 만들어두었던 파일을 이용해서
html을 만듦.
-
-
재빌드 후,
dist/index.html코드의 변화원했던 대로 나옴.
<!-- dist/index.html -->

<!DOCTYPE html>
<html>
  <head>
    <meta charset="UTF-8" />
    <title>webpack</title>
    <script defer="defer" src="main.js"></script>
  </head>
  <body>
    <div id="root"></div>
    <script src="./dist/main.js"></script>
  </body>
</html>
-
👉 webpack-dev-server
개발하기 쉽게 서버를 띄워주는 역할
🔹 사용 이유 (기존에서 불편한 점)
-
수정할 때마다 웹팩 명령어 재실행
(
src/index.js에서) 수정할 때마다 다시 웹팩 명령어(npm run build)를 실행해줘야 함.
-
파일을 직접 열고 있음.
→ 이럴 때 사용할 수 있는 것이 webpack-dev-server
🔹 설치 명령어
npm i webpack-dev-server -D
🔹 설정
◽ webpack.config.js
const path = require("path");
const HtmlWebpackPlugin = require("html-webpack-plugin");

module.exports = {
  (...생략)
  devServer: {
    static: {
      directory: path.resolve(__dirname, "dist"), // 파일 경로 작성
    },
    port: 8080,
  },
};
개발 서버가 dist 폴더를 제공할 수 있도록 작성
◽ package.json
{
  (...생략)
  "scripts": {
    "start": "webpack serve --open --mode=development", // 👈 명령어 제작
    "build": "webpack --mode=production", // 👈 build 모드 옵션 넣기
    "test": "echo \"Error: no test specified\" && exit 1"
  },
  (...생략)
}-
start명령어 제작→ 이러면
npm start를 하면 서버 뜰 수 있음.-
webpack-dev-server는 개발모드에서 사용 가능.→ 모드를
development로 명시
-
-
서버 띄움
npm start
-
효과
index.js수정 후 저장하면 바로 반영됨
-
build모드 옵션 넣고 빌드-
보통 빌드의 모드
production"build": "webpack --mode=production",-
dist/main.js(()=>{"use strict";document.getElementById("root").innerHTML="나는 코딩앙마!!~~3"})();-
깔끔
-
src/index.js에서add()를 이용한 값(num)을 사용 중인데 이것이dist/main.js에서 계산이 완료된 형태(3)로 변환된 것을 확인 가능
-
-
-
[참고] 모드를
development로 하고 빌드할 경우-
코드
"build": "webpack --mode=development",
-
필요없는 내용이 많아짐. (
dist/main.js에서 확인 가능) -
개발 모드의 파일이 더 복잡한 이유
작업 중 에러가 났을 때, 바로 찾기 수월
-
-
👉 CSS 적용 (css-loader, style-loader)
🔹 설치
npm i -D style-loader css-loader
-
css-loadercss파일을 읽어주고
-
style-loader그
css를 스타일 태그로 만들어서head내부에 넣어줌.
🔹 세팅
-
webpack.config.jsconst path = require("path"); const HtmlWebpackPlugin = require("html-webpack-plugin"); module.exports = { (...생략) module: { rules: [ { test: /\.css$/, use: ["style-loader", "css-loader"], }, ], }, (...생략) };-
modulecss는 모듈로 작성.
-
test확장자가
css일 때,
-
use사용한다.
-
use에 들어가는 배열 적용 순서뒤에서부터
-
위 코드의 순서 이유
"css-loader”,"style-loader”를 동시 사용할텐데,"css-loader”로 읽고"style-loader”로 넣어주기 때문
-
-
-
-
css제작src/style.cssbody { background-color: black; color: white; }
-
src/index.js에서importimport { add, hello } from "./util"; import "./style.css"; // 👈 const text = hello("나는 코딩앙마!!~~"); const num = add(1, 2); document.getElementById("root").innerHTML = text + num; -
npm start- [인터널 형식]
head내부에style들어감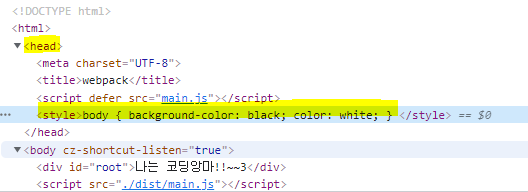
- [인터널 형식]
-
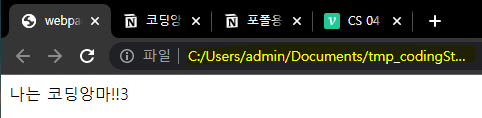
css추가src/header.cssh1 { color: yellow; }src/index.jsimport { add, hello } from "./util"; import "./style.css"; import "./header.css"; // 👈 추가 const text = hello("<h1>나는 코딩앙마!!~~</h1>"); // 👈 h1 추가 const num = add(1, 2); document.getElementById("root").innerHTML = text + num;- 확인
- 브라우저
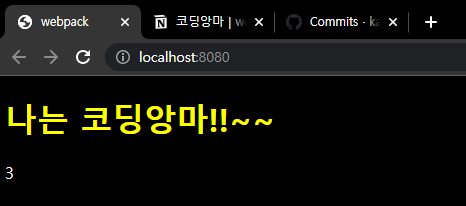
style1개 더 추가 됨
css파일 증가 시,style태그도 증가
- 브라우저
-
index.html수정 후, 페이지 소스와 비교-
index.html의 코드 수정<script src="./dist/main.js"></script>지움 -
페이지 소스 확인
-
script태그가 (index.html에 없는 것과는 달리) 자동 삽입됨⇒
html-webpack-plugin이 해주는 역할임.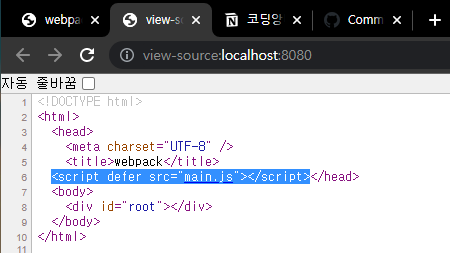
-
-
참고
- 코딩앙마_webpack 프론트엔드 필수 개발환경 셋팅 - HTML+CSS+JS+이미지