GraphQL이란
{
  hero {
    name
    friends {
      name
    }
  }
}- API 질의어
- 웹 클라이언트가 데이터를 서버로 부터 효율적으로 가져오는 것이 목적
- REST API를 대신해서 사용할 수 있다.
- gql의 문장은 주로 클라이언트 시스템에서 작성하고 호출
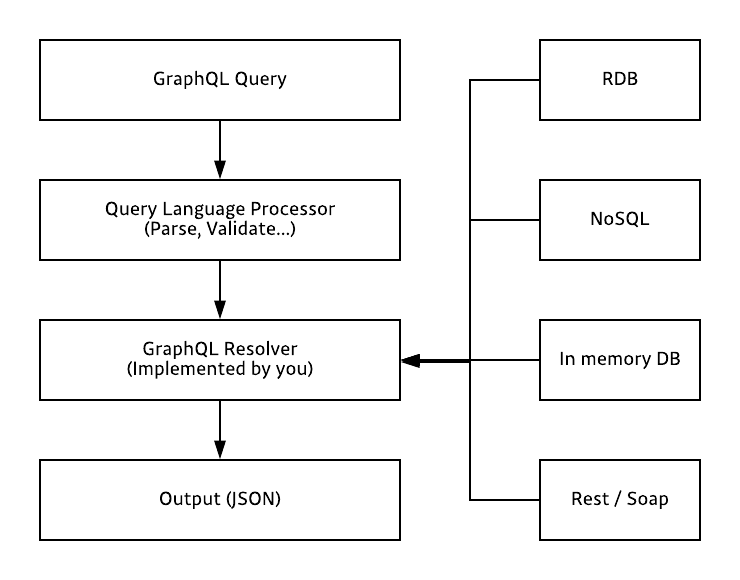
- 서버 단에서 graphQL을 처리해서 DB에 CRUD하고 그 결과를 json 형태로 내게 됨
REST API와 비교
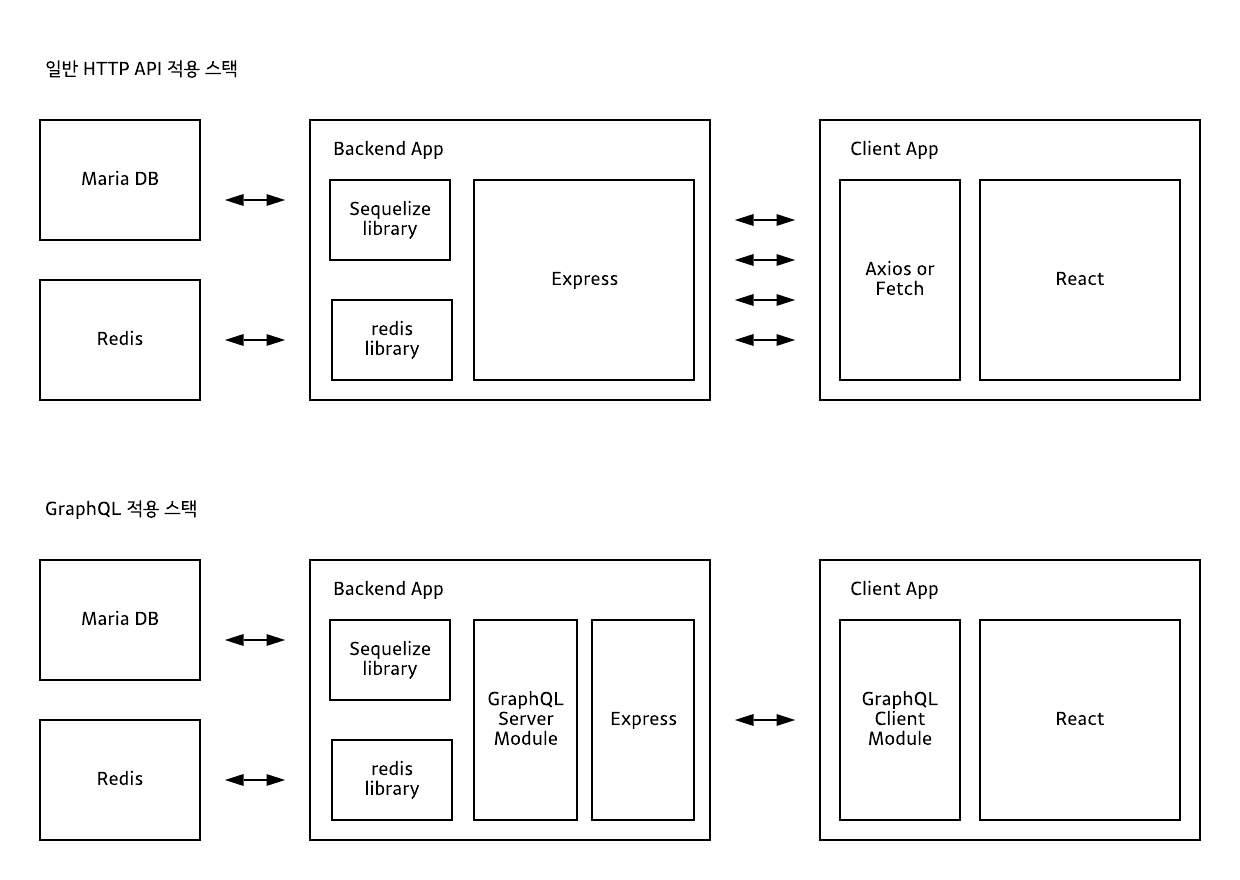
- REST API는 url, method를 조합해서 다양한 엔드포인트 존재
- ex) /comments (GET), /comments (POST), /writer (GET) 등-
- graphQL은 엔드포인트가 한개
- REST API는 엔드포인트마다 데이터베이스 SQL 쿼리가 달라짐
- GQL API는 GQL schema의 타입에 따라 데이터베이스 SQL 쿼리가 달라짐 → gql API에서는 불러오는 데이터의 종류를 쿼리 조합을 통해서 결정
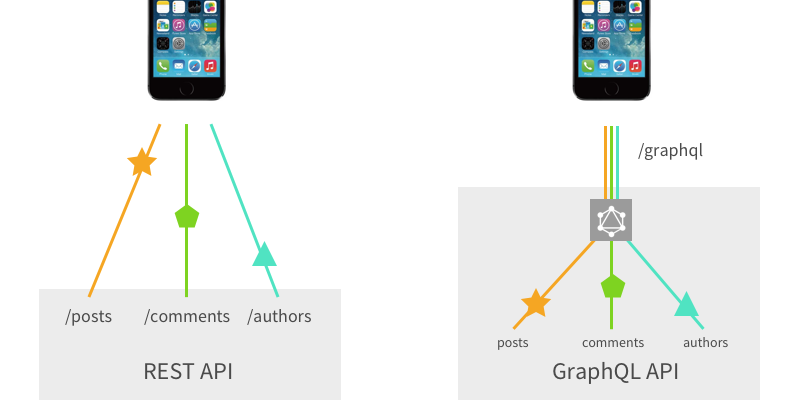
- 이렇게 GQL API를 쓰면 한번의 네트워크 호출로 처리 가능
Why GraphQL
클라이언트가 필요한 데이터만 정확히 지정할 수 있음
- REST API에선 클라이언트가 일부 정보만 필요하더라도 그에 대한 API가 없으면 다른 정보까지 같이 가져오는 API를 사용해야 함
- GraphQL을 쓰면 프론트가 필요할 때마다 필요한 것만 지정해서 딱 가져올 수 이씀
Data Fetching
인스타그램 내 프로필을 생각해보면
- 내 정보
- 내 게시글
- 팔로우, 팔로워 정보
이렇게 세 가지를 가져와야 한다.
REST API를 사용하면
- /users/:id
- /users/:id/posts
- /users/:id/friends
이렇게 세 번의 요청이 필요할 것이다.
반면 GraphQL을 사용하면
query {
  user(id: "fsdf23"){
      name
      status
      posts{
       title
       body
      }
    friends{
       name
     }
  }
}
이렇게 하나의 쿼리로 프로필 페이지에 필요한 정보를 가져올 수 있다.
Data에 Type을 적용
- GraphQL에서는 schema라는 type을 적용해서 서버단에서 쿼리의 유효성을 검사할 수 있음
GraphQL의 구조
Query / Mutation
- Query : CRUD
- Mutation : CRUD
GraphQL Client Library
GraphQL에는 Apollo Client, Relay, urql 등의 클라이언트 라이브러리가 있음
Relay
- 퍼포먼스 최적화가 잘 됨
- 근데 배우기가 어렵다
Apollo Client
- 쉽고 유연한 라이브러리
- GraphQL 쿼리를 작성하면 Apollo Client가 데이터를 캐시하고 UI를 업데이트 해줌
urql
- React에 포커스가 돼 있는 편
- 단순하고 확장성이 좋다
Apollo Client와 React 사용
- 보통 REST API를 사용할 때
React Query를 사용했음 - React Query에는
useQuery같은 hook이 있어서
1. 설치
npm install @apollo/client graphql2. Apollo Client 초기화
import { ApolloClient, InMemoryCache, ApolloProvider, gql } from '@apollo/client';

const client = new ApolloClient({
  uri: 'https://flyby-gateway.herokuapp.com/',
  cache: new InMemoryCache(),
});- uri : graphQL 서버
- cache : apollo client가 쿼리 결과를 저장할 in memory cache instance
3. Apollo Client를 React에 연결
// index.js

import React from 'react';
import * as ReactDOM from 'react-dom/client';
import { ApolloClient, InMemoryCache, ApolloProvider } from '@apollo/client';
import App from './App';

const client = new ApolloClient({
  uri: 'https://flyby-gateway.herokuapp.com/',
  cache: new InMemoryCache(),
});

// Supported in React 18+
const root = ReactDOM.createRoot(document.getElementById('root'));

root.render(
  <ApolloProvider client={client}>
    <App />
  </ApolloProvider>,
);
4. useQuery로 데이터 가져오기
// App.js

// Import everything needed to use the `useQuery` hook
import { useQuery, gql } from '@apollo/client';

const GET_LOCATIONS = gql`
  query GetLocations {
    locations {
      id
      name
      description
      photo
    }
  }
`;

function DisplayLocations() {
  const { loading, error, data } = useQuery(GET_LOCATIONS);

  if (loading) return <p>Loading...</p>;
  if (error) return <p>Error : {error.message}</p>;

  return data.locations.map(({ id, name, description, photo }) => (
    <div key={id}>
      <h3>{name}</h3>
      <img width="400" height="250" alt="location-reference" src={`${photo}`} />
      <br />
      <b>About this location:</b>
      <p>{description}</p>
      <br />
    </div>
  ));
}

export default function App() {
  return (
    <div>
      <h2>My first Apollo app 🚀</h2>
			<DisplayLocations />
    </div>
  );
}- GET_LOCATIONS라는 gql query를 만들고
- useQuery로 데이터를 받아 온다.

반갑습니다.