260904 Unity(5) 물리 및 충돌, Raycast

1. 물리 및 충돌
1.1. 개요
- 가령 도형 2개가 있다고 가정을 했을 때 Collider가 있으면 충돌체로의 역할이 가능하다.
- 이동하는 로직은 Transform으로 짰고 이동도 가능했다.
- 그런데 플레이를 시키고나서 실질적으로는 겹치게 된다.
- 충돌체는 있지만 물리엔진이 적용이 안된 상태라는 것.
- 만일 rigidbody가 있으면 충돌되어 튕겨져나간다.
- 위치를 전환시키고 회전을 가하는 것이지 물리적으로 힘을 가하진 않는다.
- 이젠 오브젝트에 힘을 가하거나 회전력을 더하거나 속도를 더한다는 것으로 접근이 된다.
- 게임에서는 물리 엔진 충돌을 자주 쓸 수 밖에 없다.
- 아이템을 습득하는 것조차 역시 물리 충돌 판정이다.
- 게임에서의 판정이 정확할수록 유저는 생각보다 더 불쾌하게 생각한다.
- 하지만 여담으론 네트워크가 적용된다면 정말 정확해야만 한다.
1.2. rigidbody
먼저 Plane 추가 및 Cube, Sphere 등을 추가한 다음 플레이를 했을 때는 아무일도 없지만 rigidbody를 적용하면 중력이 적용됨을 볼 수 있다. 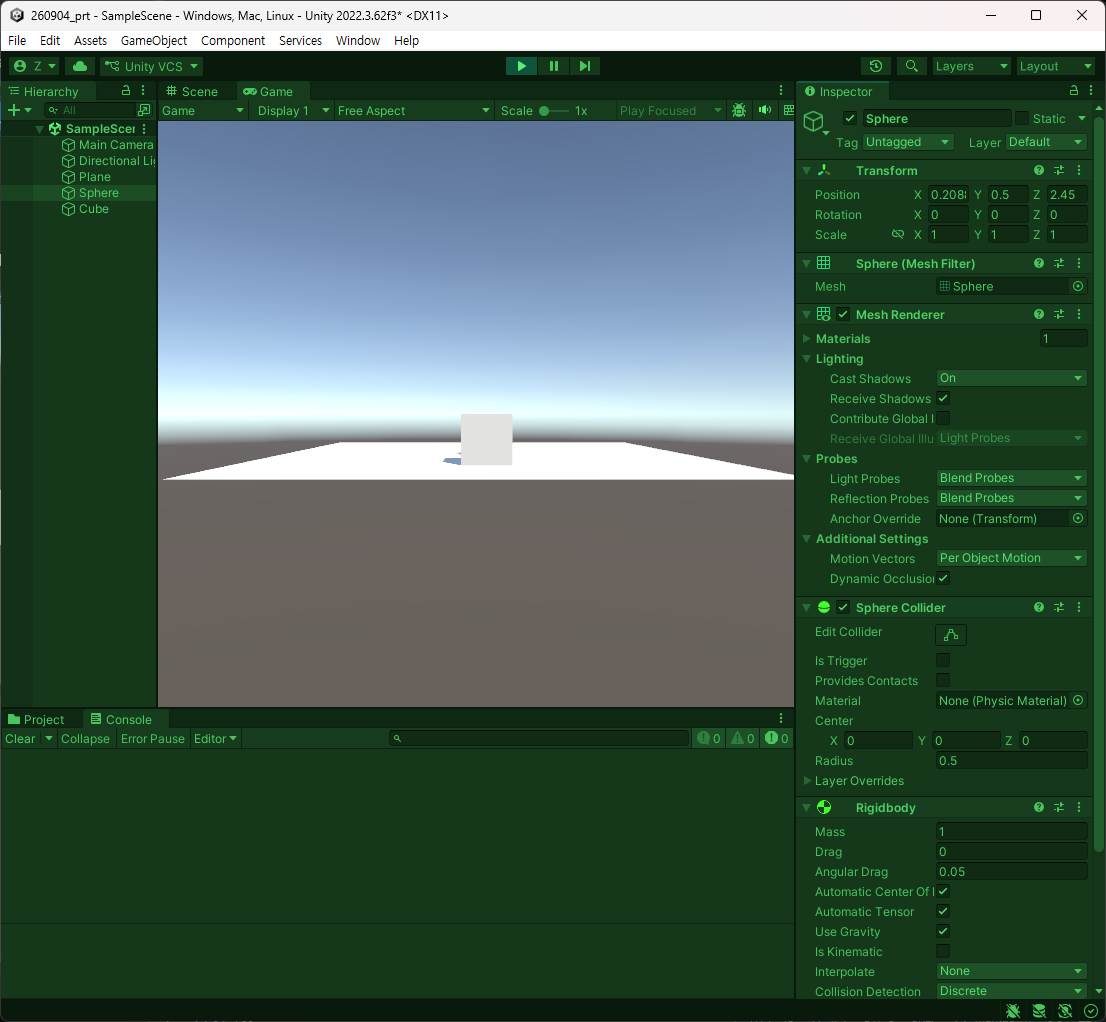 생각보다 유니티 엔진에는 내장된 물리 기능들이 많이 존재한다. (Physics).
그래서 가장 대표적이고 많이 쓰일 것이 rigidbody라는 컴포넌트이다.
질량, 중력 사용 여부, 판정을 위해 물리엔진을 쓸 경우의 kinematic, 물리 엔진을 통해 이동이 생기는 것을 막거나 회전하는 것을 막거나 하는 Constraints가 있다.
그런데 rigidbody를 줬을 때, 매우 높은 거리에서 떨어뜨렸을 경우, 물체가 통과되는 현상이 존재한다.
일단 그래서 중력을 rigidbody를 통해 줄 수 있다. 물리엔진이 적용되다 보니까 물체끼리 부딪혀 굴러가기도 한다.
그런데 Constraints에서 보면 회전과 움직임을 lock을 걸 수 있다. 물리연산 때문에 막아준다는 개념이라고 생각할 것.
그래서 캐릭터 이동을 구현할 때 물리적 구현에서 rigidbody에서 Constraints에서 x, z의 회전을 잠구기도 한다.
최종적으로는 물체 부딪히는 것을 구현하도록 가져다 쓸 수 있다.
Collider가 없이 할려고 할 때, 충돌의 기능이 없어 통과되는 것이 있기 때문에 Collider는 필요하다.
1.3. rigidbody에서 쓸만한 것
C# script를 하나 만든다. 그리고 코드 상에서 진행.
using System.Collections;
using System.Collections.Generic;
using UnityEngine;

public class CubeController : MonoBehaviour
{
    private Rigidbody _rigidbody;

    private void Awake()
    {
        // 1. 컴포넌트를 가져와서 붙여준다.
        _rigidbody = GetComponent<Rigidbody>();
    }

    private void Update()
    {
        Foo();
    }

    private void Foo()
    {
        // 4. Update에서 너무 사용하지 않도록 설정.
        if(!Input.GetKeyDown(KeyCode.Space))
            return;

        // 2. 대표적으로 쓰는 것은 AddForce(), velocity를 많이 쓴다.
        // 3. AddForce()는 힘을 가하는 것이다.
        _rigidbody.AddForce(new Vector3(0,5,0), ForceMode.Impulse);

        // 5. velocity는 속도를 직접 바꾸는 것이다.
    }
}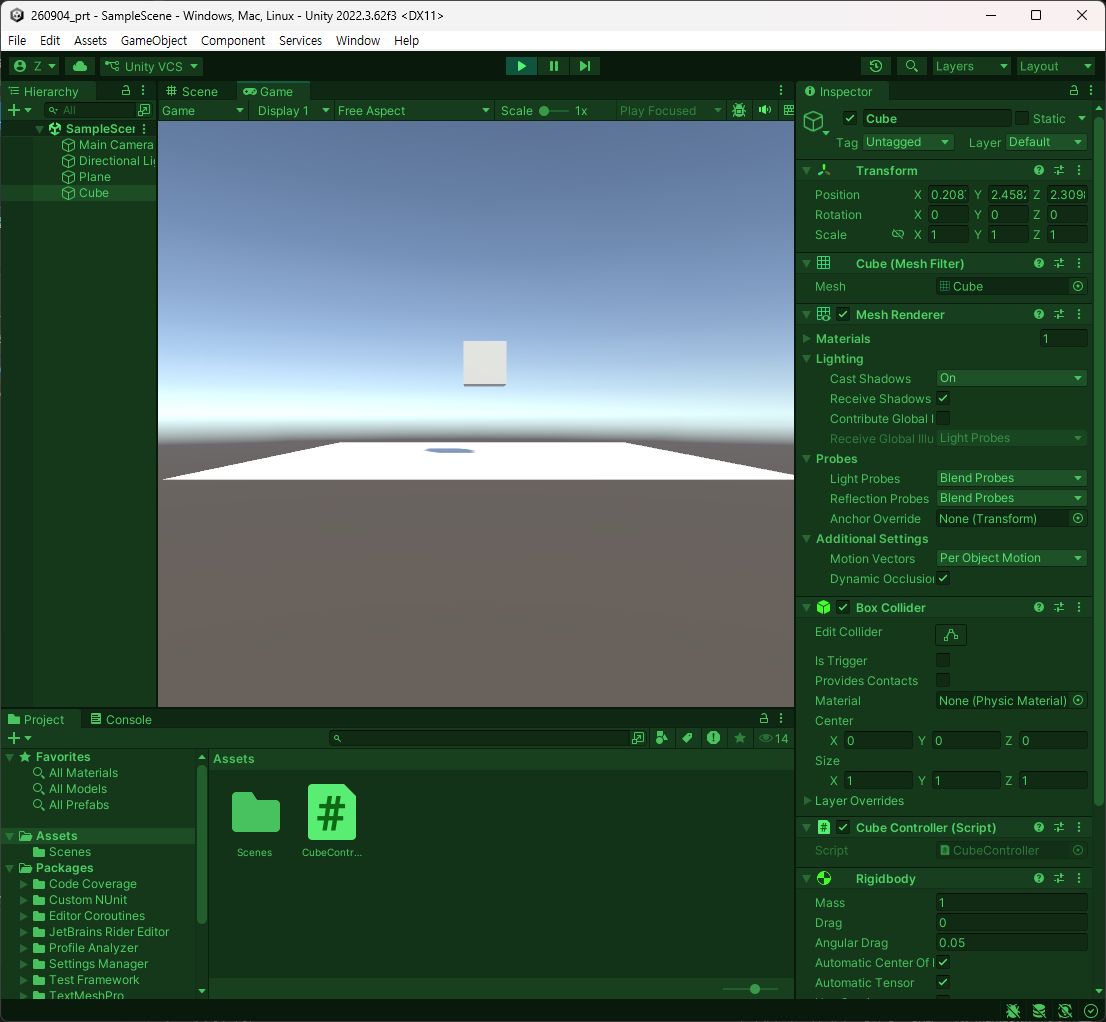
위와 같이 적용이 된다.
이번에는 velocity를 해볼 것이다.
using System.Collections;
using System.Collections.Generic;
using UnityEngine;
public class CubeController : MonoBehaviour
{
private Rigidbody _rigidbody;
private void Awake()
{
// 1. 컴포넌트를 가져와서 붙여준다.
_rigidbody = GetComponent<Rigidbody>();
}
private void Update()
{
Foo();
}
private void Foo()
{
// 4. Update에서 너무 사용하지 않도록 설정.
if(!Input.GetKeyDown(KeyCode.Space))
return;
// 2. 대표적으로 쓰는 것은 AddForce(), velocity를 많이 쓴다.
// 3. AddForce()는 힘을 가하는 것이다.
//_rigidbody.AddForce(new Vector3(0,5,0), ForceMode.Impulse);
// 5. velocity는 속도를 직접 바꾸는 것이다.
_rigidbody.velocity = new Vector3(0, 0, 5);
}
}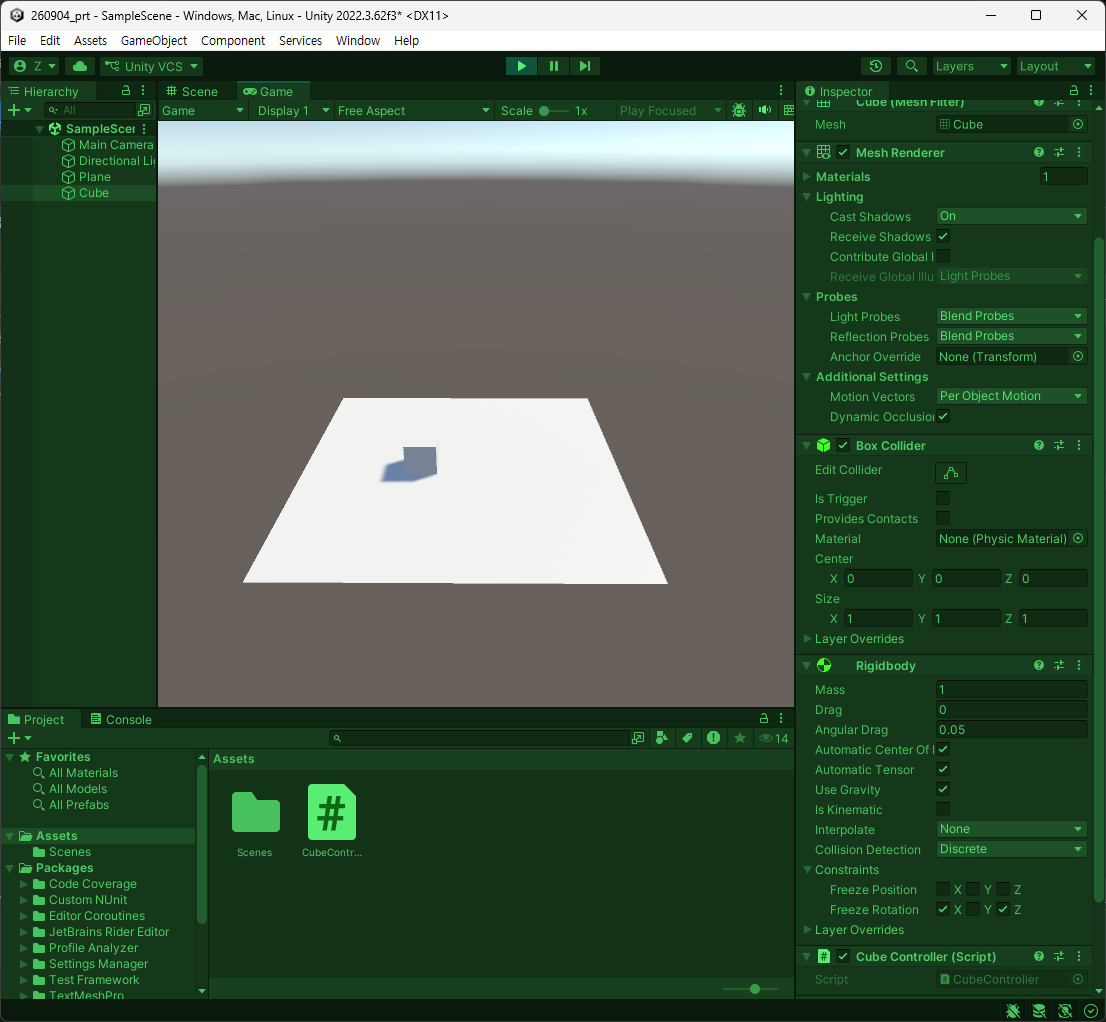 Constraint에서 회전 x, z를 잠궜을 때 가해지고 있던 속도가 점점 줄어들고 관성이 비스무리하게 구현된다.
키입력과 단위 벡터를 반환받아 속도 변수를 단위 벡터에 곱해서 이동이 되는 것을 구현이 가능할 것이다.
Transform의 경우 업데이트에서 연산을 주다 보니까 PC마다 프레임 갱신율이 다르다. 이동 속도의 보정을 위해 deltaTime을 썼다.
그런데 Transform으로 이동시킬 때와 다르게 하지만 물리엔진의 경우는 똑같은 물리 엔진의 갱신이 보장되다 보니까 여기서는 deltaTime을 곱할 필요가 없다. 오히려 곱하면 많이 느려진다.
활발하지 않지만 결과적으로는 물리의 회전력이 더해진 케이스인데 AngularVelocity로 회전시키는 것이 가능하다.
using System.Collections;
using System.Collections.Generic;
using UnityEngine;
public class CubeController : MonoBehaviour
{
private Rigidbody _rigidbody;
private void Awake()
{
// 1. 컴포넌트를 가져와서 붙여준다.
_rigidbody = GetComponent<Rigidbody>();
}
private void Update()
{
Foo();
}
private void Foo()
{
// 4. Update에서 너무 사용하지 않도록 설정.
if(!Input.GetKey(KeyCode.Space))
return;
// 2. 대표적으로 쓰는 것은 AddForce(), velocity를 많이 쓴다.
// 3. AddForce()는 힘을 가하는 것이다.
//_rigidbody.AddForce(new Vector3(0,5,0), ForceMode.Impulse);
// 5. velocity는 속도를 직접 바꾸는 것이다.
//_rigidbody.velocity = new Vector3(0, 0, 5);
// 6. Angular Velocity를 적용
_rigidbody.angularVelocity = new Vector3(0, 0, 5);
}
}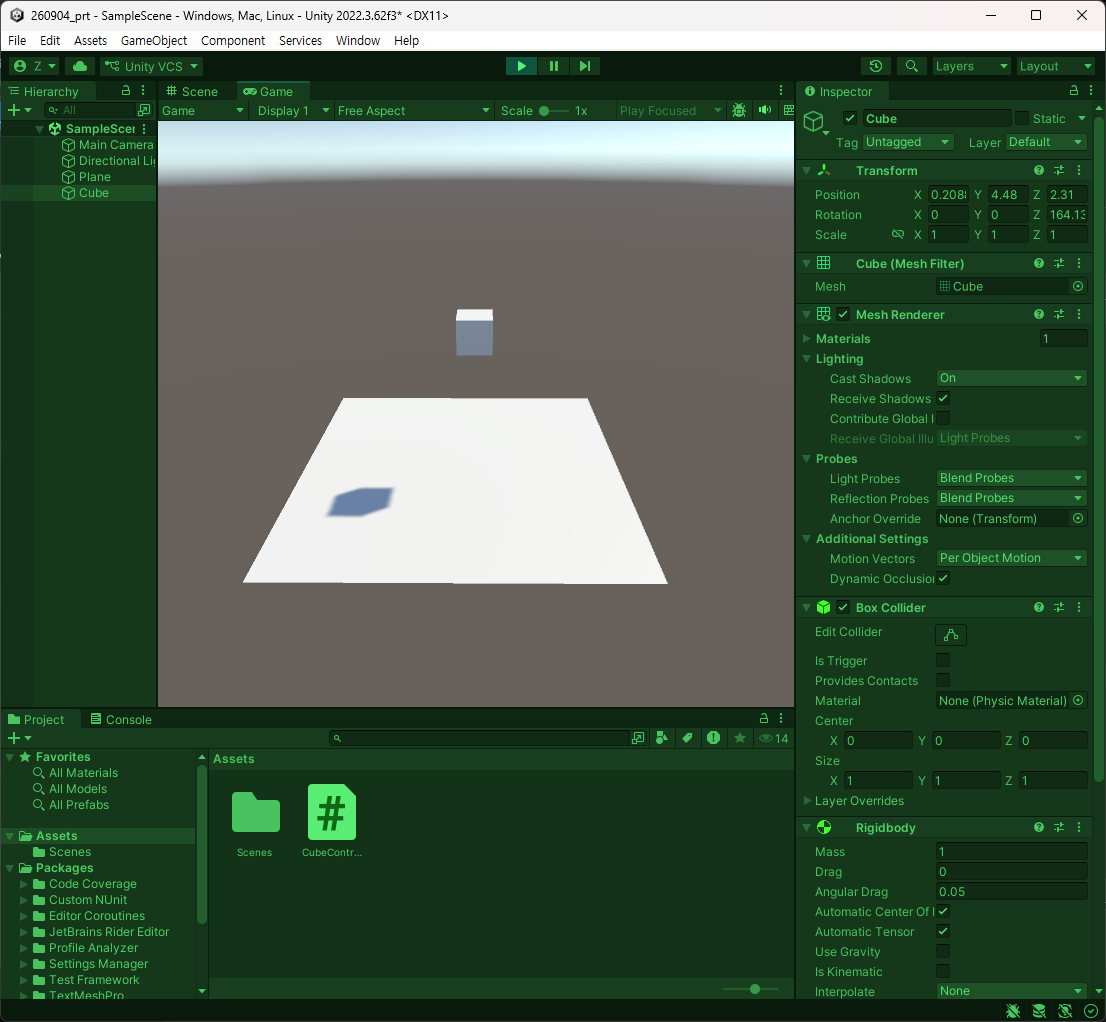 회전하다가 서서히 느려진다.
단, 캐릭터 회전은 Rotation으로 하는 것을 추천하고 이동은 키입력을 받아 단위 벡터를 반환받아 velocity로 넣어주는 방식을 취하도록 한다.
1.4. Collision
- 물리엔진을 쓰는 경우는 충돌 체크를 위함이다
- 대표적으로 Collider와 Trigger라는 키워드가 존재한다.
- Enter, Stay, Exit 이 3가지를 지원한다.
- Enter : 충돌이 시작되었을 때
- Stay : 충돌이 유지되고 있을 때
- Exit : 충돌이 종료되었을 때.
private void OnCollisionEnter(Collision collision)
{
}

private void OnTriggerEnter(Collider other)
{
}

private void OnCollisionExit(Collision collision)
{
}
기본적으로 제공하는 유니티 함수이다. 심지어 라이프사이클에서도 포함이 되며 Physics 영역에서 처리된다.
- 업데이트보다 한 프레임 내에서 빨리 호출된다.
- 무슨일이 있을 때는 이벤트 함수와 실행 순서를 매번 보도록 한다.
이제 충돌이 시작되었을 때를 보도록 하자. Enter부터.
private void OnCollisionEnter(Collision collision)
{
    Debug.Log($"{gameObject.name} : ");
}
충돌 정보가 매개변수로써 담겨있을 것이며 충돌체의 rigidbody, transform, collider, gameobject도 담고 있다.
기본적으로 이런식으로 쓴다.
private void OnCollisionEnter(Collision collision)
{
    Debug.Log($"{gameObject.name} : {collision.gameObject.name}과 충돌!");
}
그래서 몬스터 GetComponent 등을 통해 데미지를 받는다거나 하는 많은 것들에 사용된다.
사용해보도록 하자. 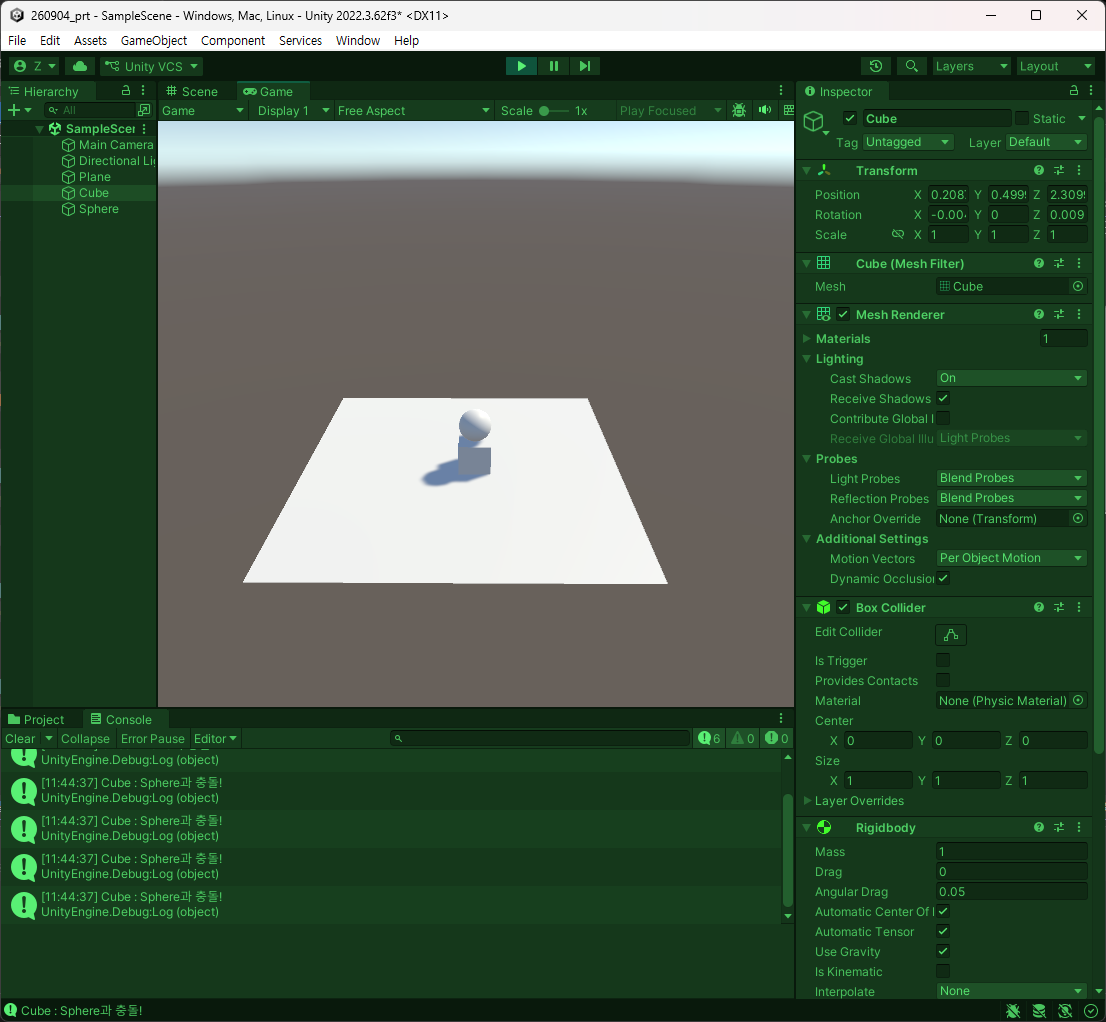 Exit을 추가.
using System.Collections;
using System.Collections.Generic;
using UnityEngine;
public class CubeController : MonoBehaviour
{
private Rigidbody _rigidbody;
private void Awake()
{
// 1. 컴포넌트를 가져와서 붙여준다.
_rigidbody = GetComponent<Rigidbody>();
}
// Collision(충돌)과 Trigger(특정 이벤트 스위치)가 존재한다.
private void OnCollisionEnter(Collision collision)
{
Debug.Log($"{gameObject.name} : {collision.gameObject.name}과 충돌!");
}
private void OnTriggerEnter(Collider other)
{
}
private void OnCollisionExit(Collision collision)
{
Debug.Log($"{gameObject.name} : {collision.gameObject.name}과 충돌 종료!");
}
}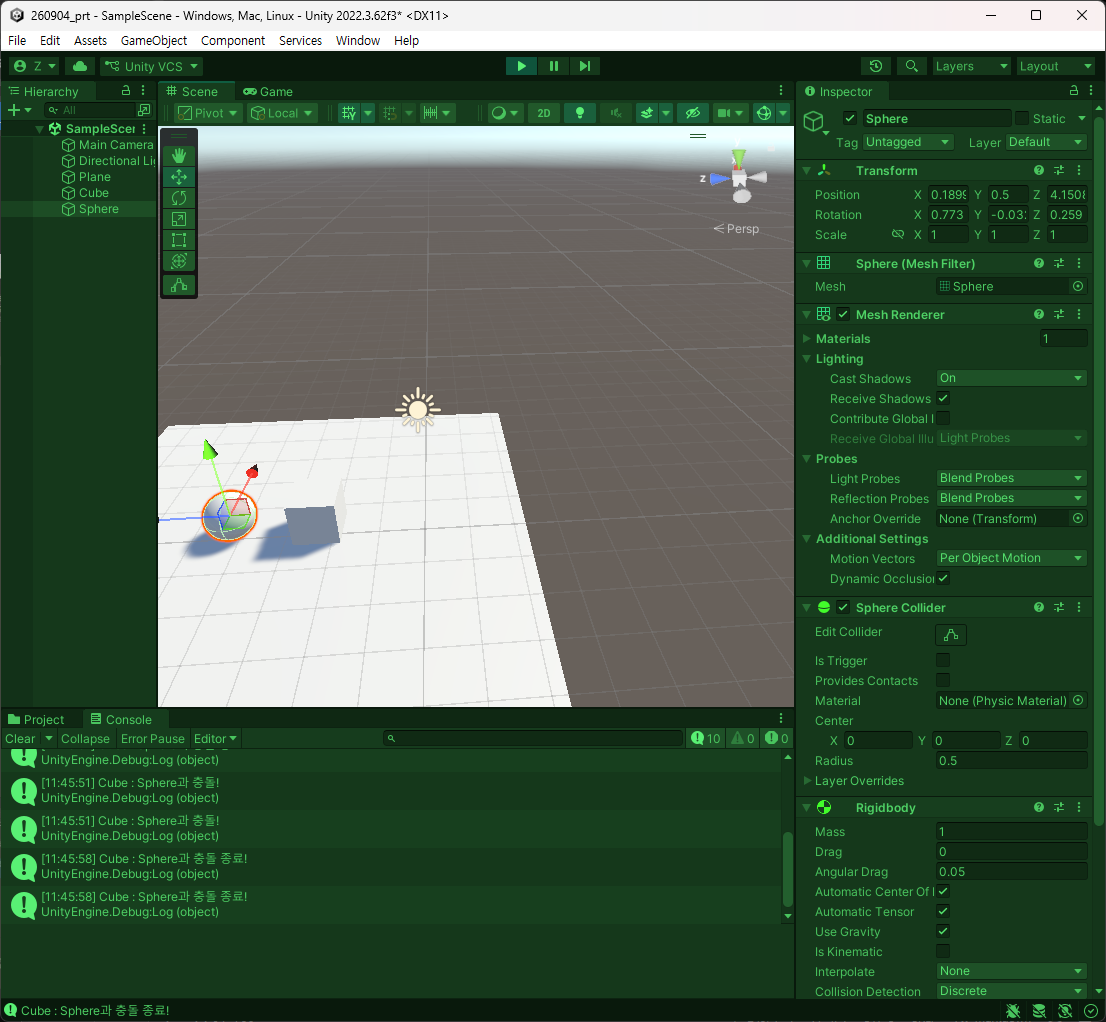 이렇게 충돌 정보를 담아준다.
Stay를 마지막에 둔 것은 잘 안쓰기 때문이다.
- 충돌 정보를 전달하고 그 정보를 쉽게 얻을 수 있는 것이 저 3개의 함수이다.
1.5. Trigger
- 말그대로의 방아쇠이다.
- 특정 영역에 들어왔을 때 이벤트가 발생하는 때에 사용한다.
일단 Sphere를 지우고 C# Script, GameObject를 추가하고 만든 오브젝트에 Sphere Collision을 추가하고 IsTrigger를 켜주면 충돌이 일어나진 않는다. 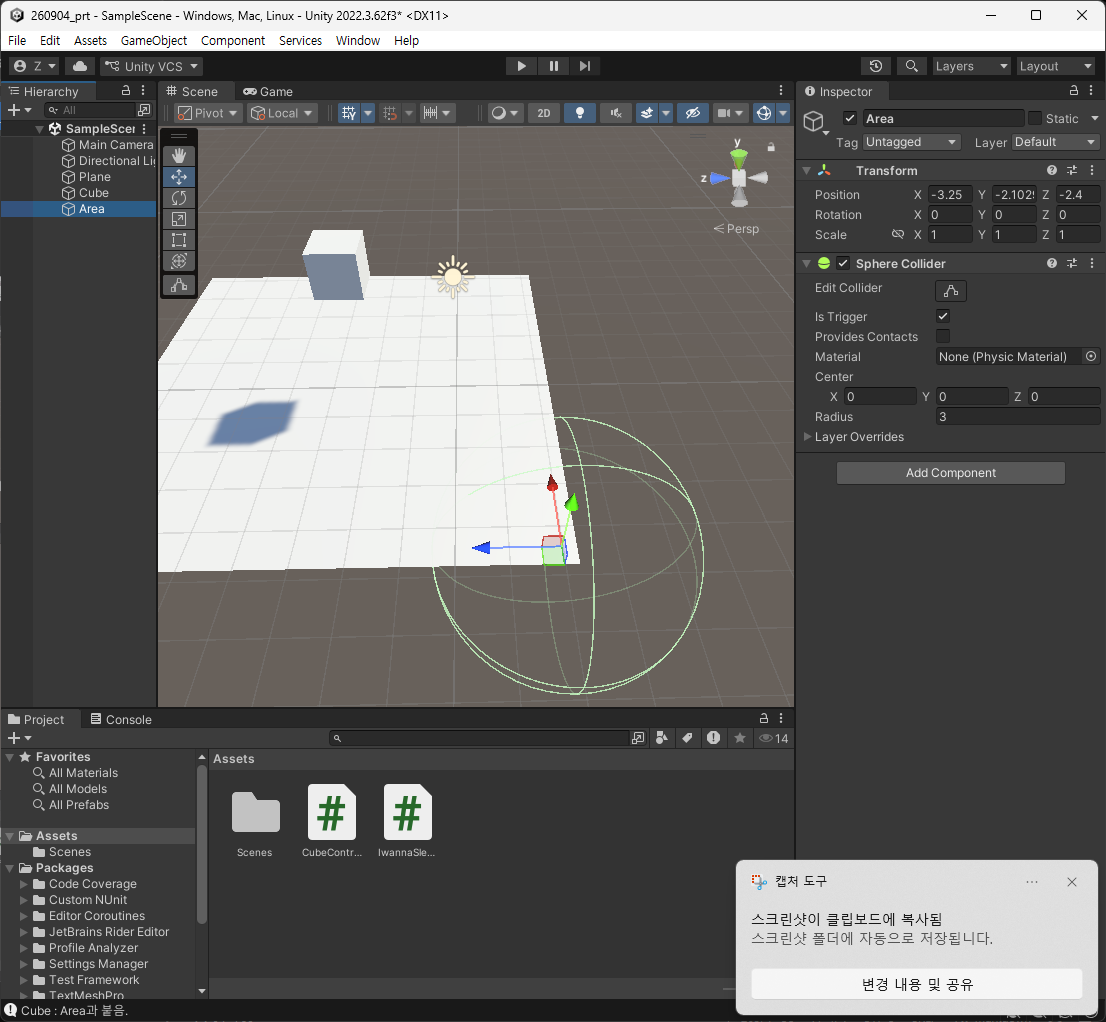 IsTrigger는 정말 스위치이다.
Trigger는 정보를 그대로 넘기는 Collision과는 다르게 충돌체를 넘겨준다.
using System.Collections;
using System.Collections.Generic;
using UnityEngine;

public class IwannaSleep : MonoBehaviour
{
    private void OnTriggerEnter(Collider other)
    {
    }

    private void OnTriggerStay(Collider other)
    {
    }

    private void OnTriggerExit(Collider other)
    {
    }
}
각 도형의 collider는 사실 클래스로 있는 Collider를 상속받고 있음.
collider는 결국 component를 상속받고 있기 때문에 Transform, GetComponent, GameObject도 다 받을 수 있단 이야기.
이를 통해 예를 들어 플레이어가 아이템에 접근하면 먹는 처리가 가능하다는 것을 알 수 있음.
using System.Collections;
using System.Collections.Generic;
using UnityEngine;
public class IwannaSleep : MonoBehaviour
{
private SphereCollider b;
private void OnTriggerEnter(Collider other)
{
Debug.Log($"{gameObject.name} : 트리거 안에 {other.gameObject.name}과 붙음.");
}
private void OnTriggerStay(Collider other)
{
Debug.Log($"{gameObject.name} : 트리거 안에 {other.gameObject.name}과 계속 붙어 있음.");
}
private void OnTriggerExit(Collider other)
{
Debug.Log($"{gameObject.name} : 트리거 안에 {other.gameObject.name}과 떼어짐.");
}
}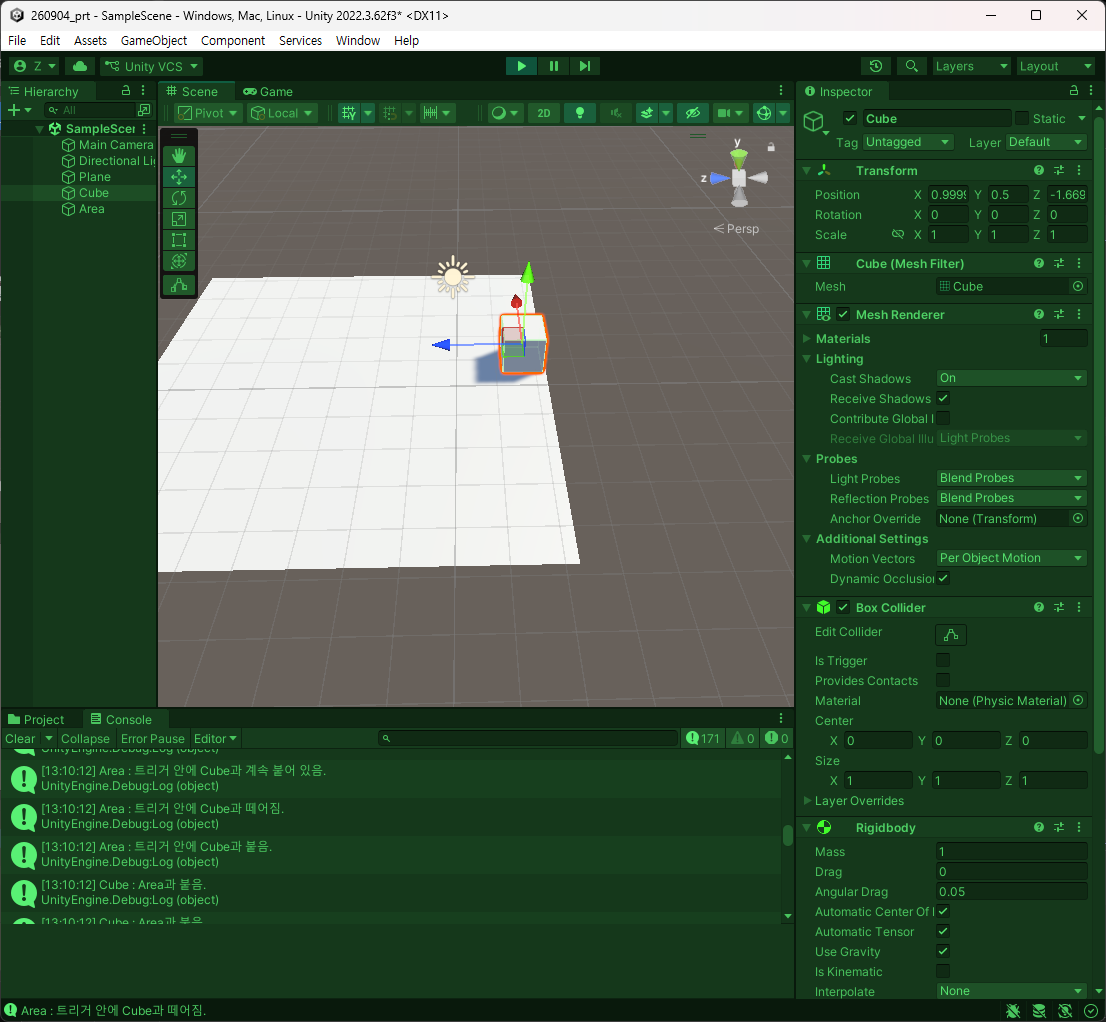 이렇게 Collider와 Trigger의 차이는 보내는 정보가 다르다는 의미이다.
Trigger가 충돌을 감지한다는 것은 알겠으나 어떤 유형의 게임 오브젝트인지를 알아야 한다.
그렇다보니 식별할 수 있는 수단이 필요하다. 그래서 가급적 Layer를 쓰라고 한다. 지금은 아니지만.
지금은 Tag를 통해 처리를 해볼 것이다.
Cube 쪽에 Player 테그를 달아준다.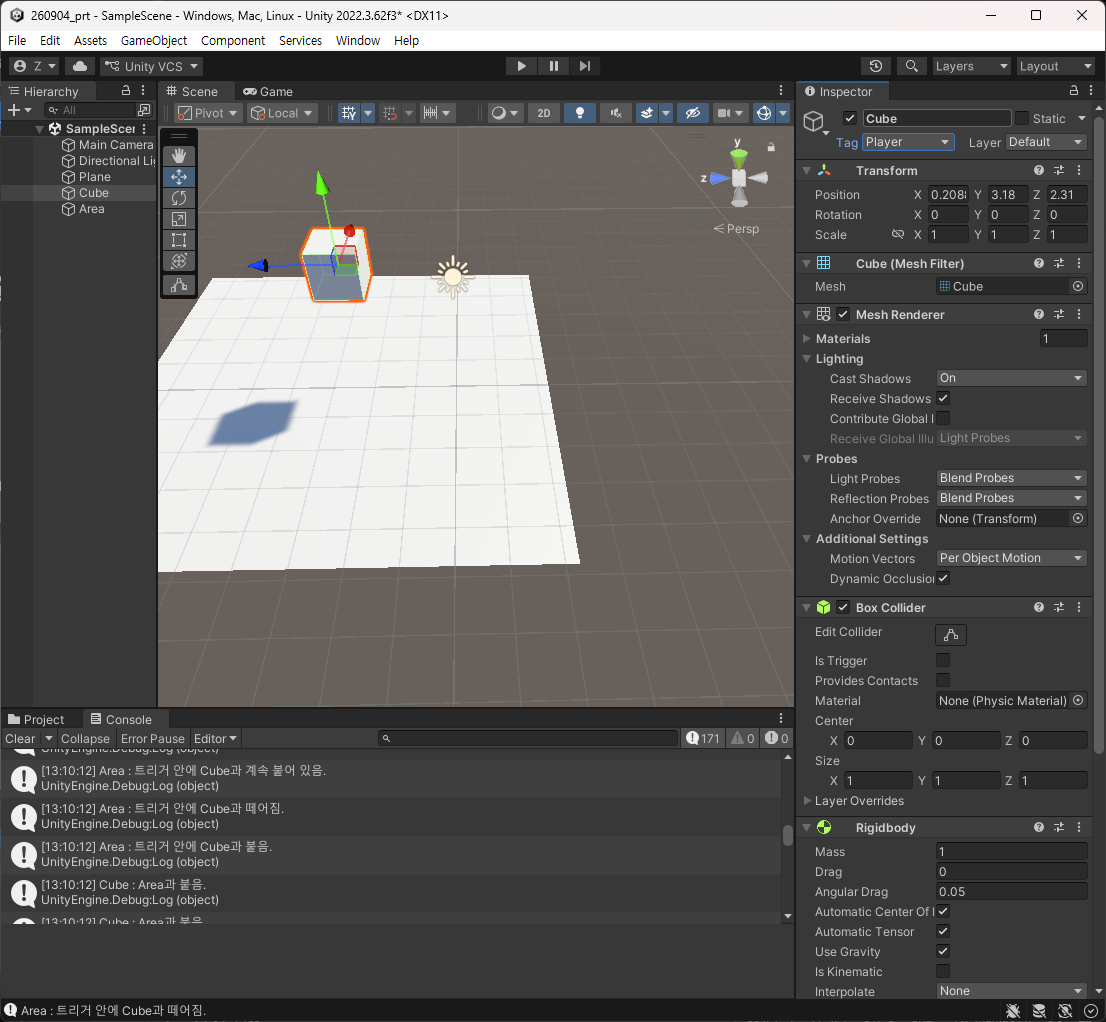 Add Tag를 통해 Monster를 추가하여 저장. 임의의 도형을 추가하여 rigid 달아주고 Monster 테그를 달아준다.
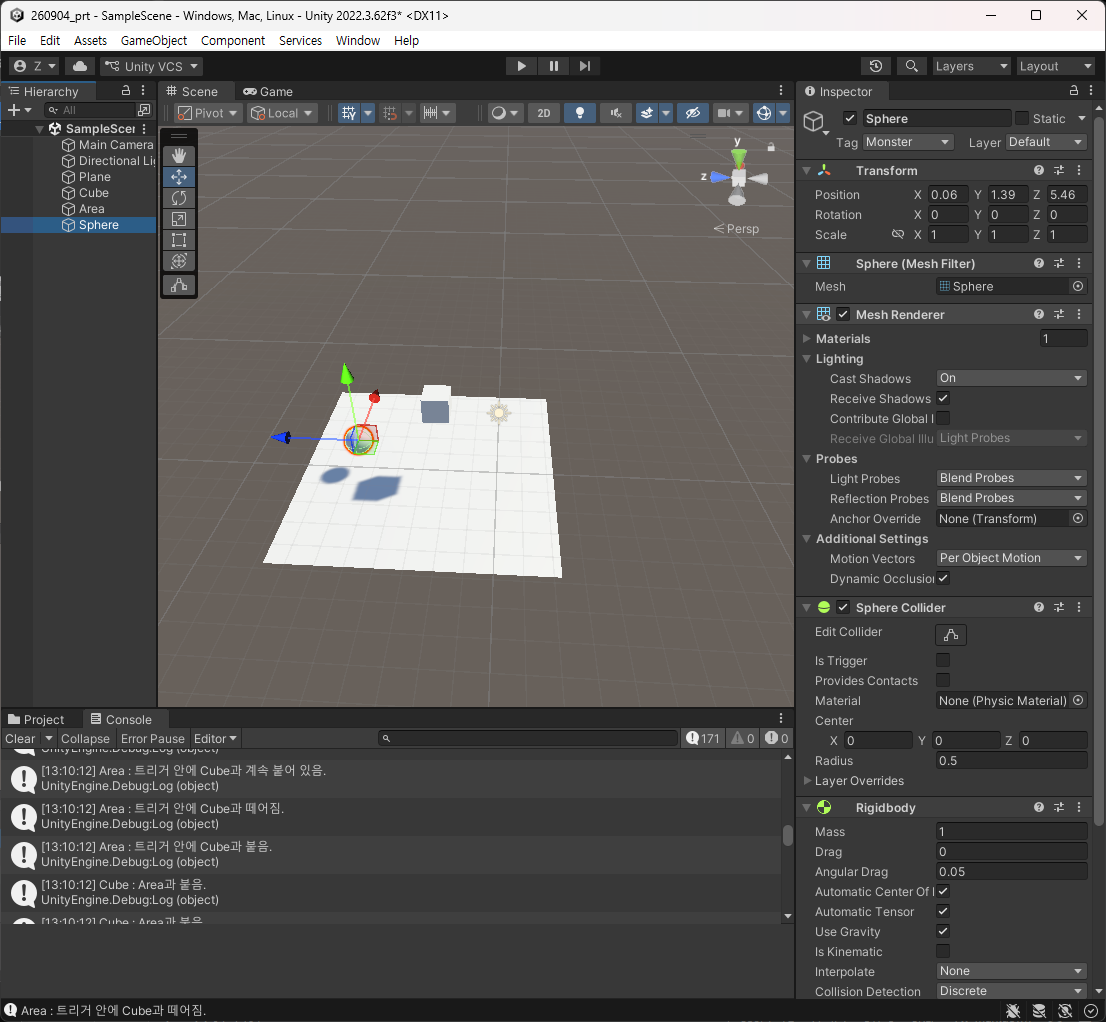 코드에서는 만들어둔 CubeController에 외부 함수를 두고
public void TakeDamage(float damage)
{
    Debug.Log($"{damage}만큼 데미지를 받음.");
}
using System.Collections;
using System.Collections.Generic;
using UnityEngine;
public class IwannaSleep : MonoBehaviour
{
private SphereCollider b;
private void OnTriggerEnter(Collider other)
{
Debug.Log($"{gameObject.name} : 트리거 안에 {other.gameObject.name}과 붙음.");
if (other.gameObject.CompareTag("Player"))
{
//Debug.Log("플레이어가 들어옴. 문 열기.");
CubeController c = other.gameObject.GetComponent<CubeController>();
c.TakeDamage(10);
}
}
private void OnTriggerStay(Collider other)
{
// Debug.Log($"{gameObject.name} : 트리거 안에 {other.gameObject.name}과 계속 붙어 있음.");
}
private void OnTriggerExit(Collider other)
{
Debug.Log($"{gameObject.name} : 트리거 안에 {other.gameObject.name}과 떼어짐.");
}
}면 데미지를 입을 수 있다.
인터페이스는 무엇을 할 수 있는 것에 따라 기능을 나눠서 정의를 했다.
인터페이스 하나를 선언.
public interface IDamagable : MonoBehaviour
{
    public void TakeDamage(float damage);
}
이러면 CubeController를 직접 참조를 얻어오는게 아닌
using System.Collections;
using System.Collections.Generic;
using UnityEngine;

public class IwannaSleep : MonoBehaviour
{
    private SphereCollider b;

    private void OnTriggerEnter(Collider other)
    {

        Debug.Log($"{gameObject.name} : 트리거 안에 {other.gameObject.name}과 붙음.");

        //if (other.gameObject.CompareTag("Player"))
        //{
        //    //Debug.Log("플레이어가 들어옴. 문 열기.");
        //   IDamagable = other.gameObject.GetComponent<IDamagable>();
        //    c.TakeDamage(10);
        //}

        IDamagable d = other.gameObject.GetComponent<IDamagable>();

        if(d != null)
        {
            d.TakeDamage(10);
        })
    }

    private void OnTriggerStay(Collider other)
    {
       // Debug.Log($"{gameObject.name} : 트리거 안에 {other.gameObject.name}과 계속 붙어 있음.");
    }

    private void OnTriggerExit(Collider other)
    {
        Debug.Log($"{gameObject.name} : 트리거 안에 {other.gameObject.name}과 떼어짐.");
    }


}
GetComponent가 IDamagable을 얻어올 때 null이 아닌 경우에만 적용이 되도록 할 수 있다.
Cube쪽에도 구현
using System.Collections;
using System.Collections.Generic;
using UnityEngine;

public class CubeController : MonoBehaviour, IDamagable
{
    private Rigidbody _rigidbody;

    private void Awake()
    {
        // 1. 컴포넌트를 가져와서 붙여준다.
        _rigidbody = GetComponent<Rigidbody>();
    }

    // Collision(충돌)과 Trigger(특정 이벤트 스위치)가 존재한다.
    private void OnCollisionEnter(Collision collision)
    {
        Debug.Log($"{gameObject.name} : {collision.gameObject.name}과 충돌!");
    }

    private void OnTriggerEnter(Collider other)
    {
        Debug.Log($"{gameObject.name} : {other.gameObject.name}과 붙음.");
    }

    private void OnCollisionExit(Collision collision)
    {
        Debug.Log($"{gameObject.name} : {collision.gameObject.name}과 충돌 종료!");
    }

    public void TakeDamage(float damage)
    {
        Debug.Log($"{damage}만큼 데미지를 받음.");
    }
}
엔진 실행.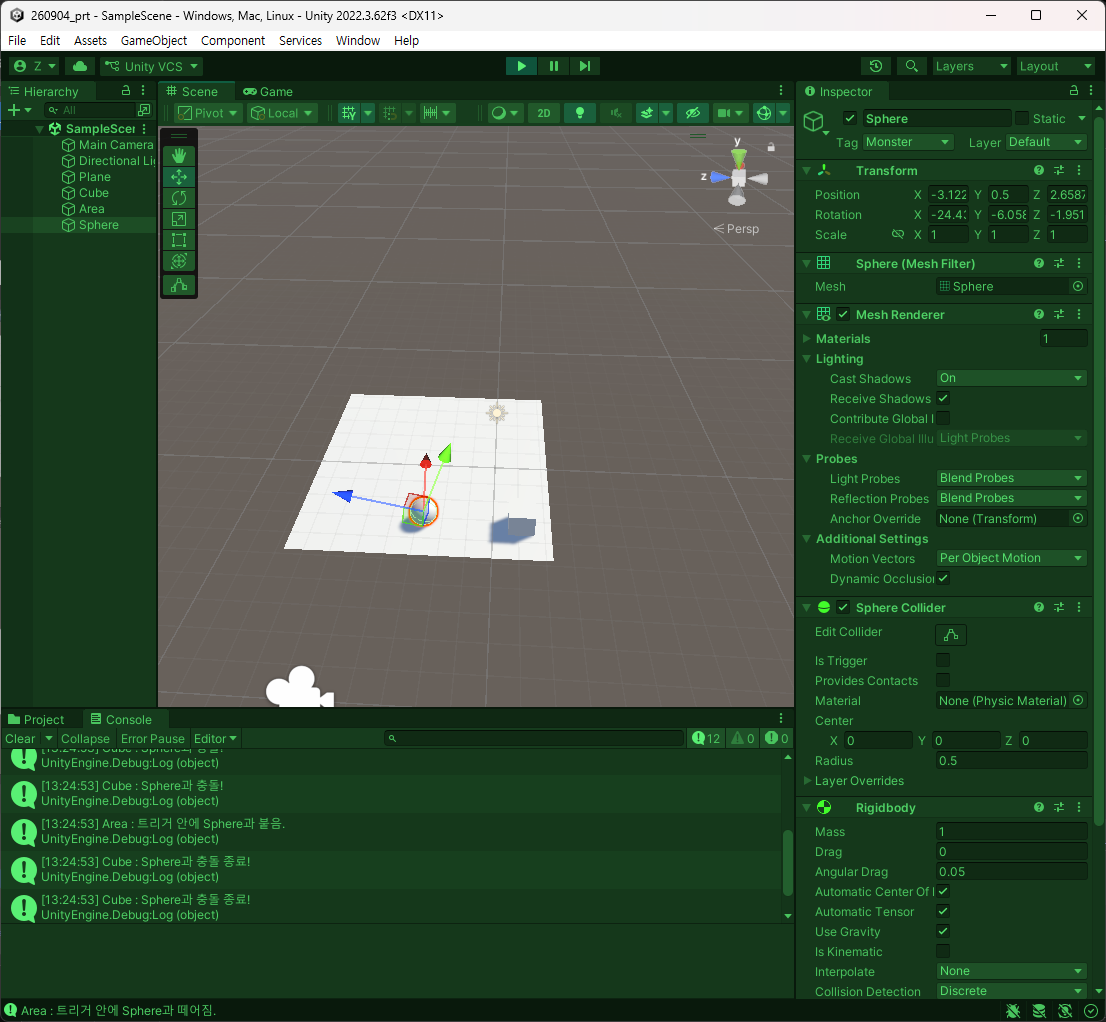
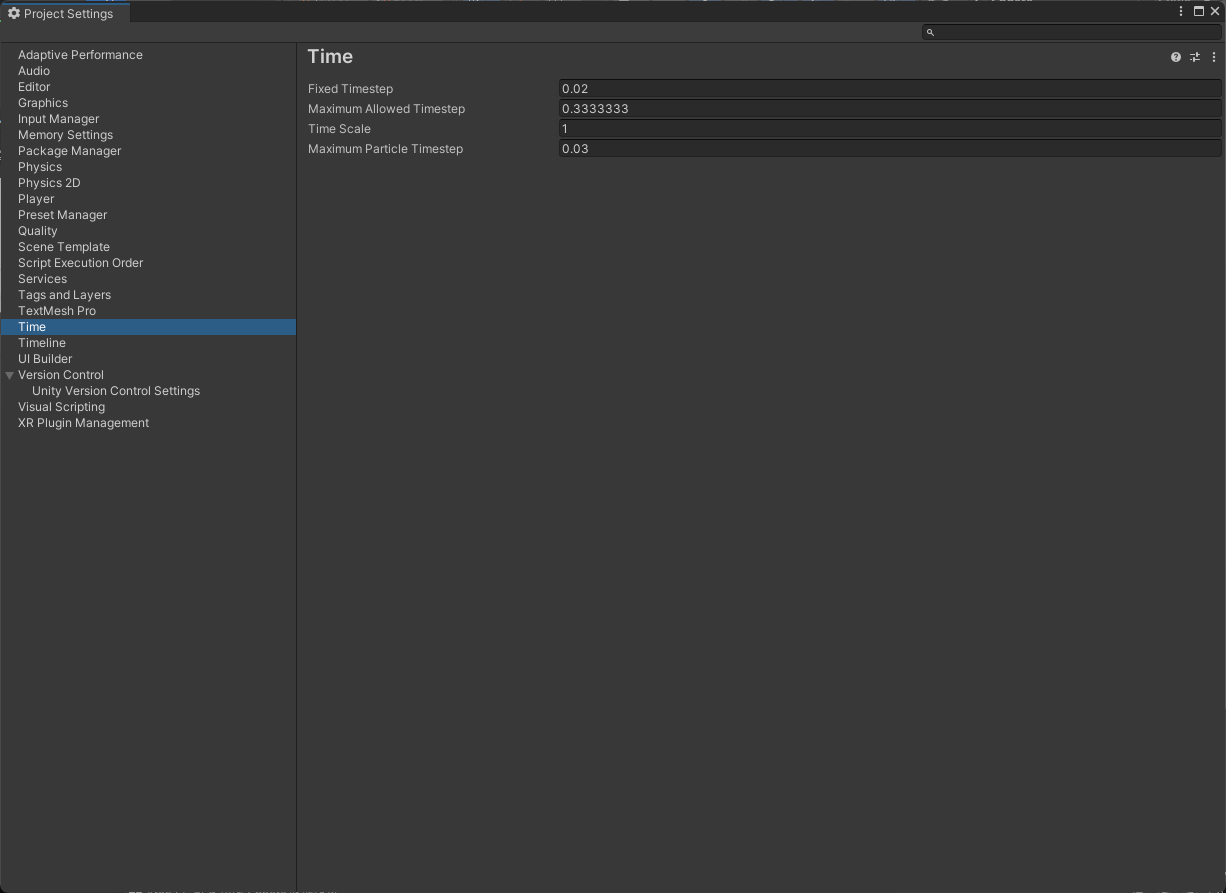 이 이미지는 물리연산이 이뤄지는 주기이다.
업데이트는 많이 있지만 FixUpdate는 유니티에서 물리 연산의 처리를 위해 불린다. 정해진 시간마다 호출되는 것이다.
물리적인 처리가 필요하면 어지간히 FixedUpdate에서 하는데 문제는 키 입력을 FixedUpdate에서 받아버리는 것이다.
update는 키입력을 어느 타이밍에 해도 받을 수 있지만 FixedUpdate는 수행되지 않고 스킵될 수 있는데 키 입력을 여기다가 하면 키 입력이 씹힐 수 있다.
그래서 키 입력은 update에서 고정적으로 하며 물리 처리만을 FixedUpdate에서 한다.
2. Raycast
2.1. 개요
- 물리 처리를 할 때는 단순히 부딪혔나 영역 안으로의 판단이 끝이었다.
- 이것만 가지고 게임을 만드려면 조금 힘든 부분이 존재한다. 클릭 반응 구현이 그 예시.
- 그럴 때, Raycast를 쓰는데 말 그대로 특정 지점에 가상의 레이저를 발사하여 그 곳에 걸리는 충돌체(Collider)를 판단하는 방법이 있다.
- 2가지 중요한 개념은 Ray, RaycastHit이다.
- 광선과 광선에 걸리는 것을 보관하는 구조체이다.
using System.Collections;
using System.Collections.Generic;
using UnityEngine;

public class CubeController : MonoBehaviour, IDamagable
{
    private void Foo()
    {
        Ray ray;
        RaycastHit hit;
    }
}
- Ray는 원점과 방향만을 가진다.
- RaycastHit은 Ray에 부딪힌 Collision에 대한 정보이다.
- 광선에 걸린 것을 GetComponent 참조나 인터페이스를 얻거나 상호작용이 가능한 것이라면 테두리 선을 띄우고 상호작용하도록 하는 것도 가능하다.
2.2. 사용
사용하자. Script에서.
using System.Collections;
using System.Collections.Generic;
using UnityEngine;

public class CubeController : MonoBehaviour, IDamagable
{
    private void update()
    {
        RayShot();
    }

    private void RayShot()
    {
        // 1. 첫번째로 Ray를 만들어야 한다. 발사 시작되는 지점과 방향.
        Ray ray = new Ray(transform.position, transform.forward);
    }
}
Ray에서 쓰는 Transform의 forward는 정면에 대한 단위 벡터이다.
다음, RaycastHit도 선언해준다.
using System.Collections;
using System.Collections.Generic;
using UnityEngine;

public class CubeController : MonoBehaviour, IDamagable
{
    private void update()
    {
        RayShot();
    }

    private void RayShot()
    {
        // 1. 첫번째로 Ray를 만들어야 한다. 발사 시작되는 지점과 방향.
        Ray ray = new Ray(transform.position, transform.forward);

        // 2. Ray가 충돌한 정보를 담을 수 있는 구조체.
        RaycastHit hit;
    }
}
뭔가 데이터를 RaycastHit에다가 넣어줘야 하는데
using System.Collections;
using System.Collections.Generic;
using UnityEngine;

public class CubeController : MonoBehaviour, IDamagable
{
    private void update()
    {
        RayShot();
    }

    private void RayShot()
    {
        // 1. 첫번째로 Ray를 만들어야 한다. 발사 시작되는 지점과 방향.
        Ray ray = new Ray(transform.position, transform.forward);

        // 2. Ray가 충돌한 정보를 담을 수 있는 구조체.
        RaycastHit hit;
        if(Physics.Raycast(ray, out hit))
        {
            Debug.Log(hit.transform.name);
        }
    }
}
설사 감지가 안된다고 하더라도 if문에 썼고 bool 타입의 RaycastHit이라 로직 수행은 감지가 되었을 때만 수행한다는 의미이다.
큐브에서 Ray를 쏠 것이기 때문에
라이프사이클에서 OnDrawGizmos라는 것이 있는데 프레임 그리기 바로 직전에 무언가를 해볼 수 있다. 그래서 이를 이용해
using System.Collections;
using System.Collections.Generic;
using UnityEngine;

public class CubeController : MonoBehaviour
{
    private void update()
    {
        RayShot();
    }

    private void RayShot()
    {
        // 1. 첫번째로 Ray를 만들어야 한다. 발사 시작되는 지점과 방향.
        Ray ray = new Ray(transform.position, transform.forward);

        // 2. Ray가 충돌한 정보를 담을 수 있는 구조체.
        RaycastHit hit;

        if(Physics.Raycast(ray, out hit))
        {
            Debug.Log(hit.transform.name);
        }
    }

    private void OnDrawGizmos()
    {
        Gizmos.color = Color.red;
        Gizmos.DrawRay(transform.position, transform.forward * 5);
    }
}
로 해서 감지 범위에 들어오는 것을 가시적으로 확인이 가능하도록 해준다.
Ray를 현재 무제한으로 쏘기 때문에 게임 안에서는 그렇게까지 판정은 하지 않는다. 주로 범위 내 있는가 없는가만을 판정하는 편.
그래서 이렇게 조정.
using System.Collections;
using System.Collections.Generic;
using UnityEngine;

public class CubeController : MonoBehaviour
{
    private void update()
    {
        RayShot();
    }

    private void RayShot()
    {
        // 1. 첫번째로 Ray를 만들어야 한다. 발사 시작되는 지점과 방향.
        Ray ray = new Ray(transform.position, transform.forward);

        // 2. Ray가 충돌한 정보를 담을 수 있는 구조체.
        RaycastHit hit;

        // 거리를 지정해서 쏠 수 있게 된다. 특정 Layer만 찾기도 가능은 함.
        if (Physics.Raycast(ray, out hit, 1f))
        {
            Debug.Log(hit.transform.name);
        }
    }

    private void OnDrawGizmos()
    {
        Gizmos.color = Color.red;
        Gizmos.DrawRay(transform.position, transform.forward);
    }
}
항상 그렇게 쓰이는 것은 아니지만 지면 판정 같은 것.
그래서 점프가 가능하다는 것이 상황마다 난해하다.
2.3. RaycastAll
- RaycastHit의 배열임.
// 거리를 지정해서 쏠 수 있게 된다. 특정 Layer만 찾기도 가능은 함.
if (Physics.RaycastAll(ray, out hit, 1f))
{
    Debug.Log(hit.transform.name);
}
따라서
private void RayShot()
{
    // 1. 첫번째로 Ray를 만들어야 한다. 발사 시작되는 지점과 방향.
    Ray ray = new Ray(transform.position, transform.forward);

    // 2. Ray가 충돌한 정보를 담을 수 있는 구조체.
    RaycastHit hit;

    // 거리를 지정해서 쏠 수 있게 된다. 특정 Layer만 찾기도 가능은 함.
    RaycastHit[] hits = Physics.RaycastAll(ray, 1f);
}
로 사용해야 한다.
그 배열에 담아줄 것 같은데
using System.Collections;
using System.Collections.Generic;
using UnityEngine;

public class CubeController : MonoBehaviour
{
    private void Update()
    {
        RayShot();
    }

    private void RayShot()
    {
        if (!Input.GetKeyDown(KeyCode.Space))
        {
            return;
        }

        // 1. 첫번째로 Ray를 만들어야 한다. 발사 시작되는 지점과 방향.
        Ray ray = new Ray(transform.position, transform.forward);

        // 2. Ray가 충돌한 정보를 담을 수 있는 구조체.
        RaycastHit hit;

        // 거리를 지정해서 쏠 수 있게 된다. 특정 Layer만 찾기도 가능은 함.
        RaycastHit[] hits = Physics.RaycastAll(ray, 10f);

        if (hits.Length > 0)
        {
            foreach (var h in hits)
            {
                Debug.Log(h.transform.name);
            }
        }
    }

    private void OnDrawGizmos()
    {
        Gizmos.color = Color.red;
        Gizmos.DrawRay(transform.position, transform.forward * 10f);
    }
}
심화는 knownUnlock이 있다고 핝다.
RaycastAll은 할당하고 직관적이기 때문에 쓰고 버릴 때 임시적으로 데이터 컨테이너 역할로 구조체를 사용한다는 이야기.
가드를 안 쳐놓고 Ray가 클래스였으면 이렇게 사용했으면 안된다.
구조체는 stack 영역에서 할당되었다가 버리기 좋음. hip에 부하를 안주고 사용할 수 있다.
구조체와 클래스는 이렇게 사용처가 다르게 나뉜다.
2.4. 마우스 클릭 지점 판정
- 시작점은 main camera로 하면 되는데 화면상의 좌표를 WorldSpace는 다르다.
- World 좌표계가 필요함. 방향을 알아야 하므로.
using System.Collections;
using System.Collections.Generic;
using UnityEngine;

public class CubeController : MonoBehaviour
{
    private void Update()
    {
        RayShot();
    }

    private void RayShot()
    {
        if(!Input.GetMouseButtonDown(0))
        {
            return;
        }

        // 1. Ray 시작 지점을 잡아줘야 한다.
        Ray ray = Camera.main.ScreenPointToRay(Input.mousePosition);
    }
}
camera.main이 있는데 테그가 main camera이다.
접근 자체가 카메라 클래스에 접근해서 Static 멤버에 접근하면 메인 카메라에 달려있는 Camera Component를 가져와준다.
계속 받아올 필요 없이 변수로써 선언해버리자.
using System.Collections;
using System.Collections.Generic;
using UnityEngine;

public class CubeController : MonoBehaviour
{
    private Camera _cam;

    private void Start()
    {
        _cam = Camera.main;
    }

    private void Update()
    {
        RayShot();
    }

    private void RayShot()
    {
        if(!Input.GetMouseButtonDown(0))
        {
            return;
        }

        // 1. Ray 시작 지점을 잡아줘야 한다.
        Ray ray = _cam.ScreenPointToRay(Input.mousePosition);
    }
}
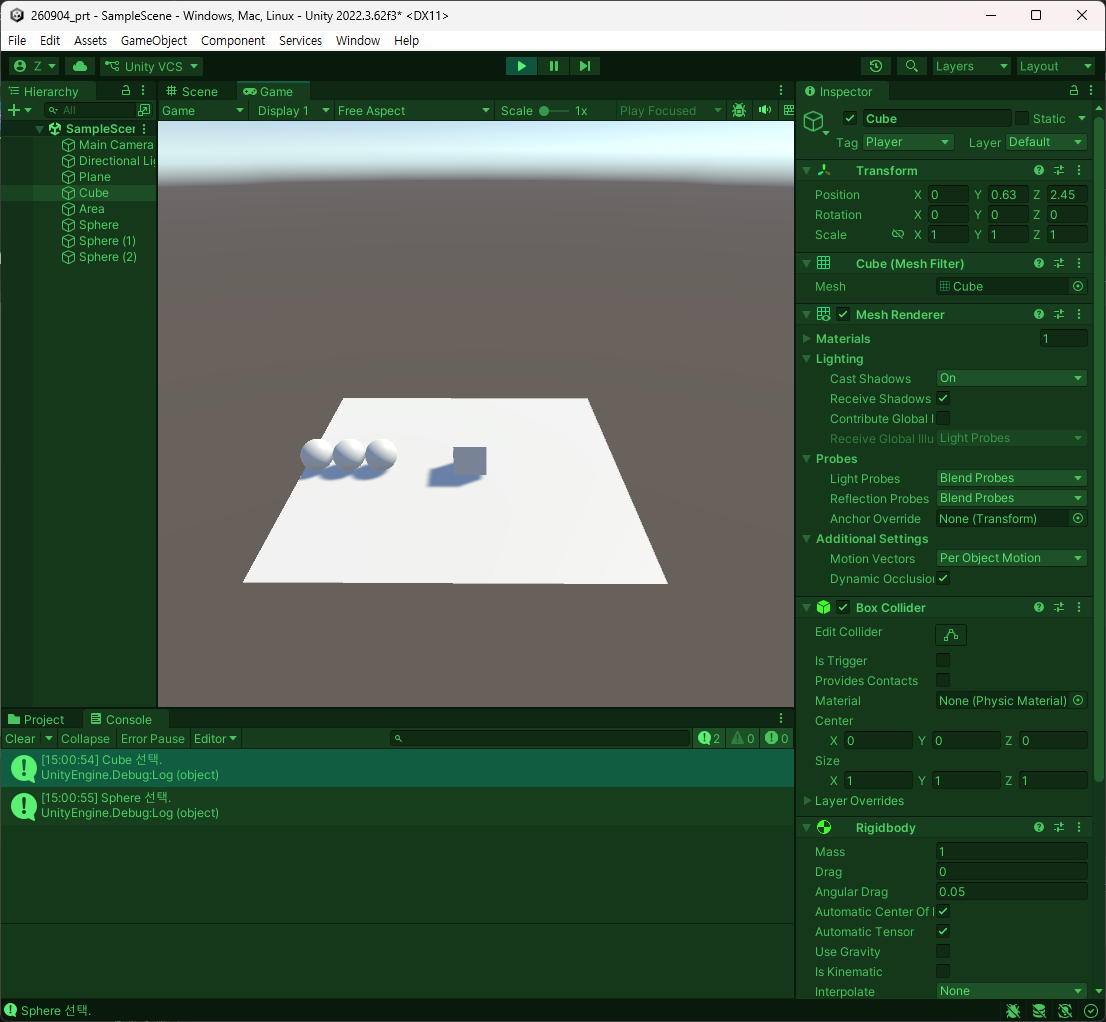
이번엔 Transform을 통한 이동까지 시켜볼 것임.
using System.Collections;
using System.Collections.Generic;
using UnityEngine;

public class CubeController : MonoBehaviour
{
    private Camera _cam;
    [SerializeField] private Transform _target;

    private void Start()
    {
        _cam = Camera.main;
    }

    private void Update()
    {
        RayShot();
    }

    private void RayShot()
    {
        if(!Input.GetMouseButtonDown(0))
        {
            return;
        }

        // 1. Ray 시작 지점을 잡아줘야 한다.
        Ray ray = _cam.ScreenPointToRay(Input.mousePosition);

        // 2. RaycastHit 구조체를 만들어서 충돌 정보를 담아준다.
        RaycastHit hit;
        if(Physics.Raycast(ray, out hit))
        {
            // 4. Plane은 제외.
            if (hit.transform.CompareTag("Ground"))
            {
                _target = null;
                return;
            }

            Debug.Log($"{hit.transform.name} 선택.");

            // 3. 충돌한 오브젝트의 Transform을 가져와서 _target에 할당한다.
            _target = hit.transform;
        }

        else
        {
            _target = null;
            return;
        }
    }
}
일단 Ground 테그를 Plane에 달아줘서 실행했을 때, Plane을 제외한 나머지는 클릭이 되는 중이다.
선택까지는 되었고 우클릭 이동을 구현해보도록 하자.
using System.Collections;
using System.Collections.Generic;
using System.Runtime.InteropServices;
using UnityEngine;

public class CubeController : MonoBehaviour
{
    private Camera _cam;
    [SerializeField] private Transform _target;

    private void Start()
    {
        _cam = Camera.main;
    }

    private void Update()
    {
        RayShot();
    }

    private void MoveTarget()
    {
        if (!Input.GetMouseButtonDown(1))
        {
            Ray ray = _cam.ScreenPointToRay(Input.mousePosition);
            RaycastHit hit;

            if (Physics.Raycast(ray, out hit))
            {
                if (hit.transform.CompareTag("Ground"))
                {
                    return;
                }

                // 여기서부터 호출이 되게끔 해야 할 것.
            }
        }
    }

    private void RayShot()
    {
        if(!Input.GetMouseButtonDown(0))
        {
            return;
        }

        // 1. Ray 시작 지점을 잡아줘야 한다.
        Ray ray = _cam.ScreenPointToRay(Input.mousePosition);

        // 2. RaycastHit 구조체를 만들어서 충돌 정보를 담아준다.
        RaycastHit hit;
        if(Physics.Raycast(ray, out hit))
        {
            // 4. Plane은 제외.
            if (hit.transform.CompareTag("Ground"))
            {
                _target = null;
                return;
            }

            Debug.Log($"{hit.transform.name} 선택.");

            // 3. 충돌한 오브젝트의 Transform을 가져와서 _target에 할당한다.
            _target = hit.transform;
        }

        else
        {
            _target = null;
            return;
        }
    }
}
C# Script를 새로 만들고 새로 만들어진 것을 토대로 CubeControll을 바꾸자.
using System.Collections;
using System.Collections.Generic;
using System.Runtime.InteropServices;
using UnityEngine;

public class CubeController : MonoBehaviour
{
    private Camera _cam;
    // 1 변경
    [SerializeField] private UnitMovement _target;

    private void Start()
    {
        _cam = Camera.main;
    }

    private void Update()
    {
        RayShot();
    }

    private void MoveTarget()
    {
        if (!Input.GetMouseButtonDown(1))
        {
            Ray ray = _cam.ScreenPointToRay(Input.mousePosition);
            RaycastHit hit;

            if (Physics.Raycast(ray, out hit))
            {
                if (hit.transform.CompareTag("Ground"))
                {
                    return;
                }

                // 여기서부터 호출이 되게끔 해야 할 것.
            }
        }
    }

    private void RayShot()
    {
        if(!Input.GetMouseButtonDown(0))
        {
            return;
        }

        // 1. Ray 시작 지점을 잡아줘야 한다.
        Ray ray = _cam.ScreenPointToRay(Input.mousePosition);

        // 2. RaycastHit 구조체를 만들어서 충돌 정보를 담아준다.
        RaycastHit hit;
        if(Physics.Raycast(ray, out hit))
        {
            // 4. Plane은 제외.
            if (hit.transform.CompareTag("Ground"))
            {
                _target = null;
                return;
            }

            Debug.Log($"{hit.transform.name} 선택.");

            // 3. 충돌한 오브젝트의 Transform을 가져와서 _target에 할당한다.
            // 2 변경
            _target = hit.transform.GetComponent<UnitMovement>();
        }

        else
        {
            _target = null;
            return;
        }
    }
}
이제 UnitMovement에서 목적지를 받는 것을 하도록 하자.
using System.Collections;
using System.Collections.Generic;
using Unity.VisualScripting;
using UnityEngine;

public class UnitMovement : MonoBehaviour
{
    // 1. 목적지를 받기
    private Vector3 _destination;
    private bool _isMoving;

    public void SetDestination(Vector3 destination)
    {
        _destination = destination;
        _isMoving = true;
    }
    // 2. 목적지까지 이동하기
    // 3. 목적지에 도착하면 목적지 해제
}
그 다음, CubeController에서 호출. MoveTarget에 추가한다.
private void MoveTarget()
{
    if (!Input.GetMouseButtonDown(1))
    {
        Ray ray = _cam.ScreenPointToRay(Input.mousePosition);
        RaycastHit hit;

        if (Physics.Raycast(ray, out hit))
        {
            if (hit.transform.CompareTag("Ground"))
            {
                return;
            }

            _target.SetDestination(hit.point);
        }
    }
}
여기서 return에 한가지 조건 설정. 타깃이 null일 때.
private void MoveTarget()
{
    if(!Input.GetMouseButtonDown(1) && _target == null)
    {
        return;
    }

    if (!Input.GetMouseButtonDown(1))
    {
        Ray ray = _cam.ScreenPointToRay(Input.mousePosition);
        RaycastHit hit;

        if (Physics.Raycast(ray, out hit))
        {
            if (hit.transform.CompareTag("Ground"))
            {
                return;
            }

            _target.SetDestination(hit.point);
        }
    }
}
계속.
using System.Collections;
using System.Collections.Generic;
using Unity.VisualScripting;
using UnityEngine;

public class UnitMovement : MonoBehaviour
{
    // 1. 목적지를 받기
    private Vector3 _destination;
    private bool _isMoving;
    [SerializeField] private float _moveSpeed;

    public void SetDestination(Vector3 destination)
    {
        _destination = destination;
        _isMoving = true;
    }
    // 2. 목적지까지 이동하기
    private void Move()
    {
        if (!_isMoving)
        {
            return;
        }

        transform.position = Vector3.MoveTowards(
            transform.position,
            _destination,
            _moveSpeed * Time.deltaTime
        );

        if(Vector3.Distance(transform.position, _destination) <= 0.1f)
        {
            _isMoving = false;
        }
    }
    // 3. 목적지에 도착하면 목적지 해제
}
CubeControll
using System.Collections;
using System.Collections.Generic;
using System.Runtime.InteropServices;
using UnityEngine;

public class CubeController : MonoBehaviour
{
    private Camera _cam;
    [SerializeField] private UnitMovement _target;

    private void Start()
    {
        _cam = Camera.main;
    }

    private void Update()
    {
        RayShot();
        MoveTarget();
    }

    private void MoveTarget()
    {
        if(!Input.GetMouseButtonDown(1) || _target == null)
        {
            return;
        }

        Ray ray = _cam.ScreenPointToRay(Input.mousePosition);
        RaycastHit hit;

        if (Physics.Raycast(ray, out hit))
        {
            if (!hit.transform.CompareTag("Ground"))
            {
                return;
            }

            _target.SetDestination(hit.point);
        }
    }

    private void RayShot()
    {
        if(!Input.GetMouseButtonDown(0))
        {
            return;
        }

        // 1. Ray 시작 지점을 잡아줘야 한다.
        Ray ray = _cam.ScreenPointToRay(Input.mousePosition);

        // 2. RaycastHit 구조체를 만들어서 충돌 정보를 담아준다.
        RaycastHit hit;
        if(Physics.Raycast(ray, out hit))
        {
            // 4. Plane은 제외.
            if (hit.transform.CompareTag("Ground"))
            {
                _target = null;
                return;
            }

            Debug.Log($"{hit.transform.name} 선택.");

            // 3. 충돌한 오브젝트의 Transform을 가져와서 _target에 할당한다.
            _target = hit.transform.GetComponent<UnitMovement>();
        }

        else
        {
            _target = null;
            return;
        }
    }
}
MoveTarget
using System.Collections;
using System.Collections.Generic;
using Unity.VisualScripting;
using UnityEngine;

public class UnitMovement : MonoBehaviour
{
    // 1. 목적지를 받기
    private Vector3 _destination;
    private bool _isMoving;
    [SerializeField] private float _moveSpeed;

    private void Update()
    {
        Move();
    }

    public void SetDestination(Vector3 destination)
    {
        _destination = destination;
        _isMoving = true;
    }
    // 2. 목적지까지 이동하기
    private void Move()
    {
        if (!_isMoving)
        {
            return;
        }

        transform.position = Vector3.MoveTowards(
            transform.position,
            _destination,
            _moveSpeed * Time.deltaTime
        );

        if(Vector3.Distance(transform.position, _destination) <= 0.1f)
        {
            _isMoving = false;
        }
    }
    // 3. 목적지에 도착하면 목적지 해제
}
3. 실습
- 이번엔 인터페이스 단위로 나눠보는 것을 해볼 것.