최근에 사이드 프로젝트를 시작했고 메인 기능은 채팅이다.
사용하는 기술 스택은 백엔드 없이 nextjs로만 사용하고 있으며 prisma를 통해 mysql DB와 통신하는 방식으로 진행하고 있다.
채팅 기능은 아직 구현해본적이 없어 우선 어떻게 실시간 채팅을 구현하는지 찾아보았다.
아래 총 3가지 정도의 방법으로 대부분 사용하는 것으로 파악하였다.
1. socket.io
2. firebase
3. sendbird
sendbird를 제외하고 나는 1,2번 위주로 살펴보았다.
sendbird를 사용하게 되면 nextjs에 서버사이드렌더링을 아예 사용하지 않도록 설정하여 사용하는 것 같아 nextjs의 이점이 없는 것 같아 선택하지 않았다.
위 2가지를 살펴보면서 파악한 정보들은 다음과 같다.
socket.io
실시간 통신할 때, 제일 많이 사용하는 방법으로 파악하였다.
프론트파트에서 socket.io-client라는 패키지를 사용하고 서버에서는 socket.io 패키지와 서버 인스턴스를 연결하여 프론트와 서버가 통신하는 방식이다.
하지만 nextjs14 app router 방식에서는 이에 대응하는 방식이 아직 적절히 나오지 않은 것 같다.
위 말대로 하기위해서는 nextjs 자체가 서버이기 때문에 nextjs 서버와 socket.io를 연결하여 구성하면 되겠다라고 생각했지만 문제점은 다음과 같았다.
nextjs 서버 인스턴스를 조회할 방법이 없다.
다음은 socket.io 공식문서에서 제시해주는 socket.io 연결 방식이다.
import express from 'express';
import { createServer } from 'node:http';
import { fileURLToPath } from 'node:url';
import { dirname, join } from 'node:path';
import { Server } from 'socket.io';

const app = express();
const server = createServer(app);
const io = new Server(server);

const __dirname = dirname(fileURLToPath(import.meta.url));

app.get('/', (req, res) => {
  res.sendFile(join(__dirname, 'index.html'));
});

io.on('connection', (socket) => {
  console.log('a user connected');
});

server.listen(3000, () => {
  console.log('server running at http://localhost:3000');
});
express 서버를 조회하여 socket.io를 연결한다.
const app = express();
const server = createServer(app);
const io = new Server(server);
하지만 nextjs는 위처럼 서버를 조회할 방법이 없다.
그리하여 page router에서 사용한 방법을 보면 api routes를 사용하여 response 값을 참조하여 socket.io와 연결하는 방식으로 대부분 사용하고 있다.
page router에서 api routes에서는 서버 요청,응답 객체를 참조하여 서버 api를 작성할 수 있다.
이해를 돕기 위한 예시 코드이다.
pages/api/socket/io.ts
import { Server as NetServer} from "http";
import { NextApiRequest, NextApiResponse } from "next";
import { Server as ServerIO } from "socket.io";
import {Socket} from "net";

export type NextApiResponseServerIo = NextApiResponse & {
    socket: Socket & {
        server: NetServer & {
            io: ServerIO;
        }
    }
}

const ioHandler = (req: NextApiRequest, res: NextApiResponseServerIo) => {
    if (!res.socket.server.io) {
        const path = "/api/socket/io";
        const httpServer: NetServer = res.socket.server as any;
        const io = new ServerIO(httpServer, {
            path: path,
            addTrailingSlash: false
        })
        res.socket.server.io = io;
    }
}
export default ioHandler;
하지만 나는 app router 방식을 사용하고 있다.
app router에서는 route handler 방식을 사용하는데 위처럼 RESPONSE 인자로 참조할 수 없기 때문에 response 객체로 socket.io와 연결할 수 없다.
app/api/route.ts
import { cookies } from 'next/headers'

export async function GET(request: Request) {


  const cookieStore = cookies()
  const token = cookieStore.get('token')

  return new Response('Hello, Next.js!', {
    status: 200,
    headers: { 'Set-Cookie': `token=${token.value}` },
  })
}
결론적으로 app router 방식에는 Response를 handler 함수의 인자로 받지 않고 있어 연결할 방법이 없기 때문에 현재까지 나온 방법으로는 socket.io와 연결할 방법이 없다.
이를 위한 방법으로 express로 서버 인스턴스를 하나 구성하여 socket.io와 연결하는 방법을 대부분 제안하고 있다.
내가 원하는 것은 nextjs 서버만 가지고 원스텝으로 가고 싶기 때문에 위 대안은 채택하지 않았다.
2.firebase
firebase는 구글에서 제공하는 클라우드 서비스로 백엔드를 클라우드 서비스로 활용할 수 있고 실시간 통신(real-time)도 가능하다.
firestore라는 Nosql Database를 통해 채팅 DB를 구성하면 firestore의 실시간 리스너를 사용하여 DB가 업데이트될 때,실시간으로 업데이트된 데이터를 화면에 최신화해줄 수 있다.
사용방법도 어렵지않고 가격적인 측면에서도 나쁘지 않은 것 같아 채택하였다
사용 방법
다음 링크에서 firebase 프로젝트를 생성하여 firestore 서비스도 생성하면 된다.
https://console.firebase.google.com/u/0/?hl=ko
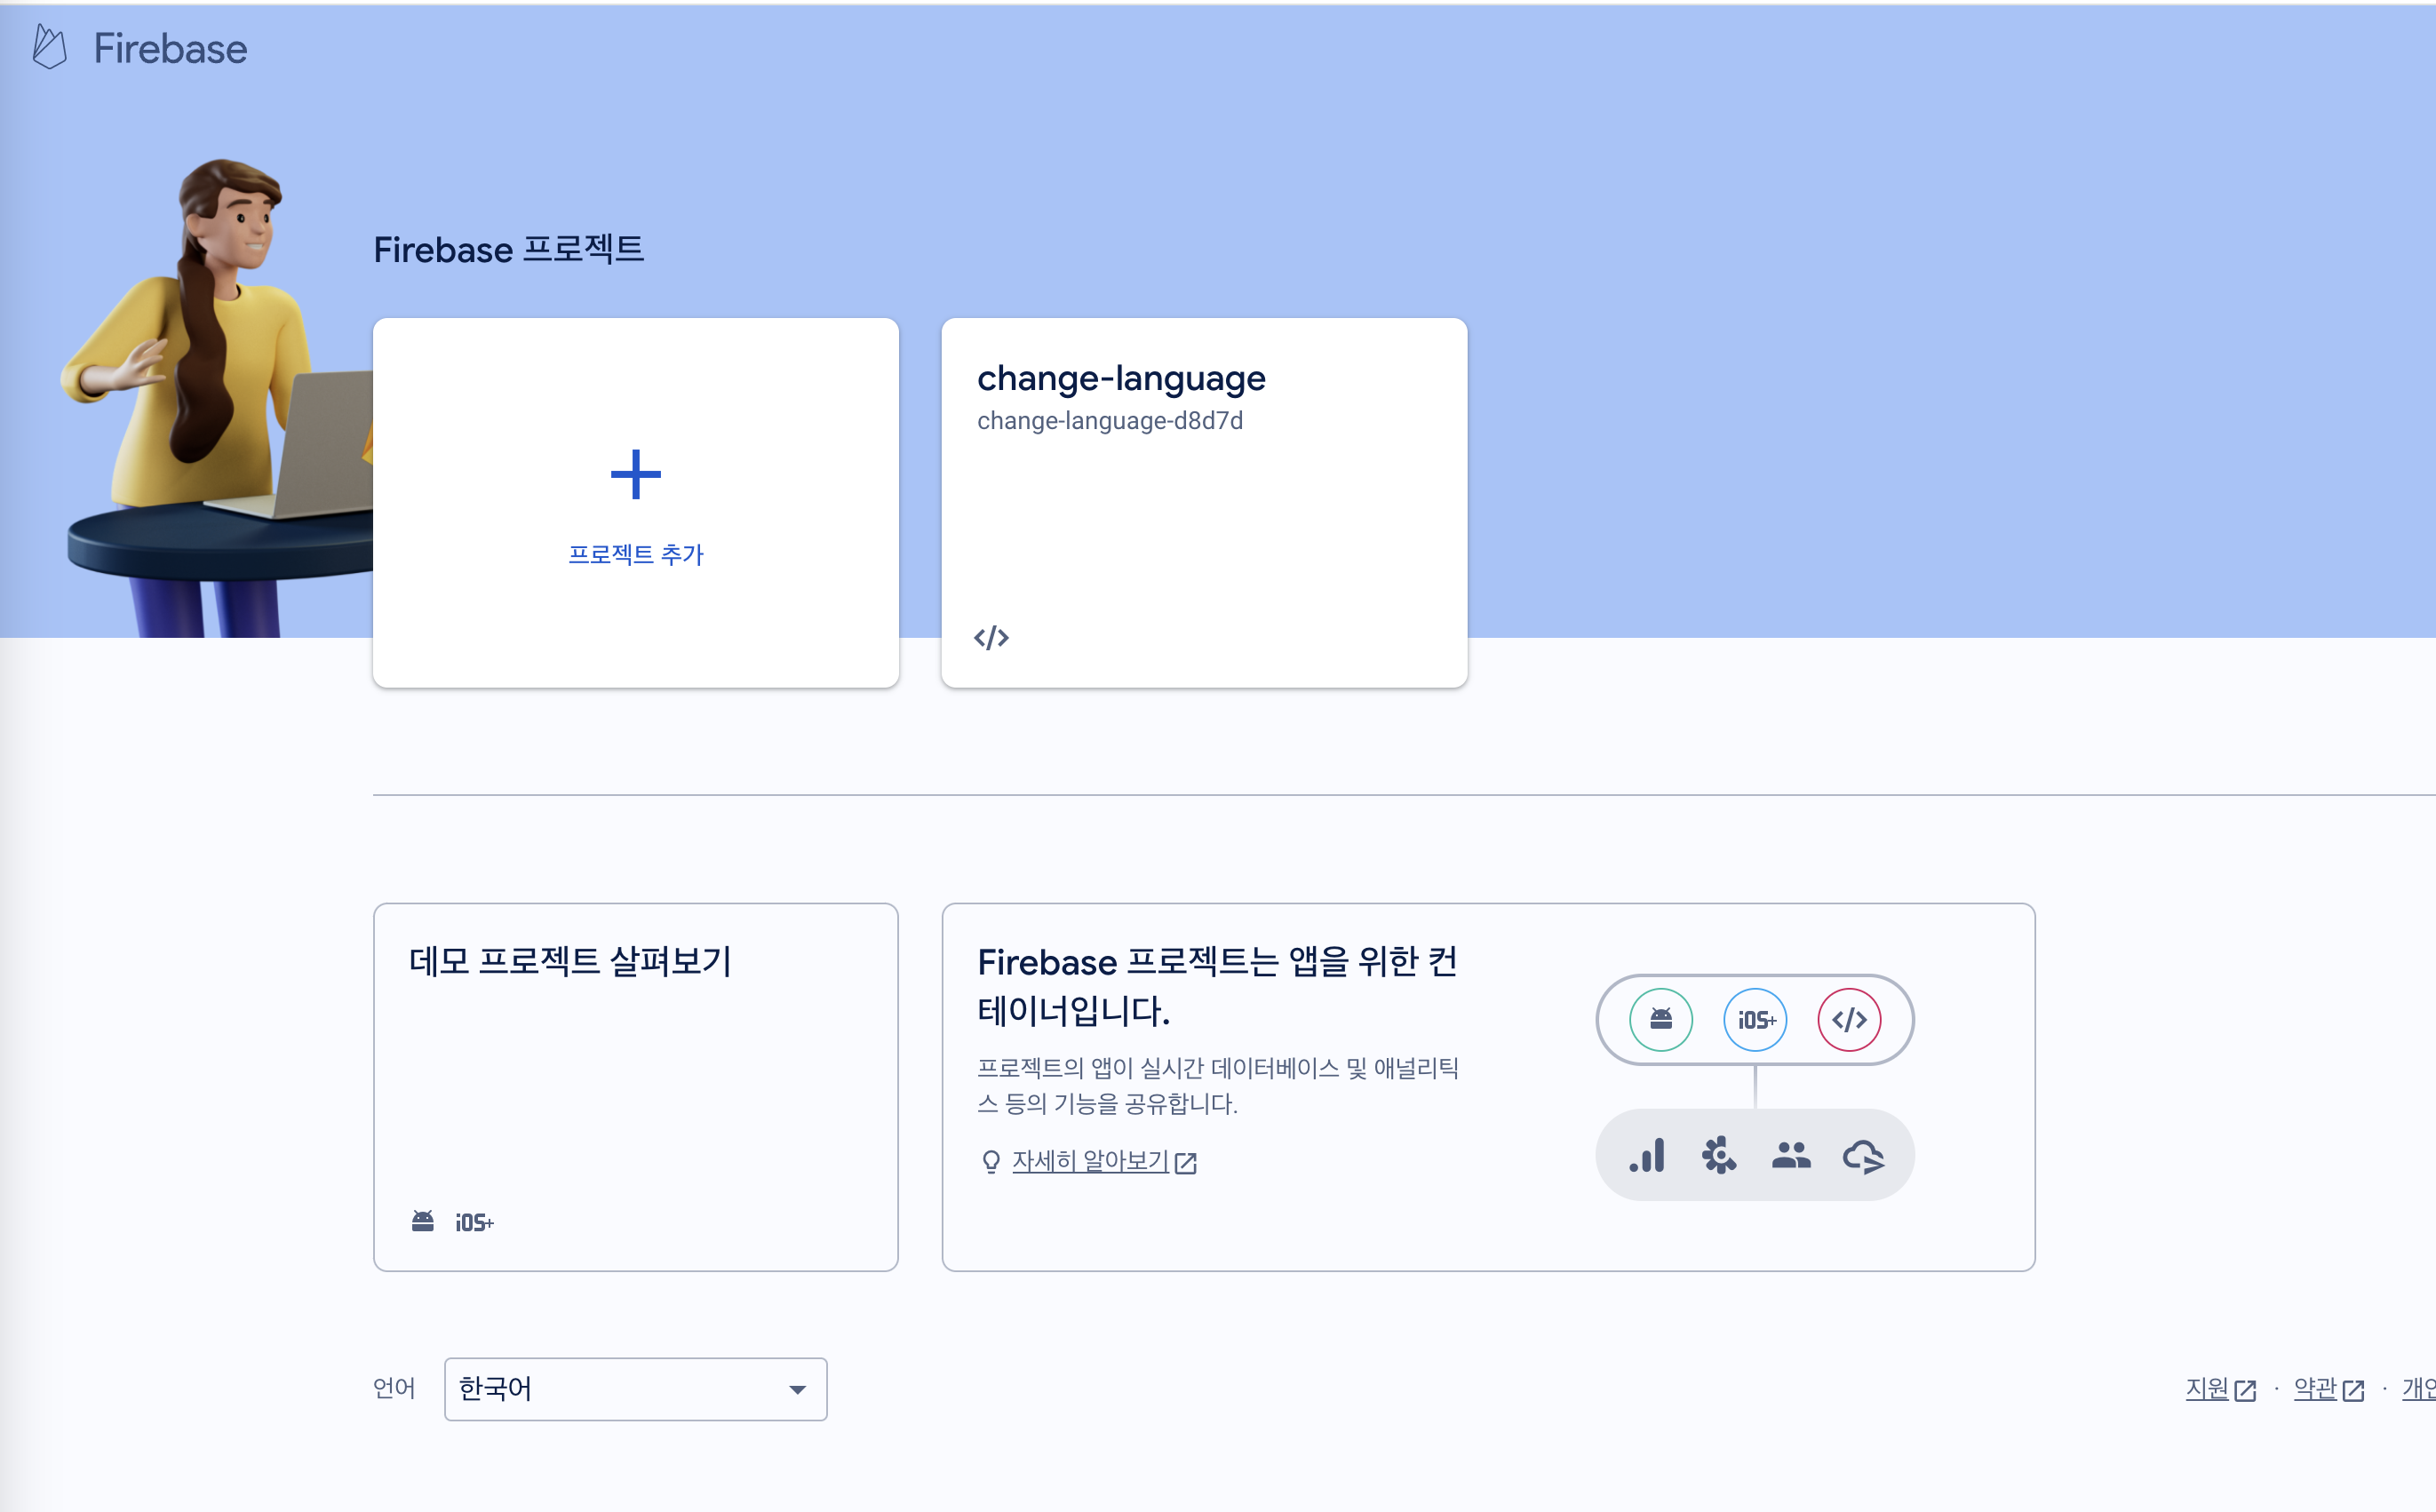
프로젝트를 생성할 때, config 제공해줄텐데 이를 참조하여 나의 nextjs 프로젝트에 연결해주면 된다.
프로젝트 생성 및 firestore 서비스 생성하는 방법은 검색해보면 잘 나와있다.
config 코드는 다음과 같은 형태이다.
제공해주는 그대로 복붙하면 된다.
fire-config.ts
// Import the functions you need from the SDKs you need
import { initializeApp } from "firebase/app";
import {getFirestore} from "@firebase/firestore";
// TODO: Add SDKs for Firebase products that you want to use
// https://firebase.google.com/docs/web/setup#available-libraries

// Your web app's Firebase configuration
// For Firebase JS SDK v7.20.0 and later, measurementId is optional
const firebaseConfig = {
    apiKey: "~~~",
    authDomain: "~~~",
    projectId: "~~~",
    storageBucket: "~~~",
    messagingSenderId: "~~",
    appId: "~~~",
    measurementId: "~~~"
};

// Initialize Firebase
const app = initializeApp(firebaseConfig);
// const analytics = getAnalytics(app);


const db = getFirestore(app);

export default db
위 db를 통해 채팅 데이터를 통신할 것이다.
나의 간단한 코드를 통해 채팅 데이터 조회 방법 및 데이터 생성 방법을 공유한다.
이를 위해 nextjs의 채팅 페이지 관련 컴포넌트들을 공유한다.
대략적으로만 구성한 것이기 때문에 변수명 및 any 타입으로 지정되있으니 참고하기 바란다.
코드에 대한 설명은 아래 주석으로 확인하면 된다.
src/app/chat/page.tsx
import ChatCollection from "@/app/chat/ChatCollection";
import ChatInput from "@/app/chat/ChatInput";

interface Chat {
    id:string
    text:string
}

/**
 * @description
 * 채팅 페이지 컴포넌트입니다.
 */
export default async function Chat(){

    return <div>
                <h1>Chat Messages</h1>
                {/* 채팅 데이터 목록 컴포넌트*/}
                <ChatCollection/>
                {/* 채팅 작성 인풋*/}
                <ChatInput/>
            </div>
}
src/app/chat/ChatCollection.tsx
"use client"
import React, {useEffect, useState} from 'react';
import {collection, onSnapshot} from "@firebase/firestore";
import db from "../../../firebase-config";

/**
 * @description
 * 채팅 목록 컴포넌트
 * firebase-firestore에서 채팅 데이터 목록을 보여줍니다.
 */
const ChatCollection = () => {

    // 채팅 목록 데이터
    const [chatData,setChatData] = useState<any[]>([])


    //
    /**
     * @description
     * 채팅 목록 데이터를 조회합니다. onSnapShot을 데이터가 실시간으 확인될 수 있도록 해줍니다.
     * 페이지가 사라질 때, 실시간 연결을 해지해주기 위해 실시간 파이어베이스 연결 함수를 반환해줍니다.
     * @param cb setState로 data를 설정해주기위한 함수 인자
     * @return unsubscribe 실시간 파이어베이스 연결 함수
     */
    function getChatList(cb:(data : any[]) => void){
        const q = collection(db, "chat")
        const unsubscribe =     onSnapshot(q,(querySnapshot) => {
            const data =    querySnapshot.docs.map((doc) => ({...doc.data(),id:doc.id}))

            cb(data)
        })

        return unsubscribe
    }


    // 마운트될 때, 실시간 파이어베이스 스트어와 연결해주며 조회하도록 해주고 페이지가 사라질 때 해지하도록 설정해줍니다.
    useEffect(() => {
        const unsubscribe = getChatList(data => setChatData(data))
        return () => {
            unsubscribe()
        }
    }, []);
    return (
        <div>
            {chatData.map((chat,index) => <p key={index}>
                {chat.text}
            </p>)}
        </div>
    );
};

export default ChatCollection;
src/app/chat/ChatInput.tsx
"use client"
import React, {useState} from 'react';
import {addDoc, collection} from "@firebase/firestore";
import db from "../../../firebase-config";

/**
 * @description
 * 채팅 작성 인풋 컴포넌트입니다.
 */
const ChatInput = () => {
    // 채팅 인풋 값
    const [message,setMessage]=useState("")

    // 채팅 메시지를 DB에 전송하고 전송되면 메시지 인풋 값을 초기화해줍니다.
   async function onSubmit(e:  React.FormEvent<HTMLFormElement>){

        e.preventDefault()
        await addDoc(collection(db,"chat"),{
            text:message
        })
       setMessage("")

    }
    return (
        <div>
            <form onSubmit={onSubmit}>
            <input type="text" name="chat" id="chat" placeholder="Send your Message" value={message} onChange={(e) => setMessage(e.target.value)}/>
            <button>전송</button>
            </form>
        </div>
    );
};

export default ChatInput;
마무리
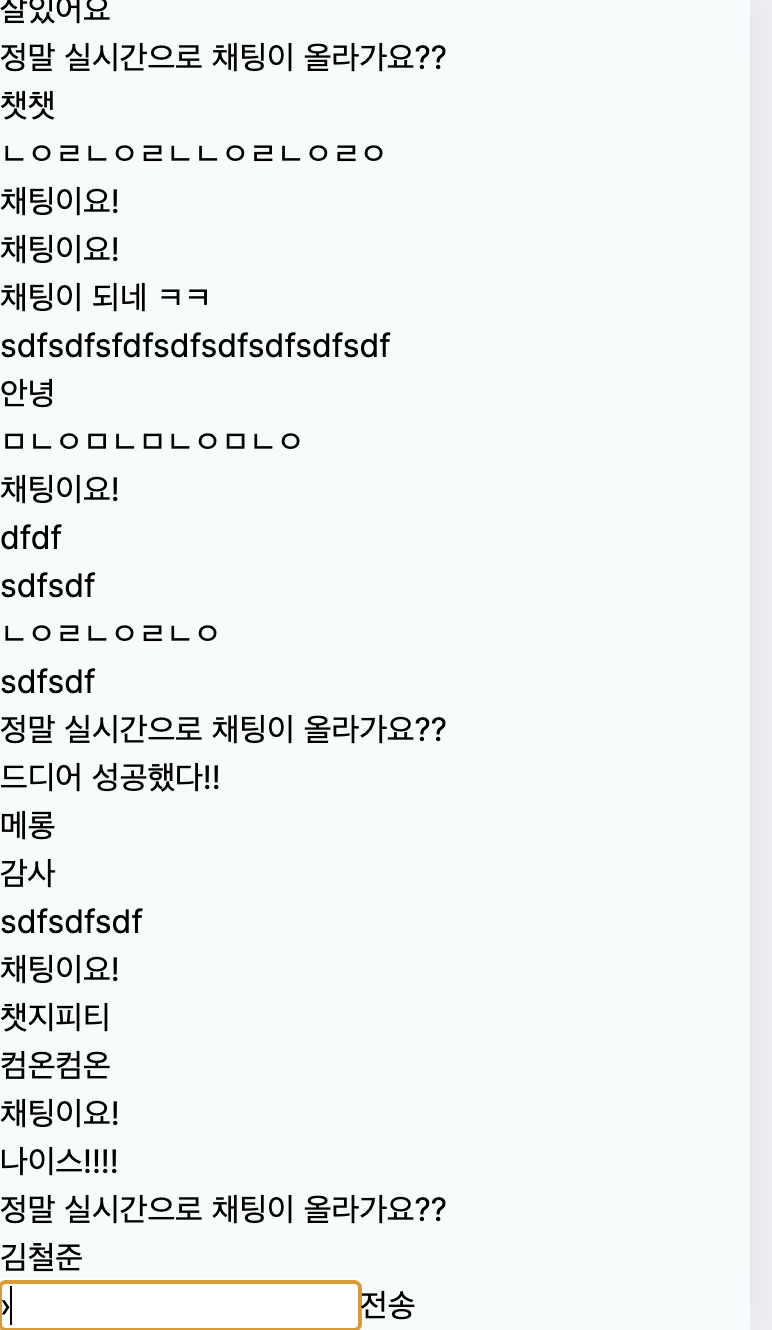
결국에는 nextjs내에서 해결하긴 했지만 socket.io를 활용하여 구성하지 못한 부분이 아쉽다.
nextjs가 풀스택 서비스를 지향하지만 아직까지 서버측을 구성할 때, 아쉬운 부분들이 많은 것 같다.
점점 고도화될테니 상황에 맞춰 잘 구성해봐야겠다.