참고 :
- https://www.youtube.com/watch?v=K9AnJ9_ZAXE&list=PLwFJcsJ61oujFW8pTo9S8_b6wujg5NgGW
- https://airflow.apache.org/docs/
Installation using Docker
Running Airflow In Docker - How-to Guides:
https://airflow.apache.org/docs/apache-airflow/stable/howto/docker-compose/index.html
Fetching docker-compose.yaml:
curl -LfO 'https://airflow.apache.org/docs/apache-airflow/2.5.1/docker-compose.yaml'docker-compose.yaml 수정 내용
x-airflow-common:
  environment:
    ...
    # DAGS 예제 제외
    AIRFLOW__CORE__LOAD_EXAMPLES: 'false'
services:
  postgres:
    ...
    ports:
      # DB 외부 접근 포트 열기
      - 5432:5432
Setting the right Airflow user
mkdir -p ./dags ./logs ./plugins
echo -e "AIRFLOW_UID=$(id -u)" > .env
Initialise the database
docker compose up airflow-initRunning Airflow
docker compose up -dConnect Airflow webserver
Webserver URL: 0.0.0.0:8080
(default)Username: airflow
(default)Password: airflow
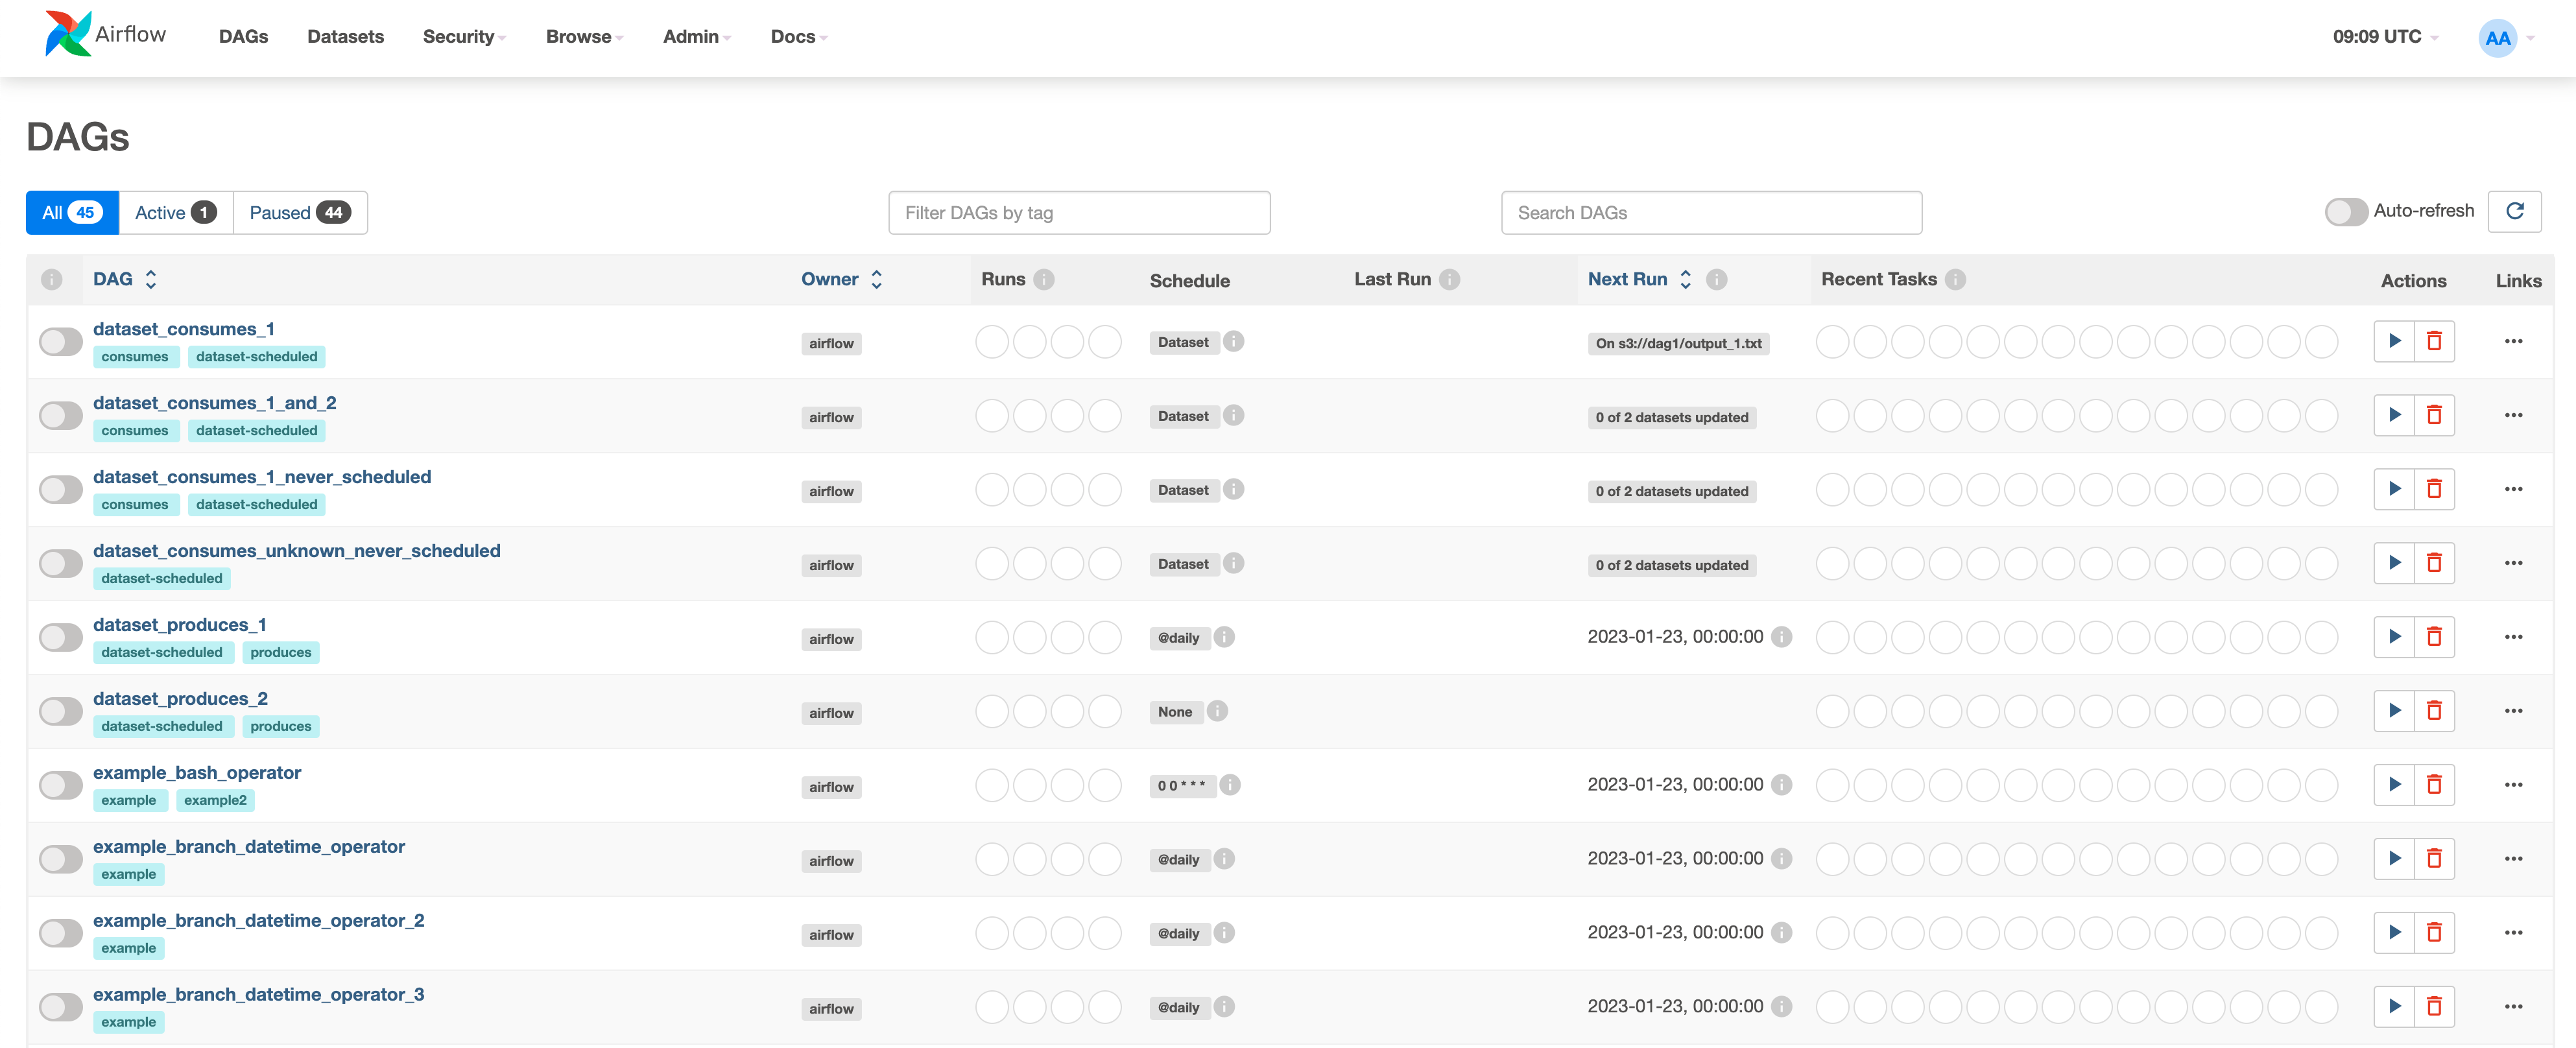
DAGs list
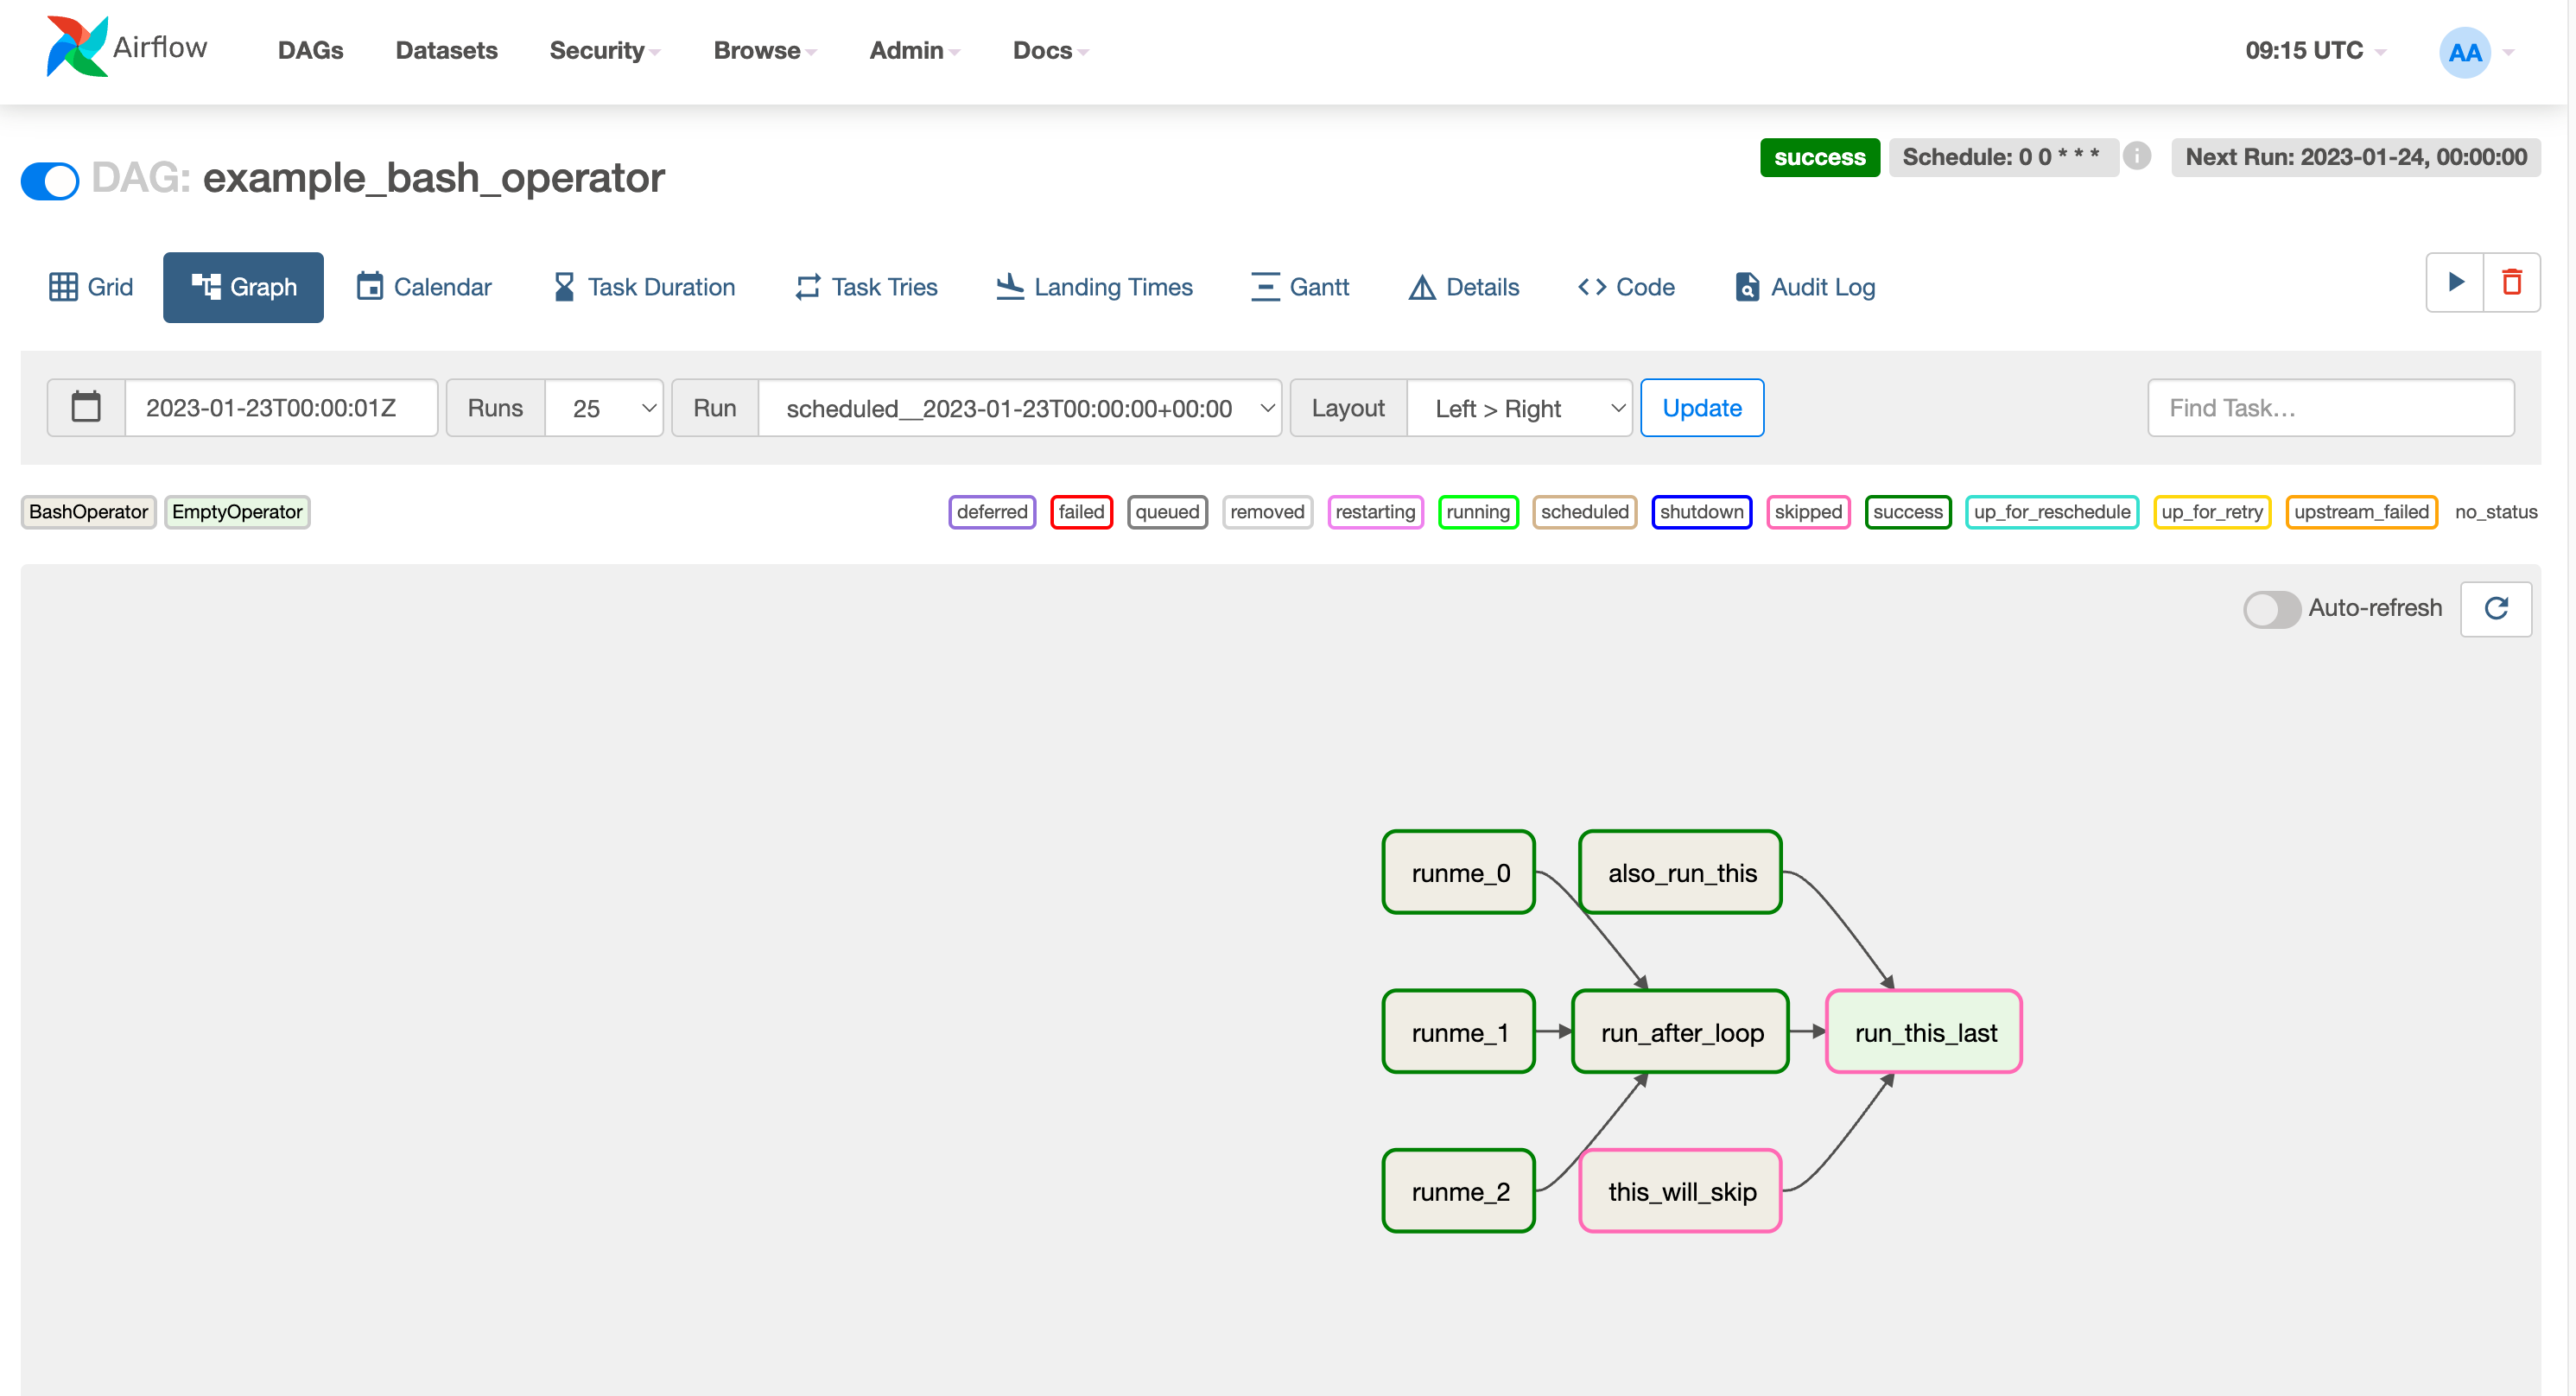
DAG graph
- 그래프 내 Task Instance 클릭하여 Instance별 로그 확인 가능
Airflow Docker install python packages
- using Dockerfile
FROM apache/airflow:{version}
COPY requirements.txt /requirements.txt
RUN pip install --user --upgrade pip
RUN pip install --no-cache-dir --user -r /requirements.txt
docker build . --tag extending_airflow:latest이후 docker-compose.yaml 파일에서 image 정보 수정
이미 도커로 설치가 되어있다면
docker-compose up -d --no-deps --build airflow-webserver airflow-scheduler
- airflow git
airflow git을 clone하여 이미지 빌드하는 방법
파이썬 패키지 설치와 별개로 커스터마이즈가 가능하나 상세 내용은 추후 별도 학습 필요
What is Airflow
- Platform for developing, scheduling, and monitoring batch-oriented workflows
- Extensible Python framework enables you to build workflows connecting with virtually any technology
- A web interface helps manage the state of your workflows
Manage workflows
- Workflow is a sequence of tasks.
- In airflow, workflow is defined as DAG(Directed Acyclic Graph - 방향성 비순환 그래프)
- A Task(representated as a node in the DAG) defines a unit of work within a DAG
- Each task is an implementation of an operator
(BashOperator, PythonOperator, CustomisedOperator, ...)
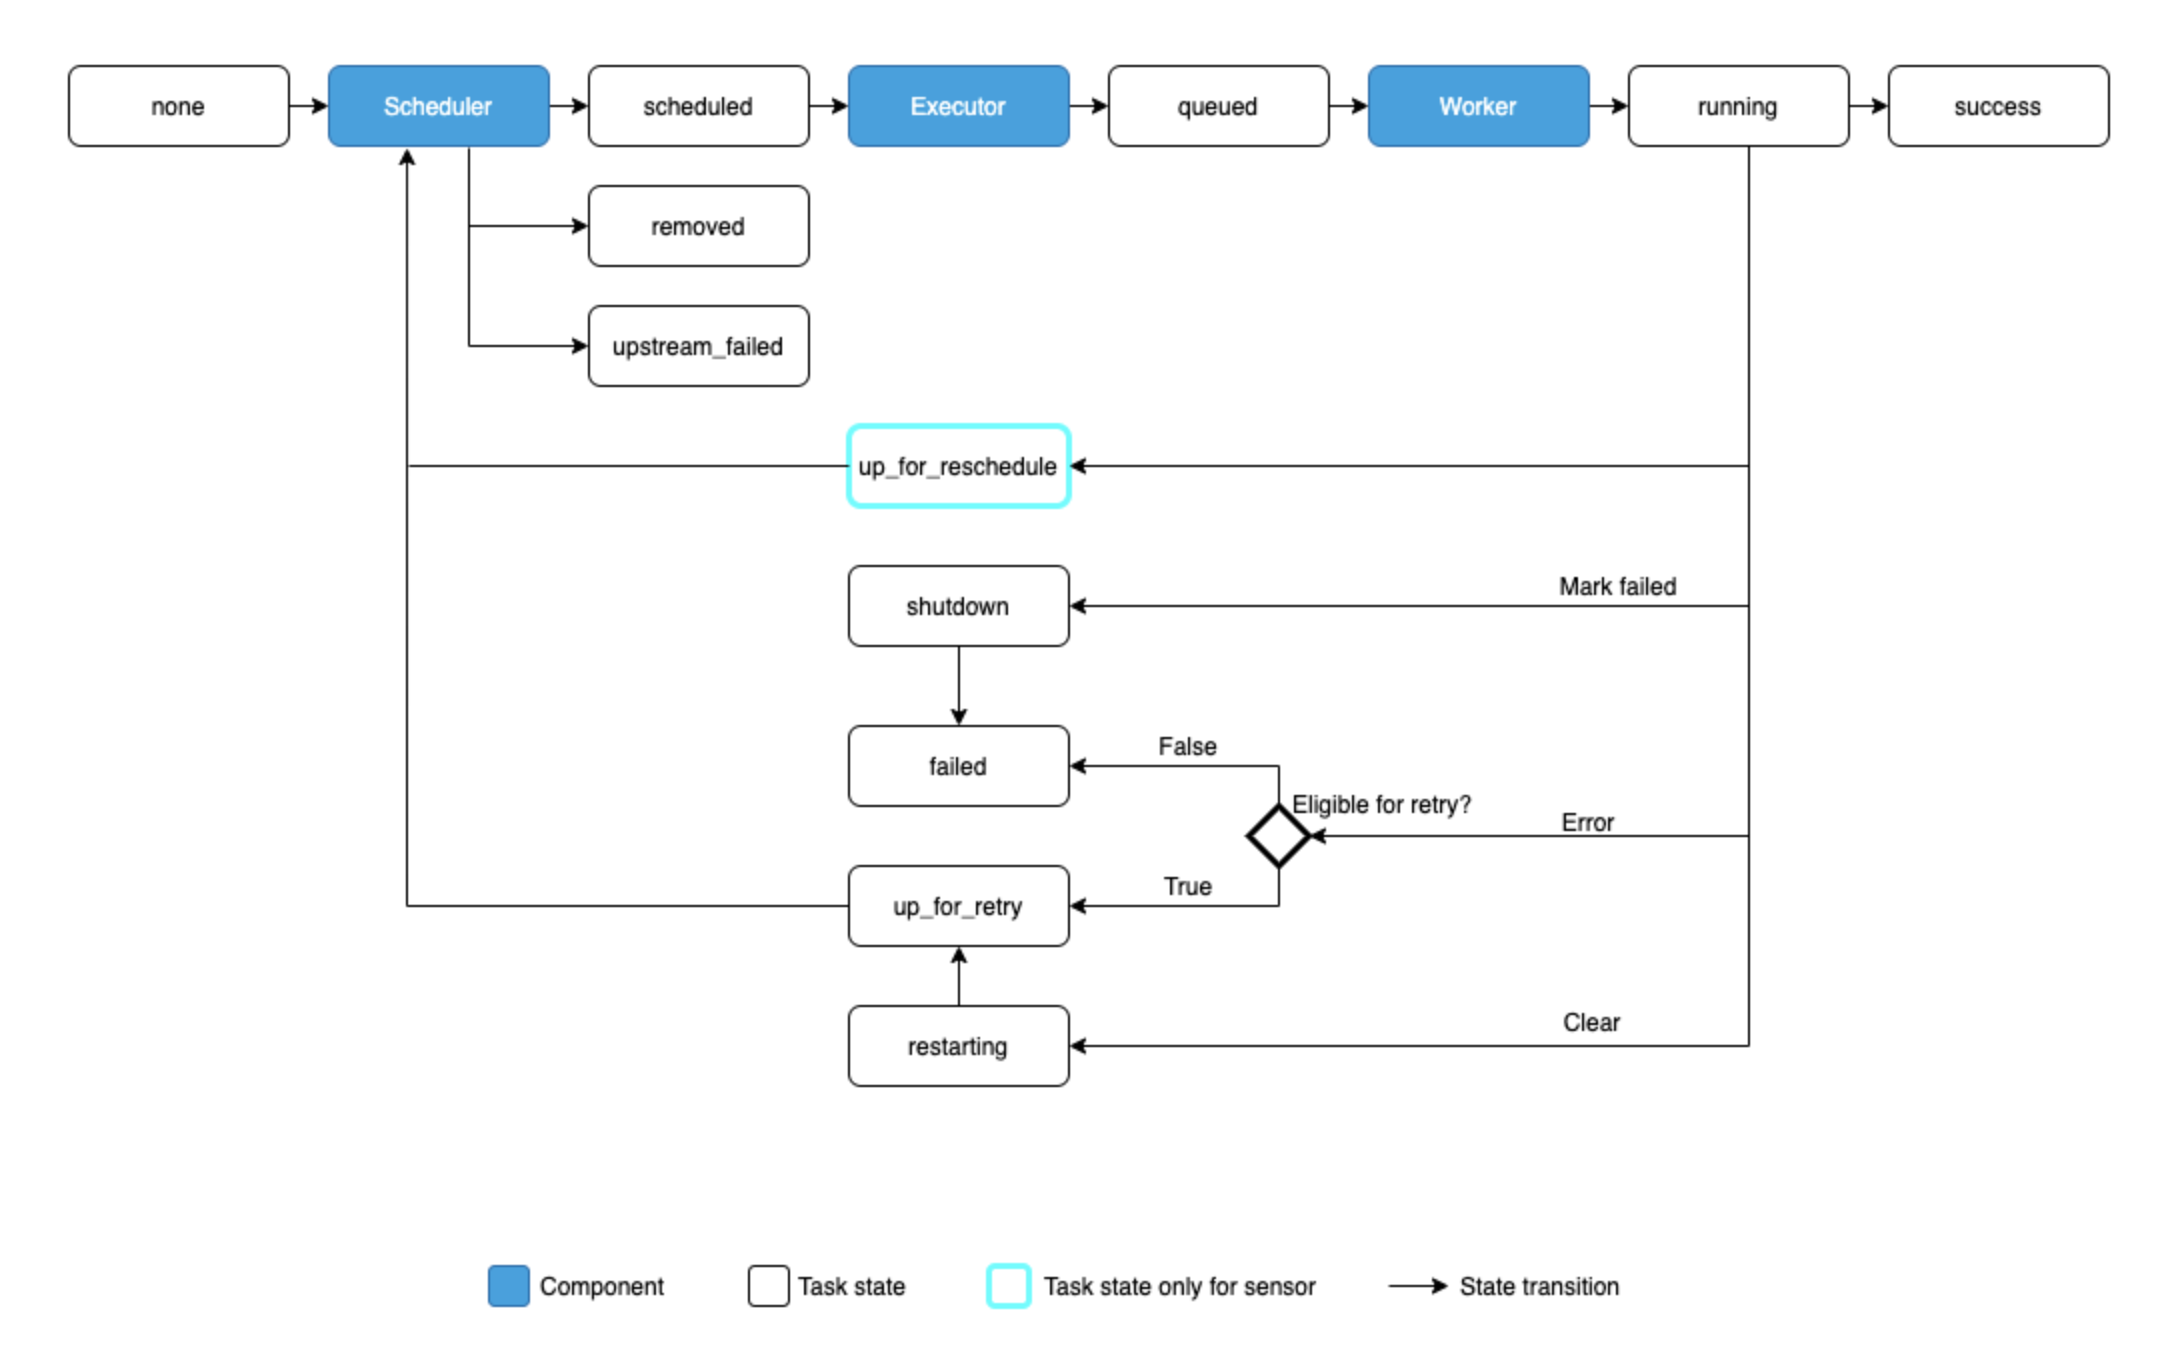
Task Lifecycle
| Type | Description |
|---|---|
| none | The Task has not yet been queued for execution (its dependencies are not yet met) |
| scheduled | The scheduler has determined the Task’s dependencies are met and it should run |
| removed | The task has vanished from the DAG since the run started |
| upstream_failed | An upstream task failed and the Trigger Rule says we needed it |
| skipped | The task was skipped due to branching, LatestOnly, or similar |
| queued | The task has been assigned to an Executor and is awaiting a worker |
| running | The task is running on a worker (or on a local/synchronous executor) |
| success | The task finished running without errors |
| up_for_reschedule | The task is a Sensor that is in reschedule mode |
| shutdown | The task was externally requested to shut down when it was running |
| failed | The task had an error during execution and failed to run |
| up_for_retry | The task failed, but has retry attempts left and will be rescheduled. |
| up_for_reschedule | The task is a Sensor that is in reschedule mode ex) task run after specific file saved in a s3 bucker |
| restarting | The task was externally requested to restart when it was running |
| deferred | The task has been deferred to a trigger |
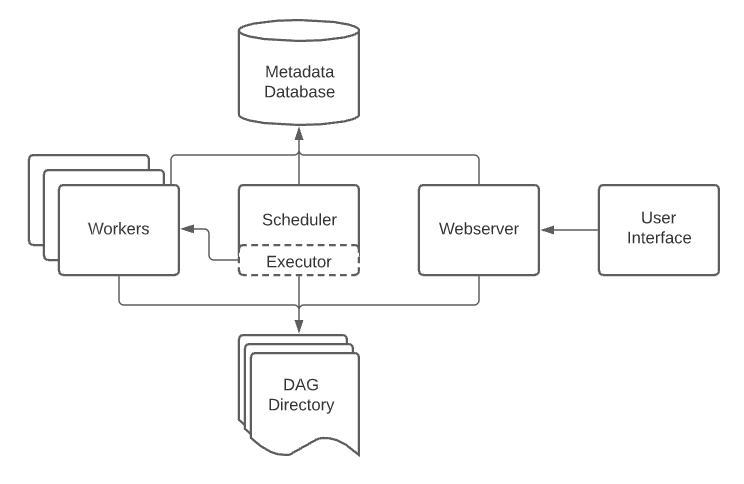
Architecture
-
A scheduler, which handles both triggering scheduled workflows, and submitting Tasks to the executor to run.
-
An executor, which handles running tasks. In the default Airflow installation, this runs everything inside the scheduler, but most production-suitable executors actually push task execution out to workers.
-
A webserver, which presents a handy user interface to inspect, trigger and debug the behaviour of DAGs and tasks.
-
A folder of DAG files, read by the scheduler and executor (and any workers the executor has)
-
A metadata database, used by the scheduler, executor and webserver to store state.
Workloads
A DAG runs through a series of Tasks, and there are three common types of task you will see:
-
Operators, predefined tasks that you can string together quickly to build most parts of your DAGs.
-
Sensors, a special subclass of Operators which are entirely about waiting for an external event to happen.
-
A TaskFlow-decorated @task, which is a custom Python function packaged up as a Task.
Control Flow
Tasks have dependencies declared on each other. You’ll see this in a DAG either using the >> and << operators:
first_task >> [second_task, third_task]
fourth_task << third_task
Or, with the set_upstream and set_downstream methods:
first_task.set_downstream([second_task, third_task])
fourth_task.set_upstream(third_task)
DAG
- ./dags(airflow docker에 mount) 폴더에 파이썬으로 작성된 DAG파일을 생성하면 airflow가 해당 파일을 읽고 관리
-> 기본적으로 5분(300)마다 webserver에서 인식하며 설정 중 dag_dir_list_interval 값으로 변경 가능
-> docker_compose.yaml에서는 AIRFLOW_SCHEDULER__DAT_DIR_LIST_INTERVAL - webserver에서 각 dag파일의 소스 확인 가능
- dag 파일의 start_date가 과거면 해당 시점부터 실행
- schedule_interval에는 datetime.timedelta, Cron Expression 모두 사용 가능 (None, @once, @hourly, ... 같은 preset 제공)
- DAG에서 기본적으로 사용할 수 있는 변수, 매크로, 필터가 존재 (ex: {{ ds }}, {{ dag_id }}, ...)
참고: https://airflow.apache.org/docs/apache-airflow/stable/templates-ref.html
# ./dags/sample_dag.py
from datetime import datetime, timedelta

from airflow import DAG
from airflow.operators.bash import BashOperator


default_args = {
    'owner': 'kckwon',
    'retries': 5,
    'retry_delay': timedelta(minutes=2)
}


with DAG(
    dag_id='sample_dag_v1',
    default_args=default_args,
    description='This is sample dag',
    start_date=datetime(2023, 1, 24, 0),
    schedule_interval='@daily'
) as dag:
    task1 = # create task with operator
    task2 = # create task with operator
    task3 = # create task with operator

    # Task dependency method 1
    # task1.set_downstream(task2)
    # task1.set_downstream(task3)

    # Task dependency method 2
    # task1 >> task2
    # task1 >> task3

    # Task dependency method 3
    task1 >> [task2, task3]
task with parameters
...

def greet(name, age):
    print(f'Hello! My name is {name}, and I am {age} years old!')

with DAG(
    dag_id='sample_dag_v2',
    default_args=default_args,
    description='This is sample dag',
    start_date=datetime(2023, 1, 24, 0),
    schedule_interval='@daily'
) as dag:
    task1 = PythonOperator(
        task_id='greet'
        python_callable=greet
        op_kwargs={'name': 'Tom', 'age': 20}
    )

    task1
Data sharing via XComs
-
task의 return 값이 XComs에 저장되고 해당 DAG의 이후 task에서 사용이 가능
-
XComs에 저장되는 값의 크기는 최대 48kb
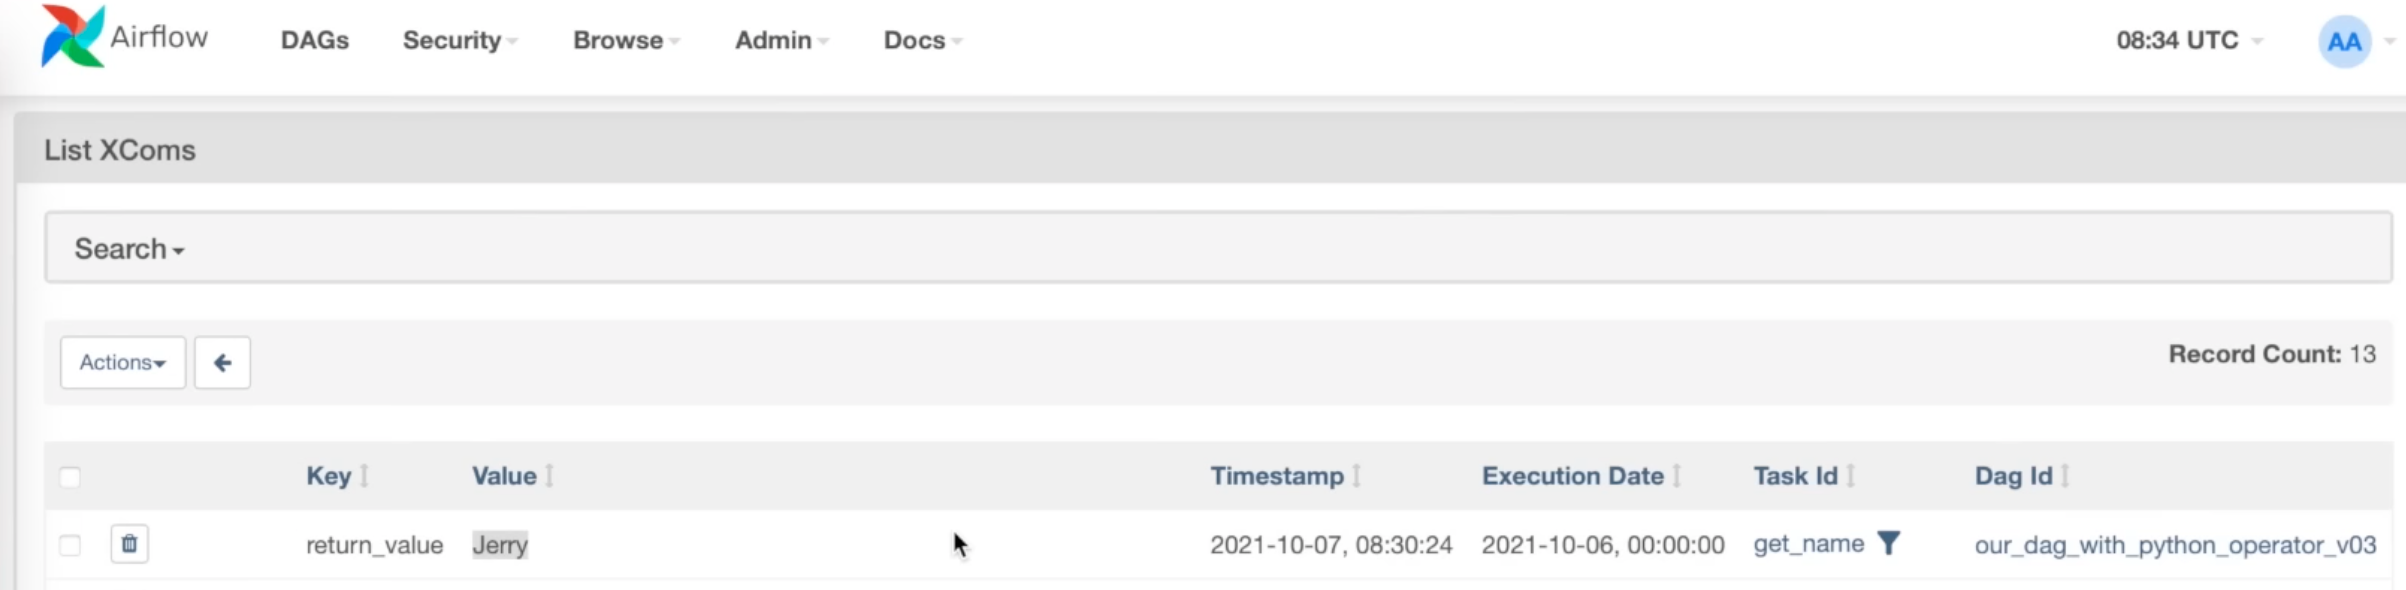
Return value
...

def get_name():
    return 'Jerry'

with DAG(
    dag_id='sample_dag_v3',
    default_args=default_args,
    description='This is sample dag',
    start_date=datetime(2023, 1, 24, 0),
    schedule_interval='@daily'
) as dag:
    task1 = PythonOperator(
        task_id='get_name'
        python_callable=get_name
    )

    task1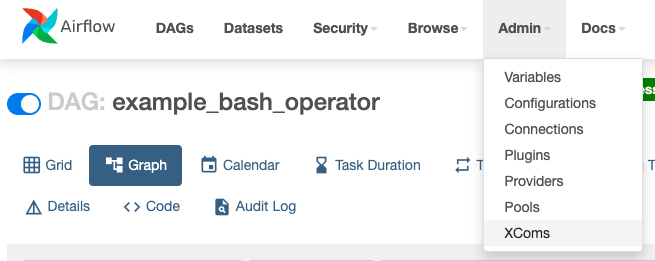
Get data from XComs
...

def get_name():
    return 'Jerry'

def greet(age, ti):
	name = ti.xcom_pull(task_id='get_name')
    print(f'Hello! My name is {name}, and I am {age} years old!')


with DAG(
    dag_id='sample_dag_v4',
    default_args=default_args,
    description='This is sample dag',
    start_date=datetime(2023, 1, 24, 0),
    schedule_interval='@daily'
) as dag:
    task1 = PythonOperator(
        task_id='get_name'
        python_callable=get_name
    )

    task2 = PythonOperator(
        task_id='get_name'
        python_callable=get_name
        op_kwargs={'age': 20}
    )

    task1 >> task2
Get/Push multiple data
...
def get_user(ti):
	name = ti.xcom_push(key='first_name', value='Jerry')
	name = ti.xcom_push(key='last_name', value='Fridman')
    age = ti.xcom_push(key='age', value=20)

def greet(ti):
	first_name = ti.xcom_pull(task_id='get_user', key='first_name')
    last_name = ti.xcom_pull(task_id='get_user', key='last_name')
    age = ti.xcom_pull(task_id='get_user', key='age')
    print(f'Hello! My name is {first_name} {last_name}, and I am {age} years old!')


with DAG(
    dag_id='sample_dag_v5',
    default_args=default_args,
    description='This is sample dag',
    start_date=datetime(2023, 1, 24, 0),
    schedule_interval='@daily'
) as dag:
    task1 = PythonOperator(
        task_id='get_name'
        python_callable=get_name
    )

    task2 = PythonOperator(
        task_id='get_name'
        python_callable=get_name
    )

    task1 >> task2
DAG with BashOperator
from datetime import datetime, timedelta

from airflow import DAG
from airflow.operators.bash import BashOperator


default_args = {
    'owner': 'kckwon',
    'retries': 5,
    'retry_delay': timedelta(minutes=2)
}


with DAG(
    dag_id='BashOperator_DAG',
    default_args=default_args,
    description='This is BashOperator_DAG',
    start_date=datetime(2023, 1, 24, 0),
    schedule_interval='@daily'
) as dag:
    task1 = BashOperator(
        task_id='first_task',
        bash_command="echo hello world, this is the first task!"
    )

    task2 = BashOperator(
        task_id='second_task',
        bash_command="echo hey, I am task2 and will be running after task1!"
    )

    task3 = BashOperator(
        task_id='thrid_task',
        bash_command="echo hey, I am task3 and will be running after task1 at the same time as task2!"
    )

    task1 >> [task2, task3]
DAG with PythonOperator
...
def greet(some_dict):
	print("some dict: ", some_dict)

with DAG(
    ...
) as dag:
    task1 = PythonOperator(
        task_id='greet',
        python_callable=greet,
        op_kwargs={'some_dict': {'a': 1, 'b': 2}}
    )

    task1
DAG with PostgresOperator
webserver > Admin > Connections에서 Postgres Type의 커넥션을 추가하고 DAG에서 해당 connection_id를 통해 사용이 가능
with DAG(
	...
) as dag:
    task1 = PostgresOperator(
        task_id='insert_into_table',
        postgres_conn_id='postgres_localhost',
        sql="""
            insert into dag_runs (dt, dag_id) values ('{{ ds }}', '{{ dag.dag_id }}')
        """
    )

    task1
Dag with AWS S3 Sensor
Sensor: A Special type of operator which waits for something to occur
use case - don't know exact time when the file exists
with DAG(
	...
) as dag:
	# KeySensor는 단지 파일이 존재하는지 체크
	# S3CreateObjectOperator, S3CopyObjectOperator 등 여러가지 Operator가 존재
    task1 = S3KeySensor(
        task_id='sensor_s3',
        bucket_name='airflow',
        bucket_key='data.csv',
        aws_conn_id='s3_conn',
        mode='poke',
        poke_interval=5,
        timeout=30
    )
Dag with Hook(AWS S3/postgres)
airflow connection을 통한 hook 사용 가능
def postgres_to_s3(ds_nodash, next_ds_nodash):
    # step 1: query data from postgresql db and save into text file
    hook = PostgresHook(postgres_conn_id="postgres_localhost")
    conn = hook.get_conn()
    cursor = conn.cursor()
    cursor.execute("select * from orders where date >= %s and date < %s",
                   (ds_nodash, next_ds_nodash))
    with NamedTemporaryFile(mode='w', suffix=f"{ds_nodash}") as f:
    # with open(f"dags/get_orders_{ds_nodash}.txt", "w") as f:
        csv_writer = csv.writer(f)
        csv_writer.writerow([i[0] for i in cursor.description])
        csv_writer.writerows(cursor)
        f.flush()
        cursor.close()
        conn.close()
        logging.info("Saved orders data in text file: %s", f"dags/get_orders_{ds_nodash}.txt")
    # step 2: upload text file into S3
        s3_hook = S3Hook(aws_conn_id="minio_conn")
        s3_hook.load_file(
            filename=f.name,
            key=f"orders/{ds_nodash}.txt",
            bucket_name="airflow",
            replace=True
        )
        logging.info("Orders file %s has been pushed to S3!", f.name)


with DAG(
    dag_id="dag_with_postgres_hooks",
    default_args=default_args,
    start_date=datetime(2023, 1, 24),
    schedule_interval='@daily'
) as dag:
    task1 = PythonOperator(
        task_id="postgres_to_s3",
        python_callable=postgres_to_s3
    )
    task1
TaskFlow API(Using Decorator)
from datetime import datetime, timedelta

from airflow.decorators import dag, task


default_args = {
    'owner': 'kckwon',
    'retries': 5,
    'retry_delay': timedelta(minutes=5)
}

@dag(dag_id='dag_with_taskflow_api',
     default_args=default_args,
     start_date=datetime(2023, 1, 24),
     schedule_interval='@daily')
def hello_world_etl():

    @task(multiple_outputs=True)
    def get_name():
        return {
            'first_name': 'Jerry',
            'last_name': 'Fridman'
        }

    @task()
    def get_age():
        return 19

    @task()
    def greet(first_name, last_name, age):
        print(f"Hello World! My name is {first_name} {last_name} "
              f"and I am {age} years old!")

    name_dict = get_name()
    age = get_age()
    greet(first_name=name_dict['first_name'],
          last_name=name_dict['last_name'],
          age=age)

hello_world_etl()
Reusing a decorated task
from airflow.decorators import task, dag
from datetime import datetime


@task
def add_task(x, y):
    print(f"Task args: x={x}, y={y}")
    return x + y


@dag(start_date=datetime(2022, 1, 1))
def mydag():
    start = add_task.override(task_id="start")(1, 2)
    for i in range(3):
        start >> add_task.override(task_id=f"add_start_{i}")(start, i)


@dag(start_date=datetime(2022, 1, 1))
def mydag2():
    start = add_task(1, 2)
    for i in range(3):
        start >> add_task.override(task_id=f"new_add_task_{i}")(start, i)


first_dag = mydag()
second_dag = mydag2()
Catch-Up / Backpill / Re-run Tasks
Catchup
An Airflow DAG defined with a start_date, possibly an end_date, and a non-dataset schedule, defines a series of intervals which the scheduler turns into individual DAG runs and executes. The scheduler, by default, will kick off a DAG Run for any data interval that has not been run since the last data interval (or has been cleared). This concept is called Catchup.
with DAG(
    dag_id='dag_with_catchup_backfill',
    default_args=default_args,
    start_date=datetime(2023, 1, 1),
    schedule_interval='@daily',
    catchup=False  # default value: True
) as dag:
    task1 = BashOperator(
        task_id='task1',
        bash_command='echo This is a simple bash command!'
    )
Backfill
There can be the case when you may want to run the DAG for a specified historical period e.g., A data filling DAG is created with start_date 2019-11-21, but another user requires the output data from a month ago i.e., 2019-10-21. This process is known as Backfill.
You may want to backfill the data even in the cases when catchup is disabled.
airflow dags backfill \
    --start-date START_DATE \
    --end-date END_DATE \
    dag_id
Re-run Tasks
Some of the tasks can fail during the scheduled run. Once you have fixed the errors after going through the logs, you can re-run the tasks by clearing them for the scheduled date. Clearing a task instance doesn’t delete the task instance record. Instead, it updates max_tries to 0 and sets the current task instance state to None, which causes the task to re-run.
Click on the failed task in the Tree or Graph views and then click on Clear. The executor will re-run it.
There are multiple options you can select to re-run -
- Past - All the instances of the task in the runs before the DAG’s most recent data interval
- Future - All the instances of the task in the runs after the DAG’s most recent data interval
- Upstream - The upstream tasks in the current DAG
- Downstream - The downstream tasks in the current DAG
- Recursive - All the tasks in the child DAGs and parent DAGs
- Failed - Only the failed tasks in the DAG’s most recent run
You can also clear the task through CLI using the command:
airflow tasks clear dag_id \
    --task-regex task_regex \
    --start-date START_DATE \
    --end-date END_DATE