42서울의 멘토링 시스템이기 때문에 로그인 구현에 42 OAuth를 이용했다.
이 글은 42 OAuth 사용법이라기 보다는, 로그인의 전반적인 흐름을 설명한다.
(사용법은 42 api docs 참조)
42 api 사용을 위한 토큰 얻기
- 로그인 후 code 획득
- code로 access token 획득
- access token으로 42 api 이용 가능
code를 얻어보자
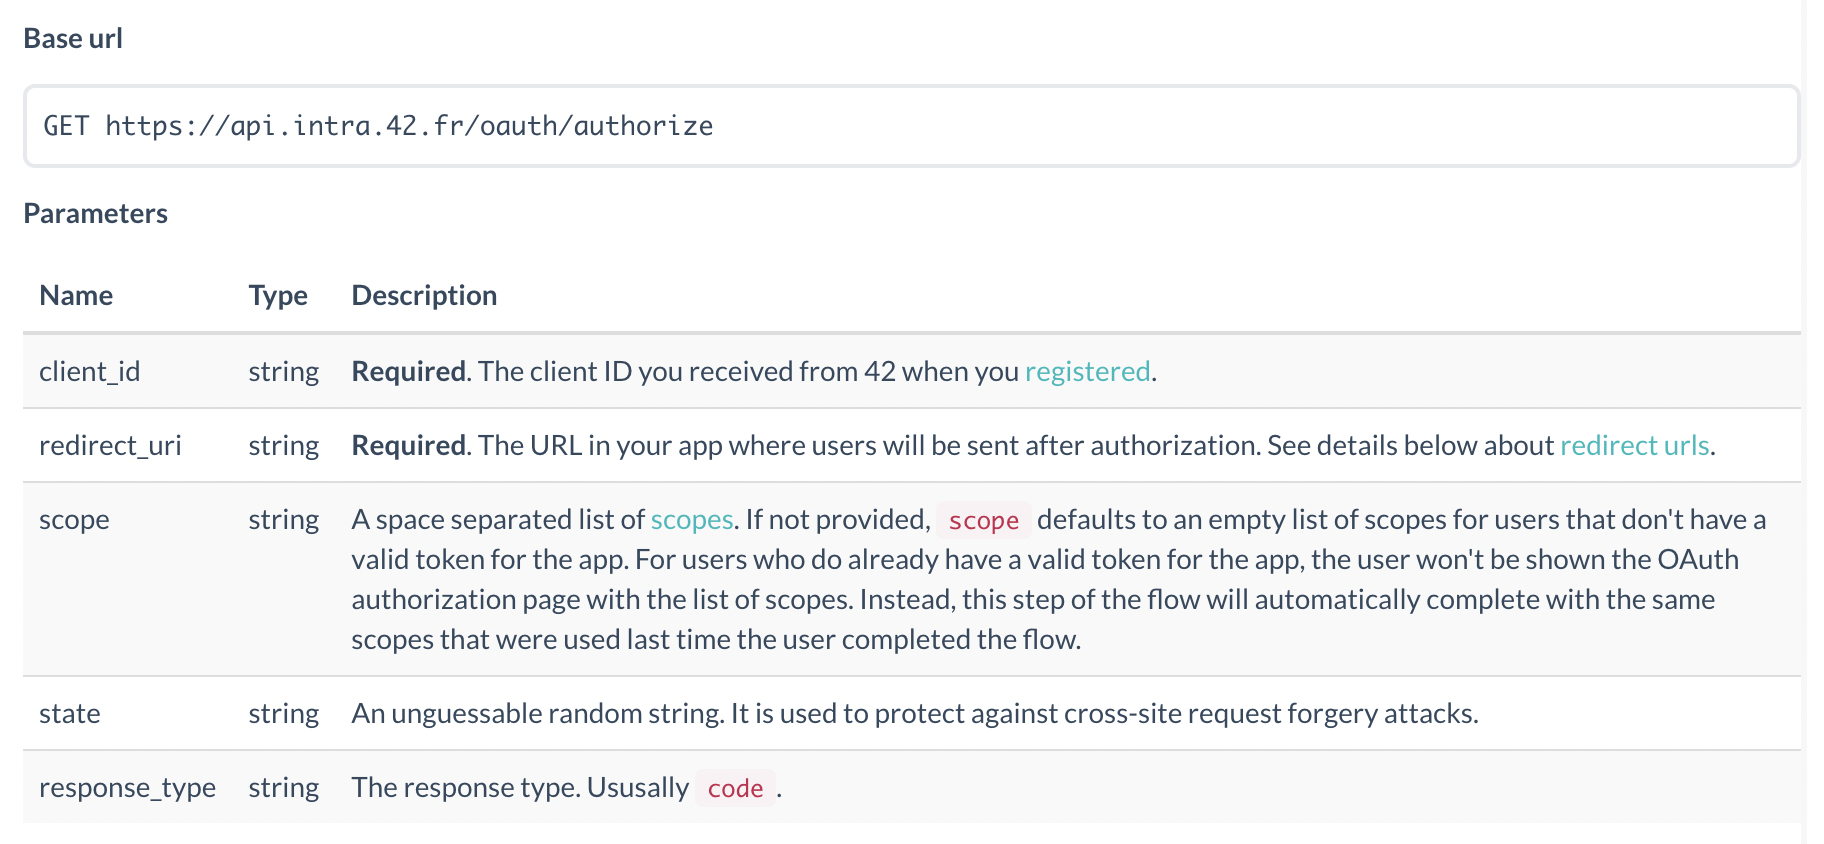
- 프론트에서 로그인 요청
https://api.intra.42.fr/oauth/authorize?client_id=${client_id}&redirect_uri=${redirect_uri}&response_type=code
- 42 로그인
- 로그인 redirect uri에 등록한 곳으로 콜백이 오면 쿼리에서
code획득
code로 access token 획득
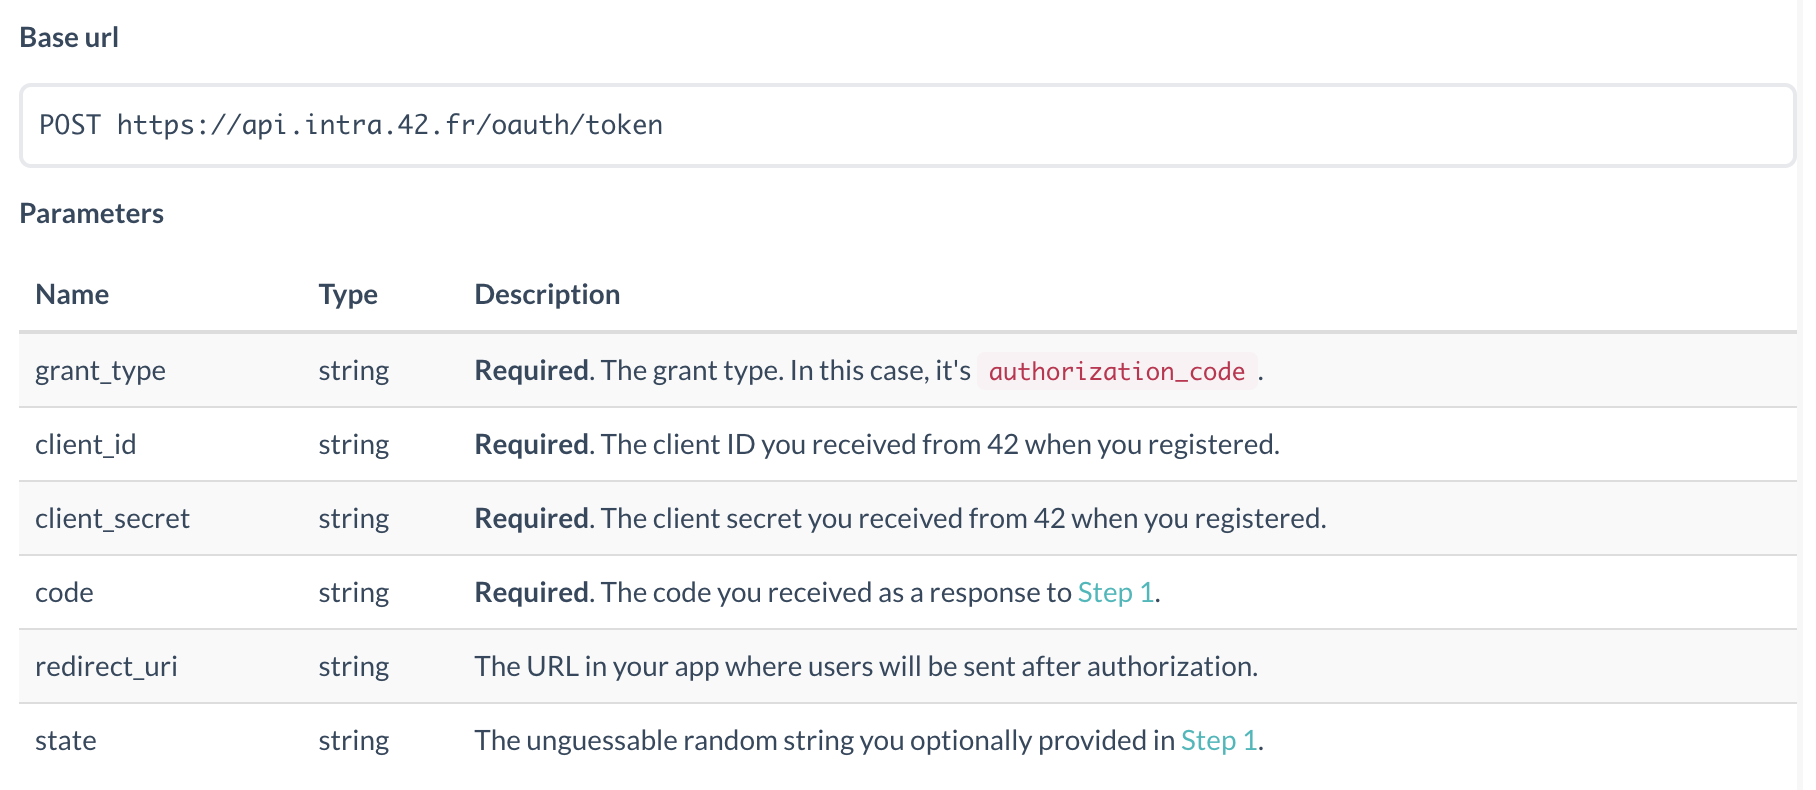
api.intra.42.fr/oauth/token으로 POST 요청https://api.intra.42.fr/oauth/token?grant_type=authorization_code&client_id=${client_id}&client_secret=${client_secret}&code=${code}&redirect_uri=${redirect_uri}
- 응답에서
access token획득
async getAccessToken(code: string): Promise<string> {
  const tokenUrl = `https://api.intra.42.fr/oauth/token?grant_type=authorization_code&client_id=${process.env.UID_42}&client_secret=${process.env.SECRET_42}&code=${code}&redirect_uri=${process.env.REDIRECT_42}`;
  let res;
  try {
    res = await fetch(tokenUrl, { method: 'post' });
  } catch (err) {
    throw new ConflictException(err, 'fetch 작업 중 에러가 발생했습니다.');
  }
  if (res.status >= 400) {
    throw new ConflictException('Access Token을 받아올 수 없습니다.');
  }
  try {
    const data: TokenResponse = await res.json();
    return data.access_token;
  } catch (err) {
    throw new ConflictException(
      err,
      '응답에서 데이터를 얻어 오는 중 에러가 발생했습니다.',
    );
  }
}
access token을 이용하여 API 요청
Authorization 헤더에 토큰을 포함시켜서 요청을 보내면 된다.
Authorization: Bearer [ACCESS_TOKEN]로그인
위와 같은 방법을 이용하면 42 프로필 정보를 받아와서 로그인을 구현할 수 있다.
액세스 토큰을 이용해서 프로필 정보를 주는 api를 요청하면 된다.
여기서 확인해야 하는 몇가지 조건이 존재한다.
- 서울 캠퍼스인가?
- 멘토링 시스템은 42서울에만 존재한다고 한다. 따라서 캠퍼스 위치를 확인 후 서울이 아니면 예외 던진다.
- 어떤 유저인가?
- 카뎃/멘토/스태프에 따라 필요한 정보가 다름, 로그인 흐름 다름
- 카뎃일 경우 본과정에 들어왔는지, 공통과정을 돌파하기 전이면 블랙홀에 빠진 건 아닌지 확인
흐름
스태프
스태프의 경우는 간단하다.
멘토링 신청 기능이 필요 없고, 레포트에 관련된 기능만 존재하므로 필요한 정보 자체가 적다.
따라서 스태프는 특별한 정보 저장 로직 없이 42 로그인으로 권한만 확인한다.
멘토
멘토는 필수정보가 존재한다.
- 레포트 작성에 필요한 회사/직책, 본명
- 멘토링 신청을 위한 멘토링 가능 여부 ( + 가능하다면 멘토링 가능 시간)
- 알림을 보내기 위한 이메일
- 카뎃과의 연락 수단으로 사용할 슬랙 아이디
를 필수정보로 취급한다.
받아온 프로필 정보를 기반으로 DB에서 유저 데이터를 검색한다.
검색결과에validateInfo라는 필수정보 확인 함수를 이용하여 유저를 회원가입 페이지로 보내야 하는지 확인한다.
validateInfo(mentor: Mentors): boolean {
  if (
    !mentor.slackId ||
    !mentor.email ||
    !mentor.name ||
    !mentor.duty ||
    !mentor.company
  ) {
    return false;
  }
  if (mentor.isActive) {
    if (!mentor.availableTime) {
      return false;
    }
    const week: AvailableTimeDto[][] = JSON.parse(mentor.availableTime);
    let join = false;
    week.forEach(day => {
      if (day.length > 0) {
        join = true;
      }
    });
    return join;
  }
  return true;
}
카뎃
카뎃 또한 필수정보가 존재한다.
- 레포트 정보에 포함될 본명
validateInfo(cadet: Cadets): boolean {
  if (!cadet.name) {
    return false;
  }
  return true;
}
굳이 함수로 빼야하나 고민을 했지만, 나중에 필수정보가 추가될 경우를 고려하여 만들어뒀다.
42 api 호출 제한

42 api는 초당 2회로 호출을 제한한다.
3명 이상이 동시에 로그인을 시도하면, 정확히 말해서 참사가 발생할 수 있다는 뜻이다. (시도해본 결과 진짜임)
그럼 1초에 두명씩 로그인을 진행해야 한다는 건데 이 문제를 어떻게 해결할까?
...
정답은 큐~
로그인 요청을 큐에 넣어서 초당 두명씩 순차적으로 처리해주면 된다.
bull을 이용하면 redis 기반 큐를 구현할 수 있다.
@Module({
  imports: [
    BullModule.forRoot({
      redis: {
        host: process.env.REDIS_HOST,
        port: +process.env.REDIS_PORT,
        password: process.env.REDIS_PASSWORD,
        username: process.env.REDIS_USERNAME,
      },
      defaultJobOptions: {
        removeOnComplete: true,
        removeOnFail: true,
      },
      limiter: {
        max: 2,
        duration: 1000,
      },
    }),
    BullModule.registerQueue({ name: 'login-queue' }),
  ],
  providers: [LoginConsumer, LoginProducer],
  exports: [LoginProducer],
})
export class BullQueueModule {}
위 코드에서 defaultJobOptions를 이용하면 성공/실패에 따라 Job을 지울지 말지 결정할 수 있다.
그리고 login-queue라는 큐를 등록한다.
핵심은 limiter이다.
1초에 2개의 Job을 실행하겠다는 의미로, 정확히 내가 원하던 기능이다.
이제 프로필을 받아오는 42 api 호출을 초당 2회로 제한이 가능해졌다.
로그인 프로듀서
일단 프로필을 받아오는 42 api 호출(이하 로그인 기능)을 Job으로 만들어 큐에 추가해주는 프로듀서를 만든다.
export class LoginProducer {
  constructor(@InjectQueue('login-queue') private loginQueue: Queue) {}

  async addJob(url: string, accessToken: string) {
    const job = await this.loginQueue.add(
      'get-profile', // Job 이름
      { url, accessToken }, // Job 실행에 필요한 데이터
      { attempts: 10, backoff: 1000 }, // 실패 시 1초 간격으로 10번 시도함
    );
    return await job.finished(); // Job이 끝나면 실행 결과 리턴
  }
}
다음은 로그인 프로듀서를 이용하여 로그인 Job을 큐에 추가하는 코드이다.
async getProfile(accessToken: string) {
  try {
    const profileUrl = 'https://api.intra.42.fr/v2/me';
    return await this.loginProducer.addJob(profileUrl, accessToken);
  } catch (err) {
    throw new ConflictException(err, '42 api 호출 중 에러가 발생했습니다.');
  }
}
로그인 프로세서
큐에 작업을 추가했다면, 그 작업을 실행해줄 프로세서가 필요하다.
다음은 login-queue에 들어온 작업을 실행하는 프로세서를 구현한 코드이다.
@Processor('login-queue')
export class LoginConsumer {
  @Process('get-profile') // login-queue의 작업 중 get-profile이라는 Job을 수행함
  async login(job: Job<LoginJob>, done) {
    const { accessToken, url } = job.data;
    let res;
    try {
      res = await fetch(url, {
        method: 'get',
        headers: {
          Authorization: `Bearer ${accessToken}`,
        },
      });
    } catch (err) {
      throw new ConflictException(err, 'fetch 작업 중 에러가 발생했습니다.');
    }
    if (res.status !== 200) {
      throw new ConflictException('프로필 정보를 받아올 수 없습니다.');
    }
    try {
      const profile = await res.json();
      done(null, profile);
    } catch (err) {
      throw new ConflictException(
        err,
        '응답에서 데이터를 얻어 오는 중 에러가 발생했습니다.',
      );
    }
  }
}
결론
위 방법을 이용하여 다음과 같은 흐름을 구성할 수 있다.
@Get('/oauth/callback')
async getProfile(@Query('code') code: string): Promise<AuthResponse> {
  const accessToken = await this.authService.getAccessToken(code);
  const profile = await this.authService.getProfile(accessToken);
  // 프로필 정보를 이용해서 여러 조건 확인
  // 유저의 역할에 따른 로그인 흐름 수행
  // JWT 리턴
}
정리를 해두니 별 내용이 없지만.. bull의 존재도 모르고 어떻게 해결할지 고민할 당시엔 정말 힘들었다.
아무튼 로그인 흐름은 이렇게 끝.
나는 수도 없이 본 코드라 글이 이해가 되지만, 처음 보는 사람은 그렇지 않을 수도 있으니
궁금한 부분이나 잘못된 부분이나 개선할 부분이 있다면 댓글로 알려주세요~
