
🍊 감상
📙 열품타 코딩 시간 8hour
👍🏼 -
👎🏼 -
🚀 목표
- Udemy에서 Javascript 강좌 수강하기 (326/682)
- 커밋 연속 30일 달성하기 (1/30, 4.07 완료)
[링크 목록]
Web Developer Bootcamp 2021
모던 자바스크립트 튜토리얼
📣 개념 정리
동기와 비동기
비교
비동기(asynchronous): 동시에 여러가지 일을 처리, 예약, 스레드나 프로세스가 여럿이 돌며 멀티태스킹
이동이 느리거나 자주 서는 열차를 다른 선로에 배치하는 것
setTime -> callback 함수
동기(synchronous): 순서대로, 코드가 반드시 작성된 순서대로
비동기 작업
동기와 비동기
callback 지옥 해결 -> promise & then, async & await
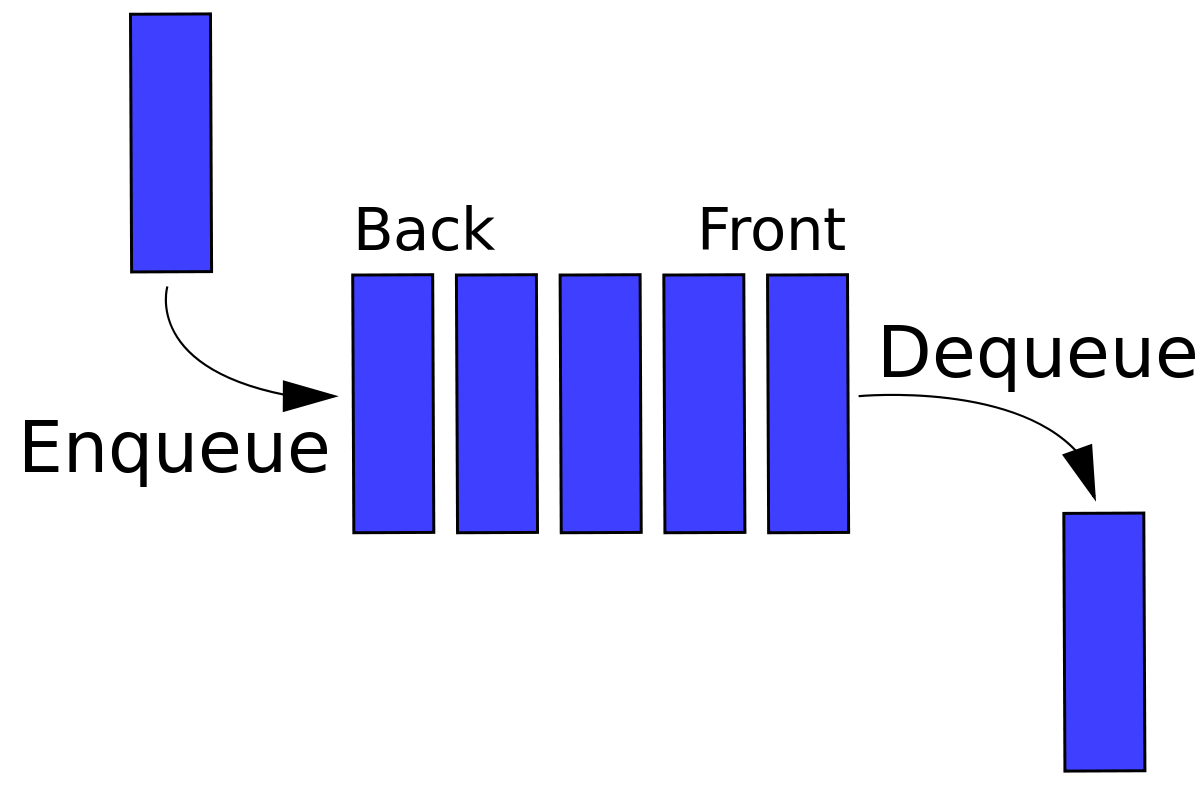
[자료구조] 큐
FIFO, 선입선출, push, shift
선형 큐, 원형 큐, 우선순위 큐
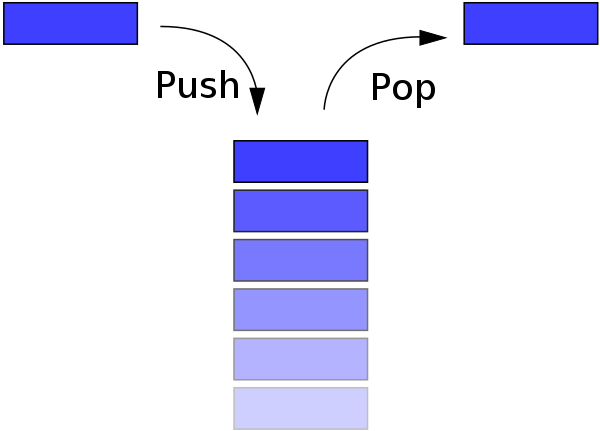
[자료구조] 스택
LIFO, FILO, 데이터 구조 단순, 호출 공간 미리 확보
함수는 스택으로 처리
push, pop
클라우드 컴퓨팅
비교
on-premis : 회사 내에서 자체적으로 서버 둠
클라우드 컴퓨팅 서비스 : aws, google cloud platform, azure, naver cloud platform
PaaS: heroku, 넷리파이, AWS Elastic Beanstalk
클라우딩 컴퓨터 서비스의 세 단계

웹 표준
크로스 브라우징
브라우저마다 css 다르게 설정해줘야 하는 속성들
-webkit-transition (사파리)
-moz-transition (파이어폭스)
-ms-transition (익스플로러)
-o-transition (오페라)
📣 The Web Developer Bootcamp 2021: 24.1-26.2
24. DOM
24-1. Introducing DOM
javascript가 html과 css와 interact하게 만들기
예시 - 구글, trello
24-2. The document objcet
tree structure
console.dir(document) -> 자바스크립트 오브젝트와 프로퍼티 볼 수 있음
document: root of the tree, top of a folder
24-3,4. getElementById
select - manipulate
getElementById
document.getElementById('banner')
getElementByTagName
cosnt allImages = document.getElementByTagName('img');
for (let img of allImages) {
	console.log(img.src)
}
getElementByClassName
24-5. querySelector & querySelectorAll
document.querySelector('#banner')
document.querySelector('.square')
document.querySelector('a[title="Java"]')
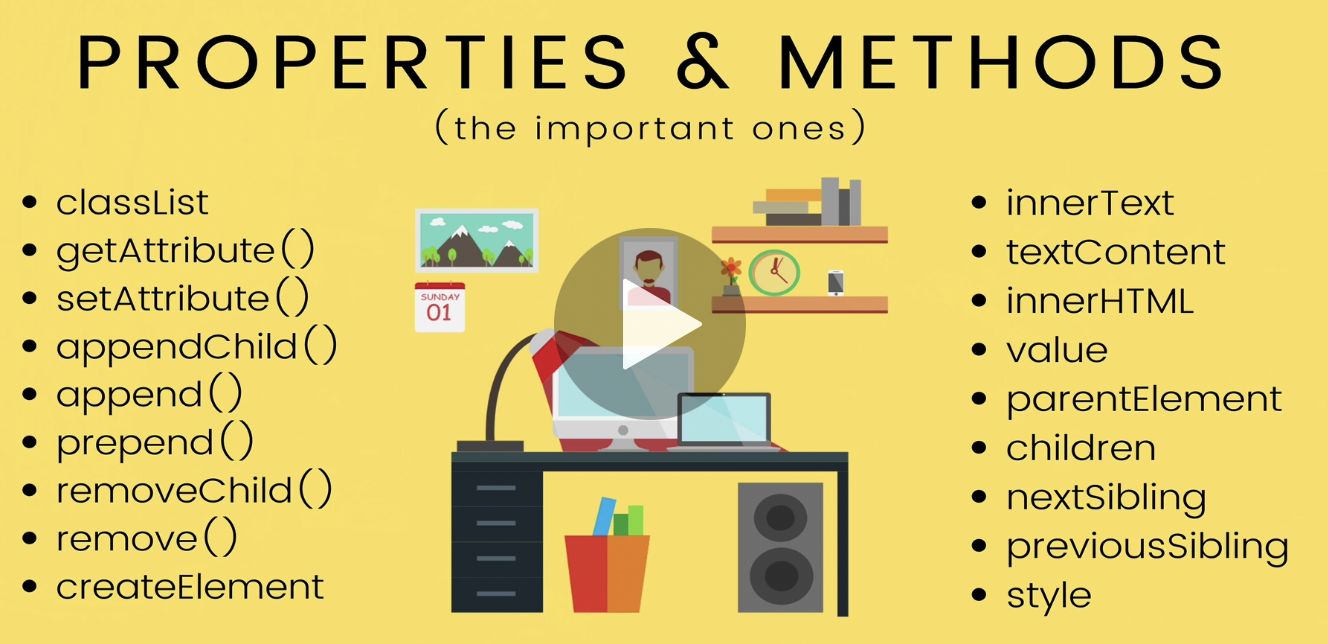
document.querySelectorAll('p a')24-6. innerHTML, textContent, &innerText
innerText // 콘텐트가 보여지는 대로 displayed, showing to user
//"마라탕 먹고 싶다"

textContent // vsc에서 보이는 대로
//"마라탕
       먹고 싶다" (vsc 내부에서 줄 잘리면 보여짐)

innerHTML // elements 수정하고 싶을 때 쓸 수 있음
//"<b>마라탕</b> 먹고 싶다"
document.querySelector('h1').innerHTML = '<b>짬뽕</b>'

//innerHTML - 추가하고 싶다면?
document.querySelector('h1').innerHTML += '<b>과 짬뽕</b>'
24-7. attribute
getAttribute
setAttribute
firstLink.href
"file://wiki.List_of_chicken_breeds"

firtstLink.getAttribute('href') // html에서 가져옴
"/wiki/List_of_chicken_breeds"

input.setAttribute('type','text') // 바꾸기

const eggImage = document.querySelector('#egg');
eggImage.alt = 'chicken';
24-8. Changing Styles
css는 dom의 actual elemet object로 잡히지 않음
h1.style.color = 'green'; -> 쓰이는 방법이 아님, inline style이 돼버림
for (let link of allLinks) {
	link.style.color = '#fff';
}

window.getComputedStyle(h1).fontSize

const treee = document.querySelector('img');
treee.style.width = '150px';
treee.style.borderRadius = '50%';

const rainbow = document.querySelectorAll('span');
for (let i = 0; i<rainbow.length;i++) {
    rainbow\[i].style.color = colors\[i];
}
24-9. classList
더 자주 쓰이는 방법
h2.classList.remove('border')
h2.classList.contains('border')
h2.classList.toggle('purple') //true
h2.classList.toggle('purple') //false

const liS = document.querySelectorAll('li');
for(let li of liS){
    li.classList.toggle('highlight');
}
25-0. Trasversing Parent, Child, Sibling
const firstBold = document.querySelector('b');
firstBold.parentElement.parentElement

const paragraph = firstBold.parentElement
paragraph.childElementCount
paragraph.children //array 아님
paragraph.children[0] //object임

squareImg.previousSibling
squareImg.previousElementSibling //elements를 더 자주 사용
squareImg.nextSibling
squareImg.nextElementSibling
25-1. Append & AppendChild
newImg.src = 'http://src';
document.body.appendChild(newImg)
newImg.classList.add('square')

const newH3 = document.createElement('h3')
newH3.innerText ='I am new'
document.body.appendChild(newH3)

const p = document.createElement('p')
p.append('i am new')
const newB = document.createElement('b')
newB.appen('hi')
p.prepend(newB)

//beforbegin
//afterbegin
//beforeend
//afterend

h1.insertAdjacentElement('afterend',h2)
for (let i =0; i <100; i++) {
const newB = document.createElement("button");
newB.innerText="Hey";
const container = document.querySelector("#container");
container.appendChild(newB);
}25-2. removeChild & remove
removeChild -> 쓰기 복잡함
remove
const img = document.querySelector('img')
img.remove()
25. DOM Events
25-6. Inline events
별로 좋은 방법은 아님/ 안 쓰이는 방법임
<button onclick="alert('you clicked me'); alert('stop click me')">click me</button>25-7. Onclick property
가장 좋은 방법은 아니지만 코드에서 볼 수 있는 형태
//1
const btn = document.querySelector('#v2');

btn.onclick = function() {
	console.log("you clicked me")
}

//2
function scream() {
	console.log("AAAAAAAHHHH");
}
btn.onmouseenter = scream;

//3
document.querySelector('h1').onclick = function() {
	alert('you clicked the h1')
}

//4
document.querySelector('h1').onclick = () => {
	alert('you clicked the h1')
}
25-8. addEventListener
제일 좋은 방법임
callback function
const btn3 = document.querySelector('#v3');
btn3.addEventListener('mouseup',function() {
	alert("Clicked")
})
addEventListner는 함수 여러 개 가능!
// overwritten 돼서 shout 함수만 동작함
tasButton.onclick = twist;
tasButton.onclick = shout;
// 함수 여러 개 가능
tasButton.addEventListner('click', twist)
tasButton.addEventListner('click', shout)
// twist 한 번만 실행시키기
tasButton.addEventListner('click', twist, {once: true})
tasButton.addEventListner('click', shout)
25-9. Generate random color exercise
// 간단한 코드라 이렇게 짜도 되지만 좋은 코드 습관을 들이는 것이 좋다
const button = document.querySelector('button');
const h1 = document.querySelector('h1');
button.addEventListener('click', function(){
    cont r = Math.floor(Math.random()*256);
    cont g = Math.floor(Math.random()*256);
    cont b = Math.floor(Math.random()*256);
    const newColor = `rgb({${r},${g},${b})`;
    document.body.style.backgroudnColor = newColor;
    h1.innerText = newColor;
})

// 이런 식으로 하면 좀 더 명확하고 reusable한 코드를 짤 수 있음
const button = document.querySelector('button');
const h1 = document.querySelector('h1');

button.addEventListener('click', function(){
	const newColor = makeRandomColor()
    document.body.style.backgroudnColor = newColor;
    h1.innerText = newColor;
})

const makeRandomColor = () => {
	cont r = Math.floor(Math.random()*256);
    cont g = Math.floor(Math.random()*256);
    cont b = Math.floor(Math.random()*256);
    return `rgb({${r},${g},${b})`;
}
26-0. Events & The keyword this
this를 사용해서 더 심플하게 만들기
for (let button of buttons) {
	button.addEventListener('click',colorize)
}

function colorize() {
	 this.style.backgroudnColor = makeRandomColor();
     this.style.color = makeRandomColor();
}
26-1. Keyword Events & Event Objects
사용자가 버튼 누른 위치인 clientX와 clientY를 확인할 수 있음 - 클릭 애니메이션 만들 때
document.querySelector('button').addEventListener('click', function(evt) {
	cosole.log(evt)
})
keydown & keyup
key와 code는 다르다! 다른 언어의 키보드 설정이나 키보드 게임 조작 설정 때 쓸 수 있는 것
const input = document.querySelector('input');
input.addEventListener('keydown',function(e) {
	console.log(e.key)  //Shift
    console.log(e.code) //ShiftLeft
})
누르는 키보드 방향키에 따라 다르게 출력하기
window.addEventListener('keydown',function(e) {
	switch (e.code) {
    	case 'ArrowUp':
        	console.log("up");
            break;
        case 'ArrowDown':
        	console.log("down");
            break;
    	case 'ArrowLeft':
        	console.log("left");
            break;
    	case 'ArrowRight':
        	console.log("right");
            break;
        default:
        	console.log("ignored")
	}
})
26-2. Form Events & PreventDefault
/dogs 페이지로 계속 이동함, 트윗이 바로 화면에 보이도록 default action을 못하게 해야 함
-> 그 방법이 preventDefault
<form action="/dogs" id="tweetForm">
	<input type="text" name="username" placeholder="username">
   	<input type="text" name="tweet" placeholder="tweet">
	<button>Post Tweet</button>
</form>

<h2>Tweets:</h2>
<ul id="tweets">

</ul>

<script>
const tweetForm = document.querySelector('#tweetForm');
const tweetsContainer = document.querySelector('#tweets');
tweetForm.addEventListener('submit',function (e) {
	e.preventDefault();

	//const usernameInput = document.querySelectorAll('input')[0];
    //const tweetInput = document.querySelectorAll('input')[1];
    //console.log(usernameInput.value, tweetInput.value)
    //이 방식을 더 간단하게 만들면

    const usernameInput = tweetForm.elements.username;
    const tweetInput = tweetForm.elements.tweet;
    addTweet(usernameInput.value,tweetInput.value)
    //reset하기 (empty input)
    usernameInput.value='';
    tweetInput.value='';
});

const addTweet = (username, tweet) => {
    const newTweet = document.createElement('li');
    const bTag = document.createElement('b');
    bTag.append(username) //btag안에 username
    newTweet.append(bTag); //li 안에 btag
    newTweet.append(`-${tweet}`) //li 안에 btag 뒤에 tweet
    tweetsContainer.append(newTweet);
}


</script>