// React 설치 명령어
npx create-react-app
npm run start

// Next 설치 명령어
npx create-next-app@latest .   // . 을 쓰면 해당 폴더에 설치를 하겠다는 의미 (이중 폴더가 안생김)
npm run dev
참고 문헌
1. SSR VS CSR
(1) CSR ( Client-Side Rendering )
: Client인 브라우저에서 JS를 로딩 후 그려냄 (렌더링을 함) ex. React, Vite + React
- 초기 요청 시에 서버로부터 빈 HTML 파일을 받아오고, 그 이후 클라이언트 측에서 JavaScript를 사용하여 동적으로 컨텐츠를 렌더링하는 방식
- 장점
- 페이지 전환과 상호작용 빠름
- 서버의 적은 부담
- 단점
- 초기 로딩 속도 느림
: 페이지 초기 요청 시에는 서버로부터 빈 HTML 파일만 전달받고, 이후 JavaScript 파일을 다운로드하고 실행해야 하므로 추가적인 시간이 소요 - SEO 최적화에 어려움
: 초기 html에는 동적으로 생성되는 컨텐츠들이 X으니까
So Sitemap등을 추가로 사용해서 SEO 최적화를 해줘야함
- 초기 로딩 속도 느림

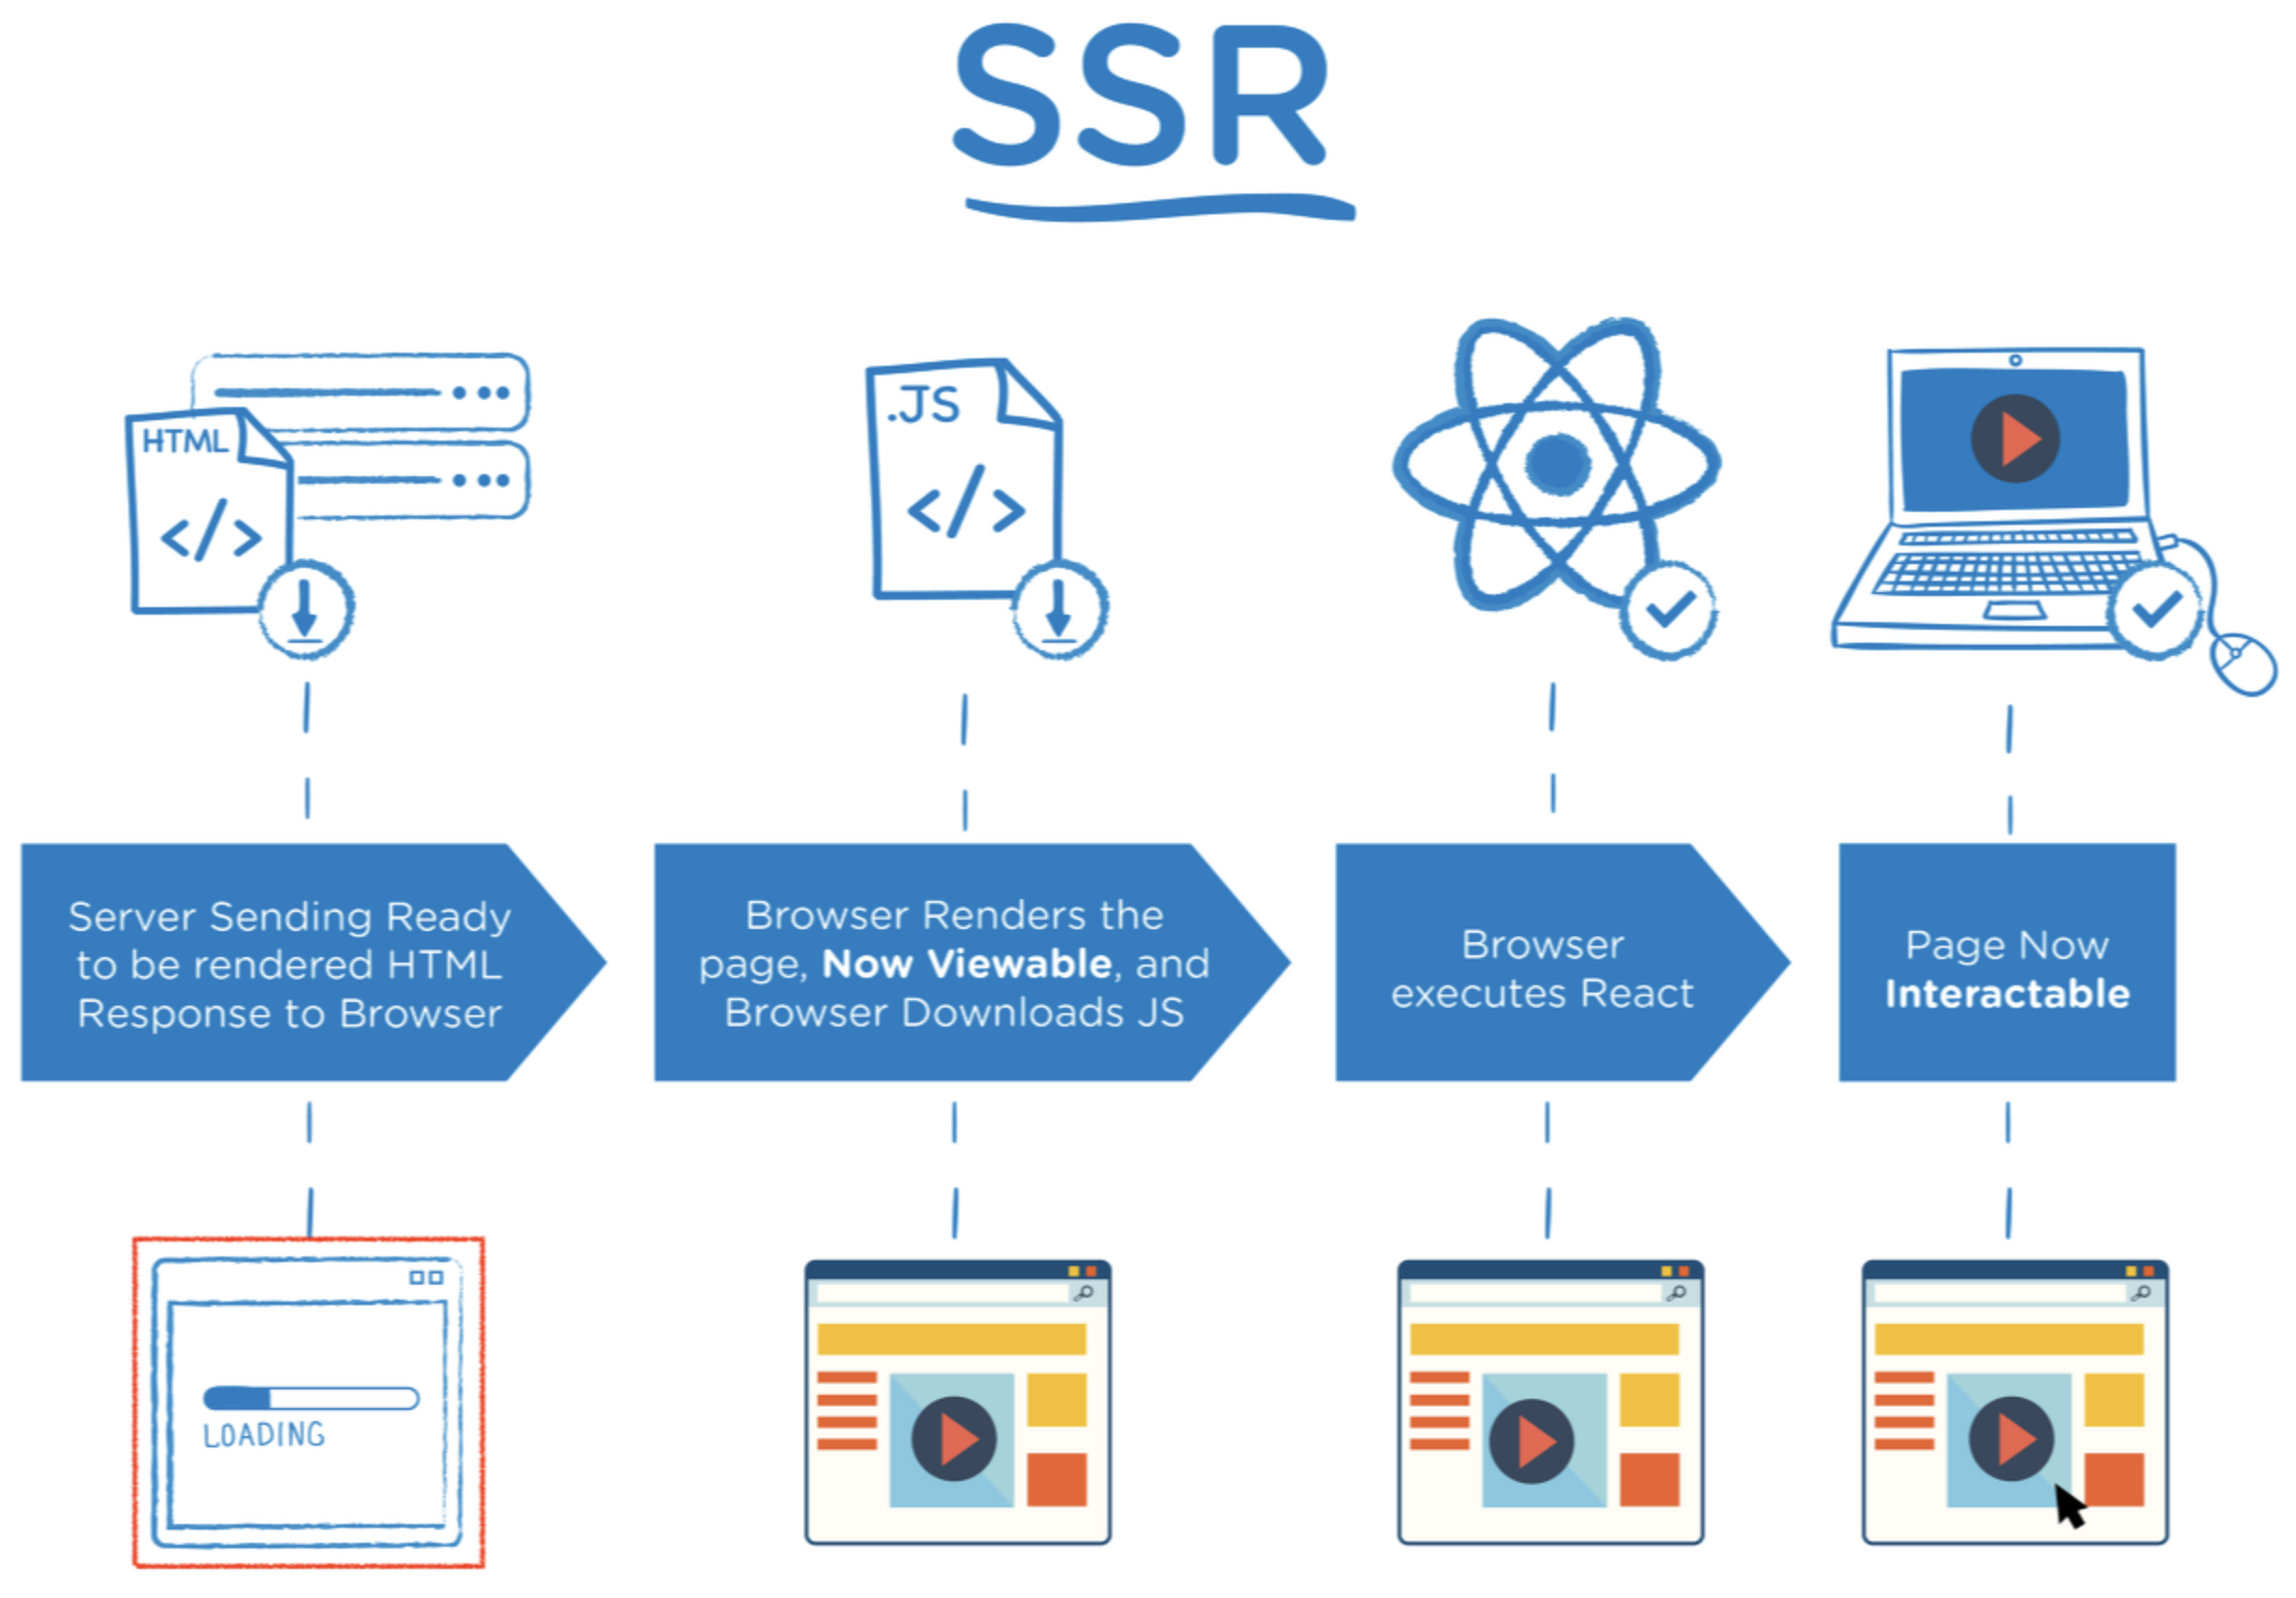
(2) SSR ( Server-Side Rendering )
: 서버에서 렌더링된 HTML을 생성하여 클라이언트에 전달하는 방식 ex. Next.js
- 초기 요청 시에 서버로부터 빈 HTML 파일을 받아오고, 그 이후 클라이언트 측에서 JavaScript를 사용하여 동적으로 컨텐츠를 렌더링하는 방식
- 장점
- 초기 로딩 속도 빠름
: 초기 진입 페이지만 서버 응답 기다리니까 느리지만, 그 외에는 이미 다 받아져있으니까 빠름 - SEO 최적화에 유리
: 모든 컨텐츠가 렌더링된 HTML에 포함되니까 - 클라이언트 측에서 적은 부담
- 초기 로딩 속도 빠름
- 단점
- 사용자 경험이 느릴 수 있음
: 페이지의 전환이나 상호작용 시에 서버 요청이 필요하므로 사용자 경험이 느릴 수 있다. - 서버 부담 있음
+) 서버 는 Next.js 애플리케이션이 실제로 실행되는 환경을 의미
ex. 개발 중일 때는 여러분의 컴퓨터 / Vercel에 배포했다면 Vercel의 서버 / AWS에 배포했다면 AWS의 서버
- 사용자 경험이 느릴 수 있음
SSR은 초기 요청 시에 서버 측에서 렌더링된 HTML을 생성하여 클라이언트에 전달하는 방식
2. App Router VS Page Router
+) 내가 ㅂㅋ에서 사용하는 방식은 page router
- 13.4.0 버전부터 app router를 지원하기 시작
2.1 Layout
App Router
- app 디렉토리 내에 root layout을 필수로 포함해야합니다.
- root layout뿐 아니라 각 layout을 compose 할 수 있습니다.
- 데이터 패칭 또한 동시에 가능합니다.
Pages Router
- 전역 공유 layout을 지정하기 위해 _app 을 사용합니다.
- 단, 여러 layout을 compose 수 없습니다.
- data fetching과 component를 함께 배치할 수 없습니다.
2.2 App Router 방식으로 routing 처리하기
(1) 정적 라우팅 (Static Routing)
- src > app > Layout.tsx 가 기본 골격임 (= Pages Router 방식에서의 App.tsx와 동일)
- Layout.tsx의 {children}으로 page.tsx가 렌더링됨
- 결론 : src > app 폴더 내에 라우트 이름에 해당하는 폴더명을 생성하고, 그 안에 page.tsx를 생성하면 됨
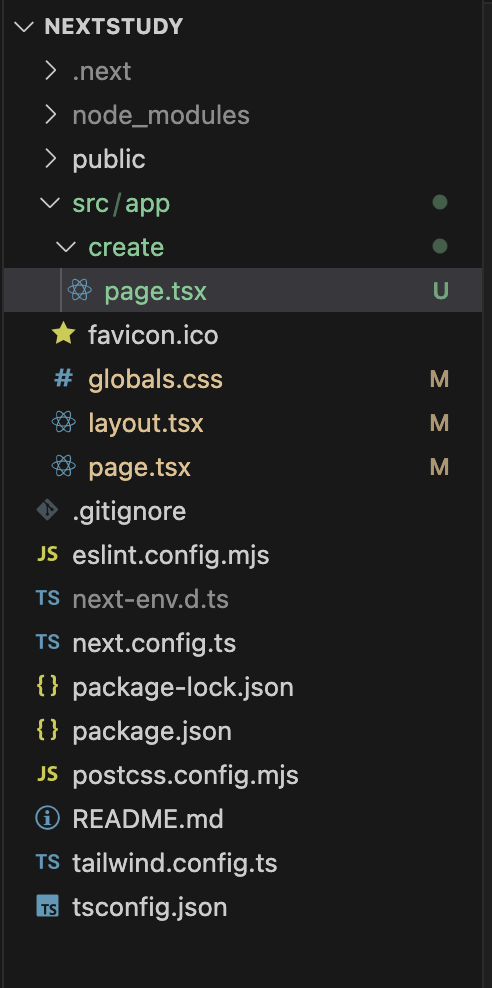
- 위와 같은 사진 상에서는 '/' 과 '/create' 라우터가 생성된 것을 알 수 있음
- 만약에 동일 폴더에 layout.tsx가 있다면, 해당 요소를 가져와서 렌더링 BUT 예시에서는 X
- 따라서, 최상단에 있는 layout.tsx를 가져와서 해당 레이아웃의 children 이 되어서 렌더링 되는것
- +) 만약에 동일 라우트 내에 자식 path들이 여러개 있고, 해당 path들에서 모두 공통 레이아웃을 가진다면, 해당 폴더에 layout를 적는 것이 좋겠지.
- ex.'/create/1' '/create/2' '/create/3' path 가 있고 공통 요소를 공유하는 경우 아래 사진과 같이 작성 가능
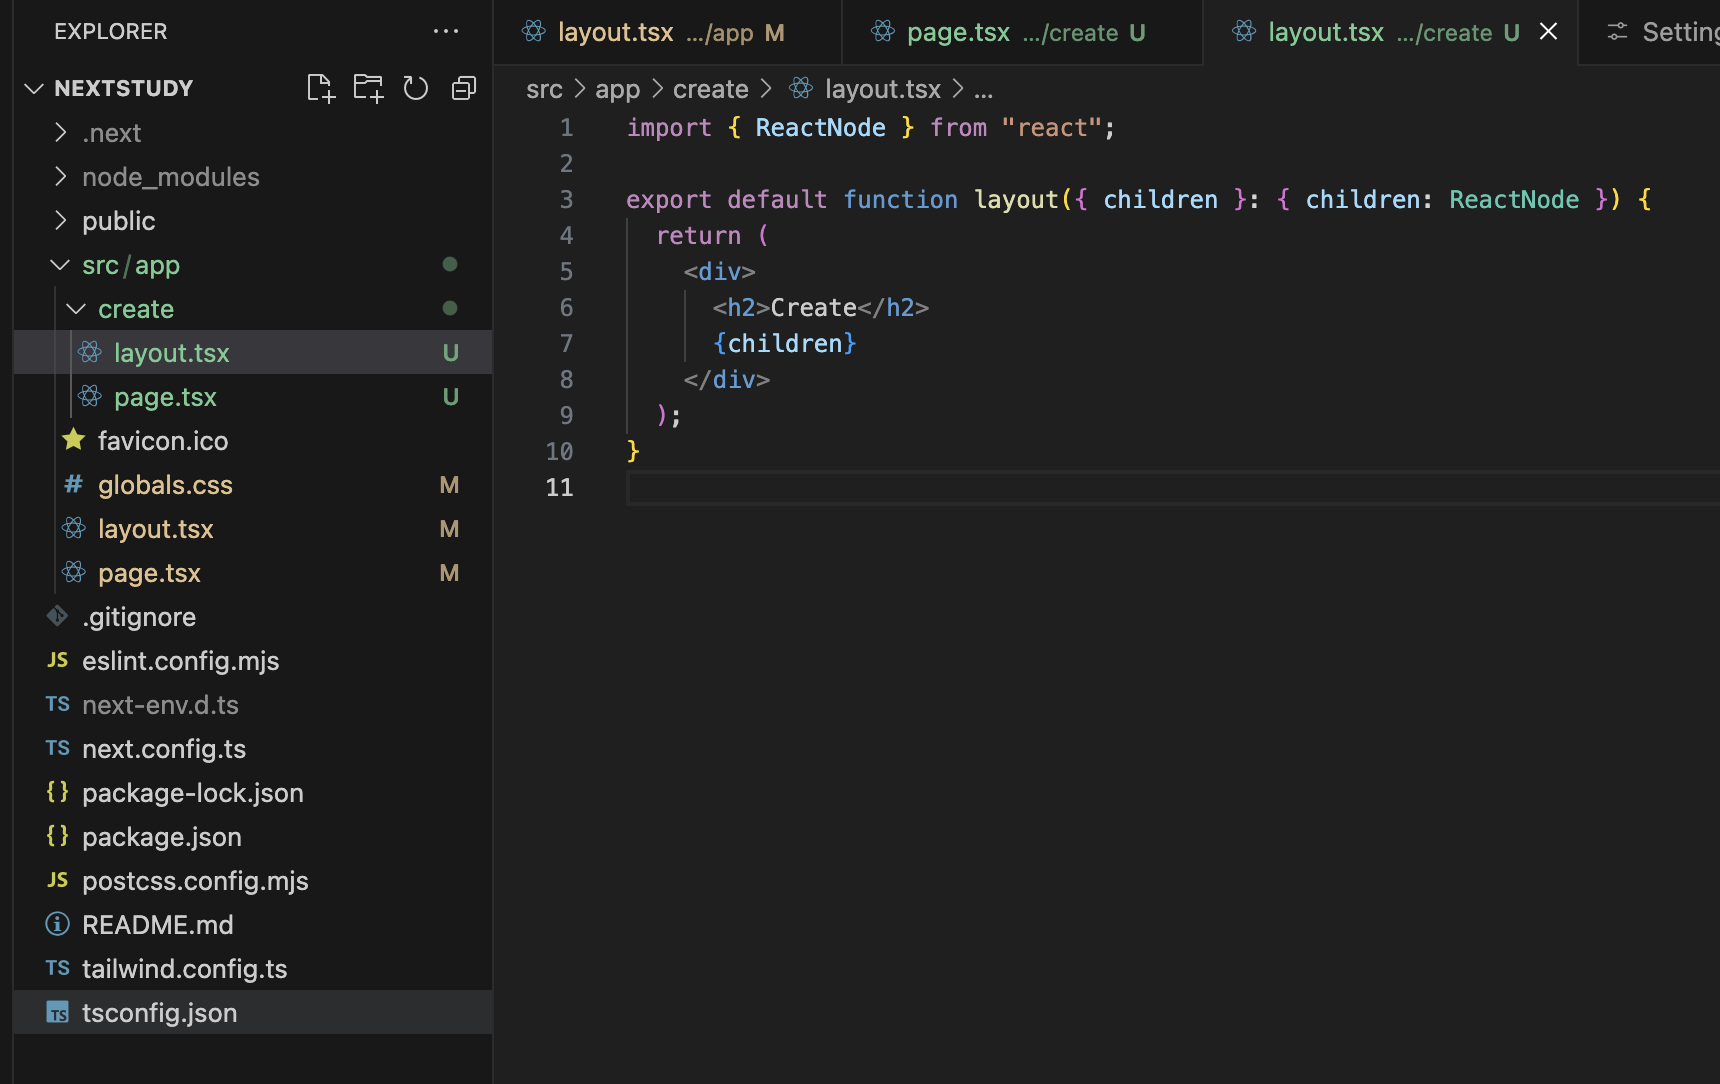
- 위 경우에서는 /create 하위 path들의 요소에 다 "Create" 라는 요소가 보이게 될 것
- 그리고 create 폴더 상위에 있는 layout.tsx가 있다면, 해당 파일의 자식 (children)으로 들어가겠지!
- +) layout을 할때는 ❗️반드시 children을 props로 받아와서 렌더링 시켜줘야 해당 폴더내의 page.tsx 들이 모두 가져와져서 화면에 렌더링됨!
(2) 동적 라우팅 (Dynamic Routing)
: 라우트 경로에 특정 값을 넣어 해당하는 페이지로 이동할 수 있게 하는 것 (= path에 어떤 값이 올지 모르는 것!!)
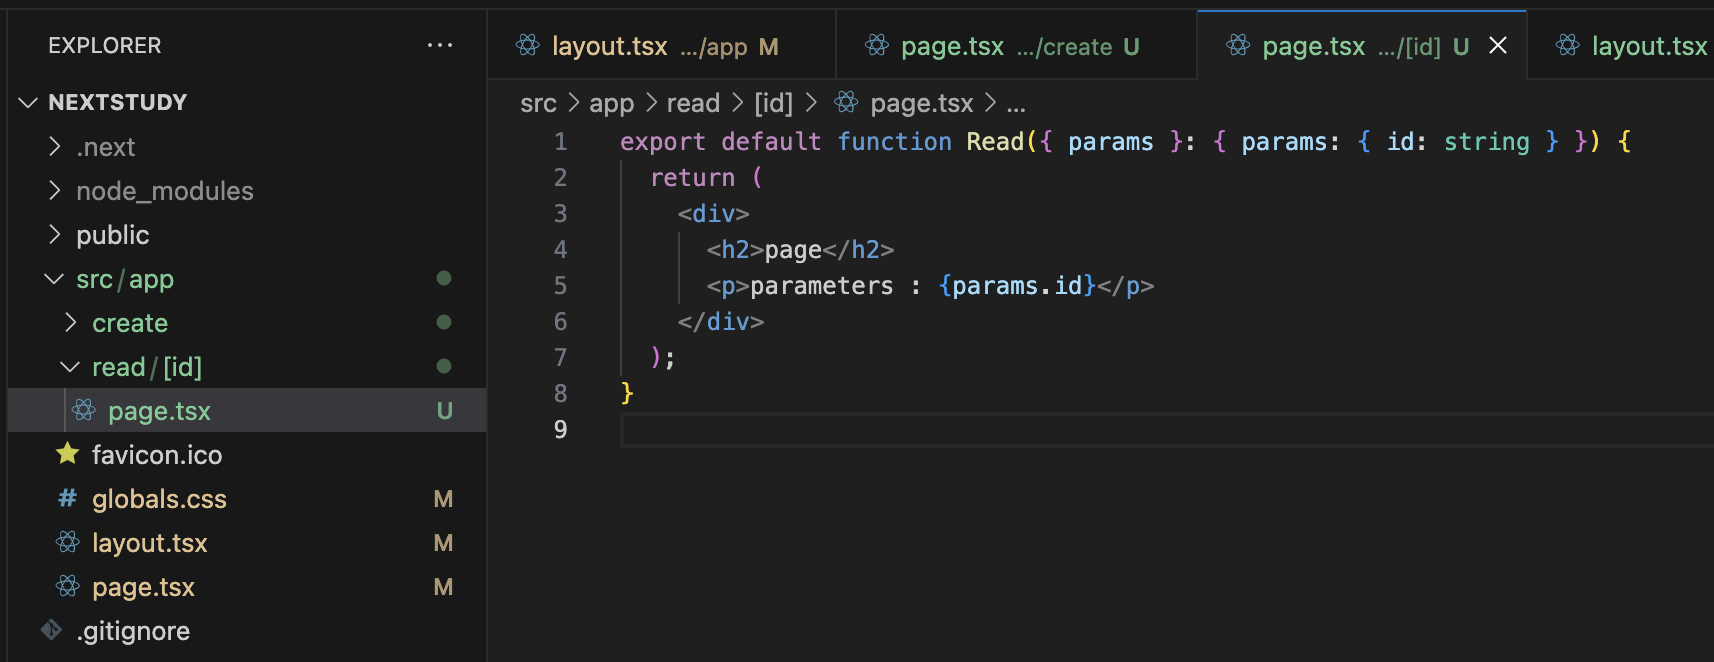
- 다음과 같이 params를 가져와서 화면에 렌더링 시킬 수도 있음
3. 'Link', 'router.push()', 'a' tag 어떻게 다를까?
next.js에서는 크게 2가지 방식으로 페이지 이동을 구현할 수 있음.
// 1. next/link의 Link 컴포넌트를 이용
<Link href="/home">HOME</Link>
// 2. router.push() 를 이용
<button onClick={() => router.push("/home")}>HOME</button>
// 3. a 태그를 이용 (이 방식은 next.js 13부터 Link에 지원을 해줘서 불필요)
<a href="/home">HOME</a>
(1) next/link의 Link 컴포넌트
// 구현 코드
<Link href="/home">HOME</Link>
// 빌드 결과
<a href="/home">HOME</a>- 빌드 후, a tag로 자동 변환된다.
- a tag 의 장점을 갖는다. (SEO 최적화, prefetch 가능, 우클릭 기능 사용 가능 등)
- 페이지 렌더링 시점에, 이동할 주소가 정해져 있는 경우 사용
- 내부 페이지로의 이동 시, 이 방식을 사용해야 SPA 방식으로 전체 html중 필요한 부분만 리렌더링 된다.
- SPA (Single Page Application) : 여러개의 페이지임에도 마치 1페이지인것처럼 동작 시켜줌
Case 1. Link를 사용하지 X - SPA 동작을 X
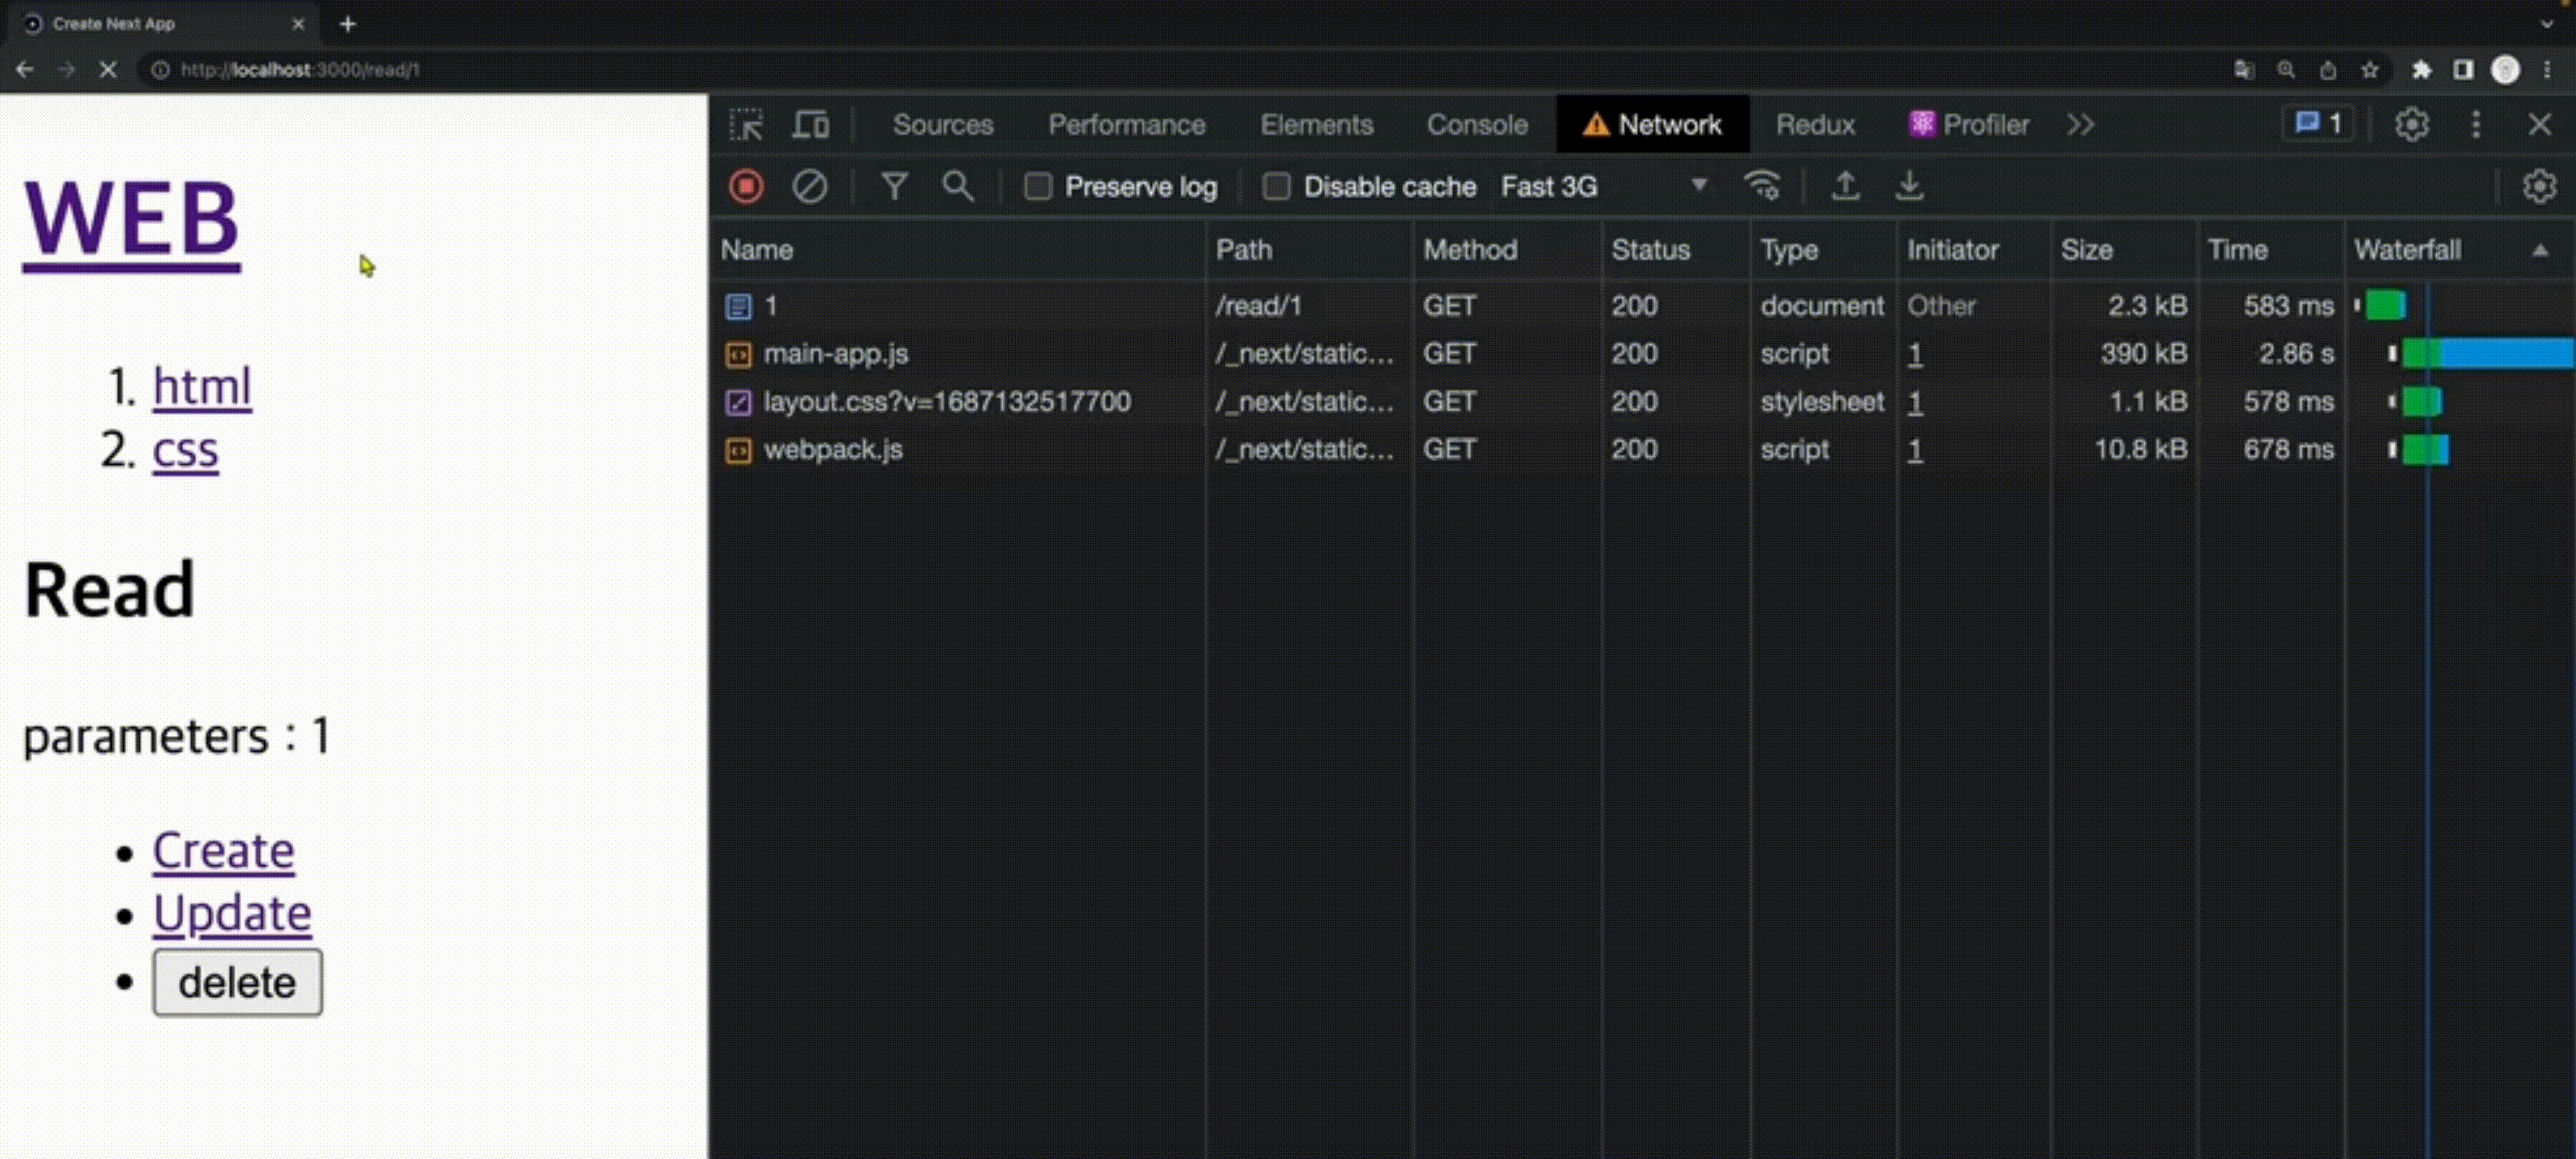
- 페이지 마다 변화가 필요한 부분은 가운데 TXT 뿐이지만, 모든 요소를 페이지 이동시마다 다운받고 있음
- ∴ 소요 시간도 길고, 서버 비용도 많이 듬
Case 2. Link를 사용- SPA 동작을 O
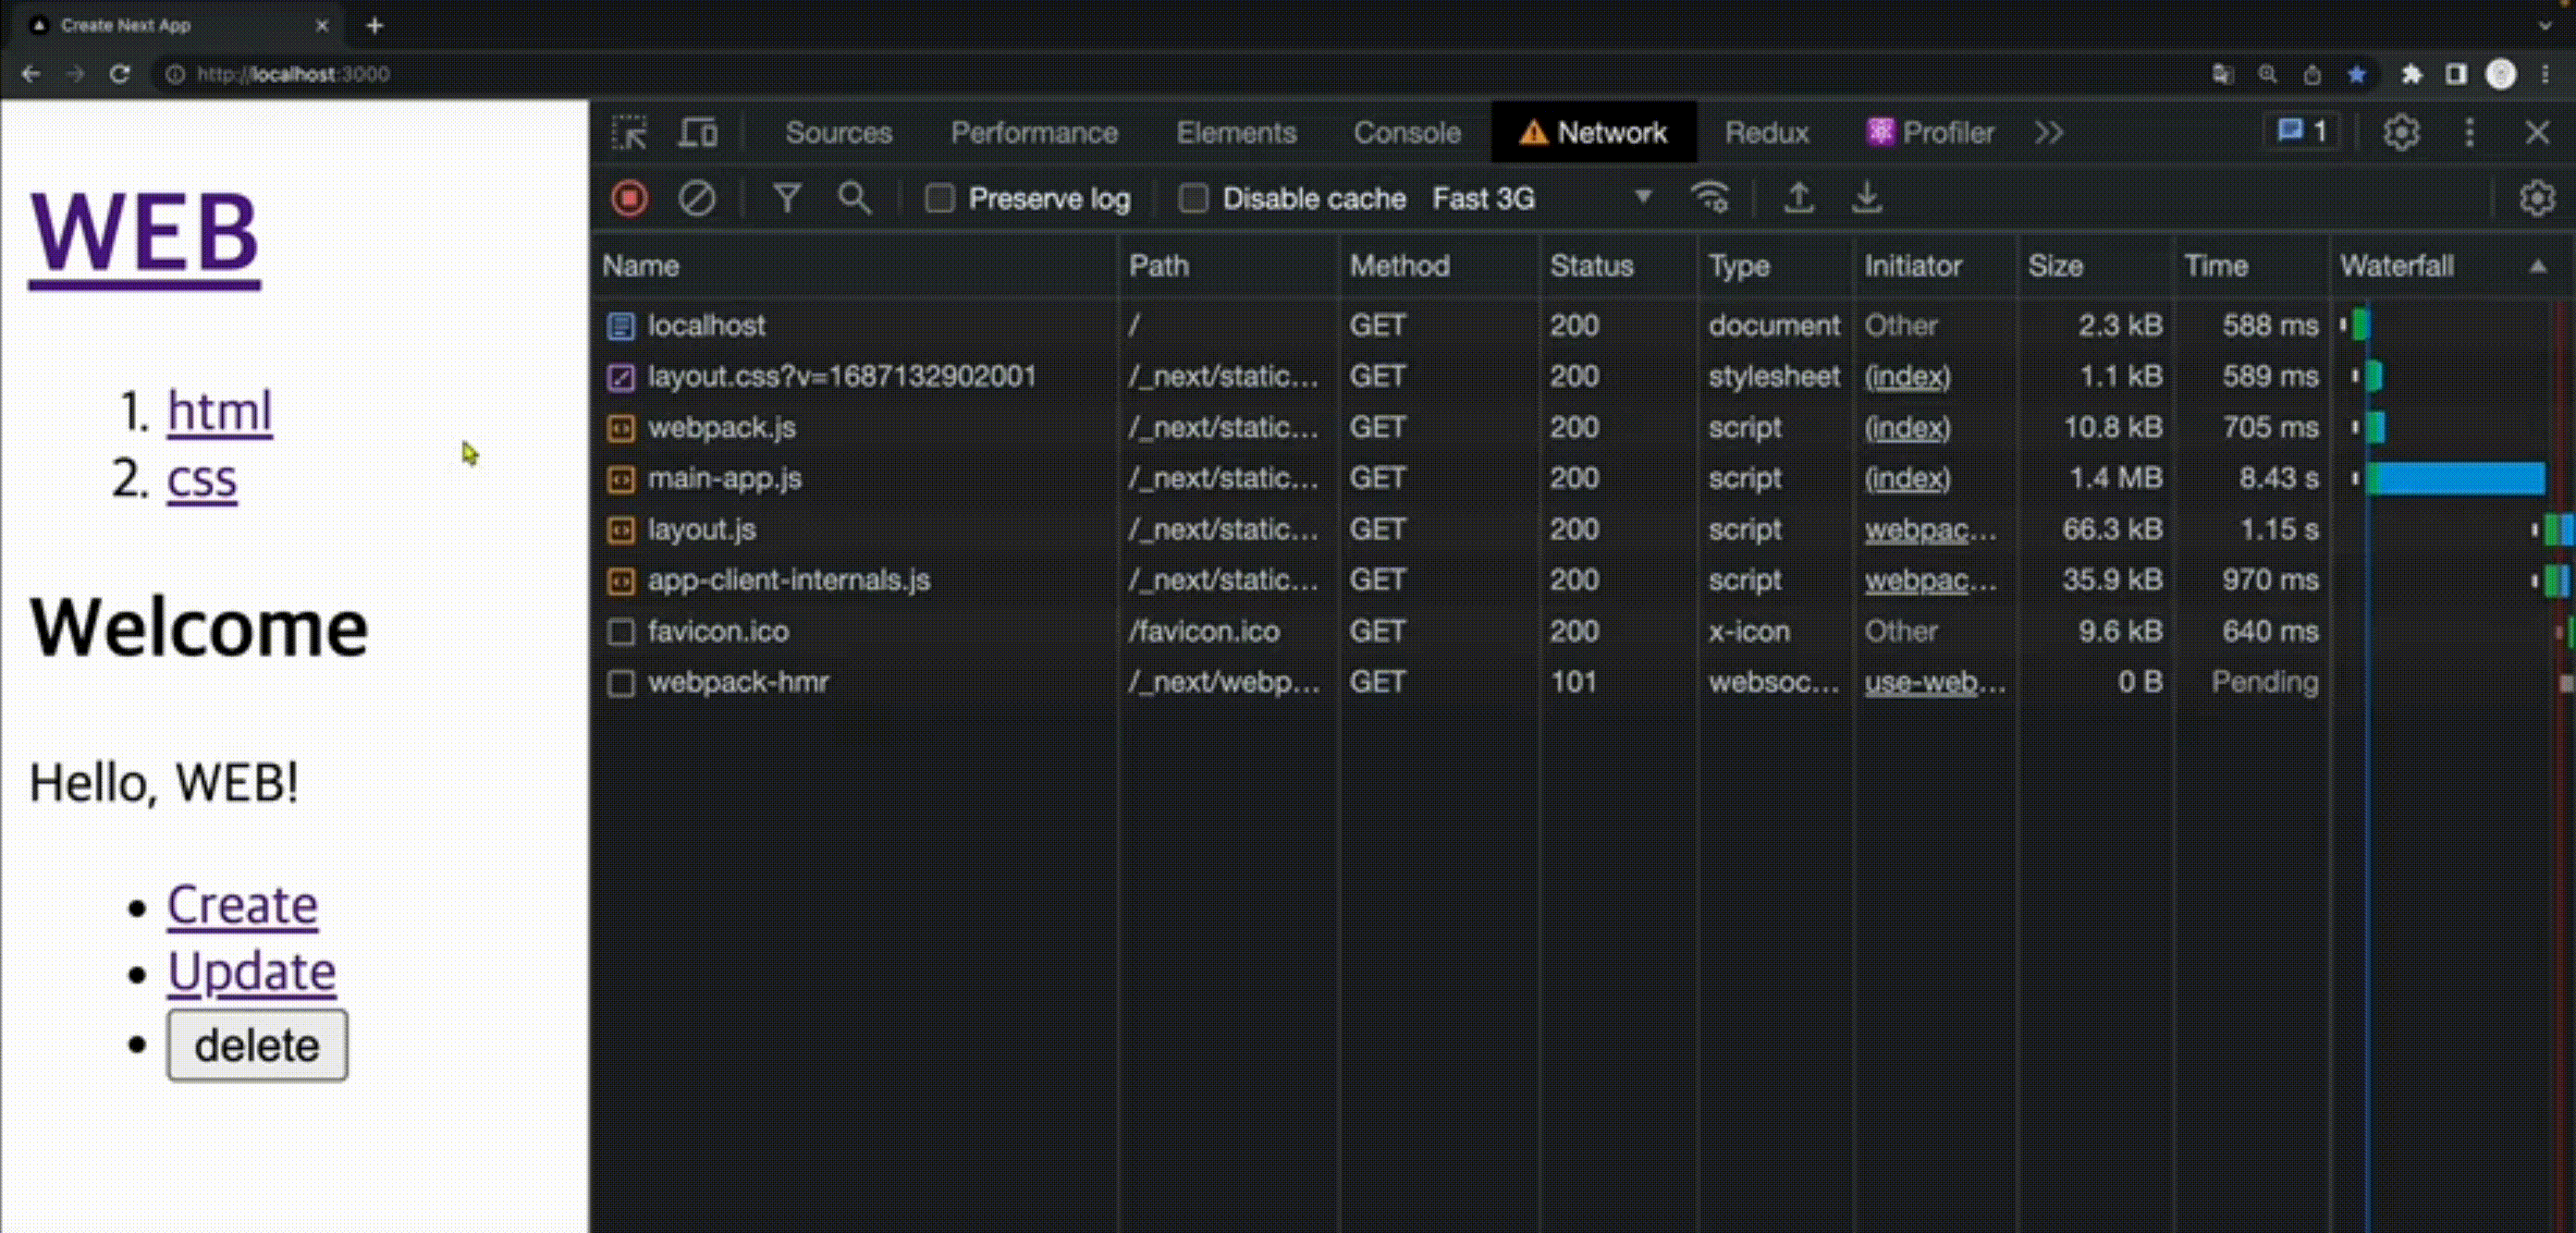
- 이동하고자 하는 곳에 커서만 올려도 이미 필요한 부분만 백그라운드에서 다운 받음
- ∴ 이동하자마자 페이지가 렌더링됨
- 이전에 이동했던 페이지는 다운 자체를 받지 않음
(2) router.push()
- 빌드 후, 이동할 주소가 html 상에 노출되지 않기 때문에 SEO에 취약하다.
- SEO가 필요 없거나, 되면 안되거나, 숨겨야 할때 사용
- 페이지 렌더링 시점에, 이동할 주소가 정해져 있지 않은 경우 사용 (ex. 비동기로 클릭 시점에 이동할 주소가 정해지는 경우 등)
- 내부 페이지로의 이동 시, 이 방식을 사용해야 SPA 방식으로 전체 html중 필요한 부분만 리렌더링 된다.
4. API 제작하기
4.1 json Server 사용하기
npx json-server --port 9999 --watch db.json

// 최신 버전 기준 아래와 같이 입력 필요
npx json-server@0.17.4 --port 9999 --watch db.json- --port 9999 : 해당 server를 9999 포트에서 실행
- db.json : 이라는 파일에 server는 내용(정보)을 저장
- watch : db.json이라는 파일이 수정되면, 바로 서버가 재시동
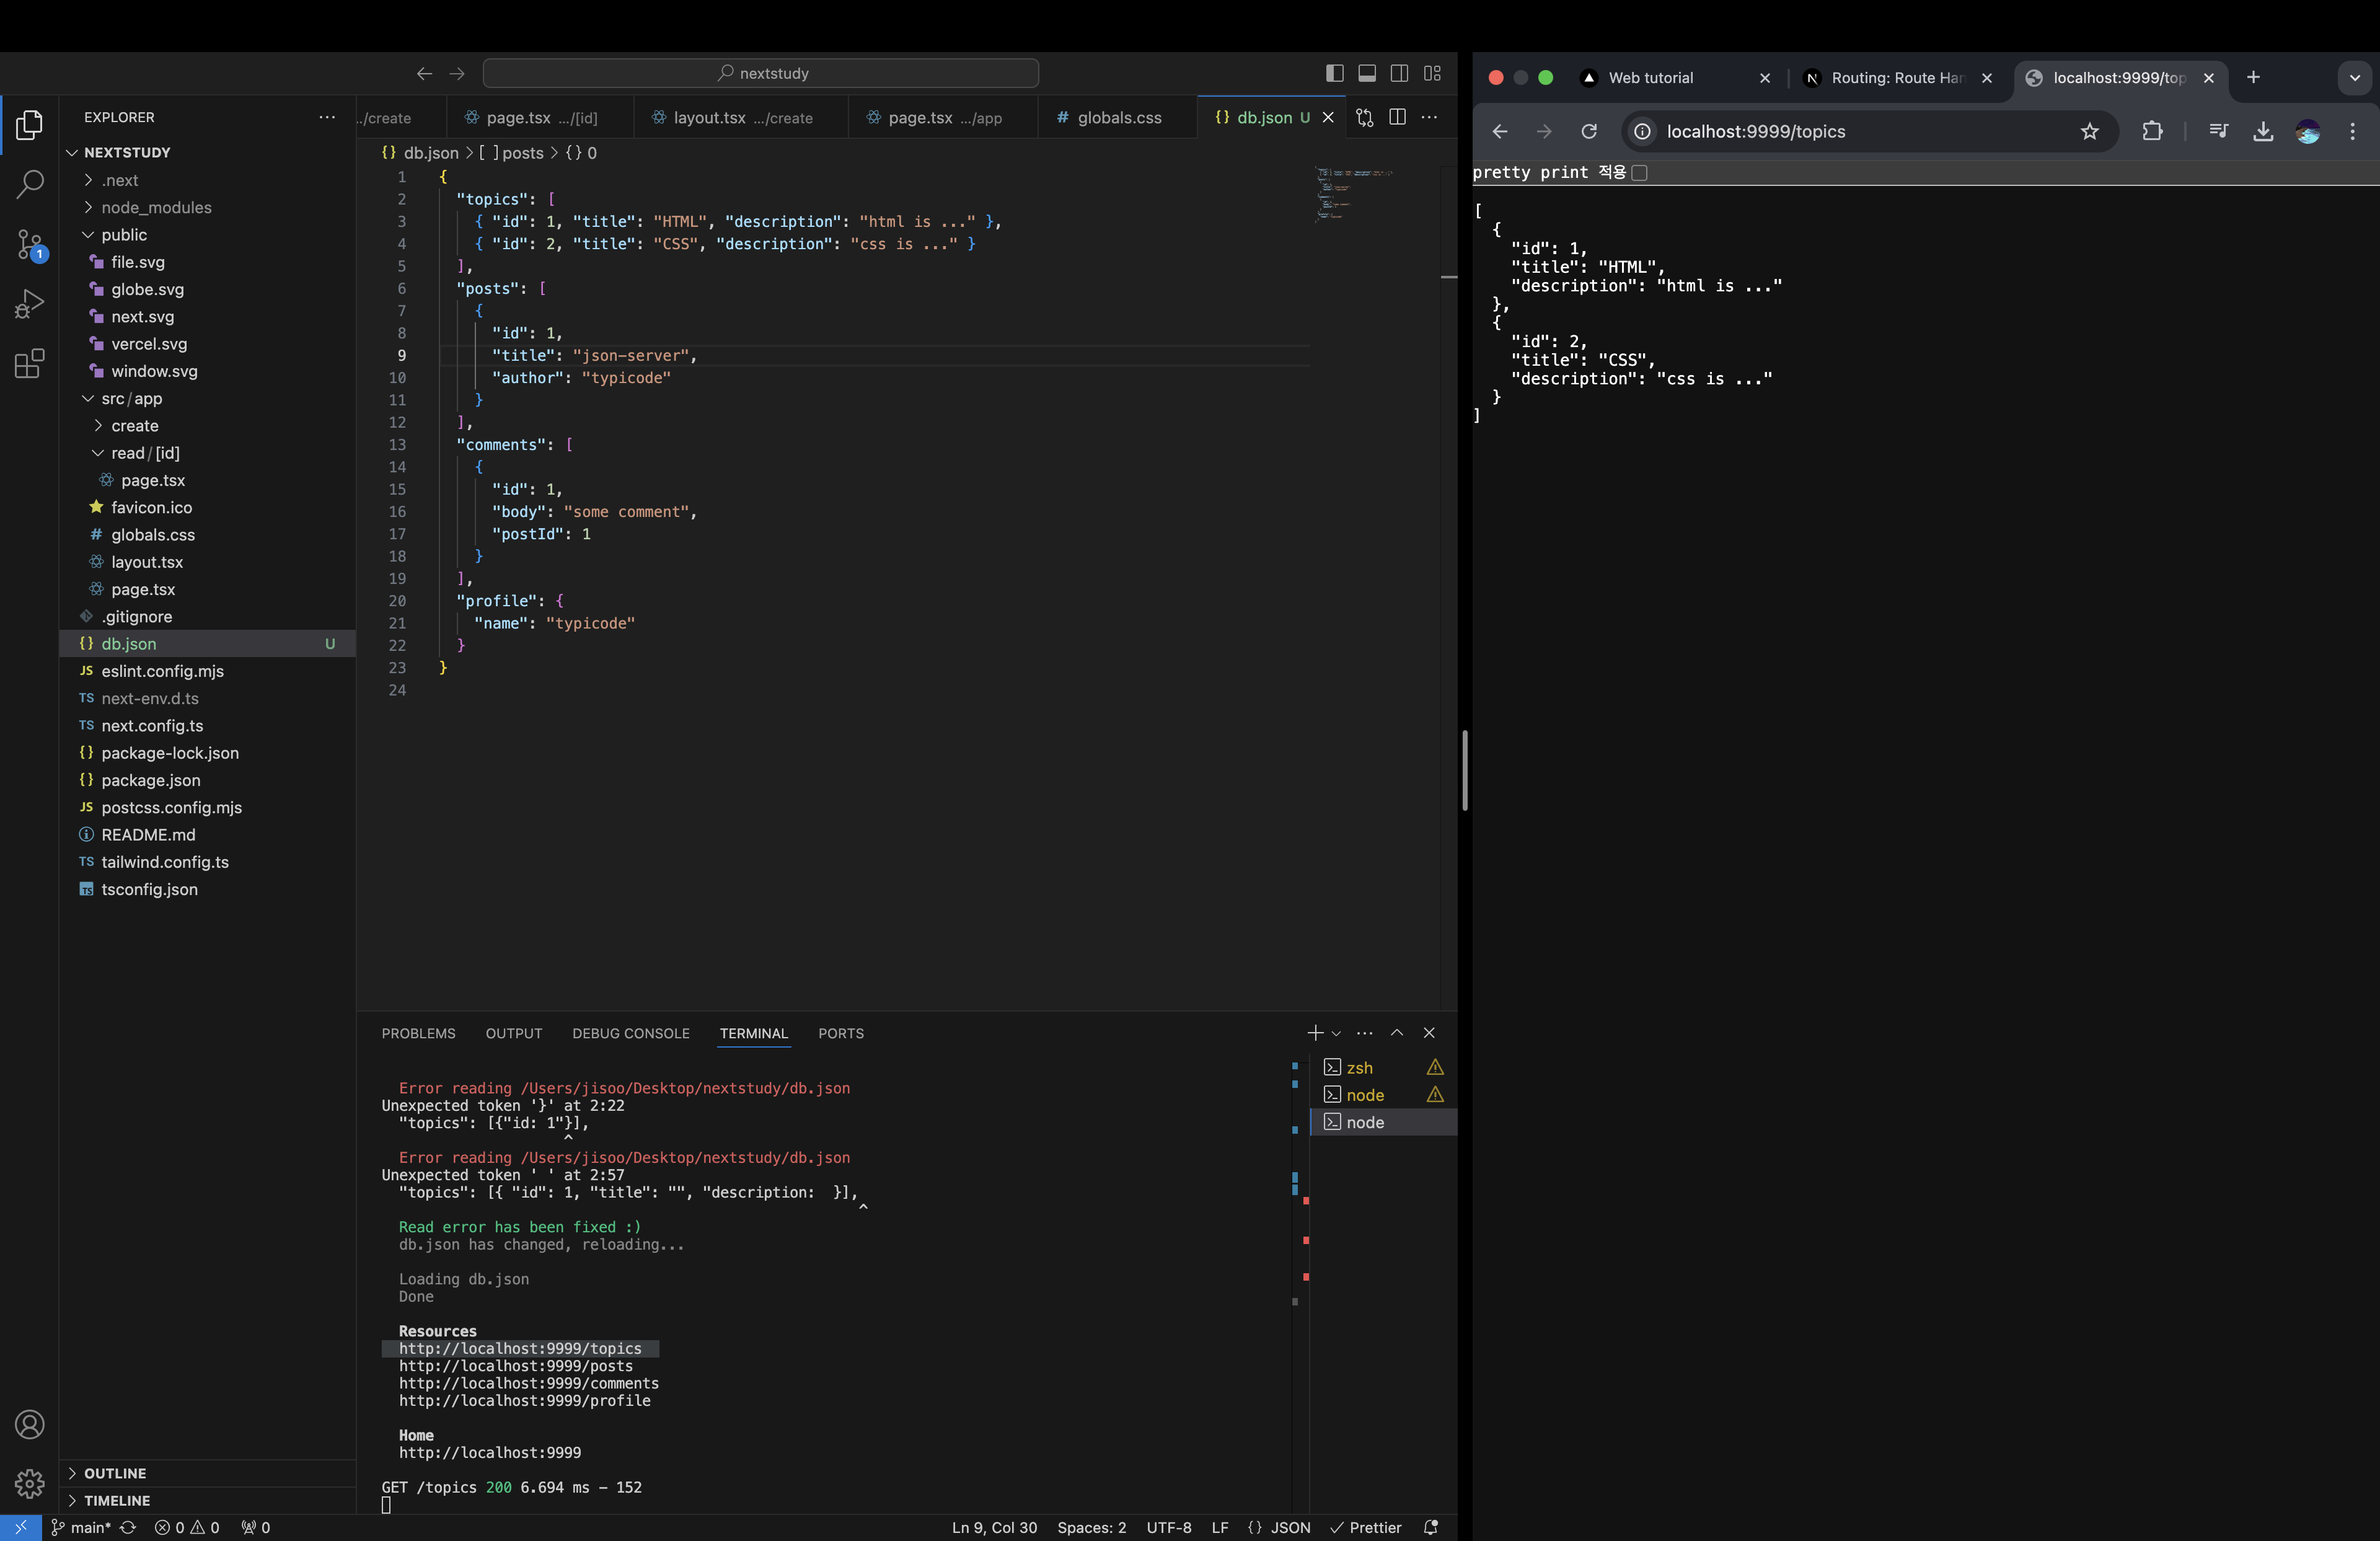
- db.json에 객체로 작성을 하면, 해당 요소에 대한 url이 생성됨
- topics에 대한 http://localhost:9999/topics 가 생성
- 파일에 있는 내용을 json 형태로 응답하는 것을 볼 수 있음
- watch 옵션에 의해 db.json이 변경되면 자동으로 서버가 재시동되니까

fetch("http://localhost:9999/topics")
  .then((resp) => {
    return resp.json(); // json으로 받아온 응답을 js로 변환
  })
  .then((result) => {
    return console.log("result : ", result); // 결과값을 출력
});- 해당 url의 console에 위와 같이 명령어를 쳐서, api를 fetch 해오는 걸 확인할 수 있음
Next.js && React 18 이후 버전 에서의 Server / Client 쪽 개념 정리
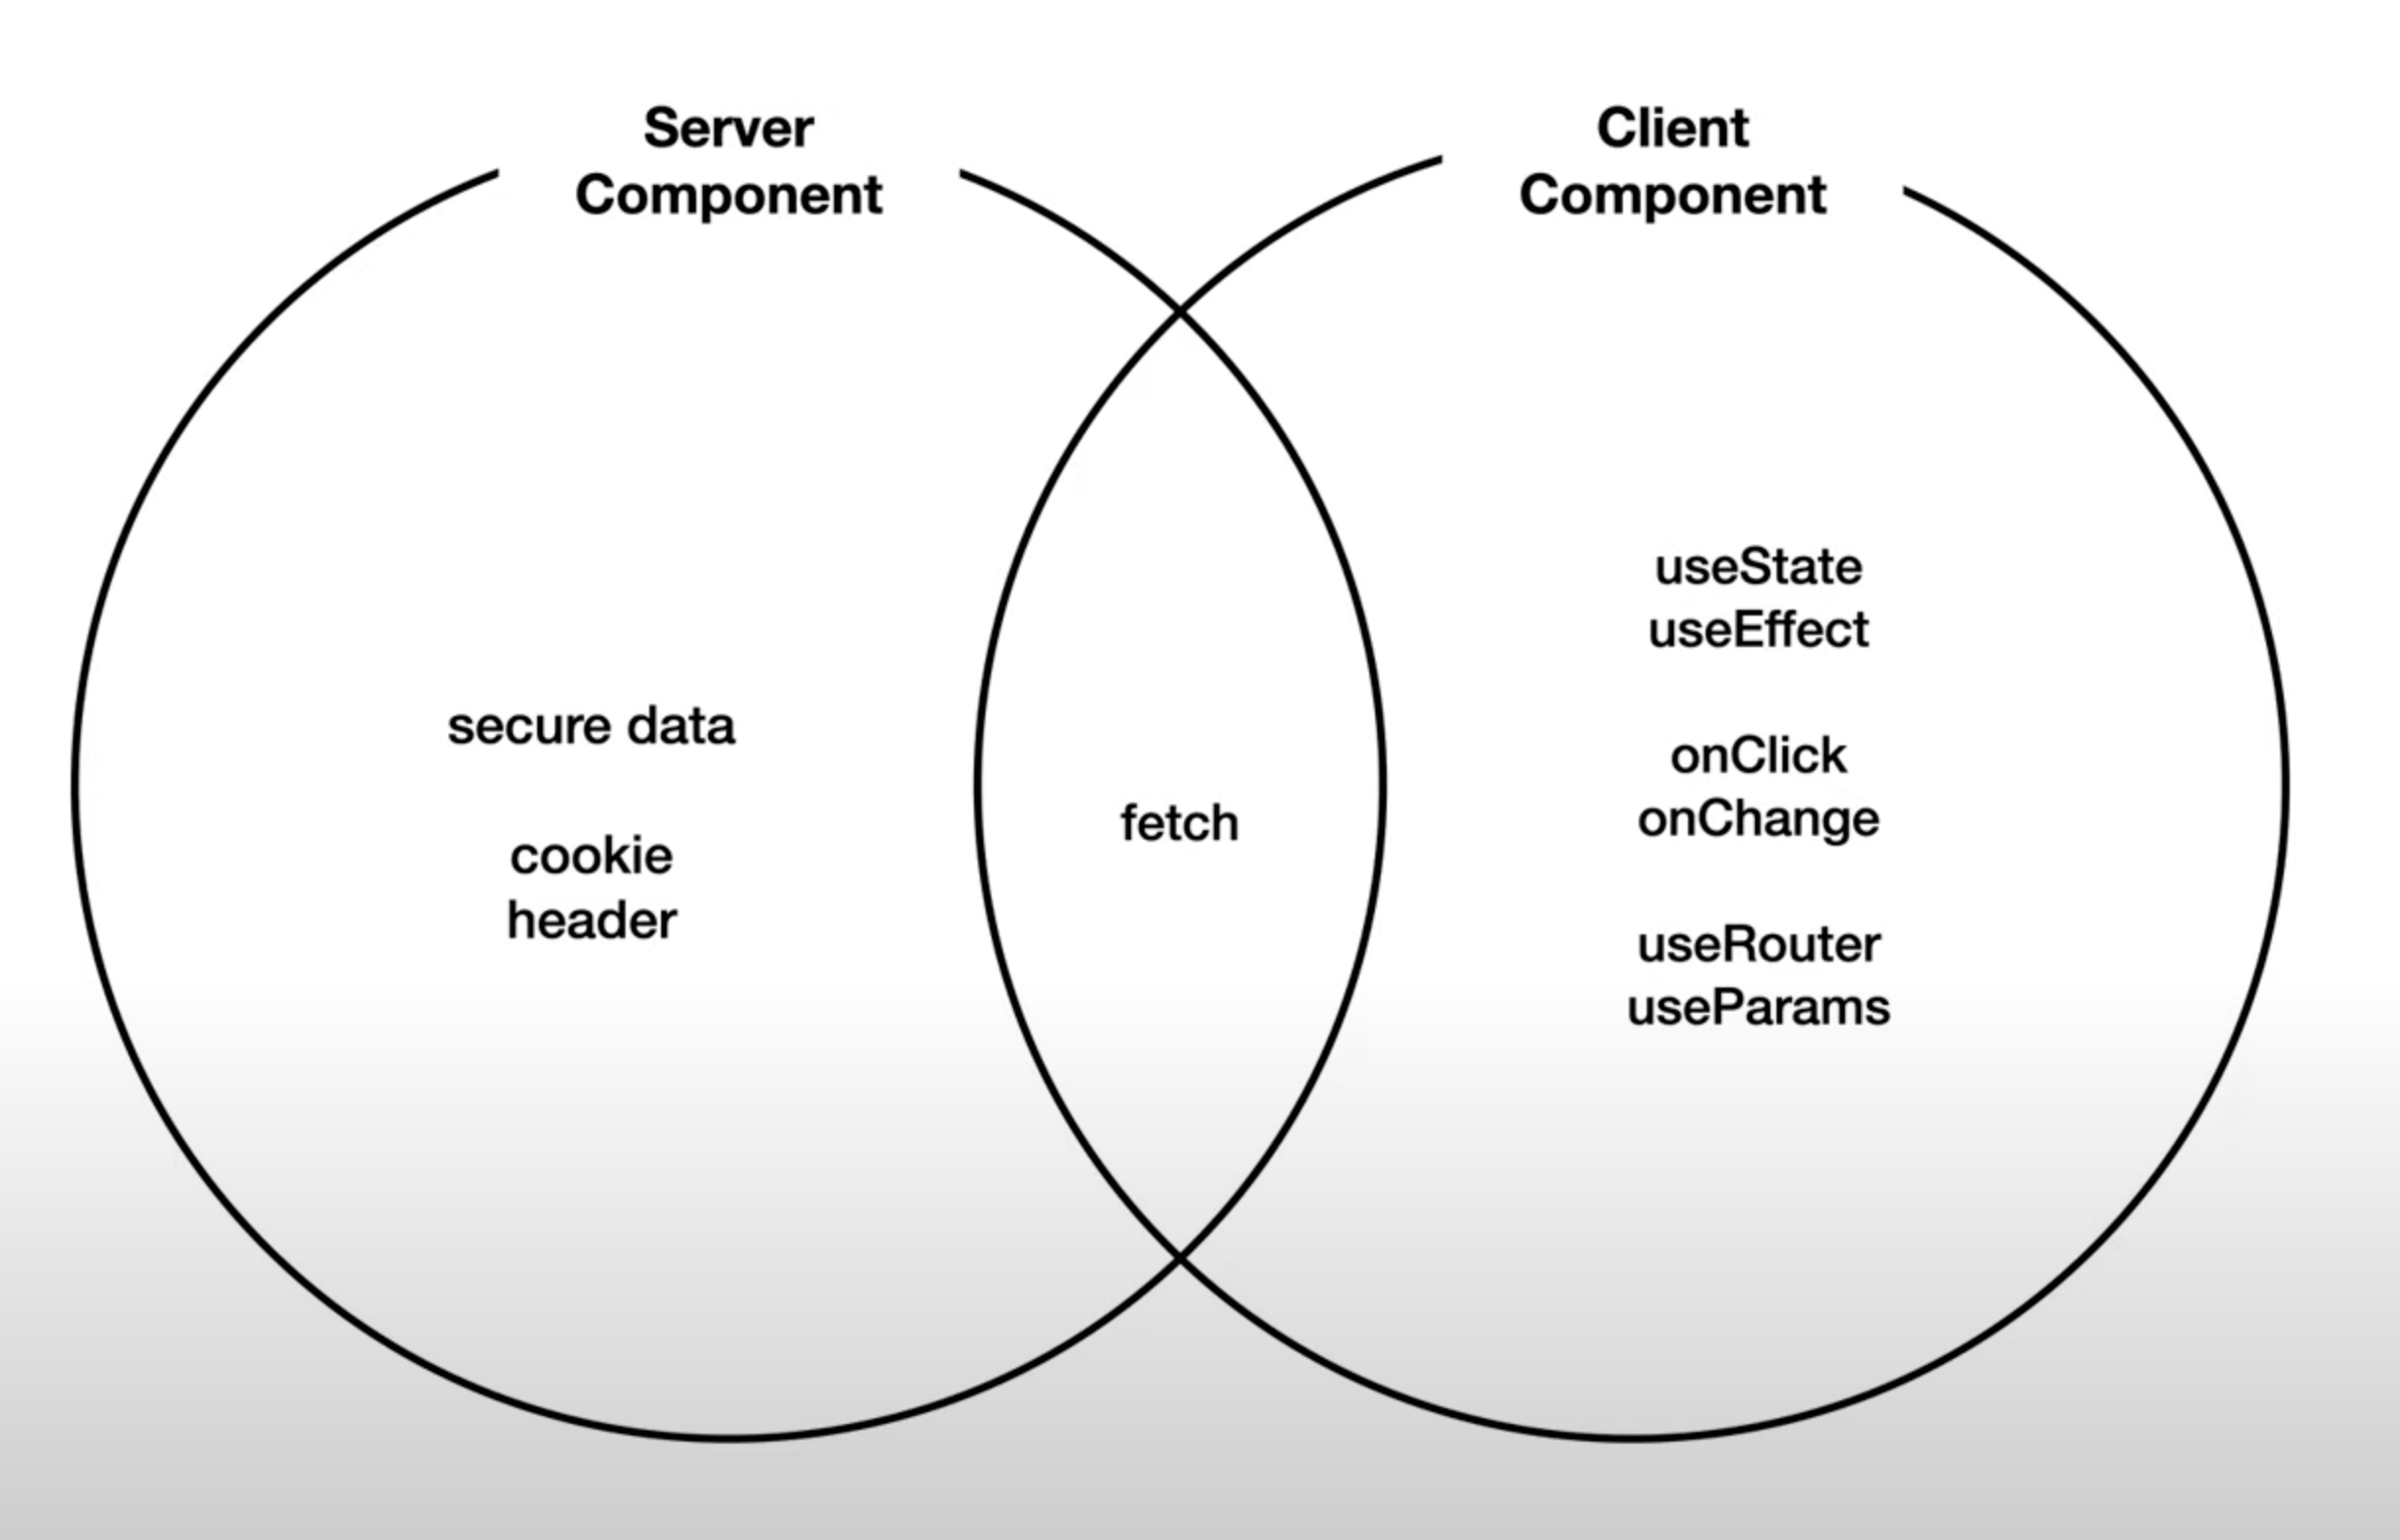
- Server Component 와 Client Component는 사용 가능한 Api가 서로 다름
- 다른 환경에서 두개를 같이 쓰려고 하면 에러가 발생
- Next.js는 기본을 Server Component가 사용될 수 있는 환경으로 만들어둠
- ∴ 초기 상태에서 바로 Client Component 관련 사용하면 에러 뜨고, use Client를 통해서 Client Component를 사용 가능
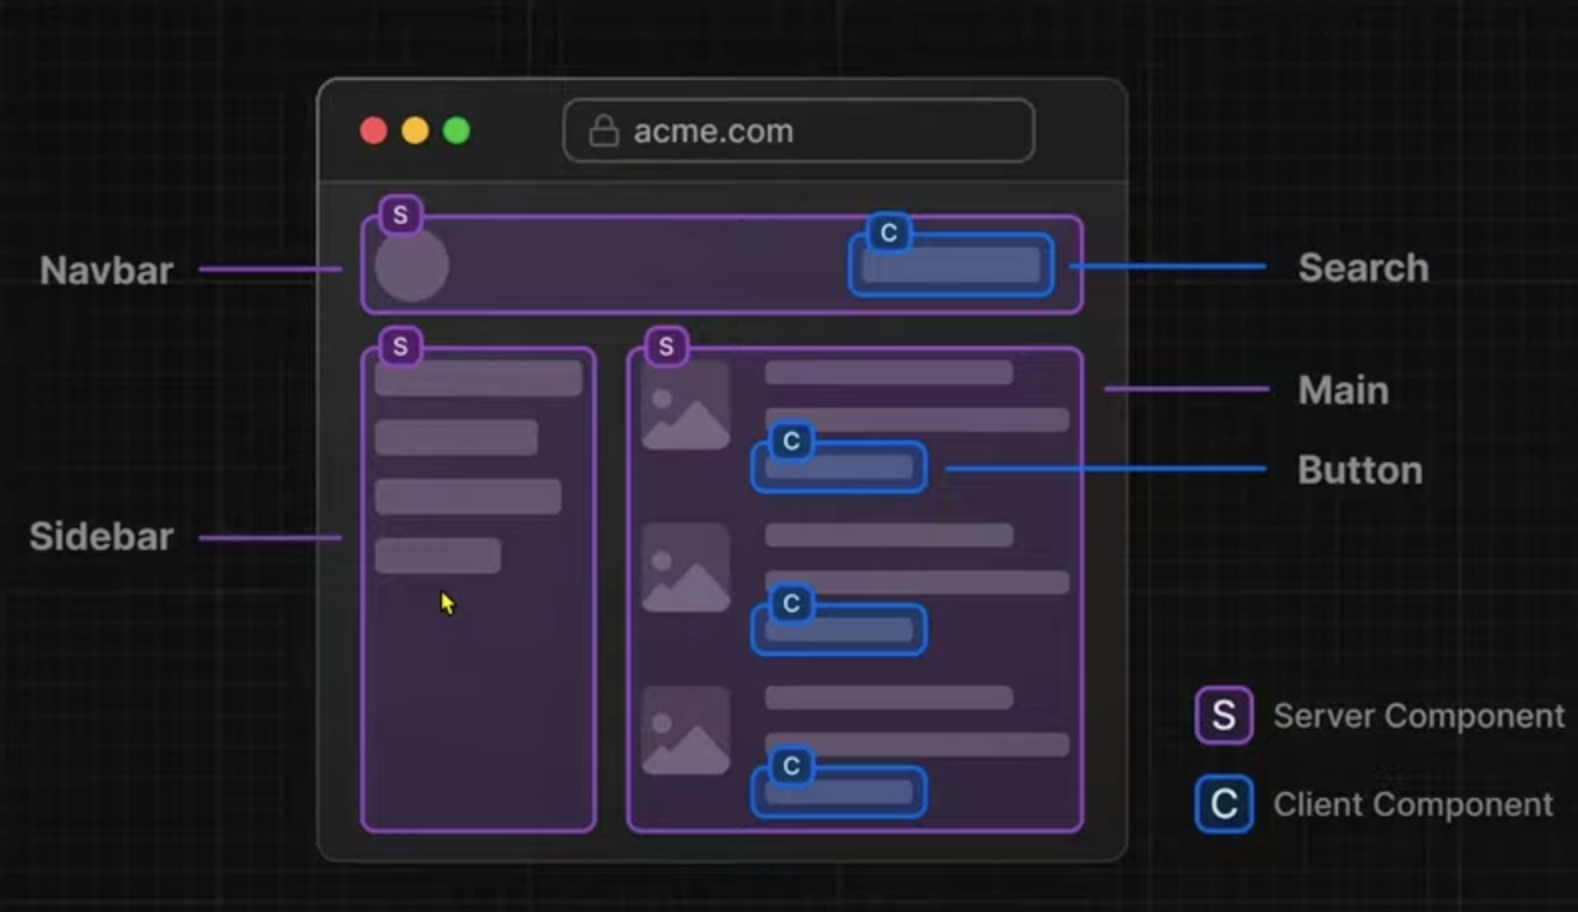
(1) Server Component
- 정보를 표현하지만 사용자와 상호작용하지는 X 는 것들은 Server Component로 만드는 것이 유리
- ex. 단순 정보만 보여주는 부분 (그림에서의 보라색 부분)
(2) Client Component
- 사용자와의 상호작용이 있는 부분만 따로 컴포넌트를 만들어서 해당 부분은 use client화 시키는 것이 좋음
∴ 단순 정보 부분은 Server Component, 사용자와의 상호작용이 있는 부분은 Client Component로 구현하는 것이 유리
예시1) api 연결하기
Client Componet를 사용해서 연결한 경우"use client";
import { Topic } from "@/type/topic";
// import type { Metadata } from "next";
import "./globals.css";
import Link from "next/link";
import { useEffect, useState } from "react";
// export const metadata: Metadata = {
// title: "Web tutorial",
// description: "Generated by jisoo",
// };
export default function RootLayout({
children,
}: Readonly<{
children: React.ReactNode;
}>) {
const [topics, setTopics] = useState<Topic[]>([]);
useEffect(() => {
fetch("http://localhost:9999/topics")
.then((res) => {
return res.json();
})
.then((result) => {
return setTopics(result);
});
}, []);
return (
<html>
<body>
<h1>
<Link href="/">Web</Link>
</h1>
<ol>
{topics.map((item) => (
<li key={item.id}>
<Link href="/read/2">{item.title}</Link>
</li>
))}
</ol>
{children}
</body>
</html>
);
}
- meta 부분은 Sercer Component 이므로, use Client를 통해 Client Component로 바꾸었기에 오류 생김 (따라서 주석처리)
- js를 사용하여 불러오기 때문에, 다른 정적 부분들과는 다르게 js가 막히면 렌더링이 안됨
- 보안 키 같은 것을 사용해야할때, 코드 상 노출이 되니까 보안적으로 문제가 있음
import { Topic } from "@/type/topic";
import type { Metadata } from "next";
import "./globals.css";
import Link from "next/link";
export const metadata: Metadata = {
title: "Web tutorial",
description: "Generated by jisoo",
};
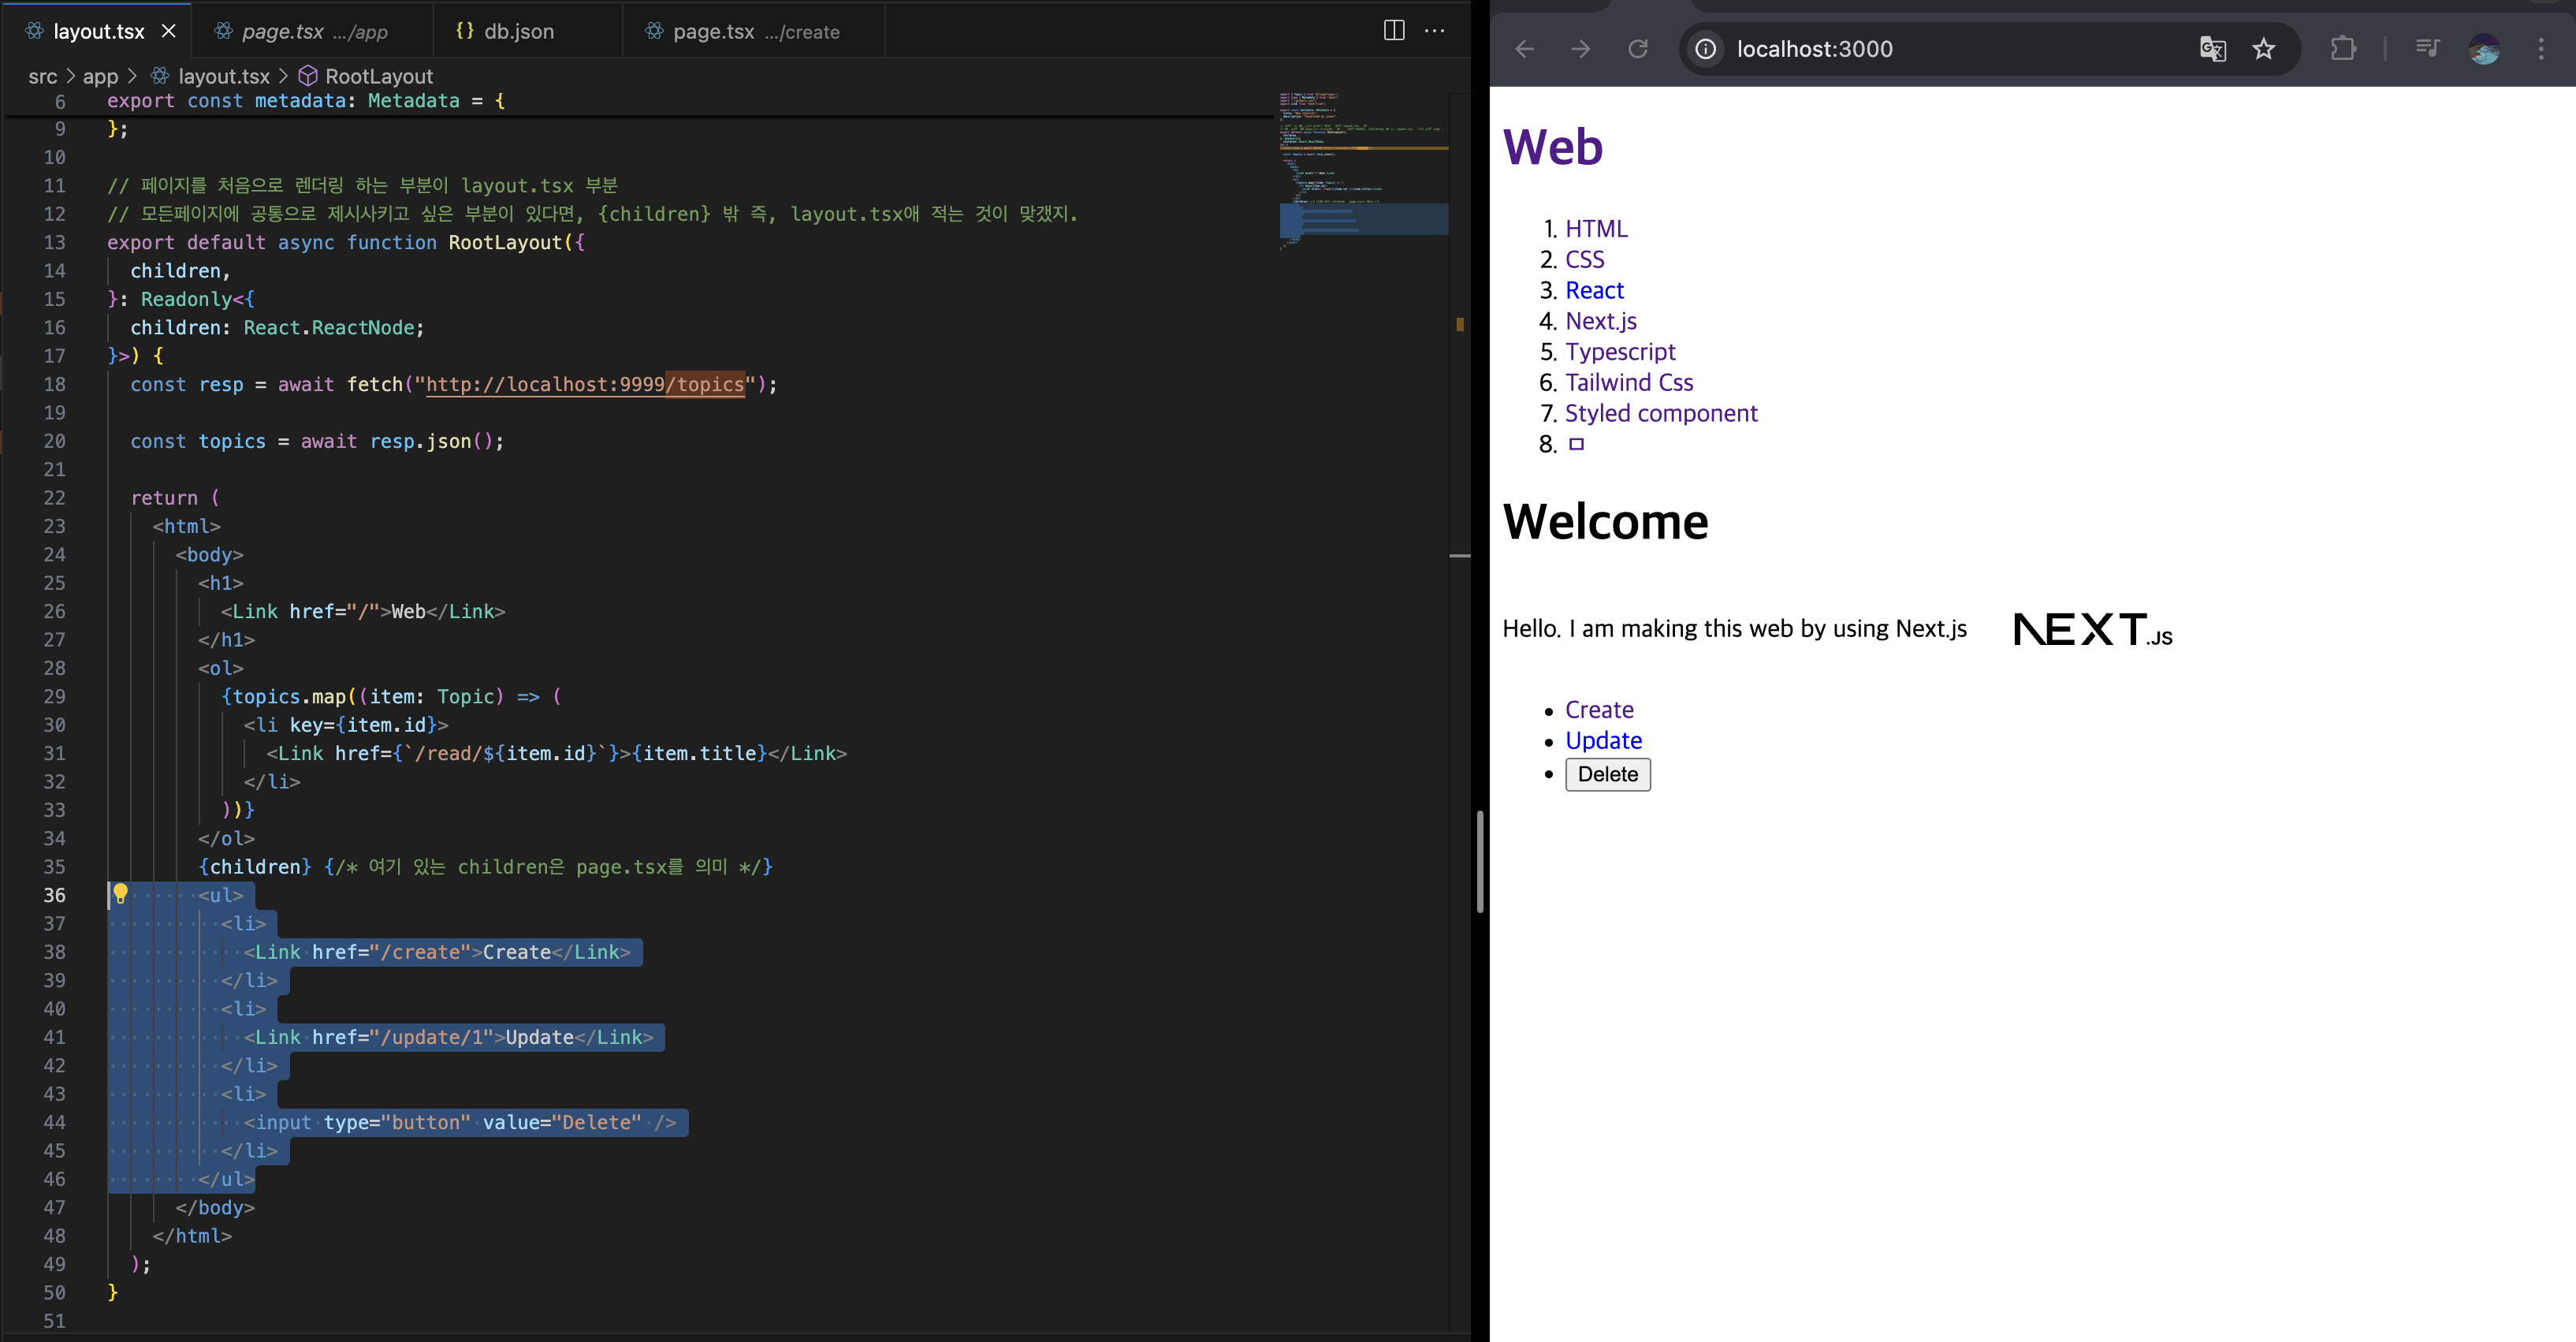
export default async function RootLayout({
children,
}: Readonly<{
children: React.ReactNode;
}>) {
const resp = await fetch("http://localhost:9999/topics");
const topics = await resp.json();
return (
<html>
<body>
<h1>
<Link href="/">Web</Link>
</h1>
<ol>
{topics.map((item: Topic) => (
<li key={item.id}>
<Link href="/read/2">{item.title}</Link>
</li>
))}
</ol>
{children}
</body>
</html>
);
}
-
function을 async로 선언
- 내부적으로 await라는 promise 문법을 사용하기 위해서!
-
기존 fetch도 비동기적이 아니라, 동기적으로 변경
-
∴ 서버 쪽에서 fetch 매소드 호출 && topics 데이터까지 가져와서 화면까지 구성 다하고, .next 폴더내에 결과를 저장하고,최종적인 정적인 내용만 client에 전달!!!!
- client로 넘어오는 용량이 적어짐 (client로 js를 전송하지 X니까)
4.1 Cache
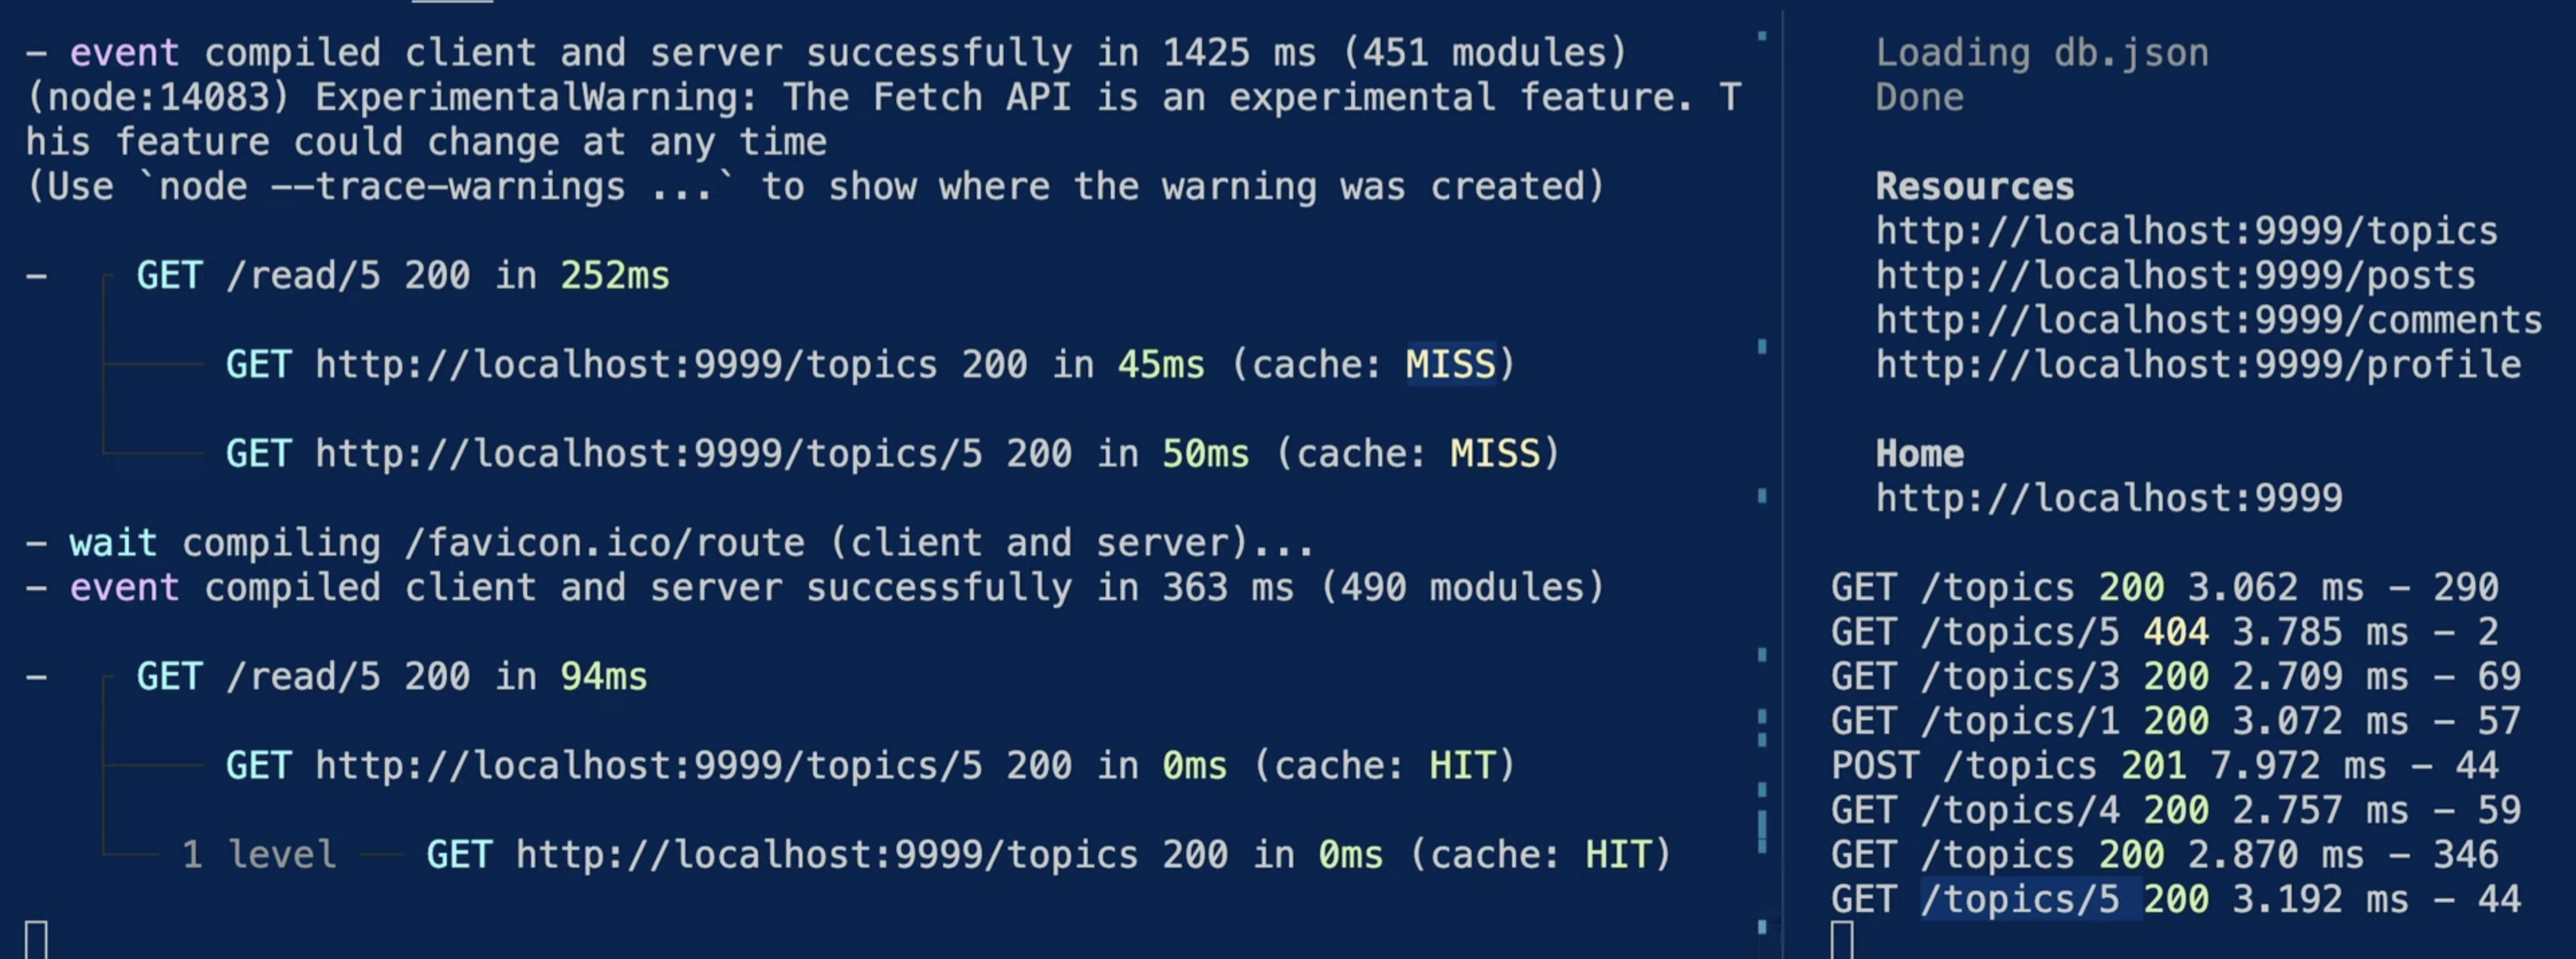
- 완전 초기 접속한 경우, Cache가 되어있는 것이 없음
- /topics와 /topics/5 에 대한 캐싱이 없으므로, miss가 나고
- 오른쪽 json server에서도 Get이 실행됨
- 그 이후 다시 새로고침을 하면, .next에 캐싱이 되어있으니까, HIT이 나고
- 오른쪽 json server에서도 아무것도 실행되지 X
❓ 만약에 Cache가 되어있는 걸 다시 재 호출 시키고 싶다면?
(1) 애초에 해당 fetch 결과를 cahcing 시키지 않기
- next.js caching 공식문서
- BUT 이건 성능 저하
(2) Caching된걸 무효화하기
‼️ In previous versions of Next.js, using fetch would have a default cache value of force-cache. This changed in version 15, to a default of cache: no-store.
-
원래 default가 캐싱이 되는건데, Next.js 15 부터 default가 캐싱 안시키는 걸로 변경됨
+) Caching 시키는 방법
  // 방법 1 : force-cache
  const res = await fetch(`https://api.vercel.app/blog/${id}`, {
    cache: 'force-cache', // 강제로 캐시 부여하겠다.
  })
  const post: Post = await res.json()
  if (!post) notFound()
  return post
}

// 방법 2 : revalidating
  const resp = await fetch("http://localhost:9999/topics", {
    next: { revalidate: 0 }, // 0초간 caching을 유지하겠다
  });

  const topics = await resp.json();
5. useParams
-
useParams 는 Client Component
-
위 코드에서 현재 선택된 부분에서 Update와 Delete 버튼을 '/topics/[id]' 일때만 보여지게 하고 싶어
- useParams를 사용하려면, 'use client'를 해야하지만, layout.tsx 전체를 그렇게 하는 것보다 컴포넌트 화 시키는 것이 이득
6. 환경변수 ENV
NEXT_PUBLIC_API_URL=http://localhost:9999


  const onDeleteClick = () => {
    const options = {
      method: "DELETE",
      headers: { "Content-Type": "application/json" },
    };

    fetch(`${process.env.NEXT_PUBLIC_API_URL}/topics/${id}`, options)
      .then((response) => {
        return response.json();
      })
      .then((result) => {
        console.log("result", result);
        router.push("/");
        router.refresh();
      });
};- 일반적으로 환경변수는 Server Component에서만 정보를 가져와진다. (보완 때문에)
- Client 부분에서도 사용하려면, 해당 env 변수 앞에 NEXT_PUBLIC을 꼭 붙여줘야함
