1. 배열(Array)
- 가장 기본적인 자료구조
- 여러 개의 변수를 담는 공간
- index가 존재하며, index는 0부터 시작한다.(zero-based numbering)
- 특정한 index에 직접적으로 접근 가능 -> O(1)

배열의 특징
- 컴퓨터의 메인 메모리에서 배열의 공간은 연속적으로 할당
- 장점 : 캐시(cache) 히트 가능성이 높고 조회가 빠르다.
- 단점: 배열의 크기를 미리 지정해야 하는 것이 일반적이므로, 데이터의 추가 및 삭제에 한계가 있다.
(JS에서는 동적 배열이 사용 가능하다.)
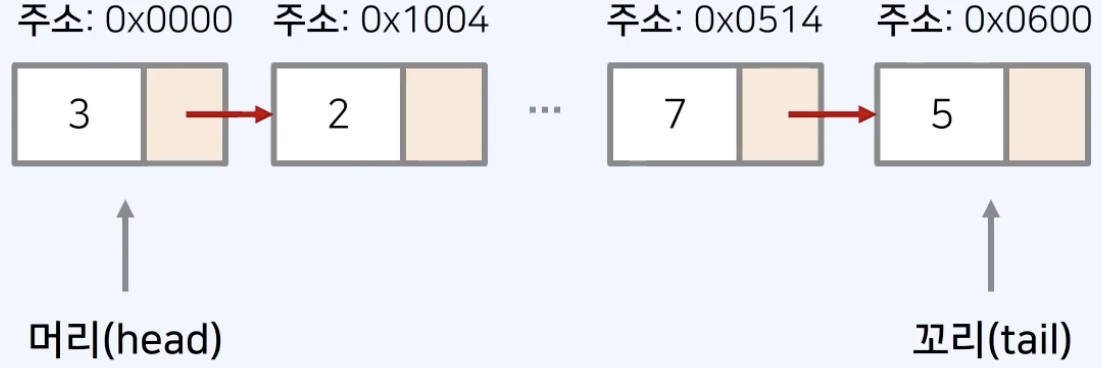
2. 연결 리스트(Linked List)
- 연결 리스트는 컴퓨터의 메인 메모리상에서 주소가 연속적이지 않다.
- 배열과 다르게 크기가 정해져 있지 않고, 리스트의 크기는 동적으로 변경 가능하다.
(42 gnl 보고 오면 될 듯) - 장점 : 포인터를 통해 다음 데이터의 위치를 가르키기 떄문에 삽입, 삭제가 편하다.
- 단점 : 특정 원소를 검색할 때 앞에서부터 찾아야 하므로 검색 속도가 느리다.
JS에서의 Array
- JS의 배열 자료형은 동적 배열이다.
- 배열의 용량이 가득차면, 자동으로 크기를 증가시킨다.
- 내부적으로 포인터를 사용하여 연결 리스트의 장점도 가지고 있다.
- 배열 혹은 스택 기능이 필요할 때 사용할 수 있다. (스택 필요할 때 사용할 수 있어서 개꿀)
생성 방법
let arr = [1, 2, 3] ;
let arr2 = new Array(1, 2, 3);
//같은 기능을 수행한다.
let arr3 = Array.from({length: 5}, () => 7);
//임의의 크기 5를 갖는 배열 생성하여 7로 초기화.
let arr4 = [[0,1,2,3], [4,5,6,7]]
// 2차원 배열 생성
let arr5 = Array.from(Array(4), ()=> new Array(5))
// [4][5]의 2차원 배열을 생성
배열 익히기
let arr = [1, 2, 3];
arr.length = 8; //index 0~7까지로 만듦
arr[6] = 10;
arr.push(3) //index 하나 증가하고 3으로 넣음.
//배열 내부 [1, 2, 3, undefined, undefined, undefined, 10, undefined, 8]
let arr2 = [34, 5];
arr2 = arr.concat(arr2); // 서로 합친 결과 반환
arr2.slice(2, 4);
//index 2~(4-1)까지 가져온다. O(N)
arr2.indexOf(4); //4값을 가지는 첫째 인덱스 반환
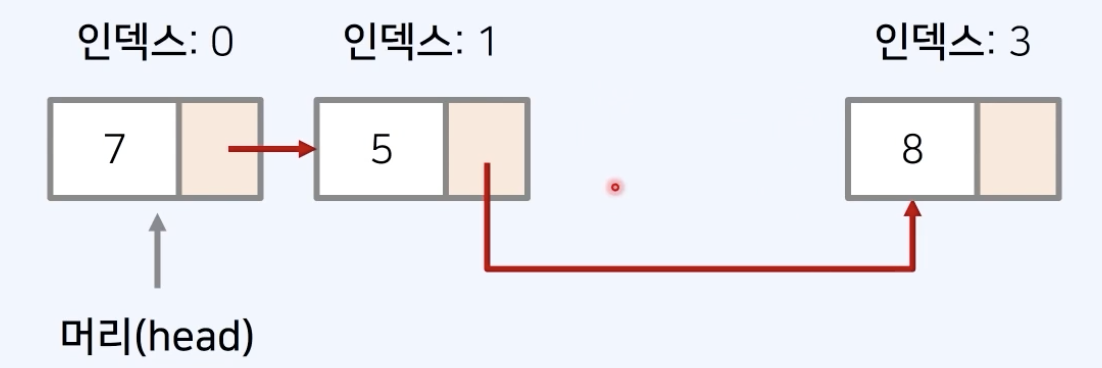
연결 리스트 개념 익히기
JS에서 연결 리스트를 구현할 일은 없지만, 개념을 이해하는 수준으로 알아본다.
- 각 노드가 한 줄로 연결되어 있는 자료 구조
- 각 노드는 (data, pointer) 쌍으로 구성된다.
- 타겟 노드의 위치를 정확하게 알고 있다면 삽입, 삭제의 성능이 O(1)이다.
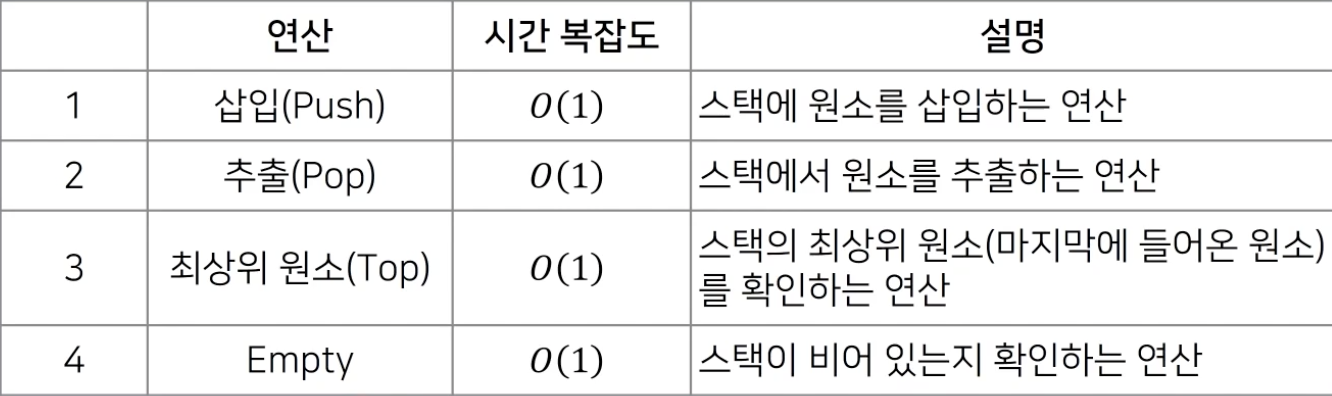
3. 스택(Stack)
- 먼저 들어온 데이터가 나중에 나가는 자료구조 (LIFO)
- JS에서 Array로 스택 자료구조를 사용 할 수 있다.

- 제공 연산(JS에서는 push, pop을 제공한다.)
// stack 사용 예제
let stack = [];

stack.push(1); //[1];
stack.push(2); //[1, 2];
stack.push(3); //[1, 2, 3];
stack.pop(); //[1, 2];
stack.push(4); //[1, 2, 4];

let lifo = stack.reverse(); //Last In First Out 을 위한 배열 뒤집기.
console.log(lifo);
4. 큐(Queue)
- 먼저 삽입된 데이터가 먼저 추출되는 자료구조 (FIFO)
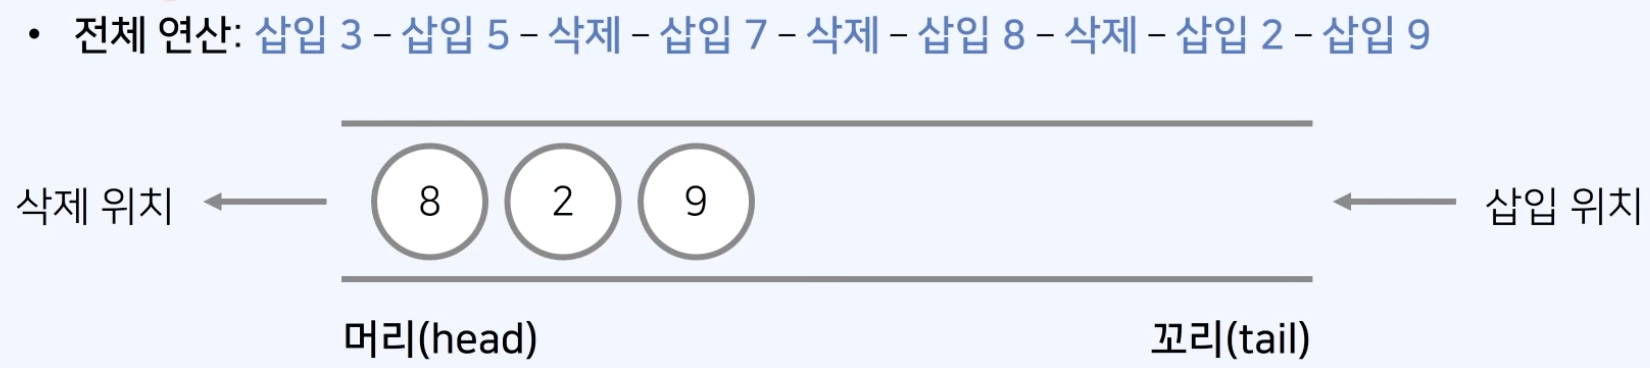
- JS에서 Array로 큐를 구현하는 것은 비효율적이기 때문에 Dictionary로 구현하면 간단하다.
// Queue 구현
class Queue{
    constructor (){
        this.items = {};
        this.headIndex = 0;
        this.tailIndex = 0;
    }
    enqueue(item) {
        this.items[this.tailIndex] = item;
        this.tailIndex++; //tailIndex 증가
    } // 데이터 삽입
    dequeue() {
        const item = this.items[this.headIndex];
        delete this.items[this.headIndex];
        this.headIndex++;
        return item;
    } //데이터 추출
    peek(){
        return this.items[this.headIndex];
    }
    getLength(){
        return this.tailIndex - this.headIndex;
    }
}
queue = new Queue();

queue.enqueue(1);
queue.enqueue(2);
queue.enqueue(3);
queue.enqueue(4);
queue.enqueue(5); //1, 2, 3, 4, 5 headIndex: 0, tailInedx : 5
queue.dequeue(); //1 반환  headInedx : 1
queue.enqueue(6); // 2, 3, 4, 5, 6 headInedx:1, tailInedx: 6

while (queue.getLength() != 0)
{
    console.log(queue.dequeue())
} //출력 2, 3, 4, 5, 6 headIndex:6, tailIndex: 6
Hello World !