가시다님의 KANS [3기] 스터디 내용을 정리한 포스트 입니다.
1. AWS VPC CNI 소개
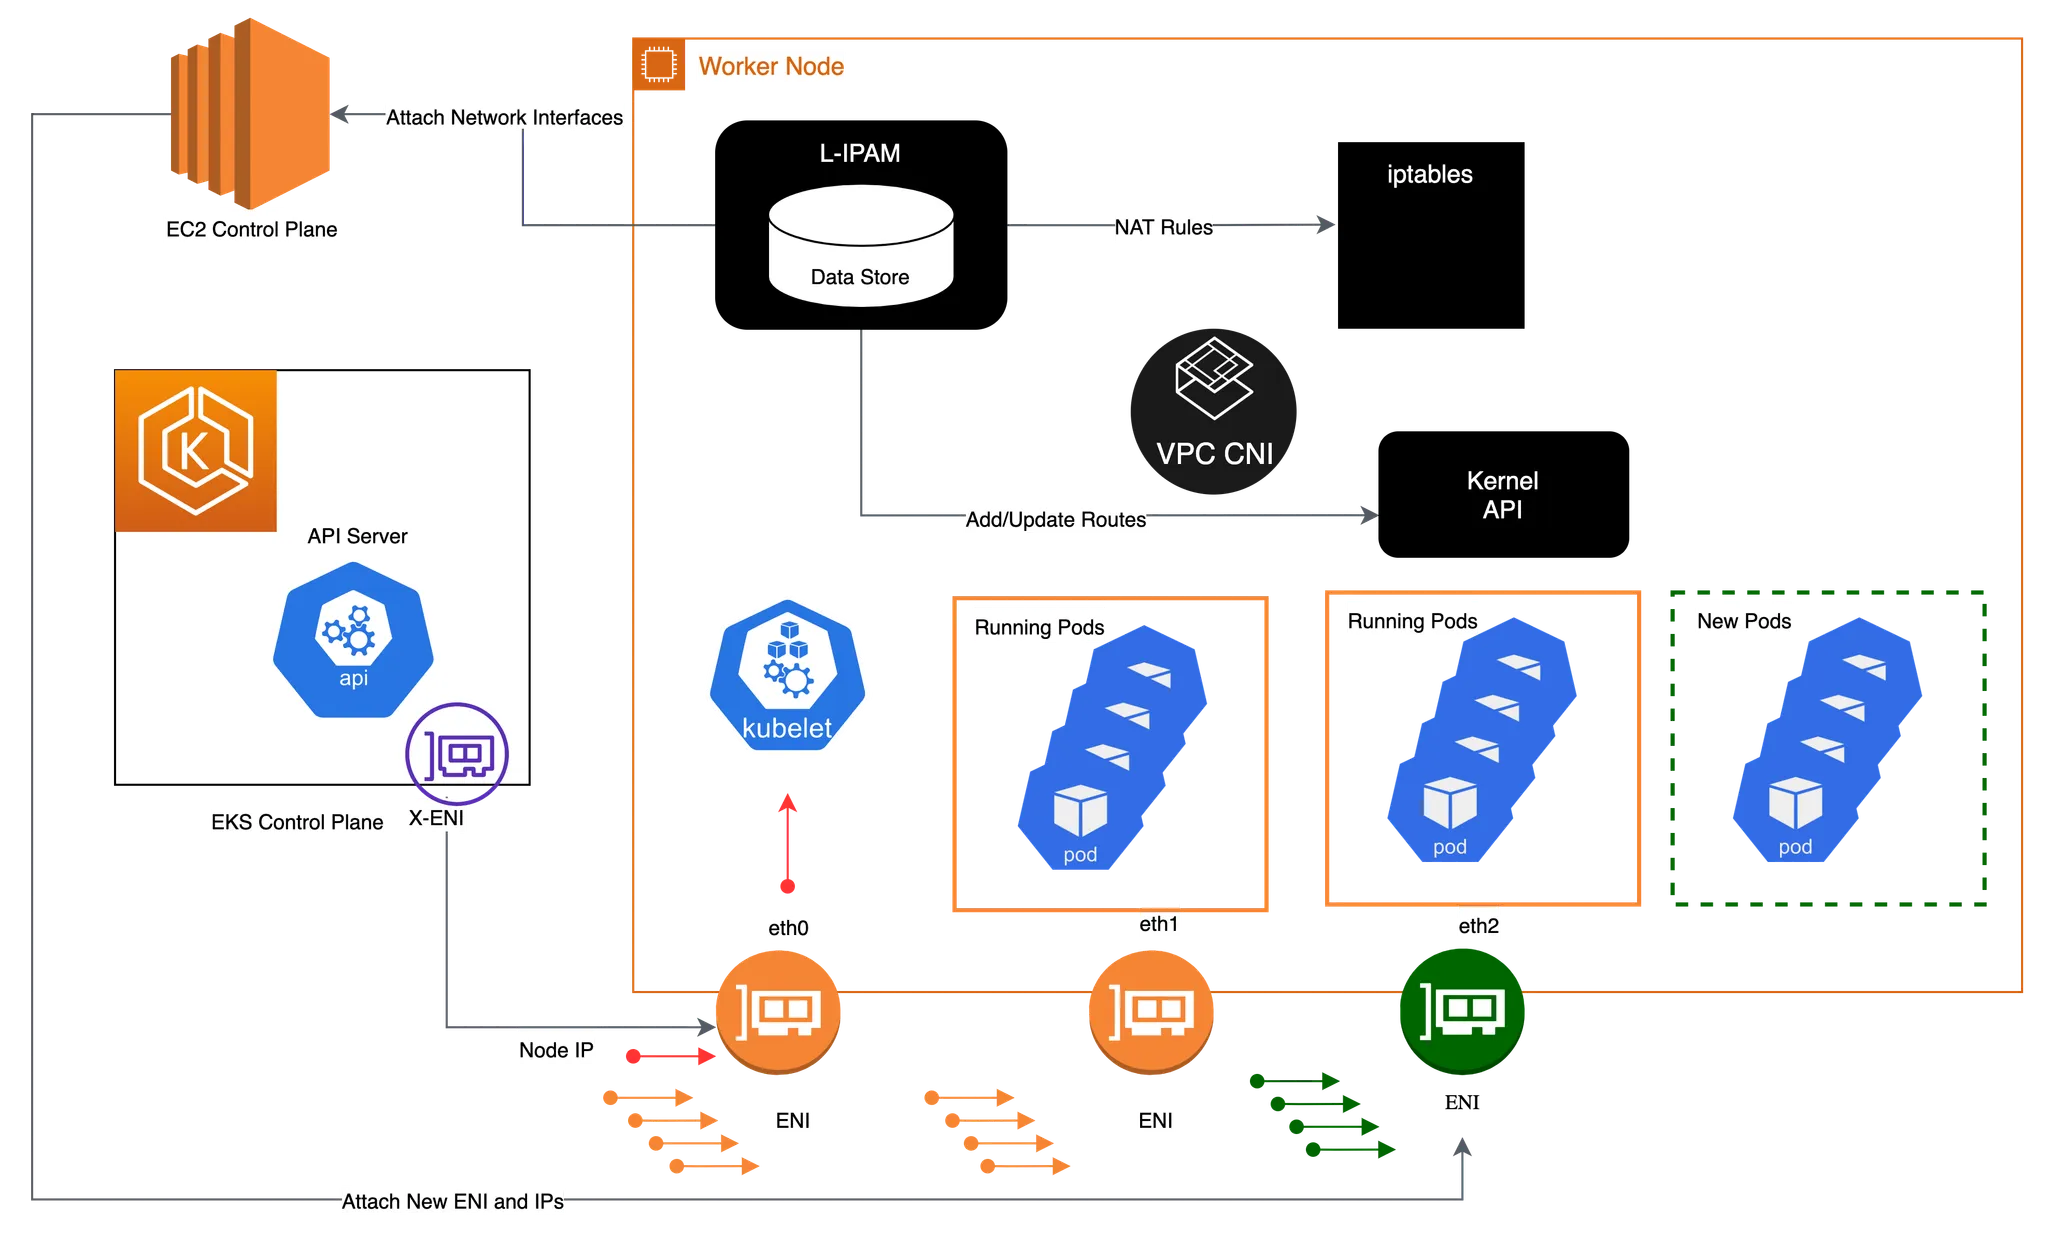
AWS VPC CNI (Container Network Interface)는 Amazon Elastic Kubernetes Service (EKS)에서 사용되는 네트워크 플러그인입니다. VPC CNI는 Kubernetes 파드가 Amazon VPC (Virtual Private Cloud) 내에서 직접 IP 주소를 할당받아 네트워크를 구성할 수 있게 해줍니다. 이를 통해 파드는 AWS의 VPC 네트워크 기능을 활용하여 다음과 같은 이점을 제공합니다.
1.1 주요 특징
-
VPC 네트워크 통합: 각 포드는 VPC의 서브넷에서 IP 주소를 할당받아 네트워킹을 진행하므로 보안 그룹을 통해 접근 제어를 쉽게 설정할 수 있습니다. VPC Flow logs , VPC 라우팅 정책, 보안 그룹(Security group) 을 사용 가능합니다.
-
고성능 네트워크 지원: AWS 네트워크의 성능을 그대로 사용할 수 있어 네트워크 지연을 줄이고 높은 성능을 유지할 수 있습니다.
-
네트워크 보안: VPC 보안 그룹을 포드에 적용하여 세분화된 보안 설정이 가능합니다.
-
IP 관리: 자동으로 IP 주소를 할당하고 관리해줌으로써, 네트워크 관리를 간소화할 수 있습니다.
1.2 K8S Calico CNI 와 AWS VPC CNI 차이
- Calico CNI: Calico는 가상 네트워크와 오버레이 네트워크를 사용하여 Pod 간 네트워크 연결을 지원합니다. IP-in-IP, VXLAN 등 다양한 네트워크 오버레이 옵션이 있으며, 네트워크 정책을 통해 세분화된 네트워크 보안과 가시성을 제공합니다.
- AWS VPC CNI: AWS VPC CNI는 Amazon VPC와 직접 통합되어 각 Pod가 VPC 내부 IP를 할당받고 AWS 네트워크 리소스와 직접 연결됩니다. 오버레이 네트워크가 필요 없으며, AWS 네트워크의 성능과 보안 정책을 그대로 적용할 수 있습니다.
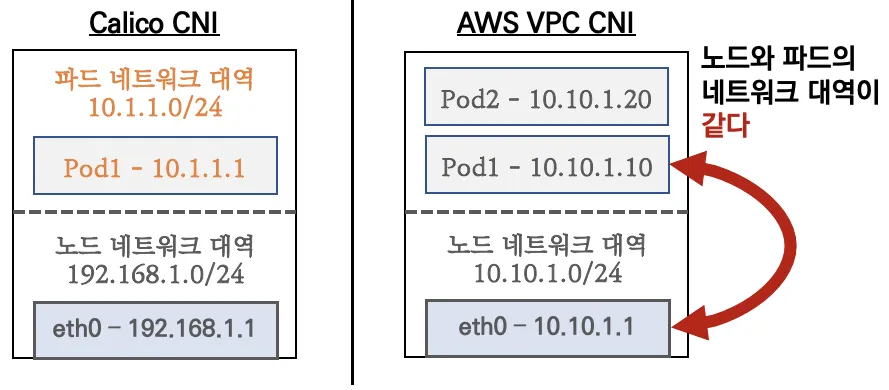
파드간 통신 시 일반적으로 K8S CNI는 오버레이(VXLAN, IP-IP 등) 통신을 하고, AWS VPC CNI는 동일 대역으로 직접 통신을 합니다.
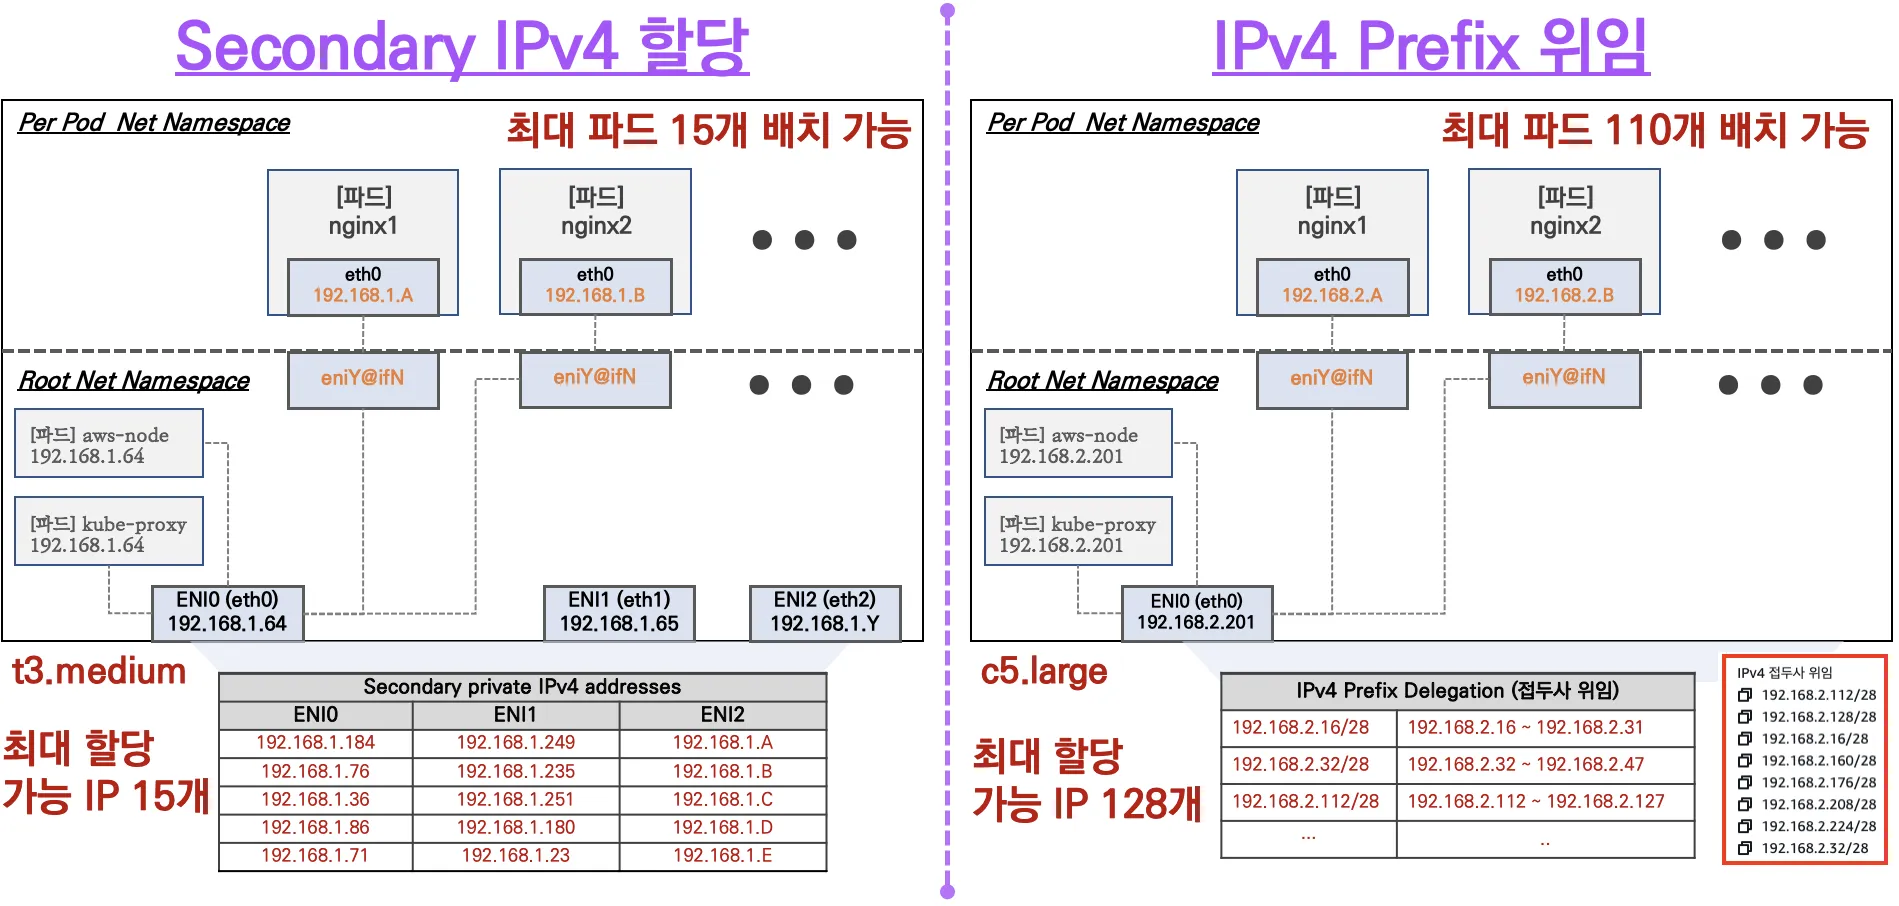
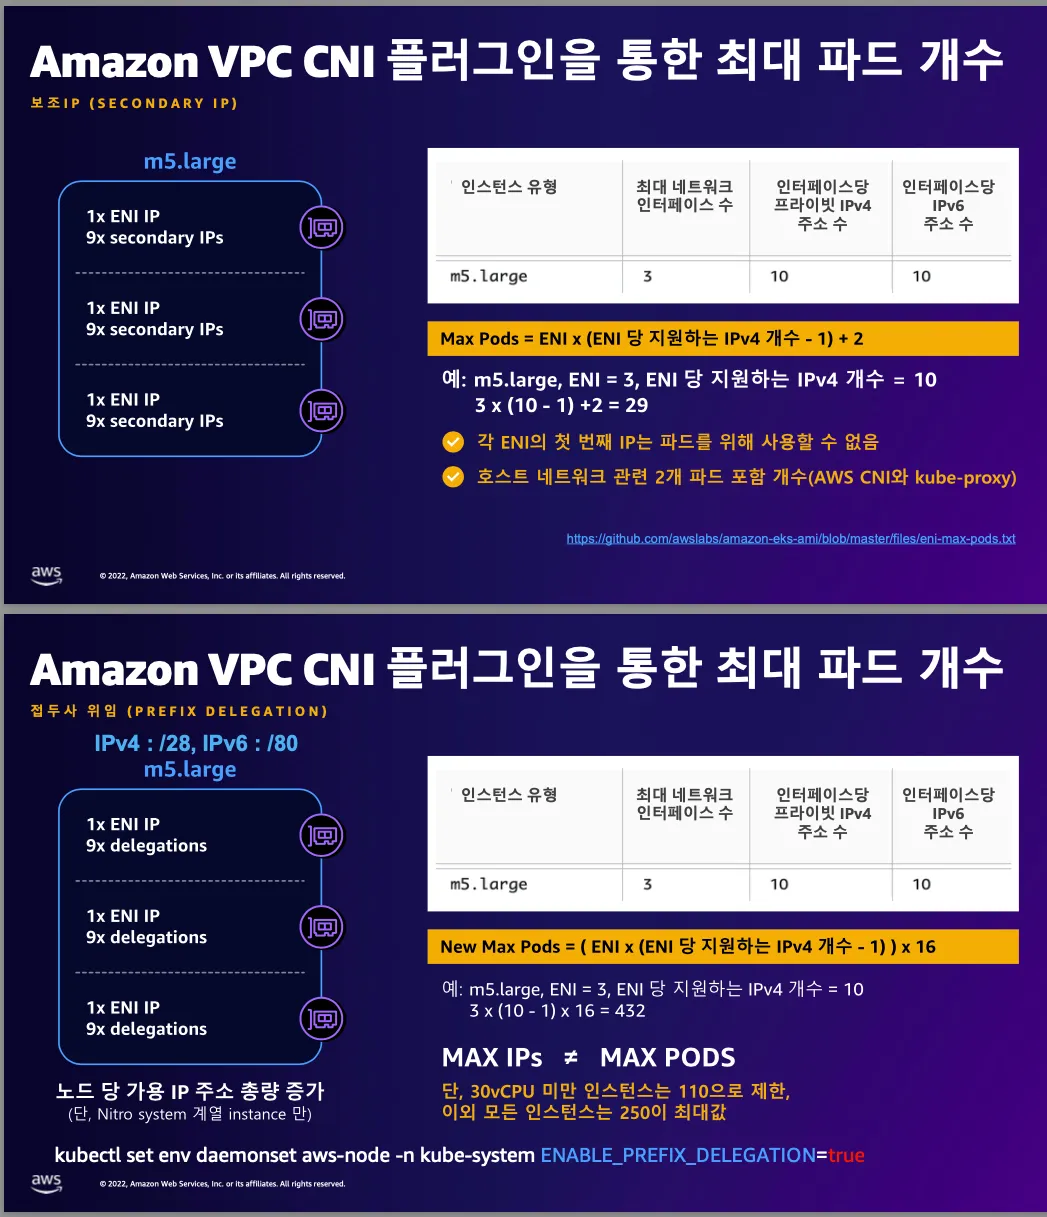
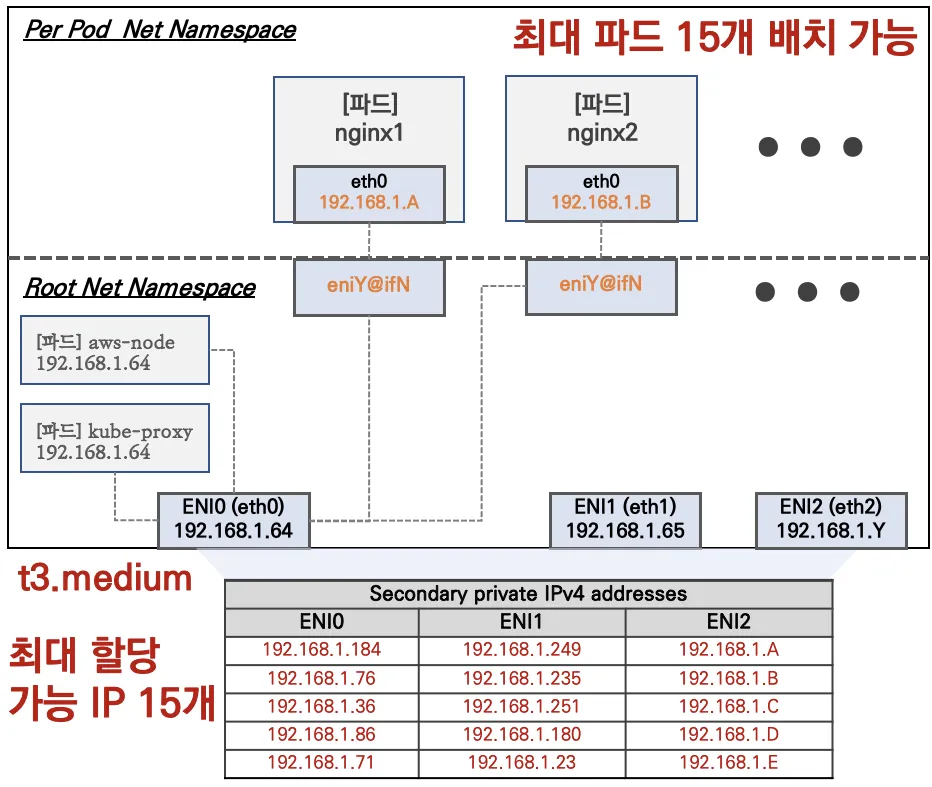
1.3 워커 노드에 생성 가능한 최대 파드 갯수
- Secondary IPv4 addresses : 인스턴스 유형에 최대 ENI 갯수와 할당 가능 IP 수를 조합하여 선정
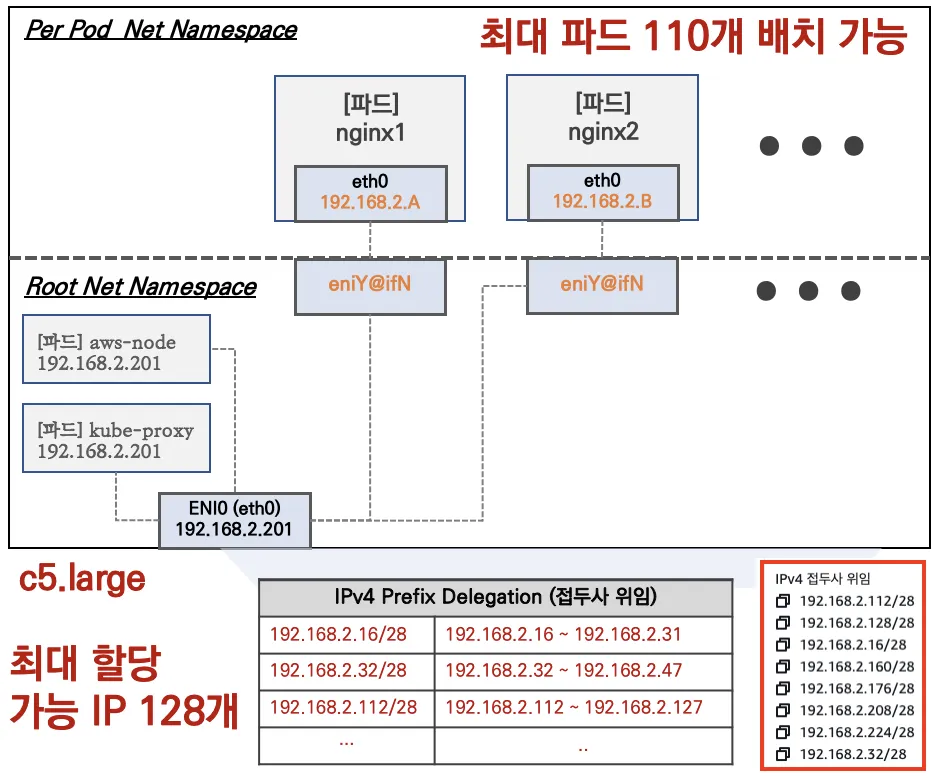
- IPv4 Prefix Delegation : IPv4 28bit 서브넷(prefix)를 위임하여 할당 가능 IP 수와 인스턴스 유형에 권장하는 최대 갯수로 선정
2. 노드에서 기본 네트워크 정보 확인
- 워커노드 기본 네트워크 구성
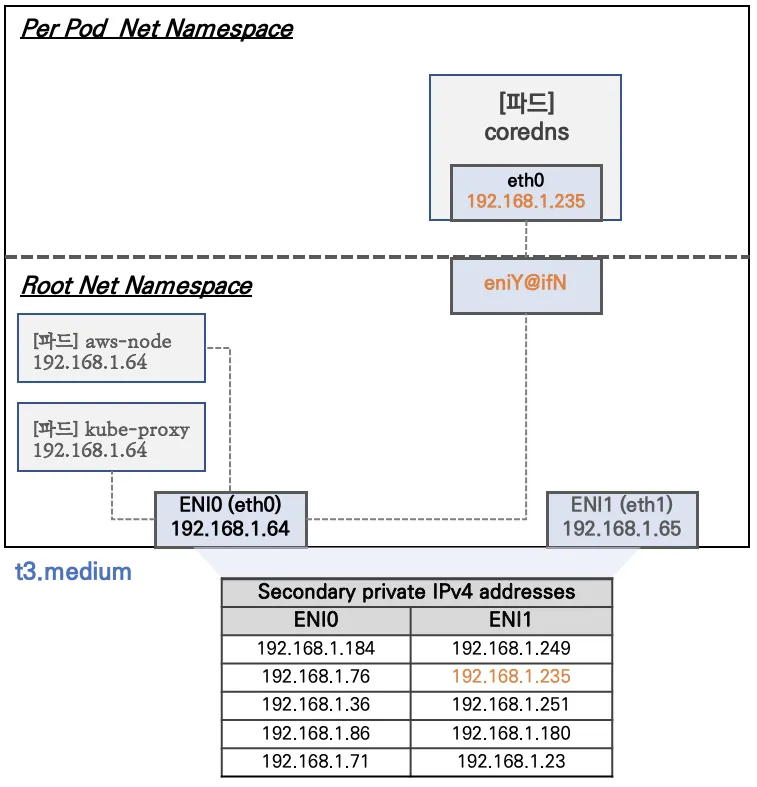
- Network 네임스페이스는 호스트(Root)와 파드 별(Per Pod)로 구분된다
- 특정한 파드(kube-proxy, aws-node)는 호스트(Root)의 IP를 그대로 사용한다
- t3.medium 의 경우 ENI 마다 최대 6개의 IP를 가질 수 있다
- ENI0, ENI1 으로 2개의 ENI는 자신의 IP 이외에 추가적으로 5개의 보조 프라이빗 IP를 가질수 있다
- coredns 파드는 veth 으로 호스트에는 eniY@ifN 인터페이스와 파드에 eth0 과 연결되어 있다
-
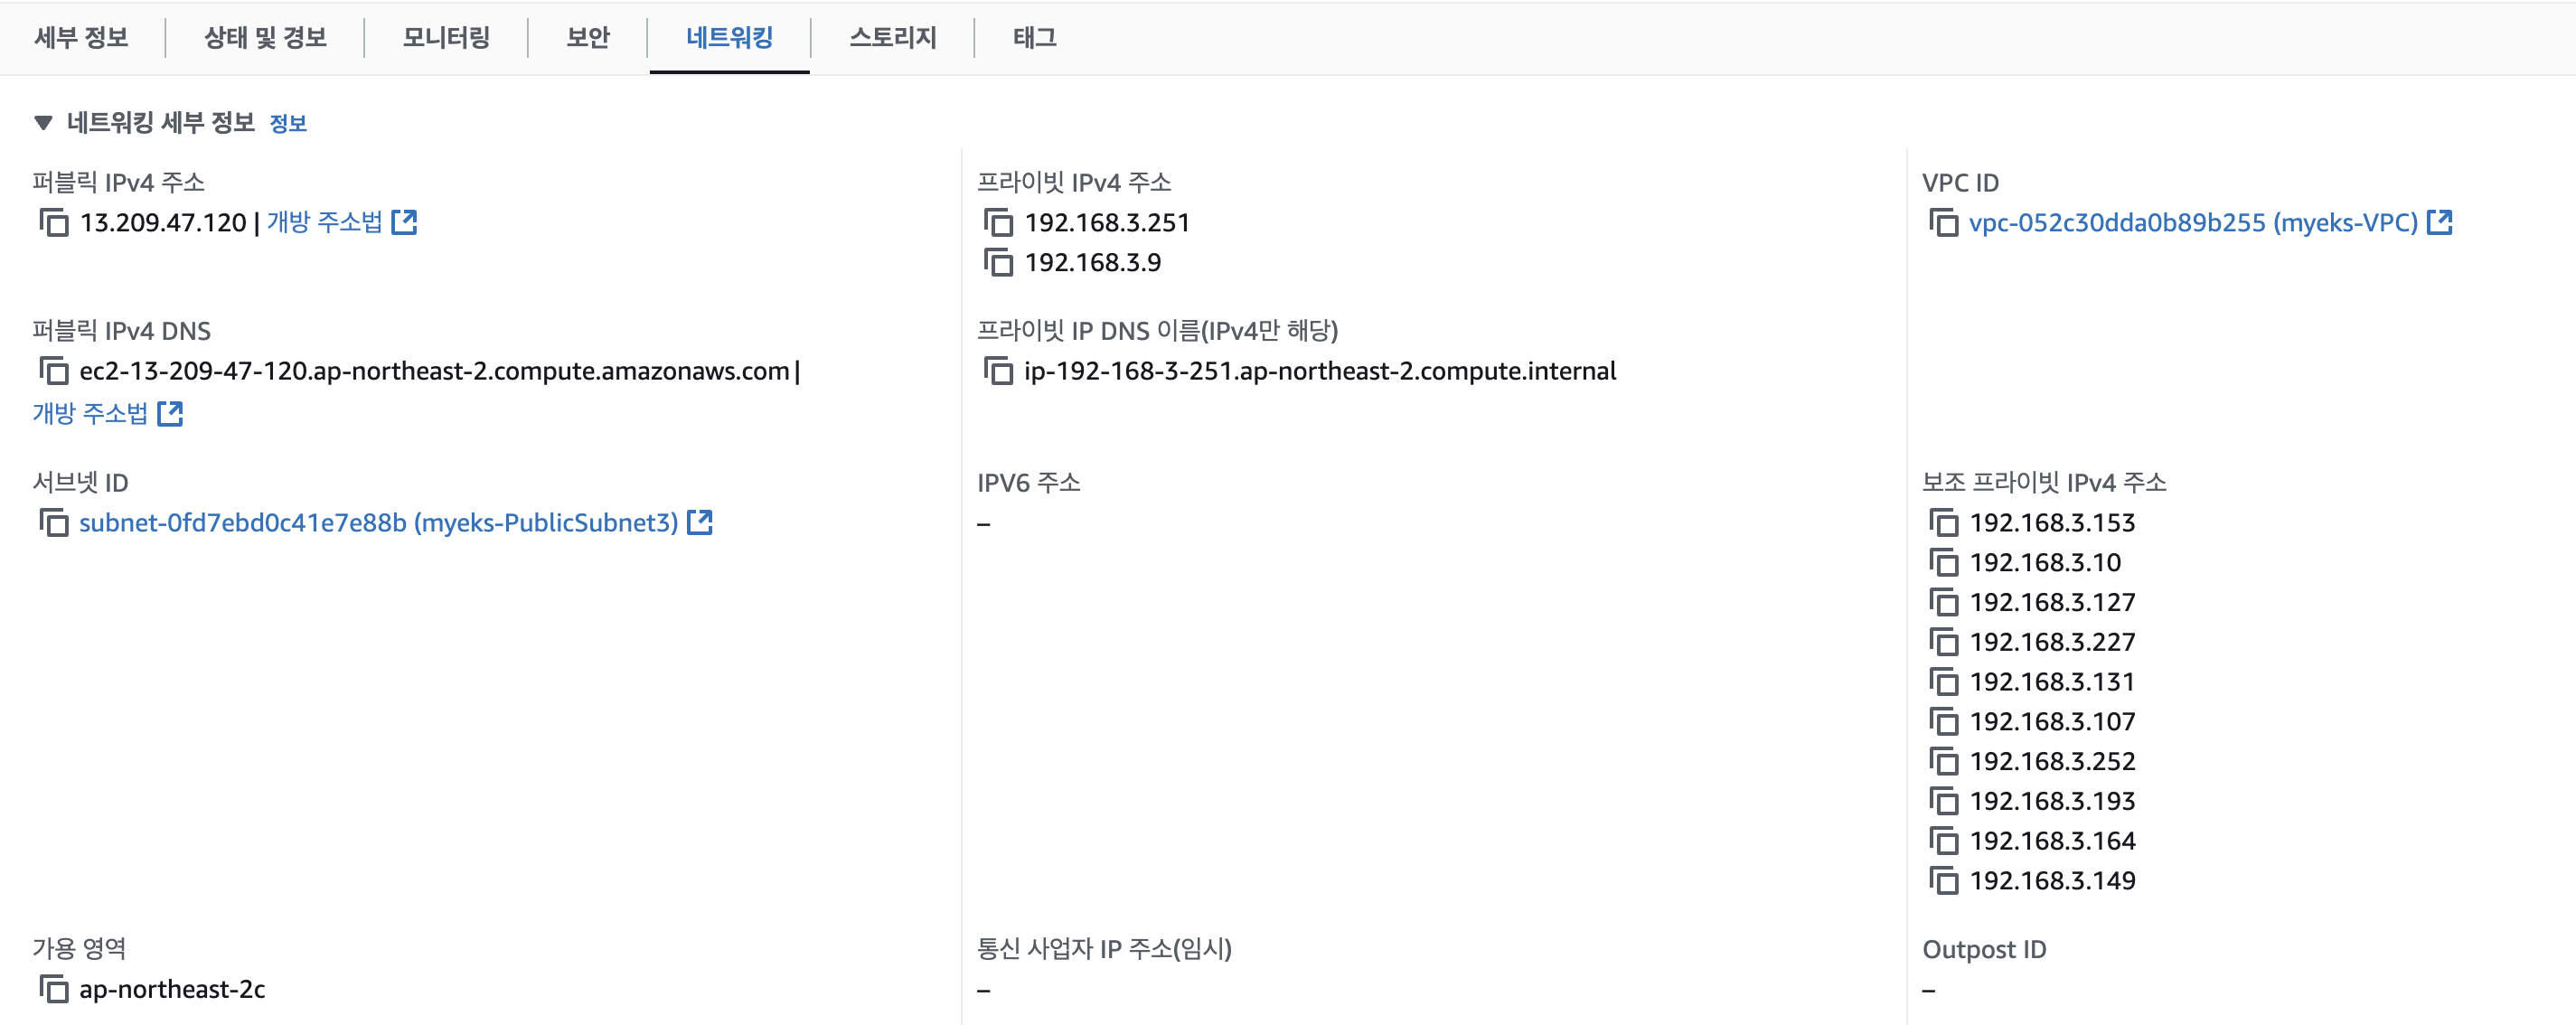
인스턴스의 네트워크 정보 확인 : 프라이빗 IP와 보조 프라이빗 IP 확인
-
[실습] 보조 IPv4 주소를 파드가 사용하는지 확인
# coredns 파드 IP 정보 확인
kubectl get pod -n kube-system -l k8s-app=kube-dns -owide
NAME                       READY   STATUS    RESTARTS   AGE   IP              NODE                                               NOMINATED NODE   READINESS GATES
coredns-6777fcd775-57k77   1/1     Running   0          70m   192.168.1.142   ip-192-168-1-251.ap-northeast-2.compute.internal   <none>           <none>
coredns-6777fcd775-cvqsb   1/1     Running   0          70m   192.168.2.75    ip-192-168-2-34.ap-northeast-2.compute.internal    <none>           <none>

# 노드의 라우팅 정보 확인 >> EC2 네트워크 정보의 '보조 프라이빗 IPv4 주소'와 비교해보자
for i in $N1 $N2 $N3; do echo ">> node $i <<"; ssh ec2-user@$i sudo ip -c route; echo; done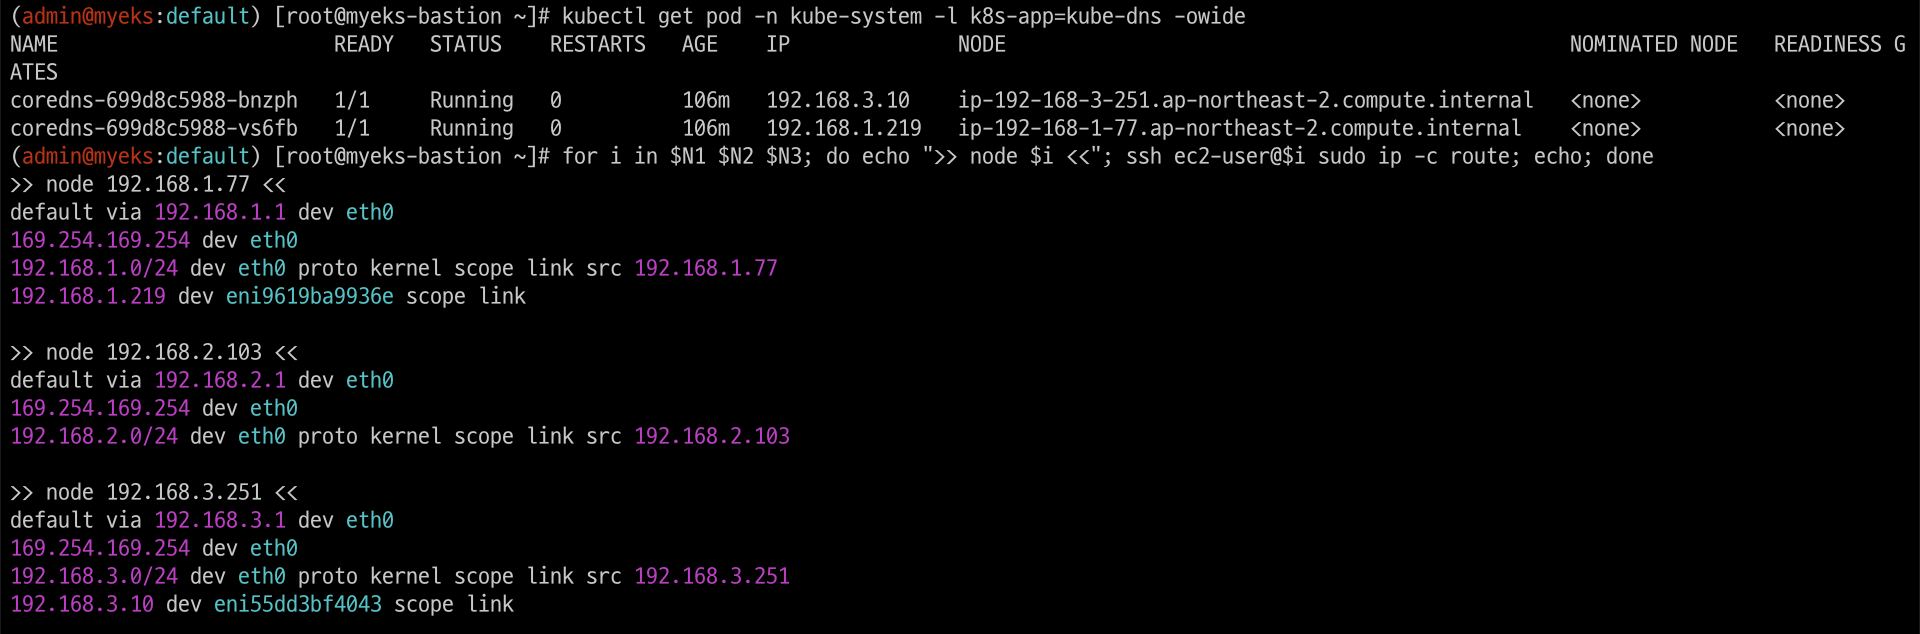
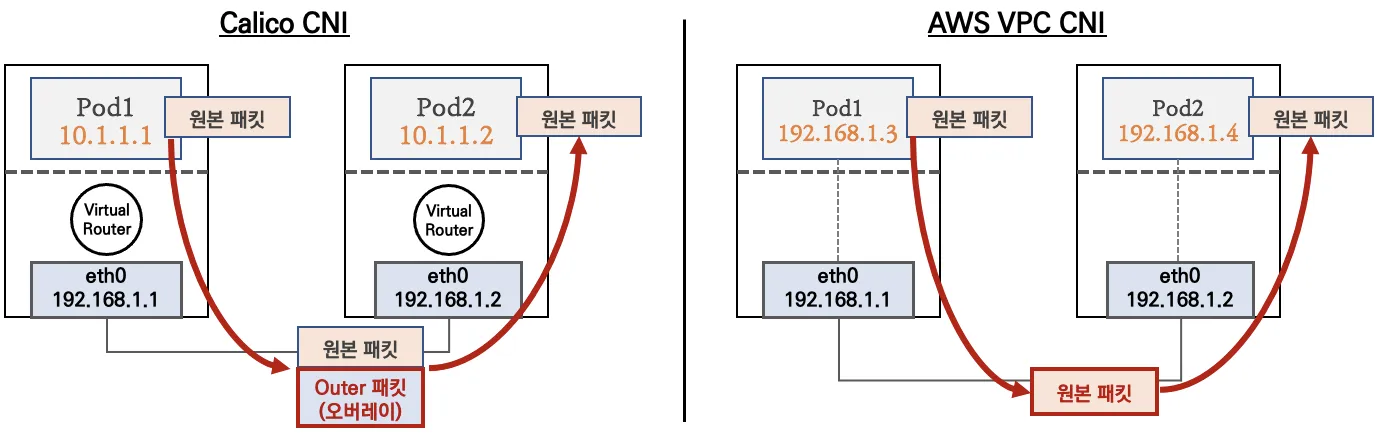
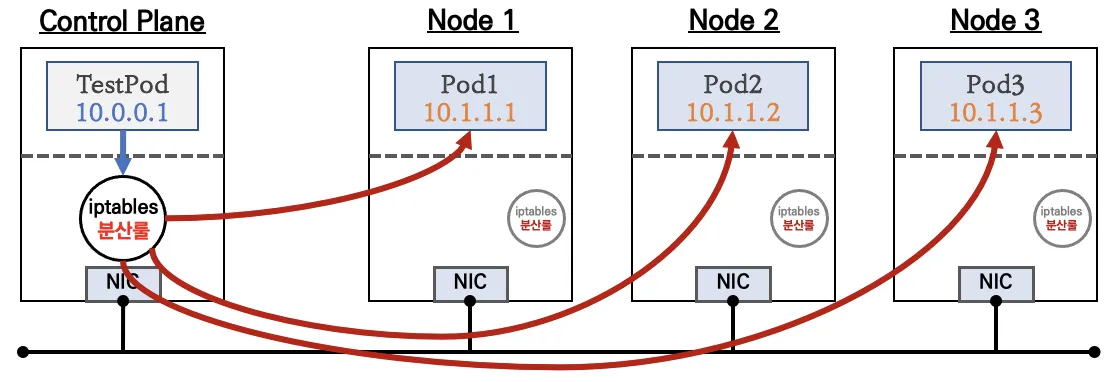
3. 노드 간 파드 통신
파드간 통신 시 tcpdump 내용을 확인하고 통신 과정을 알아봅니다.
-
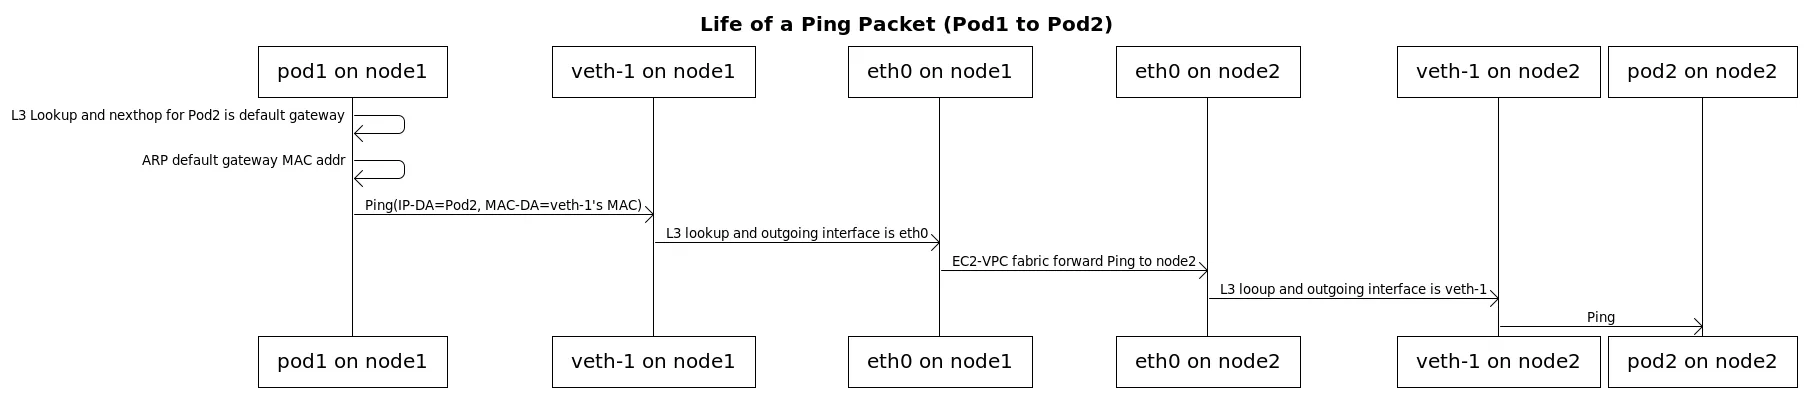
파드간 통신 흐름 : AWS VPC CNI 경우 별도의 오버레이(Overlay) 통신 기술 없이, VPC Native 하게 파드간 직접 통신이 가능하다.
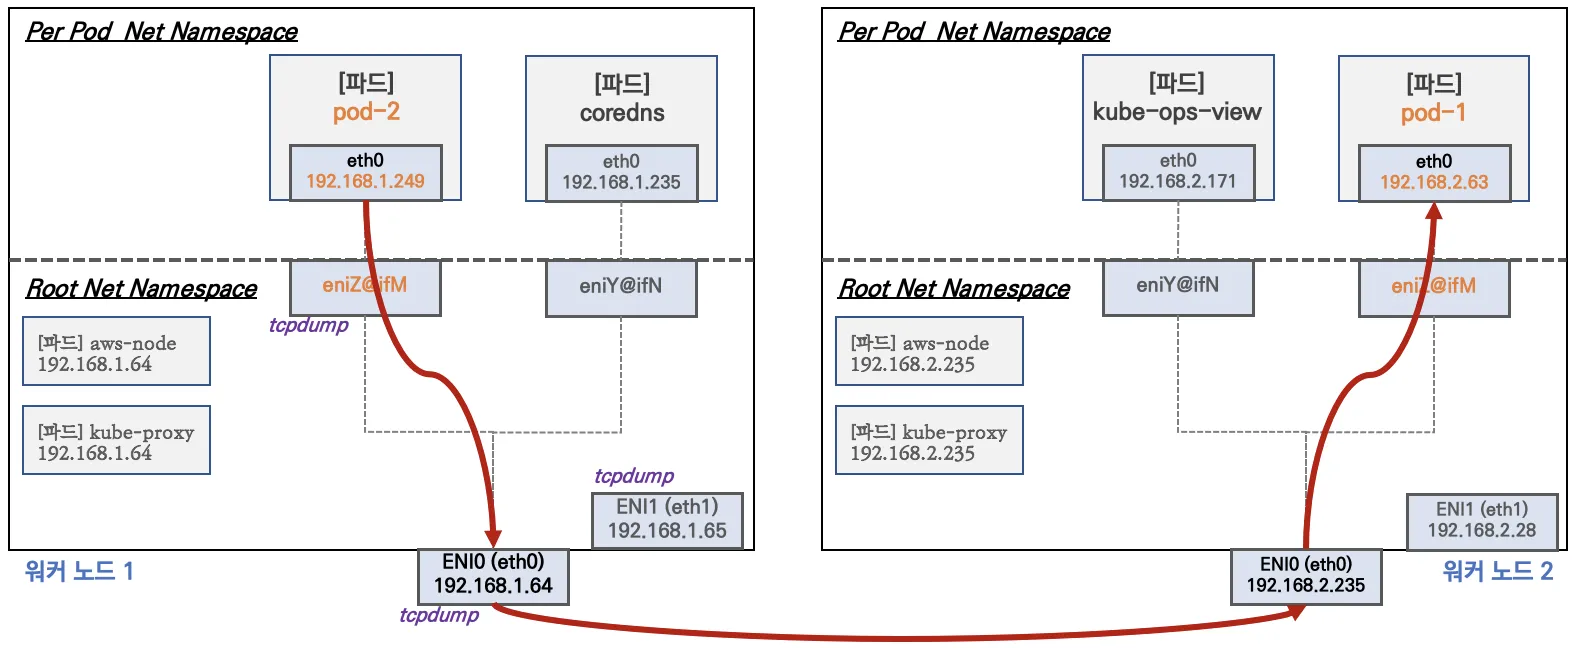
-
파드간 통신 시 과정 참고
3.1 [실습] 파드간 통신 테스트 및 확인 : 별도의 NAT 동작 없이 통신 가능
# 파드 IP 변수 지정
PODIP1=$(kubectl get pod -l app=netshoot-pod -o jsonpath={.items[0].status.podIP})
PODIP2=$(kubectl get pod -l app=netshoot-pod -o jsonpath={.items[1].status.podIP})
PODIP3=$(kubectl get pod -l app=netshoot-pod -o jsonpath={.items[2].status.podIP})

# 파드1 Shell 에서 파드2로 ping 테스트
kubectl exec -it $PODNAME1 -- ping -c 2 $PODIP2

# 파드2 Shell 에서 파드3로 ping 테스트
kubectl exec -it $PODNAME2 -- ping -c 2 $PODIP3

# 파드3 Shell 에서 파드1로 ping 테스트
kubectl exec -it $PODNAME3 -- ping -c 2 $PODIP1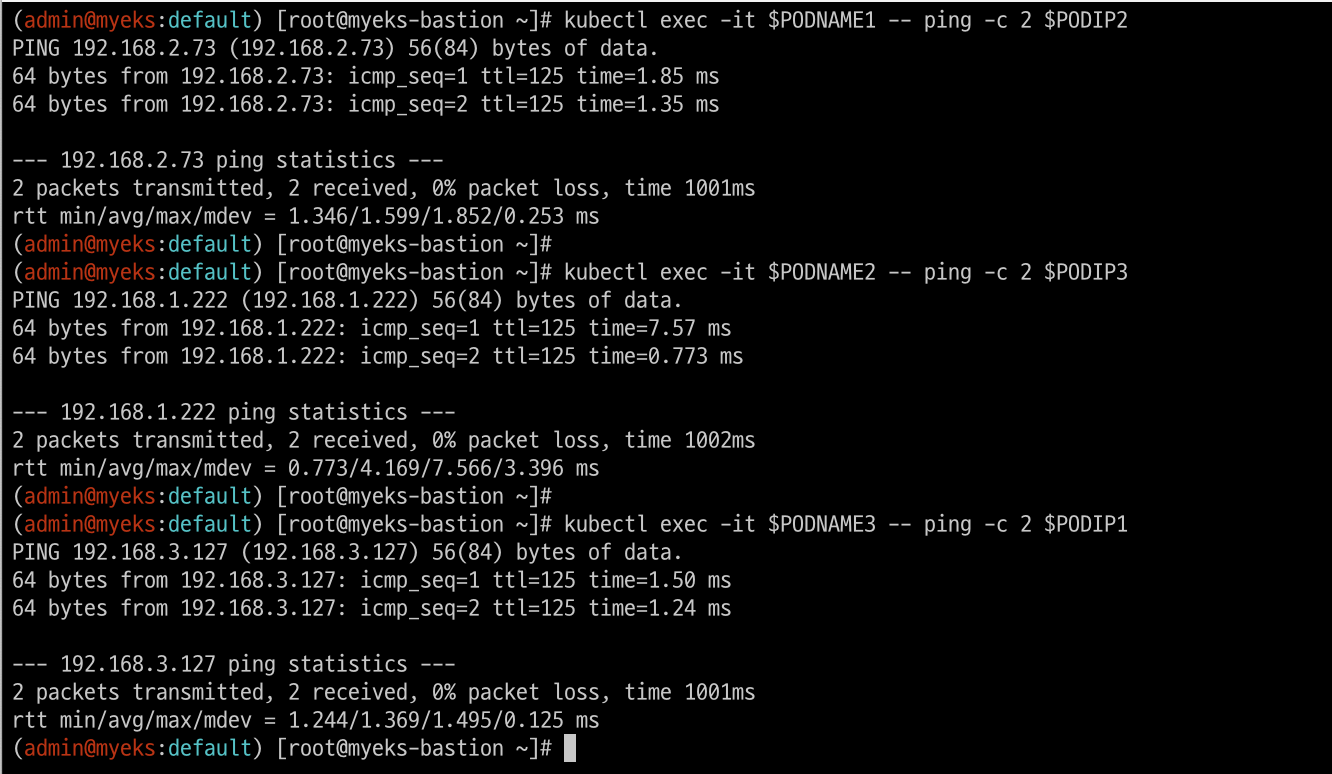
# 워커 노드 EC2 : TCPDUMP 확인
## For Pod to external (outside VPC) traffic, we will program iptables to SNAT using Primary IP address on the Primary ENI.
sudo tcpdump -i any -nn icmp
sudo tcpdump -i eth1 -nn icmp
sudo tcpdump -i eth0 -nn icmp
sudo tcpdump -i eniYYYYYYYY -nn icmp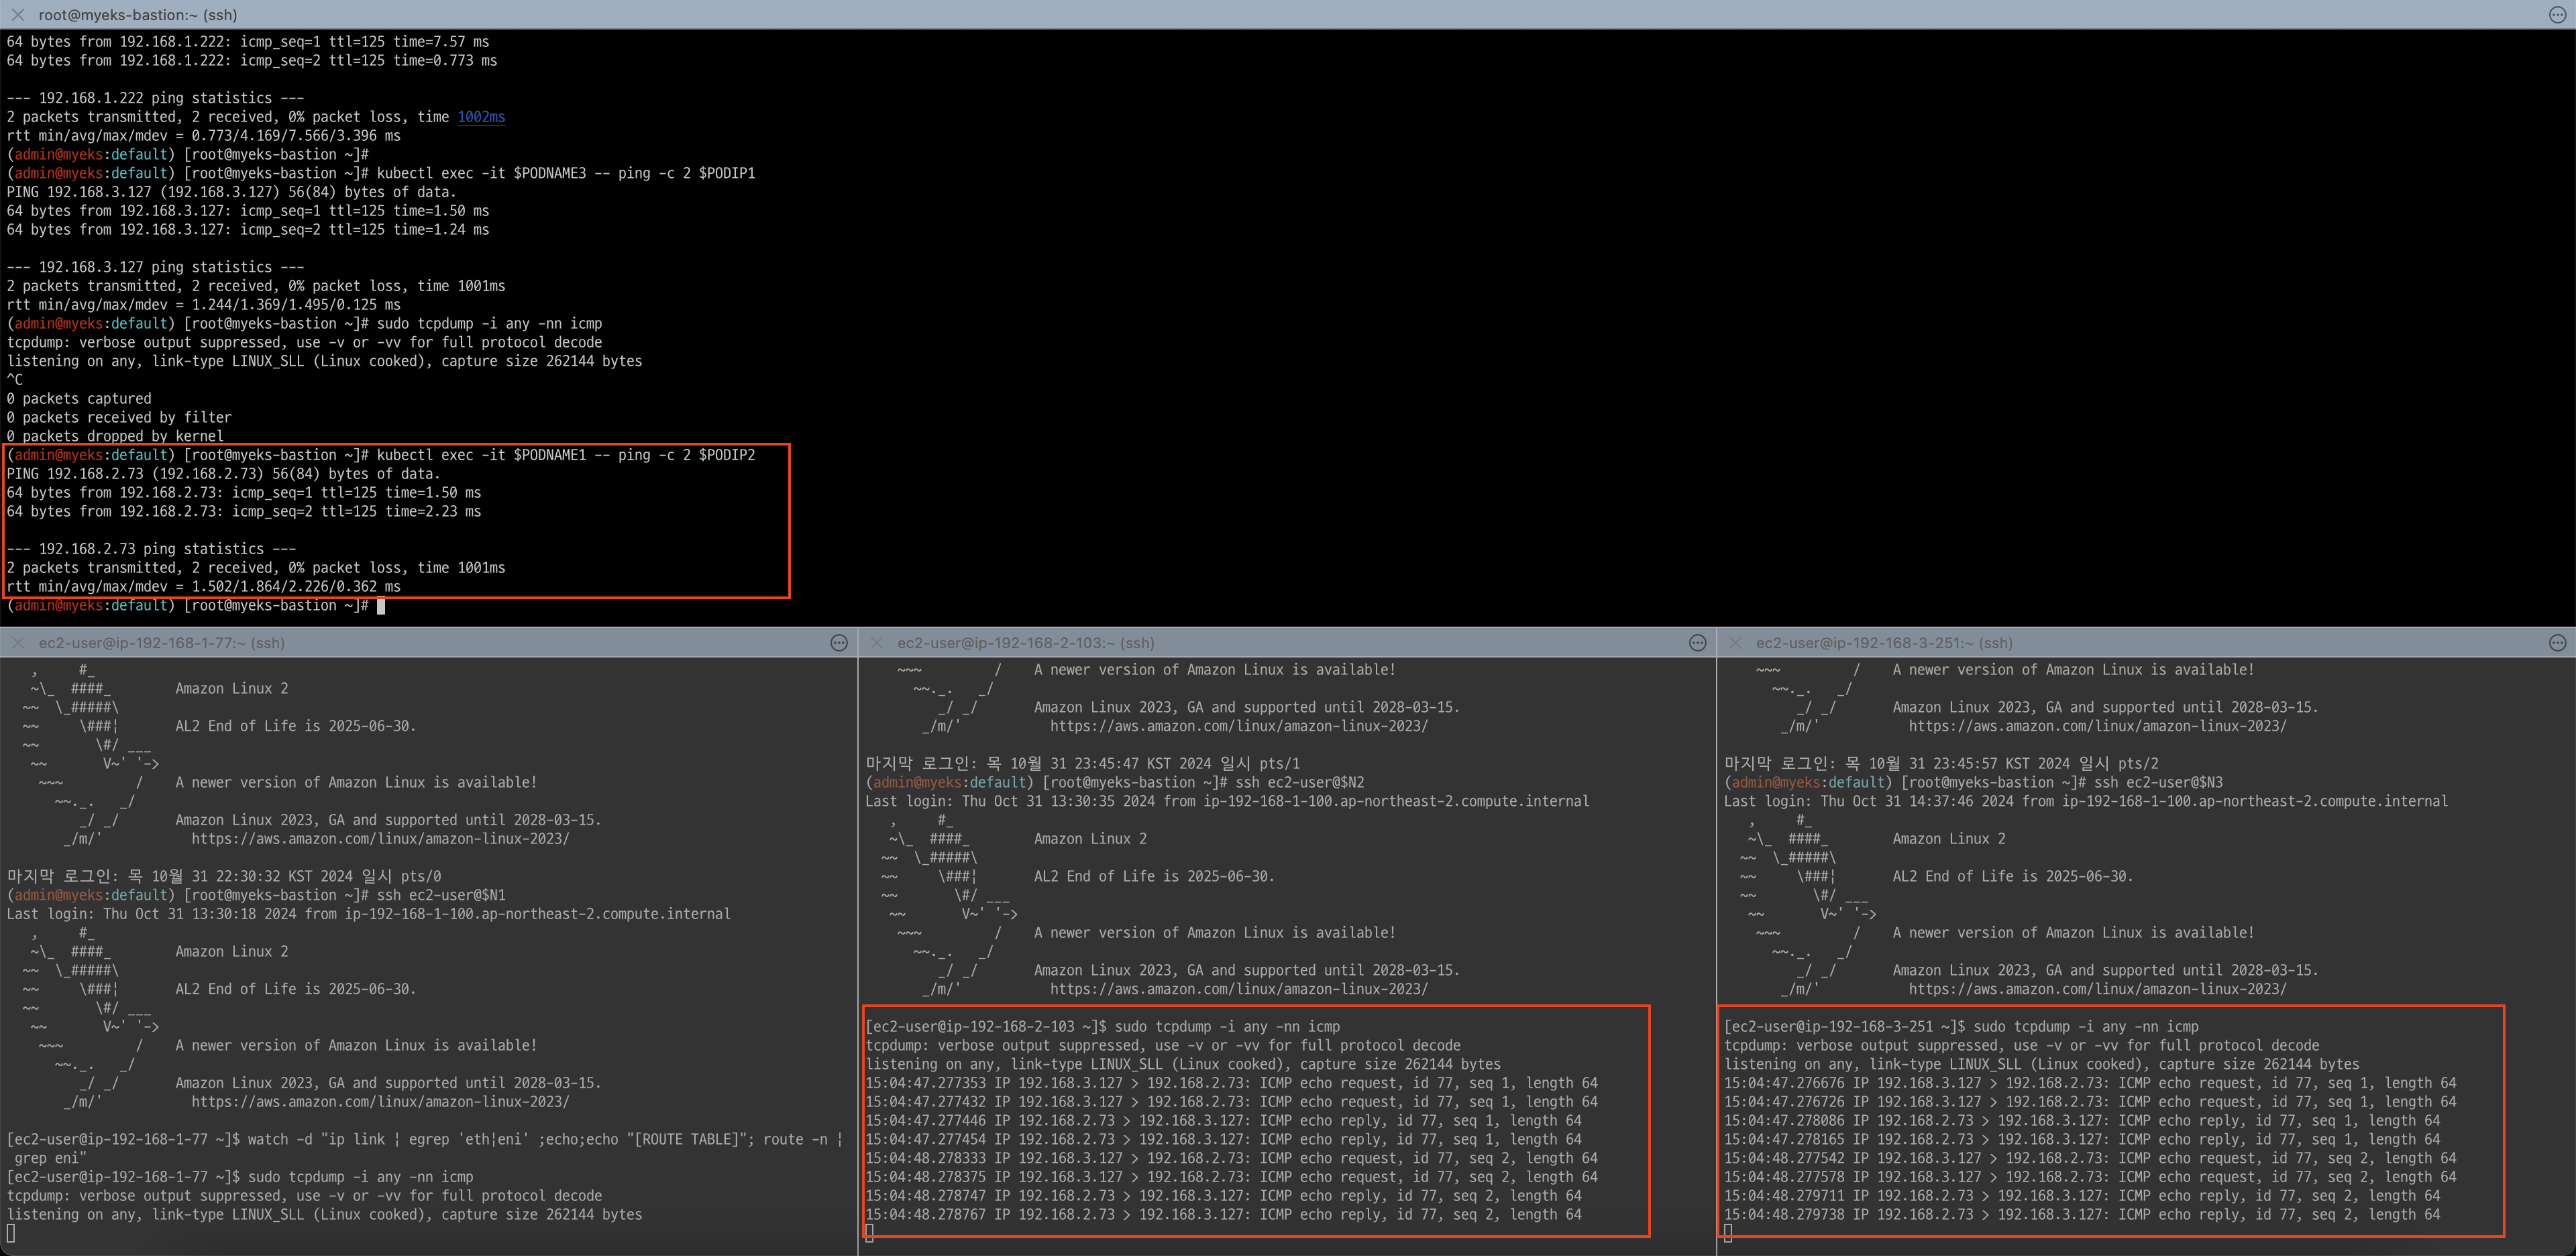
[워커 노드1]
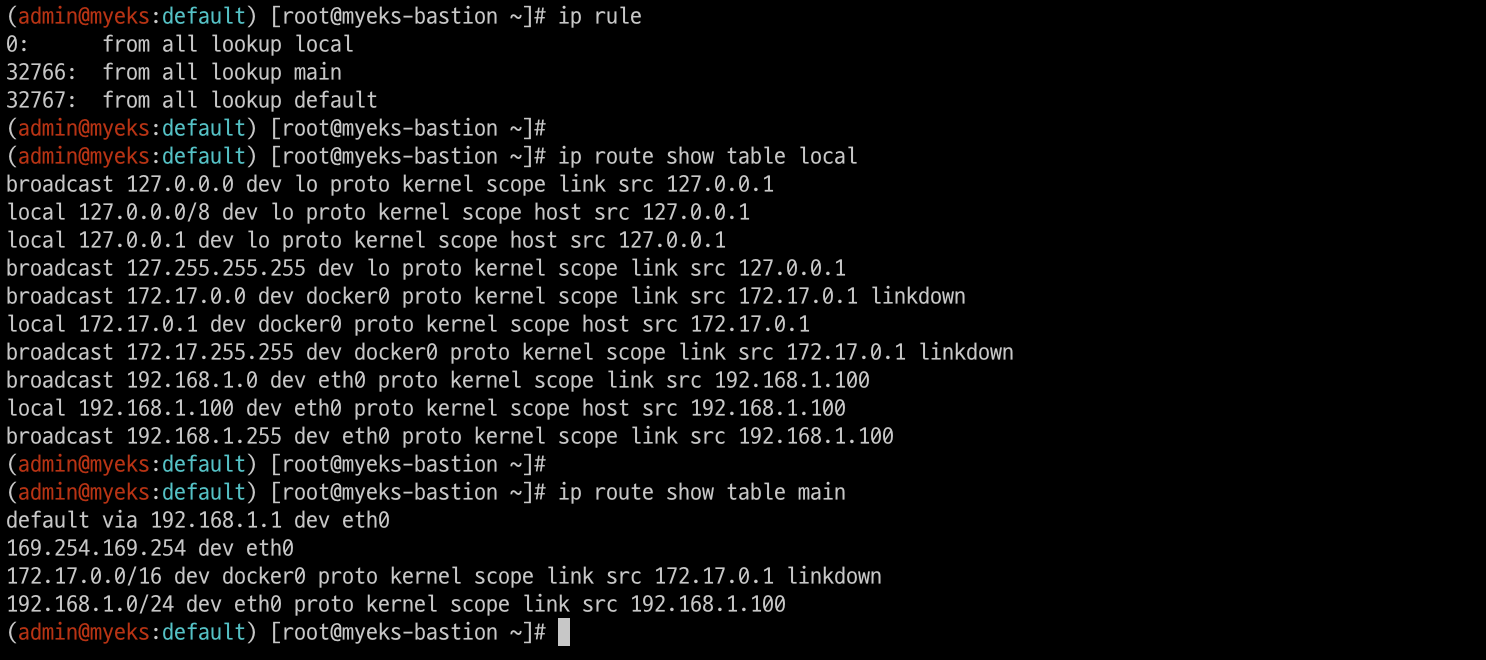
# routing policy database management 확인
ip rule
# routing table management 확인
ip route show table local
# 디폴트 네트워크 정보를 eth0 을 통해서 빠져나간다
ip route show table main
default via 192.168.1.1 dev eth0
...
4. 파드에서 외부 통신
파드에서 외부 통신 흐름 : iptable 에 SNAT 을 통하여 노드의 eth0 IP로 변경되어서 외부와 통신됨
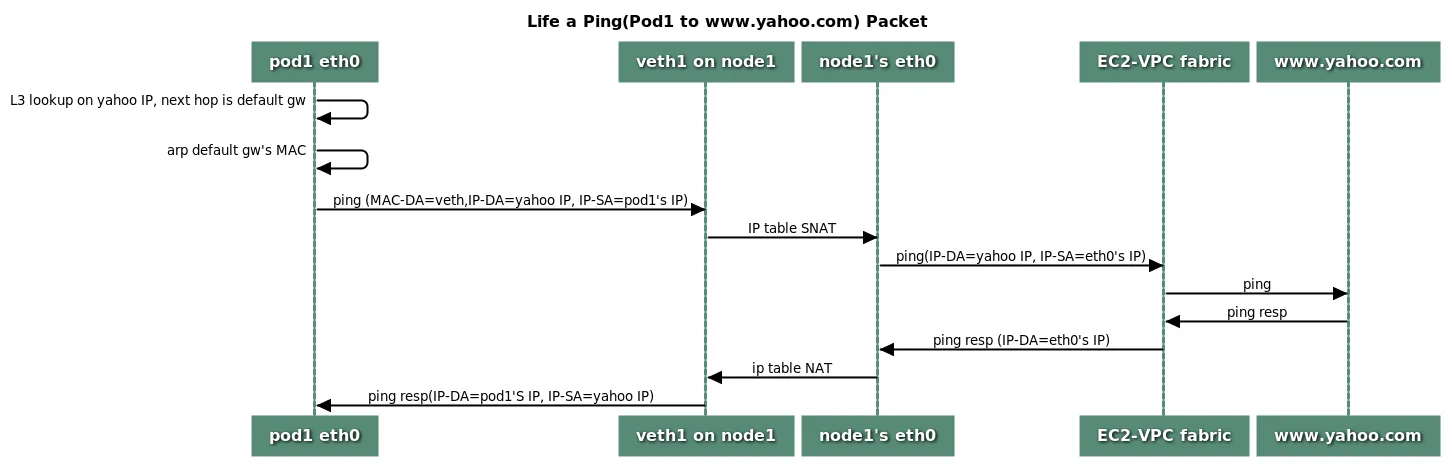
- VPC CNI 의 External source network address translation (SNAT) 설정에 따라, 외부(인터넷) 통신 시 SNAT 하거나 혹은 SNAT 없이 통신을 할 수 있다
4.1 [실습] 파드에서 외부 통신 테스트 및 확인
- 파드 shell 실행 후 외부로 ping 테스트 & 워커 노드에서 tcpdump 및 iptables 정보 확인
# 작업용 EC2 : pod-1 Shell 에서 외부로 ping
kubectl exec -it $PODNAME1 -- ping -c 1 www.google.com
kubectl exec -it $PODNAME1 -- ping -i 0.1 www.google.com

# 워커 노드 EC2 : TCPDUMP 확인
sudo tcpdump -i any -nn icmp
sudo tcpdump -i eth0 -nn icmp

# 작업용 EC2 : 퍼블릭IP 확인
for i in $N1 $N2 $N3; do echo ">> node $i <<"; ssh ec2-user@$i curl -s ipinfo.io/ip; echo; echo; done
# 작업용 EC2 : pod-1 Shell 에서 외부 접속 확인 - 공인IP는 어떤 주소인가?
## The right way to check the weather - 링크
for i in $PODNAME1 $PODNAME2 $PODNAME3; do echo ">> Pod : $i <<"; kubectl exec -it $i -- curl -s ipinfo.io/ip; echo; echo; done
>> Pod : netshoot-pod-74b7555dc7-9qltk <<
13.209.47.120

>> Pod : netshoot-pod-74b7555dc7-hwnpt <<
43.203.174.38

>> Pod : netshoot-pod-74b7555dc7-zsstv <<
43.201.7.163

kubectl exec -it $PODNAME1 -- curl -s wttr.in/seoul
kubectl exec -it $PODNAME1 -- curl -s wttr.in/seoul?format=3
kubectl exec -it $PODNAME1 -- curl -s wttr.in/Moon
kubectl exec -it $PODNAME1 -- curl -s wttr.in/:help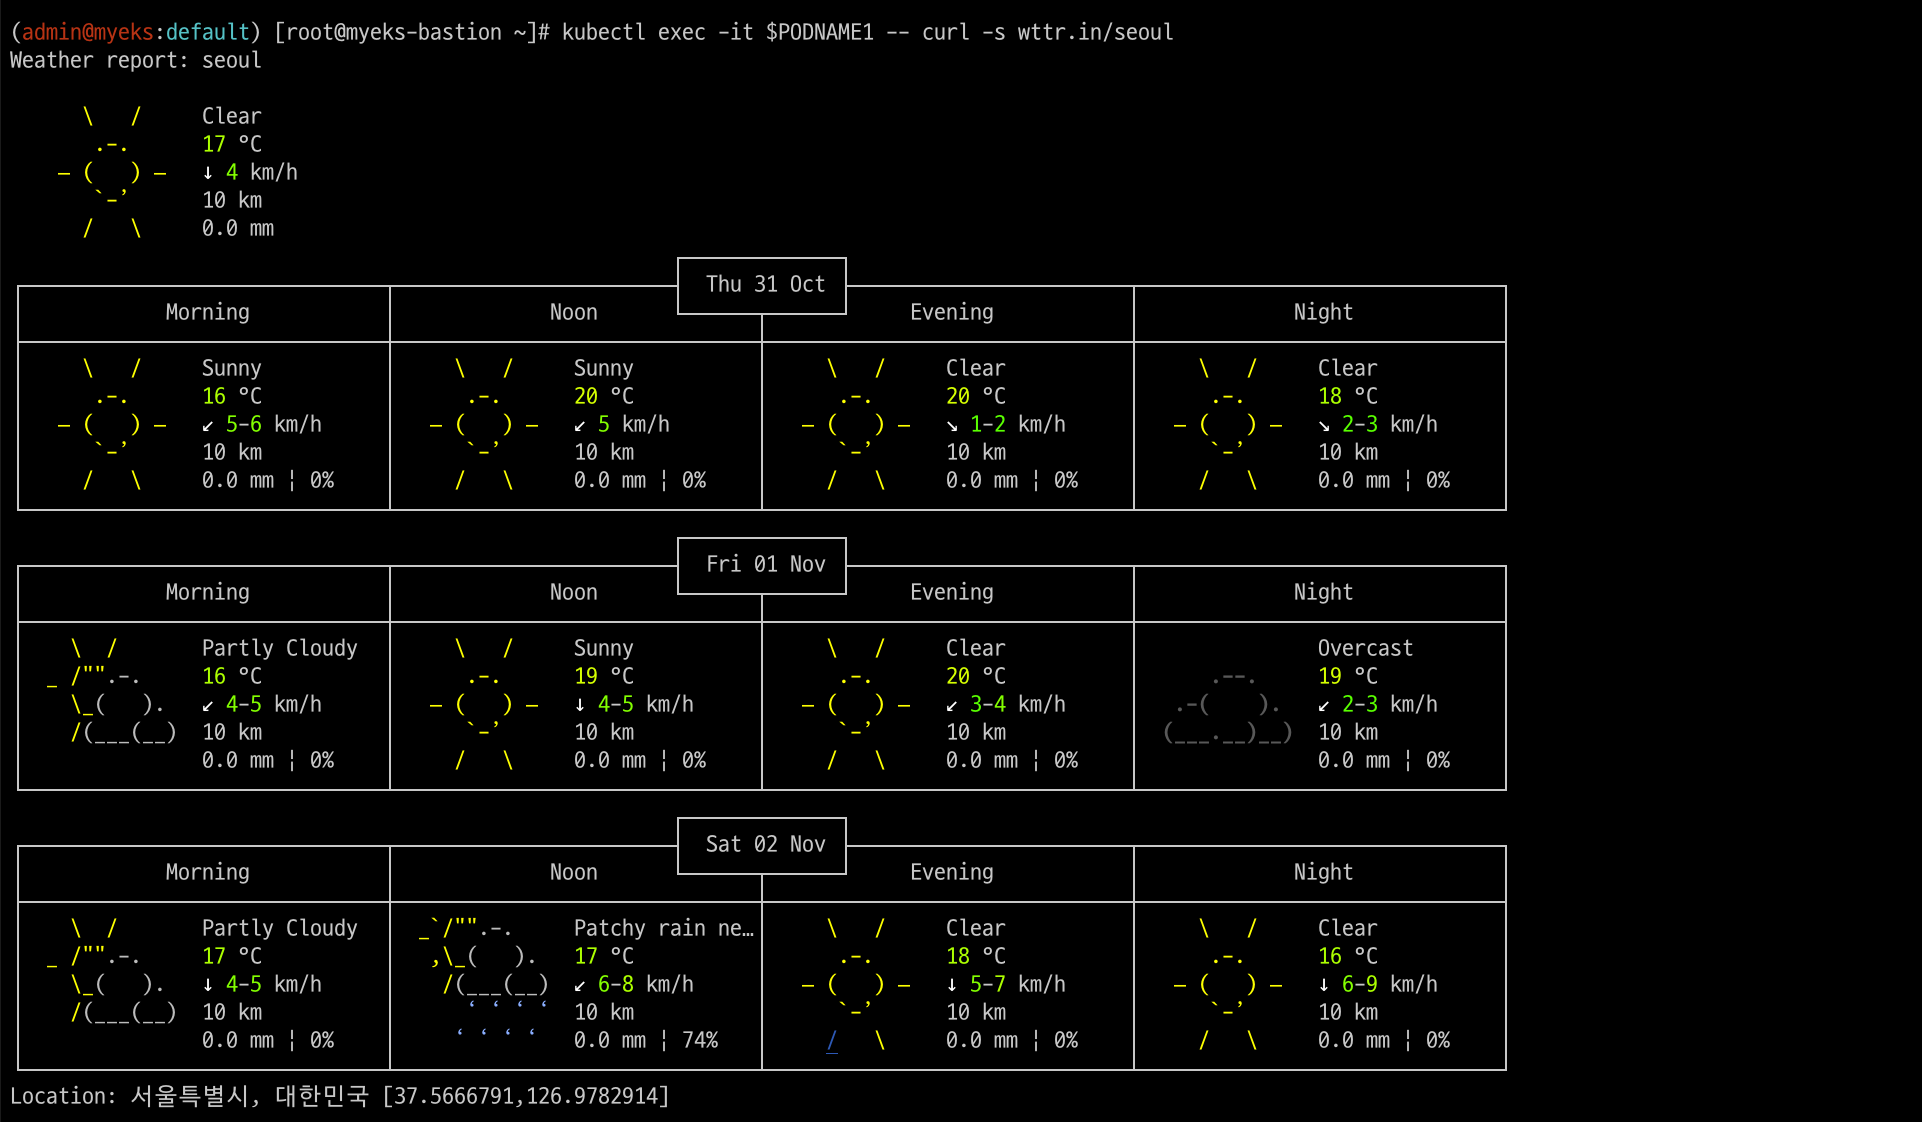
# 워커 노드 EC2
## 출력된 결과를 보고 어떻게 빠져나가는지 고민해보자!
ip rule
ip route show table main
sudo iptables -L -n -v -t nat
sudo iptables -t nat -S

# 파드가 외부와 통신시에는 아래 처럼 'AWS-SNAT-CHAIN-0' 룰(rule)에 의해서 SNAT 되어서 외부와 통신!
# 참고로 뒤 IP는 eth0(ENI 첫번째)의 IP 주소이다
# --random-fully 동작 - 링크1  링크2
sudo iptables -t nat -S | grep 'A AWS-SNAT-CHAIN'
-A AWS-SNAT-CHAIN-0 ! -d 192.168.0.0/16 -m comment --comment "AWS SNAT CHAIN" -j RETURN
-A AWS-SNAT-CHAIN-0 ! -o vlan+ -m comment --comment "AWS, SNAT" -m addrtype ! --dst-type LOCAL -j SNAT --to-source 192.168.1.251 --random-fully

## 아래 'mark 0x4000/0x4000' 매칭되지 않아서 RETURN 됨!
-A KUBE-POSTROUTING -m mark ! --mark 0x4000/0x4000 -j RETURN
-A KUBE-POSTROUTING -j MARK --set-xmark 0x4000/0x0
-A KUBE-POSTROUTING -m comment --comment "kubernetes service traffic requiring SNAT" -j MASQUERADE --random-fully
...

# 카운트 확인 시 AWS-SNAT-CHAIN-0에 매칭되어, 목적지가 192.168.0.0/16 아니고 외부 빠져나갈때 SNAT 192.168.1.251(EC2 노드1 IP) 변경되어 나간다!
sudo iptables -t filter --zero; sudo iptables -t nat --zero; sudo iptables -t mangle --zero; sudo iptables -t raw --zero
watch -d 'sudo iptables -v --numeric --table nat --list AWS-SNAT-CHAIN-0; echo ; sudo iptables -v --numeric --table nat --list KUBE-POSTROUTING; echo ; sudo iptables -v --numeric --table nat --list POSTROUTING'

# conntrack 확인
for i in $N1 $N2 $N3; do echo ">> node $i <<"; ssh ec2-user@$i sudo conntrack -L -n |grep -v '169.254.169'; echo; done
conntrack v1.4.5 (conntrack-tools):
icmp     1 28 src=172.30.66.58 dst=8.8.8.8 type=8 code=0 id=34392 src=8.8.8.8 dst=172.30.85.242 type=0 code=0 id=50705 mark=128 use=1
tcp      6 23 TIME_WAIT src=172.30.66.58 dst=34.117.59.81 sport=58144 dport=80 src=34.117.59.81 dst=172.30.85.242 sport=80 dport=44768 [ASSURED] mark=128 use=1
5. 노드에 파드 생성 갯수 제한
5.1 사전 준비 : kube-ops-view 설치
# kube-ops-view
helm repo add geek-cookbook https://geek-cookbook.github.io/charts/
helm install kube-ops-view geek-cookbook/kube-ops-view --version 1.2.2 --set service.main.type=LoadBalancer --set env.TZ="Asia/Seoul" --namespace kube-system

# kube-ops-view 접속 URL 확인 (1.5 배율)
kubectl get svc -n kube-system kube-ops-view -o jsonpath={.status.loadBalancer.ingress[0].hostname} | awk '{ print "KUBE-OPS-VIEW URL = http://"$1":8080/#scale=1.5"}'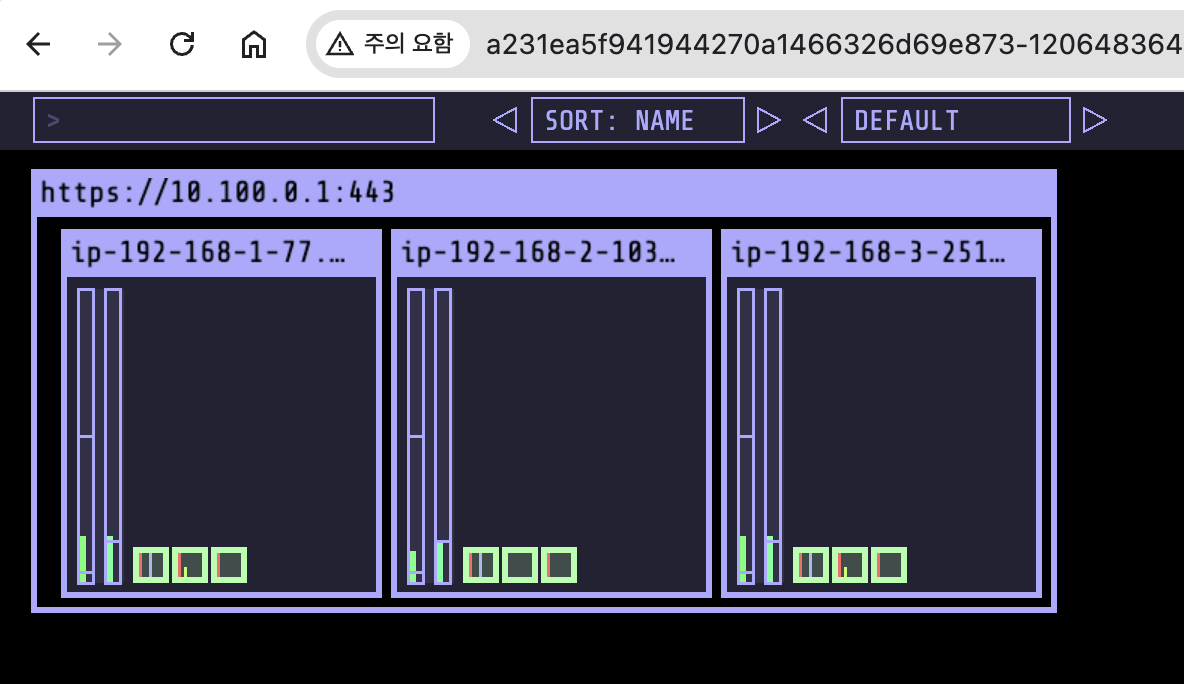
5.2 워커 노드의 인스턴스 타입 별 파드 생성 갯수 제한
인스턴스 타입 별 ENI 최대 갯수와 할당 가능한 최대 IP 갯수에 따라서 파드 배치 갯수가 결정됨(단, aws-node 와 kube-proxy 파드는 호스트의 IP를 사용함으로 최대 갯수에서 제외함)
최대 파드 생성 갯수 : (Number of network interfaces for the instance type × (the number of IP addressess per network interface - 1)) + 2
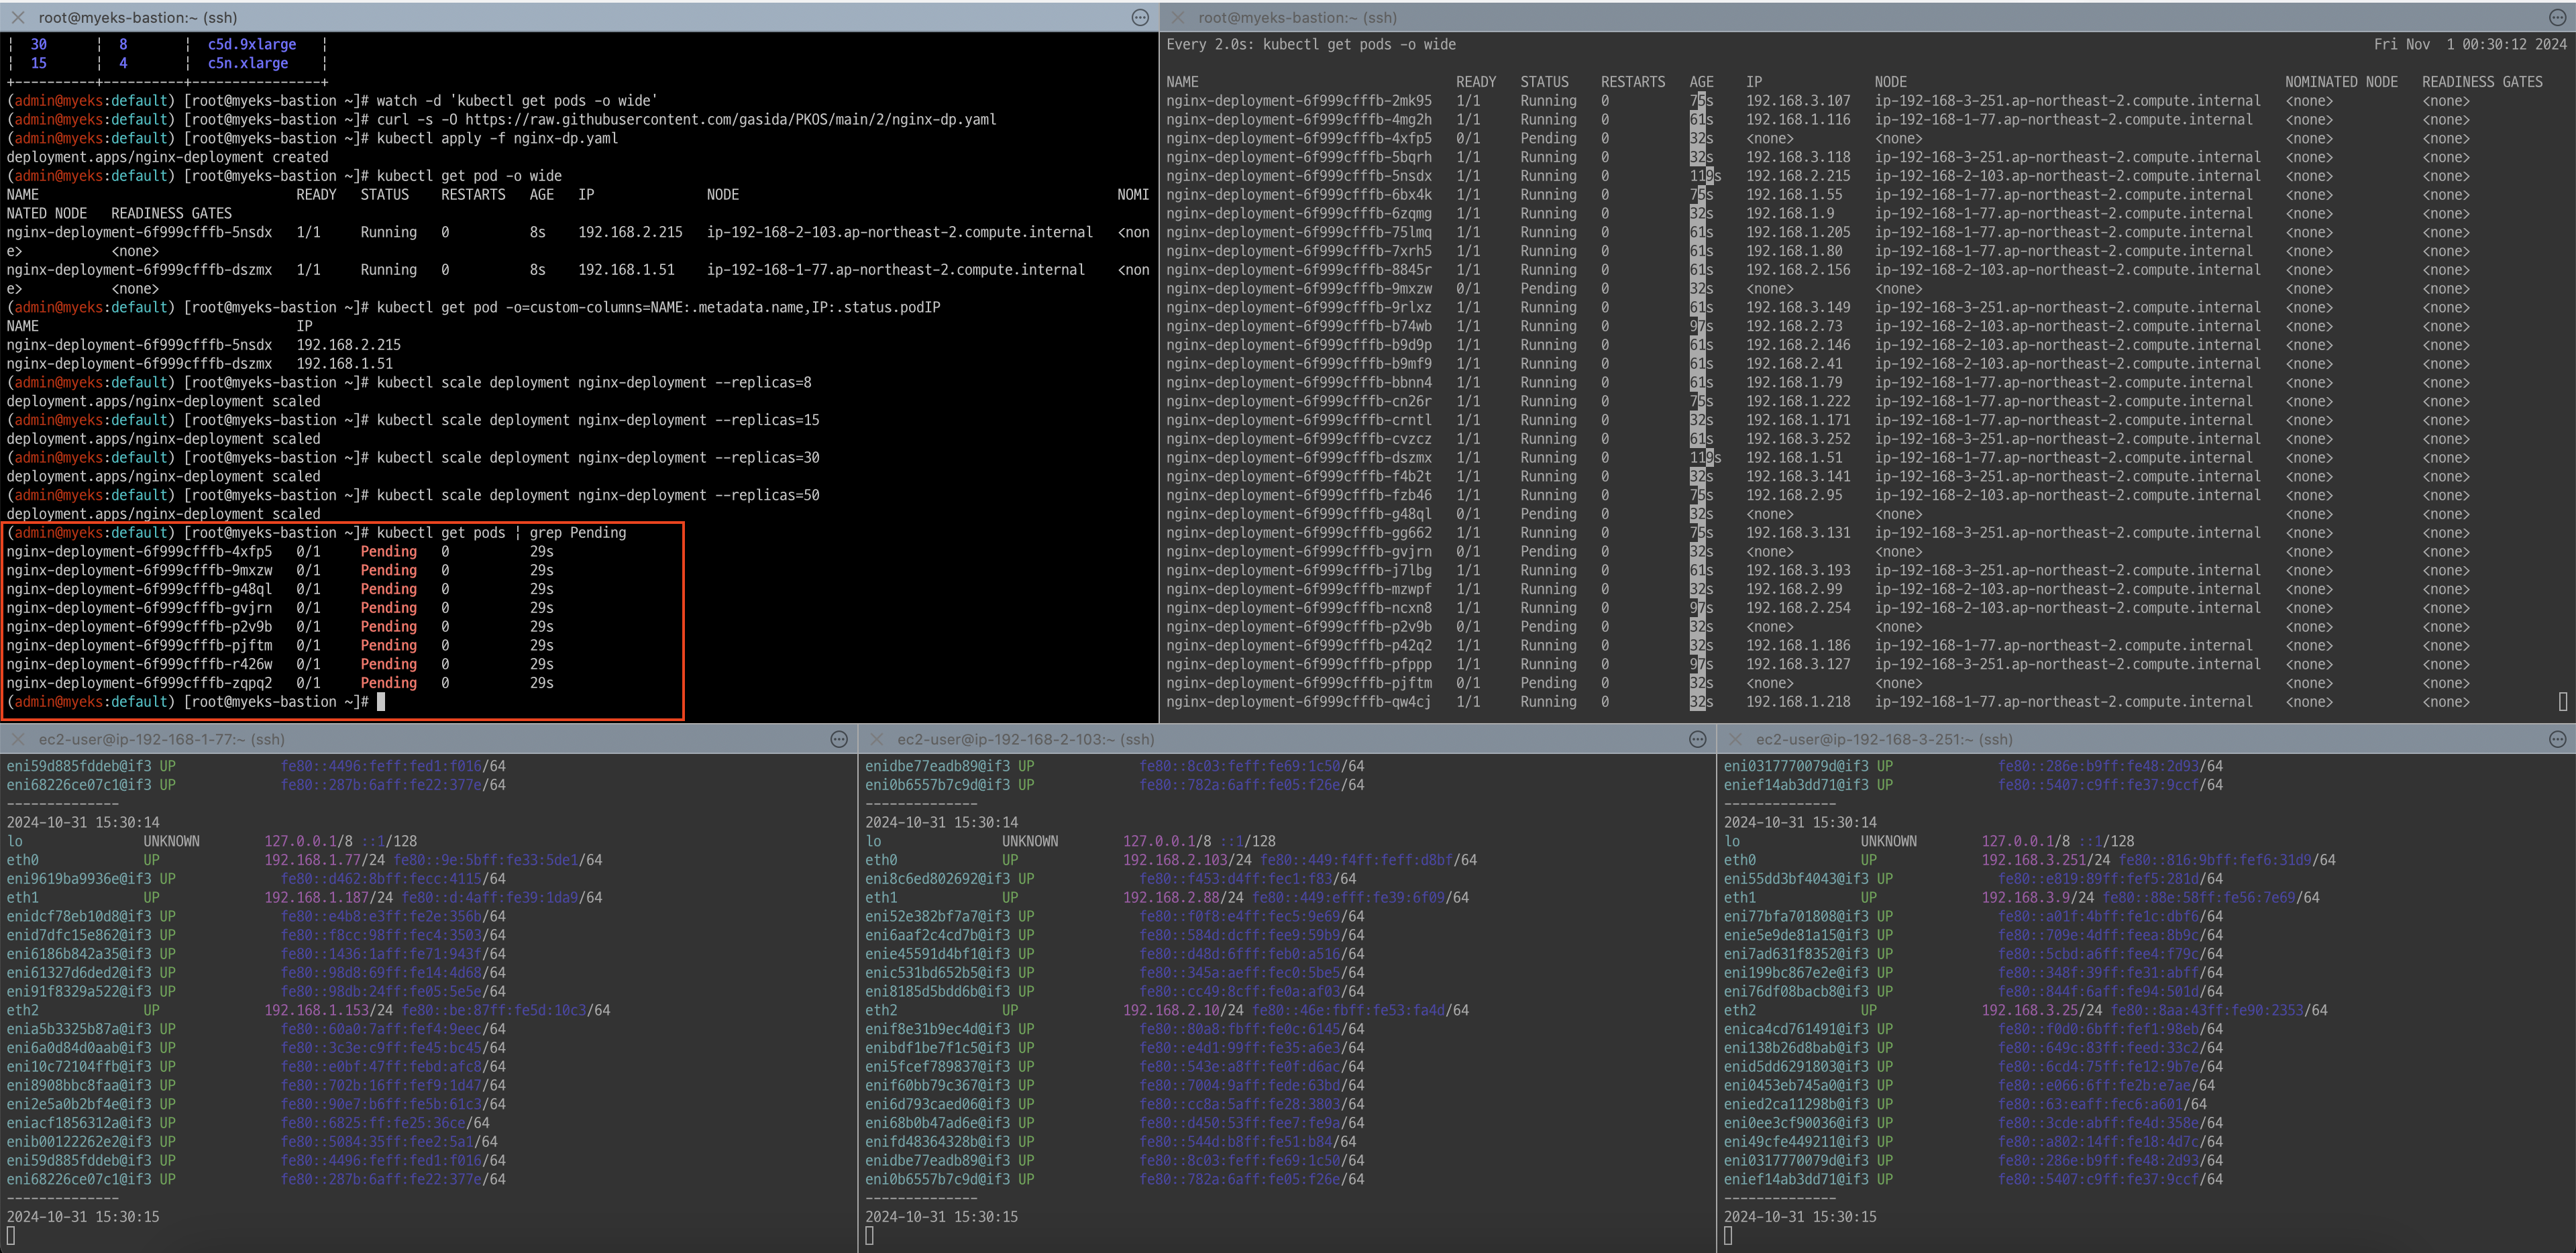
5.3 최대 파드 생성 및 확인
# 워커 노드 EC2 - 모니터링
while true; do ip -br -c addr show && echo "--------------" ; date "+%Y-%m-%d %H:%M:%S" ; sleep 1; done

# 작업용 EC2 - 터미널1
watch -d 'kubectl get pods -o wide'

# 작업용 EC2 - 터미널2
# 디플로이먼트 생성
curl -s -O https://raw.githubusercontent.com/gasida/PKOS/main/2/nginx-dp.yaml
kubectl apply -f nginx-dp.yaml

# 파드 확인
kubectl get pod -o wide
kubectl get pod -o=custom-columns=NAME:.metadata.name,IP:.status.podIP

# 파드 증가 테스트 >> 파드 정상 생성 확인, 워커 노드에서 eth, eni 갯수 확인
kubectl scale deployment nginx-deployment --replicas=8

# 파드 증가 테스트 >> 파드 정상 생성 확인, 워커 노드에서 eth, eni 갯수 확인 >> 어떤일이 벌어졌는가?
kubectl scale deployment nginx-deployment --replicas=15

# 파드 증가 테스트 >> 파드 정상 생성 확인, 워커 노드에서 eth, eni 갯수 확인 >> 어떤일이 벌어졌는가?
kubectl scale deployment nginx-deployment --replicas=30

# 파드 증가 테스트 >> 파드 정상 생성 확인, 워커 노드에서 eth, eni 갯수 확인 >> 어떤일이 벌어졌는가?
kubectl scale deployment nginx-deployment --replicas=50

# 파드 생성 실패!
kubectl get pods | grep Pending
nginx-deployment-7fb7fd49b4-d4bk9   0/1     Pending   0          3m37s
nginx-deployment-7fb7fd49b4-qpqbm   0/1     Pending   0          3m37s
...
파드 개수를 50개로 늘리다 일부 파드 생성이 pending이 됩니다.
kubectl describe pod <Pending 파드> | grep Events: -A5
Events:
  Type     Reason            Age    From               Message
  ----     ------            ----   ----               -------
  Warning  FailedScheduling  2m41s  default-scheduler  0/3 nodes are available: 3 Too many pods. preemption: 0/3 nodes are available: 3 No preemption victims found for incoming pod.

# 디플로이먼트 삭제
kubectl delete deploy nginx-deployment- 해결 방안 : Prefix Delegation, WARM & MIN IP/Prefix Targets, Custom Network
6. Service & AWS LoadBalancer Controller
6.1 서비스의 종류
-
ClusterIP 타입
-
NodePort 타입
-
LoadBalancer 타입 (기본 모드) : NLB 인스턴스 유형
-
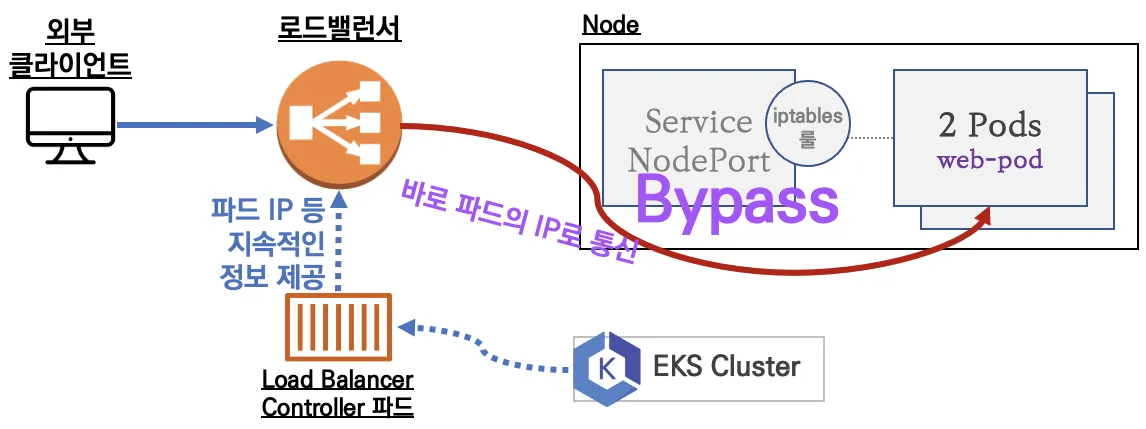
Service (LoadBalancer Controller) : AWS Load Balancer Controller + NLB IP 모드 동작 with AWS VPC CNI
6.2 NLB모드 전체 정리
6.2.1. 인스턴스 유형
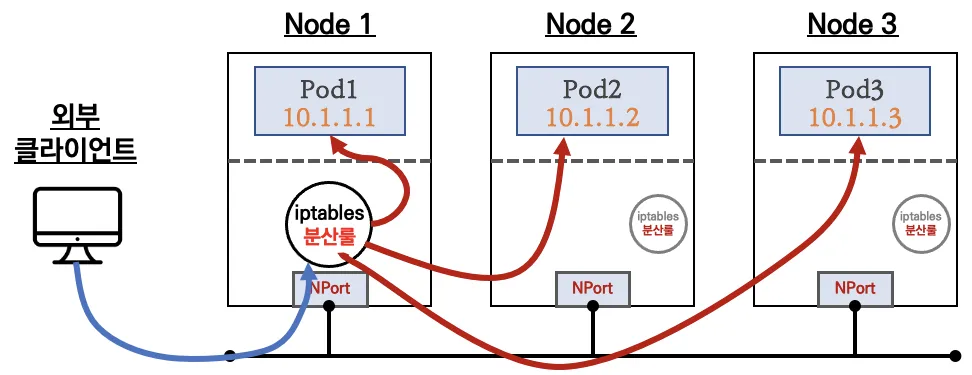
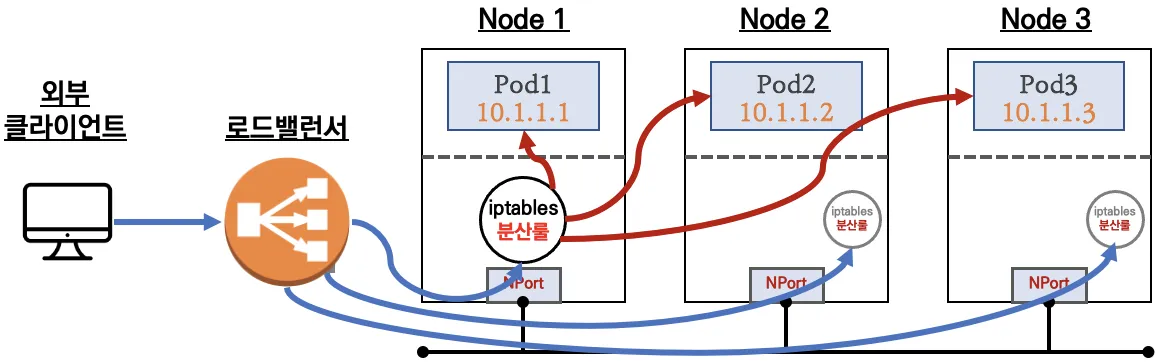
externalTrafficPolicy: ClusterIP ⇒ 2번 분산 및 SNAT으로 Client IP 확인 불가능 ←LoadBalancer타입 (기본 모드) 동작externalTrafficPolicy: Local ⇒ 1번 분산 및 ClientIP 유지, 워커 노드의 iptables 사용함
- 상세 설명
6.2.2. IP 유형
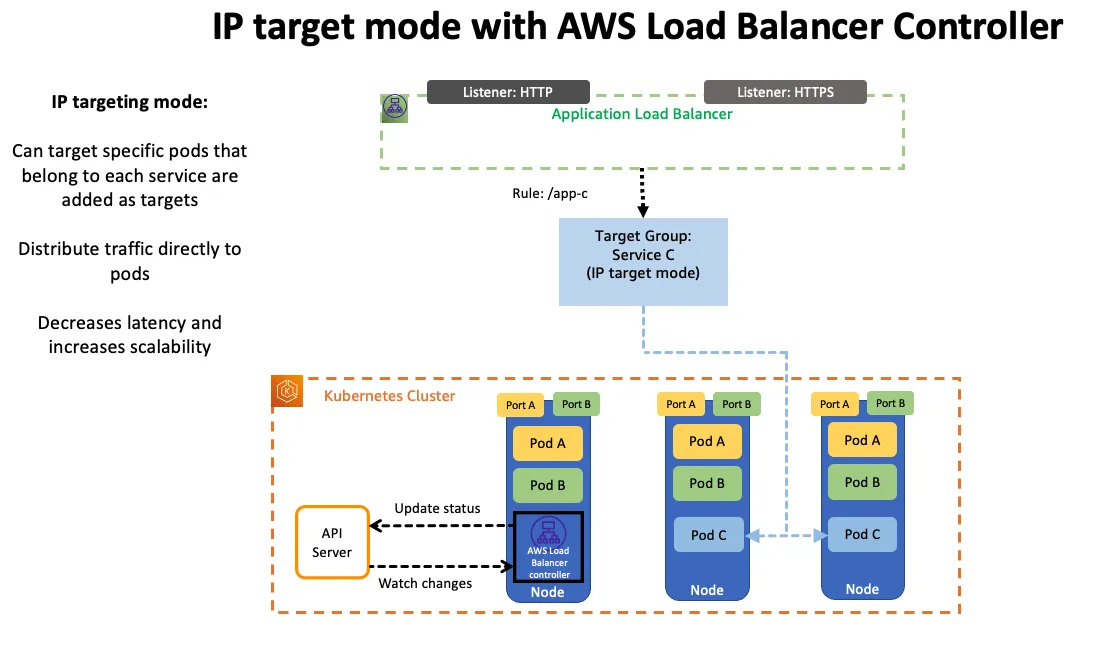
Proxy Protocol v2 비활성화⇒ NLB에서 바로 파드로 인입, 단 ClientIP가 NLB로 SNAT 되어 Client IP 확인 불가능Proxy Protocol v2 활성화⇒ NLB에서 바로 파드로 인입 및 ClientIP 확인 가능(→ 단 PPv2 를 애플리케이션이 인지할 수 있게 설정 필요)
6.2.3. AWS LoadBalancer Controller 배포
# Helm Chart 설치
helm repo add eks https://aws.github.io/eks-charts
helm repo update
helm install aws-load-balancer-controller eks/aws-load-balancer-controller -n kube-system --set clusterName=$CLUSTER_NAME


## 설치 확인
kubectl get crd
NAME                                         CREATED AT
cninodes.vpcresources.k8s.aws                2024-10-31T12:45:11Z
eniconfigs.crd.k8s.amazonaws.com             2024-10-31T12:48:28Z
ingressclassparams.elbv2.k8s.aws             2024-10-31T15:40:57Z
policyendpoints.networking.k8s.aws           2024-10-31T12:45:11Z
securitygrouppolicies.vpcresources.k8s.aws   2024-10-31T12:45:11Z
targetgroupbindings.elbv2.k8s.aws            2024-10-31T15:40:57Z

kubectl get deployment -n kube-system aws-load-balancer-controller
NAME                           READY   UP-TO-DATE   AVAILABLE   AGE
aws-load-balancer-controller   2/2     2            2           107s

kubectl describe deploy -n kube-system aws-load-balancer-controller
kubectl describe deploy -n kube-system aws-load-balancer-controller | grep 'Service Account'
  Service Account:  aws-load-balancer-controller

# 클러스터롤, 롤 확인
kubectl describe clusterrolebindings.rbac.authorization.k8s.io aws-load-balancer-controller-rolebinding
kubectl describe clusterroles.rbac.authorization.k8s.io aws-load-balancer-controller-role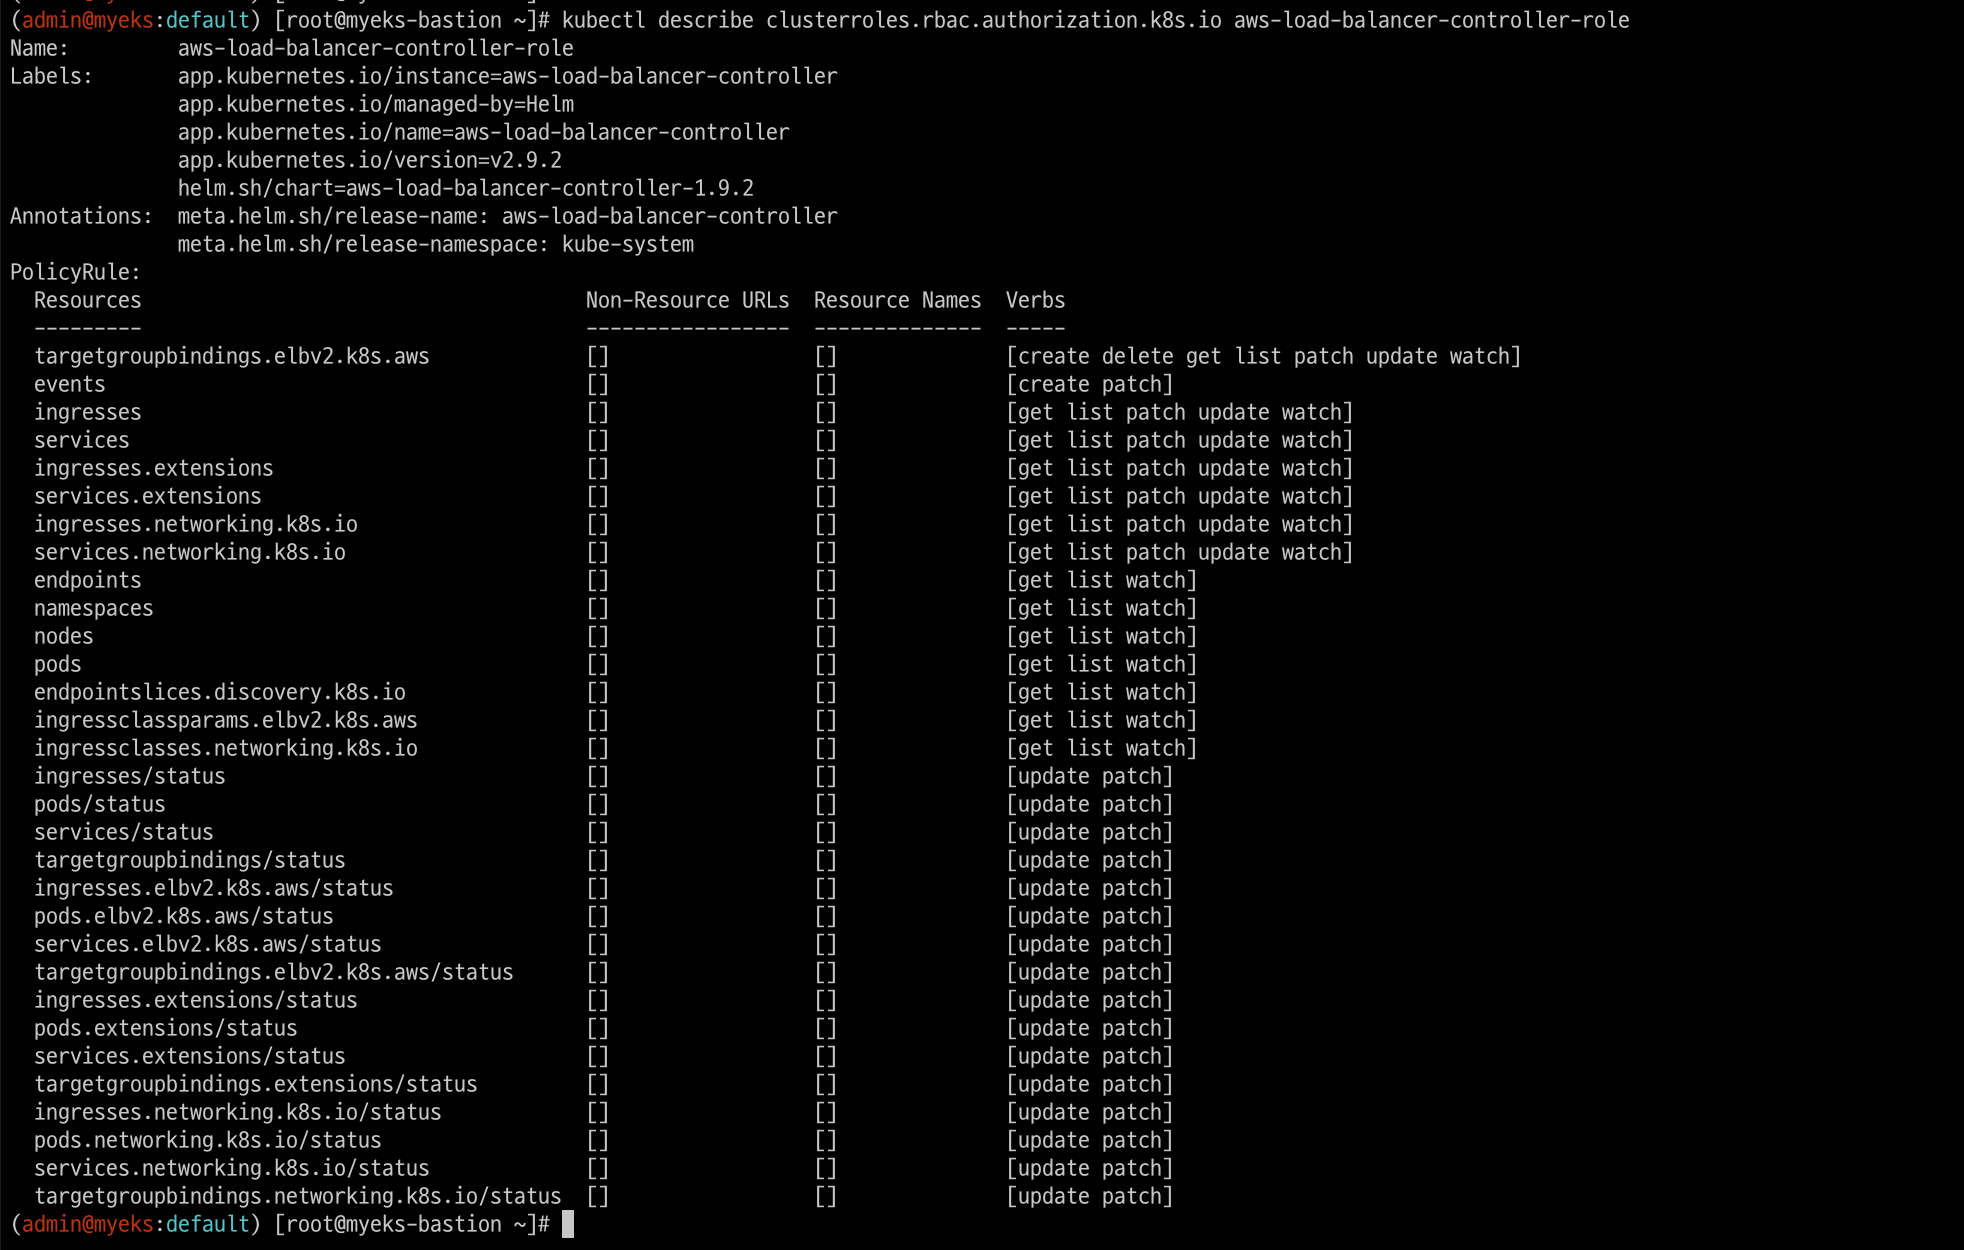
6.3. 서비스/파드 배포 테스트 with NLB
# 모니터링
watch -d kubectl get pod,svc,ep

# 작업용 EC2 - 디플로이먼트 & 서비스 생성
curl -s -O https://raw.githubusercontent.com/gasida/PKOS/main/2/echo-service-nlb.yaml
cat echo-service-nlb.yaml
kubectl apply -f echo-service-nlb.yaml

# 확인
kubectl get deploy,pod
kubectl get svc,ep,ingressclassparams,targetgroupbindings
kubectl get targetgroupbindings -o json | jq

# (옵션) 빠른 실습을 위해서 등록 취소 지연(드레이닝 간격) 수정 : 기본값 300초
vi echo-service-nlb.yaml
..
apiVersion: v1
kind: Service
metadata:
name: svc-nlb-ip-type
annotations:
  service.beta.kubernetes.io/aws-load-balancer-nlb-target-type: ip
  service.beta.kubernetes.io/aws-load-balancer-scheme: internet-facing
  service.beta.kubernetes.io/aws-load-balancer-healthcheck-port: "8080"
  service.beta.kubernetes.io/aws-load-balancer-cross-zone-load-balancing-enabled: "true"
  service.beta.kubernetes.io/aws-load-balancer-target-group-attributes: deregistration_delay.timeout_seconds=60
...
:wq!
kubectl apply -f echo-service-nlb.yaml

# AWS ELB(NLB) 정보 확인
aws elbv2 describe-load-balancers | jq
aws elbv2 describe-load-balancers --query 'LoadBalancers[*].State.Code' --output text
ALB_ARN=$(aws elbv2 describe-load-balancers --query 'LoadBalancers[?contains(LoadBalancerName, `k8s-default-svcnlbip`) == `true`].LoadBalancerArn' | jq -r '.[0]')
aws elbv2 describe-target-groups --load-balancer-arn $ALB_ARN | jq
TARGET_GROUP_ARN=$(aws elbv2 describe-target-groups --load-balancer-arn $ALB_ARN | jq -r '.TargetGroups[0].TargetGroupArn')
aws elbv2 describe-target-health --target-group-arn $TARGET_GROUP_ARN | jq
{
"TargetHealthDescriptions": [
  {
    "Target": {
      "Id": "192.168.2.153",
      "Port": 8080,
      "AvailabilityZone": "ap-northeast-2b"
    },
    "HealthCheckPort": "8080",
    "TargetHealth": {
      "State": "initial",
      "Reason": "Elb.RegistrationInProgress",
      "Description": "Target registration is in progress"
    }
  },
...

# 웹 접속 주소 확인
kubectl get svc svc-nlb-ip-type -o jsonpath={.status.loadBalancer.ingress[0].hostname} | awk '{ print "Pod Web URL = http://"$1 }'
Pod Web URL = http://k8s-default-svcnlbip-7f970c4986-58fc1201fbd7adfb.elb.ap-northeast-2.amazonaws.com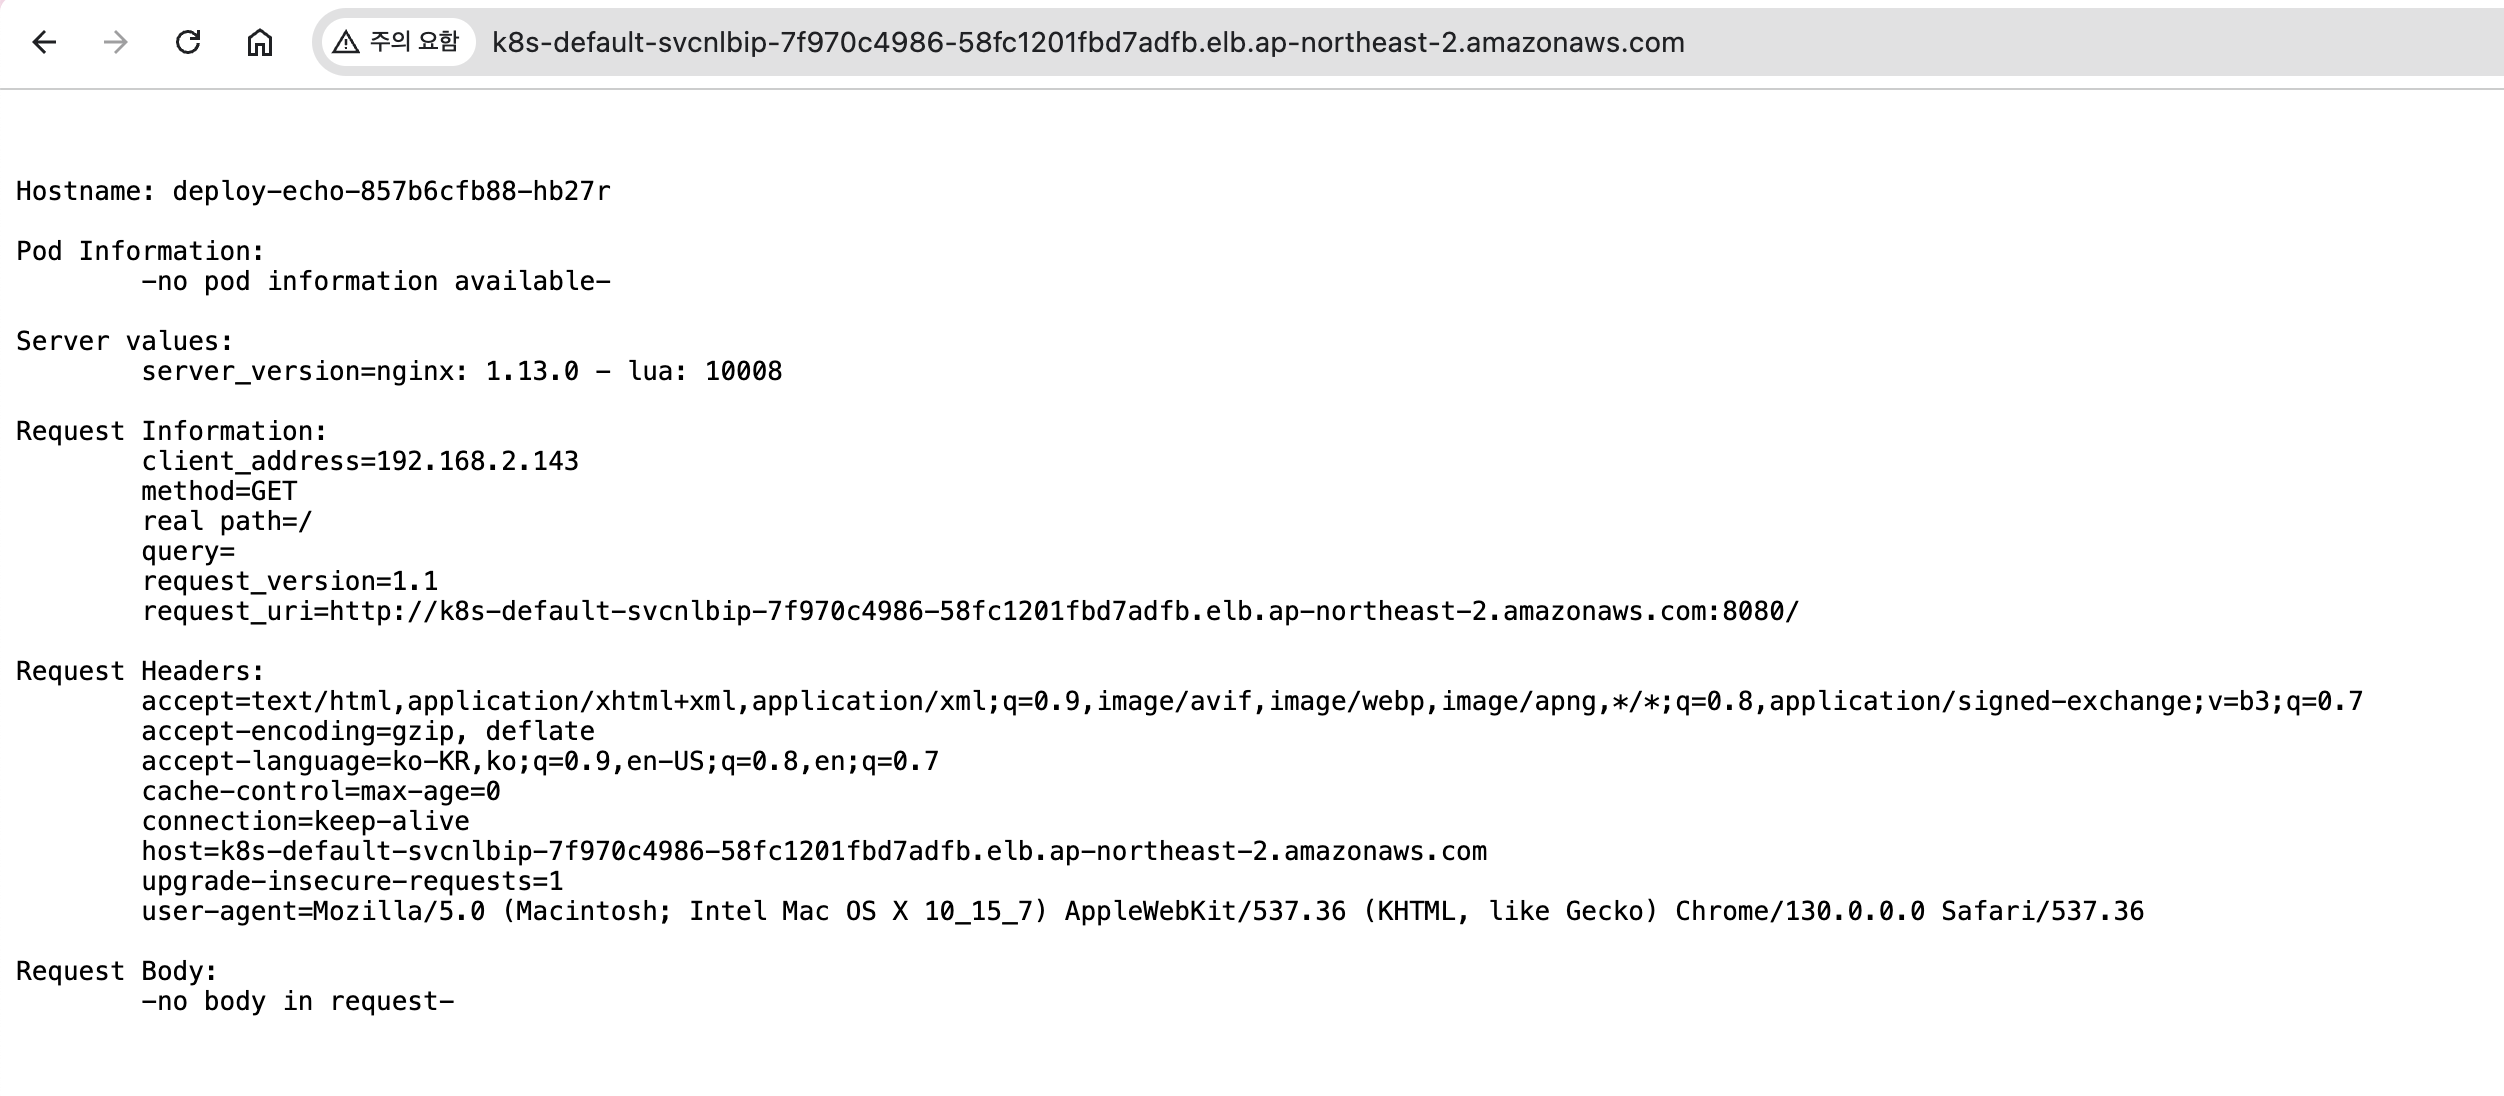
# 파드 로깅 모니터링
kubectl logs -l app=deploy-websrv -f
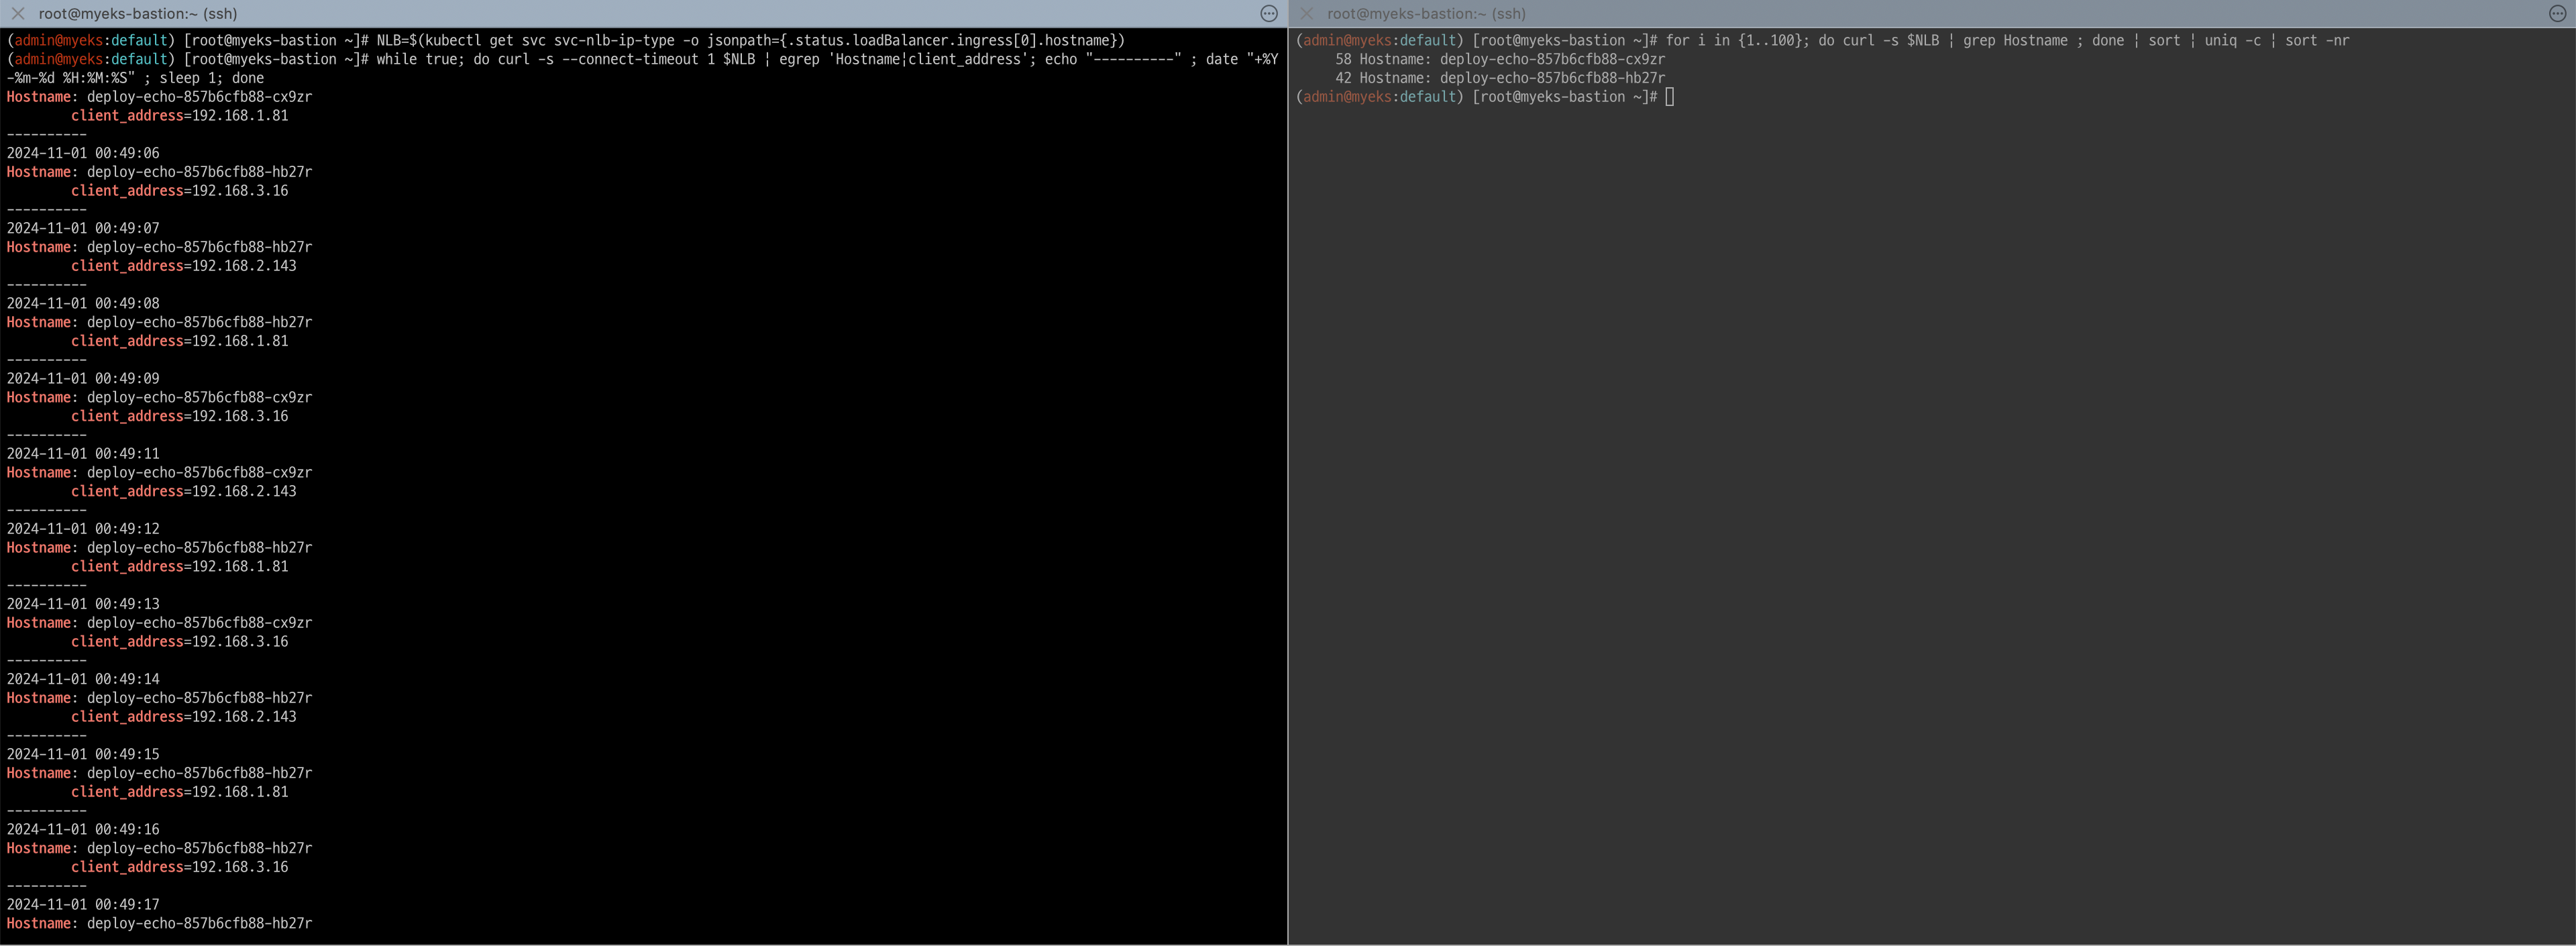
# 분산 접속 확인
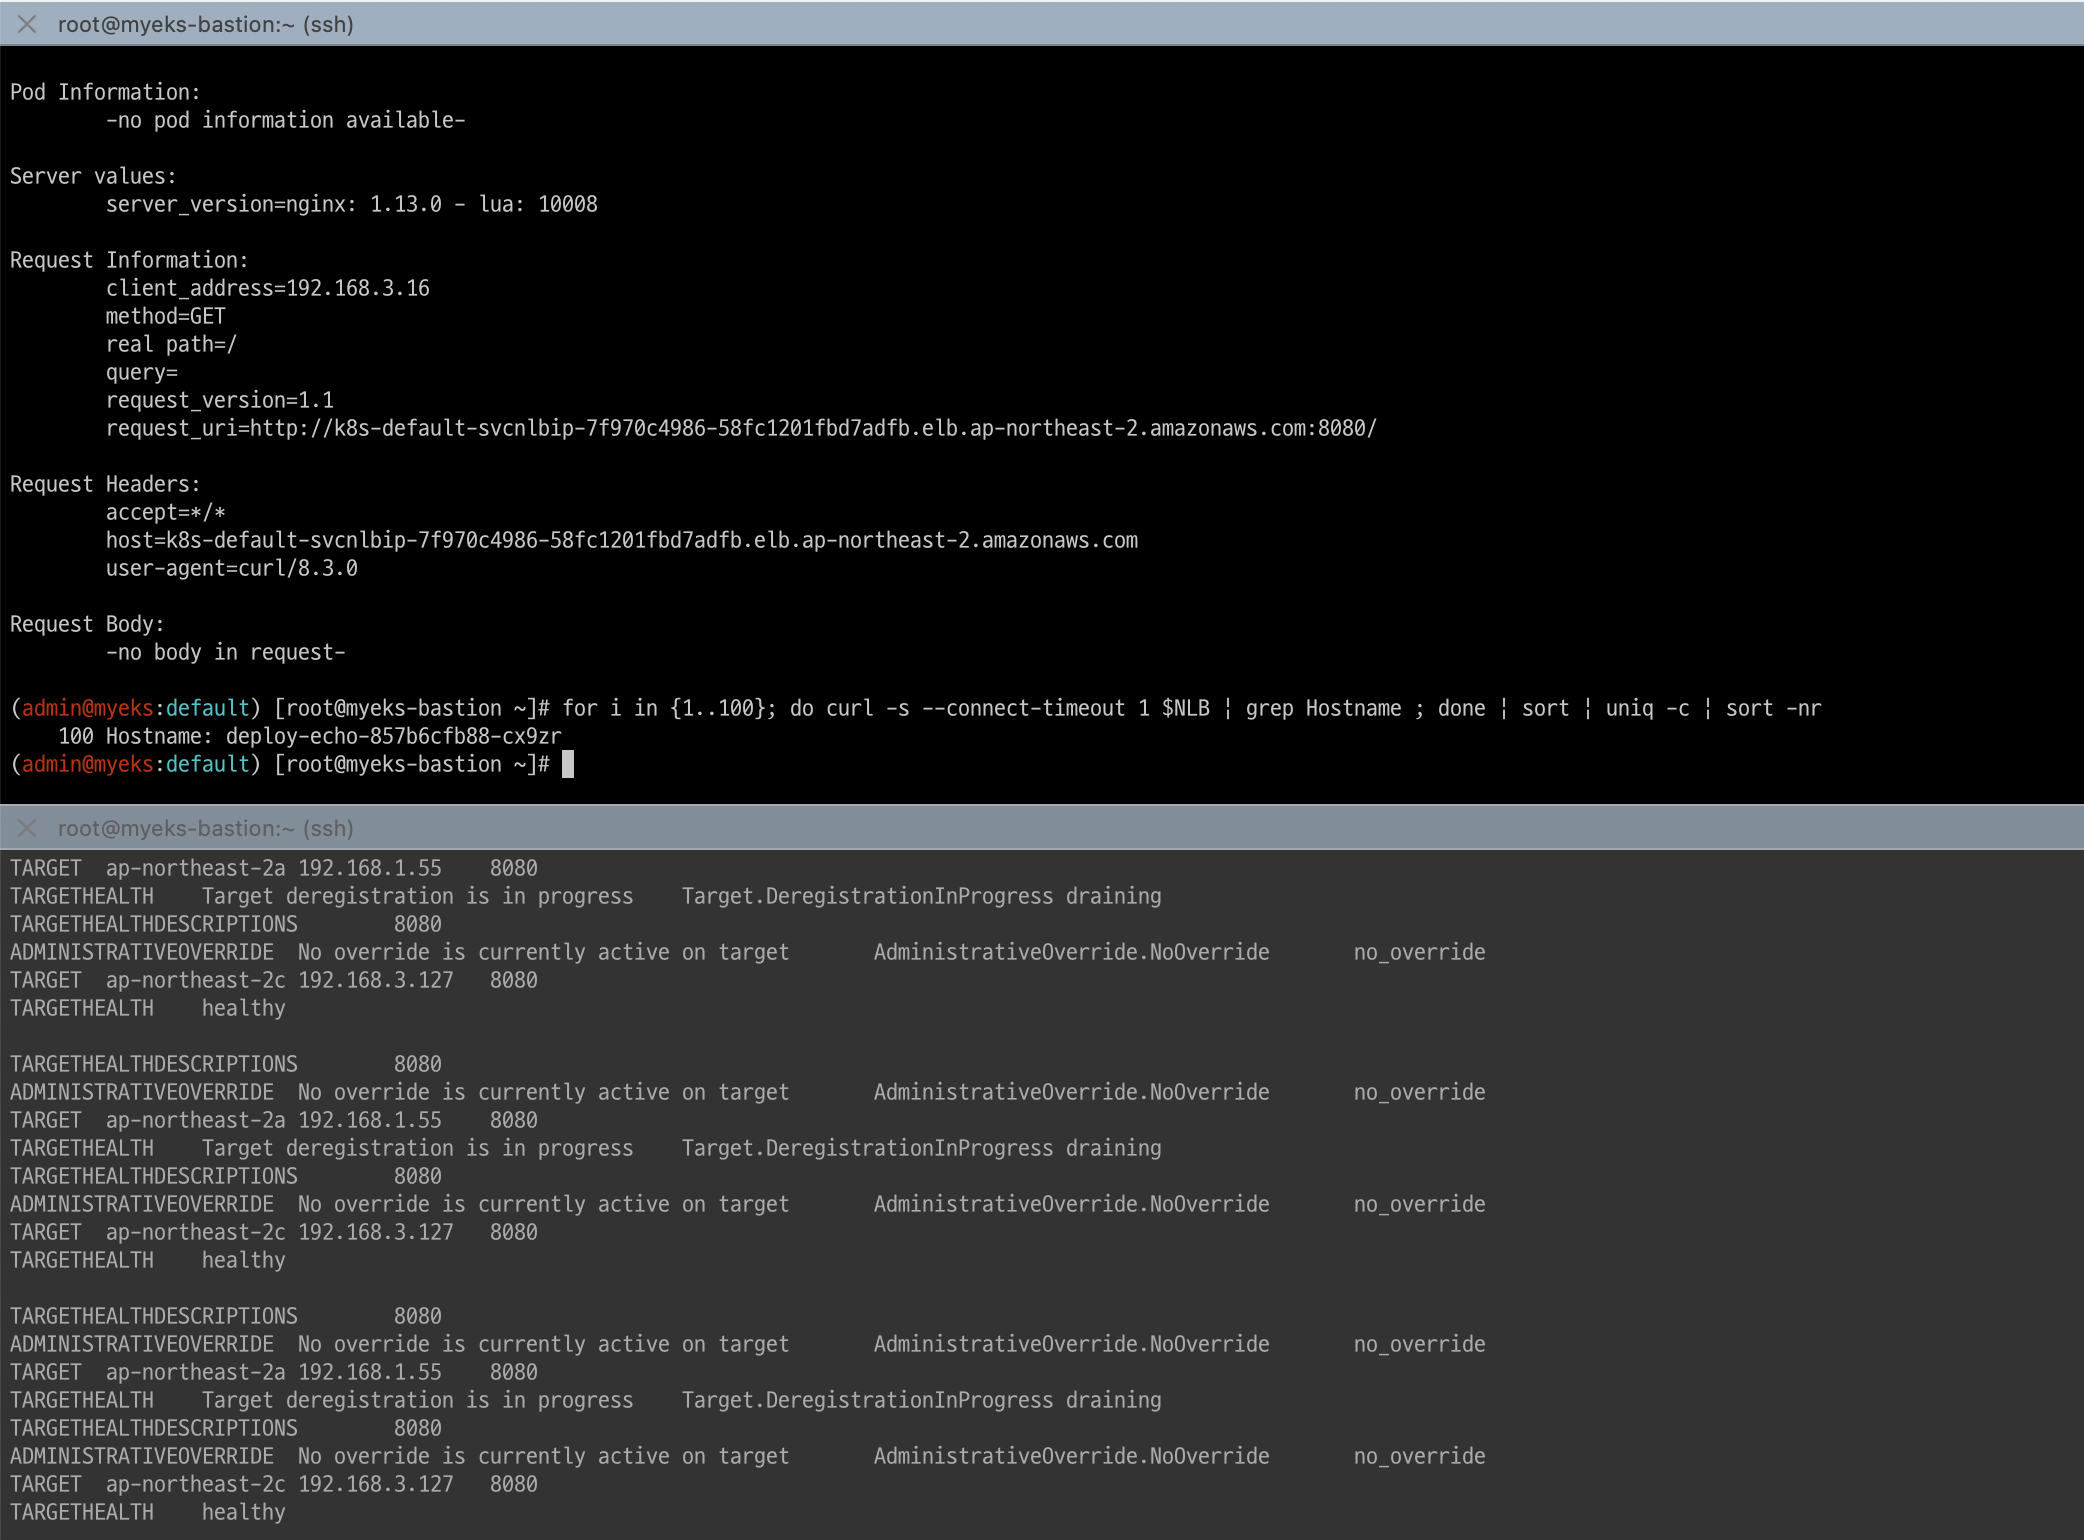
NLB=$(kubectl get svc svc-nlb-ip-type -o jsonpath={.status.loadBalancer.ingress[0].hostname})
curl -s $NLB
for i in {1..100}; do curl -s $NLB | grep Hostname ; done | sort | uniq -c | sort -nr
52 Hostname: deploy-echo-55456fc798-2w65p
48 Hostname: deploy-echo-55456fc798-cxl7z
# 지속적인 접속 시도 : 아래 상세 동작 확인 시 유용(패킷 덤프 등)
while true; do curl -s --connect-timeout 1 $NLB | egrep 'Hostname|client_address'; echo "----------" ; date "+%Y-%m-%d %H:%M:%S" ; sleep 1; done5:5 비율로 부하분산되어 웹에 접속되는 것을 확인할 수 있다.
6.4. 파드 2개 → 1개 → 3개 설정 시 동작 : auto discovery 확인
# (신규 터미널) 모니터링
while true; do aws elbv2 describe-target-health --target-group-arn $TARGET_GROUP_ARN --output text; echo; done

# 작업용 EC2 - 파드 1개 설정
kubectl scale deployment deploy-echo --replicas=1

# 확인
kubectl get deploy,pod,svc,ep
curl -s $NLB
for i in {1..100}; do curl -s --connect-timeout 1 $NLB | grep Hostname ; done | sort | uniq -c | sort -nr
1개의 파드로 정상 요청됨
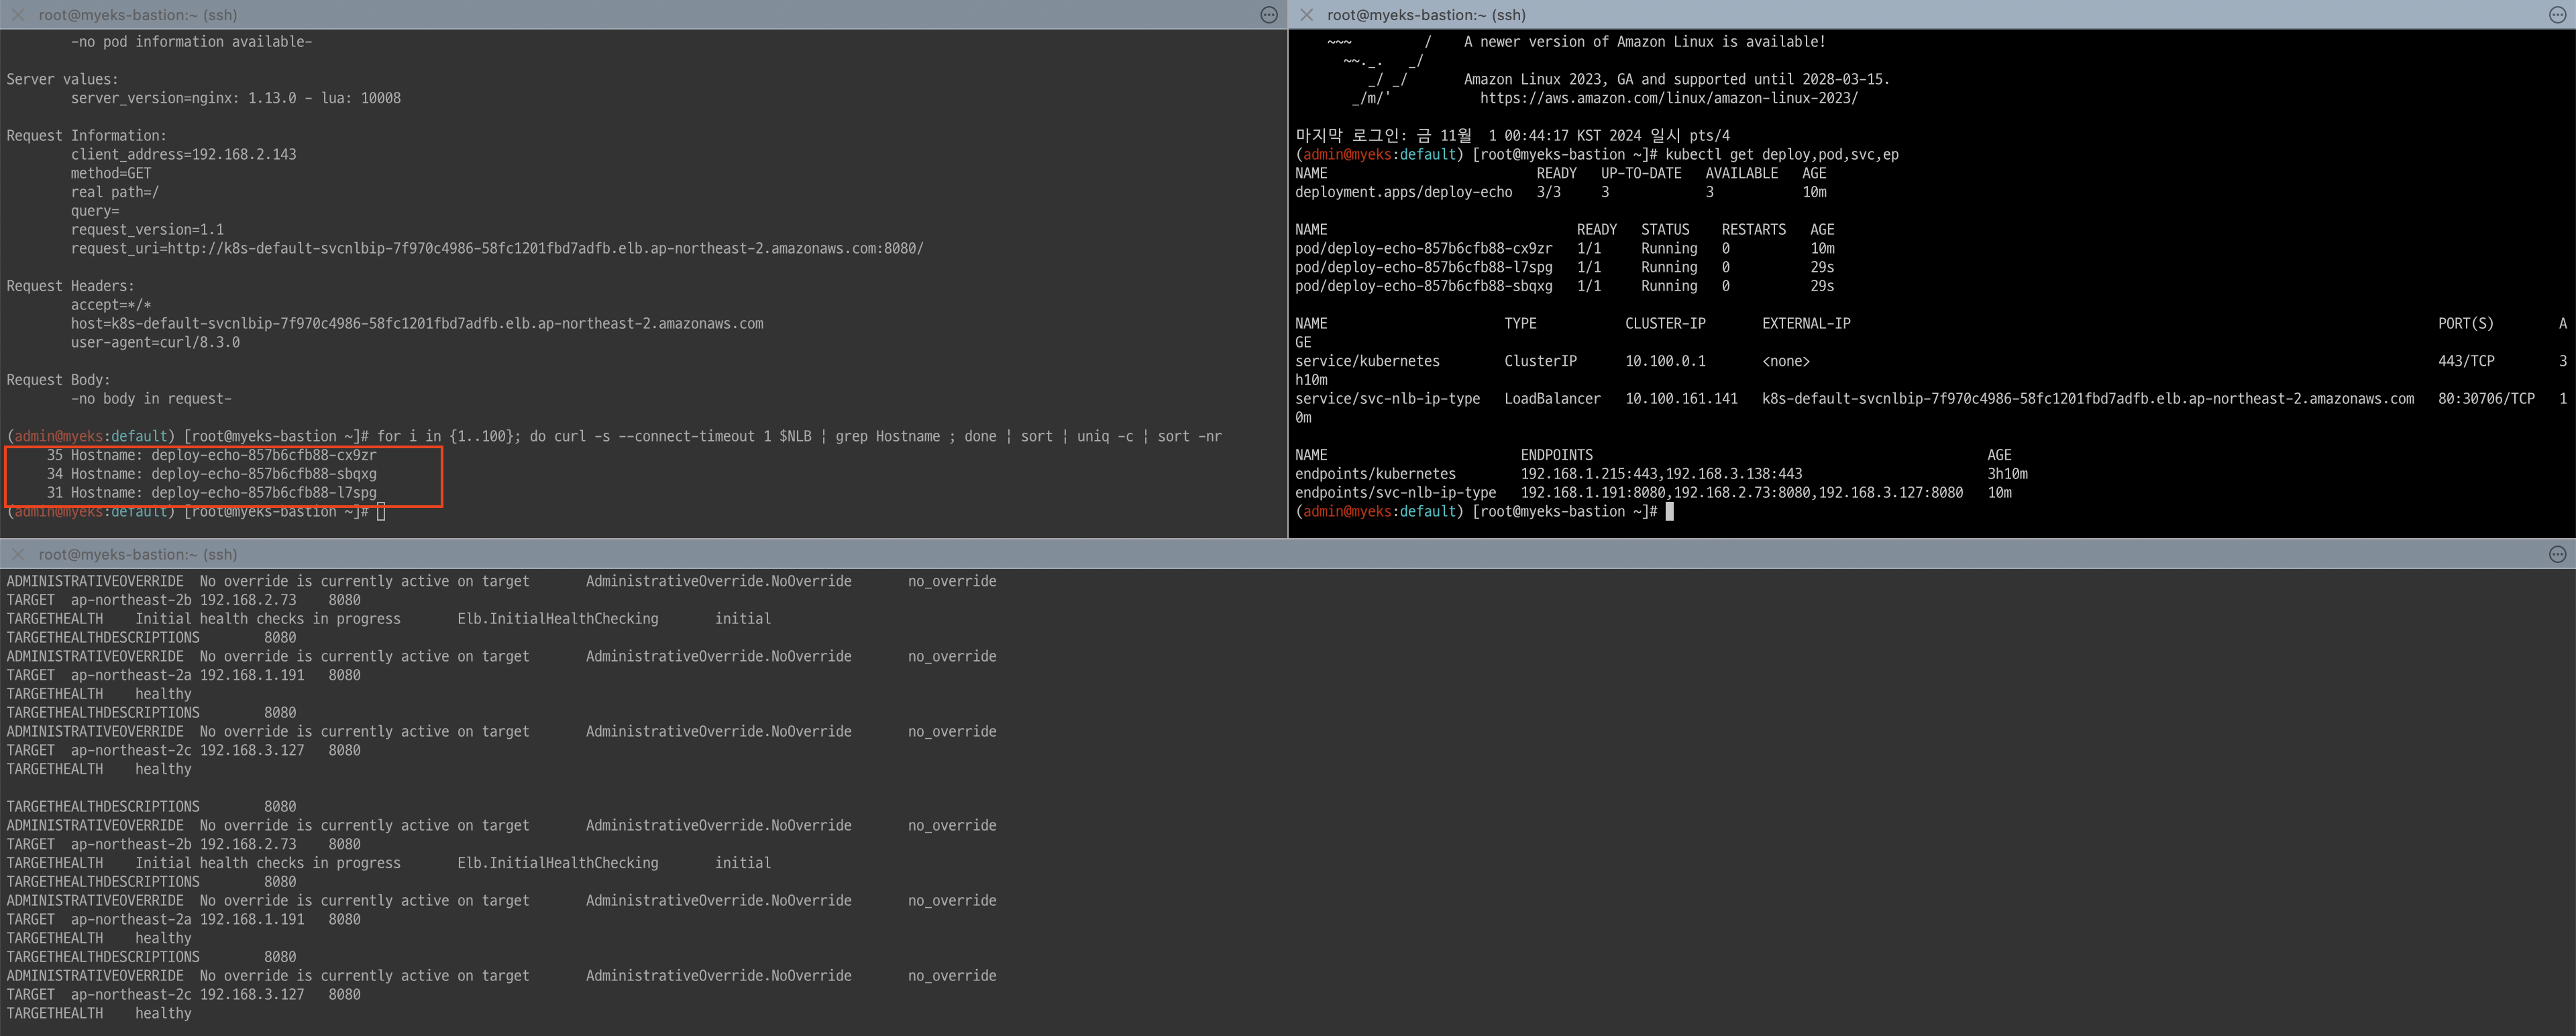
# 작업용 EC2 - 파드 3개 설정
kubectl scale deployment deploy-echo --replicas=3

# 확인 : NLB 대상 타켓이 아직 initial 일 때 100번 반복 접속 시 어떻게 되는지 확인해보자!
kubectl get deploy,pod,svc,ep
curl -s $NLB
for i in {1..100}; do curl -s --connect-timeout 1 $NLB | grep Hostname ; done | sort | uniq -c | sort -nr
3개의 파드로 정상 요청됨
#
kubectl describe deploy -n kube-system aws-load-balancer-controller | grep -i 'Service Account'
  Service Account:  aws-load-balancer-controller

# [AWS LB Ctrl] 클러스터 롤 바인딩 정보 확인
kubectl describe clusterrolebindings.rbac.authorization.k8s.io aws-load-balancer-controller-rolebinding
Name:         aws-load-balancer-controller-rolebinding
Labels:       app.kubernetes.io/instance=aws-load-balancer-controller
              app.kubernetes.io/managed-by=Helm
              app.kubernetes.io/name=aws-load-balancer-controller
              app.kubernetes.io/version=v2.9.2
              helm.sh/chart=aws-load-balancer-controller-1.9.2
Annotations:  meta.helm.sh/release-name: aws-load-balancer-controller
              meta.helm.sh/release-namespace: kube-system
Role:
  Kind:  ClusterRole
  Name:  aws-load-balancer-controller-role
Subjects:
  Kind            Name                          Namespace
  ----            ----                          ---------
  ServiceAccount  aws-load-balancer-controller  kube-system


# [AWS LB Ctrl] 클러스터롤 확인
kubectl describe clusterroles.rbac.authorization.k8s.io aws-load-balancer-controller-role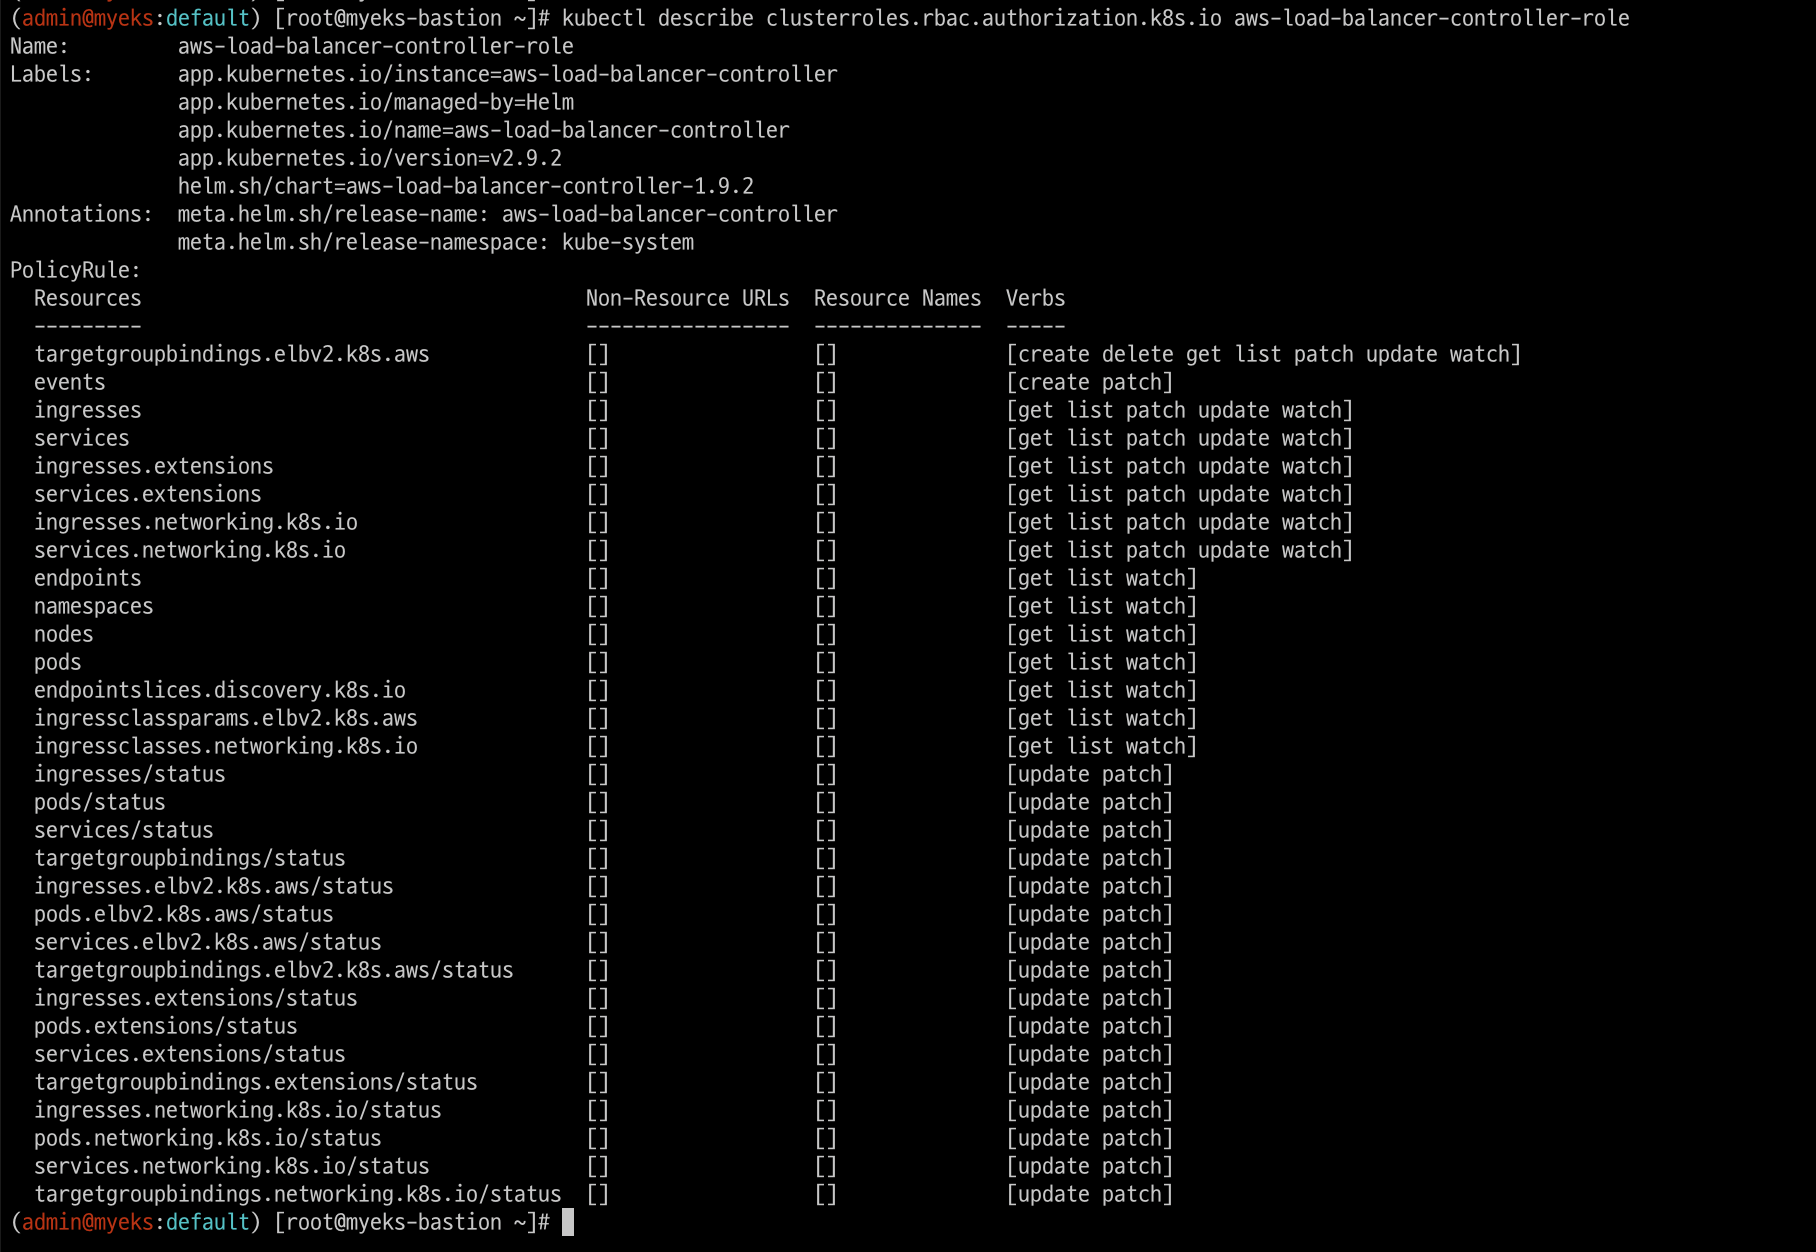
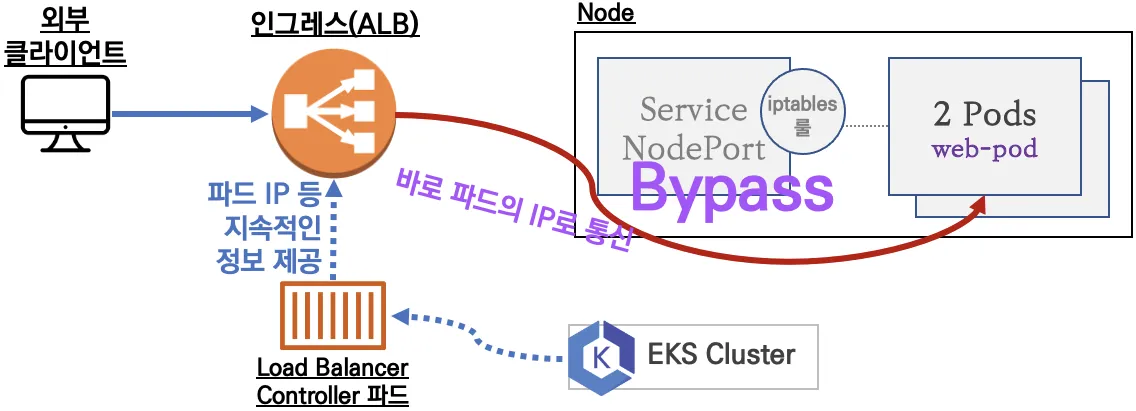
7. Ingress
클러스터 내부의 서비스(ClusterIP, NodePort, Loadbalancer)를 외부로 노출(HTTP/HTTPS) - Web Proxy 역할
- AWS Load Balancer Controller + Ingress (ALB) IP 모드 동작 with AWS VPC CNI
7.1 서비스/파드 배포 테스트 with Ingress(ALB)
# 게임 파드와 Service, Ingress 배포
curl -s -O https://raw.githubusercontent.com/gasida/PKOS/main/3/ingress1.yaml
cat ingress1.yaml
kubectl apply -f ingress1.yaml

# 모니터링
watch -d kubectl get pod,ingress,svc,ep -n game-2048

# 생성 확인
kubectl get-all -n game-2048
kubectl get ingress,svc,ep,pod -n game-2048
kubectl get targetgroupbindings -n game-2048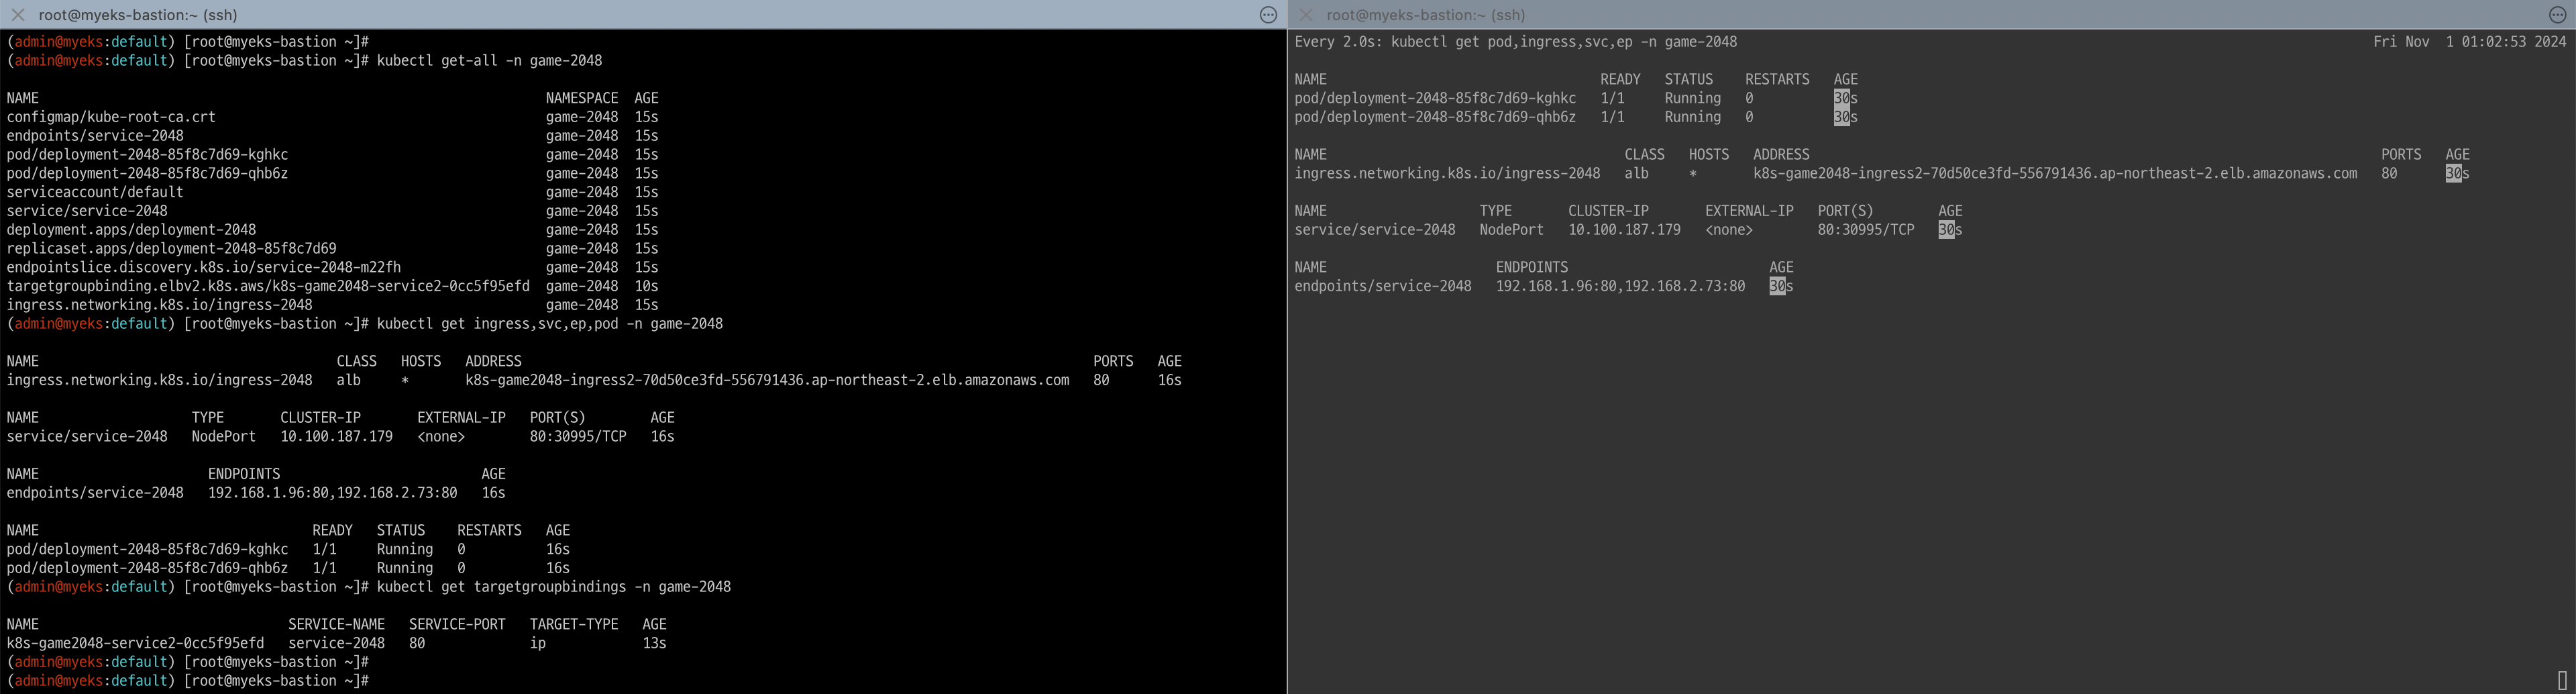
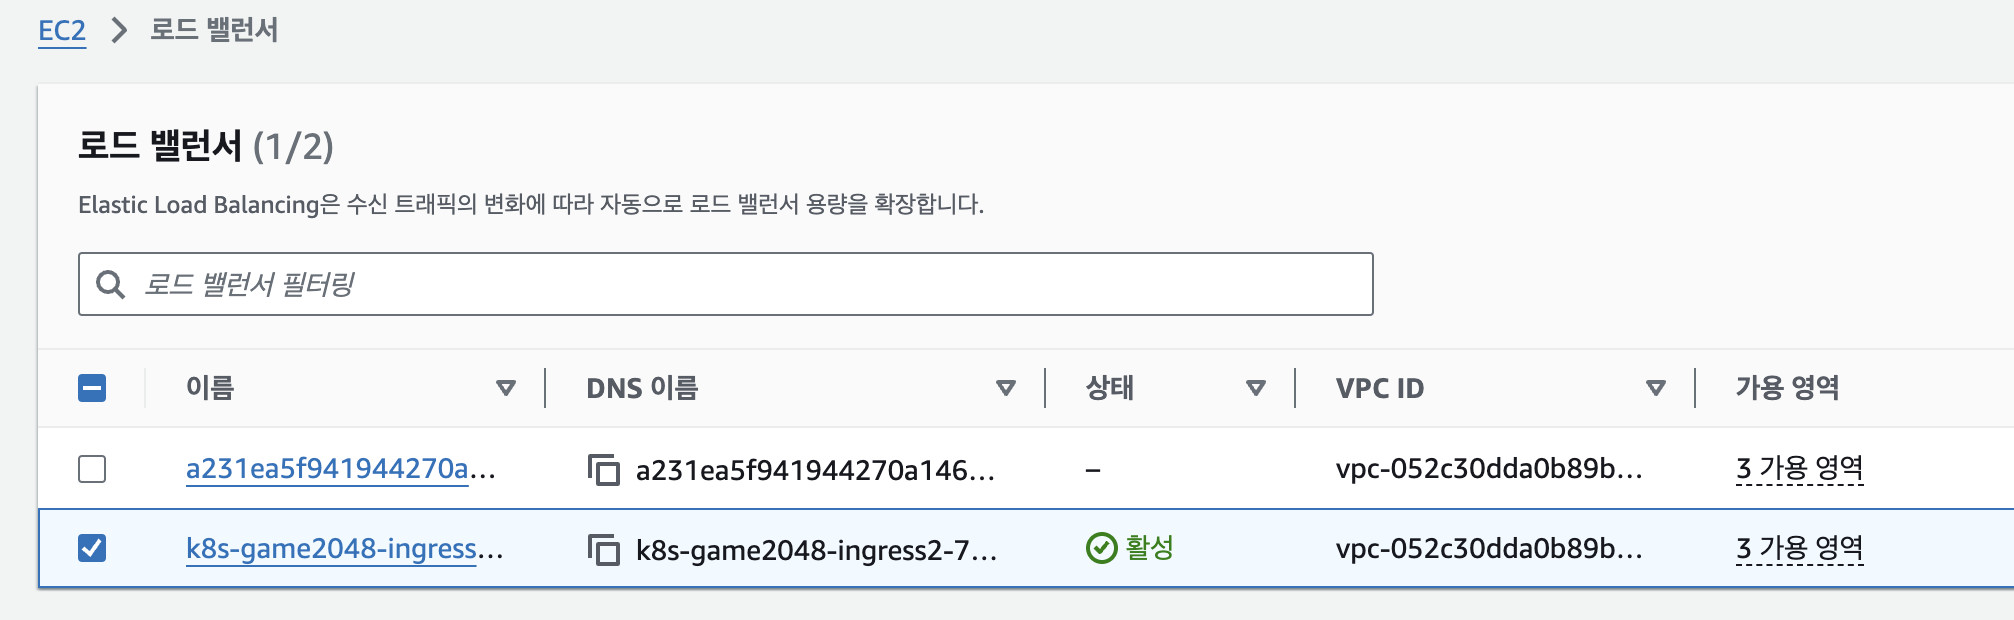
# ALB 생성 확인
aws elbv2 describe-load-balancers --query 'LoadBalancers[?contains(LoadBalancerName, `k8s-game2048`) == `true`]' | jq
ALB_ARN=$(aws elbv2 describe-load-balancers --query 'LoadBalancers[?contains(LoadBalancerName, `k8s-game2048`) == `true`].LoadBalancerArn' | jq -r '.[0]')
aws elbv2 describe-target-groups --load-balancer-arn $ALB_ARN
TARGET_GROUP_ARN=$(aws elbv2 describe-target-groups --load-balancer-arn $ALB_ARN | jq -r '.TargetGroups[0].TargetGroupArn')
aws elbv2 describe-target-health --target-group-arn $TARGET_GROUP_ARN | jq

# Ingress 확인
kubectl describe ingress -n game-2048 ingress-2048
kubectl get ingress -n game-2048 ingress-2048 -o jsonpath="{.status.loadBalancer.ingress[*].hostname}{'\n'}"

# 게임 접속 : ALB 주소로 웹 접속
kubectl get ingress -n game-2048 ingress-2048 -o jsonpath={.status.loadBalancer.ingress[0].hostname} | awk '{ print "Game URL = http://"$1 }'
Game URL = http://k8s-game2048-ingress2-70d50ce3fd-556791436.ap-northeast-2.elb.amazonaws.com

# 파드 IP 확인
kubectl get pod -n game-2048 -owide
NAME                              READY   STATUS    RESTARTS   AGE     IP             NODE                                               NOMINATED NODE   READINESS GATES
deployment-2048-85f8c7d69-kghkc   1/1     Running   0          2m54s   192.168.2.73   ip-192-168-2-103.ap-northeast-2.compute.internal   <none>           <none>
deployment-2048-85f8c7d69-qhb6z   1/1     Running   0          2m54s   192.168.1.96   ip-192-168-1-77.ap-northeast-2.compute.internal    <none>           <none>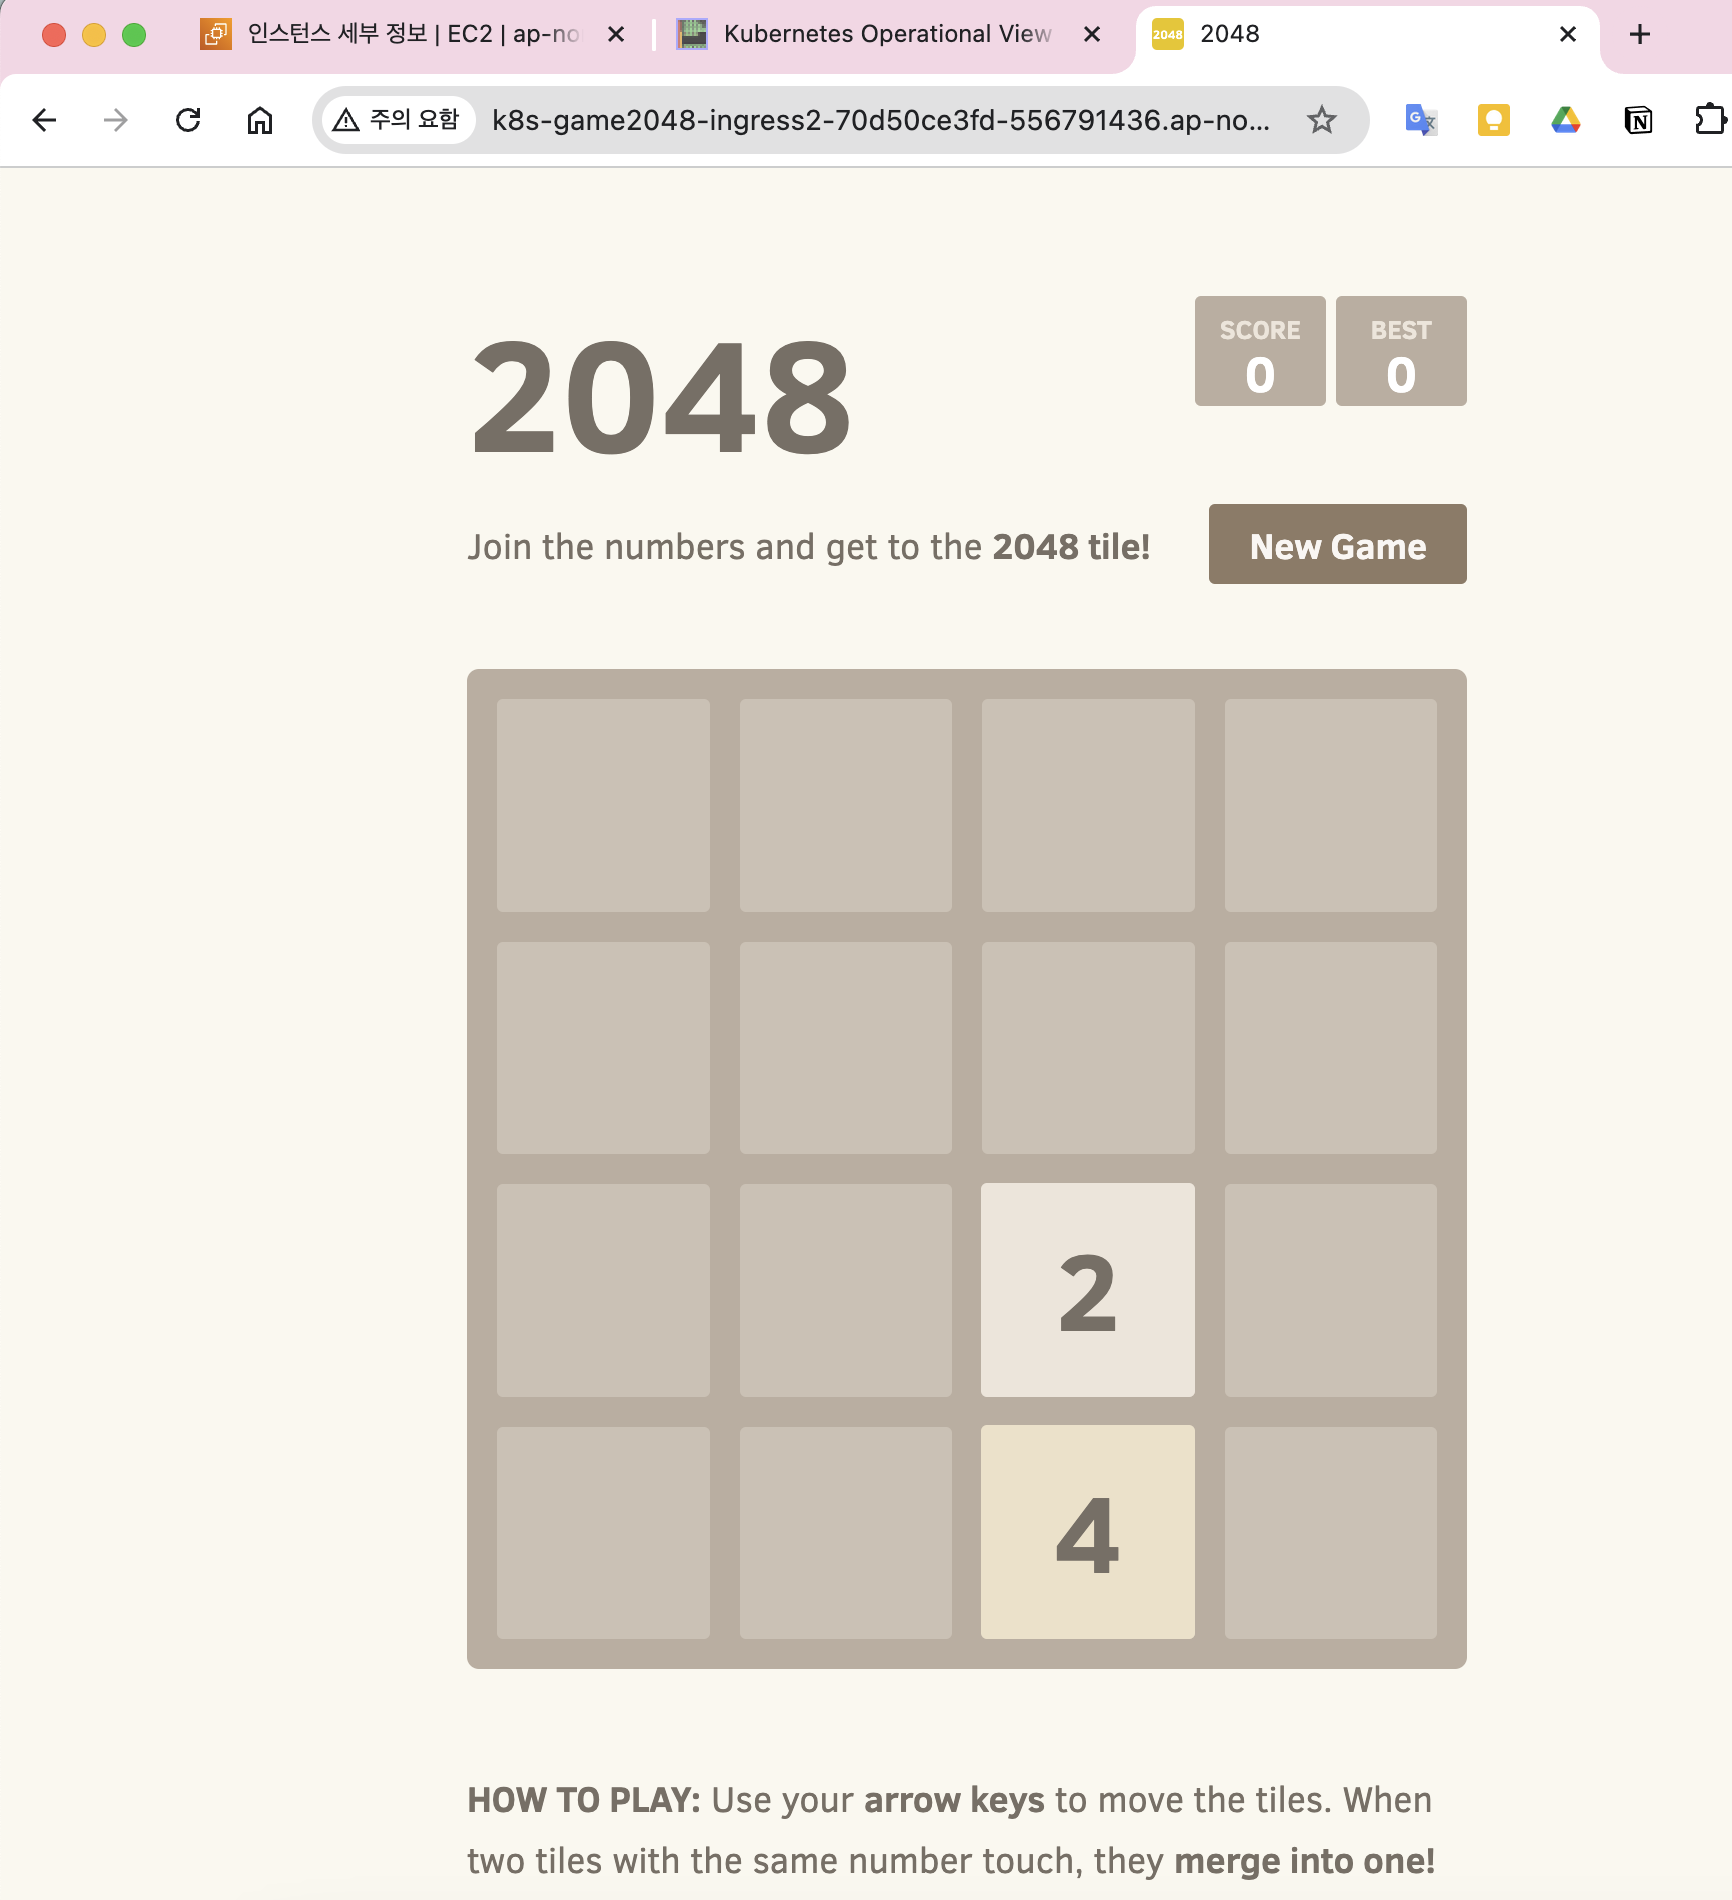
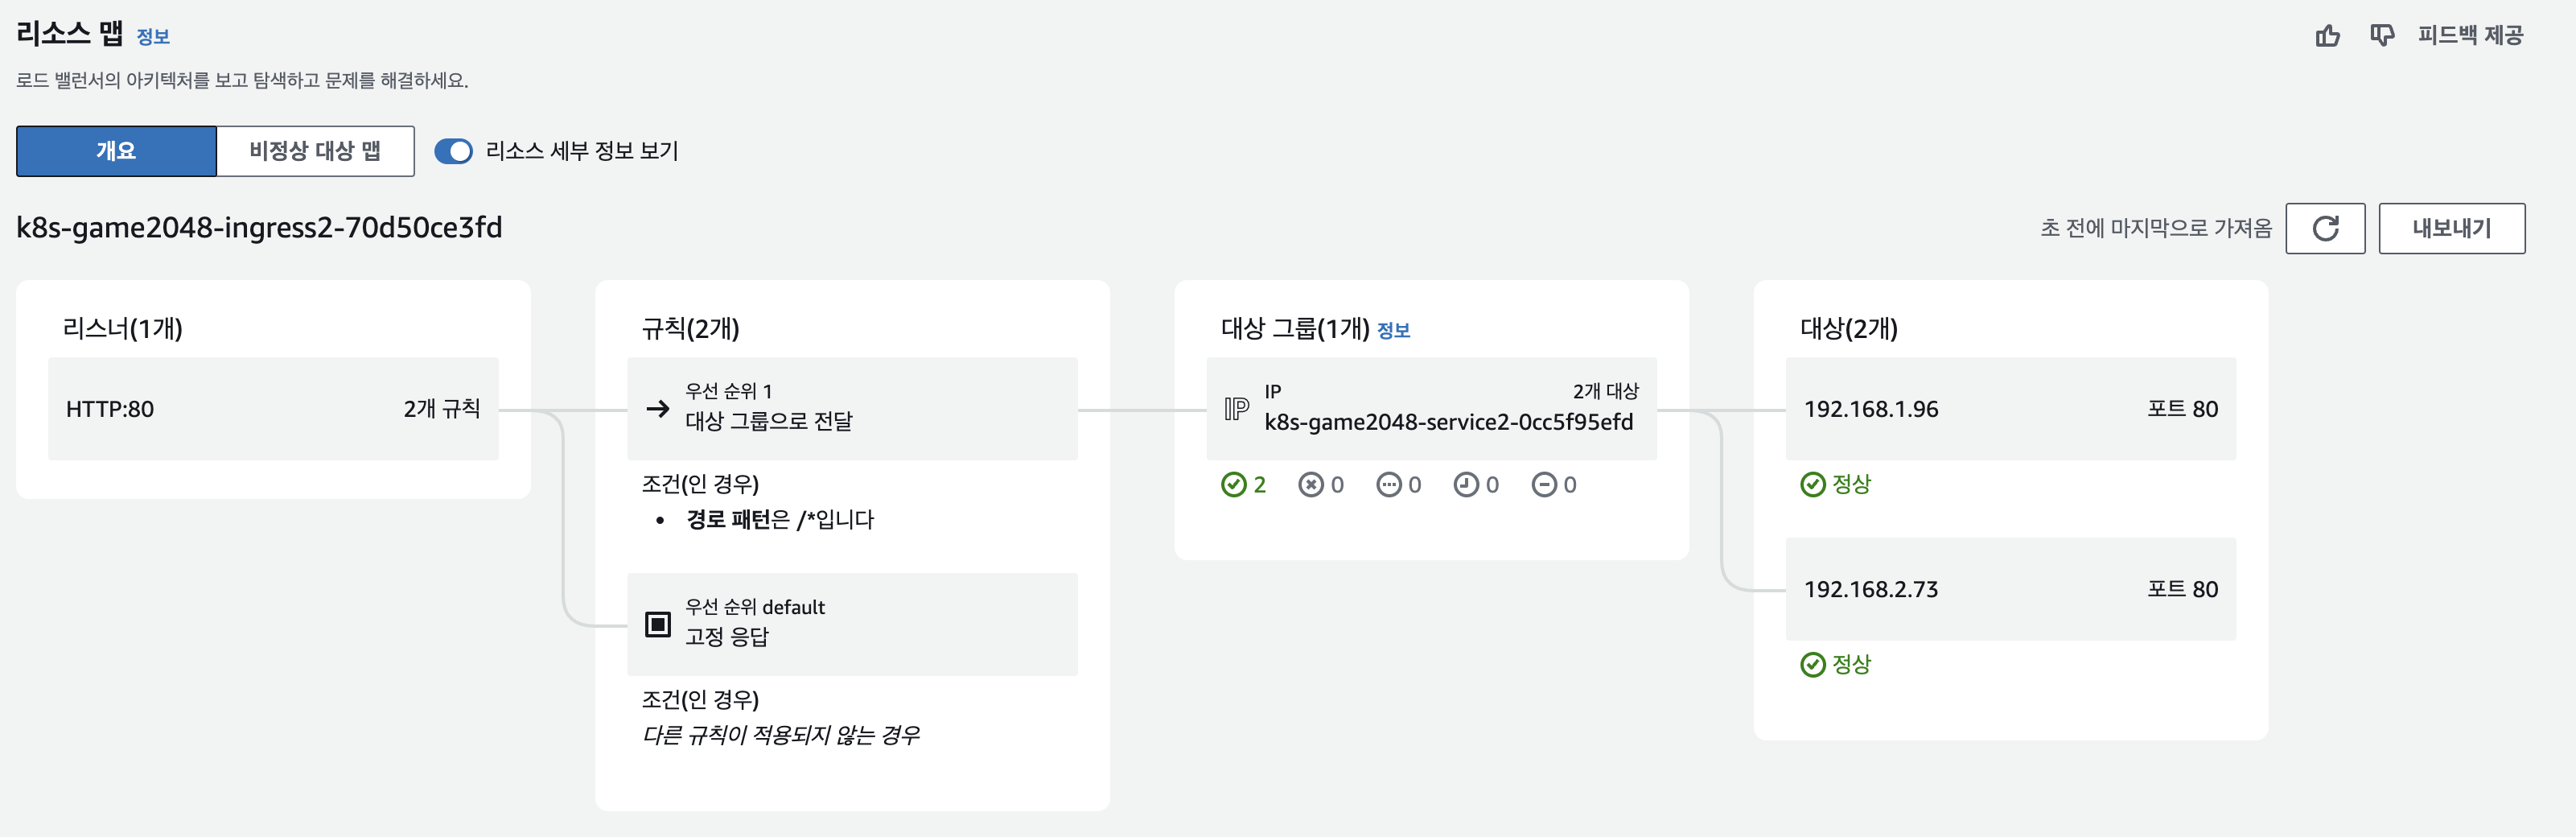
- ALB 대상 그룹에 등록된 대상 확인 : ALB에서 파드 IP로 직접 전달
- 파드 3개로 증가
# 터미널1
watch kubectl get pod -n game-2048
while true; do aws elbv2 describe-target-health --target-group-arn $TARGET_GROUP_ARN --output text; echo; done

# 터미널2 : 파드 3개로 증가
kubectl scale deployment -n game-2048 deployment-2048 --replicas 3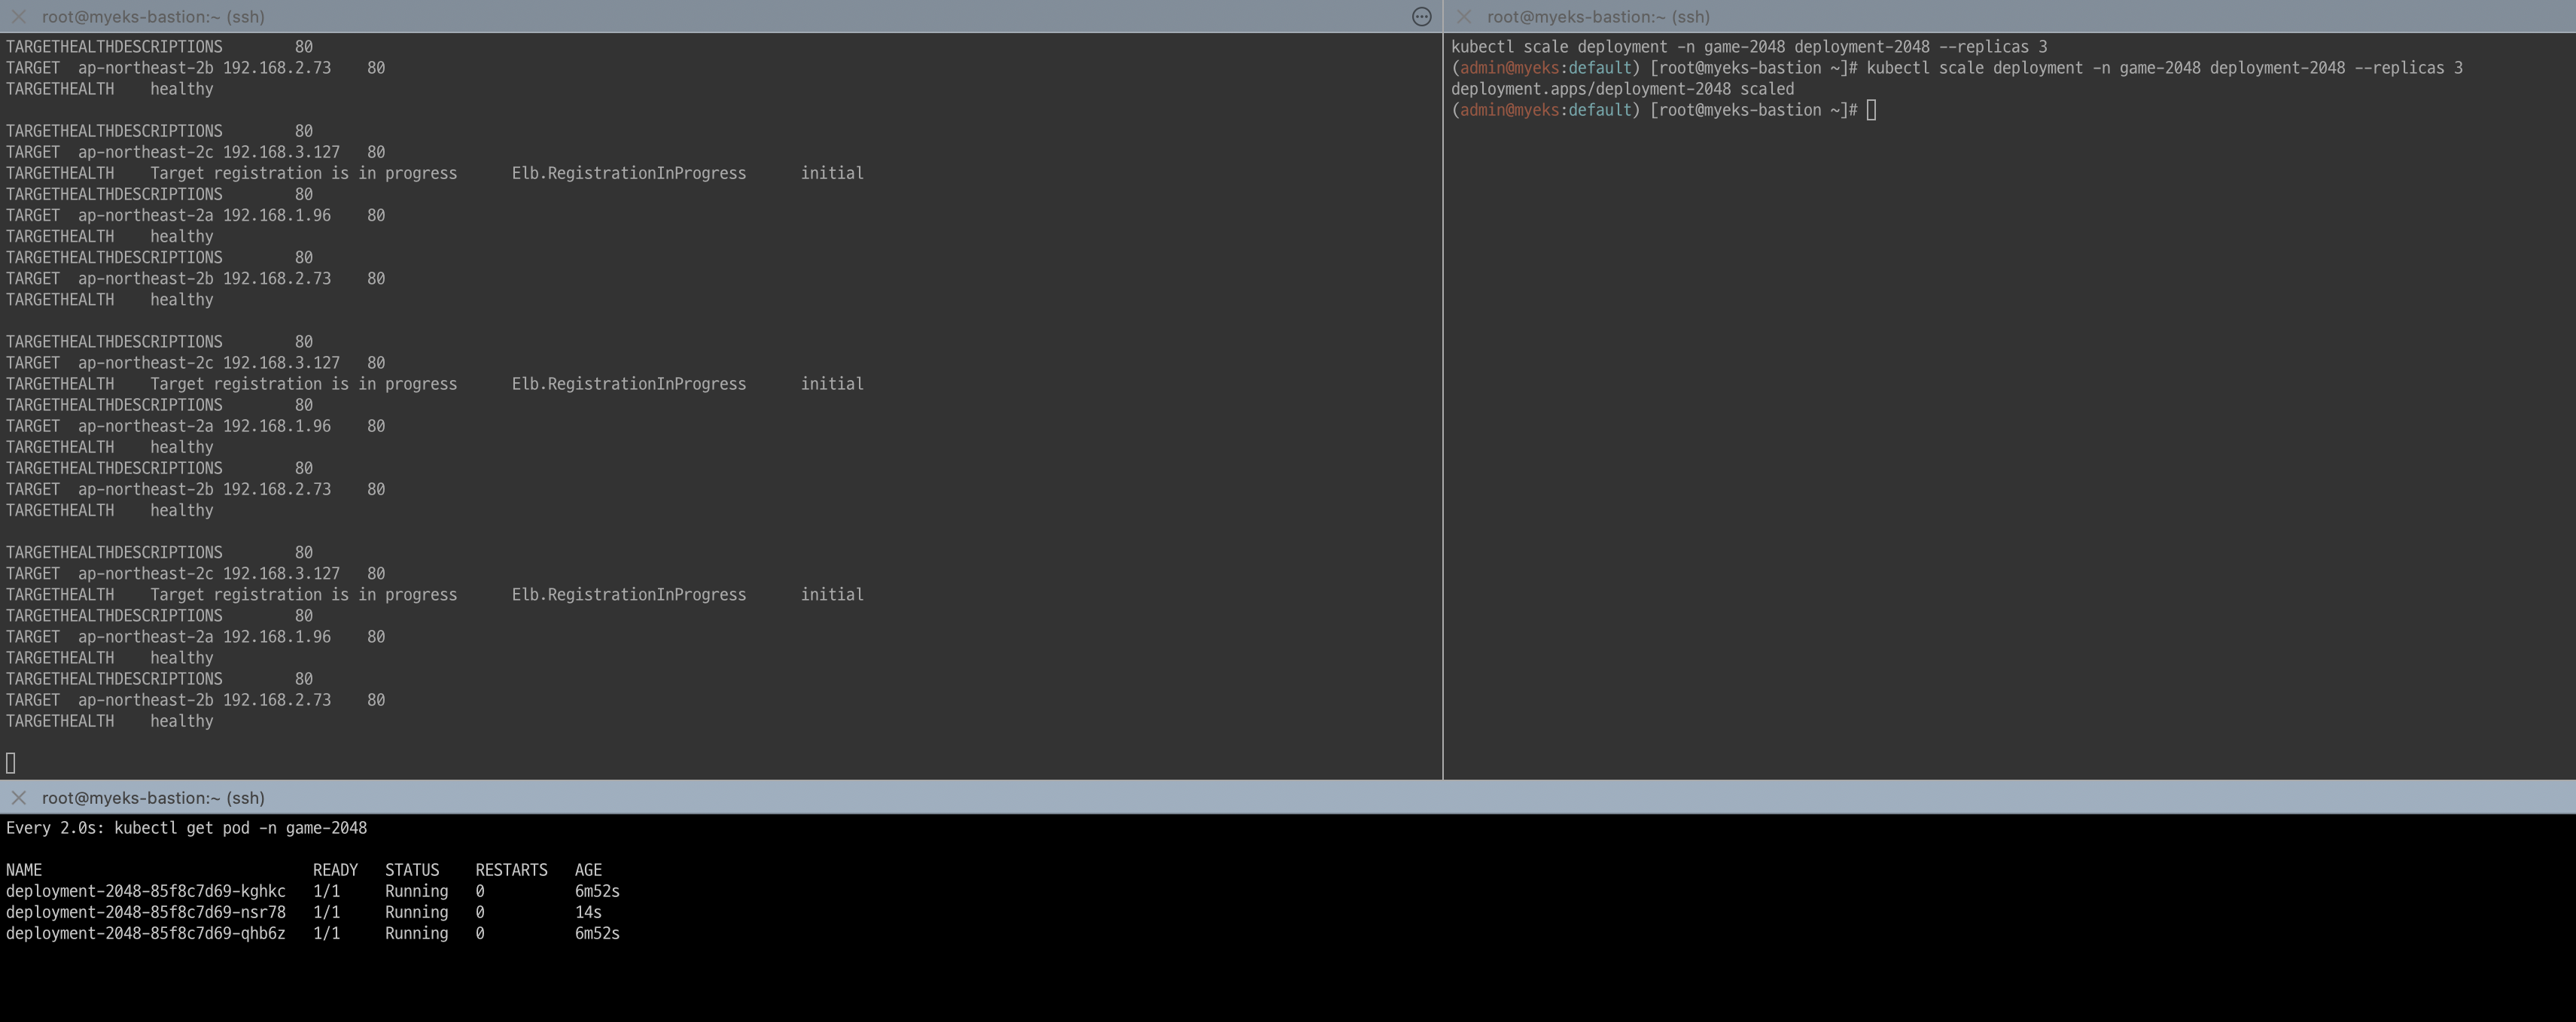
- 파드 1개로 감소
# 터미널2 : 파드 1개로 감소
kubectl scale deployment -n game-2048 deployment-2048 --replicas 1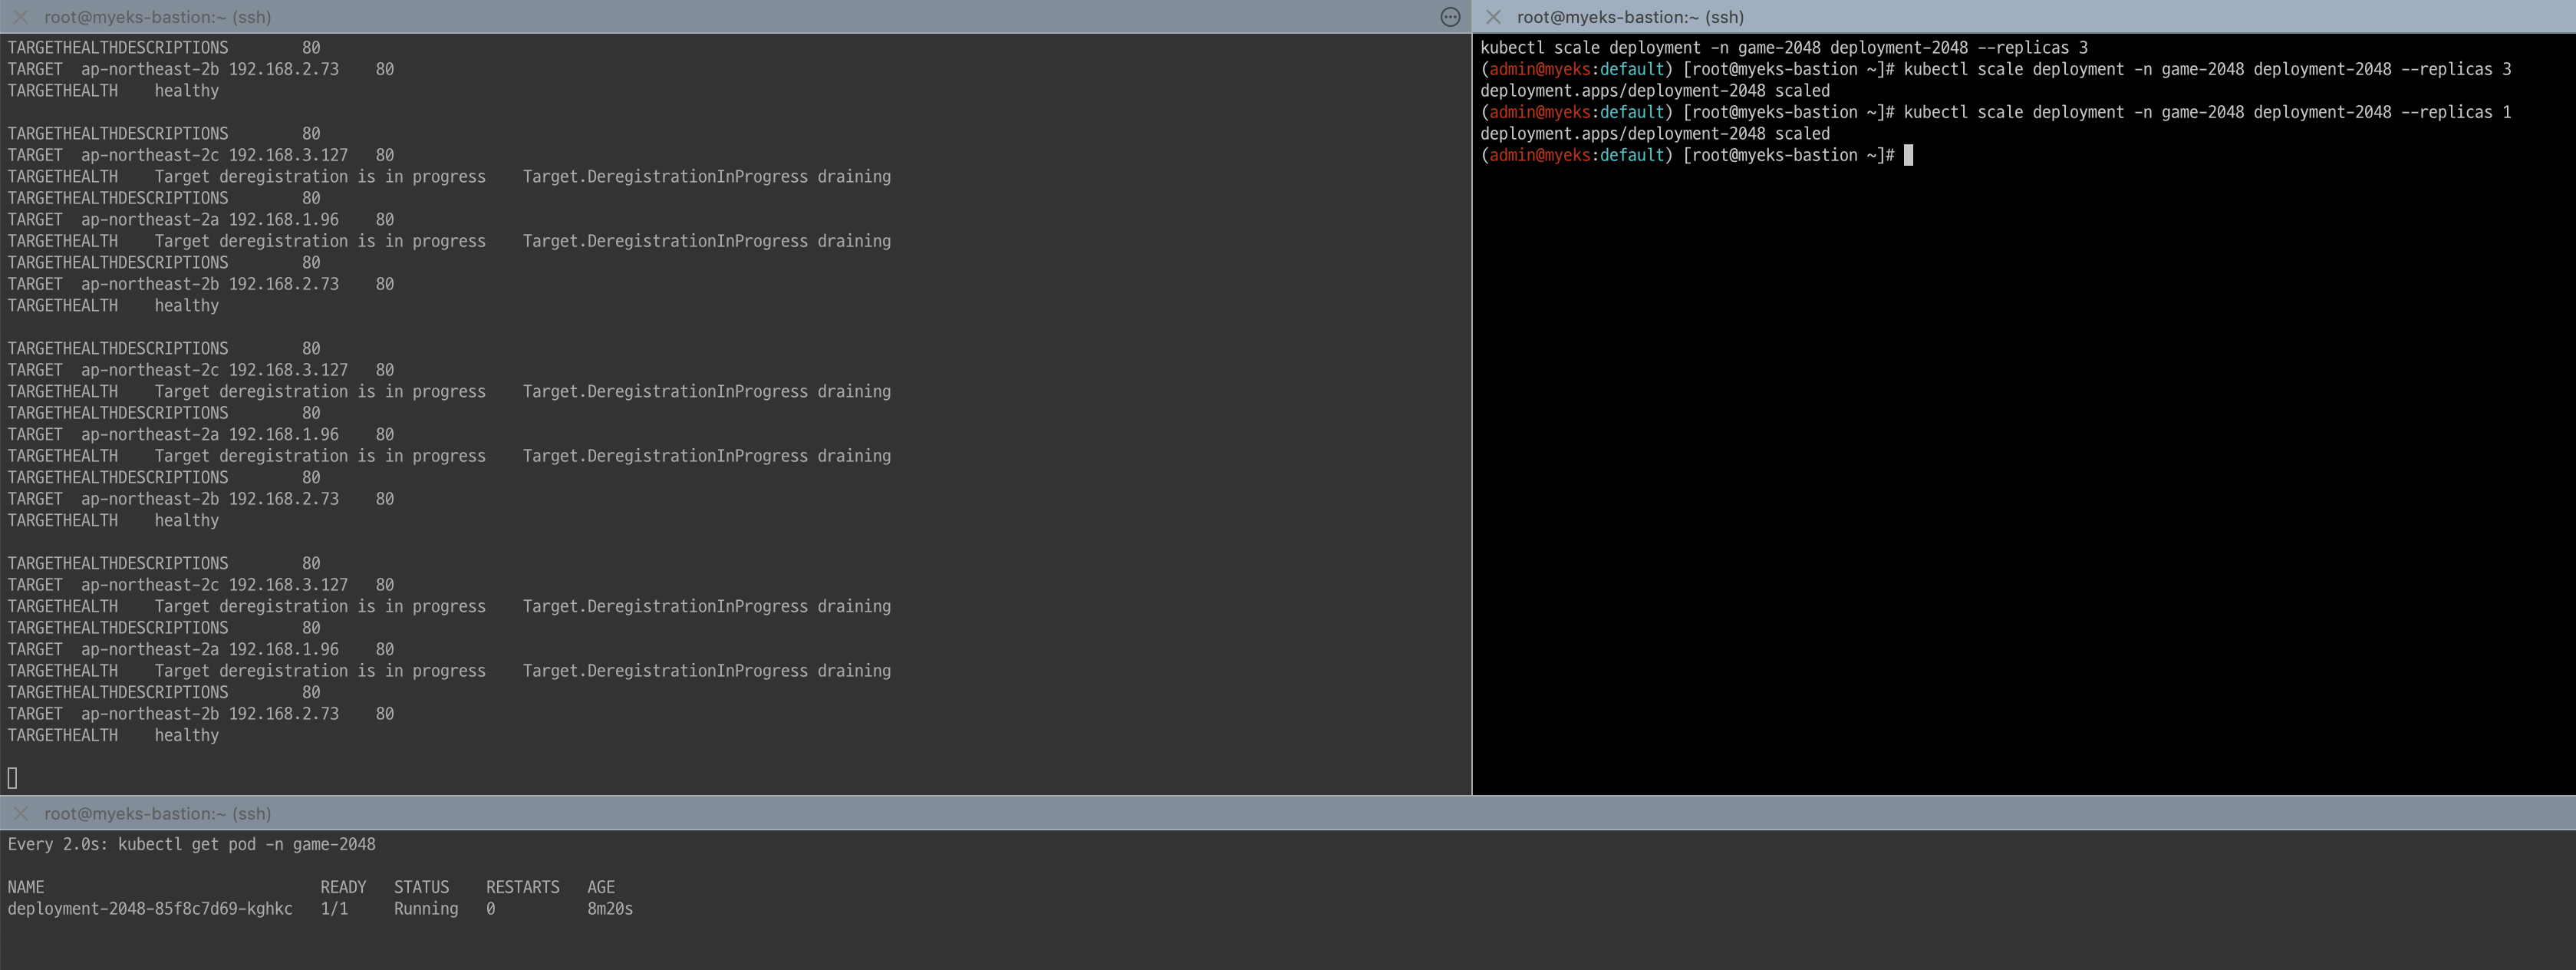
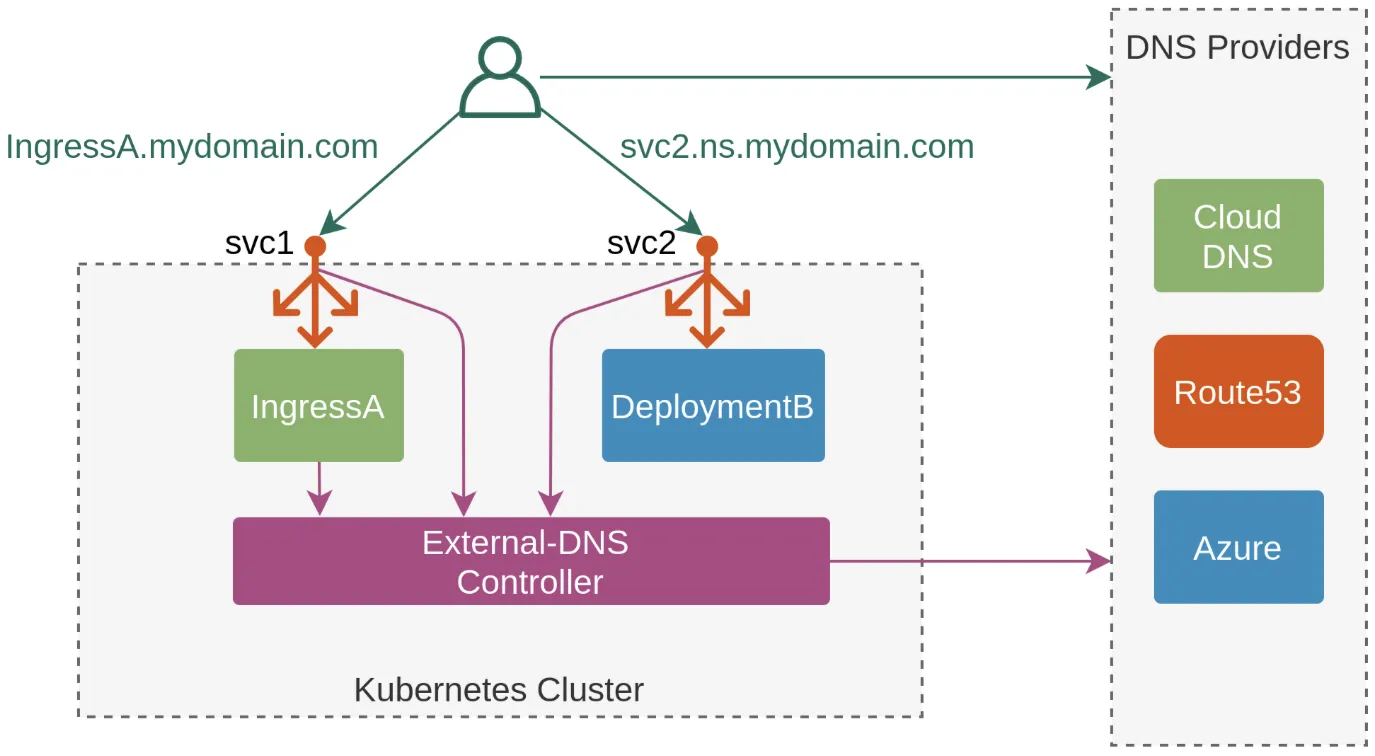
8. ExternalDNS
K8S 서비스/인그레스 생성 시 도메인을 설정하면, AWS(Route 53), Azure(DNS), GCP(Cloud DNS) 에 A 레코드(TXT 레코드)로 자동 생성/삭제가 됩니다.
8.1 AWS Route 53 정보 확인 & 변수 지정
# 자신의 도메인 변수 지정 : 소유하고 있는 자신의 도메인을 입력하시면 됩니다
MyDomain=kgetall.click
echo "export MyDomain=kgetall.click" >> /etc/profile

# 자신의 Route 53 도메인 ID 조회 및 변수 지정
aws route53 list-hosted-zones-by-name --dns-name "${MyDomain}." | jq
aws route53 list-hosted-zones-by-name --dns-name "${MyDomain}." --query "HostedZones[0].Name"
aws route53 list-hosted-zones-by-name --dns-name "${MyDomain}." --query "HostedZones[0].Id" --output text
MyDnzHostedZoneId=`aws route53 list-hosted-zones-by-name --dns-name "${MyDomain}." --query "HostedZones[0].Id" --output text`
echo $MyDnzHostedZoneId

# (옵션) NS 레코드 타입 첫번째 조회
aws route53 list-resource-record-sets --output json --hosted-zone-id "${MyDnzHostedZoneId}" --query "ResourceRecordSets[?Type == 'NS']" | jq -r '.[0].ResourceRecords[].Value'
# (옵션) A 레코드 타입 모두 조회
aws route53 list-resource-record-sets --output json --hosted-zone-id "${MyDnzHostedZoneId}" --query "ResourceRecordSets[?Type == 'A']"

# A 레코드 타입 조회
aws route53 list-resource-record-sets --hosted-zone-id "${MyDnzHostedZoneId}" --query "ResourceRecordSets[?Type == 'A']" | jq
aws route53 list-resource-record-sets --hosted-zone-id "${MyDnzHostedZoneId}" --query "ResourceRecordSets[?Type == 'A'].Name" | jq
aws route53 list-resource-record-sets --hosted-zone-id "${MyDnzHostedZoneId}" --query "ResourceRecordSets[?Type == 'A'].Name" --output text

# A 레코드 값 반복 조회
while true; do aws route53 list-resource-record-sets --hosted-zone-id "${MyDnzHostedZoneId}" --query "ResourceRecordSets[?Type == 'A']" | jq ; date ; echo ; sleep 1; done
8.2 ExternalDNS 설치
# EKS 배포 시 Node IAM Role 설정되어 있음
# eksctl create cluster ... --external-dns-access ...

#
MyDomain=<자신의 도메인>
MyDomain=kgetall.click

# 자신의 Route 53 도메인 ID 조회 및 변수 지정
MyDnzHostedZoneId=$(aws route53 list-hosted-zones-by-name --dns-name "${MyDomain}." --query "HostedZones[0].Id" --output text)

# 변수 확인
echo $MyDomain, $MyDnzHostedZoneId

# ExternalDNS 배포
curl -s -O https://raw.githubusercontent.com/gasida/PKOS/main/aews/externaldns.yaml
cat externaldns.yaml
MyDomain=$MyDomain MyDnzHostedZoneId=$MyDnzHostedZoneId envsubst < externaldns.yaml | kubectl apply -f -

# 확인 및 로그 모니터링
kubectl get pod -l app.kubernetes.io/name=external-dns -n kube-system
kubectl logs deploy/external-dns -n kube-system -f
8.3 Service(NLB) + 도메인 연동(ExternalDNS)
# 터미널1 (모니터링)
watch -d 'kubectl get pod,svc'
kubectl logs deploy/external-dns -n kube-system -f

# 테트리스 디플로이먼트 배포
cat <<EOF | kubectl apply -f -
apiVersion: apps/v1
kind: Deployment
metadata:
  name: tetris
  labels:
    app: tetris
spec:
  replicas: 1
  selector:
    matchLabels:
      app: tetris
  template:
    metadata:
      labels:
        app: tetris
    spec:
      containers:
      - name: tetris
        image: bsord/tetris
---
apiVersion: v1
kind: Service
metadata:
  name: tetris
  annotations:
    service.beta.kubernetes.io/aws-load-balancer-nlb-target-type: ip
    service.beta.kubernetes.io/aws-load-balancer-scheme: internet-facing
    service.beta.kubernetes.io/aws-load-balancer-cross-zone-load-balancing-enabled: "true"
    service.beta.kubernetes.io/aws-load-balancer-backend-protocol: "http"
    #service.beta.kubernetes.io/aws-load-balancer-healthcheck-port: "80"
spec:
  selector:
    app: tetris
  ports:
  - port: 80
    protocol: TCP
    targetPort: 80
  type: LoadBalancer
  loadBalancerClass: service.k8s.aws/nlb
EOF

# 배포 확인
kubectl get deploy,svc,ep tetris
# NLB에 ExternanDNS 로 도메인 연결
kubectl annotate service tetris "external-dns.alpha.kubernetes.io/hostname=tetris.$MyDomain"
while true; do aws route53 list-resource-record-sets --hosted-zone-id "${MyDnzHostedZoneId}" --query "ResourceRecordSets[?Type == 'A']" | jq ; date ; echo ; sleep 1; done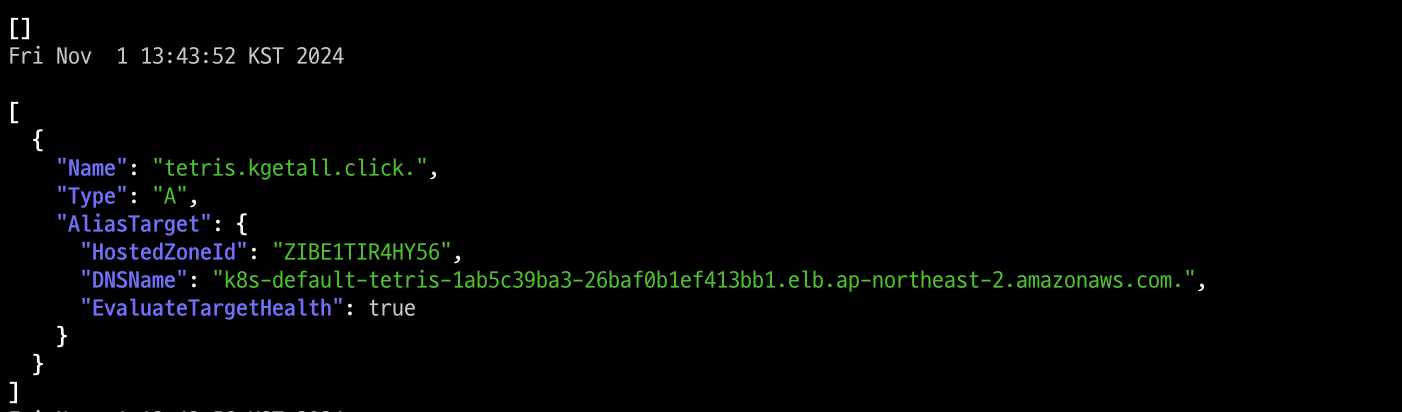
# Route53에 A레코드 확인
aws route53 list-resource-record-sets --hosted-zone-id "${MyDnzHostedZoneId}" --query "ResourceRecordSets[?Type == 'A']" | jq
aws route53 list-resource-record-sets --hosted-zone-id "${MyDnzHostedZoneId}" --query "ResourceRecordSets[?Type == 'A'].Name" | jq .[]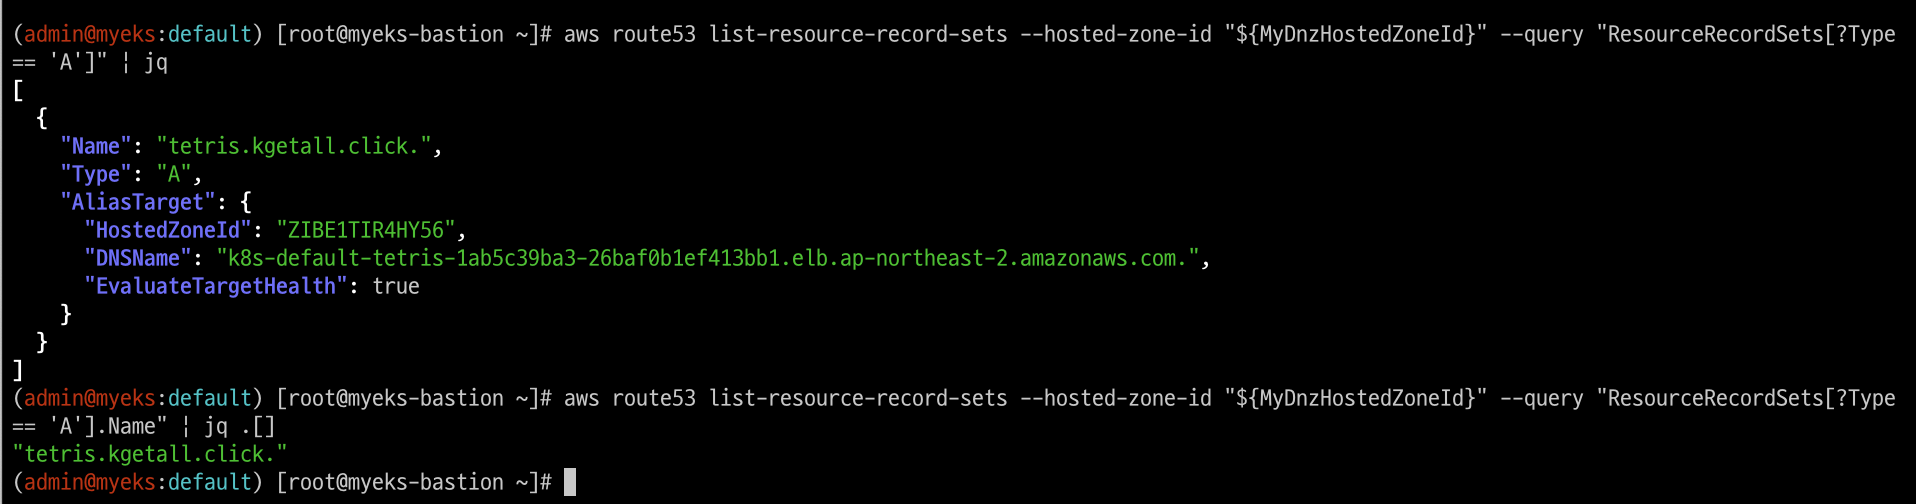
# 확인
dig +short tetris.$MyDomain @8.8.8.8
dig +short tetris.$MyDomain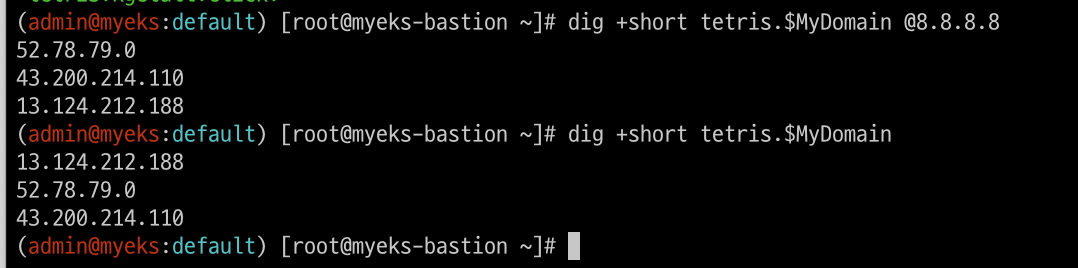
# 도메인 체크
echo -e "My Domain Checker = https://www.whatsmydns.net/#A/tetris.$MyDomain"
My Domain Checker = https://www.whatsmydns.net/#A/tetris.kgetall.click

# 웹 접속 주소 확인 및 접속
echo -e "Tetris Game URL = http://tetris.$MyDomain"
Tetris Game URL = http://tetris.kgetall.click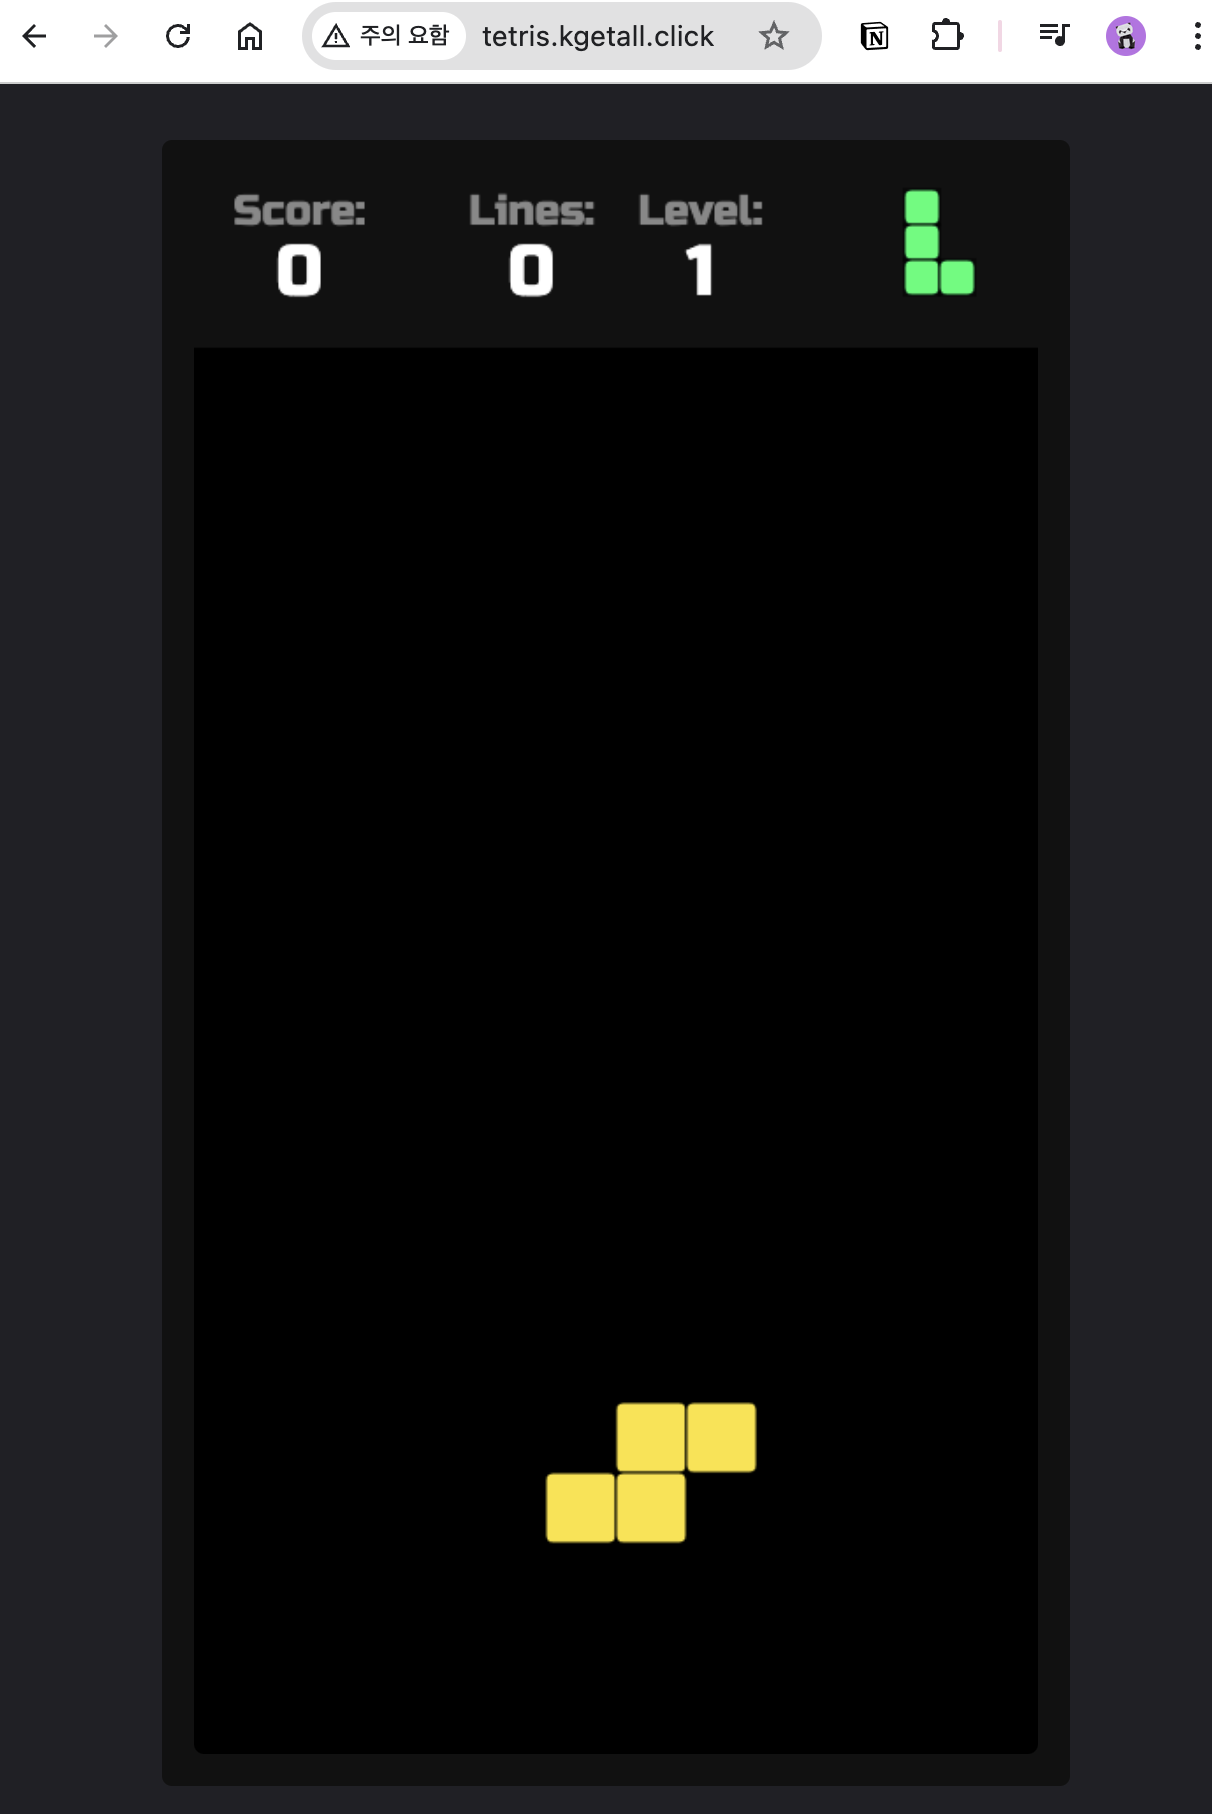
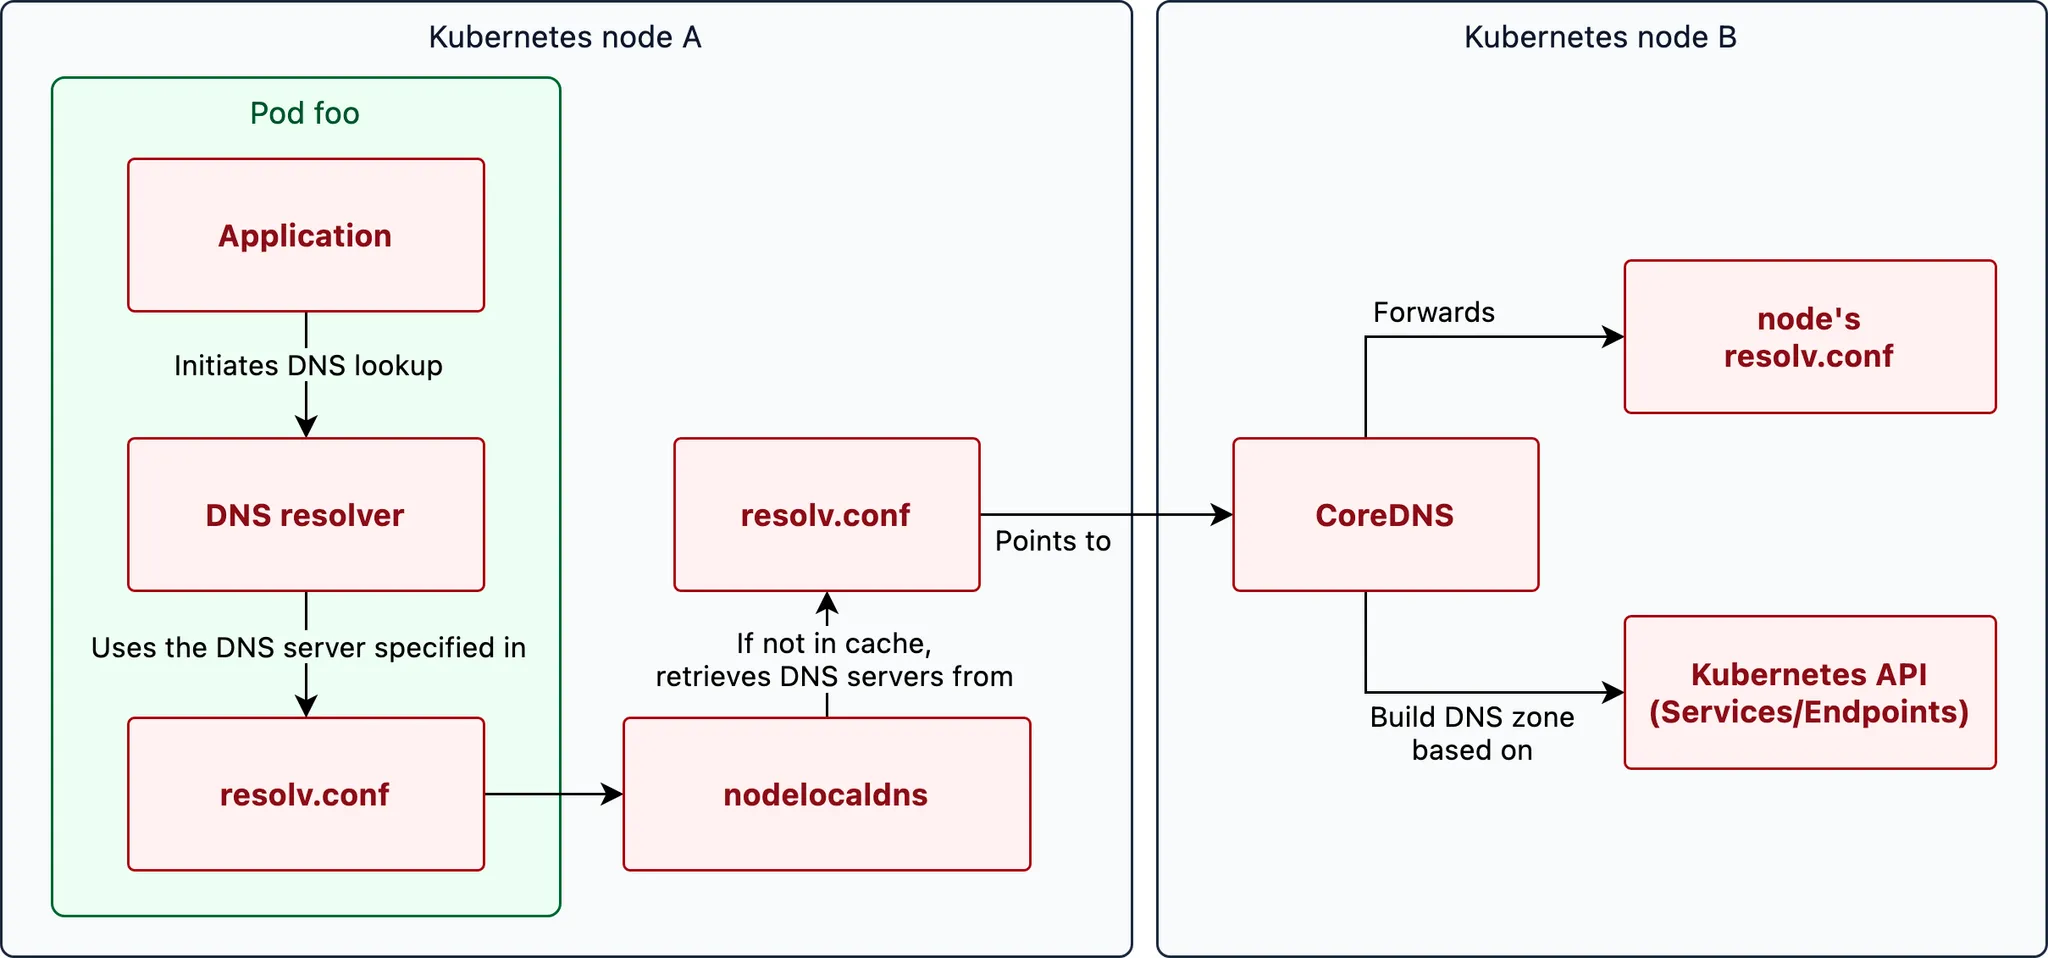
9. CoreDNS
쿠버네티스 DNS 쿼리 Flow 관련 Link
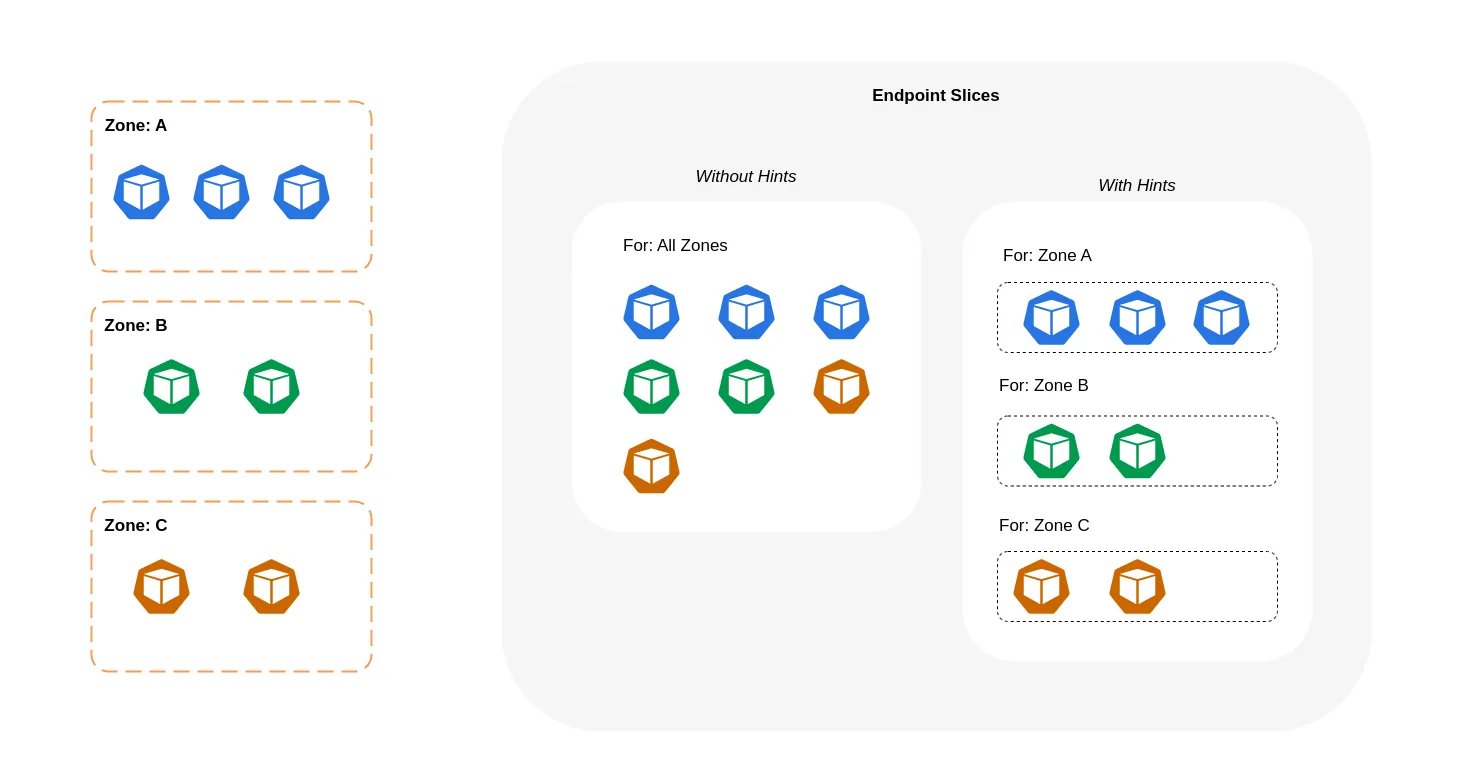
10. Topology Aware Routing
AWS에서 제공하는 Topology Aware Routing은 Amazon EKS(Kubernetes)를 위한 기능으로, 클러스터 내에서 Pod 간 트래픽이 가장 효율적인 경로로 전송되도록 돕습니다. 이 기능은 클러스터가 여러 가용 영역(AZ)에서 실행될 때, Pod가 동일한 가용 영역 내에서 다른 Pod에 연결하도록 하여 네트워크 지연을 줄이고 성능을 최적화합니다.
- Topology Aware Routing의 주요 특징
-
로컬 트래픽 라우팅: 클러스터 내에서 네트워크 트래픽을 동일한 가용 영역 내의 Pod들 간에 우선적으로 라우팅합니다. 이를 통해 지연 시간이 줄어들고 네트워크 효율이 향상됩니다.
-
고가용성 및 장애 복구: 동일한 가용 영역에 트래픽이 과부하되거나 문제가 발생할 경우, Topology Aware Routing은 다른 가용 영역으로 트래픽을 분산시켜 고가용성을 유지합니다.
-
자동화된 네트워크 최적화: Topology Aware Routing은 Kubernetes의 네트워크 정책과 통합되어 트래픽을 동적으로 조정하므로, 사용자가 별도로 설정할 필요 없이 네트워크 라우팅이 최적화됩니다.
-
EKS 및 AWS 리소스 통합: Amazon EKS에서 제공되므로 AWS 리소스와 직접 통합되며, AWS의 네트워크 구조를 활용해 높은 성능을 유지할 수 있습니다.
10.1 테스트를 위한 디플로이먼트와 서비스 배포
# 현재 노드 AZ 배포 확인
kubectl get node --label-columns=topology.kubernetes.io/zone
NAME                                               STATUS   ROLES    AGE   VERSION                ZONE
ip-192-168-1-77.ap-northeast-2.compute.internal    Ready    <none>   16h   v1.30.4-eks-a737599   ap-northeast-2a
ip-192-168-2-103.ap-northeast-2.compute.internal   Ready    <none>   16h   v1.30.4-eks-a737599   ap-northeast-2b
ip-192-168-3-251.ap-northeast-2.compute.internal   Ready    <none>   16h   v1.30.4-eks-a737599   ap-northeast-2

# 테스트를 위한 디플로이먼트와 서비스 배포
cat <<EOF | kubectl apply -f -
apiVersion: apps/v1
kind: Deployment
metadata:
  name: deploy-echo
spec:
  replicas: 3
  selector:
    matchLabels:
      app: deploy-websrv
  template:
    metadata:
      labels:
        app: deploy-websrv
    spec:
      terminationGracePeriodSeconds: 0
      containers:
      - name: websrv
        image: registry.k8s.io/echoserver:1.5
        ports:
        - containerPort: 8080
---
apiVersion: v1
kind: Service
metadata:
  name: svc-clusterip
spec:
  ports:
    - name: svc-webport
      port: 80
      targetPort: 8080
  selector:
    app: deploy-websrv
  type: ClusterIP
EOF

# 확인
kubectl get deploy,svc,ep,endpointslices
kubectl get pod -owide
kubectl get svc,ep svc-clusterip
kubectl get endpointslices -l kubernetes.io/service-name=svc-clusterip
kubectl get endpointslices -l kubernetes.io/service-name=svc-clusterip -o yaml

# 접속 테스트를 수행할 클라이언트 파드 배포
cat <<EOF | kubectl apply -f -
apiVersion: v1
kind: Pod
metadata:
  name: netshoot-pod
spec:
  containers:
  - name: netshoot-pod
    image: nicolaka/netshoot
    command: ["tail"]
    args: ["-f", "/dev/null"]
  terminationGracePeriodSeconds: 0
EOF

# 확인
kubectl get pod -owide
10.2 테스트 파드(netshoot-pod)에서 ClusterIP 접속 시 부하분산 확인
# 디플로이먼트 파드가 배포된 AZ(zone) 확인
kubectl get pod -l app=deploy-websrv -owide
# 테스트 파드(netshoot-pod)에서 ClusterIP 접속 시 부하분산 확인
kubectl exec -it netshoot-pod -- curl svc-clusterip | grep Hostname
Hostname: deploy-echo-7f67d598dc-h9vst

kubectl exec -it netshoot-pod -- curl svc-clusterip | grep Hostname
Hostname: deploy-echo-7f67d598dc-45trg
수동 명령어를 수행하여 부하분산되는 것을 확인

# 100번 반복 접속 : 3개의 파드로 AZ(zone) 상관없이 랜덤 확률 부하분산 동작
kubectl exec -it netshoot-pod -- zsh -c "for i in {1..100}; do curl -s svc-clusterip | grep Hostname; done | sort | uniq -c | sort -nr"
  35 Hostname: deploy-echo-7f67d598dc-45trg
  33 Hostname: deploy-echo-7f67d598dc-hg995
  32 Hostname: deploy-echo-7f67d598dc-h9vst
100번 반복으로 명령어 수행하여 부하분산되는 것을 확인

10.3 Topology Mode(구 Aware Hint) 설정 후 테스트 파드(netshoot-pod)에서 ClusterIP 접속 시 부하분산 확인
같은 AZ(zone)의 목적지 파드로만 접속. 엔드포인트가 트래픽을 제공해야 하는 영역을 설명합니다. 그런 다음 적용된 kube-proxy 에 따라 영역에서 엔드포인트로 트래픽을 라우팅 합니다.
# Topology Aware Routing 설정 : 서비스에 annotate에 아래처럼 추가
kubectl annotate service svc-clusterip "service.kubernetes.io/topology-mode=auto"

# 100번 반복 접속 : 테스트 파드(netshoot-pod)와 같은 AZ(zone)의 목적지 파드로만 접속
kubectl exec -it netshoot-pod -- zsh -c "for i in {1..100}; do curl -s svc-clusterip | grep Hostname; done | sort | uniq -c | sort -nr"
  100 Hostname: deploy-echo-7f67d598dc-45trg
같은 곳으로만 접속됨

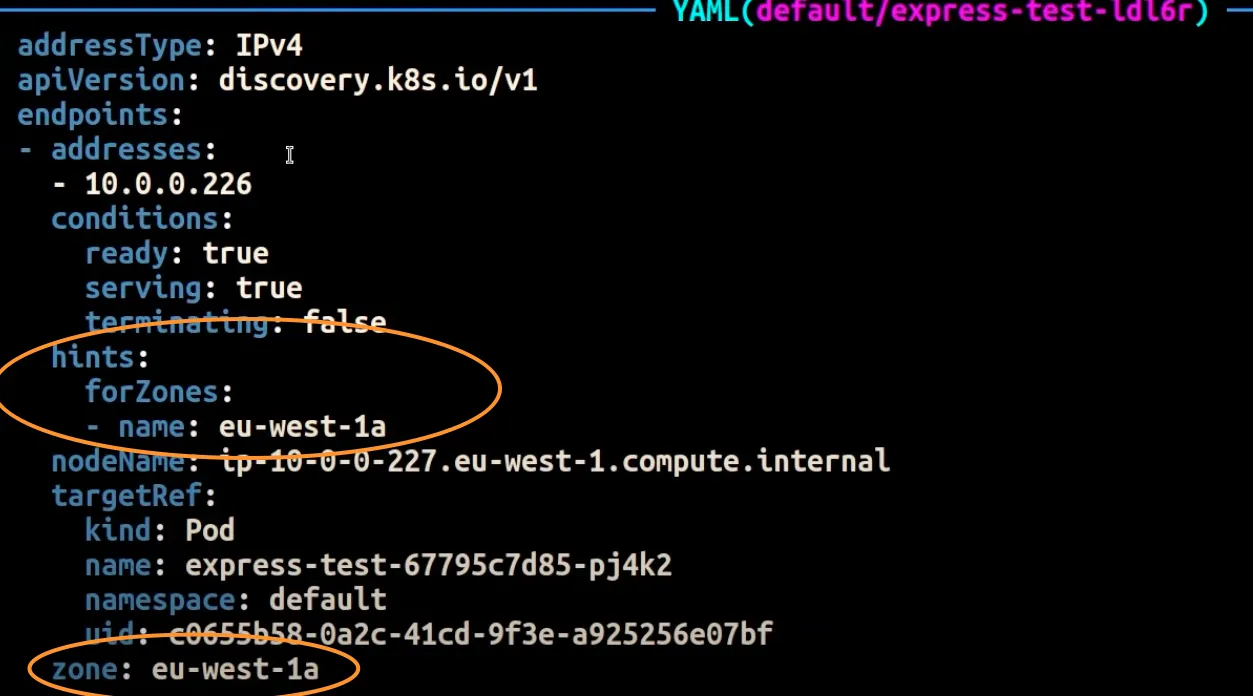
# endpointslices 확인 시, 기존에 없던 hints 가 추가되어 있음 >> 참고로 describe로는 hints 정보가 출력되지 않음
kubectl get endpointslices -l kubernetes.io/service-name=svc-clusterip -o yaml
apiVersion: v1
items:
- addressType: IPv4
  apiVersion: discovery.k8s.io/v1
  endpoints:
  - addresses:
    - 192.168.3.13
    conditions:
      ready: true
      serving: true
      terminating: false
    hints:
      forZones:
      - name: ap-northeast-2c
    nodeName: ip-192-168-3-228.ap-northeast-2.compute.internal
    targetRef:
      kind: Pod
      name: deploy-echo-7f67d598dc-hg995
      namespace: default
      uid: c1ce0e9c-14e7-417d-a1b9-2dfd54da8d4a
    zone: ap-northeast-2c
  - addresses:
    - 192.168.2.65
    conditions:
      ready: true
      serving: true
      terminating: false
    hints:
      forZones:
      - name: ap-northeast-2b
    nodeName: ip-192-168-2-248.ap-northeast-2.compute.internal
    targetRef:
      kind: Pod
      name: deploy-echo-7f67d598dc-h9vst
      namespace: default
      uid: 77af6a1b-c600-456c-96f3-e1af621be2af
    zone: ap-northeast-2b
  - addresses:
    - 192.168.1.240
    conditions:
      ready: true
      serving: true
      terminating: false
    hints:
      forZones:
      - name: ap-northeast-2a
    nodeName: ip-192-168-1-225.ap-northeast-2.compute.internal
    targetRef:
      kind: Pod
      name: deploy-echo-7f67d598dc-45trg
      namespace: default
      uid: 53ca3ac7-b9fb-4d98-a3f5-c312e60b1e67
    zone: ap-northeast-2a
  kind: EndpointSlice
...- IPTables 정책 확인 : ClusterIP는 KUBE-SVC-Y → KUBE-SEP-Z… (1곳, 해당 노드와 같은 AZ에 배포된 파드만 출력) ⇒ 동일 AZ간 접속
ssh ec2-user@$N1 sudo iptables -v --numeric --table nat --list KUBE-SERVICES
# 노드1에서 SVC 정책 확인 : SEP(Endpoint) 파드 1개 확인(해당 노드와 같은 AZ에 배포된 파드만 출력) >> 동일 AZ간 접속
ssh ec2-user@$N1 sudo iptables -v --numeric --table nat --list KUBE-SVC-KBDEBIL6IU6WL7RF
Chain KUBE-SVC-KBDEBIL6IU6WL7RF (1 references)
 pkts bytes target     prot opt in     out     source               destination
    0     0 KUBE-SEP-WC4ARU3RZJKCUD7M  all  --  *      *       0.0.0.0/0            0.0.0.0/0            /* default/svc-clusterip:svc-webport -> 192.168.1.240:8080 */
# 노드2에서 SVC 정책 확인 : SEP(Endpoint) 파드 1개 확인(해당 노드와 같은 AZ에 배포된 파드만 출력) >> 동일 AZ간 접속
ssh ec2-user@$N2 sudo iptables -v --numeric --table nat --list KUBE-SVC-KBDEBIL6IU6WL7RF
Chain KUBE-SVC-KBDEBIL6IU6WL7RF (1 references)
 pkts bytes target     prot opt in     out     source               destination
    0     0 KUBE-SEP-3HFAJH523NG6SBCX  all  --  *      *       0.0.0.0/0            0.0.0.0/0            /* default/svc-clusterip:svc-webport -> 192.168.2.36:8080 */
# 노드3에서 SVC 정책 확인 : SEP(Endpoint) 파드 1개 확인(해당 노드와 같은 AZ에 배포된 파드만 출력) >> 동일 AZ간 접속
ssh ec2-user@$N3 sudo iptables -v --numeric --table nat --list KUBE-SVC-KBDEBIL6IU6WL7RF
Chain KUBE-SVC-KBDEBIL6IU6WL7RF (1 references)
 pkts bytes target     prot opt in     out     source               destination
    0     0 KUBE-SEP-H37XIVQWZO52OMNP  all  --  *      *       0.0.0.0/0            0.0.0.0/0            /* default/svc-clusterip:svc-webport -> 192.168.3.13:8080 */
- 파드 갯수를 1개로 줄여서 같은 AZ에 목적지 파드가 없을 경우 테스트
# 파드 갯수를 1개로 줄이기
kubectl scale deployment deploy-echo --replicas 1
# 동일 AZ일 경우 0 -> 1 시도
kubectl scale deployment deploy-echo --replicas 0
kubectl scale deployment deploy-echo --replicas 1

# 파드 AZ 확인 : 아래 처럼 현재 다른 AZ에 배포
kubectl get pod -owide
NAME                           READY   STATUS    RESTARTS   AGE   IP              NODE                                               NOMINATED NODE   READINESS GATES
deploy-echo-7f67d598dc-h9vst   1/1     Running   0          18m   192.168.2.65    ip-192-168-2-248.ap-northeast-2.compute.internal   <none>           <none>
netshoot-pod                   1/1     Running   0          66m   192.168.1.137   ip-192-168-1-225.ap-northeast-2.compute.internal   <none>           <none>

# 100번 반복 접속 : 다른 AZ이지만 목적지파드로 접속됨!
kubectl exec -it netshoot-pod -- zsh -c "for i in {1..100}; do curl -s svc-clusterip | grep Hostname; done | sort | uniq -c | sort -nr"
  100 Hostname: deploy-echo-7f67d598dc-h9vst


ssh ec2-user@$N1 sudo iptables -v --numeric --table nat --list KUBE-SERVICES

# 아래 3개 노드 모두 SVC에 1개의 SEP 정책 존재
ssh ec2-user@$N1 sudo iptables -v --numeric --table nat --list KUBE-SVC-KBDEBIL6IU6WL7RF
Chain KUBE-SVC-KBDEBIL6IU6WL7RF (1 references)
 pkts bytes target     prot opt in     out     source               destination
    0     0 KUBE-SEP-X3DNVJ32VDVM4MNK  all  --  *      *       0.0.0.0/0            0.0.0.0/0            /* default/svc-clusterip:svc-webport -> 192.168.1.107:8080 */

ssh ec2-user@$N2 sudo iptables -v --numeric --table nat --list Chain KUBE-SVC-KBDEBIL6IU6WL7RF (1 references)
 pkts bytes target     prot opt in     out     source               destination
    0     0 KUBE-SEP-X3DNVJ32VDVM4MNK  all  --  *      *       0.0.0.0/0            0.0.0.0/0            /* default/svc-clusterip:svc-webport -> 192.168.1.107:8080 */

ssh ec2-user@$N3 sudo iptables -v --numeric --table nat --list KUBE-SVC-KBDEBIL6IU6WL7RF
Chain KUBE-SVC-KBDEBIL6IU6WL7RF (1 references)
 pkts bytes target     prot opt in     out     source               destination
  100  6000 KUBE-SEP-X3DNVJ32VDVM4MNK  all  --  *      *       0.0.0.0/0            0.0.0.0/0            /* default/svc-clusterip:svc-webport -> 192.168.1.107:8080 */

# endpointslices 확인 : hint 정보 없음
kubectl get endpointslices -l kubernetes.io/service-name=svc-clusterip -o yaml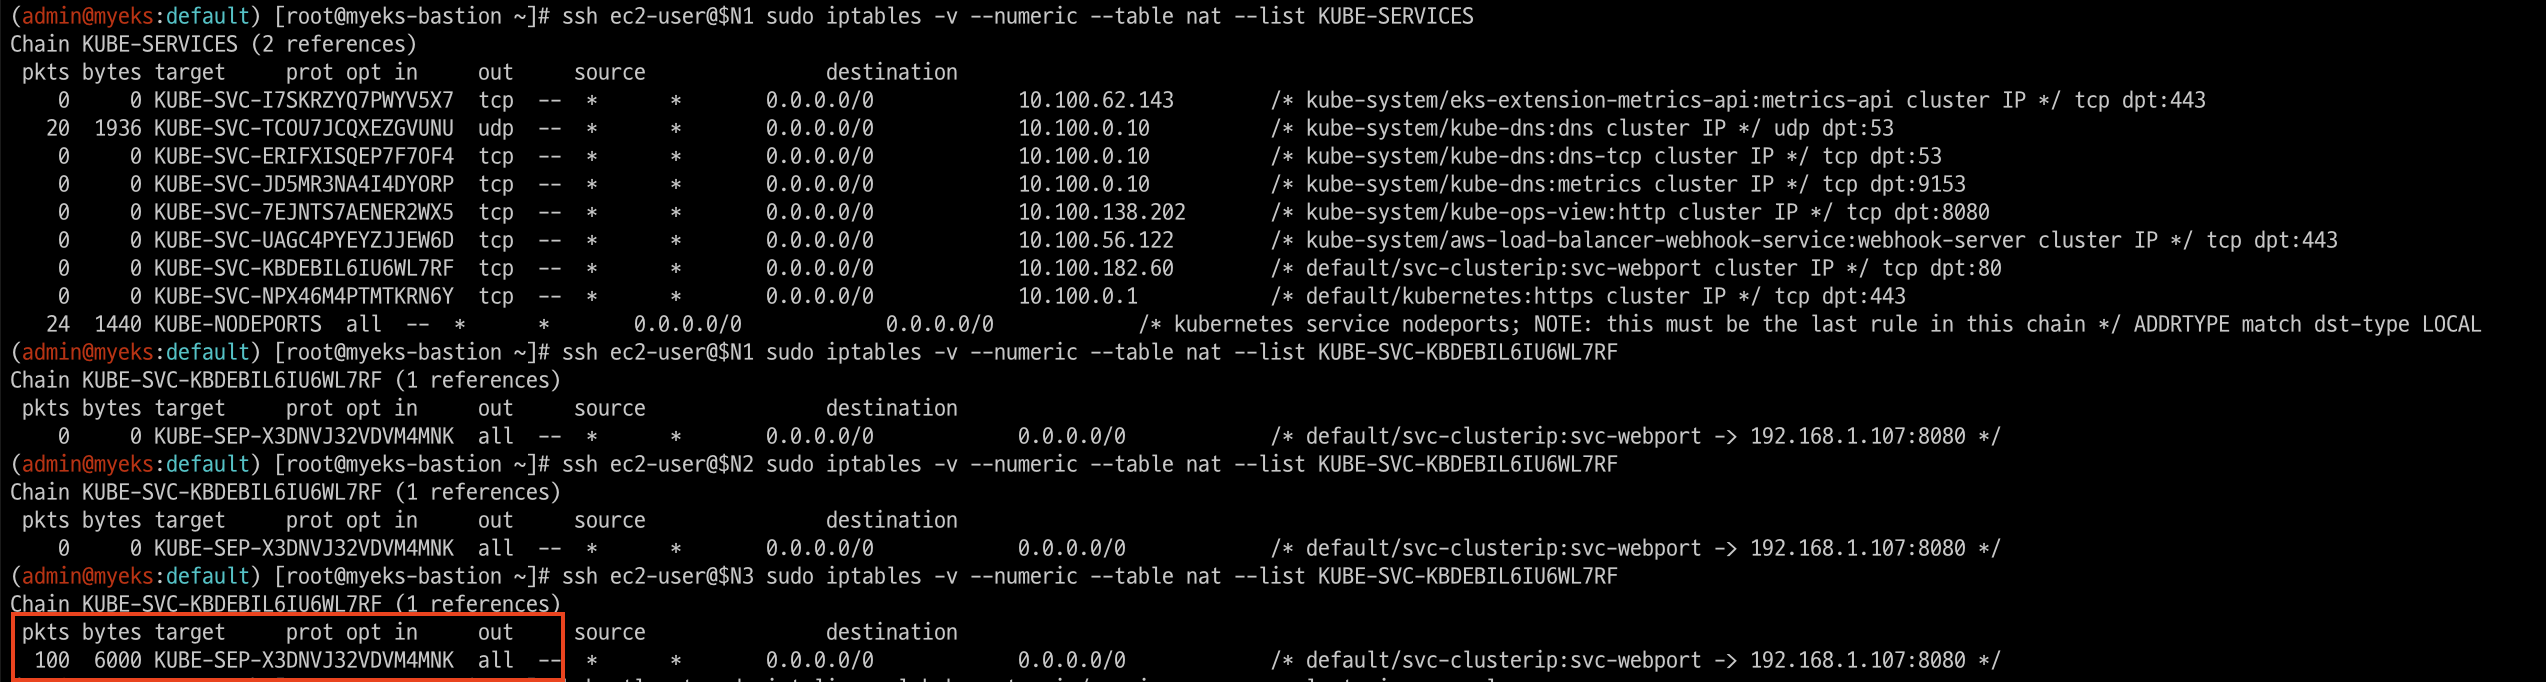
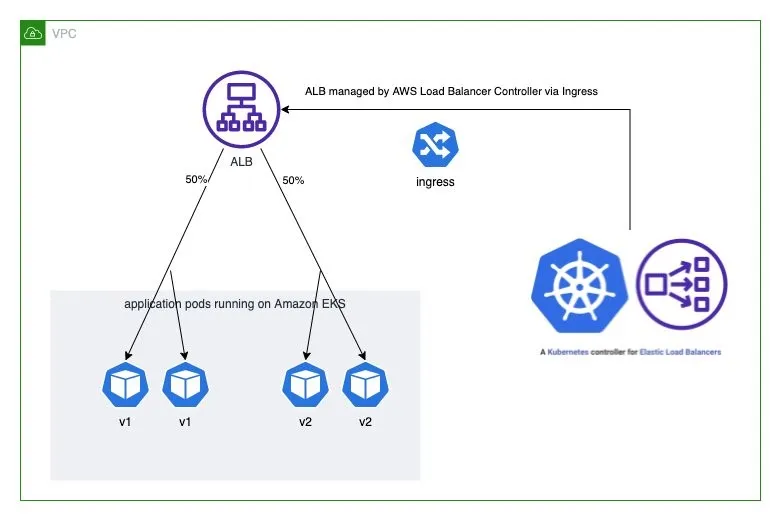
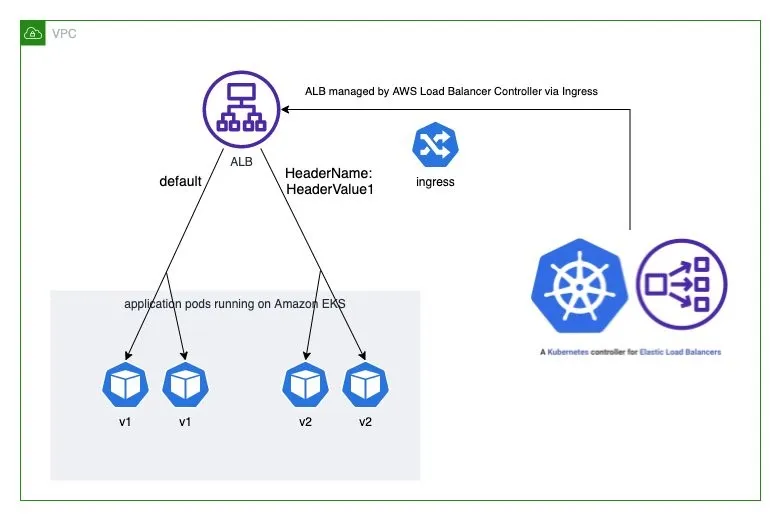
11. Using AWS Load Balancer Controller for blue/green deployment, canary deployment and A/B testing
11.1 ALB 동작 소개
- Weighted target group 가중치가 적용된 대상 그룹
- AWS 고객이 블루/그린 및 카나리아 배포와 A/B 테스트 전략을 채택할 수 있도록 돕기 위해 AWS는 2019년 11월에 애플리케이션 로드 밸런서에 대한 가중 대상 그룹을 발표했습니다. 여러 대상 그룹을 리스너 규칙 의 동일한 전달 작업 에 연결 하고 각 그룹에 대한 가중치를 지정할 수 있습니다.
- 이를 통해 개발자는 트래픽을 여러 버전의 애플리케이션에 분산하는 방법을 제어할 수 있습니다. 예를 들어, 가중치가 8과 2인 두 개의 대상 그룹이 있는 규칙을 정의하면 로드 밸런서는 트래픽의 80%를 첫 번째 대상 그룹으로, 20%를 다른 대상 그룹으로 라우팅합니다.
- Advanced request routing 고급 요청 라우팅
- AWS는 가중치가 적용된 대상 그룹 외에도 2019년에 고급 요청 라우팅 기능을 발표했습니다 . 고급 요청 라우팅은 개발자에게 표준 및 사용자 지정 HTTP 헤더와 메서드, 요청 경로, 쿼리 문자열, 소스 IP 주소를 기반으로 규칙을 작성하고 트래픽을 라우팅할 수 있는 기능을 제공합니다.
- 이 새로운 기능은 라우팅을 위한 프록시 플릿의 필요성을 없애 애플리케이션 아키텍처를 간소화하고, 로드 밸런서에서 원치 않는 트래픽을 차단하며, A/B 테스트를 구현할 수 있도록 합니다.
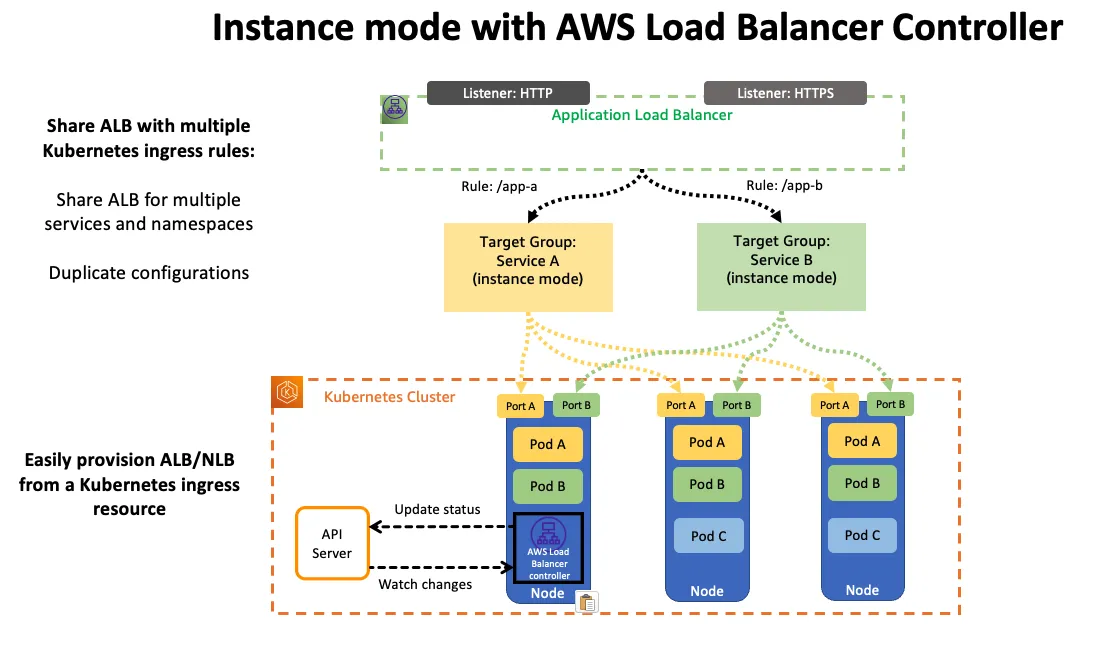
- AWS Load Balancer Controller AWS 로드 밸런서 컨트롤러
- AWS Load Balancer Controller 는 Kubernetes 클러스터의 Elastic Load Balancer를 관리하는 데 도움이 되는 컨트롤러입니다. 애플리케이션 로드 밸런서를 프로비저닝하여 Kubernetes 인그레스 리소스를 충족합니다.
- Kubernetes 인그레스 객체에 주석을 추가하여 프로비저닝된 애플리케이션 로드 밸런서의 동작을 사용자 지정할 수 있습니다. 이를 통해 개발자는 애플리케이션 로드 밸런서를 구성하고 Kubernetes 기본 의미 체계를 사용하여 블루/그린, 카나리아 및 A/B 배포를 실현할 수 있습니다.
- 예를 들어, 다음 인그레스 주석은 애플리케이션 로드 밸런서를 구성하여 두 버전의 애플리케이션 간에 트래픽을 분할합니다.
annotations:
   ...
  alb.ingress.kubernetes.io/actions.blue-green: |
    {
      "type":"forward",
      "forwardConfig":{
        "targetGroups":[
          {
            "serviceName":"hello-kubernetes-v1",
            "servicePort":"80",
            "weight":50
          },
          {
            "serviceName":"hello-kubernetes-v2",
            "servicePort":"80",
            "weight":50
          }
        ]
      }
    }
11.2 ALB 실습
11.2.1 application version 1 and version 2 배포
#
git clone https://github.com/paulbouwer/hello-kubernetes.git
tree hello-kubernetes/

# Install sample application version 1
helm install --create-namespace --namespace hello-kubernetes v1 \
  ./hello-kubernetes/deploy/helm/hello-kubernetes \
  --set message="You are reaching hello-kubernetes version 1" \
  --set ingress.configured=true \
  --set service.type="ClusterIP"

# Install sample application version 2
helm install --create-namespace --namespace hello-kubernetes v2 \
  ./hello-kubernetes/deploy/helm/hello-kubernetes \
  --set message="You are reaching hello-kubernetes version 2" \
  --set ingress.configured=true \
  --set service.type="ClusterIP"

# 확인
kubectl get-all -n hello-kubernetes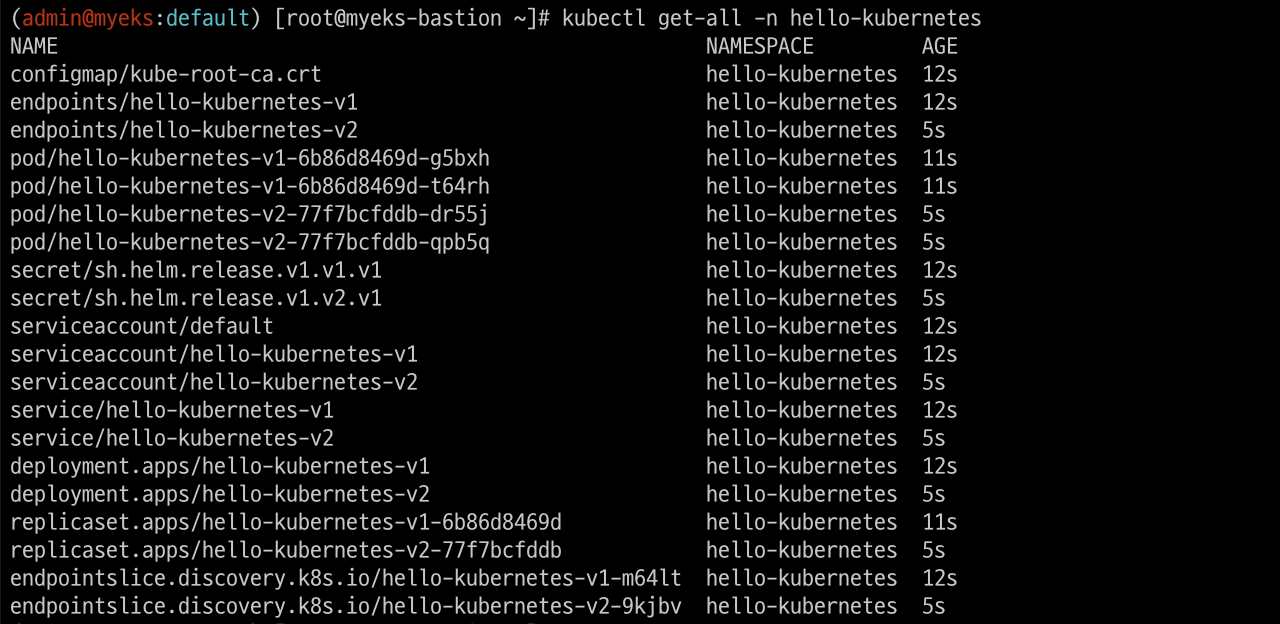
kubectl get pod,svc,ep -n hello-kubernetes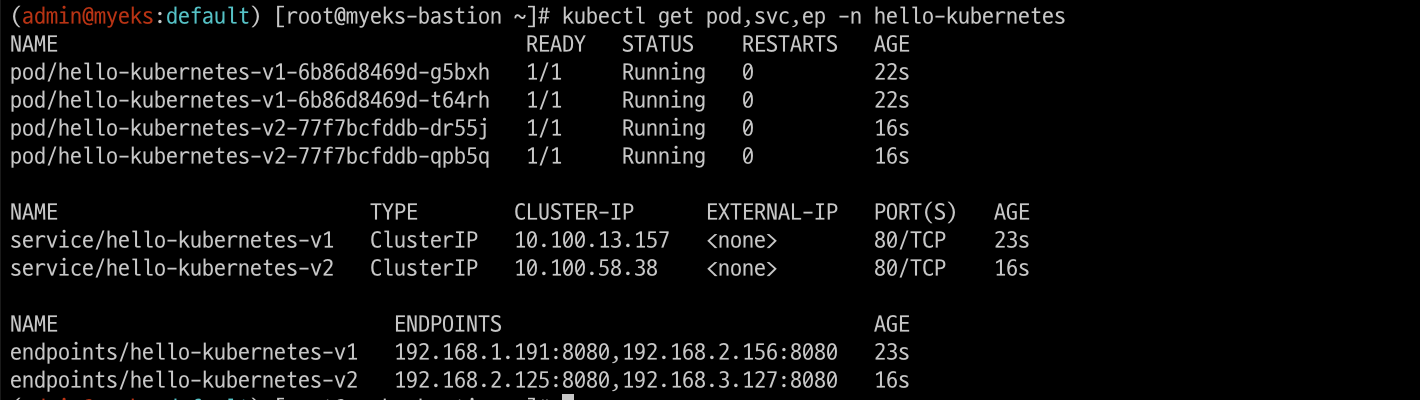
kubectl get pod -n hello-kubernetes --label-columns=app.kubernetes.io/instance,pod-template-hash
11.2.2 Deploy ingress and test the blue/green deployment
#
cat <<EOF | kubectl apply -f -
apiVersion: networking.k8s.io/v1
kind: Ingress
metadata:
  name: "hello-kubernetes"
  namespace: "hello-kubernetes"
  annotations:
    alb.ingress.kubernetes.io/scheme: internet-facing
    alb.ingress.kubernetes.io/target-type: ip
    alb.ingress.kubernetes.io/actions.blue-green: |
      {
        "type":"forward",
        "forwardConfig":{
          "targetGroups":[
            {
              "serviceName":"hello-kubernetes-v1",
              "servicePort":"80",
              "weight":100
            },
            {
              "serviceName":"hello-kubernetes-v2",
              "servicePort":"80",
              "weight":0
            }
          ]
        }
      }
  labels:
    app: hello-kubernetes
spec:
  ingressClassName: alb
  rules:
    - http:
        paths:
          - path: /
            pathType: Prefix
            backend:
              service:
                name: blue-green
                port:
                  name: use-annotation
EOF

# 확인
kubectl get ingress -n hello-kubernetes
kubectl describe ingress -n hello-kubernetes
...
Rules:
  Host        Path  Backends
  ----        ----  --------
  *
              /     blue-green:use-annotation (<error: endpoints "blue-green" not found>)
Annotations:  alb.ingress.kubernetes.io/actions.blue-green:
                {
                  "type":"forward",
                  "forwardConfig":{
                    "targetGroups":[
                      {
                        "serviceName":"hello-kubernetes-v1",
                        "servicePort":"80",
                        "weight":100
                      },
                      {
                        "serviceName":"hello-kubernetes-v2",
                        "servicePort":"80",
                        "weight":0
...

# 반복 접속 확인
ELB_URL=$(kubectl get ingress -n hello-kubernetes -o=jsonpath='{.items[0].status.loadBalancer.ingress[0].hostname}')
while true; do curl -s $ELB_URL | grep version; sleep 1; done
  You are reaching hello-kubernetes version 1
  You are reaching hello-kubernetes version 1
  ...
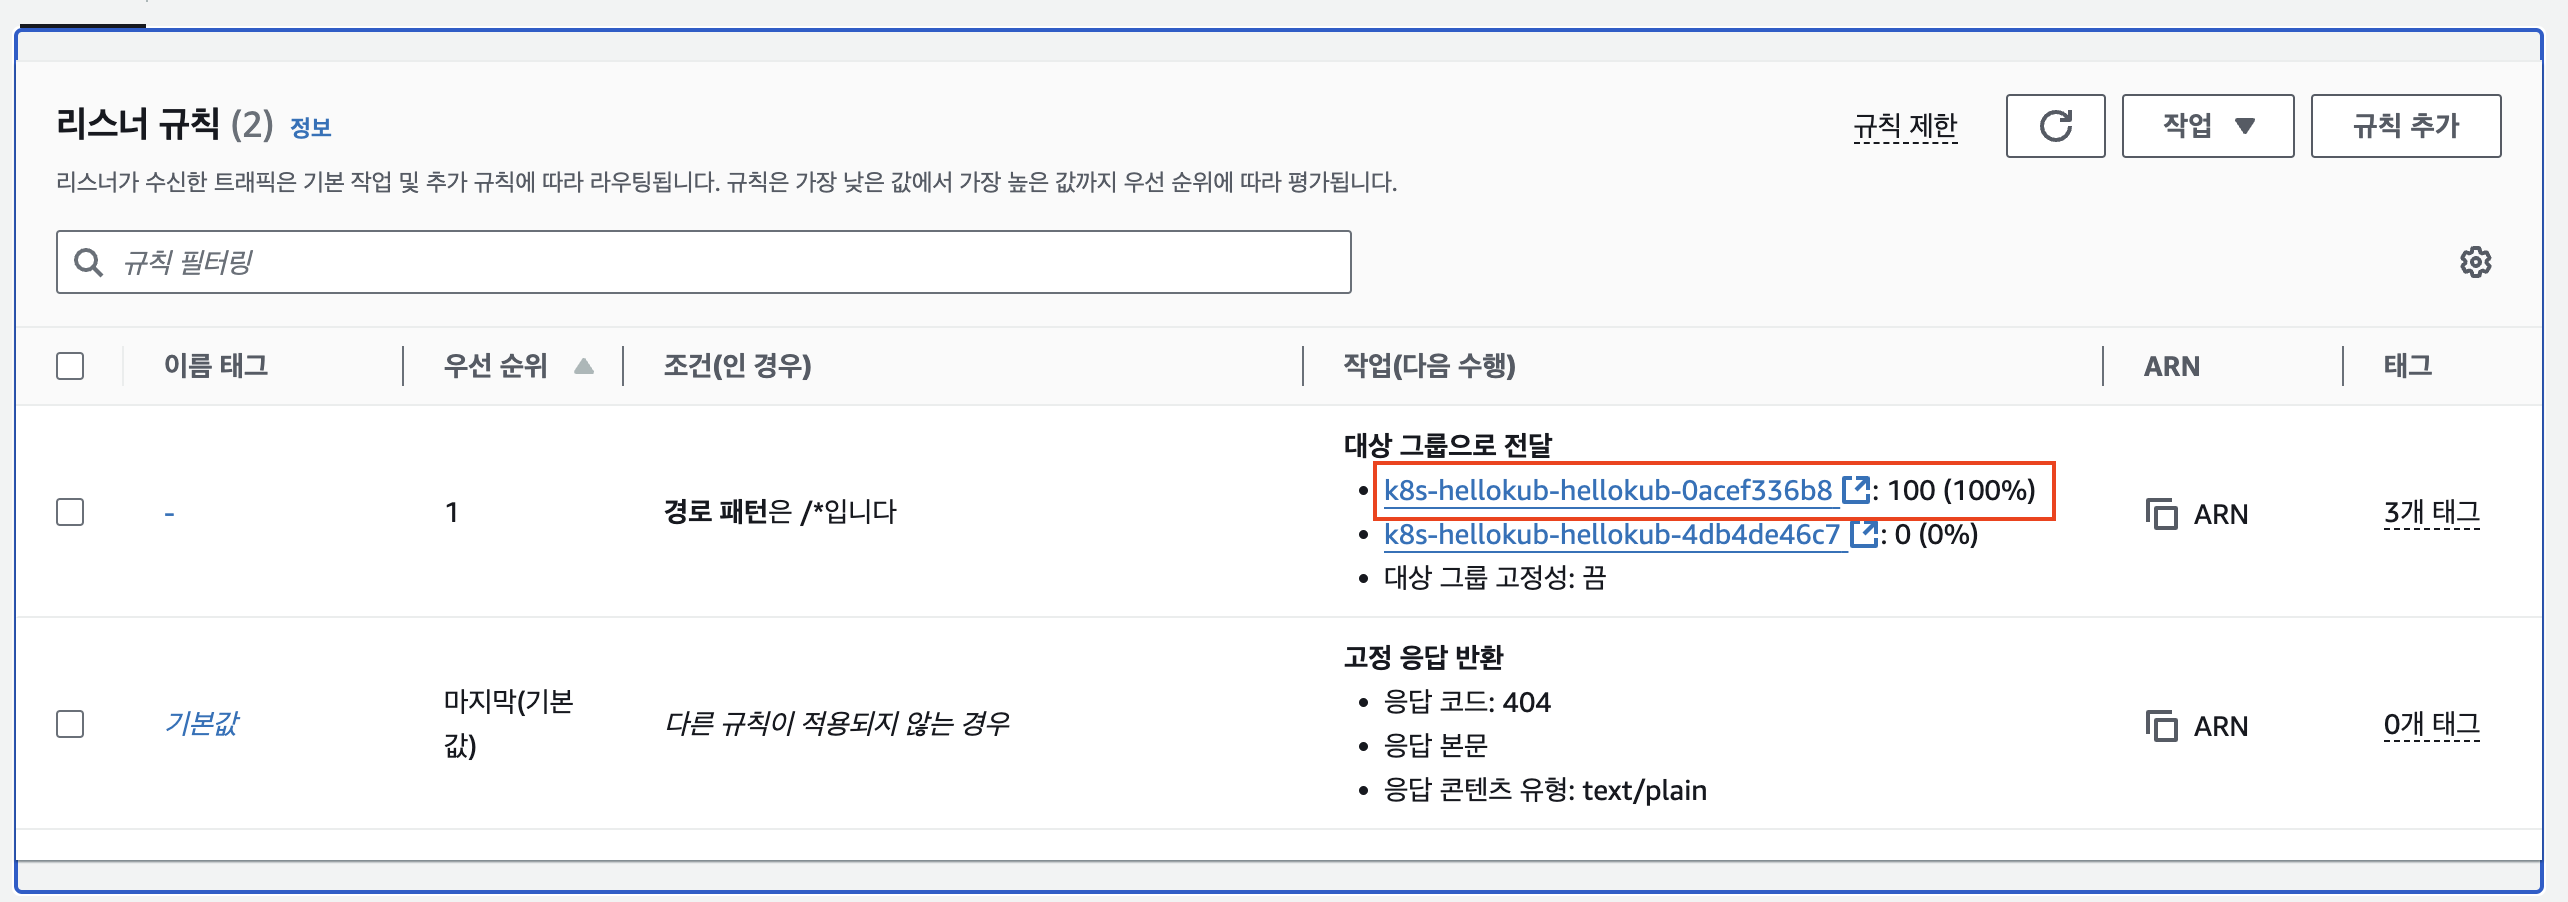
-
ALB Listener rules 에서 2개의 Target group 확인(weight)
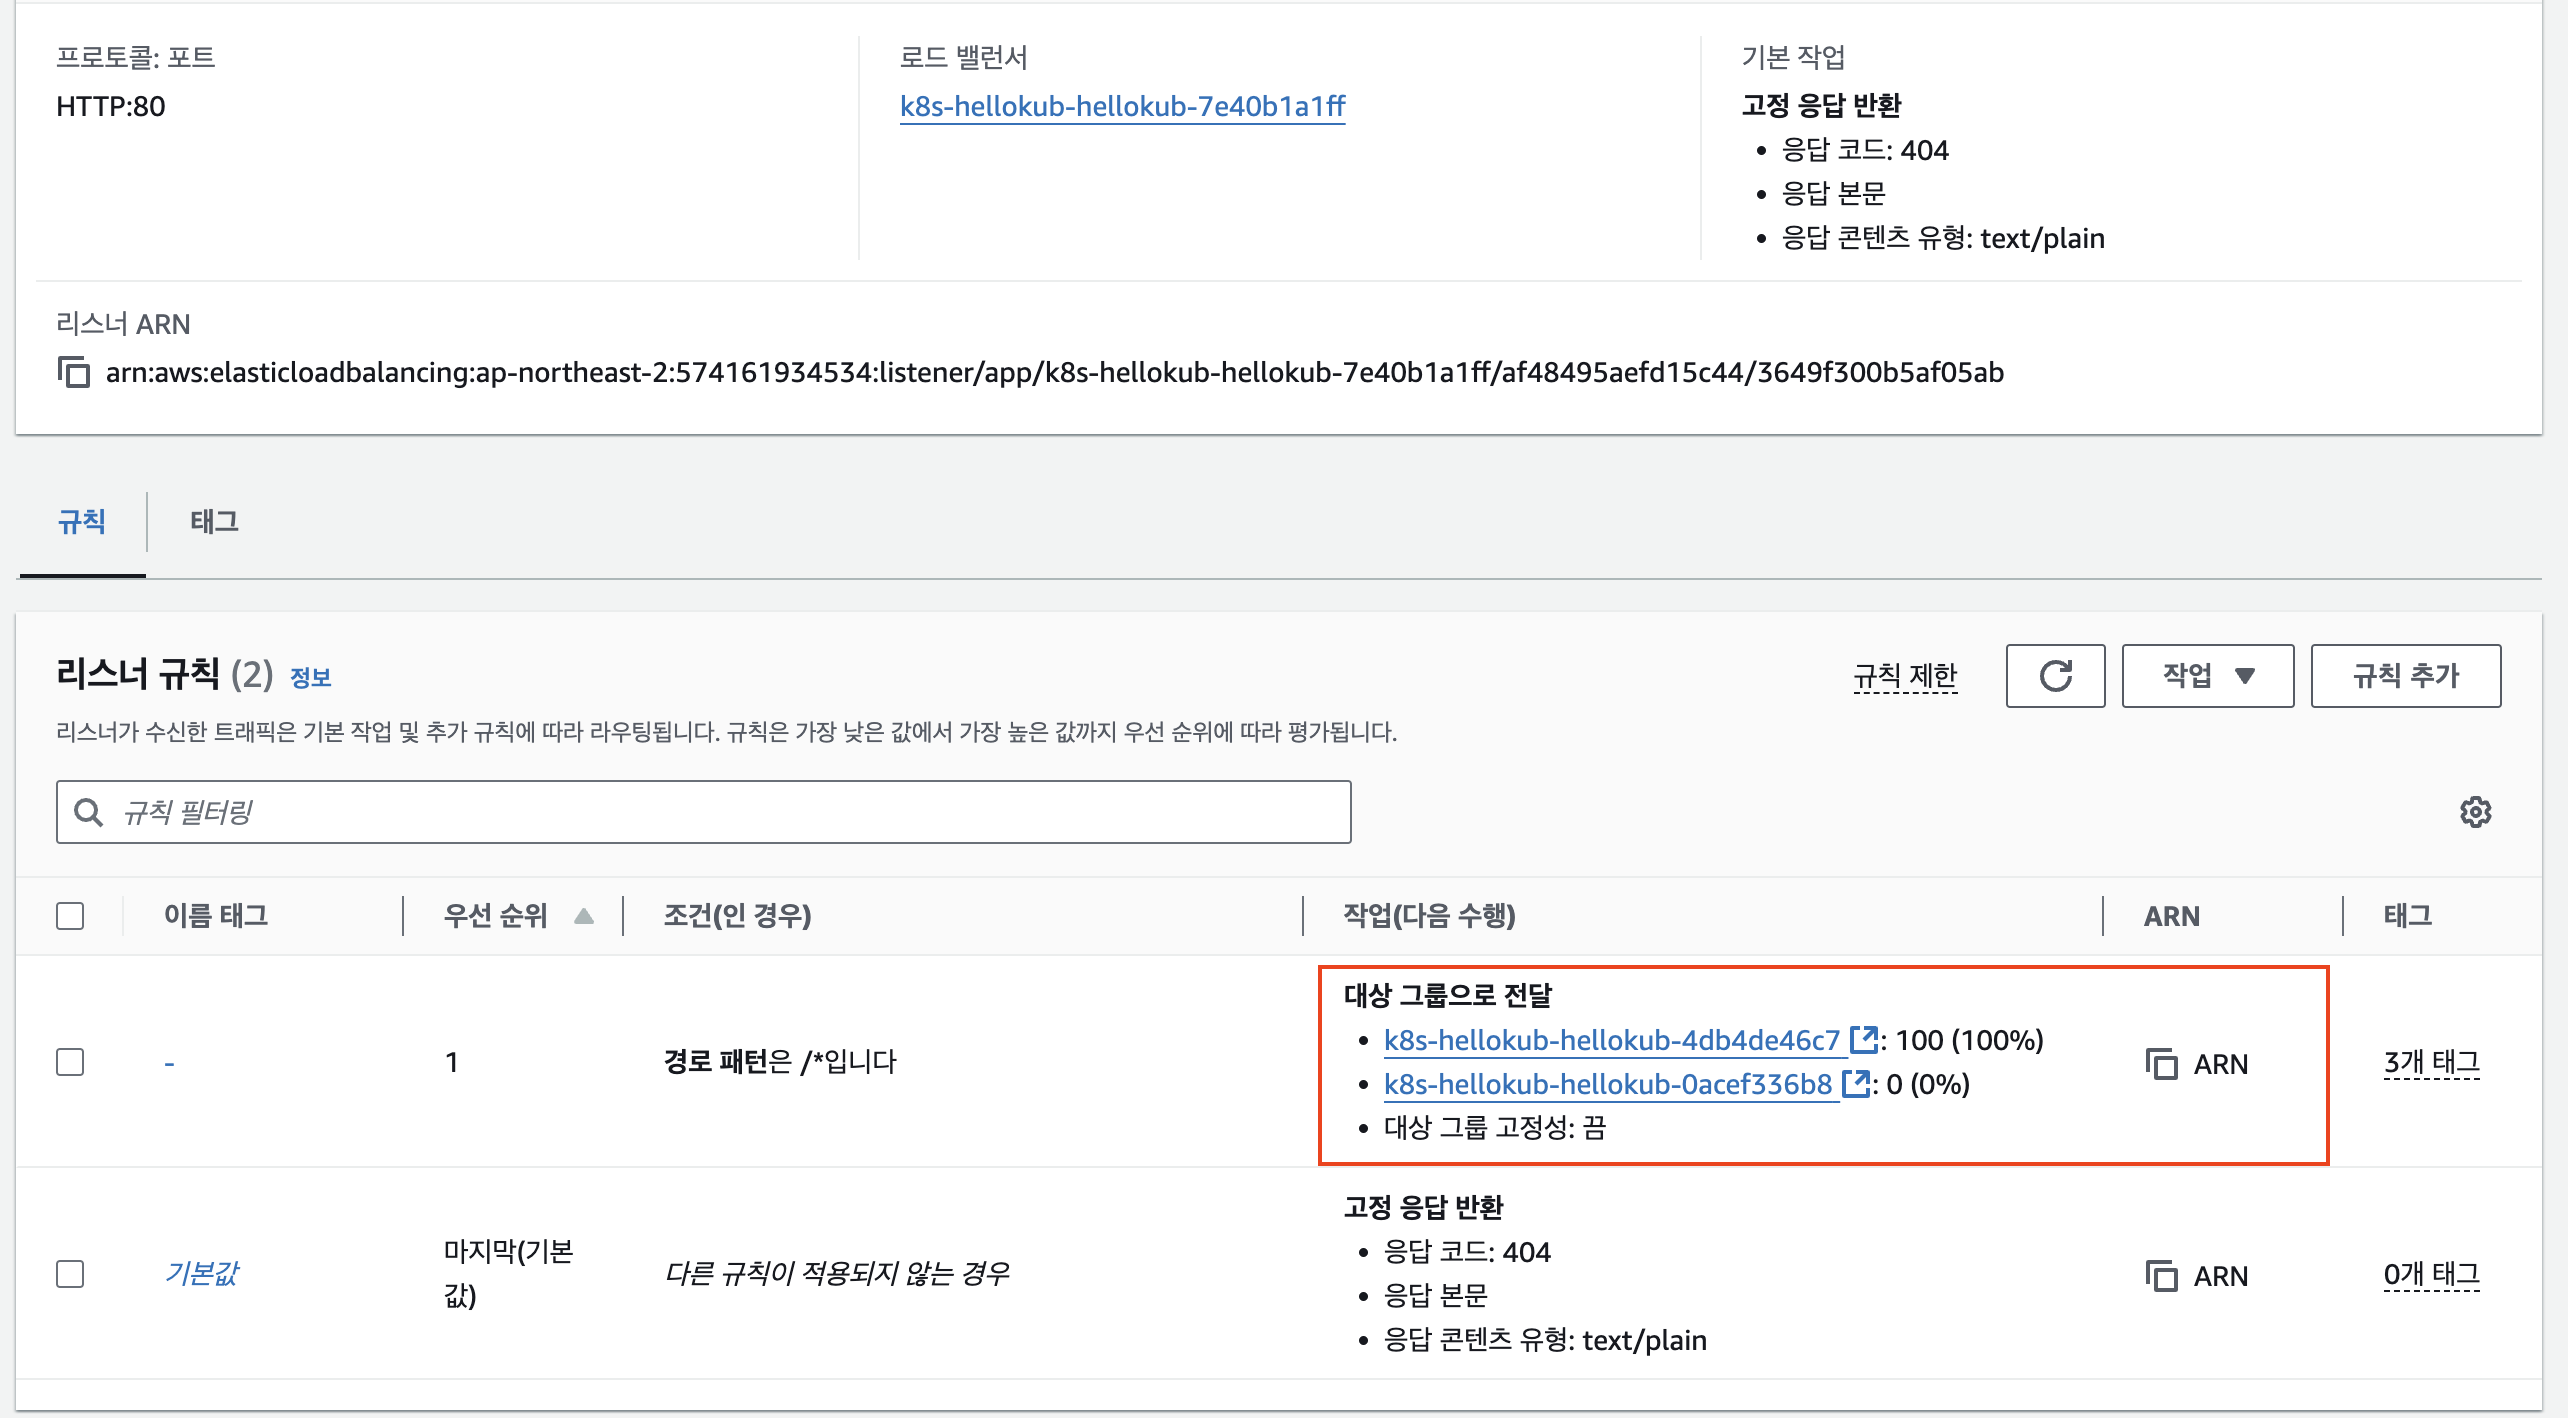
-
version 2로 접속되도록 가중치 변경
#
cat <<EOF | kubectl apply -f -
apiVersion: networking.k8s.io/v1
kind: Ingress
metadata:
name: "hello-kubernetes"
namespace: "hello-kubernetes"
annotations:
alb.ingress.kubernetes.io/scheme: internet-facing
alb.ingress.kubernetes.io/target-type: ip
alb.ingress.kubernetes.io/actions.blue-green: |
{
"type":"forward",
"forwardConfig":{
"targetGroups":[
{
"serviceName":"hello-kubernetes-v1",
"servicePort":"80",
"weight":0
},
{
"serviceName":"hello-kubernetes-v2",
"servicePort":"80",
"weight":100
}
]
}
}
labels:
app: hello-kubernetes
spec:
ingressClassName: alb
rules:
- http:
paths:
- path: /
pathType: Prefix
backend:
service:
name: blue-green
port:
name: use-annotation
EOF
# 확인
kubectl describe ingress -n hello-kubernetes
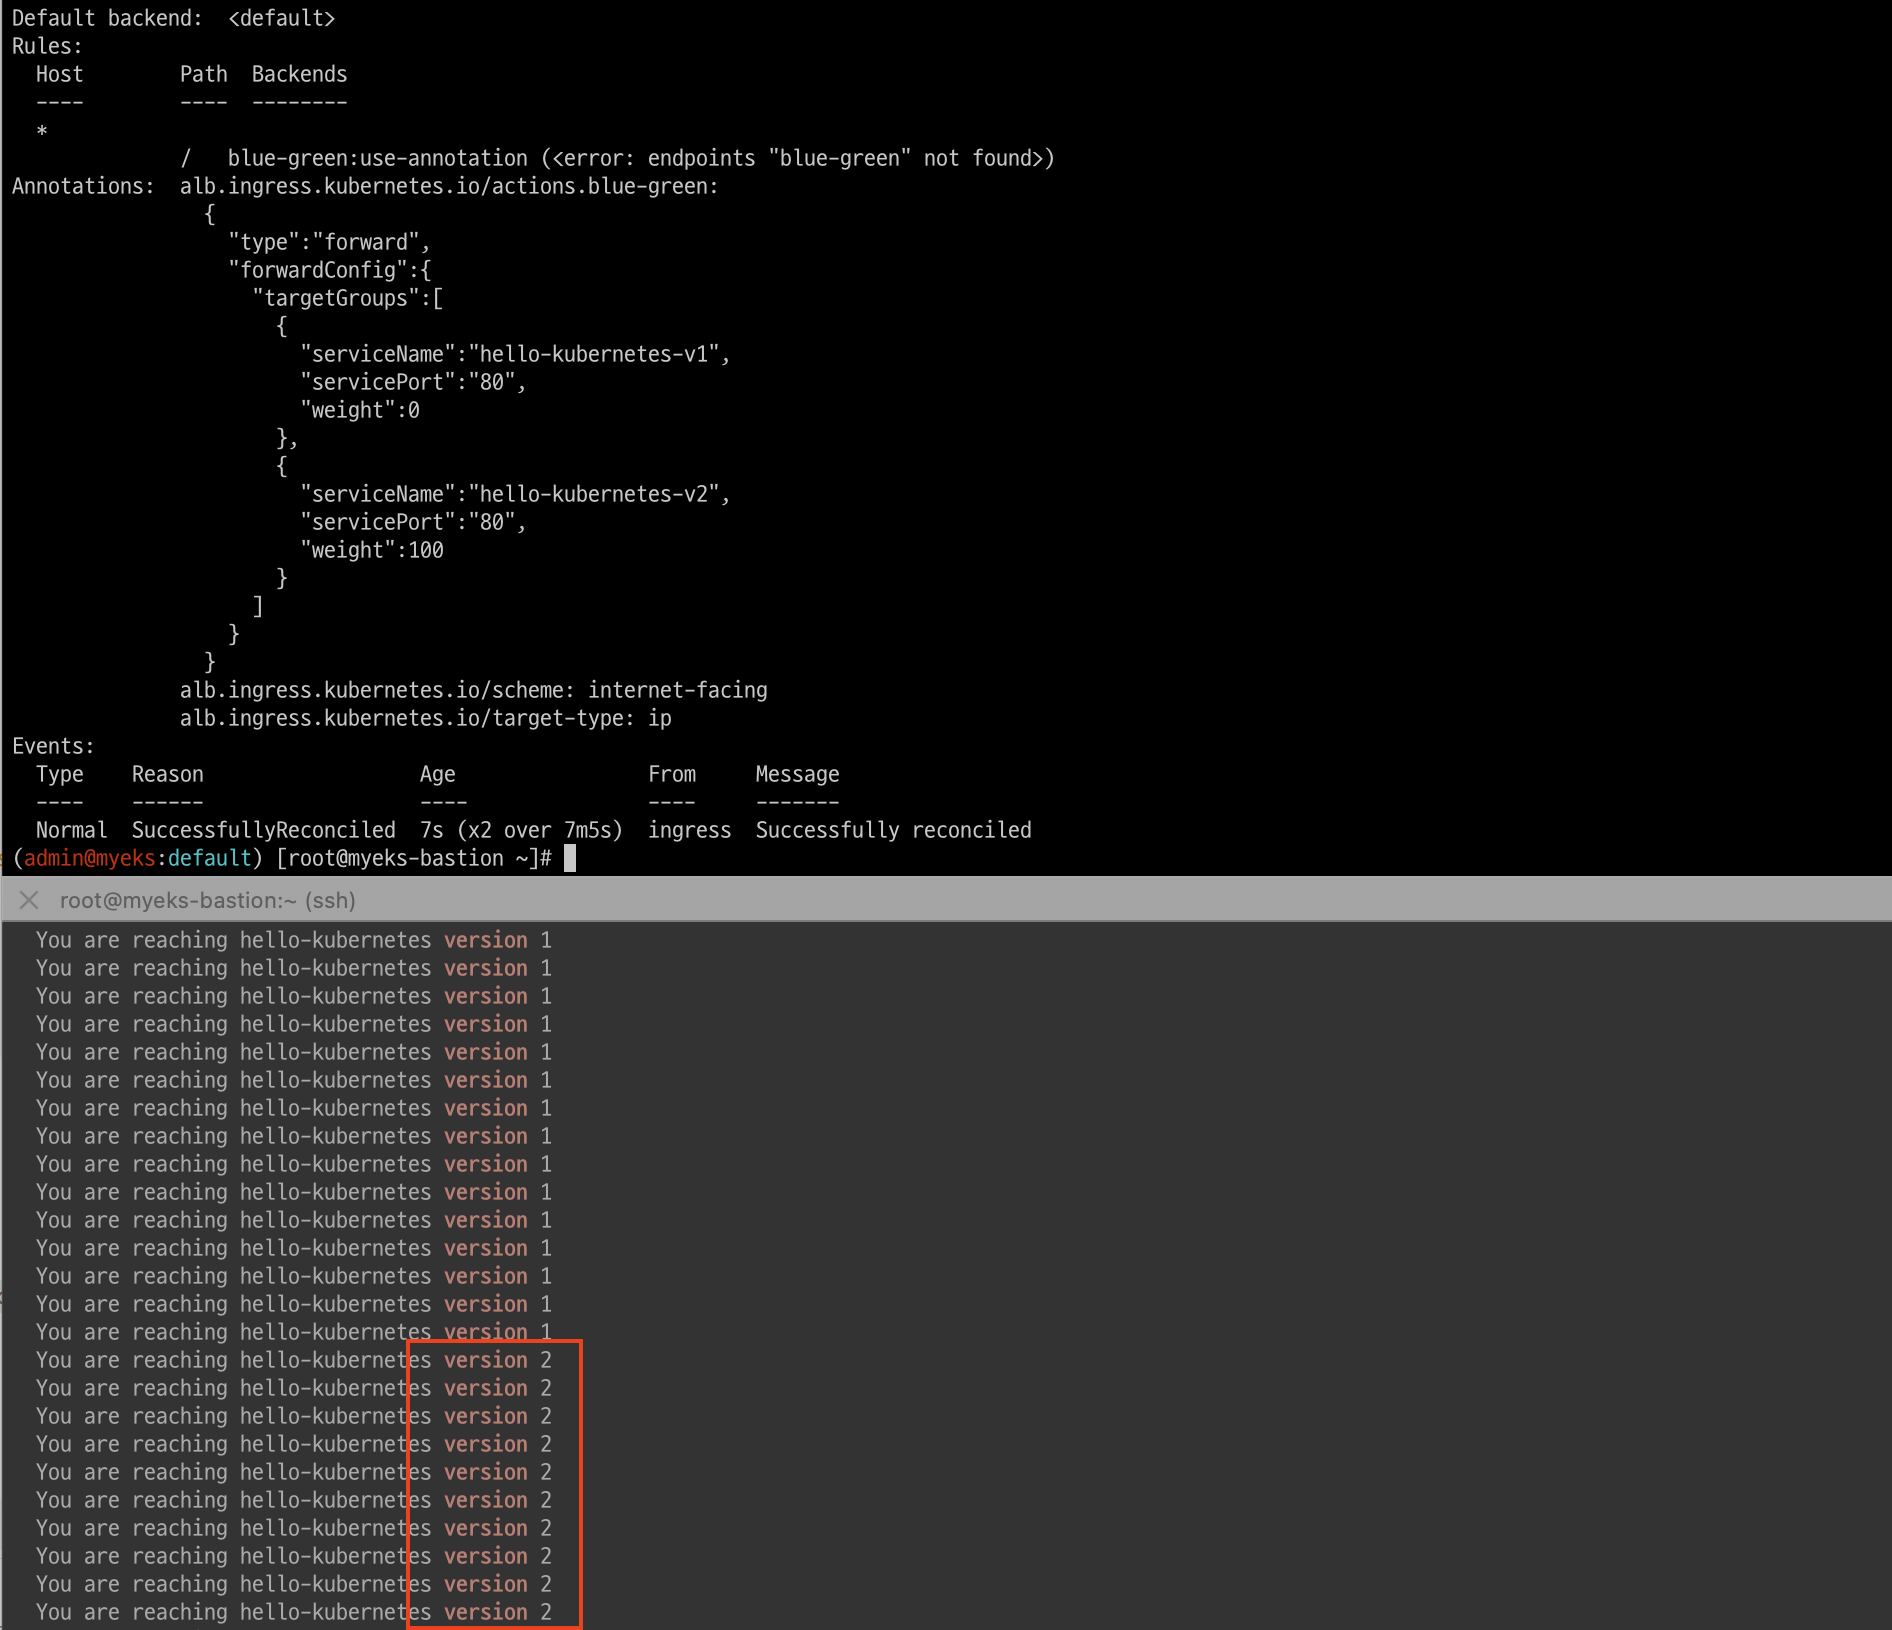
# 반복 접속 확인 : 적용에 약간의 시간 소요
ELB_URL=$(kubectl get ingress -n hello-kubernetes -o=jsonpath='{.items[0].status.loadBalancer.ingress[0].hostname}')
while true; do curl -s $ELB_URL | grep version; sleep 1; done
You are reaching hello-kubernetes version 2
You are reaching hello-kubernetes version 2
...가중치를 버젼2로 변경후 버젼2로 접속되는 것을 확인 할 수 있습니다.
- Deploy ingress and test the A/B testing
#
cat <<EOF | kubectl apply -f -
apiVersion: networking.k8s.io/v1
kind: Ingress
metadata:
name: "hello-kubernetes"
namespace: "hello-kubernetes"
annotations:
alb.ingress.kubernetes.io/scheme: internet-facing
alb.ingress.kubernetes.io/target-type: ip
alb.ingress.kubernetes.io/conditions.ab-testing: >
[{"field":"http-header","httpHeaderConfig":{"httpHeaderName": "HeaderName", "values":["kans-study-end"]}}]
alb.ingress.kubernetes.io/actions.ab-testing: >
{"type":"forward","forwardConfig":{"targetGroups":[{"serviceName":"hello-kubernetes-v2","servicePort":80}]}}
labels:
app: hello-kubernetes
spec:
ingressClassName: alb
rules:
- http:
paths:
- path: /
pathType: Prefix
backend:
service:
name: ab-testing
port:
name: use-annotation
- path: /
pathType: Prefix
backend:
service:
name: hello-kubernetes-v1
port:
name: http
EOF
# 확인
kubectl describe ingress -n hello-kubernetes
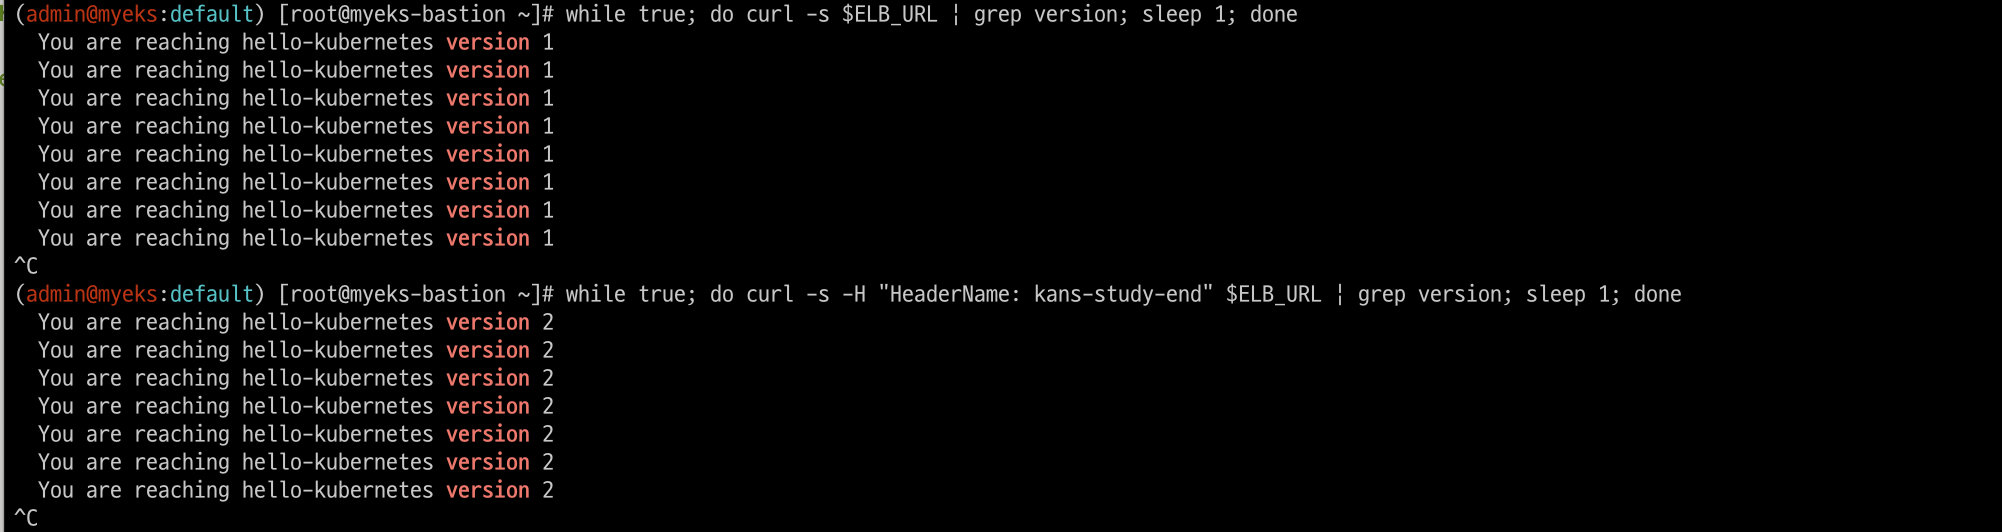
# 반복 접속 확인 : 적용에 약간의 시간 소요
ELB_URL=$(kubectl get ingress -n hello-kubernetes -o=jsonpath='{.items[0].status.loadBalancer.ingress[0].hostname}')
while true; do curl -s $ELB_URL | grep version; sleep 1; done
...
while true; do curl -s -H "HeaderName: kans-study-end" $ELB_URL | grep version; sleep 1; done
...
# 100번 접속
for i in {1..100}; do curl -s $ELB_URL | grep version ; done | sort | uniq -c | sort -nr
for i in {1..100}; do curl -s -H "HeaderName: kans-study-end" $ELB_URL | grep version ; done | sort | uniq -c | sort -nr기본은 version1으로 헤더에 "HeaderName: kans-study-end"가 확인되면 version2로 접속되도록 조건을 주었고 정책대로 각 버젼으로 접속되는 것을 볼 수 있다.

12. Network Policies with VPC CNI
AWS EKS fully supports the upstream Kubernetes Network Policy API, ensuring compatibility and adherence to Kubernetes standards
- 사전 조건 : EKS 1.25 버전 이상, AWS VPC CNI 1.14 이상, OS 커널 5.10 이상 EKS 최적화 AMI(AL2, Bottlerocket, Ubuntu)
- Network Policy Controller : v1.25 EKS 버전 이상 자동 설치, 통제 정책 모니터링 후 eBPF 프로그램을 생성 및 업데이트하도록 Node Agent에 지시
- Node Agent : AWS VPC CNI 번들로 ipamd 플러그인과 함께 설치됨(aws-node 데몬셋). eBPF 프래그램을 관리
- eBPF SDK : AWS VPC CNI에는 노드에서 eBPF 프로그램과 상호 작용할 수 있는 SDK 포함, eBPF 실행의 런타임 검사, 추적 및 분석 가능
- 사전 준비 및 기본 정보 확인
# Network Policy 기본 비활성화되어 있어, 활성화 필요 : 실습 환경은 미리 활성화 설정 추가되어 있음
tail -n 11 myeks.yaml
addons:
- name: vpc-cni # no version is specified so it deploys the default version
version: latest # auto discovers the latest available
attachPolicyARNs:
- arn:aws:iam::aws:policy/AmazonEKS_CNI_Policy
configurationValues: |-
enableNetworkPolicy: "true"
# Node Agent 확인 : AWS VPC CNI 1.14 이상 버전 정보 확인
kubectl get ds aws-node -n kube-system -o yaml | k neat
...
- args:
- --enable-ipv6=false
- --enable-network-policy=true
...
volumeMounts:
- mountPath: /host/opt/cni/bin
name: cni-bin-dir
- mountPath: /sys/fs/bpf
name: bpf-pin-path
- mountPath: /var/log/aws-routed-eni
name: log-dir
- mountPath: /var/run/aws-node
name: run-dir
...
kubectl get ds aws-node -n kube-system -o yaml | grep -i image:
kubectl get pod -n kube-system -l k8s-app=aws-node
kubectl get ds -n kube-system aws-node -o jsonpath='{.spec.template.spec.containers[*].name}{"\n"}'
aws-node aws-eks-nodeagent
# EKS 1.25 버전 이상 확인
kubectl get nod
# OS 커널 5.10 이상 확인
ssh ec2-user@$N1 uname -r
5.10.210-201.852.amzn2.x86_64
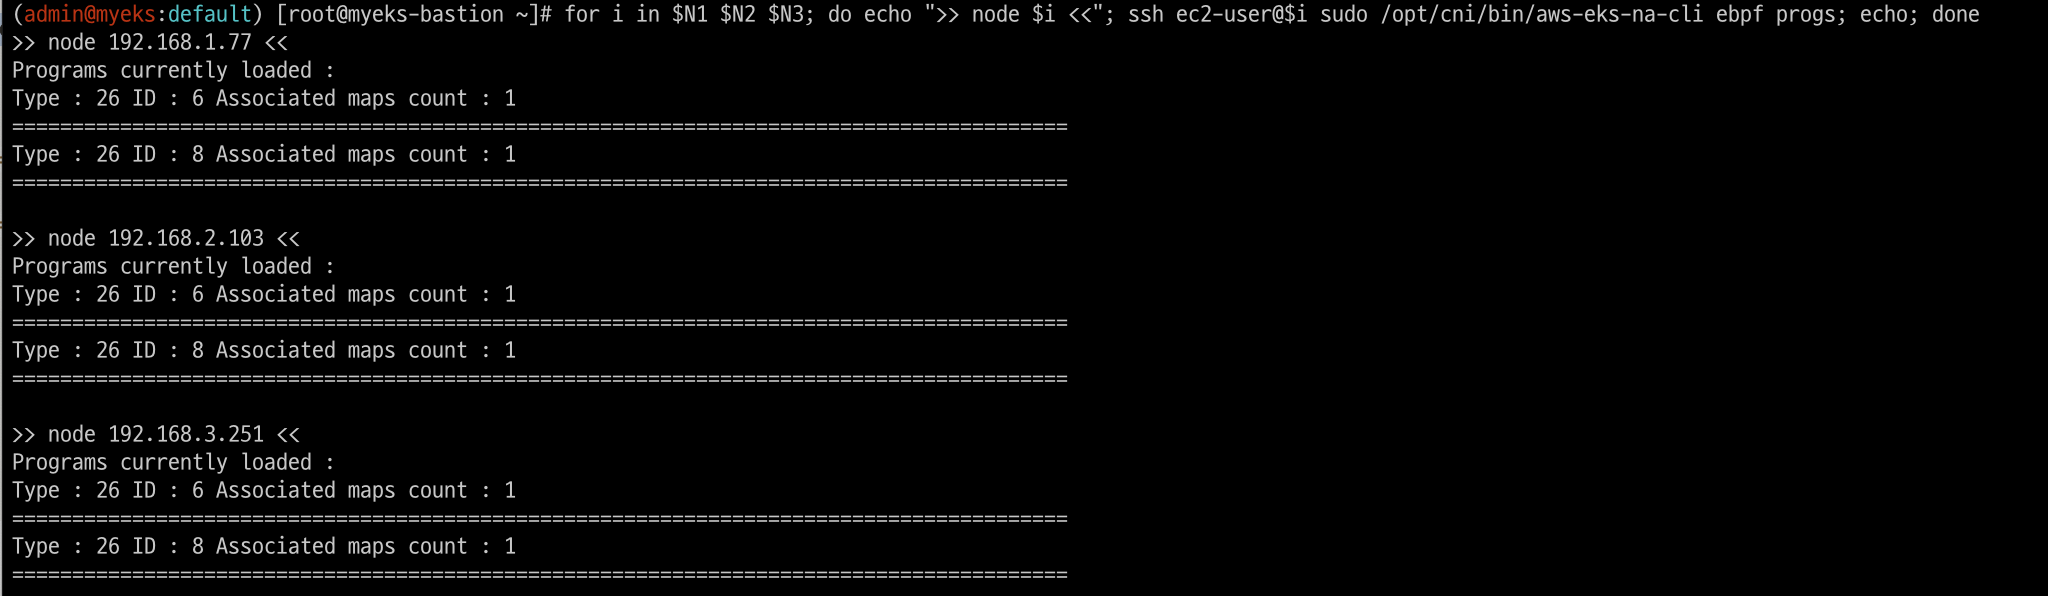
# 실행 중인 eBPF 프로그램 확인
for i in $N1 $N2 $N3; do echo ">> node $i <<"; ssh ec2-user@$i sudo /opt/cni/bin/aws-eks-na-cli ebpf progs; echo; done
...
Programs currently loaded :
Type : 26 ID : 6 Associated maps count : 1
========================================================================================
Type : 26 ID : 8 Associated maps count : 1
========================================================================================
# 각 노드에 BPF 파일 시스템을 탑재 확인
ssh ec2-user@$N1 mount | grep -i bpf
none on /sys/fs/bpf type bpf (rw,nosuid,nodev,noexec,relatime,mode=700)

ssh ec2-user@$N1 df -a | grep -i bpf
none                   0       0         0    - /sys/fs/bpf
12.1 샘플 애플리케이션 배포 및 네트워크 정책 적용 실습
#
git clone https://github.com/aws-samples/eks-network-policy-examples.git
cd eks-network-policy-examples
tree advanced/manifests/
kubectl apply -f advanced/manifests/
# 확인
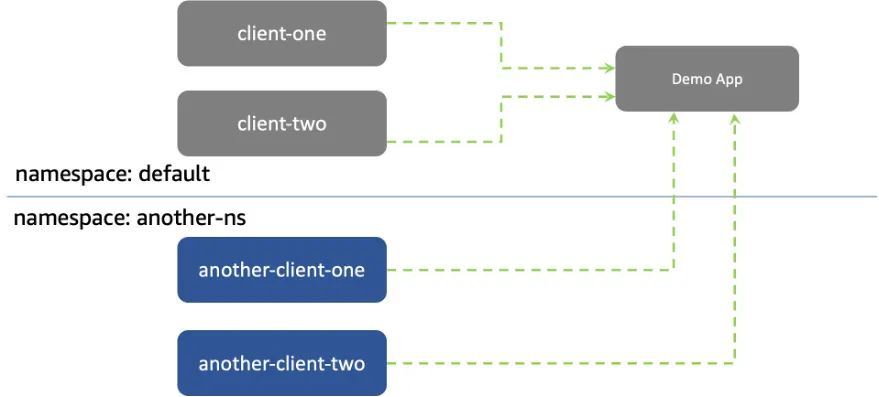
kubectl get pod,svc
kubectl get pod,svc -n another-ns
# 통신 확인
kubectl exec -it client-one -- curl demo-app
kubectl exec -it client-two -- curl demo-app
kubectl exec -it another-client-one -n another-ns -- curl demo-app
kubectl exec -it another-client-one -n another-ns -- curl demo-app.default
kubectl exec -it another-client-two -n another-ns -- curl demo-app.default.svc- 모든 트래픽 거부
# 모니터링
# kubectl exec -it client-one -- curl demo-app
while true; do kubectl exec -it client-one -- curl --connect-timeout 1 demo-app ; date; sleep 1; done
# 정책 적용
cat advanced/policies/01-deny-all-ingress.yaml
kubectl apply -f advanced/policies/01-deny-all-ingress.yaml
kubectl get networkpolicy
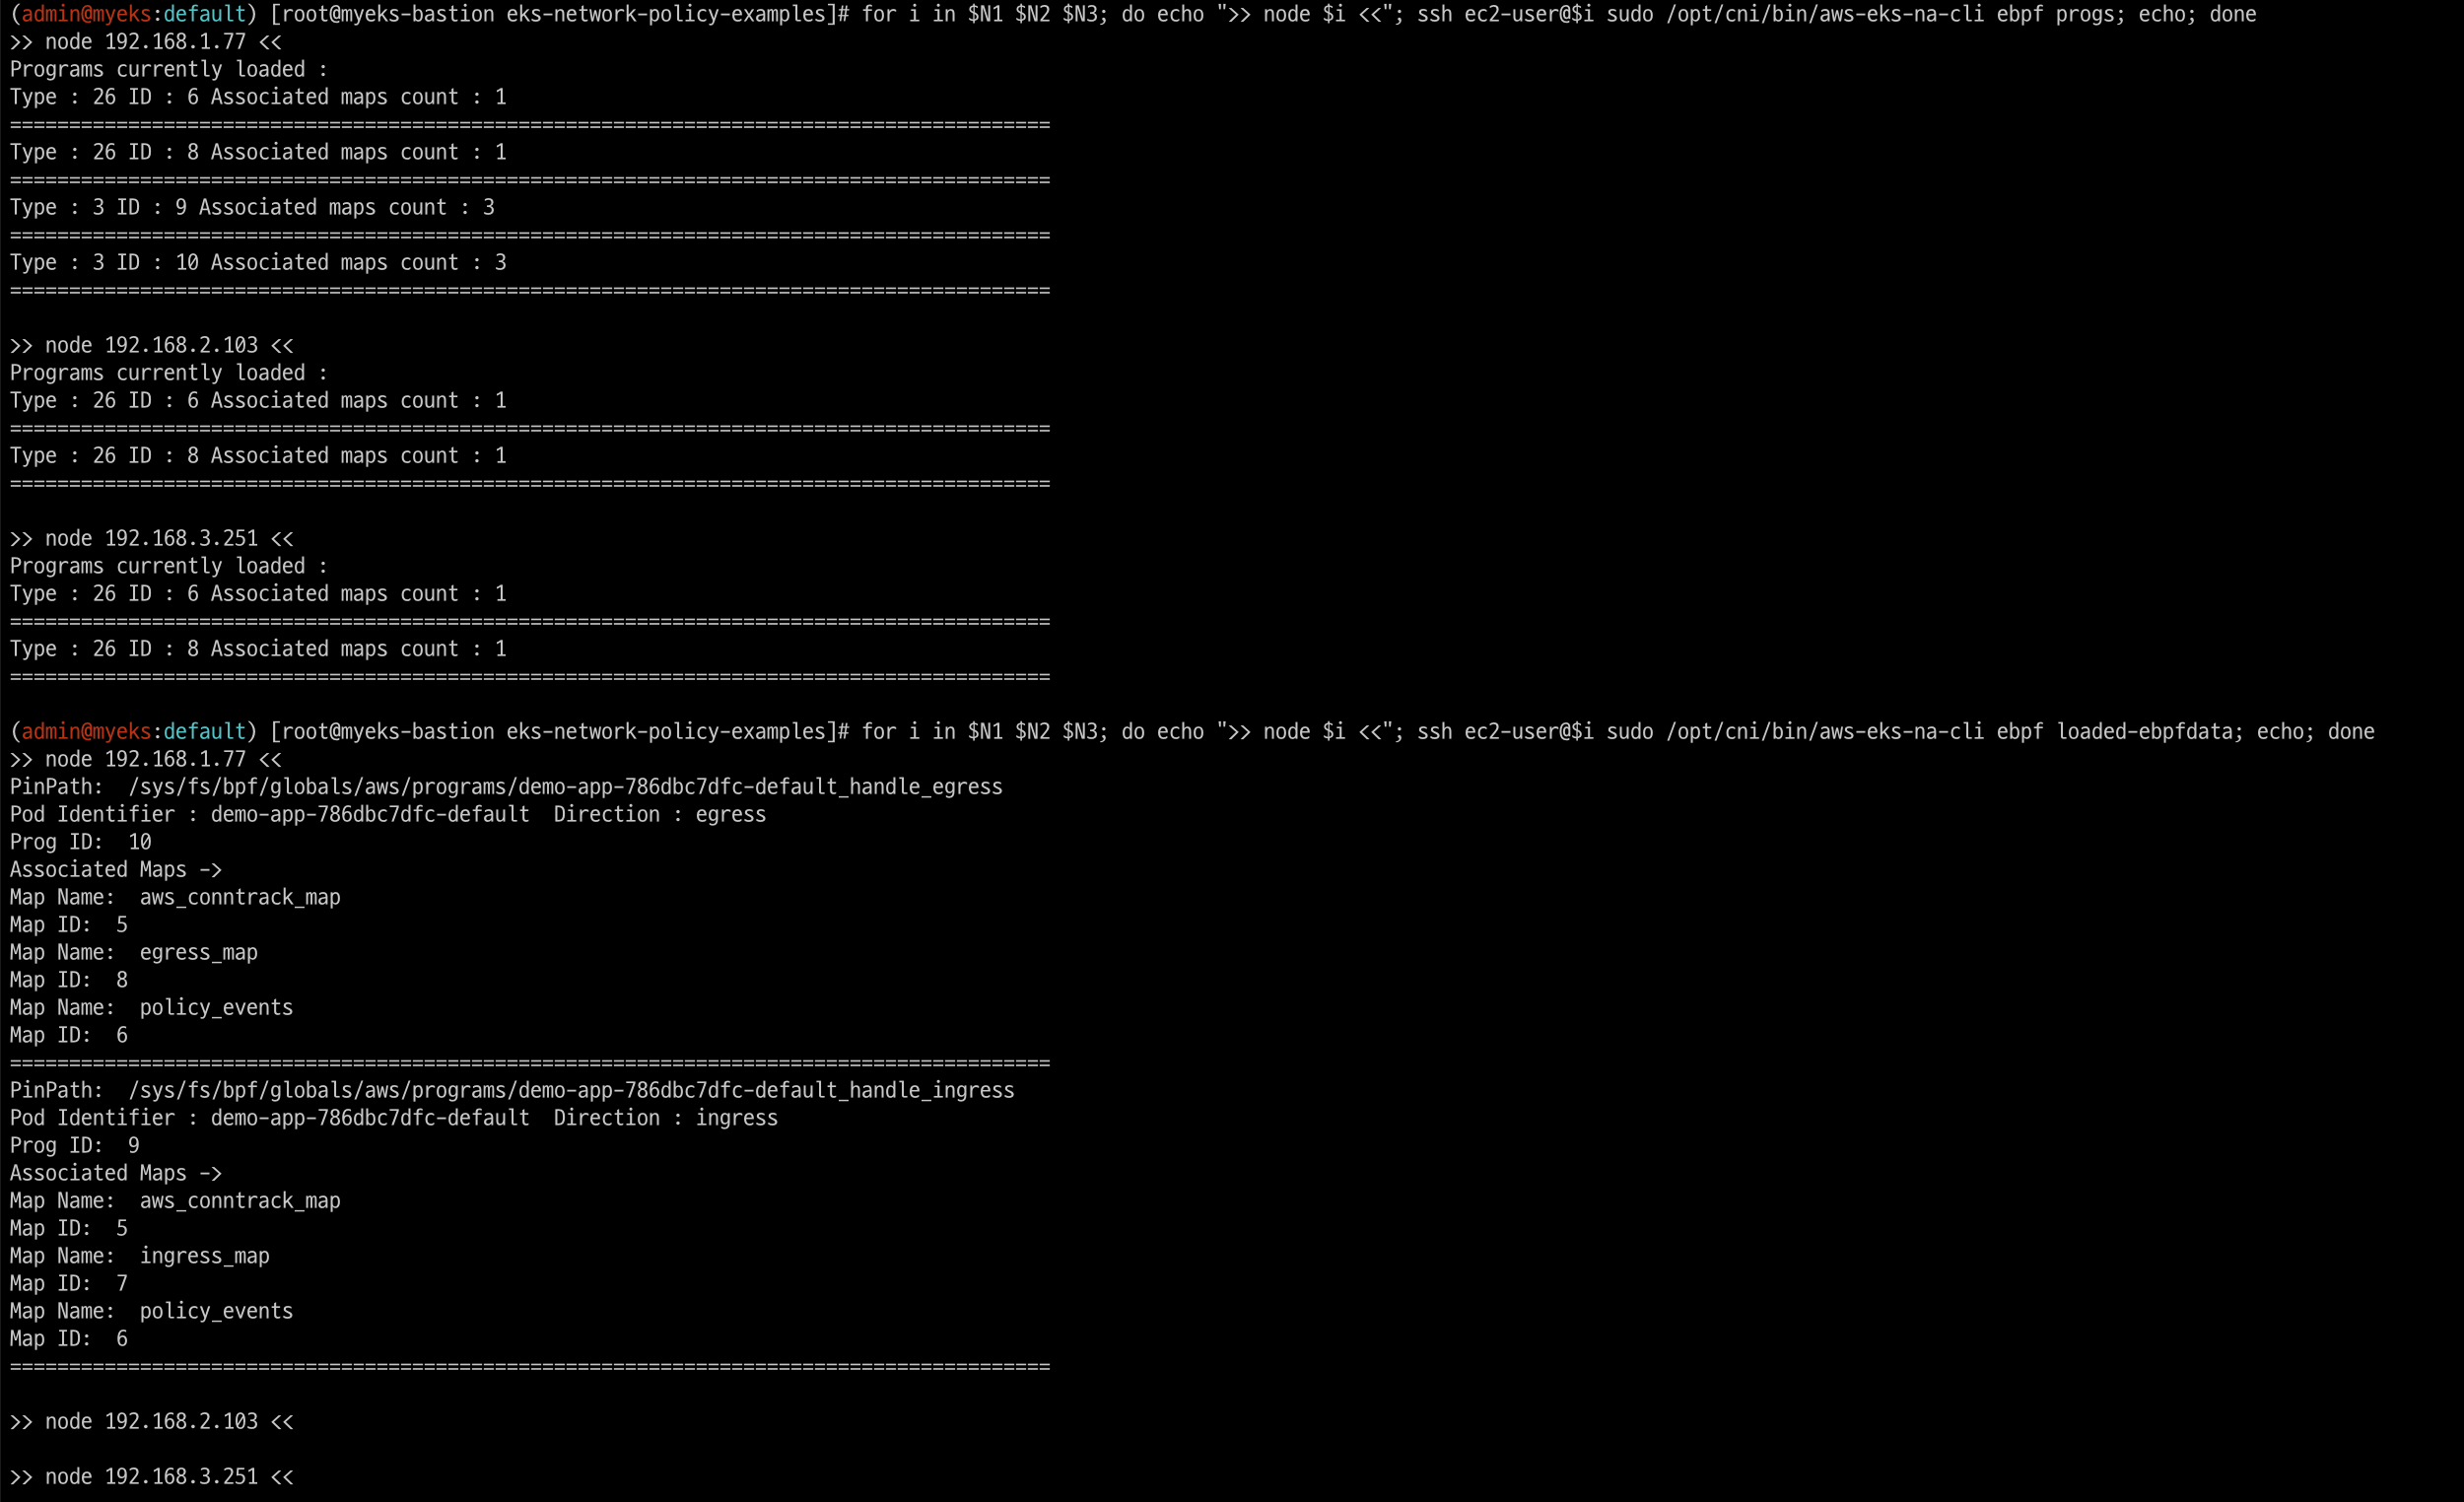
# 실행 중인 eBPF 프로그램 확인
for i in $N1 $N2 $N3; do echo ">> node $i <<"; ssh ec2-user@$i sudo /opt/cni/bin/aws-eks-na-cli ebpf progs; echo; done
for i in $N1 $N2 $N3; do echo ">> node $i <<"; ssh ec2-user@$i sudo /opt/cni/bin/aws-eks-na-cli ebpf loaded-ebpfdata; echo; done
...
>> node 192.168.3.201 <<
PinPath: /sys/fs/bpf/globals/aws/programs/demo-app-6fd76f694b-default_handle_ingress
Pod Identifier : demo-app-6fd76f694b-default Direction : ingress
Prog ID: 9
Associated Maps ->
Map Name: ingress_map
Map ID: 7
Map Name: policy_events
Map ID: 6
Map Name: aws_conntrack_map
Map ID: 5
========================================================================================
PinPath: /sys/fs/bpf/globals/aws/programs/demo-app-6fd76f694b-default_handle_egress
Pod Identifier : demo-app-6fd76f694b-default Direction : egress
Prog ID: 10
Associated Maps ->
Map Name: aws_conntrack_map
Map ID: 5
Map Name: egress_map
Map ID: 8
Map Name: policy_events
Map ID: 6
========================================================================================
ssh ec2-user@$N3 sudo /opt/cni/bin/aws-eks-na-cli ebpf dump-maps 5
ssh ec2-user@$N3 sudo /opt/cni/bin/aws-eks-na-cli ebpf dump-maps 9
ssh ec2-user@$N3 sudo /opt/cni/bin/aws-eks-na-cli ebpf dump-maps 10

# 정책 다시 삭제
kubectl delete -f advanced/policies/01-deny-all-ingress.yaml
for i in $N1 $N2 $N3; do echo ">> node $i <<"; ssh ec2-user@$i sudo /opt/cni/bin/aws-eks-na-cli ebpf loaded-ebpfdata; echo; done

# 다시 적용
kubectl apply -f advanced/policies/01-deny-all-ingress.yaml- 동일 네임스페이스 + 클라이언트1 로부터의 수신 허용
#
cat advanced/policies/03-allow-ingress-from-samens-client-one.yaml
kubectl apply -f advanced/policies/03-allow-ingress-from-samens-client-one.yaml
kubectl get networkpolicy
for i in $N1 $N2 $N3; do echo ">> node $i <<"; ssh ec2-user@$i sudo /opt/cni/bin/aws-eks-na-cli ebpf loaded-ebpfdata; echo; done
ssh ec2-user@$N3 sudo /opt/cni/bin/aws-eks-na-cli ebpf dump-maps 5
ssh ec2-user@$N3 sudo /opt/cni/bin/aws-eks-na-cli ebpf dump-maps 9
ssh ec2-user@$N3 sudo /opt/cni/bin/aws-eks-na-cli ebpf dump-maps 10

# 클라이언트2 수신 확인
kubectl exec -it client-two -- curl --connect-timeout 1 demo-app- another-ns 네임스페이스로부터의 수신 허용
# 모니터링
# kubectl exec -it another-client-one -n another-ns -- curl --connect-timeout 1 demo-app.default
while true; do kubectl exec -it another-client-one -n another-ns -- curl --connect-timeout 1 demo-app.default ; date; sleep 1; done

#
cat advanced/policies/04-allow-ingress-from-xns.yaml
kubectl apply -f advanced/policies/04-allow-ingress-from-xns.yaml
kubectl get networkpolicy
for i in $N1 $N2 $N3; do echo ">> node $i <<"; ssh ec2-user@$i sudo /opt/cni/bin/aws-eks-na-cli ebpf loaded-ebpfdata; echo; done
ssh ec2-user@$N3 sudo /opt/cni/bin/aws-eks-na-cli ebpf dump-maps 5
ssh ec2-user@$N3 sudo /opt/cni/bin/aws-eks-na-cli ebpf dump-maps 9
ssh ec2-user@$N3 sudo /opt/cni/bin/aws-eks-na-cli ebpf dump-maps 10

#
kubectl exec -it another-client-two -n another-ns -- curl --connect-timeout 1 demo-app.default- eBPF 관련 정보 확인
# 실행 중인 eBPF 프로그램 확인
for i in $N1 $N2 $N3; do echo ">> node $i <<"; ssh ec2-user@$i sudo /opt/cni/bin/aws-eks-na-cli ebpf progs; echo; done

# eBPF 로그 확인
for i in $N1 $N2 $N3; do echo ">> node $i <<"; ssh ec2-user@$i sudo cat /var/log/aws-routed-eni/ebpf-sdk.log; echo; done
for i in $N1 $N2 $N3; do echo ">> node $i <<"; ssh ec2-user@$i sudo cat /var/log/aws-routed-eni/network-policy-agent; echo; done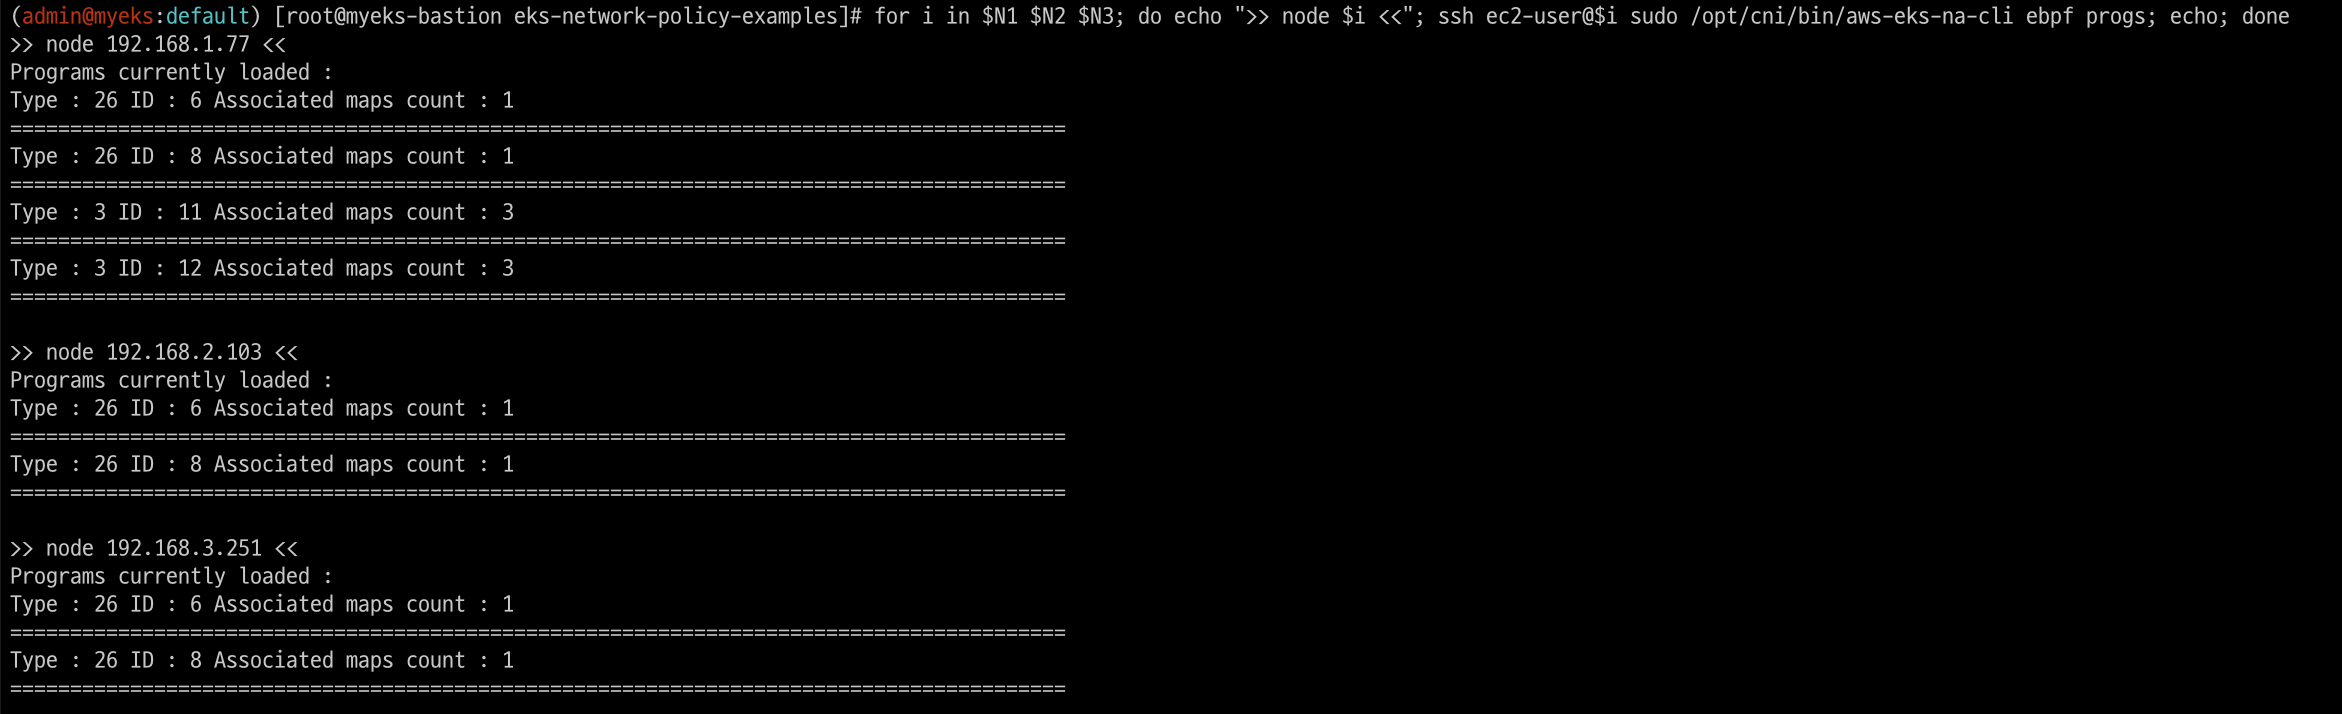

- 송신 트래픽 거부 : 기본 네임스페이스의 클라이언트-1 포드에서 모든 송신 격리를 적용
# 모니터링
while true; do kubectl exec -it client-one -- curl --connect-timeout 1 google.com ; date; sleep 1; done

#
cat advanced/policies/06-deny-egress-from-client-one.yaml
kubectl apply -f advanced/policies/06-deny-egress-from-client-one.yaml
kubectl get networkpolicy
for i in $N1 $N2 $N3; do echo ">> node $i <<"; ssh ec2-user@$i sudo /opt/cni/bin/aws-eks-na-cli ebpf loaded-ebpfdata; echo; done
ssh ec2-user@$N3 sudo /opt/cni/bin/aws-eks-na-cli ebpf dump-maps 5
ssh ec2-user@$N3 sudo /opt/cni/bin/aws-eks-na-cli ebpf dump-maps 9
ssh ec2-user@$N3 sudo /opt/cni/bin/aws-eks-na-cli ebpf dump-maps 10

#
kubectl exec -it client-one -- nslookup demo-app- 송신 트래픽 허용 : DNS 트래픽을 포함하여 여러 포트 및 네임스페이스에서의 송신을 허용
# 모니터링
while true; do kubectl exec -it client-one -- curl --connect-timeout 1 demo-app ; date; sleep 1; done

#
cat advanced/policies/08-allow-egress-to-demo-app.yaml | yh
kubectl apply -f advanced/policies/08-allow-egress-to-demo-app.yaml
kubectl get networkpolicy
13. IPv6 with EKS
악분님 IPv6 여정 발표 영상
https://www.youtube.com/watch?v=apGYpB7JtWk
The Journey to IPv6 on Amazon EKS: Foundation (Part 1) - Link
The Journey to IPv6 on Amazon EKS: Foundation (Part 2) - Link
The Journey to IPv6 on Amazon EKS: Foundation (Part 3) - Link
14. AWS VPC CNI + Cilium CNI : Hybrid mode
구성 방안 : 각 CNI의 강점을 조합하여 사용 - AWS VPC CNI(IPAM, Routing 등), Cilium(LB, Network Policy, Encryption, Visibility)

AWS에서 VPC CNI와 Cilium CNI를 Hybrid Mode로 구성하면 두 CNI의 장점을 결합해 Kubernetes 클러스터의 네트워크 성능과 보안을 극대화할 수 있습니다. 이 구성을 통해 아래와 같은 주요 이점이 있습니다.
-
네트워크 성능 최적화
• VPC CNI: Pod에 직접 VPC IP를 할당하여 AWS 네트워크 리소스를 그대로 사용할 수 있습니다. AWS 네트워크 성능을 극대화하면서 네이티브 VPC 기능(보안 그룹, 라우팅 테이블 등)을 활용할 수 있어 성능이 중요한 워크로드에 적합합니다.
• Cilium CNI: 오버레이 네트워크로 Pod 간 네트워크를 관리하므로 ENI(Elastic Network Interface) 할당 한계를 완화해줍니다. 클러스터의 확장성이 높아지고, VPC CNI의 IP 주소 제한을 줄여 대규모 Pod 배포에 유리합니다. -
고급 네트워크 보안 및 정책 제어
• Cilium은 eBPF(Extended Berkeley Packet Filter)를 사용하여 Pod 간의 세밀한 네트워크 정책 제어와 모니터링을 제공합니다. 이로 인해 높은 성능의 보안 제어가 가능하며, 클러스터 트래픽에 대한 실시간 모니터링과 로깅이 용이해집니다.
• Cilium의 네트워크 정책을 통해 L3, L4, L7 레벨에서 세밀한 트래픽 제어가 가능해 보안성이 강화됩니다. 따라서 API 요청 수준의 보안 정책을 정의하여 클러스터 전반에 적용할 수 있습니다. -
가용성과 확장성
• ENI 리소스 최적화: VPC CNI가 관리하는 ENI 할당 수가 줄어들어, Pod 밀도가 높은 클러스터에서 IP 주소의 확장성이 더 유연해집니다. Cilium은 오버레이 네트워크로 Pod 네트워크를 관리할 수 있어 AWS의 IP 자원 제약에서 더 자유롭습니다.
• Cilium의 오버레이 기능을 통해 여러 가용 영역에서 트래픽을 효율적으로 분산시켜 네트워크 트래픽이 늘어나더라도 안정적인 확장이 가능합니다. -
멀티클러스터 및 멀티클라우드 환경 지원
• Cilium은 온프레미스, 멀티클라우드 또는 다른 Kubernetes 클러스터와의 연결에 유리합니다. VPC CNI는 AWS 환경에서 고성능과 보안을 보장해 주지만 AWS 밖에서는 사용할 수 없는데, Cilium을 함께 사용하면 멀티클라우드나 하이브리드 클라우드 환경에서도 일관된 네트워킹을 구현할 수 있습니다.
