이전에 살펴보았던 BertEmbedding Layer의 출력을 가지고, N개의 transformer 인코더 구조를 통과시키는 BertEncoder 모듈에 대해서 살펴보겠습니다.

먼저 BertEncoder의 정의 부분을 살펴보면 config.num_hidden_layers에 정해진 만큼 BertLayer를 반복문으로 생성하는 것을 볼 수 있습니다. 즉 N개의 transformer 구조가 저 코드로 인해 생성되는 것입니다.
이제 부터는 저 N개의 층 중 하나인 BertLayer 속을 들여다 보겠습니다.
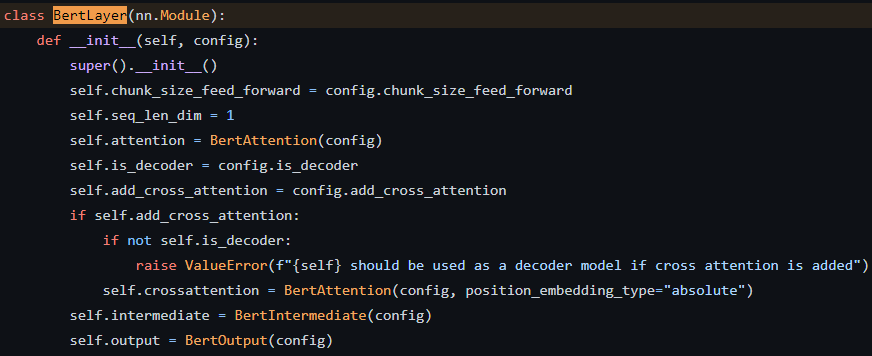
BertLayer는 크게 3개의 모듈로 구성되어있습니다.
- BertAttention
- BertIntermediate
- BertOutput
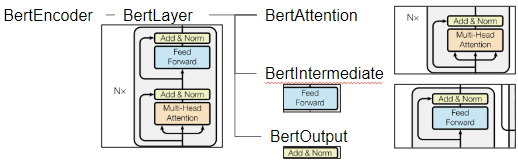
Transformer의 대표적인 그림으로 살펴보자면, 모듈들은 그림의 조각 부분을 각각 담당하고 있습니다.
BertAttention 모듈은 또 Multi-Head Attention을 계산해주는 모듈과 Add & Norm을 계산해주는 모듈로 나누어져 있습니다. 가장 핵심인 Attention 계산은 이 Multi-Head Attention 모듈 안에서 이루어집니다.
만약 Attention mechanism을 바꾸고 싶다면, 이 모듈을 불러와 수정을 하면 됩니다.
BertIntermediate 모듈은 그림에서 Feed Foward 부분을 담당하고 있습니다. 그래서 정의 부분을 살펴보면 간단하게 Linear layer 한개가 선언 되어있습니다.
def __init__(self, config):
	super().__init__()
	self.dense = nn.Linear(config.hidden_size, config.intermediate_size)
	if isinstance(config.hidden_act, str):
		self.intermediate_act_fn = ACT2FN[config.hidden_act]
ACT2FN은 active function을 의미합니다. 다음과 같이 config 파일에서 간단하게 키워드를 수정하는 것으로 다양한 active function을 사용할 수 있게 구현이 되어있습니다.
ACT2FN = {
    "gelu": GELUActivation(),
    "gelu_10": ClippedGELUActivation(-10, 10),
    "gelu_fast": FastGELUActivation(),
    "gelu_new": NewGELUActivation(),
    "gelu_python": GELUActivation(use_gelu_python=True),
    "linear": LinearActivation(),
    "mish": MishActivation(),
    "quick_gelu": QuickGELUActivation(),
    "relu": nn.ReLU(),
    "sigmoid": nn.Sigmoid(),
    "silu": SiLUActivation(),
    "swish": SiLUActivation(),
    "tanh": nn.Tanh(),
}
마지막으로 BertOuput은 Add & Norm 부분을 담당합니다. Feed Forward를 거쳐 오는 hidden_state와 residual 구조를 통해 넘어오는 input_tensor를 가지고, 다음 forward 함수와 같이 적용이되어 hidden states vector를 생산합니다.
def forward(self, hidden_states: torch.Tensor, input_tensor: torch.Tensor) -> torch.Tensor:
	hidden_states = self.dense(hidden_states)
	hidden_states = self.dropout(hidden_states)
	hidden_states = self.LayerNorm(hidden_states + input_tensor)
	return hidden_states
이과정을 N번 반복해 최종적으로 hidden states vector를 반환하게 됩니다.