'스프링 부트3 백엔드 개발자 되기' 책을 참고하며 작성 중 입니다.
사전 지식
OAuth란?
OAuth는 제 3의 서비스에 계정 관리를 맡기는 방식
ex) 네이버 로그인, 구글 로그인
OAuth 용어 정리
- 리소스 오너 (resource owner) :
인증 서버에 자신의 정보를 사용하도록 허가하는 주체 (서비스 이용자)- 리소스 서버 (resource server) :
리소스 오너의 정보를 가지며, 리소스 오너의 정보를 보호하는 주체 (네이버, 구글, 카카오)- 인증 서버 (authorization server) :
클라이언트에게 리소스 오너의 정보에 접근할 수 있는 토큰을 발급- 클라이언트 애플리케이션 (client application) :
인증 서버에게 인증을 받고 리소스 오너의 리소스를 사용하는 주체 (현재 만드는 서비스)
리소스 오너 정보를 취득하는 4가지 방법
- 권한 부여 코드 승인 타입 (authorization code grant type) :
OAuth 2.0에서 가장 잘 알려진 인증 방법
클라이언트가 리소스에 접근하는 데 사용하며, 권한에 접근할 수 있는 코드와 리소스 오너에 대한 액세스 토큰 발급- 암시적 승인 타입 (implicit grant type) :
서버가 없는 자바스크립트 웹 애플리케이션 클라이언트에서 주로 사용하는 방법
클라이언트가 요청을 보내면 리소스 오너의 인증 과정 이외에는 별다른 인증 과정을 거치지 않고 액세스 토큰 발급- 리소스 소유자 암호 자격증명 승인 타입 (resource owner password credentials) :
클라이언트의 패스워드를 이용해서 액세스 토큰에 대한 사용자의 자격 증명 교환- 클라이언트 자격증명 승인 타입 (client credentials grant) :
클라이언트가 컨텍스트 외부에서 액세스 토큰을 얻어 특정 리소스에 접근을 요청할 때 사용하는 방식
우리가 사용할 방식은 권한 부여 코드 승인 타입 !
권한 부여 코드 승인 타입의 동작 방식
애플리케이션, 리소스 오너(사용자), 리소스 서버, 인증 서버
과정을 하나씩 살펴보자
1. 권한 요청
클라이언트, 즉 스프링 부트 서버가 특정 사용자 데이터에 접근하기 위해 권한 서버(구글, 카카오)에 요청을 보내는 것
요청 URI는 권한 서버마다 다르지만 보통은 client_id, redirect_id, response_type, scope 등을 파라미터로 보낸다.
// 권한 요청을 위한 파라미터 예시
GET spring-authorization-server.example/authorize?
	client_id = abcd1234
	redirect_uri = http://localhost:8080/oauth
	response_type = code&
	scope = profile
client_id : 인증 서버가 클라이언트에 할당한 고유 식별자.
클라이언트 애플리케이션을 OAuth 서비스에 등록할 때 서비스에서 생성하는 값
redirect_uri : 로그인 성공 시 이동해야 하는 URI
response_type : 클라이언트가 제공받길 원하는 응답 타입, 인증 코드는 code 값을 포함해야 함
scope : 제공받고자 하는 리소스 오너의 정보 목록
2. 데이터 접근용 권한 부여
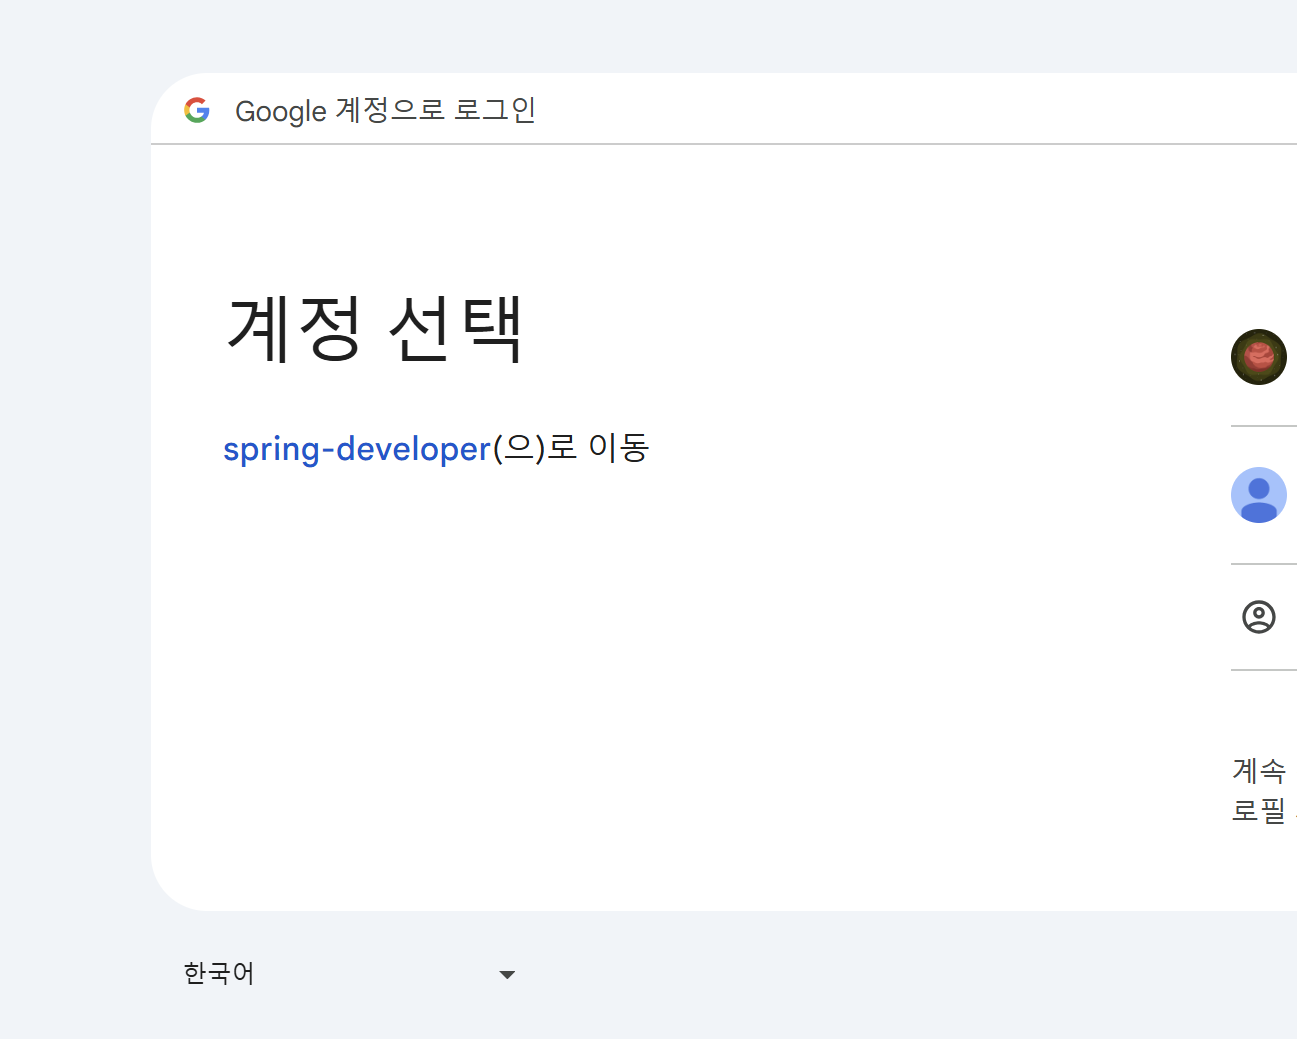
인증 서버에 요청을 처음 보내는 경우
사용자에게 보이는 페이지를 로그인 페이지로 변경하고 사용자의 데이터의 접근 동의를 얻는다.
아래와 같이 !
이 과정은 최초 1회만 진행되며, 이후에는 인증 서버에서 동의 내용을 저장하고 있기 때문에 로그인만 진행
로그인이 성공되면 권한 부여 서버는 데이터에 접근할 수 있게 인증 및 권한 부여를 수신
3. 인증 코드 제공
사용자가 로그인에 성공하면 권한 요청 시에 파라미터로 보낸 redirect_uri로 리다이렉션 된다.
이때 파라미터에 인증 코드를 함께 제공
- 보통 redirect_uri는 권한 서버에 등록을 진행해야 함!
//인증 코드 예시
GET http://localhost:8080/oauth?code=a1b2c3d4
4. 인증 코드를 액세스 토큰으로 발급
인증 코드를 받으면 액세스 토큰으로 교환해야 한다.
액세스 토큰은 로그인 세션에 대한 보안 자격을 증명하는 식별 코드를 의미
보통 다음과 같이 /token POST 요청을 보낸다.
// /token POST 예시
POST spring-authorization-server.example.com/token
{
	"client_id" : "abcd1234",
	"client_secret" : "aabbccdd11223344",
	"redirect_uri" : http://localhost:8080/oauth",
	"grant_type" : "authorization_code",
	"code" : "a1b2c3d4"
}
client_secret : OAuth 서비스에 등록할 때 제공받는 비밀키 (보통 client_id와 같이 발급된다.)
grant__type : 권한 유형을 확인하는 데 사용
현재는 authorization_code로 설정.
권한 서버는 요청 값을 기반으로 유효한 정보인지 확인하고, 유효한 정보라면 액세스 토큰으로 응답
//액세스 토큰 응답 값의 예시
{
	"access_token" : "aassddff",
	"token_type" : "Bearer",
	"expires_in" : 3600,
	"scope" : "openid profile",
...생략...
}
5. 액세스 토큰으로 API 응답 & 반환
이제 제공받은 액세스 토큰으로 리소스 오너의 정보를 가져올 수 있다.
정보가 필요할 때마다 API 호출을 통해 정보를 가져오고 리소스 서버는 토큰이 유효한지 검사한 뒤에 응답
//리소스 오너의 정보를 가져오기 위한 요청 예시
GET spring-authorization-resource-server.example.com/userinfo
Header : Authorization: Bearer aassddff
쿠키?
사용자가 어떠한 웹사이트를 방문했을 때 해당 웹사이트의 서버에서 로컬 환경에 저장하는 작은 데이터
해당 값을 통해 이전 방문 내역과 이전 로그인 내역을 유지할 수 있음
쿠키는 키:값 으로 이루어져 있으며, 만료 기간, 도메인 등의 정보를 가지고 있으며,
HTTP 요청을 통해 쿠키의 특정 키에 값을 추가할 수 있음
1. 클라이언트가 정보를 요청하면
2. 서버에서 정보를 값으로 넣은 쿠키를 생성해서 요청한 정보, 즉 HTTP 헤더와 함께 돌려보냄
3. 클라이언트는 로컬 즉, 브라우저에 쿠키를 저장
이후 사이트에 재방문 시 사용자가 로컬 환경에 있는 쿠키와 함께 서버에 요청
이렇게 하면 클라이언트에 값을 저장할 수 있기에 현재 사용자 관련 정보를 보여줄 수 있다!
토큰 발급받기
아래 내용 참고 !.!
https://support.google.com/workspacemigrate/answer/9222992?hl=ko
spring:
  security:
    oauth2:
      client:
        registration:
          google:
            client-id: ${client_id}
            client-secret: ${client_secret}
            scope:
              - email
              - profile
client_id 와 client_secret 키는 github에 올려서는 안되니 환경 변수로 처리해준다.
스프링 시큐리티로 OAuth2 구현하고 적용하기
의존성 추가
build.gradle
dependencies {
	implementation 'org.springframework.boot:spring-boot-starter-oauth2-client'
}
쿠키 관리 클래스 구현
CookieUtil
public class CookieUtil {

    //요청값 (이름, 값, 만료기간)을 바탕으로 쿠기 제작
    public static void addCookie(HttpServletResponse response, String name, String value, int maxAge){
        Cookie cookie = new Cookie(name, value);
        cookie.setPath("/");
        cookie.setMaxAge(maxAge);
        response.addCookie(cookie);
    }

    //쿠키의 이름을 입력받아 쿠키 삭제
    //삭제라기 보단 쿠키를 빈 값으로 바꾸고 만료 시간을 0으로 설정해 재생성 되자마자 만료 처리
    public static void deleteCookie(HttpServletRequest request, HttpServletResponse response, String name){
        Cookie[] cookies = request.getCookies();
        if (cookies == null) return;

        for (Cookie cookie : cookies){
            if (name.equals(cookie.getName())) {
                cookie.setValue("");
                cookie.setPath("/");
                cookie.setMaxAge(0);
                response.addCookie(cookie);
            }
        }
    }

    //객체를 직렬화하여 쿠키의 값에 들어갈 값으로 변환
    public static String serialize(Object obj){
        return Base64.getUrlEncoder().encodeToString(SerializationUtils.serialize(obj));
    }

    //쿠키를 역직렬화 객체로 변환
    public static <T> T deserialize(Cookie cookie, Class<T> cls){
        return cls.cast(
                SerializationUtils.deserialize(Base64.getUrlDecoder().decode(cookie.getValue()))
        );
    }
}
OAuth2 서비스 구현
사용자 정보를 조회해 users 테이블에 사용자 정보가
- 있다면 리소스 서버에서 제공해주는 이름을 업데이트
- 없다면 users 테이블에 새 사용자를 생성해 데이터베이스 저장
User
@Table(name = "users")
@NoArgsConstructor(access = AccessLevel.PROTECTED)
@Getter
@Entity
public class User implements UserDetails {
  //..생략

    @Column(name="nickname", unique = true)
    private String nickname;

  //생성자에 nickname 추가
    @Builder
    public User(String email, String password, String nickname) {
        this.email = email;
        this.password = password;
        this.nickname = nickname;
    }

  //사용자 이름 변경
    public User update(String nickname){
        this.nickname = nickname;
        return this;
    }
  //..생략
}
OAuth2UserCustomService
리소스 서버에서 보내주는 사용자 정보를 불러오는 메서드 loadUser()를 통해 사용자 조회
users 테이블에 사용자 정보가 있다면 업데이트,
없다면 saveOrUpdate() 메서드를 실행해 users 테이블에 회원 데이터 추가
@RequiredArgsConstructor
@Service
public class OAuth2UserCustomService extends DefaultOAuth2UserService {
    private final UserRepository userRepository;

  //요청을 바탕으로 유저 정보를 담은 객체 반환
    @Override
    public OAuth2User loadUser(OAuth2UserRequest request) throws OAuth2AuthenticationException {
        OAuth2User user = super.loadUser(request);
        saveOrUpdate(user);
        return user;
    }

  //사용자 정보가 있다면 업데이트, 없다면 유저 생성
    private User saveOrUpdate(OAuth2User oAuth2User){
        Map<String, Object> attributes = oAuth2User.getAttributes();
        String email = (String) attributes.get("email");
        String name = (String) attributes.get("name");
        User user = userRepository.findByEmail(email)
                .map(entity -> entity.update(name))
                .orElse(User.builder()
                        .email(email)
                        .nickname(name)
                        .build());
        return userRepository.save(user);
    }
}
loadUser() : 부모 클래스인 DefaultOAuth2UserService에서 제공하는 OAuth 서비스에서 제공하는 정보를 기반으로 유저 객체를 만들어줌
유저 객체는 식별자, 이름, 이메일, 프로필 사진 링크 등의 정보를 담고 있음
WebOAuthSecurityConfig
@RequiredArgsConstructor
@Configuration
public class WebOAuthSecurityConfig {

    private final OAuth2UserCustomService oAuth2UserCustomService;
    private final TokenProvider tokenProvider;
    private final RefreshTokenRepository refreshTokenRepository;
    private final UserService userService;

  	//Spring Security 기능 비활성화
    @Bean
    public WebSecurityCustomizer configure(){
        return (web) -> web.ignoring()
                .requestMatchers(toH2Console())
                .requestMatchers(
                        new AntPathRequestMatcher("/img/**"),
                        new AntPathRequestMatcher("/css/**"),
                        new AntPathRequestMatcher("/js/**")
                );
    }

    // 토큰 방식으로 인증을 하기 때문에 기존에 사용하던 폼 로그인, 세션 비활성화
    @Bean
    public SecurityFilterChain filterChain(HttpSecurity http) throws Exception{
         return http.csrf(AbstractHttpConfigurer::disable)
                 .httpBasic(AbstractHttpConfigurer::disable)
                 .formLogin(AbstractHttpConfigurer::disable)
                 .logout(AbstractHttpConfigurer::disable)
                 .sessionManagement(management -> management.sessionCreationPolicy(SessionCreationPolicy.STATELESS))

                 //헤더를 확인할 커스텀 필터 추가
                 .addFilterBefore(tokenAuthenticationFilter(), UsernamePasswordAuthenticationFilter.class)

                 //토큰 재발급 URL은 인증 없이 접근 가능하도록 설정, 나머지 API URL은 인증 필요
                 .authorizeHttpRequests(auth -> auth
                         .requestMatchers(new AntPathRequestMatcher("/api/token")).permitAll()
                         .requestMatchers(new AntPathRequestMatcher("/api/**")).authenticated()
                         .anyRequest().permitAll())
OAuth2에 필요한 정보를 세션이 아닌 쿠키에 저장해서 쓸 수 있도록 인증 요청과 관련된 상태를 저장할 저장소 설정
인증 성공 시 실행할 핸들러 설정
                 .oauth2Login(oauth2 -> oauth2
                         .loginPage("/login")

                         //Authorization 요청과 관련된 상태 저장
                         .authorizationEndpoint(authorizationEndpointConfig ->
                                 authorizationEndpointConfig.authorizationRequestRepository(OAuth2AuthorizationRequestBasedOnCookieRepository()))
                         //oAuth2의 유저 정보 저장 및 업데이트
                         .userInfoEndpoint(userInfoEndpointConfig -> userInfoEndpointConfig.userService(oAuth2UserCustomService))
                         //인증 성공 시 실행한 핸들러
                         .successHandler(oAuth2SuccessHandler())
                 )
                 //api로 시작하는 url인 경우 401 상태 코드를 반환하도록 예외 처리
                 .exceptionHandling(exceptionHandling -> exceptionHandling
                         .defaultAuthenticationEntryPointFor(
                                 new HttpStatusEntryPoint(HttpStatus.UNAUTHORIZED),
                                 new AntPathRequestMatcher("/api/**")
                         ))
                 .build();
    }


    @Bean
    public OAuth2SuccessHandler oAuth2SuccessHandler(){
        return new OAuth2SuccessHandler(tokenProvider,
                refreshTokenRepository,
                OAuth2AuthorizationRequestBasedOnCookieRepository(),
                userService
        );
    }

    @Bean
    public TokenAuthenticationFilter tokenAuthenticationFilter() {
        return new TokenAuthenticationFilter(tokenProvider);
    }

    @Bean
    public OAuth2AuthorizationRequestBasedOnCookieRepository OAuth2AuthorizationRequestBasedOnCookieRepository(){
        return new OAuth2AuthorizationRequestBasedOnCookieRepository();
    }

    @Bean
    public BCryptPasswordEncoder bCryptPasswordEncoder(){
        return new BCryptPasswordEncoder();
    }
}
OAuth2AuthorizationRequestBasedOnCookieRepository
OAuth2에 필요한 정보를 세션이 아닌 쿠키에 저장해서 쓸 수 있도록 인증 요청과 관련된 상태를 저장할 저장소
public class OAuth2AuthorizationRequestBasedOnCookieRepository implements
      AuthorizationRequestRepository<OAuth2AuthorizationRequest> {

  public final static String OAUTH2_AUTHORIZATION_REQUEST_COOKIE_NAME = "oauth2_auth_request";
  private final static int COOKIE_EXPIRE_SECONDS = 18000;

  @Override
  public OAuth2AuthorizationRequest loadAuthorizationRequest(HttpServletRequest request) {
      Cookie cookie = WebUtils.getCookie(request, OAUTH2_AUTHORIZATION_REQUEST_COOKIE_NAME);
      return CookieUtil.deserialize(cookie, OAuth2AuthorizationRequest.class);
  }

  @Override
  public void saveAuthorizationRequest(OAuth2AuthorizationRequest authorizationRequest,
                                       HttpServletRequest request, HttpServletResponse response) {
      if (authorizationRequest == null){
          removeAuthorizationRequest(request, response);
          return;
      }
      CookieUtil.addCookie(response, OAUTH2_AUTHORIZATION_REQUEST_COOKIE_NAME,
              CookieUtil.serialize(authorizationRequest), COOKIE_EXPIRE_SECONDS);
  }

  public void removeAuthorizationRequestCookies(HttpServletRequest request, HttpServletResponse response) {
      CookieUtil.deleteCookie(request, response, OAUTH2_AUTHORIZATION_REQUEST_COOKIE_NAME);
  }

  @Override
  public OAuth2AuthorizationRequest removeAuthorizationRequest(HttpServletRequest request, HttpServletResponse response) {
      return this.loadAuthorizationRequest(request);
  }
}
UserService
@RequiredArgsConstructor
@Service
public class UserService {

  private final UserRepository userRepository;

  public Long save(AddUserRequest dto){
      BCryptPasswordEncoder bCryptPasswordEncoder = new BCryptPasswordEncoder();
      return userRepository.save(User.builder()
              .email(dto.getEmail())
              .password(bCryptPasswordEncoder.encode(dto.getPassword())) //패스워드 암호화
              .build()).getId();
  }

//메서드 추가
  public User findById(Long userId){
      return userRepository.findById(userId)
              .orElseThrow(() -> new IllegalArgumentException("Unexpected user"));
  }

  public User findByEmail(String email){
      return userRepository.findByEmail(email)
              .orElseThrow(()-> new IllegalArgumentException("Unexpected user"));
  }
}
OAuth2SuccessHandler
Spring Security의 기본 로직에서는 별도의 authenticationSuccessHandler를 지정하지 않으면
로그인 성공 이후 SimpleUrlAuthenticationSuccessHandler 을 사용
토큰 관련 작업만 추가로 처리하기 위해 SimpleUrlAuthenticationSuccessHandler 상속받은 뒤에
onAuthenticationSuccess() 오버라이드
@RequiredArgsConstructor
@Component
//토큰 관련된 작업 추가
public class OAuth2SuccessHandler extends SimpleUrlAuthenticationSuccessHandler {
  public static final String REFRESH_TOKEN_COOKIE_NAME = "refresh_token";
  public static final Duration REFRESH_TOKEN_DURATION = Duration.ofDays(14);
  public static final Duration ACCESS_TOKEN_DURATION = Duration.ofDays(1);
  public static final String REDIRECT_PATH = "/articles";

  private final TokenProvider tokenProvider;
  private final RefreshTokenRepository refreshTokenRepository;
  private final OAuth2AuthorizationRequestBasedOnCookieRepository authorizationRequestRepository;
  private final UserService userService;

  @Override
  public void onAuthenticationSuccess(
				HttpServletRequest request, HttpServletResponse response, Authentication authentication)
																		throws IOException {
      OAuth2User oAuth2User = (OAuth2User) authentication.getPrincipal();
      User user = userService.findByEmail((String) oAuth2User.getAttributes().get("email"));

      //리프레시 토큰 생성 -> 저장 -> 쿠키에 저장
      String refreshToken = tokenProvider.generateToken(user, REFRESH_TOKEN_DURATION);
      saveRefreshToken(user.getId(), refreshToken);
      addRefreshTokenToCookie(request, response, refreshToken);

      //액세스 토큰 생성 -> Path에 액세스 토큰 추가
      String accessToken = tokenProvider.generateToken(user, ACCESS_TOKEN_DURATION);
      String targetUrl = getTargetUrl(accessToken);

      //인증 관련 설정값, 쿠키 제거
      clearAuthenticationAttributes(request, response);

      //리다이렉트
      getRedirectStrategy().sendRedirect(request, response, targetUrl);
  }

//액세스 토큰을 path에 추가
  private String getTargetUrl(String accessToken) {
      return UriComponentsBuilder.fromUriString(REDIRECT_PATH)
              .queryParam("token", accessToken)
              .build()
              .toUriString();
  }

//생성된 Refresh Token을 쿠키에 저장
  private void addRefreshTokenToCookie(HttpServletRequest request, HttpServletResponse response, String refreshToken) {
      int cookieMaxAge = (int) REFRESH_TOKEN_DURATION.toSeconds();
      CookieUtil.deleteCookie(request, response, REFRESH_TOKEN_COOKIE_NAME);
      CookieUtil.addCookie(response, REFRESH_TOKEN_COOKIE_NAME, refreshToken, cookieMaxAge);
  }

//생성된 Refresh Token을 전달받아 데이터베이스에 저장
  private void saveRefreshToken(Long id, String newRefreshToken) {
      RefreshToken refreshToken = refreshTokenRepository.findByUserId(id)
              .map(entity -> entity.update(newRefreshToken))
              .orElse(new RefreshToken(id, newRefreshToken));

      refreshTokenRepository.save(refreshToken);
  }

//인증 관련 설정값, 쿠키 제거
  private void clearAuthenticationAttributes(HttpServletRequest request, HttpServletResponse response){
      super.clearAuthenticationAttributes(request);
      //OAuth 인증을 위해 저장된 정보도 삭제
      authorizationRequestRepository.removeAuthorizationRequestCookies(request, response);
  }
}
onAuthenticationSuccess() 동작
- RefreshToken을 생성 후 데이터베이스에 저장
클라이언트에서 액세스 토큰이 만료되면 재발급을 요청하도록 addRefreshTokenToCookie 호출하여 쿠키에 저장 - AccessToken을 만든 뒤에 redirect 경로를 가져와 쿼리 파라미터에 액세스 토큰 추가
http://localhost:8080/article?token=eyJ03... - 인증 프로세스를 진행하면서 세션과 쿠키에 임시로 저장해둔 인증 관련 데이터를 제거
기본적으로 제공하는 메서드인 clearAuthenticationAttributes()는 그대로 호출
removeAuthorizationRequestCookies()를 추가로 호출해 OAuth 인증을 위해 저장된 정보도 삭제
글에 글쓴이 추가
Article
author 변수 추가
@Entity
@Getter
@NoArgsConstructor(access = AccessLevel.PROTECTED)
@EntityListeners(AuditingEntityListener.class)
public class Article {
//..생략..

   @Column(name = "author", nullable = false)
   private String author;

   @Builder
   public Article(String title, String content, String author){
       this.author = author;
       this.title = title;
       this.content = content;
   }
//..생략
}
AddArticleRequest
@NoArgsConstructor
@AllArgsConstructor
@Getter
public class AddArticleRequest {
	//author 추가
    public Article toEntity(String author){
        return Article.builder()
                .title(title)
                .content(content)
                .author(author)
                .build();
    }
}
Blog Service
@RequiredArgsConstructor
@Service
public class BlogService {
    private final BlogRepository blogRepository;

    //블로그 글 추가 메서드
    public Article save(AddArticleRequest request, String userName){
        return blogRepository.save(request.toEntity(userName));
    }
}
BlogApiController
현재 인증 정보를 가져오는 principal 객체를 파라미터로 추가
@RequiredArgsConstructor
@RestController
public class BlogApiController {
    private final BlogService blogService;

    @PostMapping("/api/articles")
    public ResponseEntity<Article> addArticle(@RequestBody AddArticleRequest request,
  	//아래 추가 부분
  										Principal principal){
        Article savedArticle = blogService.save(request, principal.getName());
        return ResponseEntity.status(HttpStatus.CREATED)
                .body(savedArticle);
    }
}
ArticleViewResponse
author 필드 추가
@NoArgsConstructor
@Getter
public class ArticleViewResponse {
  private Long id;
  private String title;
  private String content;
  private LocalDateTime createdAt;
  private String author; //추가

  public ArticleViewResponse(Article article) {
      this.id = article.getId();
      this.title = article.getTitle();
      this.content = article.getContent();
      this.createdAt = article.getCreatedAt();
      this.author = article.getAuthor(); //추가
  }
}
data.sql
author 칼럼 추가
INSERT INTO article(title, content, author, created_at, updated_at) VALUES ('title1','content1', 'user1', NOW(), NOW());
INSERT INTO article(title, content, author, created_at, updated_at) VALUES ('title2','content2', 'user2', NOW(), NOW());
INSERT INTO article(title, content, author, created_at, updated_at) VALUES ('title3','content3', 'user3', NOW(), NOW());
article.html
  <header class="mb-4">
    <h1 class="fw-bolder mb-1" th:text="${article.title}"></h1>
    <!-- article.author 추가 -->
    <div class="text-muted fst-italic mb-2" th:text="|Posted on ${#temporals.
                   format(article.createdAt, 'yyyy-MM-dd HH:mm')} By ${article.author}|"></div>
  </header>
OAuth 뷰 구성하기
UserViewController
@Controller
public class UserViewController {
  @GetMapping("/login")
  public String login(){
      return "oauthLogin"; //변경
  }
google SignIn 이미지
https://developers.google.com/identity/branding-guidelines 에서 로그인 버튼 이미지 가져와서 /resources/static/img 디렉터리에 넣기
버튼 이미지


oauthLogin.html
<!DOCTYPE html>
<html lang="en">
<head>
<meta charset="UTF-8">
<title>Title</title>
<link rel="stylesheet" href="https://cdn.jsdelivr.net/npm/bootstrap@4.6.1/dist/css/bootstrap.min.css">
<style>
.gradient-custom {
background: #6a11cb;
background: -webkit-linear-gradient(to right, rgba(106, 17, 203, 1), rgba(37, 117, 252, 1));
background: linear-gradient(to right, rgba(106, 17, 203, 1), rgba(37, 117, 252, 1))
}
</style>
</head>
<body class="gradient-custom">
<section class="d-flex vh-100">
<div class="container-fluid row justify-content-center align-content-center">
<div class="card bg-dark" style="border-radius: 1rem;">
<div class="card-body p-5 text-center">
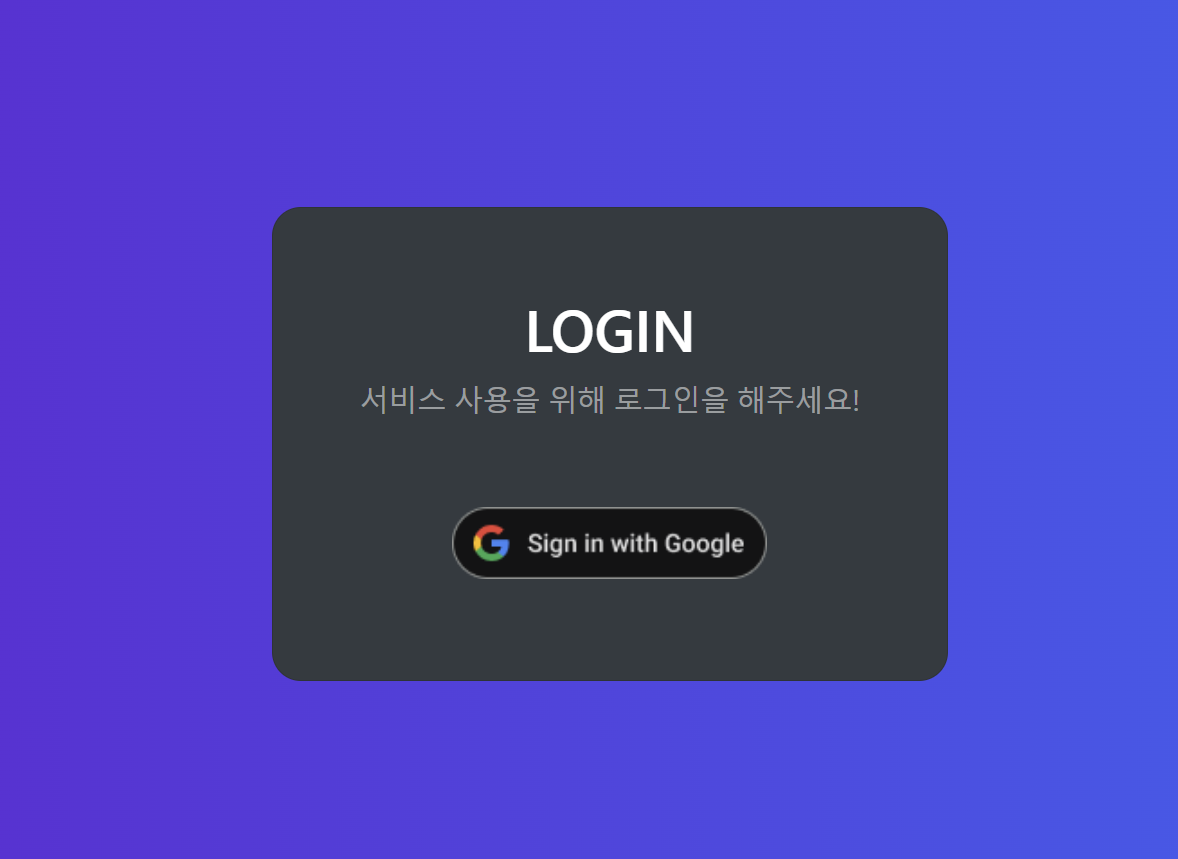
<h2 class="text-white">LOGIN</h2>
<p class="text-white-50 mt-2 mb-5">서비스 사용을 위해 로그인을 해주세요!</p>
<div class = "mb-2">
<a href="/oauth2/authorization/google">
<img src="/img/google.png"> <!--이미지 위치-->
</a>
</div>
</div>
</div>
</div>
</section>
</body>
</html>token.js
파라미터로 받은 토큰이 있다면 토큰을 로컬 스토리지에 저장
const token = searchParam('token')

if (token) {
    localStorage.setItem("access_token", token)
}

function searchParam(key) {
    return new URLSearchParams(location.search).get(key);
}
articleList.html
token.js 추가
<script src="/js/article.js"></script>
<script src="/js/token.js"></script>
</body>
</html>
article.js
POST 요청을 보낼 때 AccessToken도 함께 보낸다.
만약 응답에 권한이 없다는 에러 코드가 발생하면 Refresh Token과 함께 새로운 AccessToken을 요청하고,
새로운 AccessToken으로 다시 API 요청
const createButton = document.getElementById('create-btn')

if (createButton) {
    // 등록 버튼을 클릭하면 /api/articles로 요청을 보낸다
    createButton.addEventListener('click', event => {
        body = JSON.stringify({
            title: document.getElementById('title').value,
            content: document.getElementById('content').value
        });
        function success() {
            alert('등록 완료되었습니다.');
            location.replace('/articles');
        };
        function fail() {
            alert('등록 실패했습니다.');
            location.replace('/articles');
        };

        httpRequest('POST','/api/articles', body, success, fail)
    });
}

function getCookie(key){
    var result = null;
    var cookie = document.cookie.split(";");
    cookie.some(function (item){
        item = item.replace(" ", "");

        var dic = item.split("=");

        if (key === dic[0]){
            result = dic[1];
            return true;
        }
    });
    return result;
}

function httpRequest(method, url, body, success, fail) {
    fetch(url, {
        method: method,
        headers: { // 로컬 스토리지에서 액세스 토큰 값을 가져와 헤더에 추가
            Authorization: 'Bearer ' + localStorage.getItem('access_token'),
            'Content-Type': 'application/json',
        },
        body: body,
    }).then(response => {
        if (response.status === 200 || response.status === 201) {
            return success();
        }
        const refresh_token = getCookie('refresh_token');
        if (response.status === 401 && refresh_token) {
            fetch('/api/token', {
                method: 'POST',
                headers: {
                    Authorization: 'Bearer ' + localStorage.getItem('access_token'),
                    'Content-Type': 'application/json',
                },
                body: JSON.stringify({
                    refreshToken: getCookie('refresh_token'),
                }),
                })
                .then(res => {
                    if (res.ok) {
                        return res.json();
                    }
                })
                .then(result => { // 재발급이 성공하면 로컬 스토리지값을 새로운 액세스 토큰으로 교체
                    localStorage.setItem('access_token', result.accessToken);
                    httpRequest(method, url, body, success, fail);
                })
                .catch(error => fail());
        } else {
            return fail();
        }
    });
}
이어서 삭제, 수정 기능도 수정
const deleteButton = document.getElementById('delete-btn');

if (deleteButton) {
    deleteButton.addEventListener('click', event => {
        let id = document.getElementById('article-id').value;
        function success(){
            alert("삭제가 완료되었습니다.");
            location.replace('/articles');
        }

        function fail(){
            alert("삭제 실패했습니다.");
            location.replace('/articles');
        }

        httpRequest("DELETE", "/api/articles/"+id, null, success, fail);
    });
}

const modifyButton = document.getElementById('modify-btn');

if (modifyButton){
    modifyButton.addEventListener('click', event => {
        let params = new URLSearchParams(location.search);
        let id = params.get('id');

        body : JSON.stringify({
            title : document.getElementById('title').value,
            content : document.getElementById('content').value
        });

        function success(){
            alert('수정이 완료되었습니다');
            location.replace(`/articles/`+ id);
        }

        function fail() {
            alert('수정이 실패했습니다');
            location.replace(`/articles/` + id);
        }
        httpRequest("PUT", "/api/articles/"+id, body, success, fail);
    });
}
글 수정, 삭제, 글쓴이 확인 로직 추가
BlogService
@RequiredArgsConstructor
@Service
public class BlogService {
    private final BlogRepository blogRepository;

    //..생략..

    public void delete(long id){
        Article article = blogRepository.findById(id)
                        .orElseThrow(() -> new IllegalArgumentException("not found : "+id));

        authorizeArticleAuthor(article);
        blogRepository.delete(article);
    }

    @Transactional
    public Article update (long id, UpdateArticleRequest request){
        Article article = blogRepository.findById(id)
                .orElseThrow(() -> new IllegalArgumentException("not found : " + id));

        authorizeArticleAuthor(article);
        article.update(request.getTitle(), request.getContent());

        return article;
    }

    //현재 인증 객체에 담겨 있는 사용자의 정보와 글을 작성한 사용자의 정보 비교
    private void authorizeArticleAuthor(Article article) {
        String userName = SecurityContextHolder.getContext().getAuthentication().getName();
        if (!article.getAuthor().equals(userName)) {
            throw new IllegalArgumentException("not authorized");
        }
    }
}
OAuth2 실행 테스트
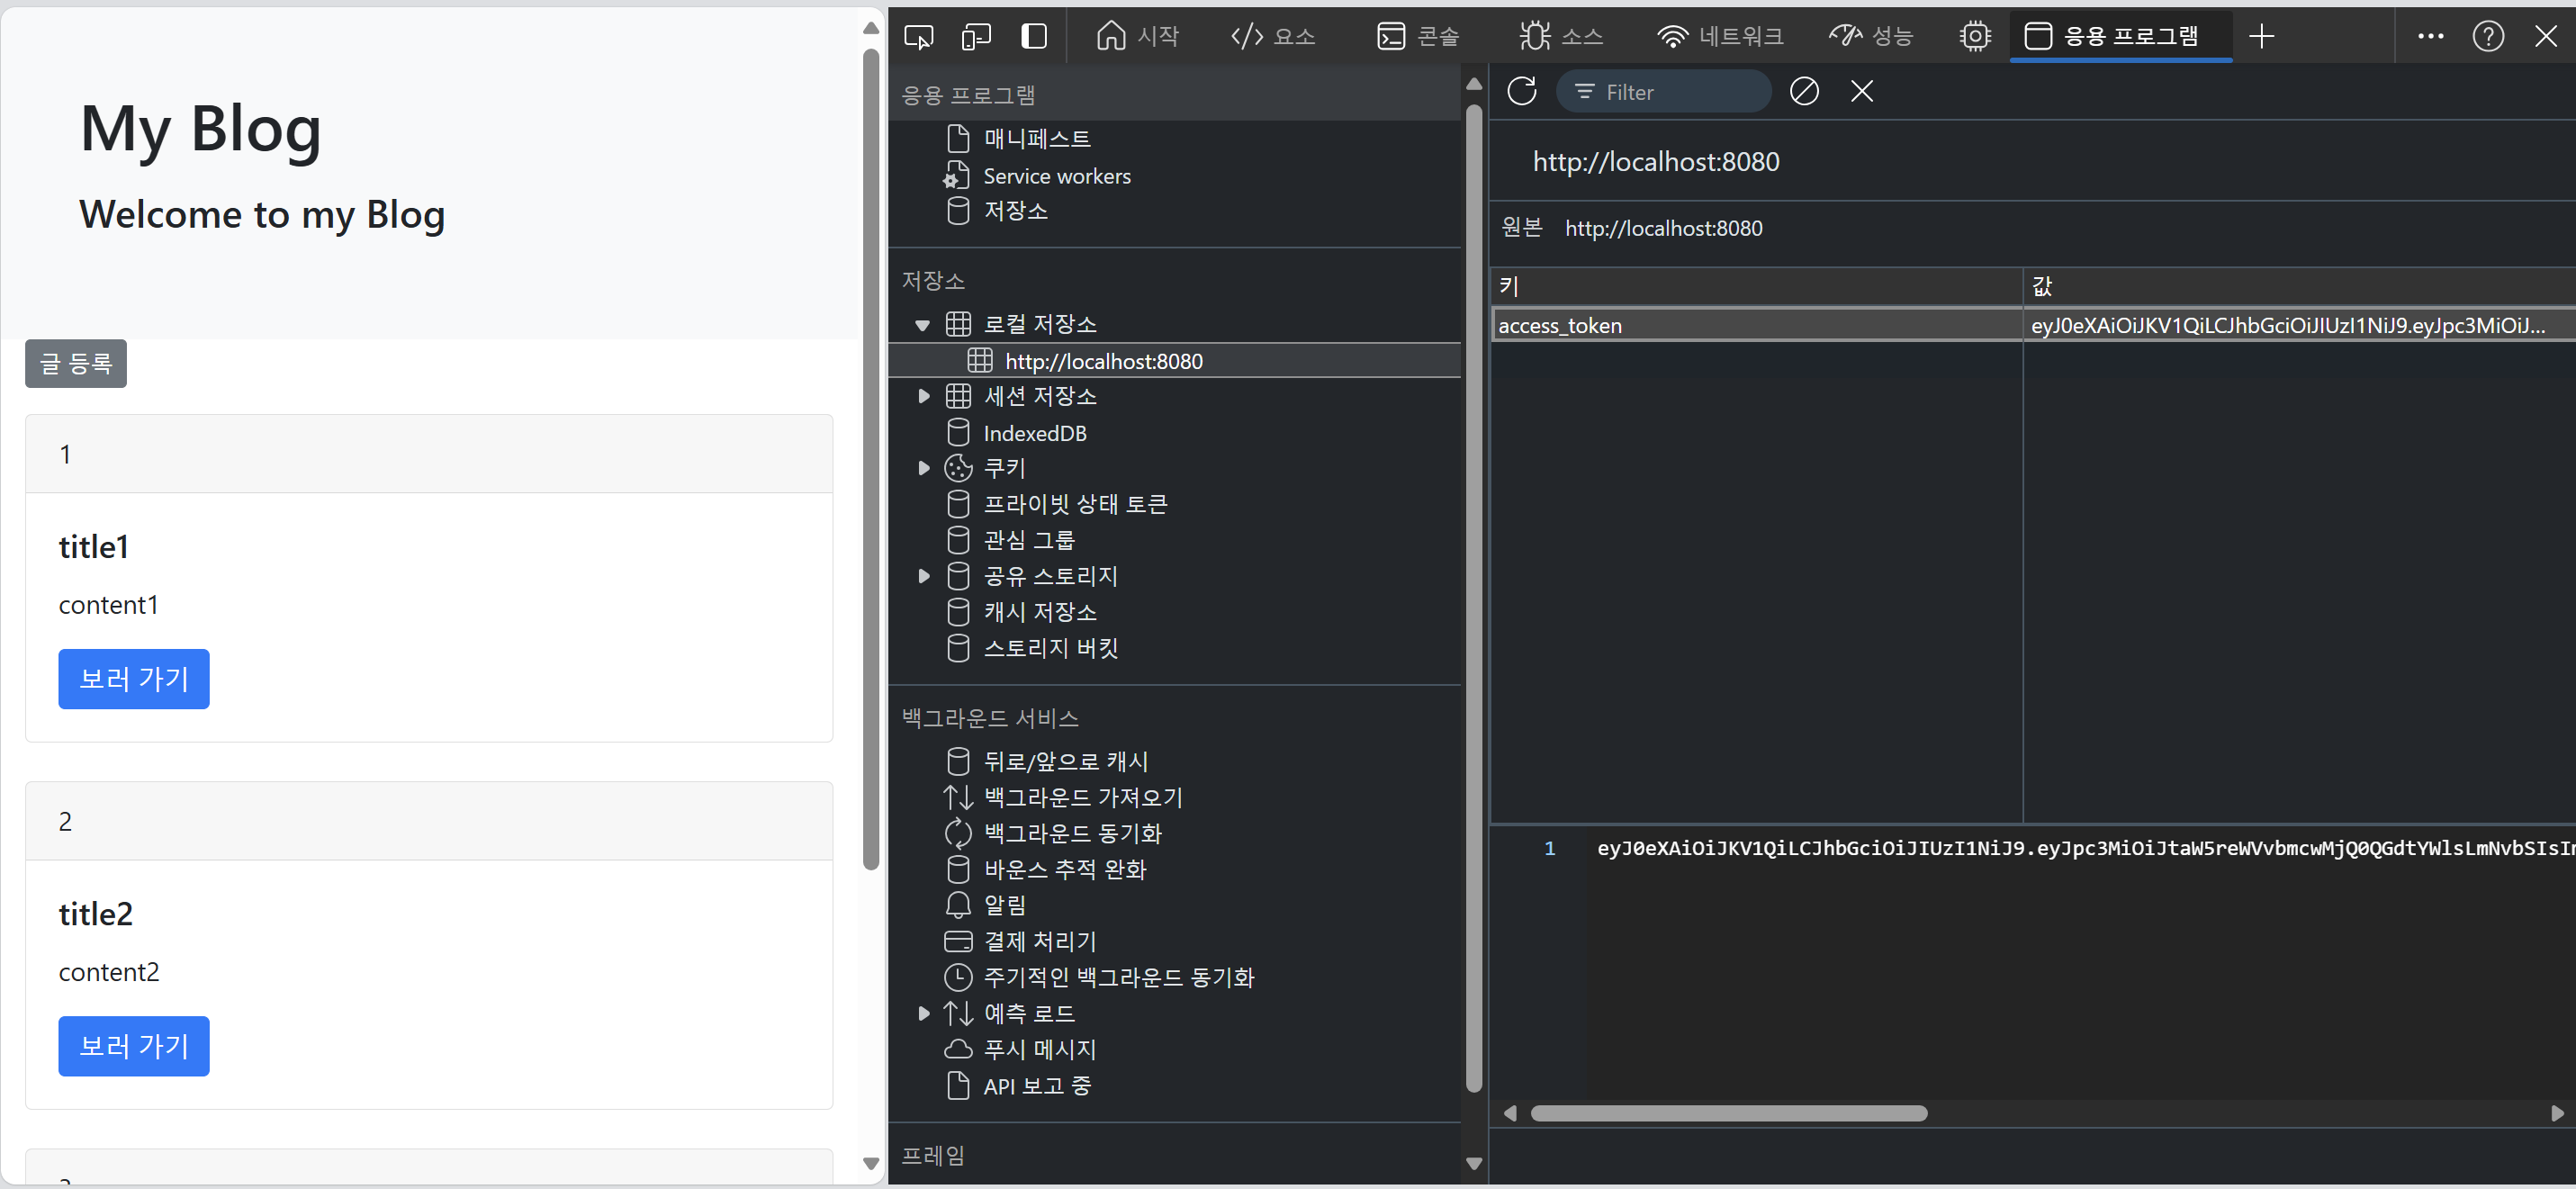
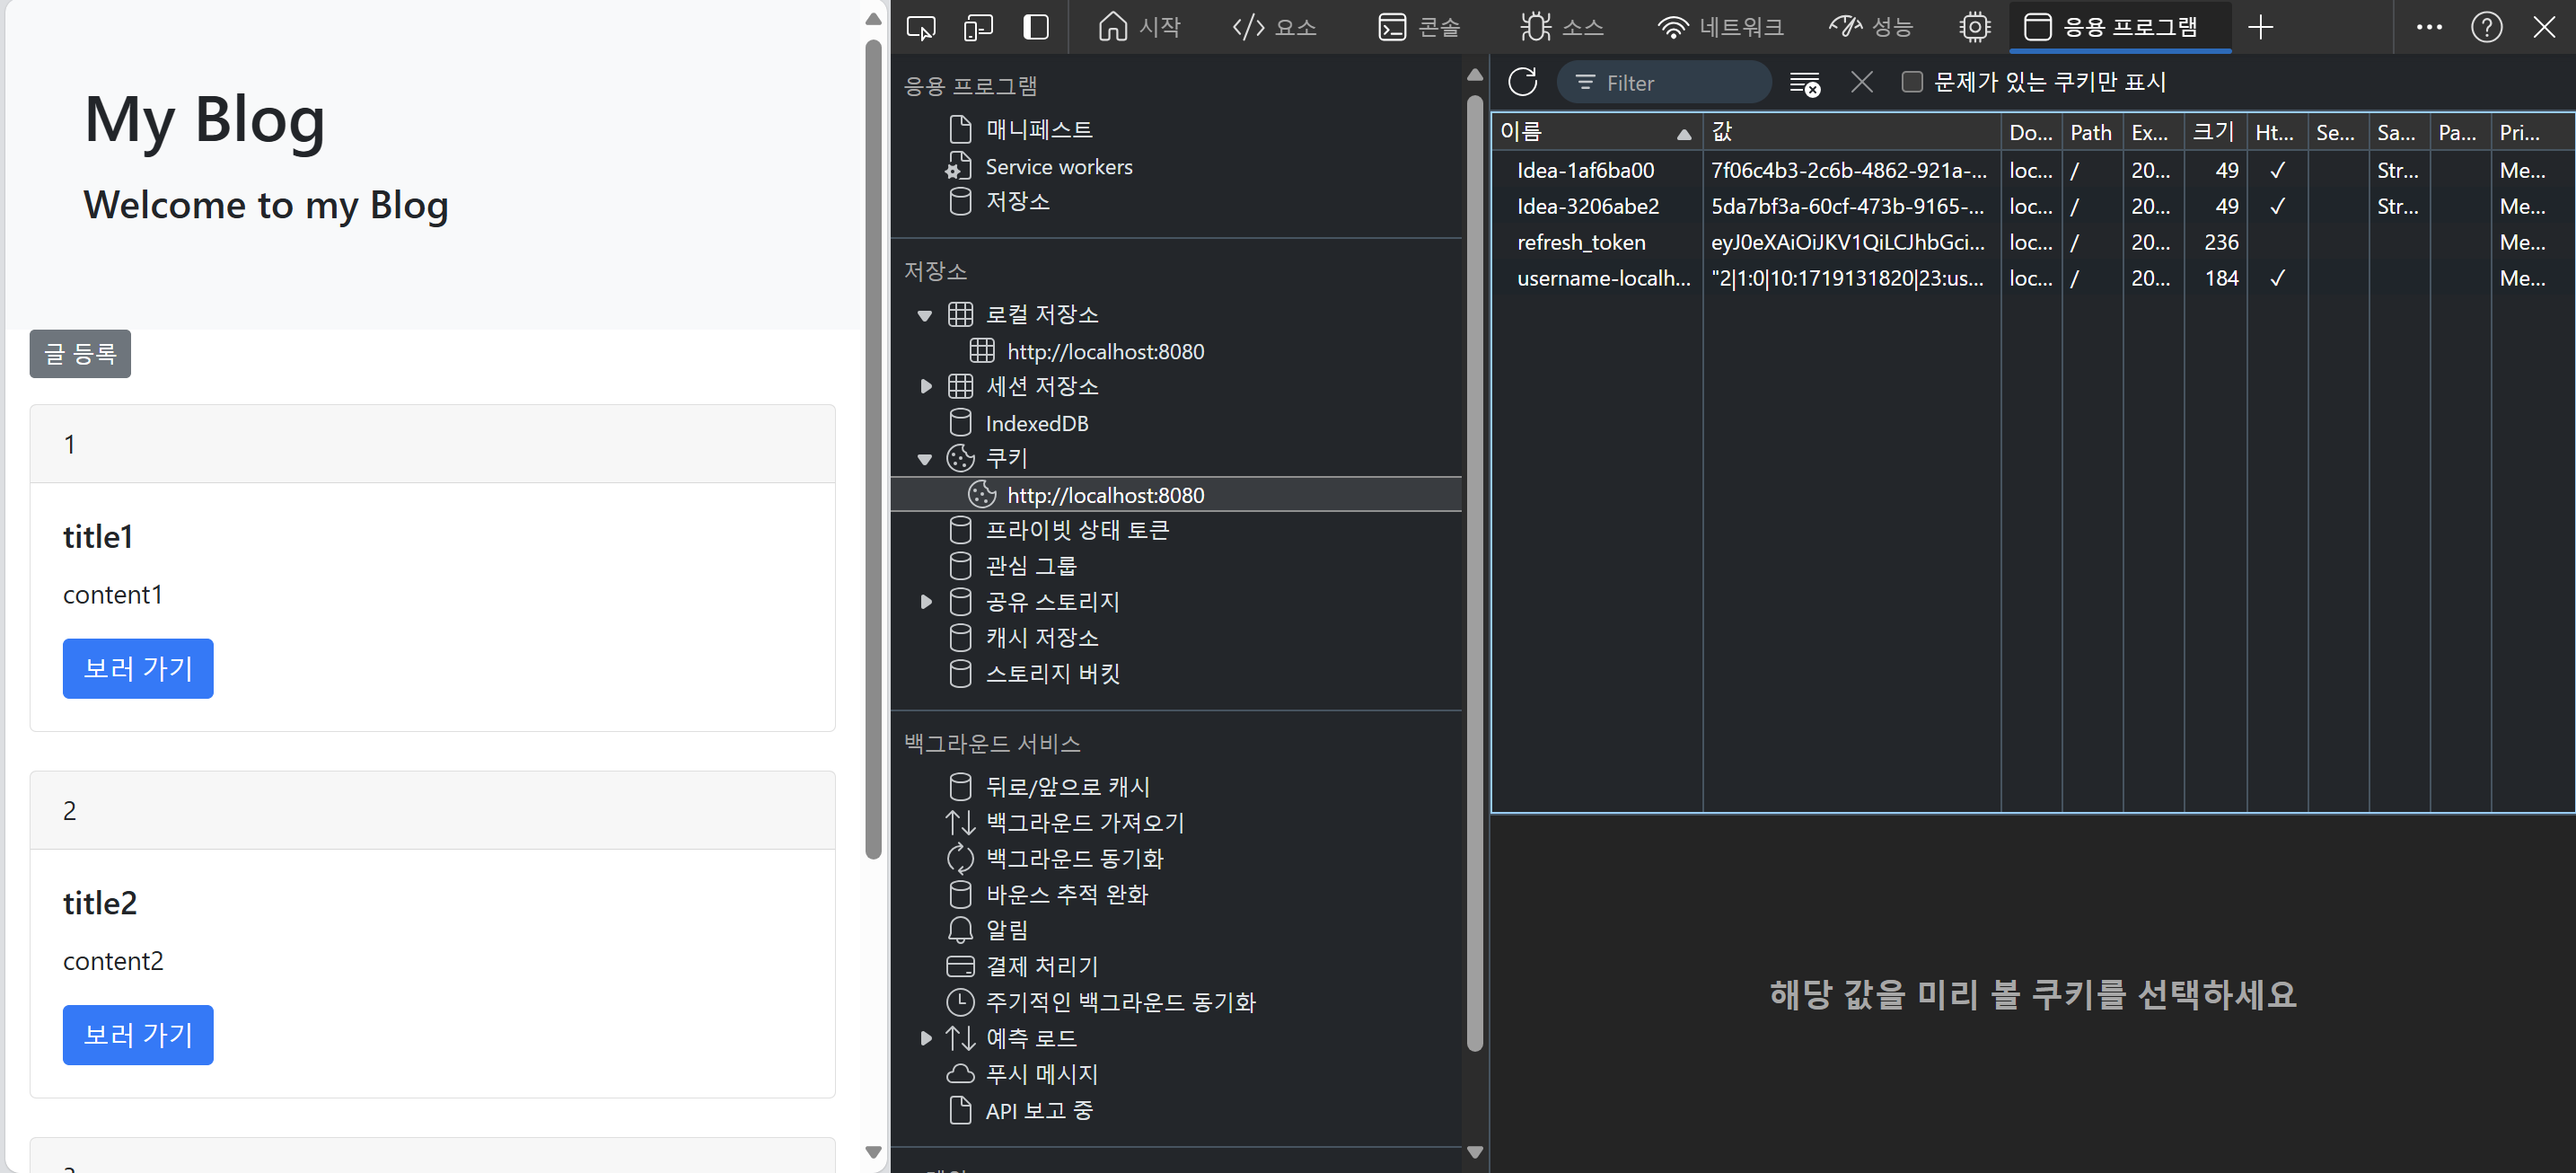
로그인
Access Token
Refresh Token
AccessToken 재발급

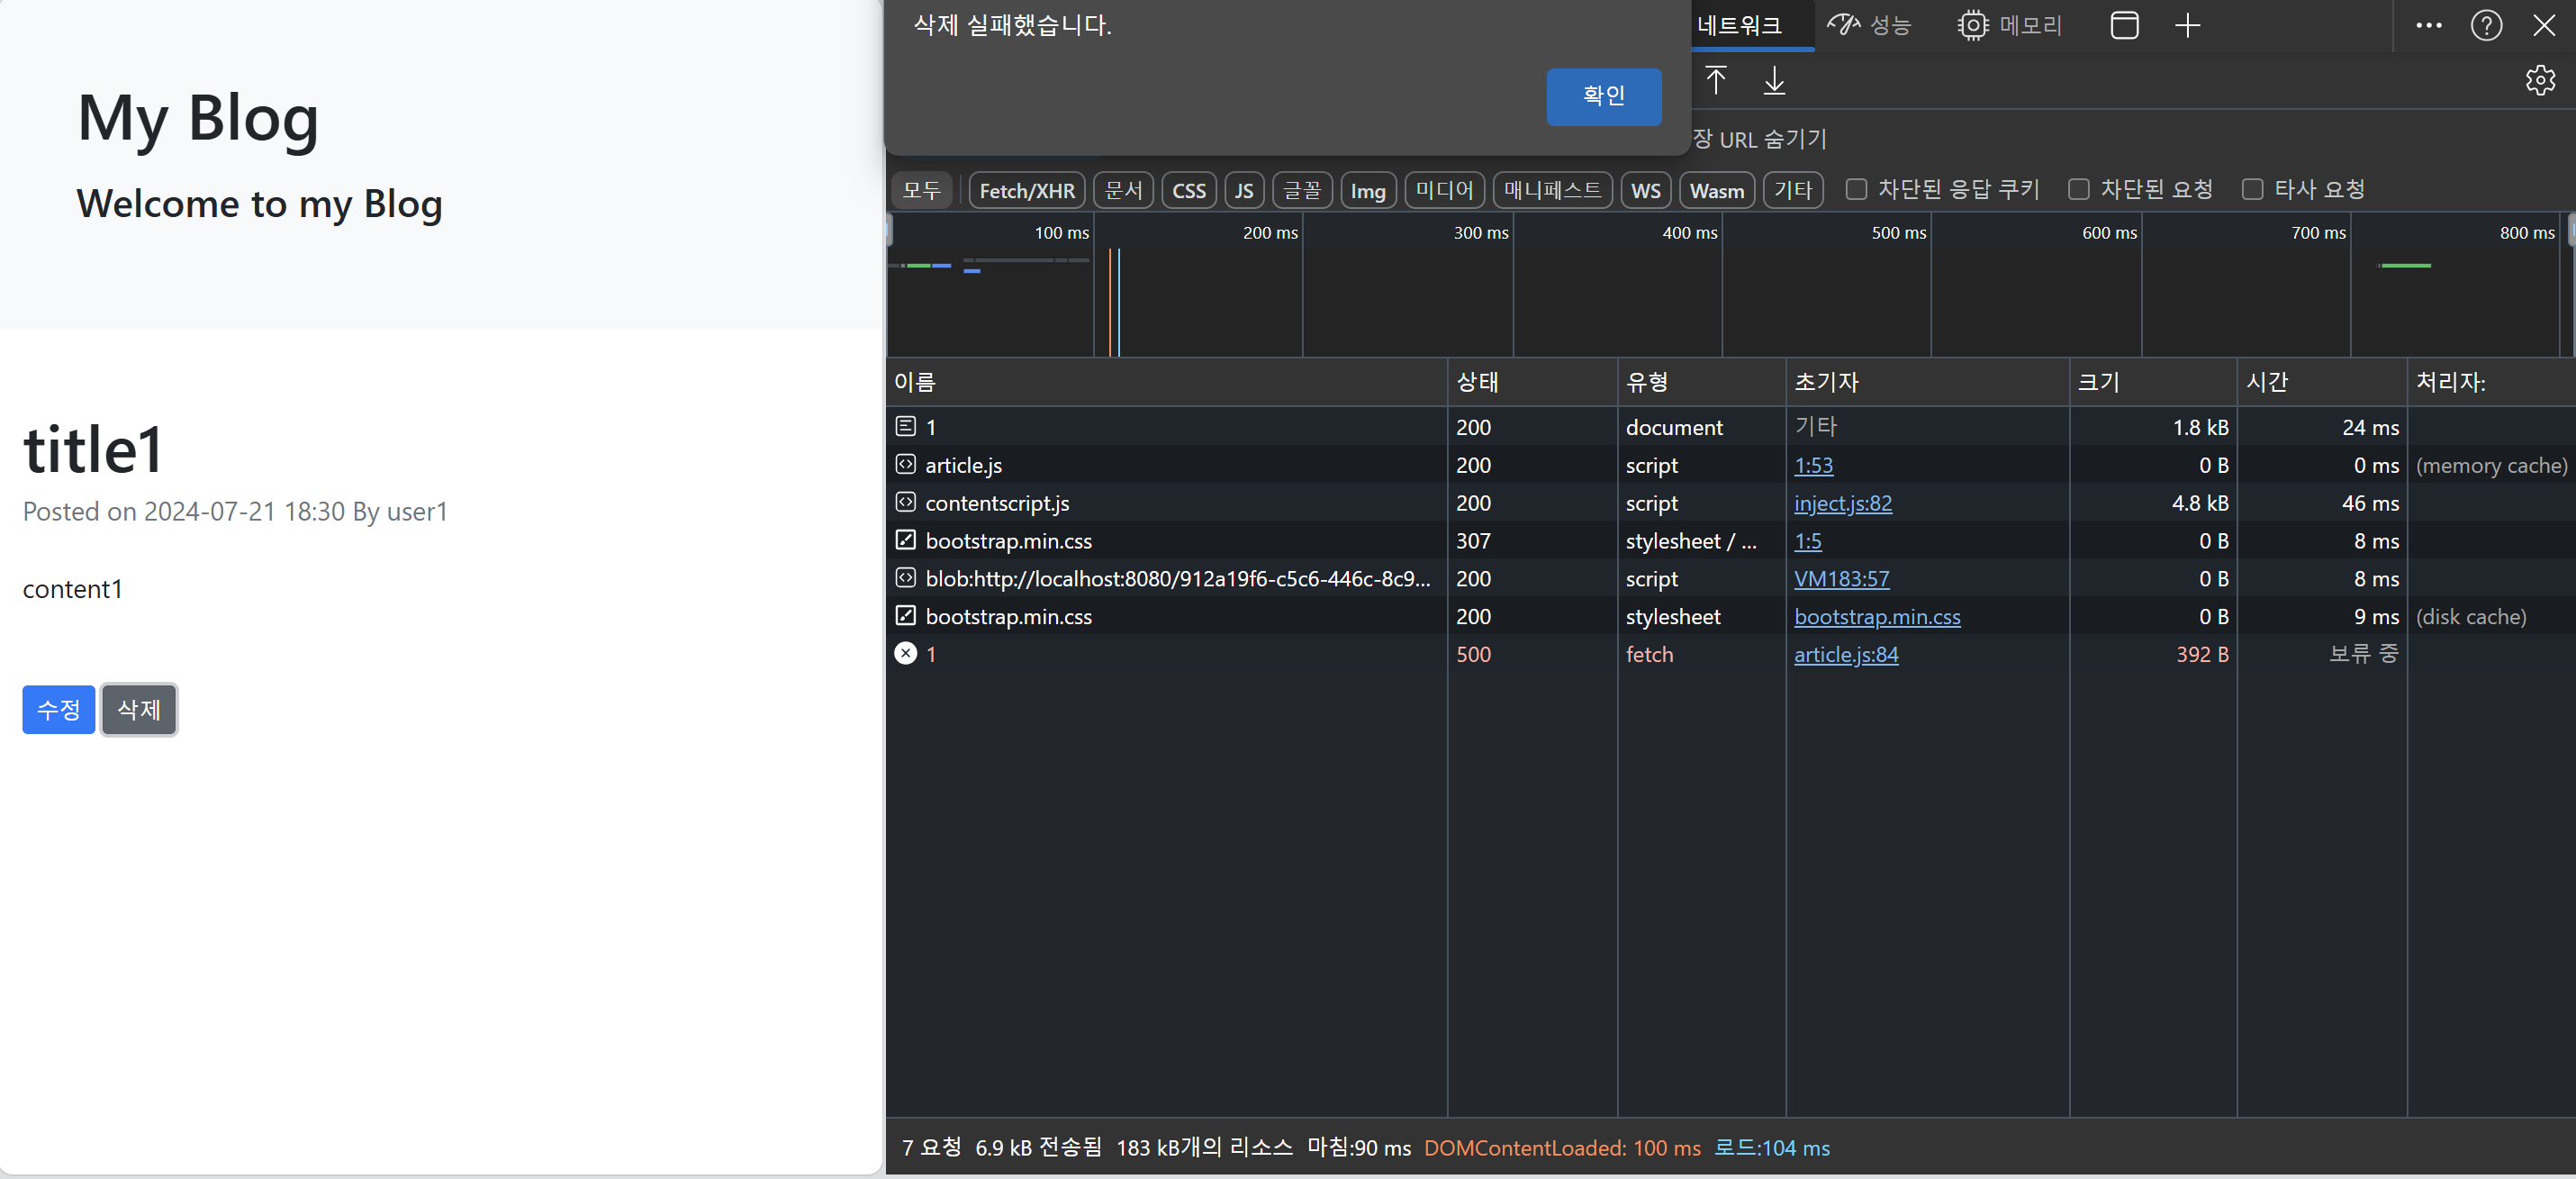
내가 작성한 글 삭제 실패
Test Code 수정
BlogApiControllerTest
@SpringBootTest //테스트용 애플리케이션 컨텍스트
@AutoConfigureMockMvc // MockMvc 생성 및 자동 구성
class BlogApiControllerTest {

  //..생략

    @Autowired
    UserRepository userRepository;

    User user;

  //..생략

  //인증 객체를 저장하는 SecurityContext에
  //setAuthentication()으로 테스트 유저 지정
    @BeforeEach
    void setSecurityContext() {
        userRepository.deleteAll();
        user = userRepository.save(User.builder()
                .email("user@gmail.com")
                .password("test")
                .build());

        SecurityContext context = SecurityContextHolder.getContext();
        context.setAuthentication(new UsernamePasswordAuthenticationToken(user, user.getPassword(), user.getAuthorities()));
    }

  	//글을 만드는 로직 메서드로 추출
  	private Article createDefaultArticle(){
        return blogRepository.save(Article.builder()
                .title("title")
                .content("content")
                .author(user.getUsername())
                .build());
    }

    @DisplayName("addArticle : 블로그에 글 추가에 성공한다.")
    @Test
    public void addArticle() throws Exception {
        final String url = "/api/articles";
        final String title = "title";
        final String content = "content";
        final AddArticleRequest userRequest = new AddArticleRequest(title, content);

        final String requestBody = objectMapper.writeValueAsString(userRequest);

  		//Principal 객체에 테스트 유저가 들어가도록 모킹
  		//getName()을 호출하면 "userName"이라는 값 반환
        Principal principal = Mockito.mock(Principal.class);
        Mockito.when(principal.getName()).thenReturn("username");

        ResultActions result = mockMvc.perform(post(url)
                .contentType(MediaType.APPLICATION_JSON)
                .principal(principal) //Principal 추가
                .content(requestBody));

        List<Article> articles = blogRepository.findAll();

        result.andExpect(status().isCreated());

        assertThat(articles.size()).isEqualTo(1);
        assertThat(articles.get(0).getTitle()).isEqualTo(title);
        assertThat(articles.get(0).getContent()).isEqualTo(content);
    }
나머지 Test 코드를 createDefaultArticle() 메소드 사용으로 수정
    /*
    Given : 블로그 글을 저장
    When : 목록 조회 API를 호출
    Then : 응답코드가 200 OK? 반환받은 값 중에 0번째 요소의 content 와 title이 저장된 값과 같은지 확인
     */

    @DisplayName("findAllArticles : 블로그 글 목록 조회에 성공한다.")
    @Test
    public void findAllArticles() throws Exception{
        //given
        final String url = "/api/articles";
        Article savedArticle = createDefaultArticle();

        //when
        ResultActions result = mockMvc.perform(get(url)
                .accept(MediaType.APPLICATION_JSON));

        //then
        result.andExpect(status().isOk())
                .andExpect(jsonPath("$[0].content").value(savedArticle.getContent()))
                .andExpect(jsonPath("$[0].title").value(savedArticle.getTitle()));
    }

    /*
    Given : 블로그 글 저장
    When : 저장한 블로그 글의 id 값으로 API 호출
    Then : 응답코드가 200 Ok, 반환받은 content와 title이 저장된 값과 같은지 확인
     */

    @DisplayName("findArticle : 블로그 글 조회에 성공한다.")
    @Test
    public void findArticle() throws Exception{
        //given
        final String url = "/api/articles/{id}";
        Article savedArticle = createDefaultArticle();


        //when
        final ResultActions result = mockMvc.perform(get(url, savedArticle.getId()));

        //then
        result
                .andExpect(status().isOk())
                .andExpect(jsonPath("$.content").value(savedArticle.getContent()))
                .andExpect(jsonPath("$.title").value(savedArticle.getTitle()));
    }

    /*
    Given : 블로그 글 저장
    When : 저장한 블로그 글의 id 값으로 삭제 API 호출
    Then : 응답 코드 200 OK, 블로그 글 리스트를 전체 조회해 조회한 배열 크기가 0인지 확인
     */
    @DisplayName("deleteArticle : 블로그 글 삭제에 성공한다.")
    @Test
    public void deleteArticle() throws Exception{
        //given
        final String url = "/api/articles/{id}";
        Article savedArticle = createDefaultArticle();


        //when
        mockMvc.perform(delete(url, savedArticle.getId())).andExpect(status().isOk());

        //then
        List<Article> articles = blogRepository.findAll();

        assertThat(articles.size()).isZero();
        assertThat(articles).isEmpty();
        //같은 동작
    }

    /*
    Given : 블로그 글 저장
    When : UPDATE API로 수정 요청을 보냄, 요청 타입 : JSON, given에서 만들어둔 객체를 요청 본문으로 함께 보냄
    Then : 200 OK , id로 조회한 후에 값이 수정되었는 지 확인
     */
    @DisplayName("updateArticle : 블로그 글 수정에 성공한다.")
    @Test
    public void updateArticle() throws Exception{
        //given
        final String url = "/api/articles/{id}";
        Article savedArticle = createDefaultArticle();


        final String newTitle = "newTitle";
        final String newContent = "newContent";

        UpdateArticleRequest request = new UpdateArticleRequest(newTitle, newContent);

        //when
        ResultActions result = mockMvc.perform(put(url, savedArticle.getId())
                .contentType(MediaType.APPLICATION_JSON)
                .content(objectMapper.writeValueAsString(request)));

        //then
        result.andExpect(status().isOk());
        Article article = blogRepository.findById(savedArticle.getId()).get();

        assertThat(article.getTitle()).isEqualTo(newTitle);
        assertThat(article.getContent()).isEqualTo(newContent);
    }

}
+) 로그아웃 구현
Controller
TokenApiControler
@RequiredArgsConstructor
@RestController
public class TokenApiController {
    private final TokenService tokenService;
    private final RefreshTokenService refreshTokenService;

  //..생략
    @DeleteMapping("/api/refresh-token")
    public ResponseEntity deleteRefreshToken() {
        refreshTokenService.delete();

        return ResponseEntity.ok()
                .build();
    }
}
Repository
RefreshTokenRepository
public interface RefreshTokenRepository extends JpaRepository<RefreshToken, Long> {
    //.. 생략

    void deleteByUserId(Long userId);
}
Service
RefreshTokenService
@RequiredArgsConstructor
@Service
public class RefreshTokenService {
    private final RefreshTokenRepository refreshTokenRepository;
    private final TokenProvider tokenProvider;

    //..생략..

    @Transactional
    public void delete() {
        String token = SecurityContextHolder.getContext().getAuthentication().getCredentials().toString();
        Long userId = tokenProvider.getUserId(token);

        refreshTokenRepository.deleteByUserId(userId);
    }

}
JavaScript
article.js
const logoutButton = document.getElementById('logout-btn');

if (logoutButton){
    logoutButton.addEventListener('click', event => {
        function success(){
            localStorage.removeItem('access_token');

            deleteCookie('refresh_token');
            location.replace('/login');
        }
        function fail() {
            alert('로그아웃 실패');
        }

        httpRequest('DELETE', '/api/refresh-token', null, success, fail);
    });
}

function deleteCookie(name){
    document.cookie = name + '=; expires=Thu, 01 Jan 1970 00:00:01 GMT;';
}
HTML
articleList.html
  </div>
    <button type="button" class="btn btn-secondary" id="logout-btn">로그아웃</button>
<!--    <button type="button" class="btn btn-secondary">로그아웃</button>-->
</div>
로그아웃 Test
TokenApiControllerTest
    @BeforeEach
    void setSecurityContext(){
        userRepository.deleteAll();
        user = userRepository.save(User.builder()
                .email("user@gmail.com")
                .password("test")
                .build());

        SecurityContext context = SecurityContextHolder.getContext();
        context.setAuthentication(new UsernamePasswordAuthenticationToken(user, user.getPassword(), user.getAuthorities()));
    }

    @DisplayName("deleteRefreshToken : 리프레시 토큰을 삭제한다.")
    @Test
    public void deleteRefreshToken() throws Exception {
        //given
        final String url = "/api/refresh-token";

        String refreshToken = createRefreshToken();

        refreshTokenRepository.save(new RefreshToken(user.getId(), refreshToken));

        SecurityContext context = SecurityContextHolder.getContext();
        context.setAuthentication(new UsernamePasswordAuthenticationToken(user, refreshToken, user.getAuthorities()));

        //when
        ResultActions result = mockMvc.perform(delete(url)
                .contentType(MediaType.APPLICATION_JSON));

        //then
        result.andExpect(status().isOk());

        assertThat(refreshTokenRepository.findByRefreshToken(refreshToken)).isEmpty();
    }

    private String createRefreshToken() {
        return JwtFactory.builder()
                .claims(Map.of("id", user.getId()))
                .build()
                .createToken(jwtProperties);
    }
}
OAuth2 + JWT + 스프링 시큐리티의 조합으로 인증 서비스 제작
쿠키, OAuth, 권한 부여 코드 승인 타입