이전까지의 수업은 notion에 기록하고 있었는데, 이제 곧 세미 프로젝트를 시작하는 만큼 이제부터는 여기에 기록하려 한다.
최대한 상세하게 기록하고 싶지만 코드 전체를 넣기엔 강사님 수업의 저작권이 염려되기 때문에 코드는 부분적으로만 기록할 예정이다.
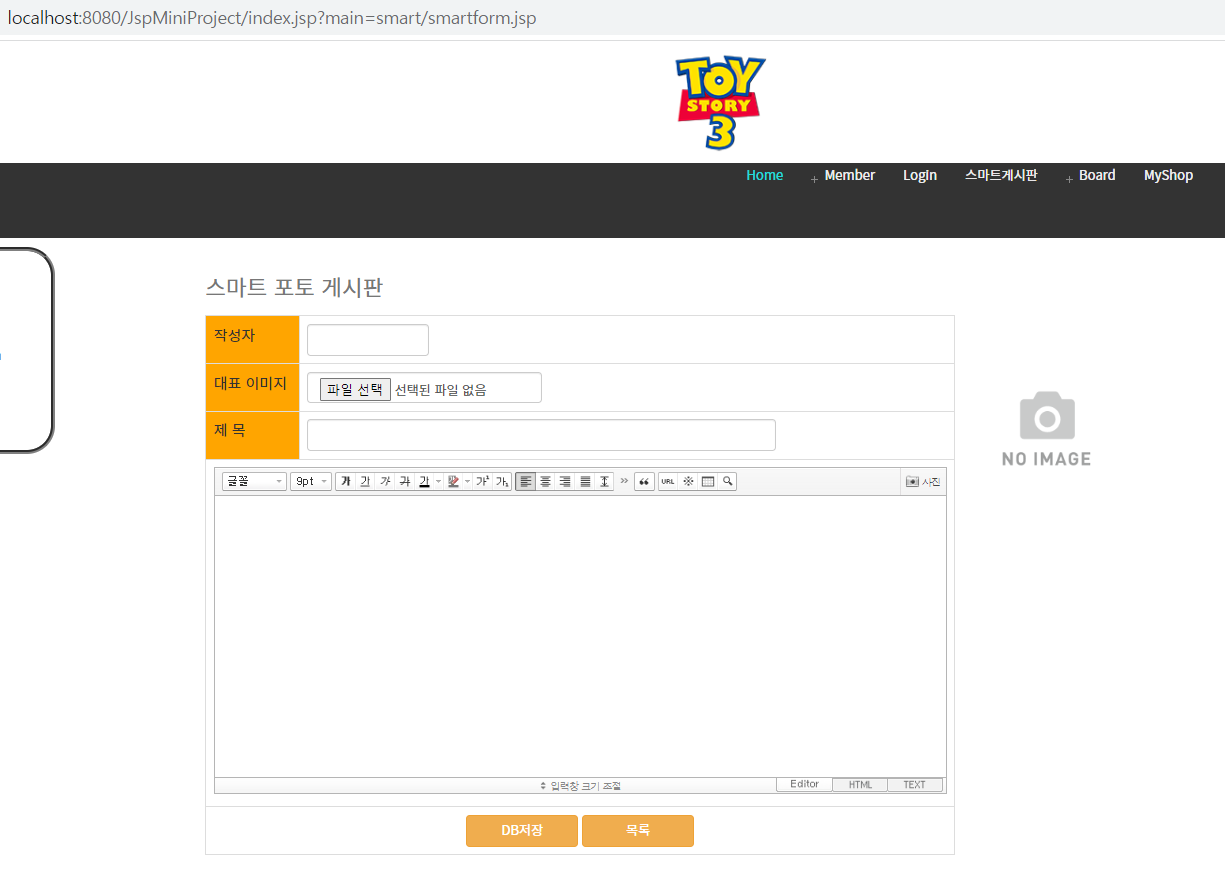
오늘 수업에서는 네이버 스마트 에디터2.0을 적용한 게시판을 만들어보았다.
오늘 배운 것은
- 메뉴에서 '스마트게시판' 선택하면 글쓰기 폼으로 연결
- 글 리스트에서 제목 앞에 작은 이미지를 띄우기 위해 대표 이미지를 별도로 지정해주고 선택한 사진 폼에서 미리 볼 수 있게 하기
- DB저장 누르면 DB로 저장되고, 목록 누르면 글 리스트로 이동
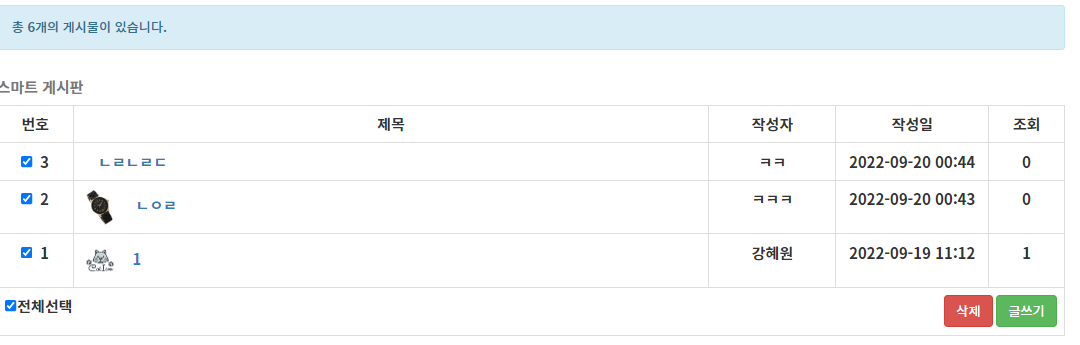
- 글 리스트에서는 번호 앞에 체크 박스를 두어 체크한 글을 삭제 가능하게 하고 전체 선택 누르면 현재 페이지에 있는 모든 체크박스가 선택/해제 되도록 하기
- 글을 클릭하면 상세 페이지가 나오고 삭제, 수정, 글쓰기를 할 수 있도록 하기
이정도로 정리할 수 있겠다.
스마트 에디터 세팅
먼저 강사님이 주신 스마트 에디터 2.0 파일을 받고 webapp에 폴더를 복사해준다.(네이버에서 배포하는 파일을 찾아보았는데 강사님이 주신 파일과 뭔가 많이 다르다...나중에는 네이버에서 배포한 파일로 연습을 해봐야겠다.)
스마트 에디터 2.0에서 업로드한 파일을 저장하기 위해 webapp에 'save' 폴더도 만들어준다.
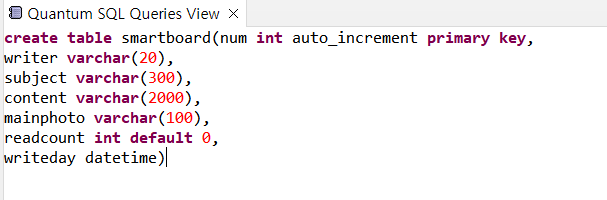
테이블 생성, dto/dao.java
그 다음은 smartboard table을 생성하고, SmartDto.java, SmartDao.java 파일을 생성한다.
SmartDao.java에서 Db연결을 해주고, 사용할 메서드들을 미리 정리해놓는다.
Dao에 정의된 메서드는
insertSmart() - DB에 추가
getAllDatas() - DB에 있는 전체 리스트 출력
getTotalCount() - 페이징 처리1. 전체 글 갯수 구하기
getList() - 페이징 처리2. 한 페이지에 필요한 리스트만 내보내기
getData() - num에 따른 하나의 Data 반환하기
updateSmart() - DB 수정
deleteSmart() - DB 삭제
updateReadCount() - 조회수 카운트
이렇게 총 8개이다.
업로드 경로 지정
webapp>se2>photo_uploader>popup>file_uploader.jsp에서 파일이 업로드 될 경로를 지정해준다.
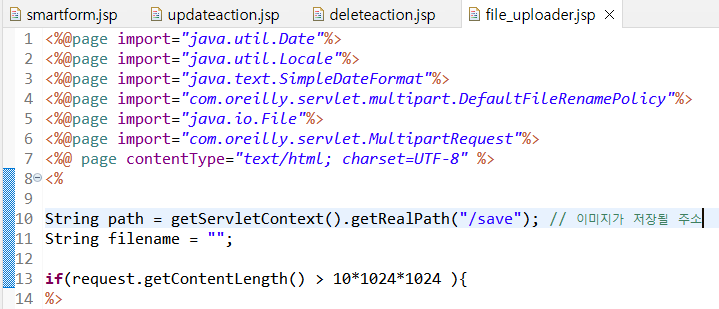
* 파일이 저장될 주소를 save가 아닌 다른 이름의 폴더로 바꾸는 경우 위의 코드와 함께 smartform.jsp에서 textArea에 이미지가 뜨게 하는 사용자 함수도 수정해줘야 한다.
추가
smartform.jsp
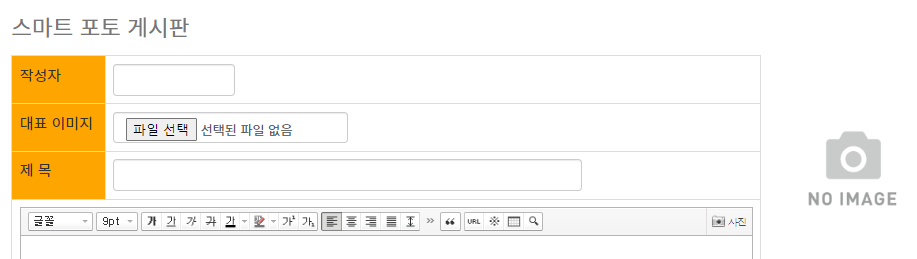
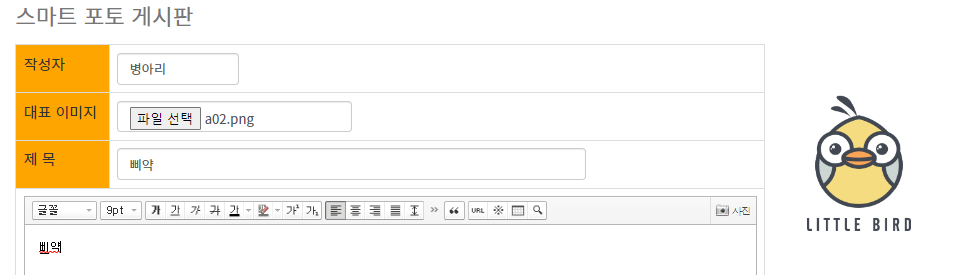
스마트 에디터에서 사진을 선택하는 경우에는 첨부 완료하고 textArea에서 바로 볼 수 있지만, 대표 이미지에서 file을 선택하는 경우는 글 쓰는 폼에서 미리보기를 할 수 없다. 따라서 미리보기 공간을 별도로 두고 처음 글쓰기 폼에 들어갔을 때는 no image 이미지가 뜨도록 설정한다.

id를 showimg로 주고 위에서 css를 줬다.
//첨부한 이미지 미리보기 사용자 함수
function readURL(input){
	if (input.files && input.files[0]) {
        var reader = new FileReader();
        reader.onload = function (e) {
        $('#showimg').attr('src', e.target.result);
        }
        reader.readAsDataURL(input.files[0]);
    }

}
그러면 아래처럼 선택한 mainphoto를 미리 볼 수 있다.
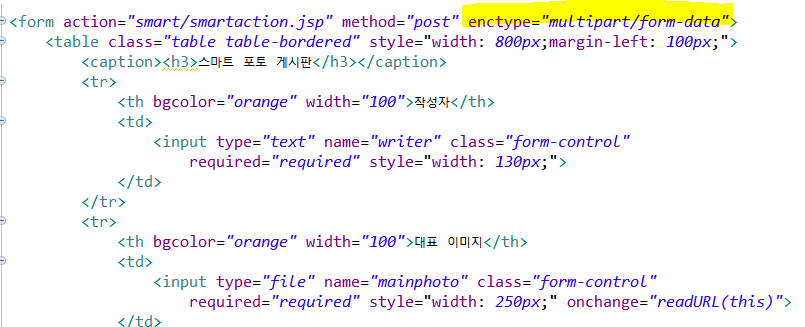
그리고 이렇게 mainphoto 파일을 추가하기 때문에 enctype이 multipart/form-data를 추가해줘야 한다.
(enctype은 HTML 폼을 post 방식으로 전송하는 경우 전송하는 데이터를 인코딩하기 위해 인코딩 타입을 명시하는 속성이며, multipart/form-data는 파일(<input type="file">)이 포함된 폼을 전송할 때 사용한다.)
그리고 smartform에서 목록을 누르면 게시물 목록으로 가게끔 경로를 넣는다.
DB저장은 기존에 작성되어 있던 사용자 함수가 적용되어 있다.
index.jsp에서 main부분에 글 목록이 출력되도록 'index.jsp?main=' 을 앞에 붙인다.
<tr>
			<td colspan="2" align="center">
				<button type="button" class="btn btn-warning"
					style="width: 120px;"
					onclick="submitContents(this)">DB저장</button>

				<button type="button" class="btn btn-warning"
					style="width: 120px;"
					onclick="location.href='index.jsp?main=smart/smartlist.jsp'">목록</button>
			</td>
		</tr>
smartaction.jsp
smartform을 submit 하면 smart 폴더의 smartaction.jsp가 실행되도록 되어있다. 이제 smartaction.jsp를 만들어서 작성한 내용들을 DB에 저장해보자.

smartaction에서는 request. 대신 MultipartRequest로 내용을 불러운다.
//이미지가 업로드 될 실제 경로
String realPath = getServletContext().getRealPath("/save"); //save에 realPath를 넣겟다?!?!!?!?
System.out.println(realPath); //콘솔창 확인해서 이미지 들어갔는지 확인

//업로드사이즈
int uploadSize = 1024*1024*10; //10mb

try{

	//생성자 파라메타
	//request, 업로드폴더, 업로드사이즈, 한글타입, new DefaultFileRenamePolicy(같은 이름에 (2), (3)붙여서 저장하기)
	MultipartRequest multi = new MultipartRequest(request,realPath, uploadSize, "utf-8", new DefaultFileRenamePolicy() );

	//입력값 읽기

	String writer = multi.getParameter("writer");
	String subject = multi.getParameter("subject");
	String content = multi.getParameter("content");
	String mainphoto = multi.getFilesystemName("mainphoto");
이후에 dto 선언을 하고 dto.setWriter(writer); 방식으로 dto에 입력값을 dto에 담고
dao를 선언하고 dao.insertSmart(dto);를 호출한다.
그리고 목록으로 이동하는 response.sendRedirect로 경로를 준다.
response.sendRedirect("../index.jsp?main=smart/smartlist.jsp");sendRedirect는 실제로 주소를 이동하기 때문에 "../"를 붙여서 상대 경로로 정확하게 써줘야 한다.
DB저장에 성공하면 아래처럼 확인할 수 있다.
스마트 에디터를 통해 추가한 이미지 파일은 img 속성으로 들어간다.

전체 출력
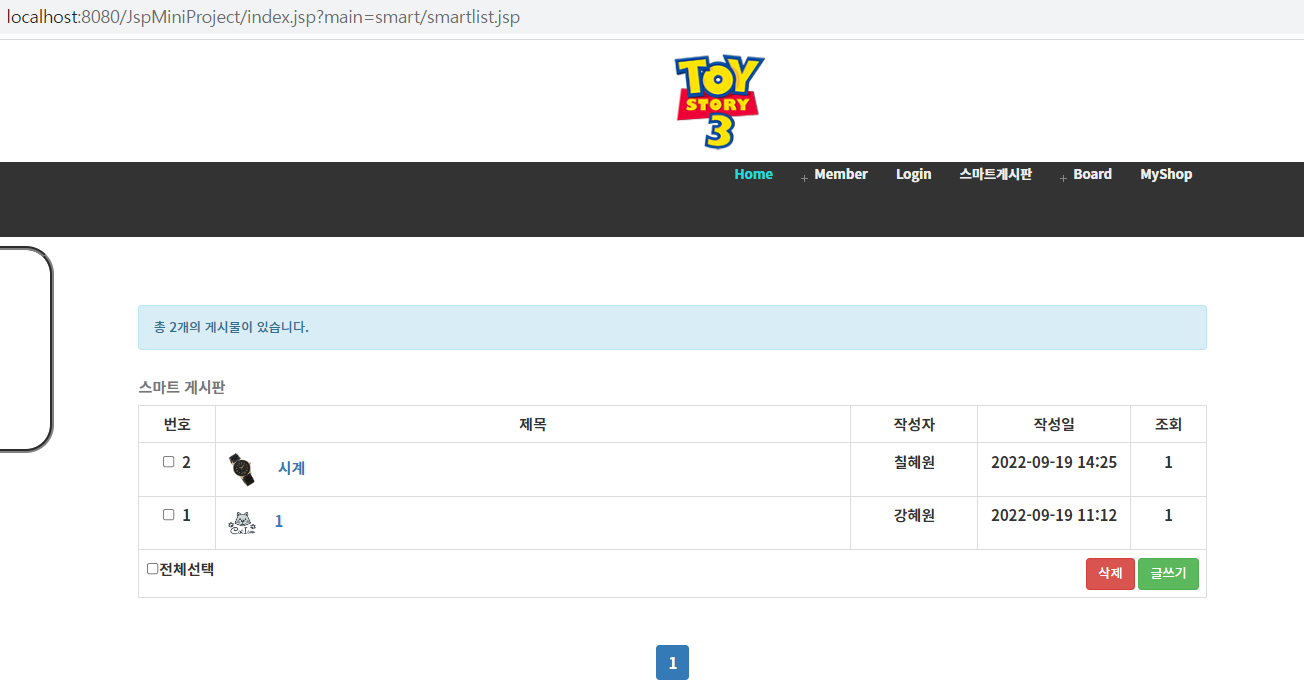
smartlist.jsp
게시물 목록을 볼 수 있는 smartlist.jsp를 만들어준다.
<%
if(totalCount==0){
%>
<tr>
<td colspan="5" align="center">
<b>등록된 게시물이 없습니다.</b>
</td>
</tr>
<%}else{
SimpleDateFormat sdf = new SimpleDateFormat("yyyy-MM-dd HH:mm");
for(SmartDto dto:list){
%>
<tr>
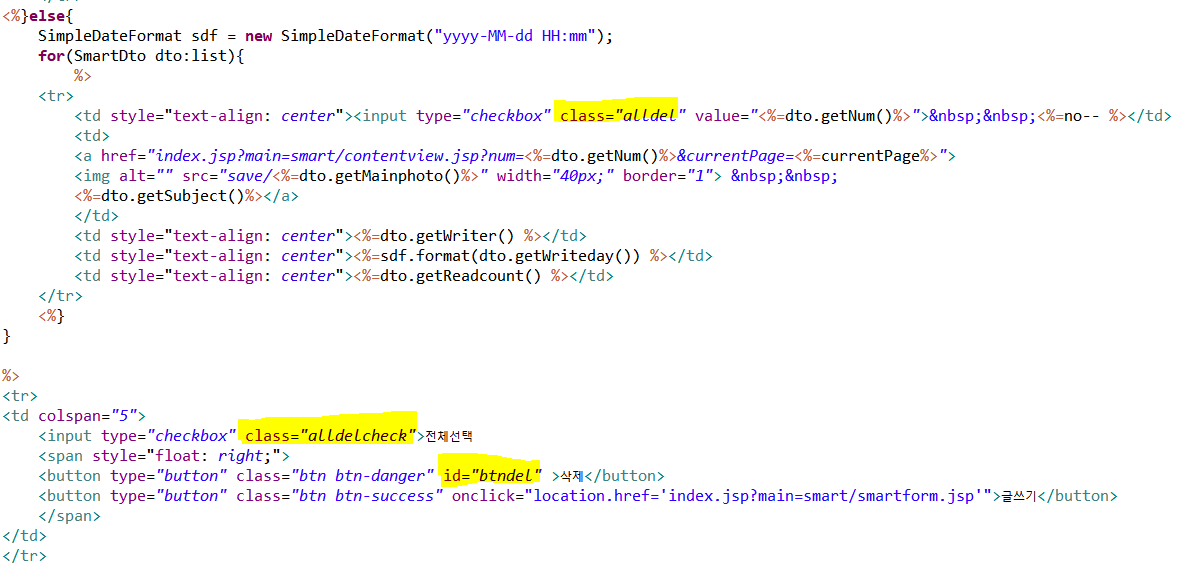
<td style="text-align: center"><input type="checkbox" class="alldel" value="<%=dto.getNum()%>"> <%=no-- %></td>
<td>
<a href="index.jsp?main=smart/contentview.jsp?num=<%=dto.getNum()%>¤tPage=<%=currentPage%>">
<img alt="" src="save/<%=dto.getMainphoto()%>" width="40px;" border="1">
<%=dto.getSubject()%></a>
</td>
<td style="text-align: center"><%=dto.getWriter() %></td>
<td style="text-align: center"><%=sdf.format(dto.getWriteday()) %></td>
<td style="text-align: center"><%=dto.getReadcount() %></td>
</tr>
<%}
}
%>
<tr>
<td colspan="5">
<input type="checkbox" class="alldelcheck">전체선택
<span style="float: right;">
<button type="button" class="btn btn-danger" id="btndel" >삭제</button>
<button type="button" class="btn btn-success" onclick="location.href='index.jsp?main=smart/smartform.jsp'">글쓰기</button>
</span>
</td>
</tr>
게시물 제목을 클릭하면 게시물을 확인할 수 있도록 제목 부분에 a태그를 활용한다.
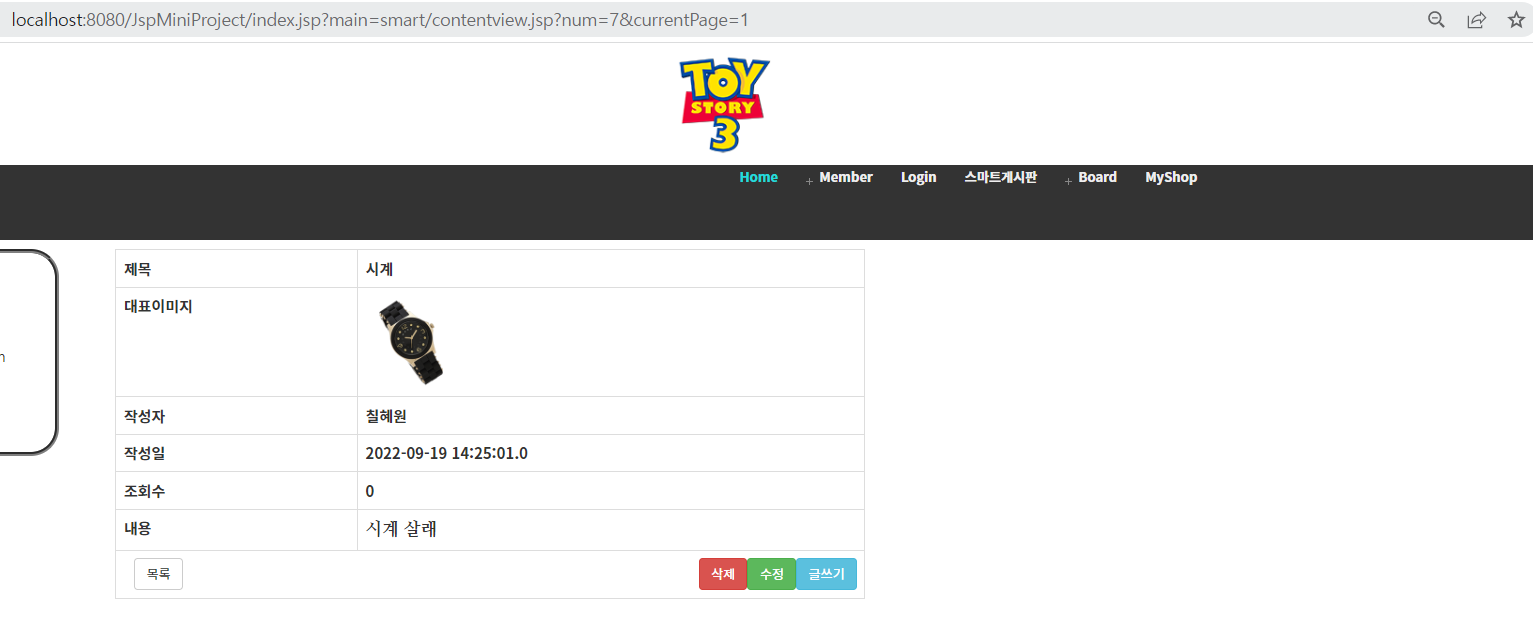
<a href="index.jsp?main=smart/contentview.jsp?num=<%=dto.getNum()%>¤tPage=<%=currentPage%>">contentview.jsp
contentview.jsp는 클릭한 제목에 해당하는 num값과 currentPage값을 받아와야 한다. 그래야 해당 num에 맞는 게시물 내용을 출력하고, 상세보기에서 update와 delete를 실행했을 때 currentPage에 머물 수 있기 때문이다.
<%
String num = request.getParameter("num");
String currentPage = request.getParameter("currentPage");

SmartDao dao = new SmartDao();

SmartDto dto = dao.getData(num);

dao.updateReadCount(num);

SimpleDateFormat sdf = new SimpleDateFormat("yyy-MM-dd HH:mm");
%>
내용을 출력하는 table을 만들고, 마지막 행에는 버튼을 만들어준다.
<tr>
<td colspan="2">
<button type="button" class="btn btn-info" onclick="location.href='index.jsp?main=smart/smartform.jsp'" style="float: right;">글쓰기</button>
<button type="button" class="btn btn-default" onclick="location.href='index.jsp?main=smart/smartlist.jsp'">목록</button>
<button type="button" class="btn btn-success" onclick="location.href='index.jsp?main=smart/updateform.jsp?num=<%=dto.getNum()%>¤tPage=<%=currentPage %>'" style="float: right;">수정</button>
<button type="button" class="btn btn-danger" onclick="funcdel(<%=num%>,<%=currentPage%>)" style="float: right;">삭제</button>
</td>
</tr>수정
updateform.jsp
수정 버튼을 누르면 updateform으로 넘어가서 기존 내용이 출력되어 있는 입력창에서 수정을 할 수 있도록를 적용한다.
수정폼은 smartform을 복사해서 updateform.jsp를 만들어준다.
그리고 num, currentPage값을 받아오고 getData(num) 메서드를 호출한다.
String num = request.getParameter("num");
	String currentPage = request.getParameter("currentPage");

	SmartDao dao = new SmartDao();
	SmartDto dto = dao.getData(num);
그리고 원래 첨부했던 대표이미지가 수정폼을 들어가자마자 미리보기 될 수 있게 img src에 dto.getMainphoto()값을 넣어준다.
form의 action은 updateaction.jsp가 되도록 해주고,
hidden으로 num값과 currentPage 값을 넣어준다.
<img alt="" src="save/<%=dto.getMainphoto()%>" style="max-width: 300px;" id="showimg">
<form action="smart/updateaction.jsp" method="post" enctype="multipart/form-data">
<input type="hidden" name="num" value=<%=num %>>
<input type="hidden" name="currentPage" value=<%=currentPage %>>
그리고 위에서 호출한 getData(num)을 통해서 DB의 데이터가 각 자리에 입력되도록 value값을 준다.
<table class="table table-bordered" style="width: 800px;margin-left: 100px;">
		<caption><h3>스마트 포토 게시판</h3></caption>
		<tr>
			<th bgcolor="orange" width="100">작성자</th>
			<td>
				<input type="text" name="writer" value="<%=dto.getWriter() %>" class="form-control"
					required="required" style="width: 130px;">
			</td>
		</tr>
		<tr>
			<th bgcolor="orange" width="100">대표 이미지</th>
			<td>
			<h5>대표 사진을 변경할 경우에만 다시 선택해주세요</h5>
				<input type="file" name="mainphoto" value="<%=dto.getMainphoto() %>" class="form-control"
					required="required" style="width: 250px;" onchange="readURL(this)">
			</td>
		</tr>
		<tr>
			<th bgcolor="orange" width="100">제  목</th>
			<td>
				<input type="text" name="subject" value="<%=dto.getSubject() %>" class="form-control"
					required="required" style="width: 500px;">
			</td>
		</tr>
		<tr>
			<td colspan="2">
				<textarea name="content" id="content"
					required="required"
					style="width: 100%;height: 300px;display: none;"><%=dto.getContent() %></textarea>

			</td>
		</tr>
		<tr>
			<td colspan="2" align="center">
				<button type="button" class="btn btn-warning"
					style="width: 120px;"
					onclick="submitContents(this)">DB저장</button>

				<button type="button" class="btn btn-warning"
					style="width: 120px;"
					onclick="location.href='index.jsp?main=smart/smartlist.jsp'">목록</button>
			</td>
		</tr>

	</table>
updateaction.jsp도 smartaction.jsp를 복사하고 필요한 부분을 추가한다.
먼저 num값과 currentPage값을 가져온다.
MultipartRequest multi = new MultipartRequest(request,realPath, uploadSize, "utf-8", new DefaultFileRenamePolicy() );

	//입력값 읽기
	String num = multi.getParameter("num");
	String currentPage = multi.getParameter("currentPage");

	String writer = multi.getParameter("writer");
	String subject = multi.getParameter("subject");
	String content = multi.getParameter("content");
	String mainphoto = multi.getFilesystemName("mainphoto");
그리고 대표 이미지를 수정하지 않은 경우에는 기존 mainphoto를 넣어줘야 하고 수정한 경우에는 새로운 mainphoto를 넣어야 하기 때문에 기존 mainphoto 값을 얻어줘야 한다.
그리고 updateform에서 받아온 mainphoto가 null이면, 즉 update할 때 대표이미지를 따로 안넣었으면 기존 mainphoto값을 주고 null이 아니라면 수정한 mainphoto 값을 준다.
	//num에 해당하는 기존 mainphoto
	SmartDao dao = new SmartDao();
	String gu_mainphoto = dao.getData(num).getMainphoto();

	//dto에 담기
	SmartDto dto = new SmartDto();

	dto.setNum(num);
	dto.setWriter(writer);
	dto.setSubject(subject);
	dto.setContent(content);
	dto.setMainphoto(mainphoto==null?gu_mainphoto:mainphoto);

    //insert 호출
	dao.updateSmart(dto);
목록으로 호출할 때는 기존에 있던 페이지로 다시 돌아가게 해야 한다. 10번 페이지에서 글을 삭제했더니 다시 1번 페이지로 돌아가면 불편하기 때문이다.
//목록으로 이동
response.sendRedirect("../index.jsp?main=smart/contentview.jsp?num="+num+"¤tPage="+currentPage);<tr>
<td colspan="2">
<button type="button" class="btn btn-info" onclick="location.href='index.jsp?main=smart/smartform.jsp'" style="float: right;">글쓰기</button>
<button type="button" class="btn btn-default" onclick="location.href='index.jsp?main=smart/smartlist.jsp'">목록</button>
<button type="button" class="btn btn-success" onclick="location.href='index.jsp?main=smart/updateform.jsp?num=<%=dto.getNum()%>¤tPage=<%=currentPage %>'" style="float: right;">수정</button>
<button type="button" class="btn btn-danger" onclick="funcdel(<%=num%>,<%=currentPage%>)" style="float: right;">삭제</button>
</td>
</tr>삭제
삭제버튼은 바로 삭제액션만 하고 다시 목록으로 돌아가면 되기 때문에 사용자 함수 funcdel을 준다.(수정과 같은 경로를 줘도 상관은 없다) 이때 삭제할 게시물의 num값과, 다시 돌아갈 currentPage 값을 알고 있어야 하기 때문에을 준다.
<script type="text/javascript">
function funcdel(num,currentPage){
//alert(num+","+currentPage)
var a = confirm("삭제하시겠습니까?");
if(a){
location.href = "smart/deleteaction.jsp?num="+num+"¤tPage="+currentPage;
}
}
</script>deleteaction.jsp
funcdel 함수는 삭제하겠냐는 경고창이 뜨고 확인을 누르면 num과 currentPage를 갖고 deleteaction.jsp로 이동한다.
deleteaction.jsp는 간단하다..(뒷부분이 어려울 뿐)
<%
String num = request.getParameter("num");
String currentPage = request.getParameter("currentPage");

SmartDao dao = new SmartDao();
dao.deleteSmart(num);

response.sendRedirect("../index.jsp?main=smart/smartlist.jsp?currentPage="+currentPage);

%>
이제 리스트에서
1. '전체선택'을 체크했을 때 페이지의 모든 게시물이 체크되기
2. 선택된 게시물을 삭제하기
를 할 차례다.
smartform.jsp에서 게시물의 체크박스에는 class="alldel", 전체선택 체크박스에는 class="alldelcheck", 삭제 버튼에는 id="btndel"을 추가한다.
전체선택을 클릭했을 때의 이벤트를 작성한다.
<script type="text/javascript">
$(function(){
	$(".alldelcheck").click(function(){
		//전체 체크
		var chk = $(this).is(":checked");
		console.log(chk);

		//전체 체크값을 글 앞의 체크에 일괄 전달
		$(".alldel").prop("checked",chk);

	});
 </script>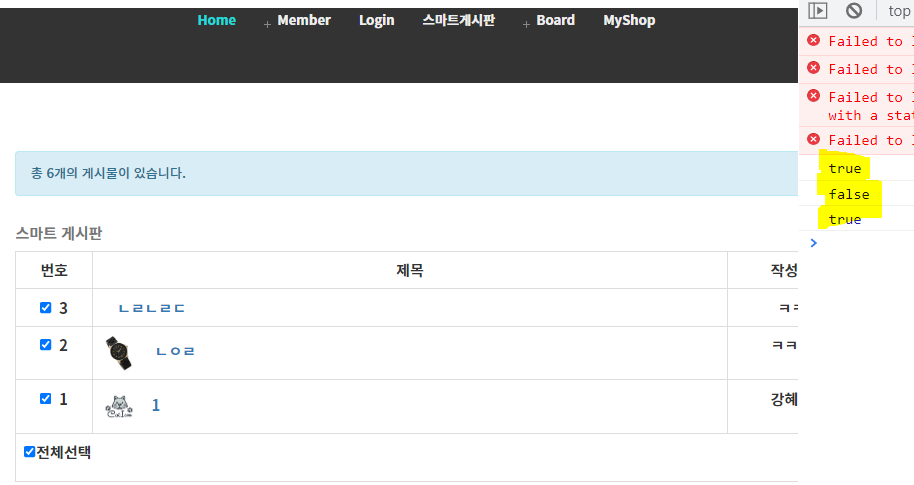
위처럼 var chk = (".alldel").prop("checked",chk);는 chk값을, 즉 전체선택을 클릭했을 때 나오는 checked 속성값(true/false)을 게시물의 체크박스의 "checked" 속성값에 일괄 적용한다는 의미이다.
게시물 체크박스를 체크한 후 삭제 버튼을 눌렀을 때 삭제가 되도록 해보자.
체크된 체크박스의 길이를 len이라고 두고 len이 0이면 '최소 한개 이상의 글을 선택해주세요' 경고창이 뜨게 한다.
체크된 체크박스가 있는 경우, $(".alldel:checked")는 체크가 되어 있는 게시물 체크박스에 each 함수를 호출하고, 체크된 박스의 value값을 얻어온다.
<td style="text-align: center"><input type="checkbox" class="alldel" value="<%=dto.getNum()%>"> <%=no-- %></td>이렇게 input 태그의 value 값에 dto.getNum을 넣어줬기 때문에 $(this).val()을 하면 게시물의 번호를 가져올 수 있다. 그리고 여러개의 박스가 있으므로 변수 n에 값을 누적한다.
//삭제 버튼 클릭시 삭제
$("#btndel").click(function(){
//체크된 길이 구하기
var len = $(".alldel:checked").length;
if(len==0){
alert("최소 한개 이상의 글을 선택해주세요");
}else{
var a = confirm(len+"개의 글을 삭제하시겠습니까?");
//체크된 곳의 value(num)값 얻기
var n = "";
$(".alldel:checked").each(function(idx){
n+=$(this).val()+",";
});
//마지막 컴마 제거하기
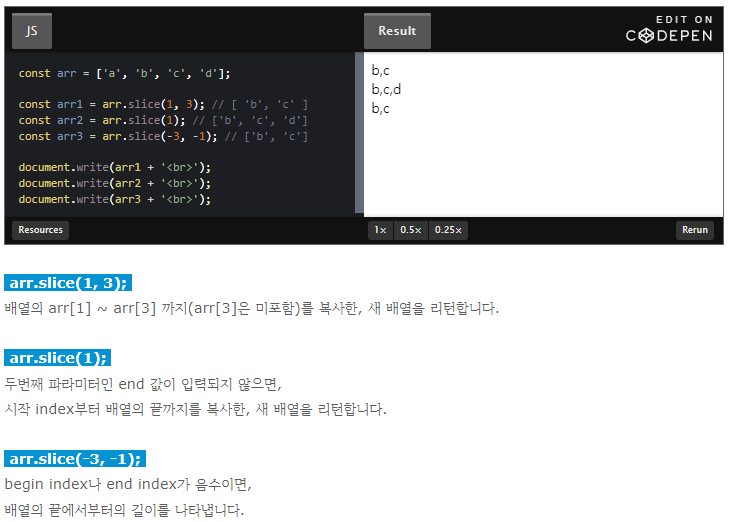
n=n.slice(0,-1);
//alert(n);
//삭제파일로 전송
location.href="smart/alldelete.jsp?nums="+n;
}
});체크된 박스들의 value값은 a,b,c, 이런식으로 누적되는데 마지막에 항상 ","가 포함되기 때문에 원활한 delete를 위해 ,를 제거해줘야 한다.
배열 n에 slice 함수를 적용해서 제일 마지막에 있는 ,를 제거해주고location.href="smart/alldelete.jsp?nums="+n;로 이동하게 한다.
arr.slice([begin[, end]])
slice 함수는 잘라낼 배열의 시작index와 end index를 파라미터로 받아서,
그 사이의 원소들을 새로운 배열로 만들어서 리턴한다. 이때 원본 배열인 arr은 변경되지 않는다.
- 파라미터
begin: 잘라낼 배열의 시작 index
end: 잘라낼 배열의 종료 index(end index의 값은 잘라낼 배열에 포함되지 않는다.)
end index가 생략되면, begin index부터 배열의 끝까지를 잘라냅니다.
리턴값: 잘라낸 원소들로 만든 새로운 배열을 리턴한다.
출처: https://hianna.tistory.com/398 [어제 오늘 내일:티스토리]
alldelete.jsp
alldeleteaction.jsp에서는 list에서 넘긴 nums를 쪼개서 num의 배열로 만들어준다.
배열의 갯수만큼 반복해서 deleteSmart()를 호출한 후 다시 list로 보내주면 된다.
<%
String nums = request.getParameter("nums");
String currentPage = request.getParameter("currentPage");
SmartDao dao = new SmartDao();

//,로 분리해서 배열로
String [] num = nums.split(",");

//배열 갯수만큼 delete 한 후
for(int i=0;i<num.length;i++){
	dao.deleteSmart(num[i]);
}
/* for(String n:num){
	dao.deleteSmart(n);
	} */

response.sendRedirect("../index.jsp?main=smart/smartlist.jsp");

%>