디바운스 (debounce)
어떤 내용을 입력하다가 특정 시간 동안 대기하고 있으면 마지막에 입력된 내용을 바탕으로 서버 요청을 하는 방법
특징 : 유료 API를 이용할 때 단어 하나를 칠때마다 요청을 하는 것이 아닌 일정 지연이 있을때 진행하여 비용적인 문제도 연관하여 도움
기본적인 디바운드의 예시
<!DOCTYPE html>
<html lang="en">
<head>
    <meta charset="UTF-8">
    <title>Title</title>
</head>
<body>
<input id="input">
<script>
  var timer;
  document.querySelector('#input').addEventListener('input', function(e) {
    if (timer) {
      clearTimeout(timer);	// 0.2초 미만으로 입력이 주어질 경우 해당 timer를 clear(없앤다)한다.
    }
    timer = setTimeout(function() {
      console.log('여기에 ajax 요청', e.target.value);
    }, 200);
  });
</script>
</body>
</html>
input 부분에 필요 내용을 치고 일정시간 딜레이가 있을경우 콘솔에 출력을 진행한다.
if문의 경우 과거 입력이 현재 입력으로 인해 영향을 받아 과거의 timer를 없애는 역할을 수행한다.
스로틀
마지막 함수가 호출된 후 일정 시간(ex 마지막 함수가 끝나기 전까지)이 지나기 전에 다시 호출되지 않도록 하는 것
일정 주기마다의 실행을 제한을 거는 것
디바운스 vs 스로틀
Throttle 와 Debounce 의 차이점은 이벤트를 언제 발생 시킬지의 시점 차이이다.
Debounce 는 입력이 끝날때까지 무한적으로 기다리지만, Throttle 는 입력이 시작되면, 일정 주기로 계속 실행한다.
Debounce 의 시간을 짧게 가져간다면, Throttle 와 비슷한 효과가 날 수 있지만, 그럼에도 시점에서 차이가 날 수 있다.
- 디바운스 : 무지 기다리다 마지막 처리
- 스로틀 : 처음 실행 후 처음꺼 끝날때까지 계속 기다리다가 그 다음 허용 준비
두가지 전부 사용한 예시
<!DOCTYPE html>
<html lang="en">
<head>
    <meta charset="UTF-8">
    <title>Title</title>

</head>
<body>

<div>a</div>
<div>a</div>
<div>a</div>
<div>a</div>
<div>a</div>
<div>a</div>
<div>a</div>
<div>a</div>
<div>a</div>
<div>a</div>
<div>a</div>
<div>a</div>
<div>a</div>
<div>a</div>
<div>a</div>
<div>a</div>
<script>
  function debounce(fn, delay) {
    let timer
    return function() {
      clearTimeout(timer);
      timer = setTimeout(() => { // *
        f1();
      }, delay);
    }
  }
  function throttle(fn, delay) {
    let timer
    return function() {
      if (!timer){
        timer = setTimeout(() => {
          timer = null
          f2();
        }, delay)
      }
    }
  }

  function f1() {
    console.log(`debounce 발생`)
  }
  function f2() {
    console.log(`throttle 발생`)
  }


  window.addEventListener('scroll', debounce(f1, 1000))
  window.addEventListener('scroll', throttle(f2, 1000))
</script>
</body>
</html>
작동방식
- 디바운스
 function debounce(fn, delay) {
    let timer
    return function() {
      clearTimeout(timer);
      timer = setTimeout(() => { // *
        f1();
      }, delay);
    }
  }
반응이 더는 없을때 console.log를 포함한 f1함수 실행 (delay보다 짧은 시간마다 실행될때마다 과거의 timer를 clearTimeout으로 처리한다.)
clearTimeout은 해당 setTimeout을 없애는 역할을 담당
- 스로틀
 function throttle(fn, delay) {
    let timer
    return function() {
      if (!timer){
        timer = setTimeout(() => {
          timer = null
          f2();
        }, delay)
      }
    }
  }
처음 timer가 undefined로 설정되어 if문이 실행되고 timer 어떠한 Number 값으로 설정된다.
다음 이벤트가 발생 할 때 timer는 숫자이므로 if문을 수행하지않는다.
timer가 계속 숫자를 유지하는 상태에서 delay시간이 지난 후 setTimeout이 실행되어 timer는 null로 바뀌고 그에 해당하는 f2()함수 하나를 실행한다. ( 즉 해당 시간 전까지 f2()함수를 한번 실행하는 일정한 시간동안 실행을 제한)
다시 timer가 null이 되므로 if문을 실행 할 수 있고 timer가 setTimeout에 의해 Number로 바뀌고 다음 반복시에도 Number이므로 if문을 수행하지 못하고 delay까지 기다린다.
따라서 해당 시간동안 실행은 처음 시작한 한번의 횟수로 제한을 걸 수 있다.
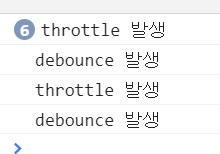
실행결과

해당 위의 결과는 처음에는 휠을 계속 작동시키고 멈췄을때 6번의 스로링이 발생하고 멈춘 후 1번의 디바운스가 발생한다.
그다음으로 휠을 1번만 하고 멈추니 스로링과 디바운스가 1번씩 출력되는 것을 알 수 있다.
210910
- 스로틀링 예시 : 느린 상황에서 버튼을 여러번 눌렀을때 해당 버튼에 대해 동작을 전부 처리하는 것이 아니라 어떤 한번을 처리하기 전까지 나머지는 무시하는 형태로 있고 어떤 한번의 처리가 끝나고 다시 눌러야 그 다음 처리를 진행할 수 있게 한다.
- App.js
 this.setState = (nextState) => {
    this.state = nextState;
    console.log(this.state, "this.state");
    photoListComponent.setState({
      isLoading: this.state.isLoading,
      photos: nextState.photos,
      totalCount: this.state.totalCount,
    });
  };

...


onScrollEnded: async () => {
       await fetchPhotos();
    },

      .....

const fetchPhotos = async () => {
    this.setState({
      ...this.state,
      isLoading: true,
    });
    const { limit, nextStart } = this.state;

    const photos = await request(
      `/cat-photos?_limit=${limit}&_start=${nextStart}`
    );
    this.setState({
      ...this.state,
      nextStart: nextStart + limit,
      photos: [...this.state.photos, ...photos],
      isLoading: false,
    });
  };
- photoList.js
 window.addEventListener("scroll", () => {
    const { isLoading, totalCount, photos } = this.state;

    let isScrollEnded =
      window.innerHeight + window.scrollY + 100 >= document.body.offsetHeight;
    if (isScrollEnded && !isLoading && photos.length < totalCount) {
      console.log(photos.length, totalCount);
      onScrollEnded();
    }
  });
처음의 어떤 이벤트가 발생하면 !isLoading은 false이므로 그 후의 이벤트는 진행을 처리하지 않고 request함수가 끝난 후 isLoading이 false이면
!isLoading이 true이므로 다음 이벤트를 발생시킬수 있게된다.
- 이벤트쪽 isLoading이 false이므로 조건을 통한 onScrollEnded 실행
- fetchPhotos 실행
- setState로 isLoading true로 설정 및 photoList.js의 이벤트 핸들러쪽에도 영향
- API 동작..
- 다시 이벤트 실행해도 isLoading이 true이므로 이벤트가 실행하지않는다.
- API 동작이 끝나고 setState로 isLoading false로 설정 및 photoList.js의 이벤트 핸들러쪽에도 영향
- 다시 이벤트 실행하면 isLoading이 false이므로 이벤트가 실행가능
210913 (디바운스 코드)
function debounce(fn, delay) {
  let timer = null;
  return function () {
    const context = this;
    const args = arguments;
    clearTimeout(timer);
    timer = setTimeout(() => {
      fn.apply(context, args);
    }, delay);
  };
}- 사용법
debounce(함수 , 3000)