아두이노 I2C LCD 모듈 제어 함수
| 번호 | 함수 | 설명 |
|---|---|---|
| 1 | LiquidCrystal_I2C lcd(0x27, 16, 2); | 0x27는 I2C 주소를 가지고 있는 16x2 LCD객체 생성 |
| 2 | lcd.begin( ); | LCD 사용 시작 |
| 3 | lcd.init( ); | LCD 초기화 |
| 4 | lcd.backlight( ); | LCD 백라이트를 켬 |
| 5 | lcd.noBacklight( ); | LCD 백라이트를 끔 |
| 6 | lcd.display( ); | LCD에 내용 표시 |
| 7 | lcd.noDisplay( ); | LCD에 내용 숨김 |
| 8 | lcd.setCursor(col,row); | row, col의 좌표로 커서를 옮김 |
| 9 | lcd.home( ); | 커서를 0,0의 좌표로 이동 |
| 10 | lcd.cursor( ); | LCD에 커서를 표시 |
| 11 | lcd.noCursor( ); | LCD에 커서를 숨김 |
| 12 | lcd.blink( ); | 커서를 깜박임 |
| 13 | lcd.noBlink( ); | 커서를 깜박이지 않음 |
| 14 | lcd.print(string); | LCD 화면에 문자열을 출력 |
| 15 | lcd.write(char); | LCD 화면에 문자 출력, 아스키 코드 입력 시에는 아스키 코드에 해당하는 문자를 출력 |
| 16 | lcd.clear( ); | LCD 화면의 모든 문자를 지움 |
| 17 | lcd.scrollDisplayRight( ); | LCD 화면 내용을 오른쪽으로 한 칸 이동 |
| 18 | lcd.scrollDisplayLeft( ); | LCD 화면 내용을 왼쪽으로 한 칸 이동 |
| 19 | lcd.autoscroll( ); | LCD 화면 내용을 자동으로 오른쪽에서 왼쪽으로 이동 |
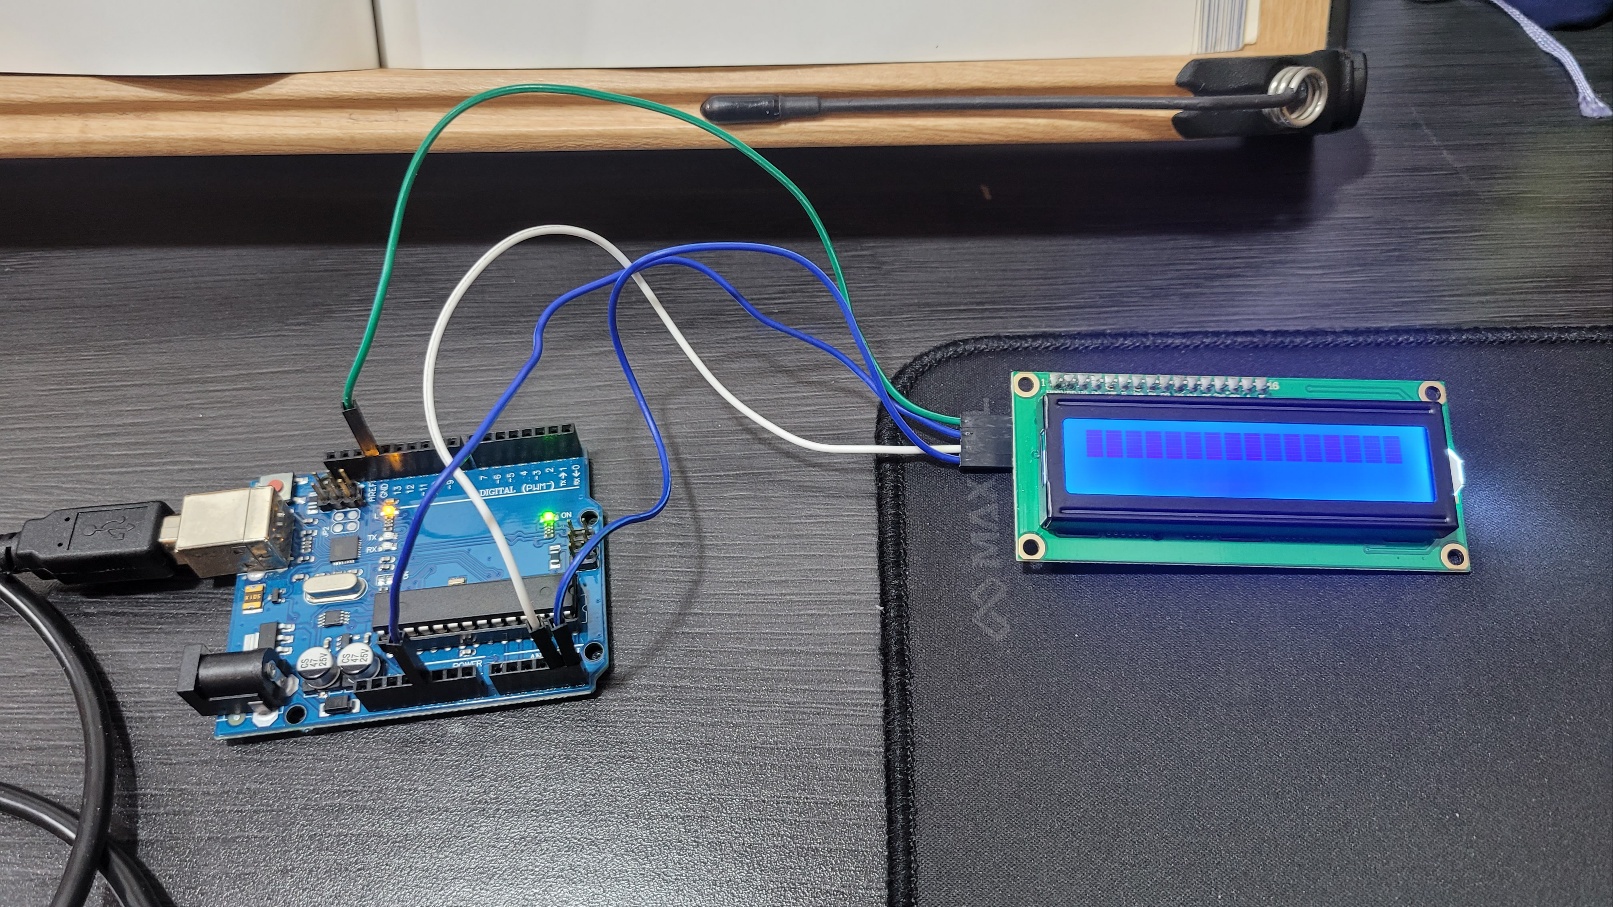
회로 구성
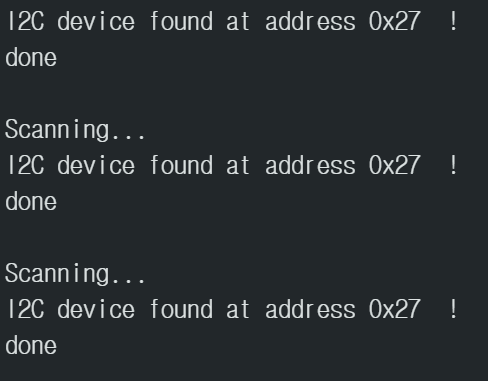
스케치 6-1 I2C_scanner
#include <Wire.h>

void setup()
{
  Wire.begin();
  Serial.begin(9600);
  while (!Serial);
  Serial.println("\nI2C Scanner");
}

void loop()
{
  byte error, address;
  int nDevices;
  Serial.println("Scanning...");
  nDevices = 0;
  for(address = 1; address < 127; address++)
  {
    // The i2c_scanner uses the return value of
    // the Write.endTransmisstion to see if
    // a device did acknowledge to the address.
    Wire.beginTransmission(address);
    error = Wire.endTransmission();

    if (error == 0)
    {
      Serial.print("I2C device found at address 0x");
      if (address < 16)
        Serial.print("0");
      Serial.print(address, HEX);
      Serial.println("  !");

      nDevices++;
    }
    else if (error==4)
    {
      Serial.print("Unknown error at address 0x");
      if (address < 16)
        Serial.print("0");
      Serial.println(address,HEX);
    }
  }
  if (nDevices == 0)
    Serial.println("No I2C devices found\n");
  else
    Serial.println("done\n");

  delay(5000);           // wait 5 seconds for next scan
}
6-1 실행결과
스케치 6-1을 실행시키면 시리얼 모니터에 현재 사용하고 있는 I2C LCD 장치의 채널 주소가 출력된다.
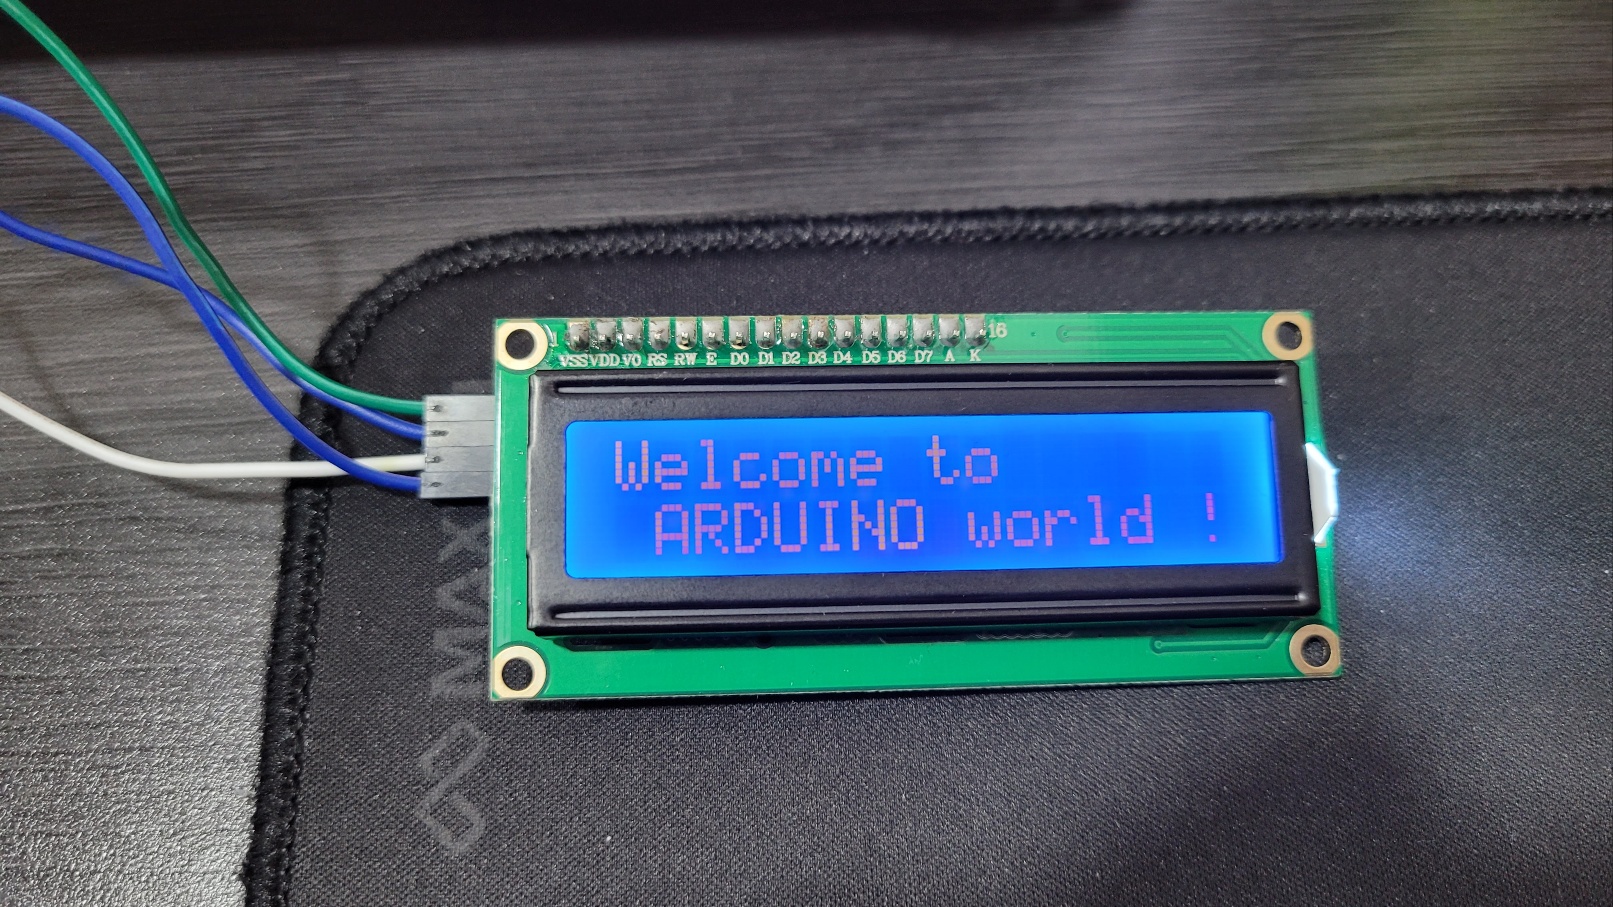
스케치 6-2 "Welcome to ARDUINO world !" 출력
#include <LiquidCrystal_I2C.h>

// 16×2 크기의 I2C LCD 객체를 생성
// 16 글자 2줄짜리 디스플레이의 I2C LCD 주소는 주로 0x27로 설정
LiquidCrystal_I2C lcd(0x27, 16, 2);

void setup()
{
  lcd.init(); // I2C LCD의 초기화
  lcd.backlight(); // I2C LCD의 백라이트 켜기
}

void loop()
{
  lcd.setCursor(0, 0); // 커서를 0번 행(윗줄)의 0번 열(가장 왼쪽 열)에 위치
  lcd.print("Welcome to"); // 메시지를 I2C LCD에 표시
  lcd.setCursor(1, 1); // 커서를 1번행(아랫줄)의 1번 열(왼쪽 두 번째 열)에 위치
  lcd.print("ARDUINO world !"); // 메시지를 I2C LCD에 표시
}
6-2 스케치 분석
lcd.init( ); // I2C LCD의 초기화
lcd.backlight( ); // I2C LCD의 백라이트 켜기
lcd.setCursor(n,m); // n번째 열, m번째 행으로 커서 이동, n=0~15의 정수, m = 0 또는 1
lcd.print("문자열"); // 문자열의 출력
6-2 실행결과
스케치 6-3 커서 깜박임 제어
#include <LiquidCrystal_I2C.h>
LiquidCrystal_I2C lcd(0x27, 16, 2);

void setup()
{
  lcd.init(); // I2C LCD의 초기화
  lcd.backlight(); // I2C LCD의 백라이트 켜기
}

void loop()
{
  lcd.print("Cursor Blink"); // "Cursor Blink" 출력
  lcd.cursor();                // 커서 보이기
  lcd.blink();                  // 깜빡이기
  delay(3000);                 // 3초 지연
  lcd.clear();                  // LCD화면 지우기
  lcd.print("Cursor Out");      // "Cursor Out" 출력
  lcd.noBlink( );               // 깜박임 정지
  delay(3000);                 // 3초 지연
  lcd.clear();                  // LCD화면 지우기
  lcd.noCursor( );             // 커서 감추기
  delay(3000);                 // 3초 지연
  lcd.clear( );                 // LCD화면 지우기
}
6-3 스케치 분석
"Cursor Blink"라는 문자열이 표시되고 3초 동안 커서 깜박이다가 "Cursor Out"이라는 문자열이 표시되면서 3초 동안 커서의 깜박임을 멈춘다. 그리고 LCD 화면에 표시된 내용이 깨끗하게 지워지고 3초 동안 커서가 사라지는 동작이 반복되는 아두이노 프로그램이다.
스케치 6-4 문자열 깜박이기
#include <LiquidCrystal_I2C.h>
LiquidCrystal_I2C lcd(0x27, 16, 2);

void setup()
{
  lcd.init(); // I2C LCD의 초기화
  lcd.backlight(); // I2C LCD의 백라이트 켜기
}

void loop()
{
    lcd.print("Hello!, arduino!");     // "Hello! ardunio" 출력
    lcd.noDisplay();       // 표시 안함
    delay(1000);           // 1초 지연
    lcd.display();          // 표시
    delay(1000);           // 1초 지연
    lcd.clear( );           // LCD화면 지우기
}
6-4 스케치 분석
LCD 표시장치에 "Hello, arduino!"를 출력하고 이 문자열이 1초 간격으로 깜박이는 프로그램
스케치 6-5 배너 만들기
#include <LiquidCrystal_I2C.h>

char array1[]="Hello, world!               ";   // I2C LCD의 윗줄에 표시할 문장
char array2[]="Nice to meet you.         ";    // I2C LCD의 아랫줄에 표시할 문장
int delayTime = 500;
LiquidCrystal_I2C lcd(0x27,16,2);  // 16×2 디스플레이의 I2C LCD 주소는 0x27로 설정

void setup()
{
  lcd.init();                    // I2C LCD의 초기화
  lcd.backlight();              // I2C LCD의 백라이트 켜기
}

void loop()
{
  lcd.setCursor(15,0);          // 커서를 0번행(디스플레이의 윗줄)의 15번열에 위치
  for (int posCnt1 = 0; posCnt1 < 26; posCnt1++)
  {
    lcd.scrollDisplayLeft();      //출력되는 문자열을 왼쪽으로 한 칸씩 이동
    lcd.print(array1[posCnt1]);  // 메시지를 I2C LCD에 표시
    delay(delayTime);
  }
  lcd.clear();            // I2C LCD 화면을 지우고 커서를 왼쪽 상단에 위치
  lcd.setCursor(15,1);    //커서를 1번행(디스플레이의 아랫줄)의 15번열에 위치
  for (int posCnt2 = 0; posCnt2 < 26; posCnt2++)
  {
    lcd.scrollDisplayLeft(); //출력되는 문자열을 왼쪽으로 한 칸씩 이동
    lcd.print(array2[posCnt2]);
    delay(delayTime);
  }
  lcd.clear();
}
6-5 스케치 분석
LCD 표시장치에 두 줄의 문장을 출력하고 한 줄씩 차례대로 오른쪽에서 왼쪽으로 한 칸씩 문자열이 이동하는 배너 프로그램
- lcd.scrollDisplayLeft( ); 함수는 출력되는 문자열을 왼쪽으로 한 칸씩 이동시키는 함수

Shine like a star, Just like a star