1. Swagger
이 글은 스프링부트, Gradle 환경에서 API 문서 Swagger를 설정하는 방법에 대해 다룹니다.
의존성 추가
build.gradle 파일에 아래 코드를 추가합니다.
// Swagger
implementation 'io.springfox:springfox-boot-starter:3.0.0'
implementation 'io.springfox:springfox-swagger-ui:3.0.0'
✨SwaggerConfig.java 파일 추가하기
package example.config;

import org.springframework.context.annotation.Bean;
import org.springframework.context.annotation.Configuration;
import springfox.documentation.builders.ApiInfoBuilder;
import springfox.documentation.builders.PathSelectors;
import springfox.documentation.builders.RequestHandlerSelectors;
import springfox.documentation.service.ApiInfo;
import springfox.documentation.spi.DocumentationType;
import springfox.documentation.spring.web.plugins.Docket;
import springfox.documentation.swagger2.annotations.EnableSwagger2;

@Configuration
@EnableSwagger2
public class SwaggerConfig {
    @Bean
    public Docket api() {
        return new Docket(DocumentationType.OAS_30)
                .useDefaultResponseMessages(true) // Swagger 에서 제공해주는 기본 응답 코드를 표시할 것이면 true
                .apiInfo(apiInfo())
                .select()
                .apis(RequestHandlerSelectors.basePackage("example.src")) // Controller가 들어있는 패키지. 이 경로의 하위에 있는 api만 표시됨.
                .paths(PathSelectors.any()) // 위 패키지 안의 api 중 지정된 path만 보여줌. (any()로 설정 시 모든 api가 보여짐)
                .build();
    }

    public ApiInfo apiInfo() {
        return new ApiInfoBuilder()
                .title("SpringBoot Rest API Documentation")
                .description("3rd UMC Server: BAEMIN Clone coding - ?조")
                .version("0.1")
                .build();
    }
}
api() 함수는 스웨거 설정을 위해 필요하고, apiInfo()는 설정해주지 않아도 된다.
api가 들어있는 Controller의 이름을 꼭 ~~~Controller.java 로 설정해 주어야 한다.
여기까지 설정이 잘 됐으면...
http://localhost:8080/swagger-ui/index.html 로 접속하였을 때, Swagger의 API 시트에 본인이 만든 api가 보여야 한다.
- 스웨거 버전 3 이하는 http://localhost:8080/swagger-ui 로 접속하면 연결된다.
- 본인이 사용하는 포트 번호도 확인해 주세요.
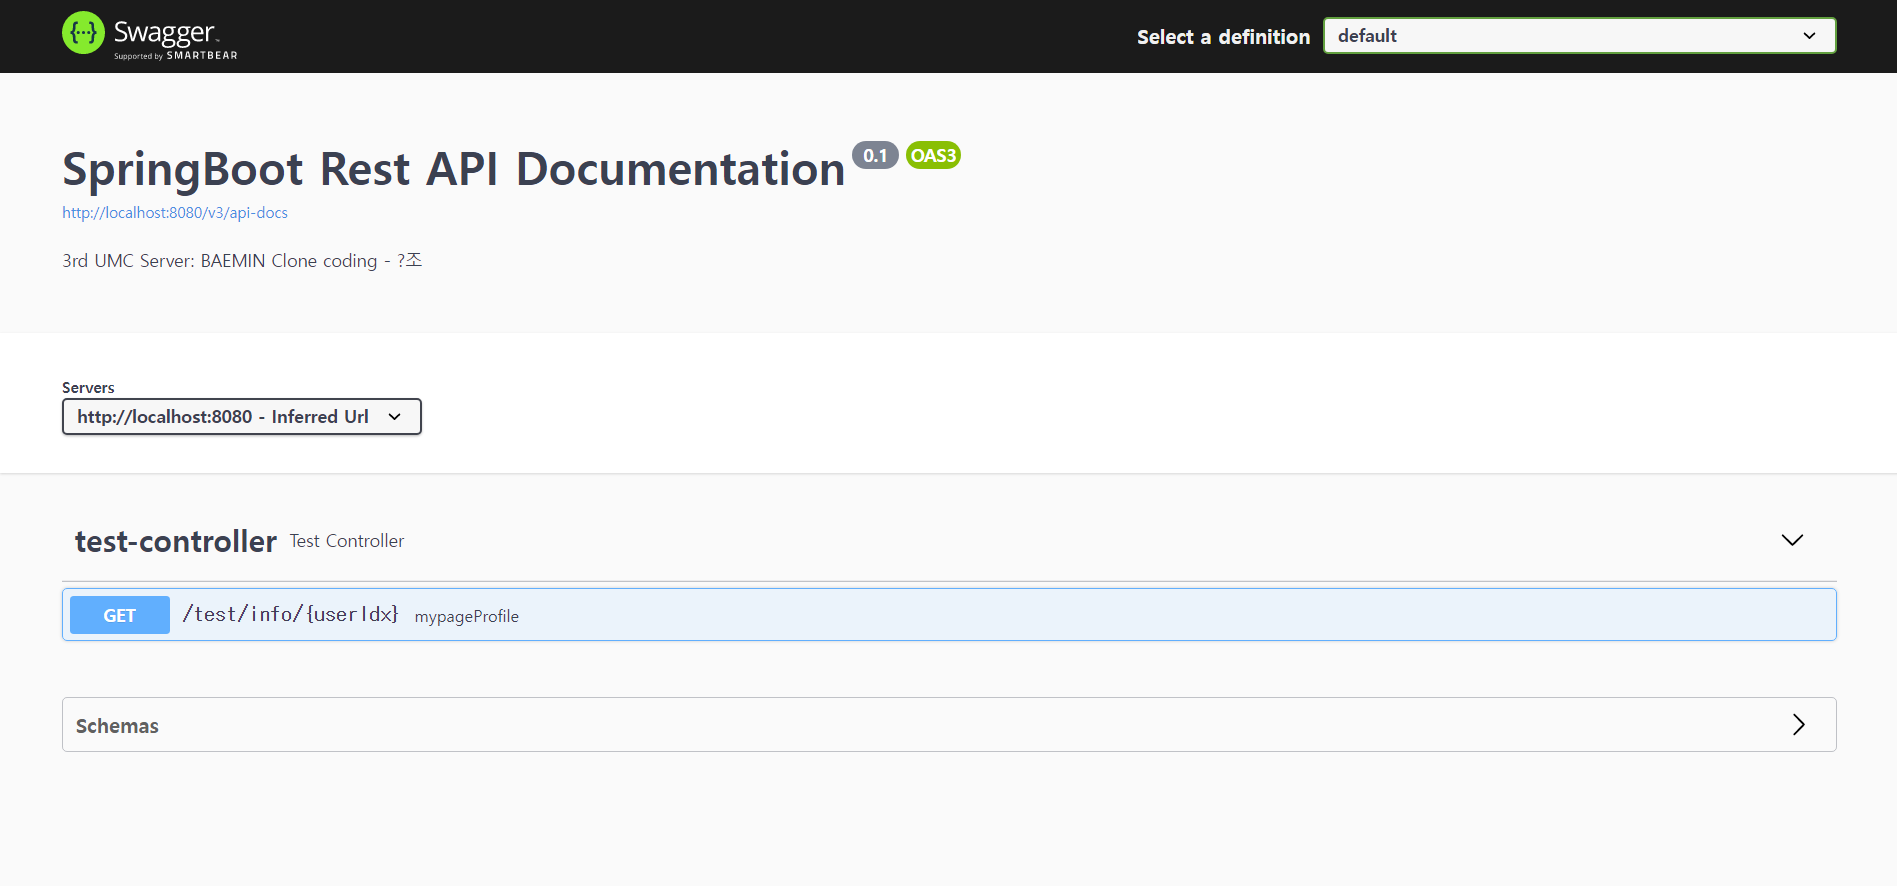
특정 api 박스를 선택했을 때, 상세 정보도 확인할 수 있다.
하지만... 더 자세한 설명을 써 줄 필요가 있겠죠?
2. Swagger Annotation을 추가하여 API 문서 작성하기
swagger 어노테이션을 통해 세부 사항들을 자세하게 작성할 수 있다.
1) 파일별로 API 분류하기
@Api(tags="태그 이름")
@Api(tags = "test") Controller 파일에 붙여주면, 이런 식으로 정리가 된다.
2) API 설명 작성하기
@ApiOperation(value="사용 목적", notes="설명")
@ApiOperation(
    value = "마이페이지 회원 정보 조회",
    notes = "로그인한 유저의 페이지에서, 회원 정보에 해당하는 부분을 불러오는 API")
Controller 안의 특정 api에 작성하면 된다.
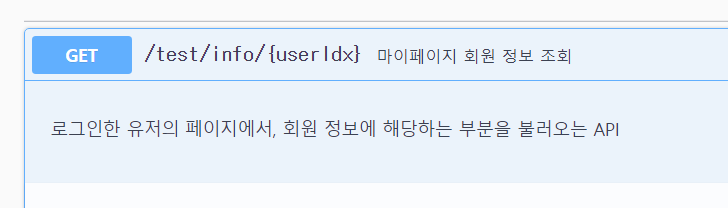 api 설명이 추가되었다.
3) Parameter 설명 작성하기
@ApiImplicitParam
@ApiImplicitParam(
        name = "userIdx",
        value = "유저 인덱스 번호",
        required = true,
        dataType = "int",
        paramType = "path",
        defaultValue = "None"
)
이것도, Controller 안의 특정 api에 작성한다.
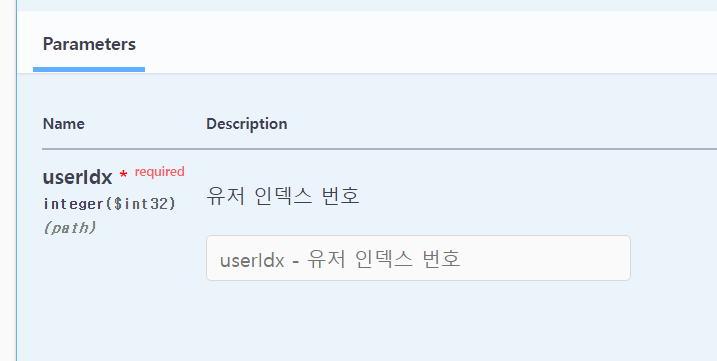 parameter의 세부적인 특징까지 볼 수 있다.
4) Response 코드에 대한 설명 작성하기
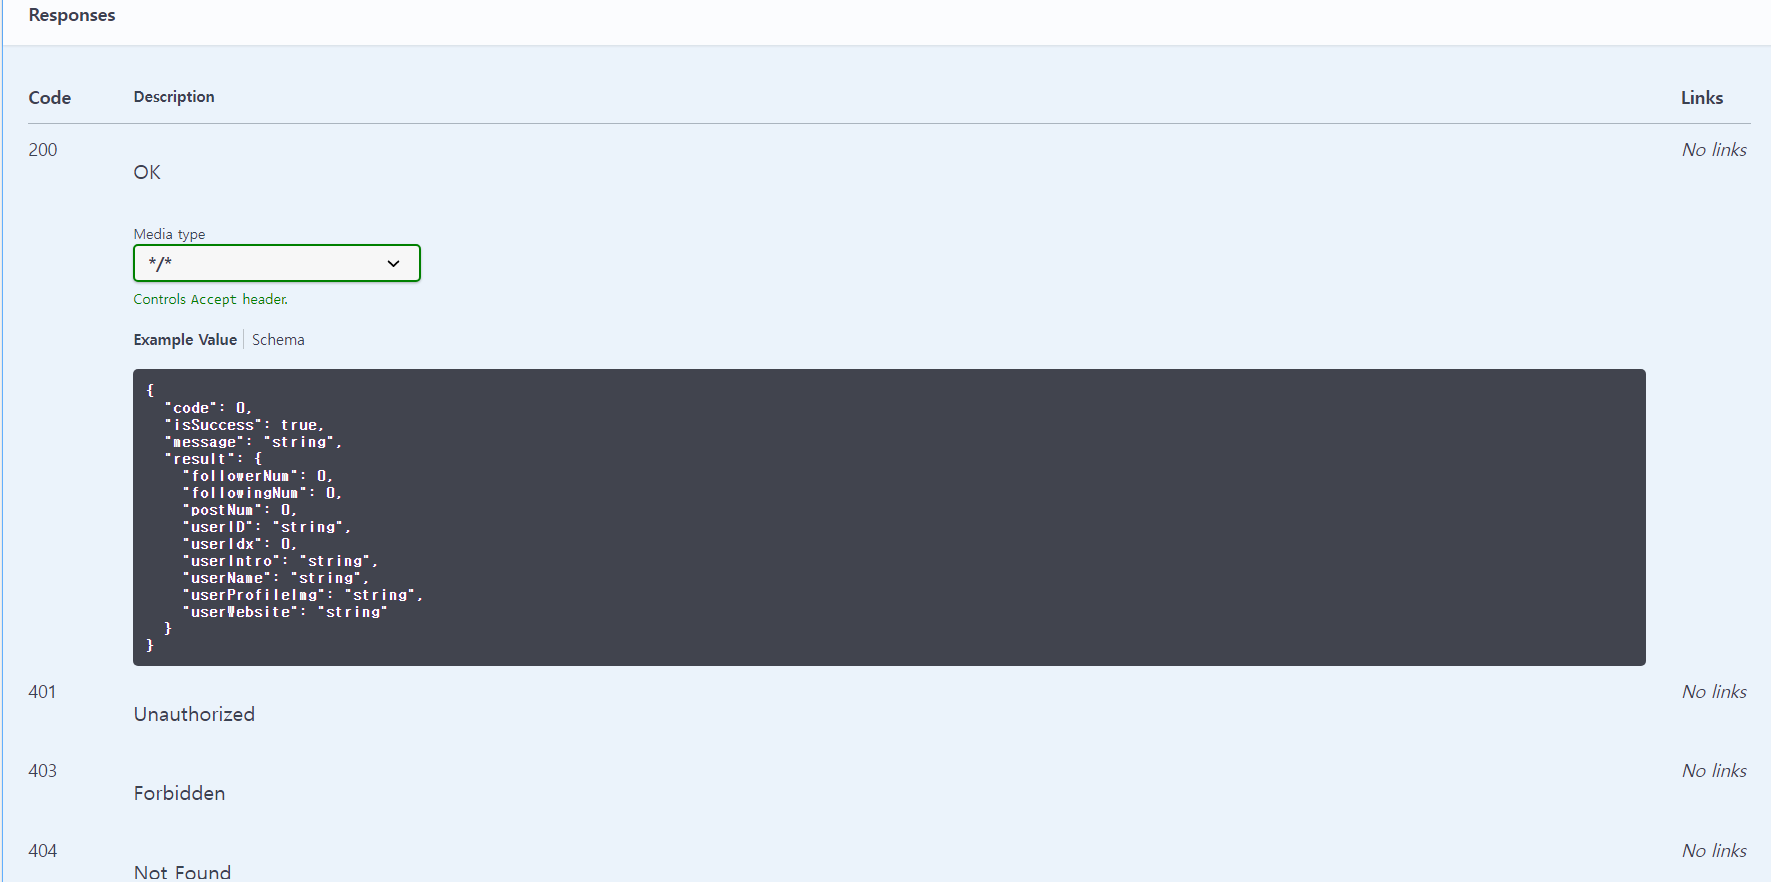
@ApiResponse(code="코드", message="상태 메시지"), @ApiResponses_
@ApiResponse(code = 200, message = "성공입니다.")여러 개를 작성하고 싶을 때는,
@ApiResponses({
        @ApiResponse(code=200, message="성공"),
        @ApiResponse(code=401, message="접근 권한이 없습니다.")
})
이렇게 작성한다.
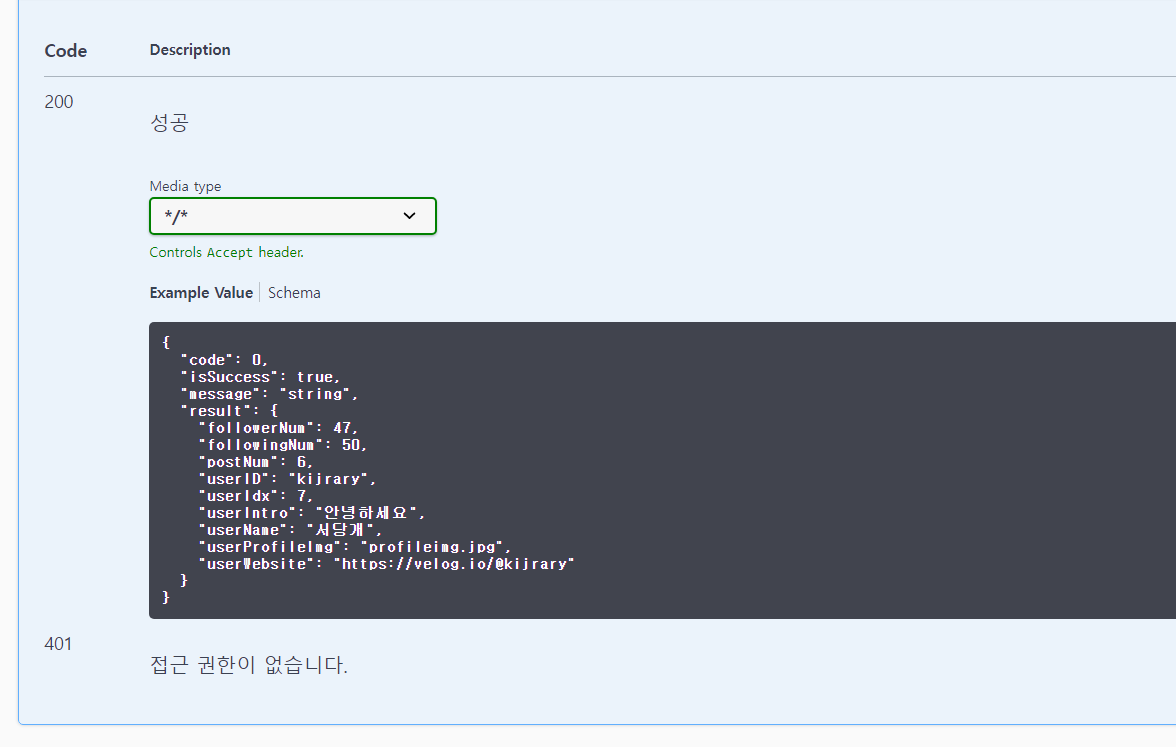 200, 401 응답에 대한 내용이 추가되었다.
5) 모델에 대한 설명 작성하기
@ApiModel(value="설명")
이 설정을 해 주지 않으면, API 아래 Schema를 볼 수 있는 부분에
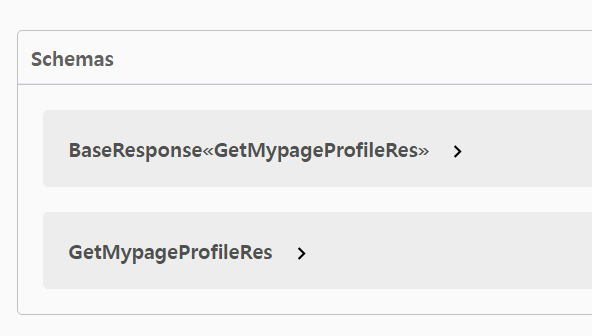 모델들이 서버에서 설정한 이름 그대로 나타나게 된다.
프론트 입장에서는 이해하기 어려울 수 있으므로, 이에 대한 설명을 작성해 보자.
@ApiModel(value = "마이페이지 회원 정보 조회 응답")이렇게 바뀌었다. 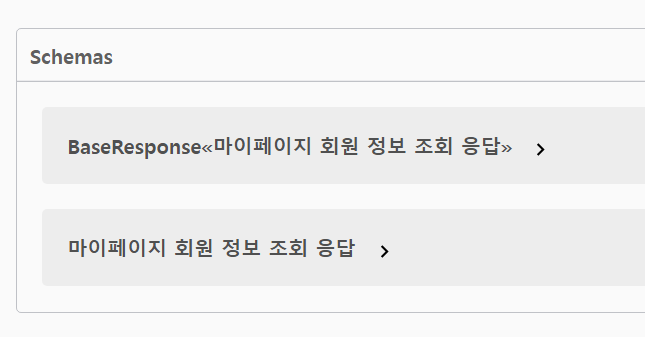
6) 데이터 모델 사용 예시 작성하기
@ApiModelProperty(value="설명", example="예시", required=true/false)
@ApiModelProperty(value="유저 인덱스 번호", example = "7", required = true)
private int userIdx;
@ApiModelProperty(value="유저 이름", example = "서당개", required = true)
private String userName;
이 어노테이션을 모델 안의 각 변수들에 하나씩 지정해주면,
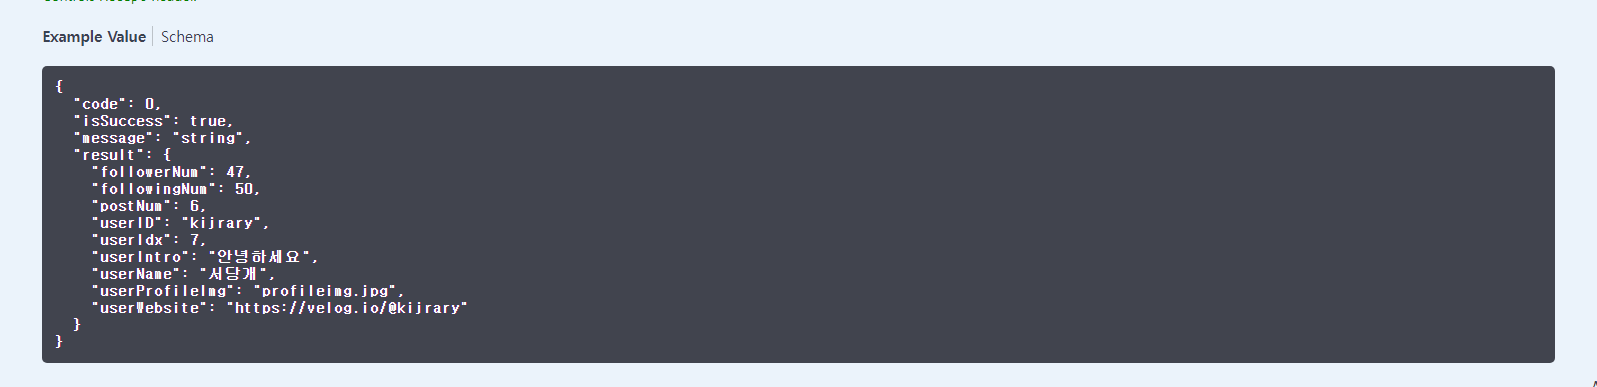 이렇게 예시를 띄워준다!
Schemas에서도 자세하게 볼 수 있다.
✨어노테이션 설정한 전체 코드
Controller 파일
TestController.java
package example.src.test;

import example.config.BaseException;
import example.config.BaseResponse;
import example.src.test.model.GetMypageProfileRes;
import example.utils.JwtService;
import io.swagger.annotations.*;
import org.slf4j.Logger;
import org.slf4j.LoggerFactory;
import org.springframework.beans.factory.annotation.Autowired;
import org.springframework.web.bind.annotation.*;

import static example.config.BaseResponseStatus.*;

@RestController
@Api(tags = "test")
@RequestMapping("/test")
public class TestController {
    final Logger logger = LoggerFactory.getLogger(this.getClass());
    @Autowired
    private final TestProvider testProvider;
    @Autowired
    private final TestService testService;
    @Autowired
    private final JwtService jwtService;

    public TestController(TestProvider testProvider, TestService testService, JwtService jwtService){
        this.testProvider = testProvider;
        this.testService = testService;
        this.jwtService = jwtService;
    }

    /**
     * 1.1 마이페이지 회원 정보 조회 API
     * [GET] /test/info/{userIdx}
     * @param userIdx
     * @return GetMypageProfileRes
     * @throws BaseException
     */
    @ApiOperation(
            value = "마이페이지 회원 정보 조회",
            notes = "로그인한 유저의 페이지에서, 회원 정보에 해당하는 부분을 불러오는 API")
    @ApiImplicitParam(
            name = "userIdx",
            value = "유저 인덱스 번호",
            required = true,
            dataType = "int",
            paramType = "path",
            defaultValue = "None"
    )
    @ApiResponses({
            @ApiResponse(code=200, message="성공"),
            @ApiResponse(code=401, message="접근 권한이 없습니다.")
    })
    @GetMapping("/info/{userIdx}")
    public BaseResponse<GetMypageProfileRes> mypageProfile(@PathVariable ("userIdx") int userIdx) throws BaseException {
        // 헤더로 받은 JWT를 통해 유저의 인덱스를 추출합니다.
        int userIdxByJwt = jwtService.getUserIdx();
        // JWT로 추출한 유저 인덱스와, 파라미터로 받은 유저 인덱스가 일치하는지 확인합니다(validation 처리용 - 만약 일치하지 않는다면, 큰 문제가 되겠죠??)
        if(userIdx != userIdxByJwt){
            throw new BaseException(INVALID_JWT);
        }
        GetMypageProfileRes getMypageProfileRes = testService.mypageProfile(userIdx);
        return new BaseResponse<>(getMypageProfileRes);
    }

}
모델 파일
GetMypageProfileRes.java
import io.swagger.annotations.ApiModel;
import io.swagger.annotations.ApiModelProperty;
import lombok.AllArgsConstructor;
import lombok.Getter;
import lombok.Setter;

@ApiModel(value = "마이페이지 회원 정보 조회 응답")
@Getter
@Setter
@AllArgsConstructor
public class GetMypageProfileRes {
    @ApiModelProperty(value="유저 인덱스 번호", example = "7", required = true)
    private int userIdx;
    @ApiModelProperty(value="유저 인스타 아이디", example = "kijrary", required = true)
    private String userID;
    @ApiModelProperty(value="유저 이름", example = "서당개", required = true)
    private String userName;
    @ApiModelProperty(value="유저 소개글", example = "안녕하세요", required = true)
    private String userIntro;
    @ApiModelProperty(value="유저 소개 웹사이트", example = "https://velog.io/@kijrary", required = true)
    private String userWebsite;
    @ApiModelProperty(value="유저 프로필 이미지", example = "profileimg.jpg", required = true)
    private String userProfileImg;
    @ApiModelProperty(value="작성한 게시물 수", example = "6", required = true)
    private int postNum;
    @ApiModelProperty(value="유저를 팔로우하고 있는 사람 수", example = "47", required = true)
    private int followerNum;
    @ApiModelProperty(value="유저가 팔로우하고 있는 사람 수", example = "50", required = true)
    private int followingNum;
}