
-
Chapter 40 이벤트
-
이벤트 드리븐 프로그래밍
브라우저는 처리해야 할 특정 사건이 발생하면 이를 감지해 이벤트를 발생시킨다.
마우스 클릭, 키보드 입력, 마우스 이동 등이 일어나면 이를 감지해 특정한 타입의 이벤트를 발생시킨다.
이벤트가 발생했을 때 호출될 함수를 이벤트 핸들러라 하고, 이벤트가 발생했을 때 브라우저에서 이벤트 핸들러의 호출을 위임하는 것을 이벤트 핸들러 등록이라고 한다.
<!DOCTYPE html>
<html>
  <body>
    <button>Click me!</button>
    <script>
      const $button = document.querySelector('button');
      // 사용자가 버튼을 클릭하면 함수를 호출하도록 요청
      $button.onclick = () => { alert('button click'); };
    </script>
  </body>
</html>
버튼 요소 $button의 onclick 프로퍼티에 함수를 할당했다.
이벤트 핸들러 프로퍼티에 함수를 할당하면 해당 이벤트가 발생했을 때 할당한 함수가 브라우저에 의해 호출된다.프로그램의 흐름을 이벤트 중심으로 제어하는 프로그래밍 방식을 이벤트 드리븐 프로그래밍이라 한다.
-
이벤트 핸들러 등록
이벤트 핸들러는 이벤트가 발생했을 때 브라우저에 호출을 위임한 함수다.
-
이벤트 핸들러 프로퍼티 방식
window 객체와 Document, HTMLElement 타입의 DOM 노드 객체는 이벤트에 대응하는 이벤트 핸들러 프로퍼티를 가지고 있다.
<!DOCTYPE html>
<html>
<body>
  <button>Click me!</button>
  <script>
    const $button = document.querySelector('button');

    // 이벤트 핸들러 프로퍼티 방식은 하나의 이벤트에 하나의 이벤트 핸들러만을 바인딩할 수 있다.
    // 첫 번째로 바인딩된 이벤트 핸들러는 두 번째 바인딩된 이벤트 핸들러에 의해 재할당되어
    // 실행되지 않는다.
    $button.onclick = function () {
      console.log('Button clicked 1');
    };

    // 두 번째로 바인딩된 이벤트 핸들러
    $button.onclick = function () {
      console.log('Button clicked 2');
    };
  </script>
</body>
</html>
이벤트 핸들러를 등록하기 위해서는 이벤트를 발생시킬 객체인 이벤트 타깃과 이벤트의 종류를 나타내는 문자열인 이벤트 타입 그리고 이벤트 핸들러를 지정할 필요가 있다.
addEventListener 메서드 방식
<!DOCTYPE html>
<html>
<body>
  <button>Click me!</button>
  <script>
    const $button = document.querySelector('button');

    // 이벤트 핸들러 프로퍼티 방식
    // $button.onclick = function () {
    //   console.log('button click');
    // };

    // addEventListener 메서드 방식
    $button.addEventListener('click', function () {
      console.log('button click');
    });
  </script>
</body>
</html>
addEventListener 메서드의 첫 번째 메개변수에는 이벤트의 종류를 나타내는 문자열인 이벤트 타입을 전달한다.
이때 이벤트 핸들러 프로퍼티 방식과는 달리 on 접두사를 붙이지 않는다. 두 번째 매개변수에는 이벤트 핸들러를 전달한다. 마지막 매개변수에는 이벤트를 캐치할 이벤트 전파 단계(캡처링 또는 버블링)을 지정한다.
addEventListener 메서드는 하나 이상의 이벤트 핸들러를 등록할 수 있고, 이벤트 핸들러는 등록된 순서대로 호출된다.
이벤트 객체
이벤트가 발생하면 이벤트에 관련한 다양한 정보를 담고 있는 이벤트 객체가 동적으로 생성된다.
생성된 이벤트 객체는 이벤트 핸들러의 첫 번째 인수로 전달된다.
<!DOCTYPE html>
<html>
<body>
  <p>클릭하세요. 클릭한 곳의 좌표가 표시됩니다.</p>
  <em class="message"></em>
  <script>
    const $msg = document.querySelector('.message');

    // 클릭 이벤트에 의해 생성된 이벤트 객체는 이벤트 핸들러의 첫 번째 인수로 전달된다.
    function showCoords(e) {
      $msg.textContent = `clientX: ${e.clientX}, clientY: ${e.clientY}`;
    }

    document.onclick = showCoords;
  </script>
</body>
</html>
이벤트 전파
<!DOCTYPE html>
<html>
<body>
  <ul id="fruits">
    <li id="apple">Apple</li>
    <li id="banana">Banana</li>
    <li id="orange">Orange</li>
  </ul>
</body>
</html>
ul 요소의 두 번째 자식 요소인 li 요소를 클릭하면 클릭 이벤트가 발생한다. 이때 생성된 이벤트 객체는 이벤트를 발생시킨 DOM 요소인 이벤트 타깃을 중심으로 DOM 트리를 통해 전파된다.
- 캡처링 단계: 이벤트가 상위 요소에서 하위 요소 방향으로 전파
- 타깃 단계: 이벤트가 이벤트 타깃에 도달
- 버블링 단계 : 이벤트가 하위 요소에서 상위 요소 방향으로 전파
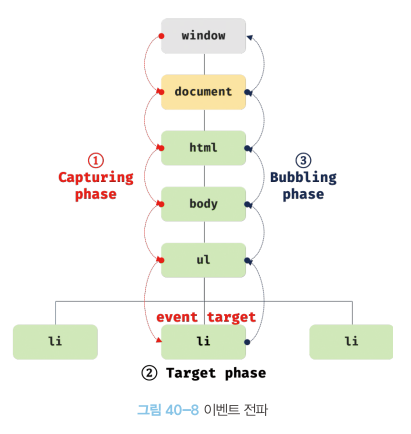
<!DOCTYPE html>
<html>
<body>
  <ul id="fruits">
    <li id="apple">Apple</li>
    <li id="banana">Banana</li>
    <li id="orange">Orange</li>
  </ul>
  <script>
    const $fruits = document.getElementById('fruits');
    const $banana = document.getElementById('banana');

    // #fruits 요소의 하위 요소인 li 요소를 클릭한 경우
    // 캡처링 단계의 이벤트를 캐치한다.
    $fruits.addEventListener('click', e => {
      console.log(`이벤트 단계: ${e.eventPhase}`); // 1: 캡처링 단계
      console.log(`이벤트 타깃: ${e.target}`); // [object HTMLLIElement]
      console.log(`커런트 타깃: ${e.currentTarget}`); // [object HTMLUListElement]
    }, true);

    // 타깃 단계의 이벤트를 캐치한다.
    $banana.addEventListener('click', e => {
      console.log(`이벤트 단계: ${e.eventPhase}`); // 2: 타깃 단계
      console.log(`이벤트 타깃: ${e.target}`); // [object HTMLLIElement]
      console.log(`커런트 타깃: ${e.currentTarget}`); // [object HTMLLIElement]
    });

    // 버블링 단계의 이벤트를 캐치한다.
    $fruits.addEventListener('click', e => {
      console.log(`이벤트 단계: ${e.eventPhase}`); // 3: 버블링 단계
      console.log(`이벤트 타깃: ${e.target}`); // [object HTMLLIElement]
      console.log(`커런트 타깃: ${e.currentTarget}`); // [object HTMLUListElement]
    });
  </script>
</body>
</html>
이벤트는 이벤트를 발생시킨 이벤트 타깃은 물론 상위 DOM 요소에서도 캐치할 수 있다.
이벤트 핸들러 내부의 this
이벤트 핸들러 어트리뷰트 방식
<!DOCTYPE html>
<html>
<body>
  <button onclick="handleClick()">Click me</button>
  <script>
    function handleClick() {
      console.log(this); // window
    }
  </script>
</body>
</html>
일반 함수로서 호출되는 함수 내부의 this는 전역 객체를 가리킨다.
이벤트 핸들러 프로퍼티 방식과 addEventListener 메서드 방식
<!DOCTYPE html>
<html>
<body>
  <button class="btn1">0</button>
  <button class="btn2">0</button>
  <script>
    const $button1 = document.querySelector('.btn1');
    const $button2 = document.querySelector('.btn2');

    // 이벤트 핸들러 프로퍼티 방식
    $button1.onclick = function (e) {
      // this는 이벤트를 바인딩한 DOM 요소를 가리킨다.
      console.log(this); // $button1
      console.log(e.currentTarget); // $button1
      console.log(this === e.currentTarget); // true

      // $button1의 textContent를 1 증가시킨다.
      ++this.textContent;
    };

    // addEventListener 메서드 방식
    $button2.addEventListener('click', function (e) {
      // this는 이벤트를 바인딩한 DOM 요소를 가리킨다.
      console.log(this); // $button2
      console.log(e.currentTarget); // $button2
      console.log(this === e.currentTarget); // true

      // $button2의 textContent를 1 증가시킨다.
      ++this.textContent;
    });
  </script>
</body>
</html>
이벤트 핸들러 프로퍼티 방식과 addEventListener 메서드 방식 모두 이벤트 핸들러 내부의 this는 이벤트를 바인딩한 DOM 요소를 가리킨다.
즉, 이벤트 핸들러 내부의 this는 이벤트 객체의 currentTarget 프로퍼티와 같다.
