회사에서 node랑 MySQL에 프론트는 react로 구현해보게 되어 연습할겸 글 작성해보겠다..!
백엔드(backend)
-
폴더 하나 생성 후 backend폴더와 frontend폴더를 생성

-
백엔드 폴더 터미널을 열어
npm init -y입력하여 npm install명령을 실행할 수 있도록 만들어주고, 이후 라이브러리들 설치!
npm i expressnpm i mysql- nodemon 설치 안되어있으면
npm i nodemon
-
backend 폴더에
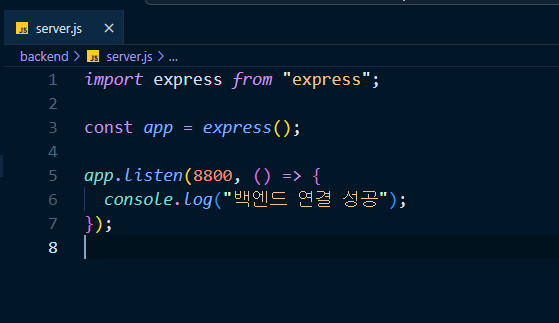
server.js파일 생성 -
express를 불러와 app생성
import express from "express"

const app = express()- app이 포트번호를 listen할 수 있도록 포트 번호 작성(여기선 8800사용)
app.listen(8800, () => {
  console.log("백엔드 연결 성공")
})
package.json파일에서 "main"과 "scripts"사이에 아래 코드 넣기
"type": "module",추가로 "scripts"안에 다음 코드 추가
"start": "nodemon server.js"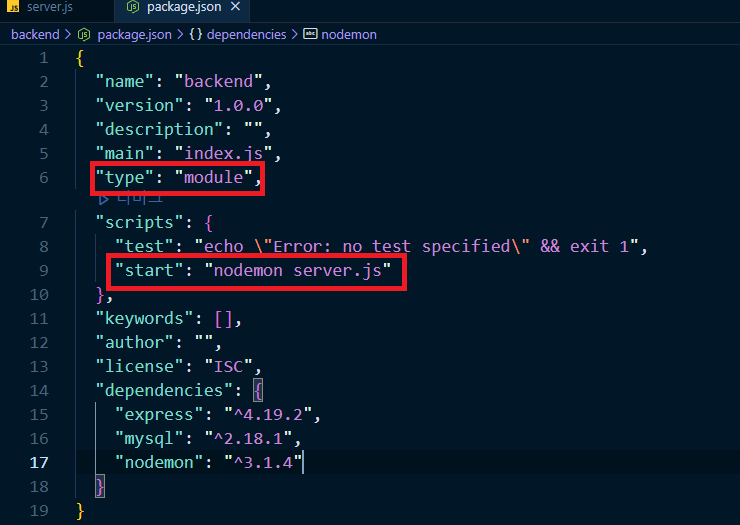
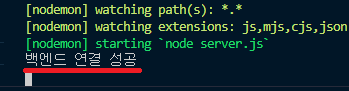
npm start로 서버를 시작할 수 있다.
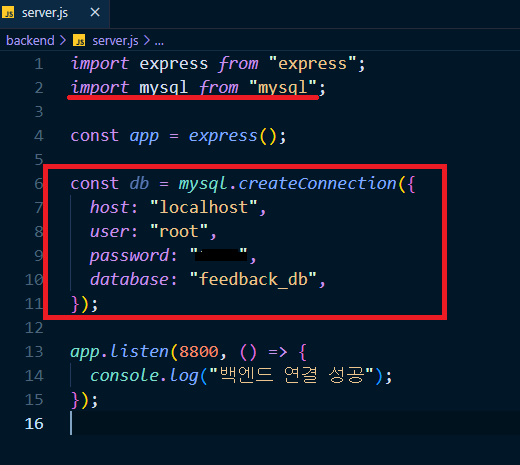
MySQL 연결
server.js에 아래 코드 추가
import mysql from "mysql"

const db = mysql.createConnection({
  host:"localhost",
  user:"유저명",
  password:"비밀번호",
  database:"db이름"
})
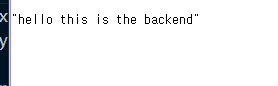
- get 요청 보낸 뒤,
app.get("/", (req, res) => {
  res.json("hello this is the backend")
})http://localhost:8800에서 메시지 확인
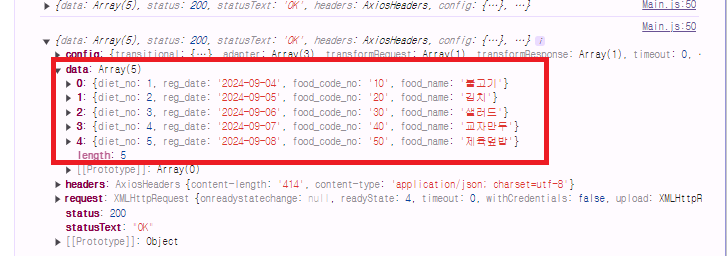
- 연결 잘 되는 거 확인했으면 MySQL에서 테이블 정보를 가져와보기
app.get("/diet", (req, res) => {
  const q = "select * from diettb";
  db.query(q, (err, data) => {
    if (err) return res.json(err);
    return res.json(data);
  });
});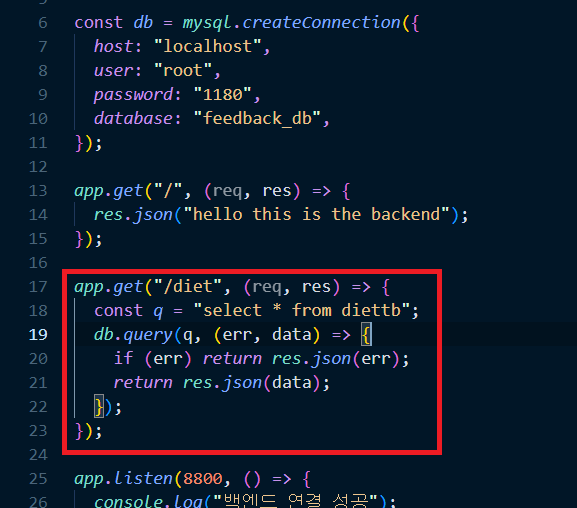
브라우저에서 /diet으로 get요청해서 확인해보기
잘 들어가있음!!!
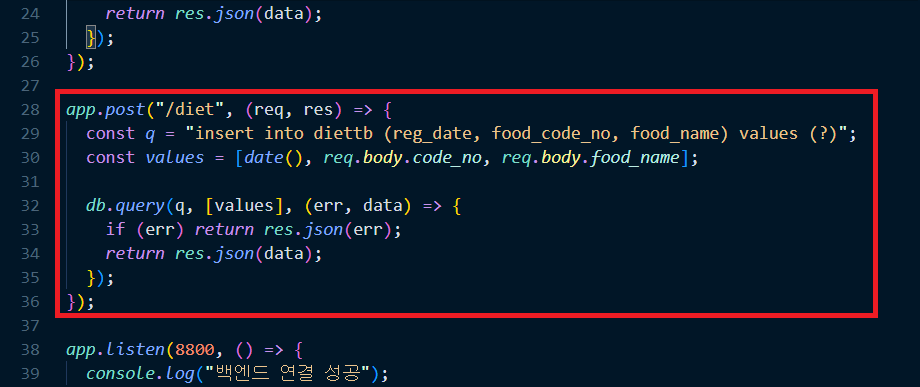
- post요청도 해보기
미들웨어 사용을 위해server.js에 아래 코드 추가
app.use(express.json())
req.body.이름이런 식으로 사용자가 넣은 값 받아와서 넣어주는 코드 작성
app.post("/diet", (req, res) => {
  const q = "insert into diettb (reg_date, food_code_no, food_name) values (?)";
  const values = [date(), req.body.code_no, req.body.food_name];

  db.query(q, [values], (err, data) => {
    if (err) return res.json(err);
    return res.json(data);
  });
});
프론트엔드(frontend)
-
frontend 폴더에서 터미널 열고
npx create-react-app .으로 리액트 설치 -
npm i react-router-dom으로 react router dom 설치
설치 파일들 많았어서 따로 적어두기
backend
- npm i express
- npm i mysql
- npm i nodemon
frontend
- npm i react-router-dom
- npm i react-helmet-async
- npm i react-bootstrap bootstrap
- npm i styled-components
- npm i reset-css
- npm i styled-reset
-
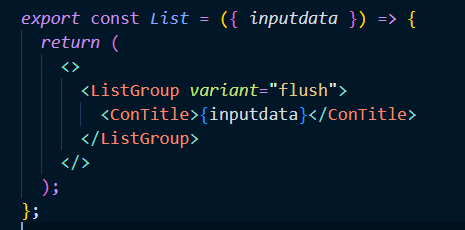
frontend/src경로에 pages폴더에 필요한 jsx파일 생성
-
테이블에서 값을 가져와 띄우기 위해 axios 라이브러리 설치
npm i axios -
데이터 가져와서 뿌려주기 위해
main.js에 코드 작성
import styled from "styled-components";
import { List } from "../../components/List";
import { useEffect, useState } from "react";
import { Loading } from "../../components/Loading";
import axios from "axios";

const ListWrap = styled.section`
  display: flex;
  justify-content: center;
  align-items: center;
`;
const LeftList = styled.div``;
const ListSpaceGround = styled.div`
  width: 20%;
`;
const RightList = styled.div``;

export const Main = () => {

  const [listData, setListData] = useState([]);
  const [loading, setLoading] = useState(true);

  const conListData = async () => {
    try {
      const res = await axios.get("http://localhost:8800/diet");
      console.log(res);
    } catch (err) {
      console.log(err);
    } finally {
      setLoading(false);
    }
  };

  useEffect(() => {
    conListData();
  }, []);

  if (loading) {
    return <Loading />;
  }

  return (
    <ListWrap>
      <LeftList>
        {/* {listData.map((data) => ( */}
        <List usertype="사용자" inputdata="listData에서 받아온 사용자title" />
        {/* ))} */}
      </LeftList>
      <ListSpaceGround />
      <RightList>
        <List usertype="전문가" inputdata="listData에서 받아온 전문가name" />
      </RightList>
    </ListWrap>
  );
};
=> 뭔가 복잡한데 useState랑 useEffect부분 살펴보면 될듯함..!
- 백엔드 폴더의
server.js에서
npm i cors로 cors 설치 후 아래 코드 추가
import cors from "cors"

app.use(cors())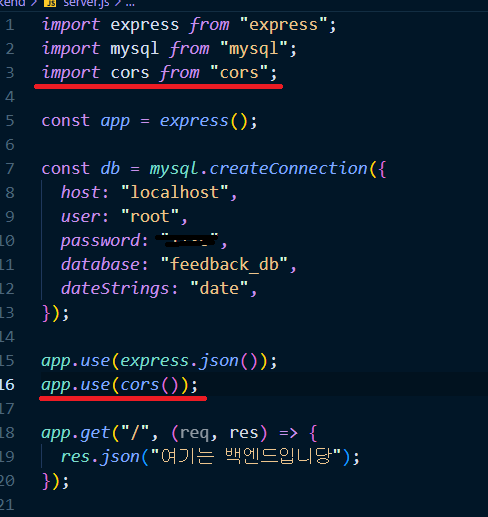
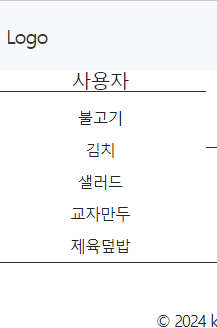
아래와같이 잘 출력된다.
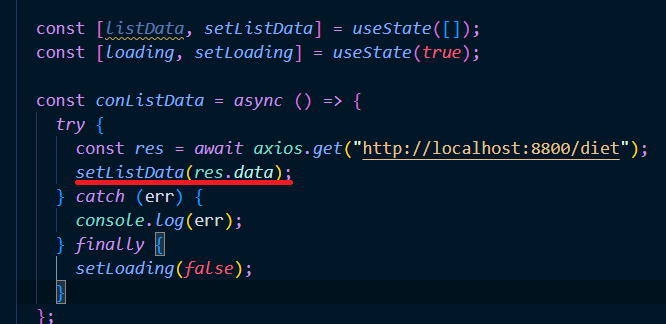
- 확인했으면 다시 jsx파일로 돌아와서 작성했던 setListData에 해당 데이터를 넣어준다.
map함수를 돌려서 아래처럼 넣어주고
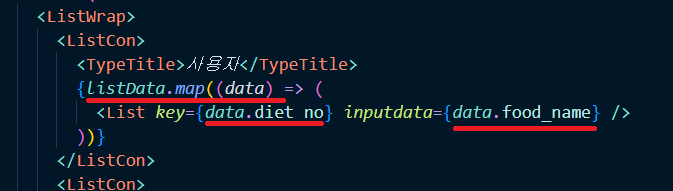
List컴포넌트에서는 inputdata를 props로 받아와 사용
Main.js의 전체코드
import styled from "styled-components";
import { List } from "../../components/List";
import { useEffect, useState } from "react";
import { Loading } from "../../components/Loading";
import axios from "axios";

const ListWrap = styled.section`
  display: flex;
  justify-content: center;
  align-items: center;
`;
const ListCon = styled.div`
  width: 50%;
`;

const TypeTitle = styled.div`
  text-align: center;
  font-size: 20px;
  margin-bottom: 10px;
  border-bottom: 1px solid #333;
`;
export const Main = () => {

  const [listData, setListData] = useState([]);
  const [loading, setLoading] = useState(true);

  const conListData = async () => {
    try {
      const res = await axios.get("http://localhost:8800/diet");
      setListData(res.data);
    } catch (err) {
      console.log(err);
    } finally {
      setLoading(false);
    }
  };

  useEffect(() => {
    conListData();
  }, []);

  if (loading) {
    return <Loading />;
  }

  return (
    <ListWrap>
      <ListCon>
        <TypeTitle>사용자</TypeTitle>
        {listData.map((data) => (
          <List key={data.diet_no} inputdata={data.food_name} />
        ))}
      </ListCon>
      <ListCon>
        <TypeTitle>전문가</TypeTitle>
        <List inputdata="listData에서 받아온 전문가name" />
      </ListCon>
    </ListWrap>
  );
};
결과는 아래!

10분의 정리로 10시간을 아낄 수 있다는 마음으로 글을 작성하고 있습니다💕