
[1] HTML과 JS 비교
<body>
 <script>
document.write(1+1);
 </script>
</body>
결과 : 숫자 2
자바스크립트로 쓴 코드는 동적이기 때문에 숫자 1과 1을 더한 값 2가 나온다.
<body>
1+1
</body>
결과 : 1+1
HTML로 쓴 코드는 정적이기 때문에 문자 그대로를 출력
[2] Javascript와 사용자의 상호작용, Event
<!DOCTYPE html>
<html>
    <head>
        <title></title>
    </head>
    <body>
        <input type="button" value="hi" onclick="alert('hi')">
        <input type="text" onchange="alert('changed')">
        <input type="text"
    </body>
</html>
value라는 속성을 이용해 글씨를 쓴다.
On으로 시작하는 속성들을 이용하는 것을 Event라고 한다.
대략 10~20개 정도 존재하며 "javascript keydown event"라고 구글링하여 원하는 이벤트를 검색 할 수 있다.
※생각해보기
1) 버튼 위에 마우스를 올리면 경고창이 뜨는 웹 사이트를 만드는 개발자가 되었다고 상상해 보고 어떤 이벤트를 사용하면 좋을지 알아보기.
<body>
<input type="button"
</body>
[3] 콘솔
콘솔를 이용해 웹사이트에서의 간단한 문제를 Javascript를 실행하여 해결 할 수 있다.
alert('생각해보기')[4] 변수
x=1;
y=1000;
x+y;
1001
=는 왼쪽에 있는 변수에 오른쪽에 있는 숫자를 대입한다는 의미인 대입연산자라고한다.
변수는 여러군데 흩어져있는 값들을 한번에 바꿀 수 있으며 변수 앞에 var(variable)을 붙이면 좋다.
var word = "hello"[5] CSS
1)
<h1 style="background-color: green; color: white; font-size: 80px;"> Javascript </h1>CSS를 이용하여 디자인을 바꿀 수 있다. EX) color:green
CSS property+"원하는 디자인 요소"를 통해 구글링
2) div 와 span
<div>Rollin'</div> 온통 너의 생각뿐이야 나도 미치겠어결과 : Rollin'
온통 너의 생각뿐이야 나도 미치겠어
<span>Rollin'</span> 온통 너의 생각뿐이야 나도 미치겠어결과 : Rollin'온통 너의 생각뿐이야 나도 미치겠어
- div 태그는 화면 전체를 사용하기 때문에 줄바꿈이 되고, span은 줄바꿈이 되지 않는다.
3) class
 <head>
        <style>
            .js{
                font-size: 100px;
            }
        </style>
    </head>

    <h2>
            <div class="js">Rollin'</div> 온통 너의 생각뿐이야 나도 미치겠어
            너무 보고 싶어 매일 매일 매일
            자꾸 초라해지잖아 내 모습이
            그대여 내게 말해줘 사랑한다고
            <span class="js">Rollin'</span><span class="js">Rollin'</span><span class="js">Rollin'</span><span class="js">Rollin'</span> 하루가 멀다 하고 Rolling in the deep
     </h2>
    </body>
4) 선택자
<head>
        <style>
            .js{
                font-size: 100px;
            }
            #first{
                color: tomato;
            }
        </style>
    </head>

 <h2>
     <span id="first" class="js">Rollin'</span> 온통 너의 생각뿐이야 나도 미치겠어
 </h2>
class는(.) ,id는 (#)
class는 단어의 그룹 즉, 반을 의미하고
id는 식별, 개인 아이디처럼 한페이지에 한번만 쓸 수 있다.
 <head>
        <style>
             .js{
                font-size: 100px;
            }
             #first{
                color: tomato;
            }
             span{
             color:red;
           }
        </style>
    </head>
 <h2>
     <span id="first" class="js">Rollin'</span> 온통 너의 생각뿐이야 나도 미치겠어
 </h2>
결과는 tomaot색
이유 : id > class > 태그 순서로 우선순위를 가지게 된다.
5) Javascript
<body>
 <h1><a href="index.html">WEB</a></h1>
        <input type="button" value="night" onclick="
        document.querySelector('body').style.backgroundColor='black';">

        <input type="button" value="day" onmouseover="
        document.querySelector('body').style.backgroundColor='gray';">
</body>
a href=하이퍼링크
index로 이동 (현재창에서 이동)
querySelector 함수를 이용하여 원하는 태그를 선택,
(자바스크립트 코드)document.querySelector('body')는 body를 태그(.class, #id)
*backgroundcolor(X) backgroundColor(O)*
[1] 비교연산자와 불리언
1) 비교연산자
===,<(&less than sign),>(&greater than sign)
1===1; true
1===2; false
<h1>1<2</h1>
<script>
document.write(1<2);
</script>
true<h1>1<1</h1>
<script>
document.write(1<1);
false불리언(Boolean)
True와 Fasle를 보고 불리언(Boolean) 데이터 타입이라고 부른다.
숫자(Number)나 문자열(String)에는 아주 많은 종류가 있지만 불리언에는 True 아니면 False, 딱 두가지만이 존재한다.
[2] 조건문
1) if가 true라면 else는 실행되지 않고, if가 false라면 else가 실행된다.
<input id="night_day" type="button" value="night" onclick="
        if (document.querySelector('#night_day').value === 'night'){
            document.querySelector('body').style.backgroundColor= 'black' ;
            document.querySelector('body').style.color= 'white' ;
            document.querySelector('#night_day').value = 'day' ;
        } else {
            document.querySelector('body').style.backgroundColor= 'white' ;
            document.querySelector('body').style.color= 'black' ;
            document.querySelector('#night_day').value = 'night' ;
        }
    ">
night를 눌렀을때 버튼도 day가 바뀌기 위해서는 else에 value를 바꿔주는 코드를 추가한다. (document.querySelector('#night_day').value = 'night' ;)
2) 리팩토링
 <input id="night_day2" type="button" value="night" onclick="
            if (document.querySelector('#night_day2').value === 'night'){
                document.querySelector('body').style.backgroundColor= 'black' ;
                document.querySelector('body').style.color= 'white' ;
                document.querySelector('#night_day2').value = 'day' ;
            } else {
                document.querySelector('body').style.backgroundColor= 'white' ;
                document.querySelector('body').style.color= 'black' ;
                document.querySelector('#night_day2').value = 'night' ;
            }
        ">
같은 버튼을 하나 더 만든다면 night_day2처럼 구분을 해줘야한다.
 <input type="button" value="night" onclick="
          if (this.value === 'night'){
              document.querySelector('body').style.backgroundColor= 'black' ;
              document.querySelector('body').style.color= 'white' ;
              this.value = 'day' ;
          } else {
              document.querySelector('body').style.backgroundColor= 'white' ;
              document.querySelector('body').style.color= 'black' ;
              this.value = 'night' ;
          }
      ">
하지만 일일히 구분하는 번거로움을 없애기 위해 document.querySelector('#night_day2') 대신 this를 사용한다.
      <input type="button" value="night" onclick="
          var target = document.querySelector('body')
          if (this.value === 'night'){
              target.style.backgroundColor= 'black' ;
              target.style.color= 'white' ;
              this.value = 'day' ;
          } else {
              target.style.backgroundColor= 'white' ;
              target.style.color= 'black' ;
              this.value = 'night' ;
          }
      ">
중복을 제거하기 위해서는 target이라는 변수를 사용한다.
var target = document.querySelector('body') 코드를 추가하고
document.querySelector('body')부분을 지우고 taget으로 바꿔주면 중복이 제거되고 코드의 길이도 줄일 수 있다.
(*바꾸고 싶은 중복코드를 선택하여 ctrl+D로 다중 선택 후 원하는 코드를 치면 한번에 바꿀 수 있다.)
[3] 반복문
while안의 불리언이 false가 될 때까지 반복한다.
즉, 반복문과 조건문은 순서대로 실행되는 프로그램의 실행 흐름을 제어하는 제어문이다.
<script>
   document.write('<li>1<li>');
   var i = 0;
   while(i < 3){
   	document.write('<li>2<li>');
   	document.write('<li>3<li>');
	i = i + 1;
   }
	document.write('<li>4<li>');
   </script>
var i = 0; i의 값은 0 이므로 3보다 작으니까 2,3이 나온다.
i가 0이었을때 0+1은 1이되므로 i값은 1이된다.
i값이 1일때 3보다 작으므로 2,3이 한번 더 나온다.
i값이 1일때 1+1은 2이므로 i값은 2가된다.
i값이 2일때 2는 31보다 작으므로 2,3이 한번 더 나온다.
i값이 2일때 2+1는 3이므로 i값은 3이되어 3<3이 false가 되어 반복문 실행을 종료한다.
[4] 배열
     <body>
         <h1>Loop & Array</h1>
         <script>
             var coworkers = ['egoing','leezche','duru','teaho'];
         </script>
         <h2>Co workers</h2>
         <ul>
            <script>
                var i = 0;
                while(i < 5){
                    document.write('<li>'+coworkers[i]+'</li>');
                    i = i + 1;
            }
            </script>
         </ul>
</body> 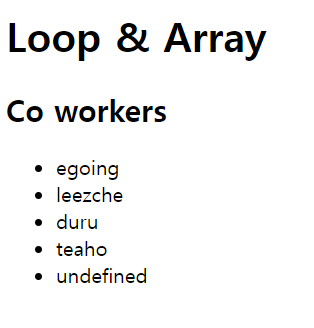
var coworkers 안에 있는 원소의 수는 4개 뿐인데 while(i < 5)이기 때문에 4번째는 undefined로 출력된다.
이와 반대로 원소의 수는 4개인데 while(i <3)이 된다면 3번째 원소는 출력이 되지 않는다.
이를 해결하는 방법으로는?
5대신 coworkers의 배열의 길이는 입력해주면 자동으로 반복횟수가 조정이 된다.
<script>
            var coworkers = ['egoing','leezche','duru','teaho'];
        </script>
        <h2>Co workers</h2>
        <ul>
           <script>
               var i = 0;
               while(i < coworkers.length){
                   document.write('<li>'+coworkers[i]+'</li>');
                   i = i + 1;
           }
           </script>
*링크를 추가하는 방법
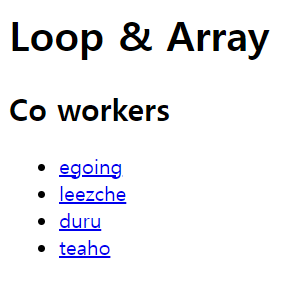
<h2>Co workers</h2>
         <ul>
            <script>
                var i = 0;
                while(i < coworkers.length){
                    document.write('<li><a href="http.www.naver.com/'+coworkers[i]+'">'+coworkers[i]+'</a></li>');
                    i = i + 1;
            }
            </script>