
주제
- 제목 : 네이버 뉴스 분류기
- 미션 : 뉴스를 크롤링해서 뉴스를 분류하기
파일 정보
네이버에서 크롤링을 하여서 기사 분류

- 각종 분야 별로 뉴스 카테고리를 수작업으로 크롤링하였음
🤣 생각보다 힘들었다는 생각이듬
라이브러리 및 패키지 설치
# 모듈
import nltk
import re
import pandas as pd
from nltk.stem import WordNetLemmatizer
from nltk.tokenize import word_tokenize
from konlpy.tag import Komoran
import matplotlib.pyplot as plt
import pickle
import pandas as pd
from sklearn.model_selection import train_test_split
import numpy as np
import shutil
import os
import tensorflow as tf
from tensorflow.keras.models import Model
from tensorflow.keras.layers import Dropout, Input, Dense, Lambda
from tensorflow.keras.callbacks import ReduceLROnPlateau, ModelCheckpoint, EarlyStopping
from transformers import TFBertModel, AutoModel, AutoTokenizer
from tensorflow.keras.utils import to_categorical
from sklearn.preprocessing import LabelEncodernltk.download('wordnet')단어 간의 동의어, 반의어, 유의어 관계를 탐색을 위해 사용
기본설정
# 캐시 디렉토리 설정 및 모델/토크나이저 로드
cache_dir = os.path.expanduser('~/.cache/huggingface/transformers')

if not os.path.exists(cache_dir):
    try:
        os.makedirs(cache_dir)
        print(f"Cache directory created at: {cache_dir}")
    except Exception as e:
        print(f"An error occurred while creating the cache directory: {e}")
else:
    print(f"Cache directory already exists: {cache_dir}")

# 모델과 토크나이저
bert_model_name = 'bert-base-uncased'
bert_tokenizer_name = 'bert-base-uncased'


try:
    bert_model = AutoModel.from_pretrained(bert_model_name, cache_dir=cache_dir)
    tokenizer = AutoTokenizer.from_pretrained(bert_tokenizer_name, cache_dir=cache_dir)
    print("Model and tokenizer loaded successfully.")
except Exception as e:
    print(f"An error occurred while loading the model or tokenizer: {e}")

# 한국어 토큰라이저 초기화
komoran = Komoran()
데이터로드
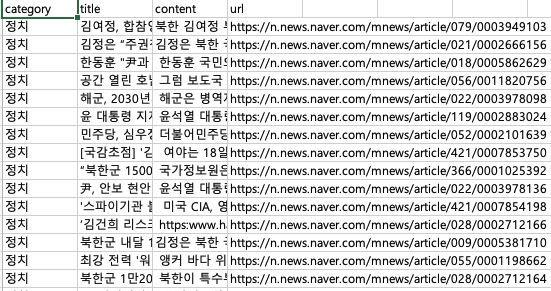
# 파일 불러오기
news = pd.read_csv('/content/naver_news_bk.csv')
news.head()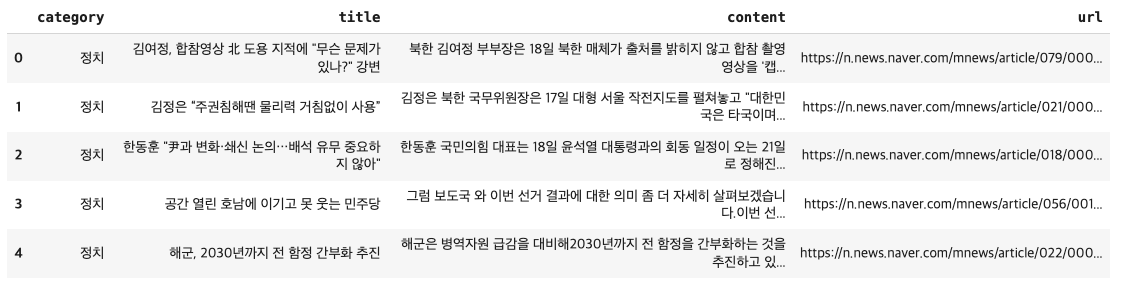
# 필요한 열만 선택
news = news[['title', 'content', 'category', 'url']]
# 카테고리 명칭 정규화
news['category'] = news['category'].replace({
    "정치": "Politics",
    "경제": "Economy",
    "사회": "Society",
    "생활/문화": "Lifestyle/Culture",
    "세계": "World",
    "IT/과학": "IT/Science",
    "연예": "Entertainment"
})
# 카테고리 개수 확인 및 시각화
plt.figure(figsize=(10, 10))
plt.pie(x=news.category.value_counts(), labels=news.category.value_counts().index, autopct='%1.1f%%', textprops={'fontsize': 8, 'alpha': .7})
plt.title('The percentage of instance belonging to each class', alpha=.7)
plt.tight_layout()
plt.show()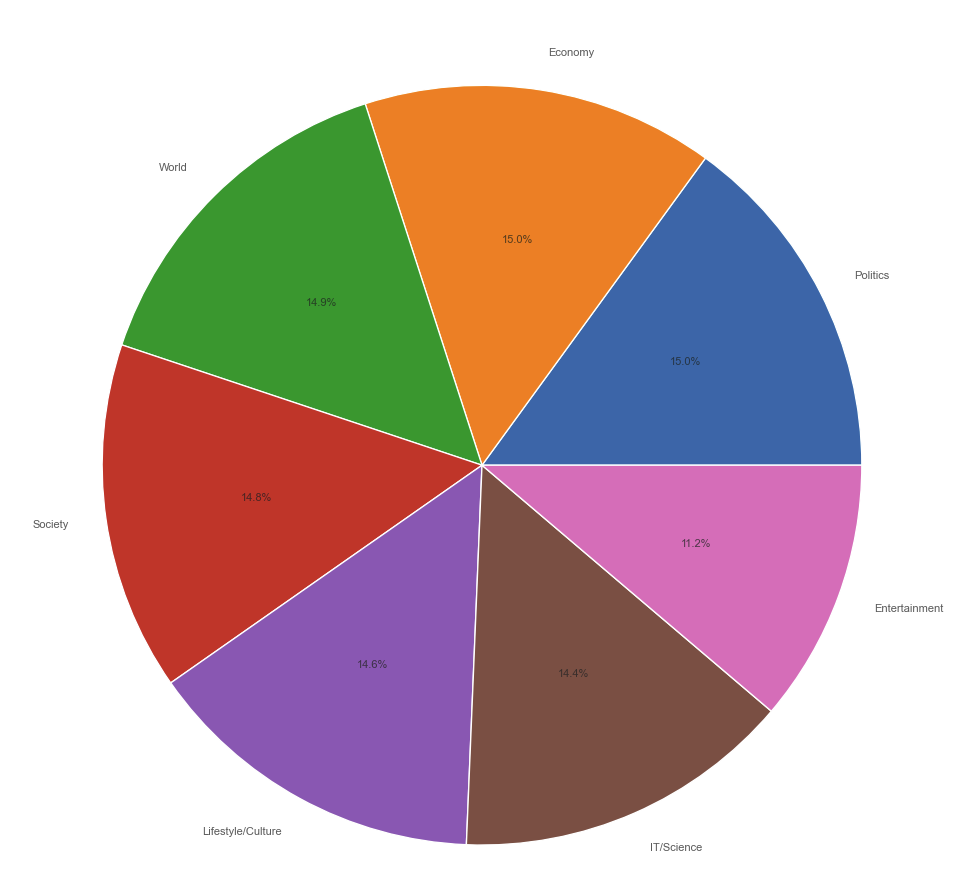
전처리
# 한국어 불용어 사전 사용
with open('/content/stopwords-ko.txt', 'r') as f:
    stopwords = f.readlines()
stopwords = [re.sub('\n', '', w) for w in stopwords]

MAX_BERT_LEN = 512

def text_preprocessing(df: pd.DataFrame):
    processed_data = []
    max_len = 0
    for index, row in df.iterrows():
        # NaN 값을 빈 문자열로 대체
        title = row['title'] if isinstance(row['title'], str) else ''
        content = row['content'] if isinstance(row['content'], str) else ''

        # Komoran 형태소 분석기를 사용한 토큰화
        head_desc = title + " " + content
        head_desc_tokenized = komoran.morphs(head_desc)
        punctuation_stopwords_removed = [re.sub(r'[^가-힣\w\s]', '', token) for token in head_desc_tokenized if token not in stopwords]  # punctuations and stopwords removal
        number_removed = [re.sub(r'\d+', '', token) for token in punctuation_stopwords_removed]  # numbers removal
        empty_str_removed = [token for token in number_removed if token != '']  # empty strings removal
        if len(empty_str_removed) > max_len:
            max_len = len(empty_str_removed)
        processed_data.append({
            'title': row['title'],
            'content': " ".join(empty_str_removed),
            'category': row['category'],
            'url': row['url']
        })


    max_len = min(max_len, MAX_BERT_LEN)  # 최대 길이 제한

    new_df = pd.DataFrame(processed_data)
    X, y = new_df['content'], new_df['category']
    return X, y, max_len

 X, y, max_len = text_preprocessing(news)

# Save preprocessed data
def save_data(name, data):
    with open(name, 'wb') as f:
        pickle.dump(data, f)

save_data('preprocessed_text_data.h5', X)
save_data('preprocessed_labels.h5', y)
save_data('max_sequence_length', max_len)

# Labels
label_encoder = LabelEncoder()
y = label_encoder.fit_transform(news['category'])

# 토크나이저에서 최대 길이를 제한
def tokenizer_preprocessing(texts, tokenizer):
    encoded_dict = tokenizer.batch_encode_plus(
        texts.tolist(),
        return_token_type_ids=False,
        padding=True,
        max_length=min(max_len, 510),  # 최대 길이 제한
        truncation=True
    )
    return np.array(encoded_dict['input_ids'])

padded_train = tokenizer_preprocessing(X_train, tokenizer)
padded_eval = tokenizer_preprocessing(X_eval, tokenizer)
padded_test = tokenizer_preprocessing(X_test, tokenizer)

save_data('padded_train.h5', padded_train)
save_data('padded_eval.h5', padded_eval)
save_data('padded_test.h5', padded_test)
모델 설정 및 훈련
# Split dataset
X_train, X_temp, y_train, y_temp = train_test_split(X, y, test_size=0.3, random_state=42)
X_eval, X_test, y_eval, y_test = train_test_split(X_temp, y_temp, test_size=0.5, random_state=42)
# 모델 설정 일관되게 수정
with tf.distribute.get_strategy().scope():
pretrained_model = TFBertModel.from_pretrained('bert-base-multilingual-cased')
if pretrained_model is not None:
print("모델이 성공적으로 로드되었습니다.")
else:
print("모델 로드에 실패했습니다")
# 입력 레이어 정의 # This and the following lines need to be indented within the 'with' block
input_ids = Input(shape=(min(max_len, 510),), dtype='int32', name='input_ids')
# DistilBERT 모델 적용
def apply_distilbert(x):
return pretrained_model(x).last_hidden_state
# bert_output = Lambda(apply_distilbert)(input_ids)
bert_output = Lambda(apply_distilbert, output_shape=lambda s: (s[0], 510, 768))(input_ids)
# CLS 토큰 추출을 위한 Lambda 레이어
#cls_token = Lambda(lambda x: x[:, 0, :])(bert_output)
cls_token = Lambda(lambda x: x[:, 0, :], output_shape=lambda s: (s[0], 768))(bert_output)
# Dense 레이어 추가
x = Dense(64, activation='relu')(cls_token)
output_layer = Dense(7, activation='sigmoid')(x)
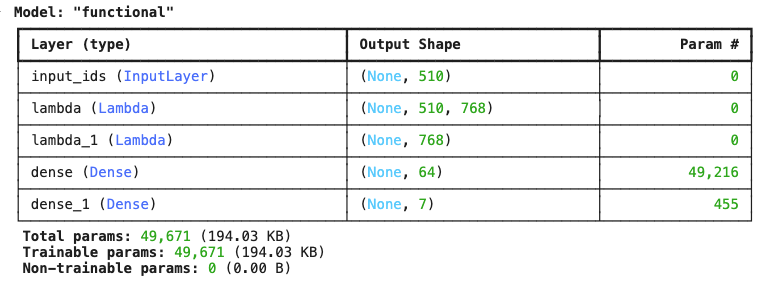
# 모델 정의 및 컴파일
bert_tf = Model(inputs=input_ids, outputs=output_layer)
bert_tf.compile(optimizer='adam', loss='binary_crossentropy', metrics=['accuracy'])
bert_tf.summary()
# y_train과 y_eval을 원-핫 인코딩 # This should be outside the 'with' block
y_train = to_categorical(y_train, num_classes=7)
y_eval = to_categorical(y_eval, num_classes=7)
# 콜백 설정
EPOCHS = 50
BATCH_SIZE = 32
early_stopping = EarlyStopping(patience=10, restore_best_weights=True)
model_checkpoint = ModelCheckpoint(
'/content/model_weights.keras',
monitor='val_accuracy',
save_best_only=True
)
lr = ReduceLROnPlateau(monitor='val_loss', factor=0.2, patience=2)
# 모델 훈련
history = bert_tf.fit(
padded_train,
y_train,
validation_data=(padded_eval, y_eval),
epochs=EPOCHS,
batch_size=BATCH_SIZE,
callbacks=[lr, early_stopping, model_checkpoint]
)
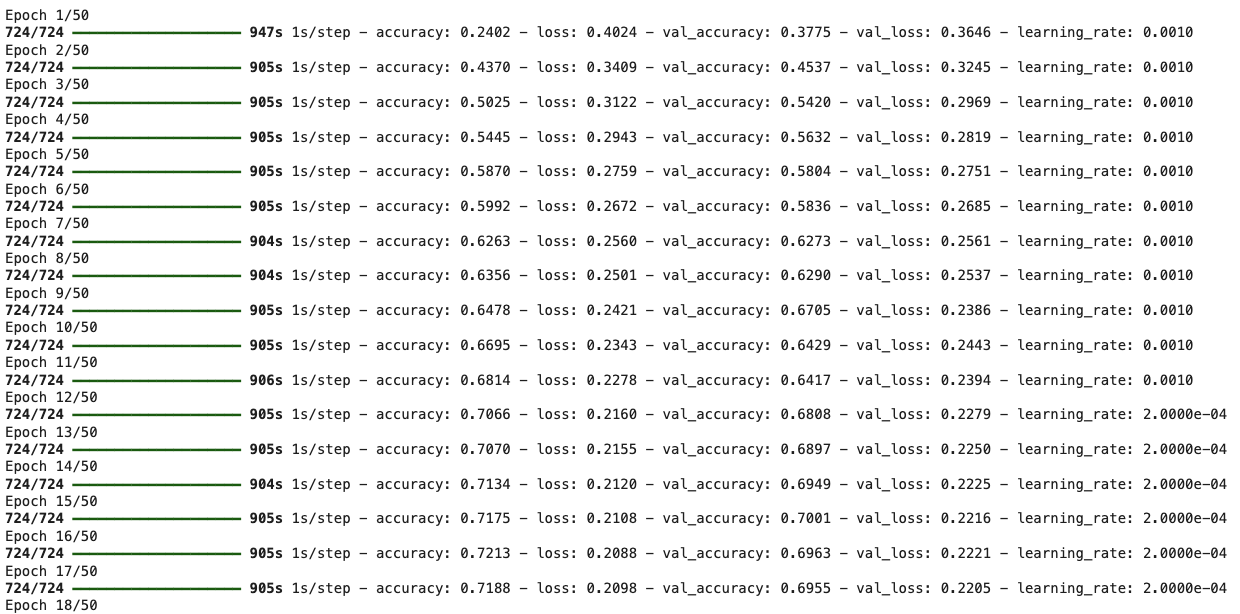
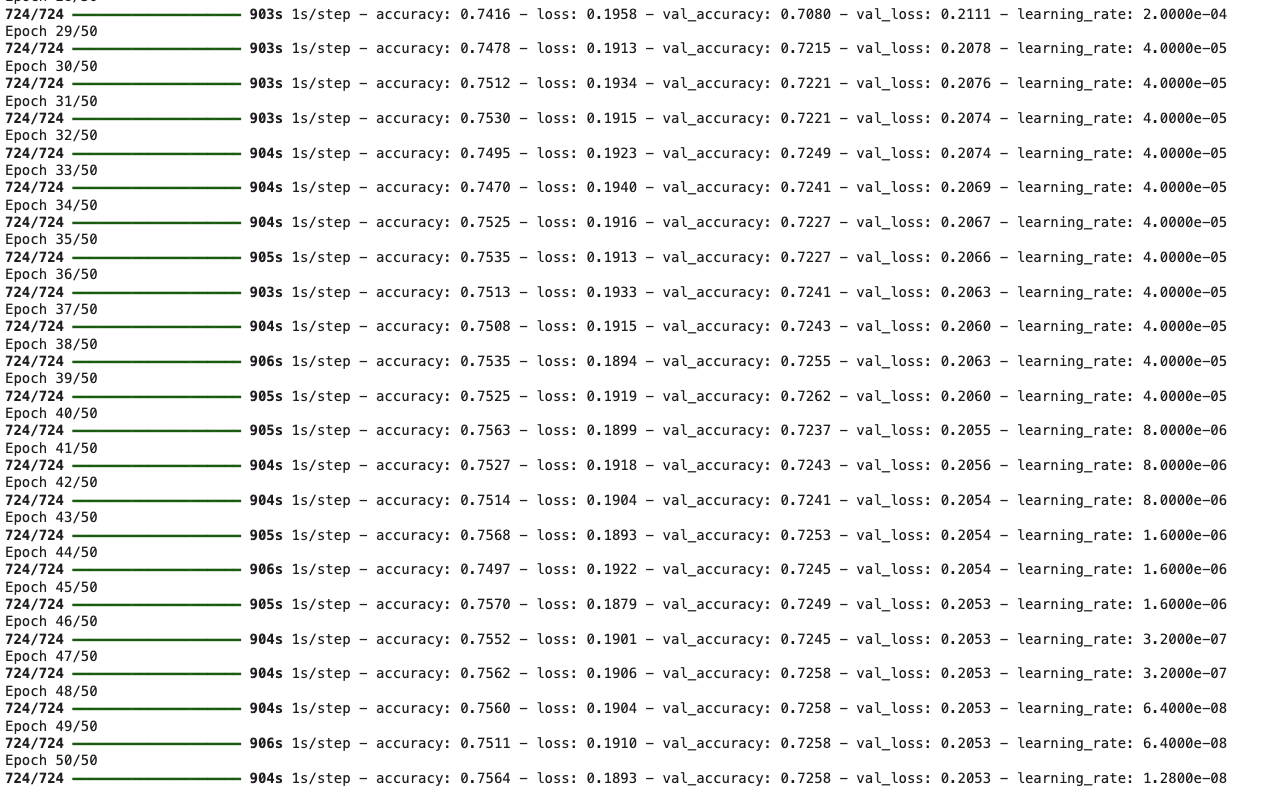
🐶모델 훈련완료 ~~~
결과
plt.figure(figsize=(7, 7))
plt.plot(history.history['loss'], label='loss');
plt.plot(history.history['val_loss'], label='val_loss');
plt.legend();
plt.title('Loss vs Validation Loss');
plt.tight_layout();

plt.figure(figsize=(7, 7))
plt.plot(history.history['accuracy'], label='accuracy')
plt.plot(history.history['val_accuracy'], label='val_accuracy')
plt.legend()
plt.title('Accuracy vs Validation Accuracy')
plt.xlabel('Epoch')
plt.ylabel('Accuracy')
plt.tight_layout()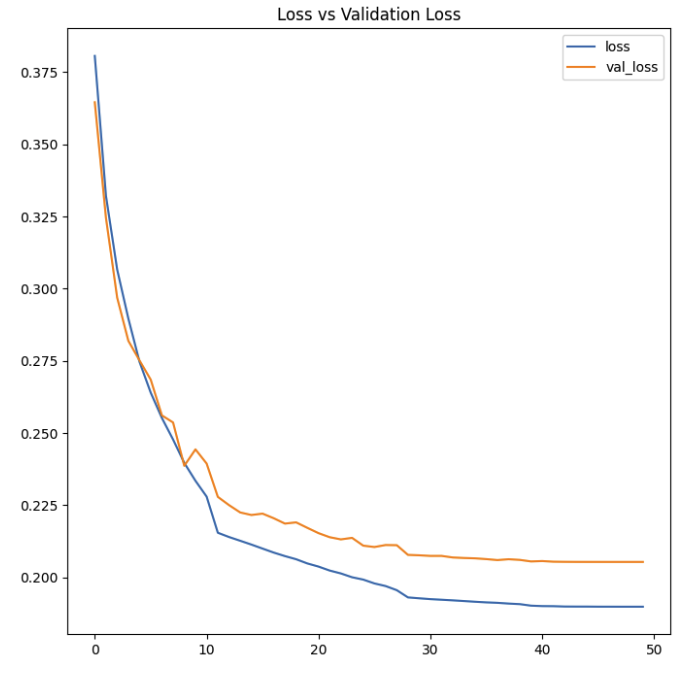
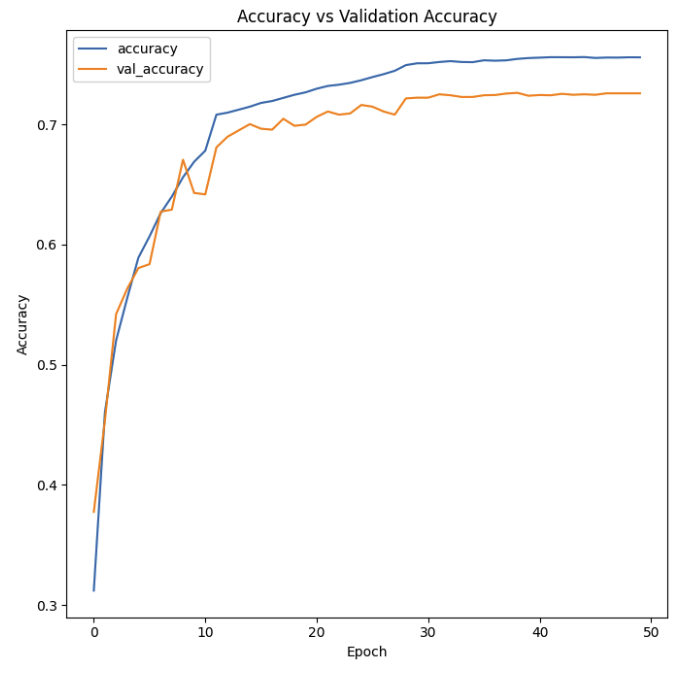
✏️ 나의 생각
케글보다 네이버뉴스자료 데리터 사용시, loss는 조금 높지만 Accuracy는 높게 나왔지만 모델을 수정해서 조금 더 좋은 결과를 나타낼수 있을 거 같다.

개발자를 위한 첫시작