
- 2024.01.02 추가
렌더링 방식에 변경점이 생겼는지, 해당 포스팅의 Cheerio.js 만으로는 크롤링이 불가능하고 Puppeteer 를 추가로 사용해 주어야 합니다. 다음 포스팅을 참고해주세요!
https://velog.io/@kimbangul/Next.js-Puppeteer-chromium-%EC%9C%BC%EB%A1%9C-CSR-%ED%8E%98%EC%9D%B4%EC%A7%80-%ED%81%AC%EB%A1%A4%EB%A7%81%ED%95%98%EA%B8%B0
Next.js 12.3.1 기준으로 작성되었습니다. (13버전 이하)
Cheerio.js 설치
npm install cheerio // or yarn add cheerioCheeris.js는 Node 환경에서 HTML을 파싱할 수 있는 라이브러리입니다.
npm install axios추가로, 저는 http 비동기 통신 라이브러리 axios를 설치해서 진행했습니다.
Next.js api 생성
// pages/api/crawler/index.ts
import type { NextApiRequest, NextApiResponse } from 'next';

export default async function handler (
  req: NextApiRequest,
  res: NextApiResponse)  {
  res.status(200).json(
    {
  		dummy: 'hello'
  	}
  )
}
pages/api 폴더 안에 api를 생성해 줍니다. (13버전 이상, 앱 라우터를 쓴다면 app/api/crawler/route.ts 로 생성)
type 생성
// pages/api/crawler/type.ts
export interface ContentType {
  head?: string; // 썸네일 이미지
  date: string; // 작성 날짜
  context: string; // 포스트 미리보기 요약글
  href?: string; // 링크
  headline: string; // 제목
  tags: string[]; // 태그 목록
}
크롤링으로 만들 데이터에 대한 타입을 정의해줍니다.
라이브러리 import
// pages/api/crawler/index.ts
import type { NextApiRequest, NextApiResponse } from 'next';
import axios from 'axios';
import cheerio, {Element} from 'cheerio';
import { ContentType } from './type';

export default async function handler (
  req: NextApiRequest,
  res: NextApiResponse)  {
  res.status(200).json(
    {
  		dummy: 'hello'
  	}
  )
}
cheerio, axios, type 을 api에서 import 해 줍니다.
크롤링 함수 만들기
// pages/api/crawler/index.ts
import type { NextApiRequest, NextApiResponse } from 'next';
import axios from 'axios';

//..(중략)..

const getHtml = async (url : string) => {
  try {
    // url로 html 요청 후 cheerio에 html 로드
    const html = await axios.get(url);
    const $ = cheerio.load(html.data);

    let content : ContentType[] = []; // 결과값으로 return 해 줄 변수
    const ARTICLE_SELECTOR = $("#root div:nth-child(2) div:nth-child(3) div:nth-child(4) div:nth-child(3) > div > div"); // 게시물 선택, 동일 태그가 여러개여서 배열로 생성됩니다.

    // FUNCTION 태그 구하는 함수
    const getTag = (tagSelector : Element) => {
      let result : string[] = []

      // 게시물 DOM을 파라미터로 받아 그 게시물의 태그를 선택합니다.
      const tagList = $(tagSelector).find(".tags-wrapper > a");

      tagList.map((idx,el)=>{
        const tag = $(el).text();
        result[idx] = tag;
      });

      return result;
    }

    // 선택한 게시물 갯수만큼 처음에 선언했던 content 배열에
    // 각 게시물의 정보를 입력합니다.
    ARTICLE_SELECTOR.map((idx, el) => {
      content[idx] = {
        head: $(el).find("img").attr('src'),
        date: $(el).find(".subinfo > span:first-of-type").text(),
        context: $(el).find("p").text(),
        href: $(el).find("a:first-child").attr('href'),
        headline: $(el).find("h2").text(),
        tags: getTag(el),
      }
    });

    return content;
  }
  catch(e){
    console.log(e);
  }
}

// ..(생략)..
url 연결 및 결과 return
// .env
NEXT_PUBLIC_BACK_API_URL=http://127.0.0.1:3000
NEXT_PUBLIC_BLOG_URL=https://velog.io/@kimbangul
env 파일을 생성하고 크롤링할 velog url 주소를 입력해 줍니다.
저는 back단에서 고정으로 url을 입력해 줬지만,
api 요청시 파라미터를 받아 유동적으로 크롤링이 가능하게 해도 괜찮을 것 같습니다.
// pages/api/crawler/index.ts
import type { NextApiRequest, NextApiResponse } from 'next';
import axios from 'axios';

//..(중략)..

const getHtml = async (url : string) => {
  // ..(중략)..
}

// env파일의 url 파라미터로 넣어 실행
const article = getHtml(process.env.NEXT_PUBLIC_BLOG_URL || '');

export default async function handler (
  req: NextApiRequest,
  res: NextApiResponse)  {
  res.status(200).json(await article) // 크롤링한 결과값 json 형식으로 send
}
클라이언트에서 데이터 받아오기
// PostView.tsx
import styled from 'styled-components';
import axios from 'axios';
import { useEffect } from 'react';

const PostsView = () => {

  useEffect(()=> {
    axios.get(`${process.env.NEXT_PUBLIC_BACK_API_URL}/api/crawler`).then((res)=>{
      console.log(res);
    })
  }, []);

  //...(생략)...
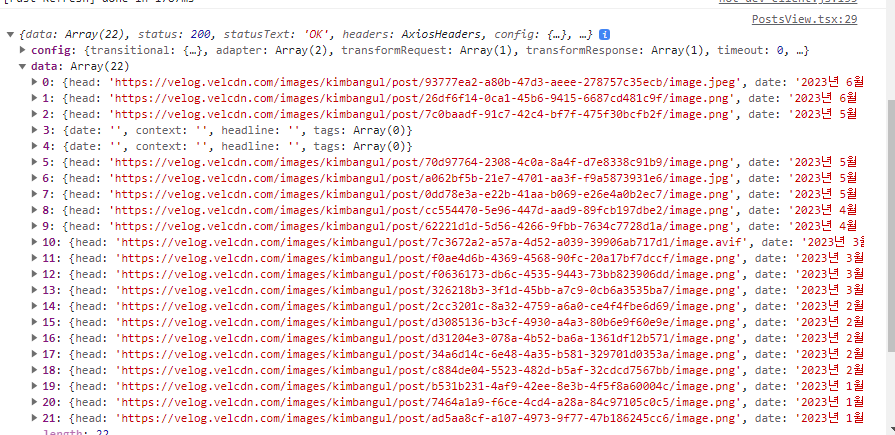
response의 data에 크롤링한 데이터가 잘 들어온 걸 볼 수 있습니다.😀
참고자료
- https://lightcode.tistory.com/44 (Cheerio 사용해서 HTML파싱하여 Scraping하기)
- https://cheerio.js.org/docs/intro (Cheerio.js 공식 문서)

코딩하는 고양이🐱 / UI Developer, Front-end Developer