스포티파이 developer 공식문서 - Authorization Code Flow를 참고하여 구현했다.
(node + express로 엄청 간단하게 만든 백엔드 코드는 유튜브 영상을 참고하여 만들었다.)
스포티파이 소셜 로그인은 Oauth 2.0 서비스를 지원한다.
소셜 로그인의 flow는 다음 그림과 같다. (출처: 공식문서)
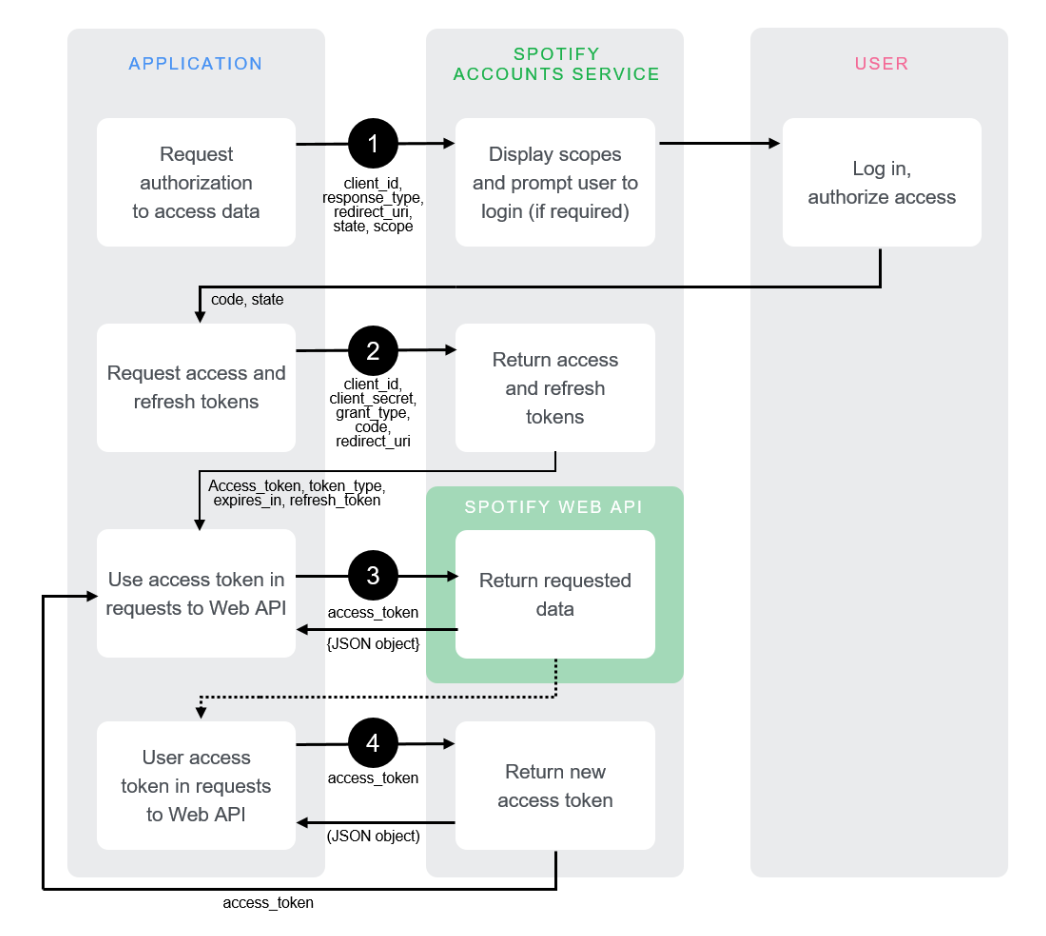
스포티파이 소셜로그인 flow 정리
- /authorize endpoint로 스포티파이 사용자에게 승인 요청을 보낸다.
- 요청이 진행되면, 사용자는 요청 url에 함께 보냈던 읽을 데이터 범위(scope)에 대한 접근 승인 대화창을 보게 된다. (만약 스포티파이에 사용자가 로그인되어있지 않으면 먼저 로그인 후 접근 승인 대화창으로 넘어간다.)
- 사용자가 접근을 승인하면(또는 거부하면) 요청 url에 함께 보냈던 redirect_uri 주소로 리디렉션 된다.
- redirect_uri 주소로 리디렉션 되면서 주소창 query parameter에 access_token을 요청할 수 있는
code와state가 같이 넘어온다.(발급된다.)
<예시>

https://my-domain.com/callback?code=NApCCg..BkWtQ&state=34fFs29kd09- 발급받은
code로 access_token을 요청한다.
요청에 대한 응답으로는 다음과 같은 정보가 JSON data로 반환된다.
{
   "access_token": "NgCXRK...MzYjw",
   "token_type": "Bearer",
   "scope": "user-read-private user-read-email",
   "expires_in": 3600,
   "refresh_token": "NgAagA...Um_SHo"
}- 발급받은 access_token으로 Web api를 요청한다.
스포티파이 소셜로그인 코드 구현
- 승인 요청 url주소는 다음과 같다.
https://accounts.spotify.com/authorize?client_id=(클라이언트ID)&response_type=code&redirect_uri=(redirect uri)&scope=(읽고싶은 데이터 scope)client_id는 스포티파이 developer 웹사이트 dashboard에서 새로운 프로젝트를 생성한 후 setting 페이지에서 찾을 수 있다.
새 프로젝트 생성 시 redirect uri를 지정할 수 있고, 그냥 만들고 나중에 지정해도 된다.
import { Loginlayout, LoginTitle, LoginButton } from '../style/Login.styled';

const { VITE_AUTH_URL } = import.meta.env;

const Login = () => {
  return (
    <Loginlayout>
      <LoginTitle>Track Your Listening History</LoginTitle>
      <LoginButton href={VITE_AUTH_URL}>Login With Spotify</LoginButton>
    </Loginlayout>
  );
};

export default Login;
로그인 컴포넌트에서 승인 요청 url을 a태그 href주소로 연결한다.
-
로그인 버튼을 클릭하면 승인 요청 페이지(또는 로그인하지 않은 경우 스포티파이 로그인 페이지)로 이동한다.
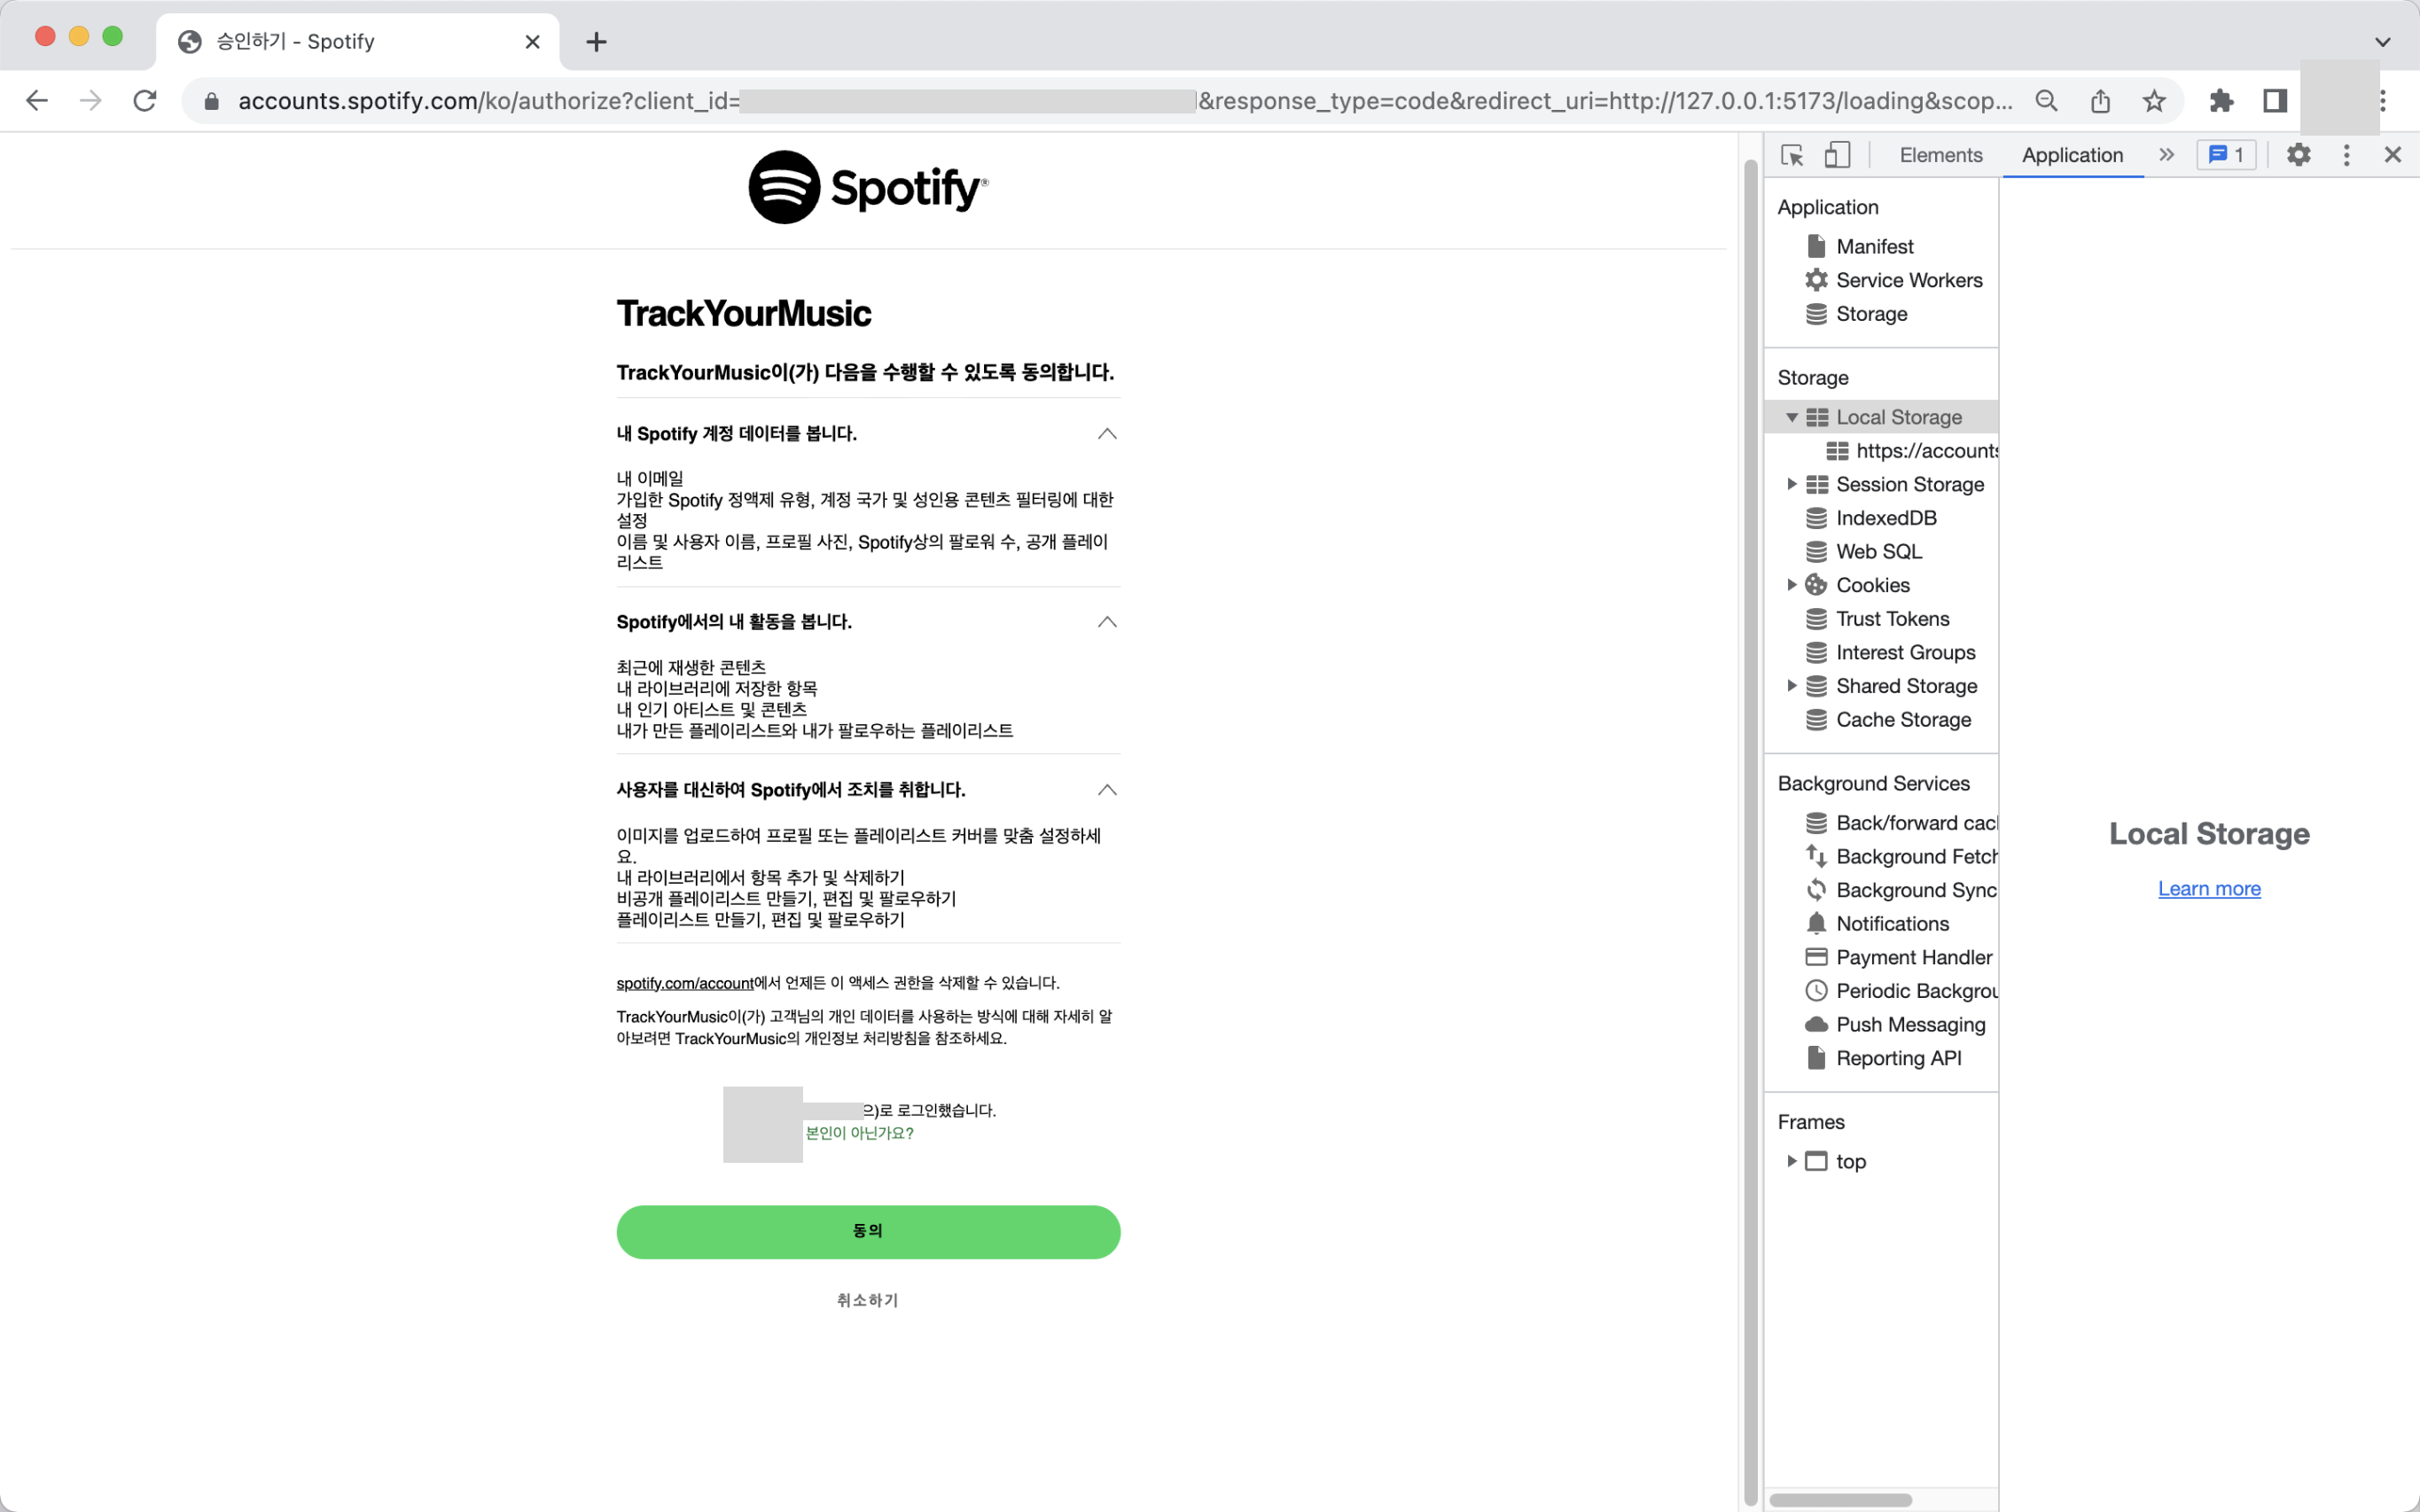
-
동의 버튼을 클릭하면 위 이미지 주소창에 보이는 redirect_uri(Loading페이지)로 리디렉션 되면서 code와 state가 함께 query parameter로 들어온다.

query parameter에서 code를 가져와 access_token을 요청한다.
import { useEffect } from 'react';
import { useNavigate } from 'react-router-dom';
import { useDispatch } from 'react-redux';
import useAuth from '../hooks/useAuth';
import { Loadinglayout, LoadSpinner } from '../style/Loading.styled';
import { tokenAction } from '../store/token-slice';

const code = new URLSearchParams(window.location.search).get('code');

const Loading = () => {
  const accessToken = useAuth(code!);
  const navigate = useNavigate();
  const dispatch = useDispatch();

  localStorage.setItem('accessToken', accessToken);
  dispatch(tokenAction.getToken(accessToken));

  useEffect(() => {
    if (!accessToken) return;

    const loadTime = setTimeout(() => {
      navigate('/home');
    }, 1500);

    return () => clearTimeout(loadTime);
  }, [accessToken]);

  return (
    <Loadinglayout>
      <h1>Login ...</h1>
      <LoadSpinner />
    </Loadinglayout>
  );
};

export default Loading;
URLSearchParams의 get 메서드로 code의 값을 가져온 후, 커스텀 훅으로 만들어둔 useAuth에 code를 보내 accessToken을 발급하는 api를 요청한다.
access_token을 발급받고 로컬스토리지에 저장하면서 리덕스로 전역 state에도 저장한다.
access_token을 가져오면 1.5초 후 <Home /> 페이지로 리다이렉트 된다.
1.5초의 시간을 준 것은 사실상 Loading페이지로 리다이렉트 되고 바로 access_token을 받아오기 때문에 Loading페이지는 0.n초만에 사라진다.
화면이 너무 급하게 바뀌는 게 싫어서 1.5초 후에 <Home /> 페이지로 이동하도록 했다.
// node + express로 만든 access_token을 요청하는 api
app.post('/loading', function (req, res) {
  const code = req.body.code;

  const spotifyApi = new SpotifyWebApi({
    redirectUri: process.env.REDIRECT_URI,
    clientId: process.env.CLIENT_ID,
    clientSecret: process.env.CLIENT_SECRET,
  });

  spotifyApi
    .authorizationCodeGrant(code)
    .then((data) => {
      res.json({
        status: data.statusCode,
        accessToken: data.body.access_token,
        refreshToken: data.body.refresh_token,
        expiresIn: data.body.expires_in,
      });
    })
    .catch((error) => {
      console.log(error);
      res.sendStatus(400);
    });
});
스포티파이 소셜로그인 개념을 이해하는데 처음이라 정말 많이 헤맸다.
튜토리얼 동영상도 5번은 본 듯...
그리고 예시 코드가 잘 없고 다 외국 글이라 좀 알아가기 힘들었는데 스포티파이 api를 사용해서 꼭 뭔가를 만들어보고 싶다는 마음 하나로 끝까지 구현했다.
