
Spring boot의 설치는 https://start.spring.io/ 를 참고해 주세요.
1. Creating Simple API
@RestController
public class HelloController {

//    @RequestMapping(value = "/", method = RequestMethod.GET)
    @GetMapping("/")
    public String helloWorld() {
        return "Welcom spring";
    }
}
@RestController
- HTTP 요청에 대해 JSON으로 반환
@GetMapping("/")
- @RequestMapping(value = "/", method = RequestMethod.GET) 동등
2. Running Springboot App
프로퍼티 설정
/resources/application.properties

server.port = 8082

Terminal mvn spring-boot:run- Spring Boot의 프로퍼티 파일에서 정적인 값들을 key value 형식으로 관리 가능하며, 기존 스프링 프레임워크의 복잡한 XML 설정을 하나의 파일로 설정할 수 있도록 한다.
- Spirng Boot의 실행은 터미널에서 mvn spring-boot:run 명령어로 실행 가능하다.
3. Springboot Devtools
1) Springboot Devtools dependency 적용
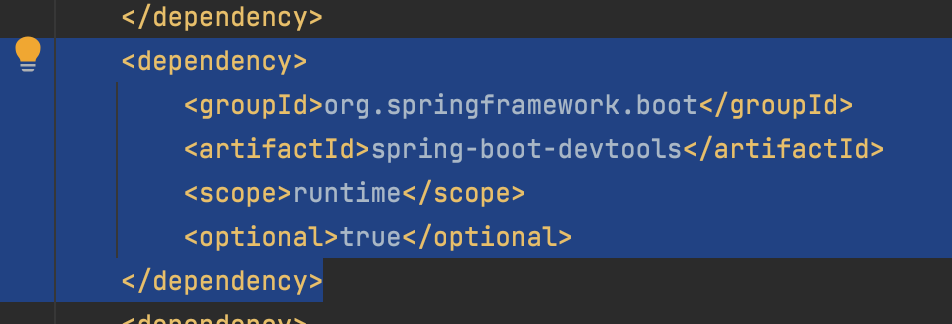
2) 셋팅 설정
3) 코드 수정 시 자동 리로드 적용
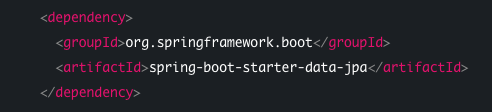
3. Adding H2 and JPA Dependency
1) JPA dependency 추가
2) h2 설정
spring.h2.console.enabled=true
spring.datasource.url=jdbc:h2:mem:dcbapp
spring.datasource.driverClassName=org.h2.Driver
spring.datasource.username=sa
spring.datasource.password=password
spring.jpa.database-platform=org.hibernate.dialect.H2Dialect
3) /h2-console 접속 후

4. Creating Springboot Components
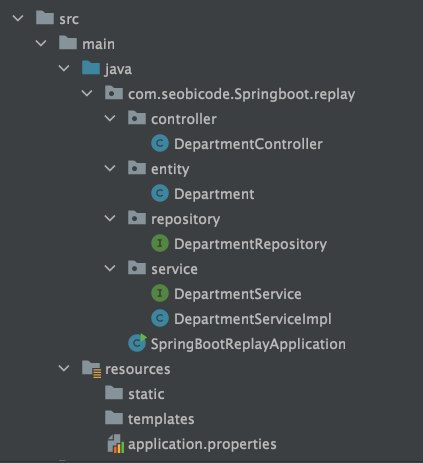
1) Entity
@Entity => (1)
public class Department {

    @Id => (2)
    @GeneratedValue(strategy =  GenerationType.AUTO) => (3)
    private Long departmentId;
    private String departmentName;
    private String departmentAddress;
    private String departmentCode;

    // generate getter & setter
    ...

    // generate constructor
    ...

    // generate default constructor
    ...

    // generate toString
    ...

}
(1) @Entity : Department class는 @Entity로 주입되고 JPA entitiy를 가리키며 동일한 이름을 가진 테이블과 매핑 된다.
(2) @Id : departmentId는 @Id 주입되고 이를 통해 JPA는 object's id로 인식한다.
(3) @GeneratedValue : ID는 자동으로 생성
2) Repository
@Repository
public interface DepartmentRepository extends JpaRepository<Department, Long> - (1) {

}
(1) JpaRepository : Entity와 Id의 타입을 generic parameter에 적용
3) Service
// DepartmentService

public interface DepartmentService {
    Department saveDepartment(Department department);
}
// DepartmentServiceImpl
@Service - (1)
public class DepartmentServiceImpl implements DepartmentService {
@Autowired
private DepartmentRepository departmentRepository;
@Override
public Department saveDepartment(Department department) {
return departmentRepository.save(department);
}
}(1) @Service : @Service 주입을 통해 해당 클래스가 어플리케이션의 비즈니스 로직 layer임을 나타낸다.
4) Controller
@RestController
public class DepartmentController {

    @Autowired
    private DepartmentService departmentService;

    @PostMapping("/departments")
    public Department saveDepartment(@RequestBody Department department) {
        // 이거 안할려고 위에 autowired 적용
        // DepartmentService service = new DepartmentServiceImpl();
        return departmentService.saveDepartment(department);
    }
}
(1) @PostMapping : POST URL 지정
(2) @RequestBody : HTTP req body
참고 - Spring Boot Tutorial | Full In-depth Course by Daily Code Buffer

Pay it forward