
1. 쿠버네티스 요약 정리
1) 이점
- Automatic deployment of the containerized aplications across different servers
- Distribution of the load across multiple servers
- Auto-scaling of the deployed applications
- Monitoring and health check of the containers
- Replacement of the failed containers
2) 지원하는 컨테이너 런타임
- Docker
- CRI-O
- containerd
3) 구성 요소
(1) POD
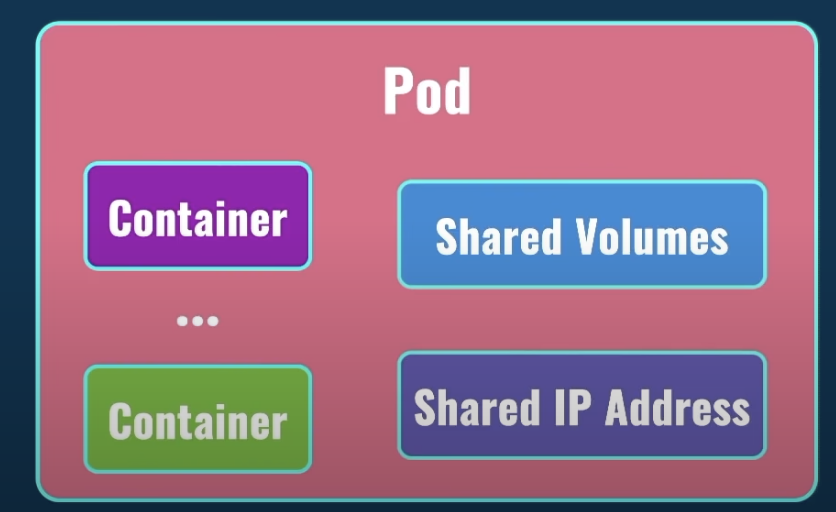
- POD is the smallest unit in the kubernetes
- POD에 있는 컨테너들은 volumes과 IP를 공유 한다.
-The containers are encapsulated into a kubernetes object known as pods - 스케일업 컨테이너 추가 시, POD안에 컨테이너들이 증가하는게 아니라 개별 컨테이너를 가진 POD들이 증가한다. (추가 POD을 수용할 수 없으면 새로운 Node에 POD 생성)
- Helper Container는 POD안에 multi 컨테이너를 구성할 수 있으며, 같은 network space를 공유하며 localhost로 연결된다.
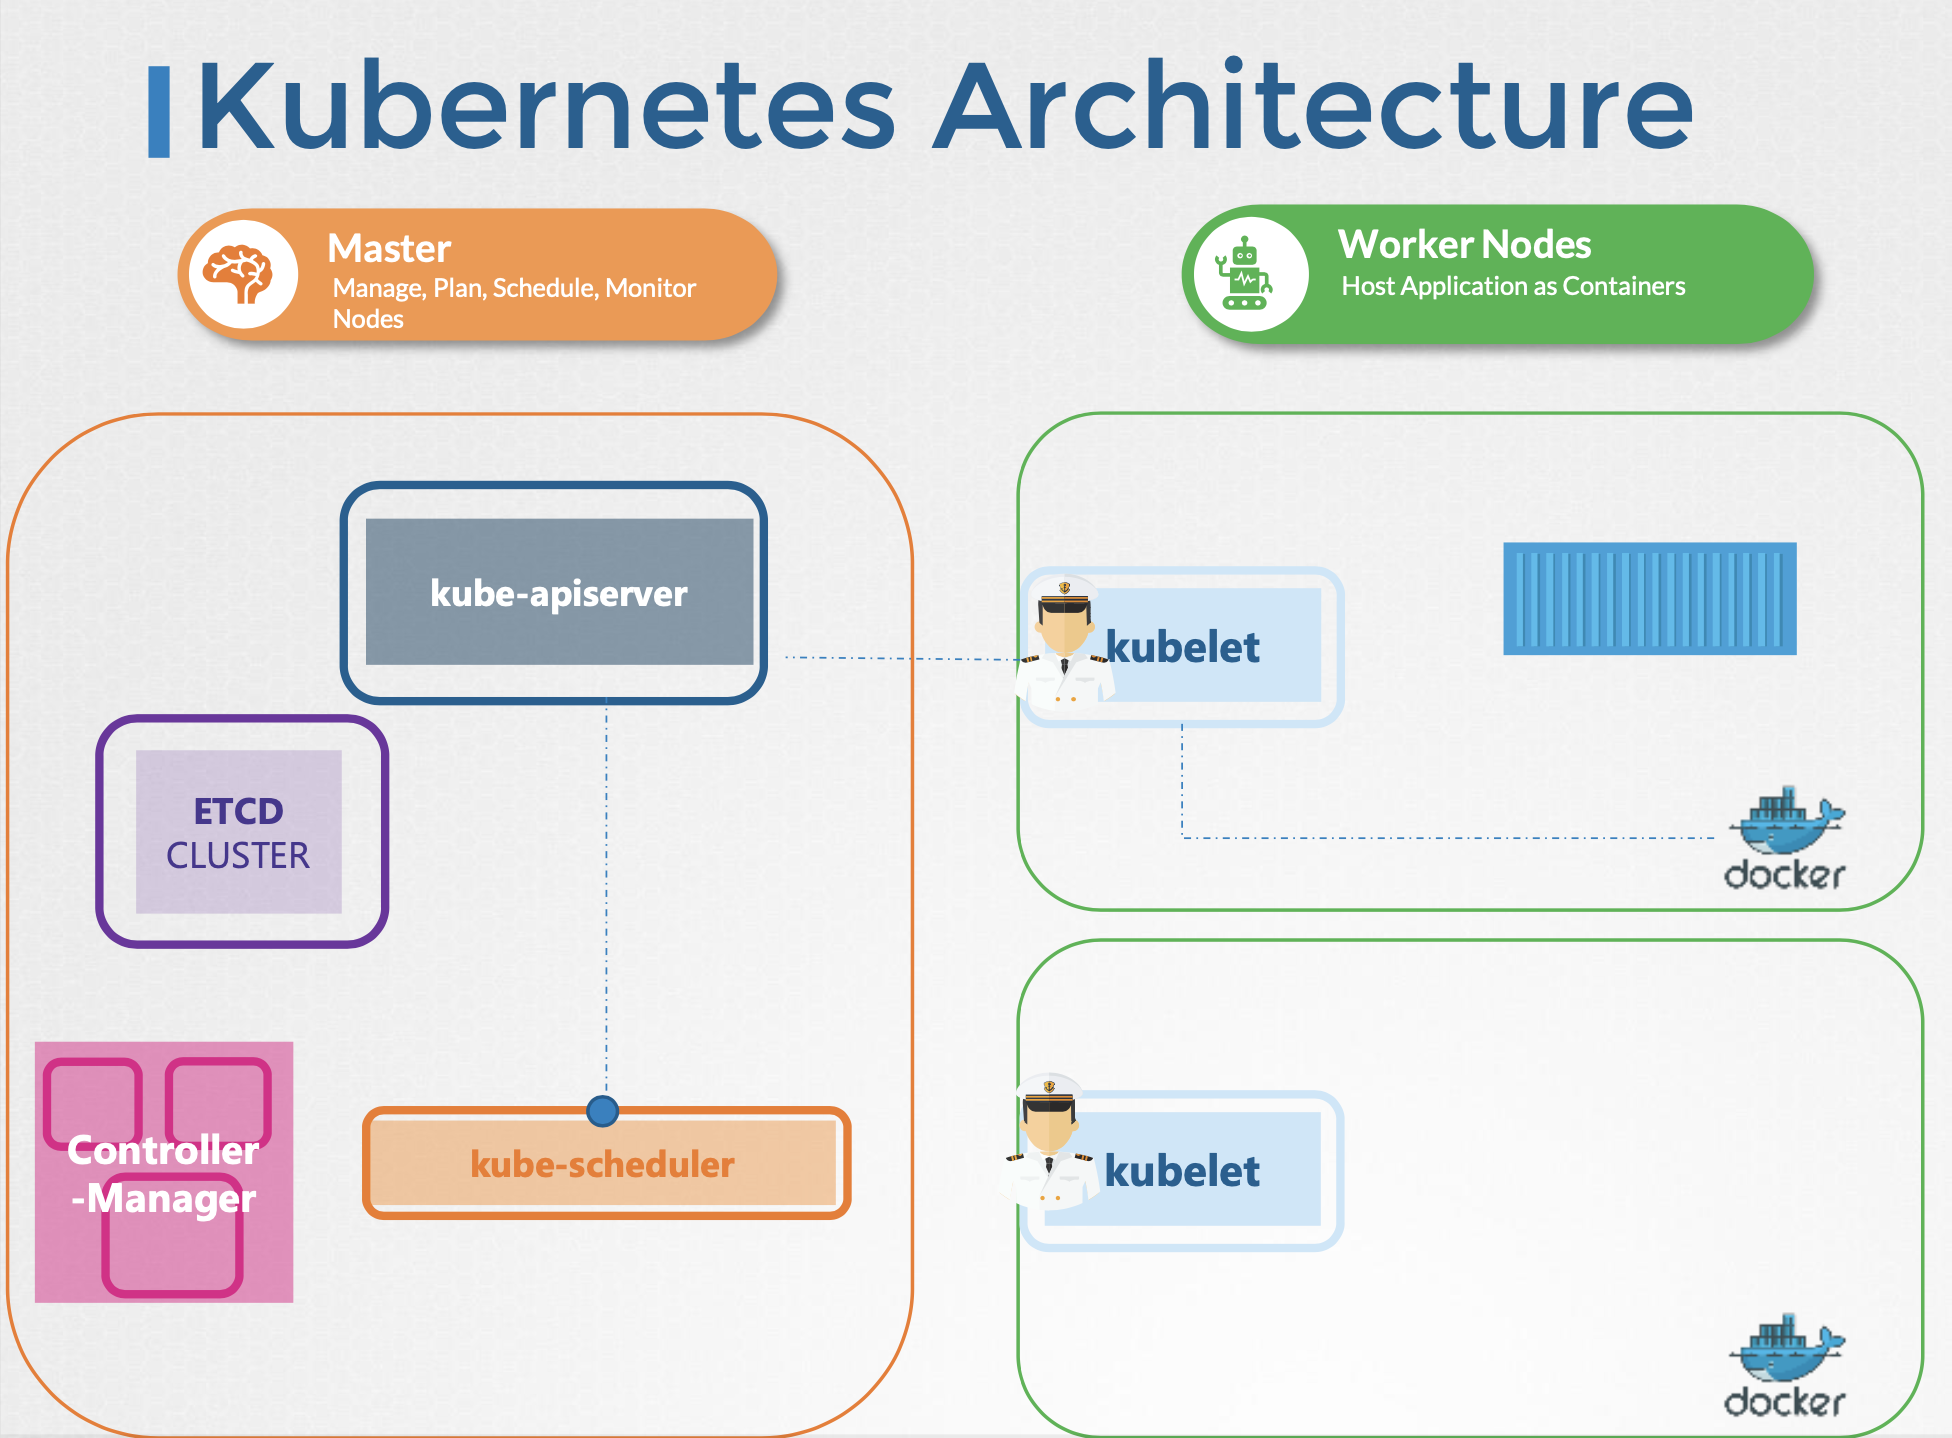
(2) Kubernetes Cluster

- 쿠버네티스 클러스터는 여러 노드들로 구성되며 각 노드에는 여러 POD으로 구성된다.
- 노드는 마스터 노드와 워커노드로 나뉘며, 마스터 노드는 워커노드들을 관리한다.
- 마스터 노드에 API Server / Scheduler / Kube Controller Manager / Cloud Controller Manger / etcd가 있다.
kube-apiserver
- 주요 관리 컴포넌트
- 워커노드는 apiserver와 커뮤니케이션
- 주기적으로 kubelet으로 부터 상태 리포트를 받아 노드의 상태를 모니터링
- Etcd에서 정보 가져 올 시, 인증 작업 진행 ~ 유일하게 Etcd와 커뮤니케이션 진행
Etcd
- A distributed reliable key-value store
- node, pods, configs, secrets, accounts, roles 등을 저장
- kubectl로 가져오는 정보들은 Etcd에서 가져온다.
kube-schedular
- deciding which pod goes on which node (it doesn't actually place the pod on the nodes. that's the job of the kublet)
- pod에 의해 요청된 cpu / 메모리를 바탕으로 적합한 node를 필터링
- node별 충분한 용량 체크 후 랭크 적용
Controller-Manager : a controller is a process that continuously monitors the state of various components
- Node-Controller : node 모니터링 (Node Monitor Period = 5s / Node Monitor Grace Period = 40s / POD Eviction Timeout = 5m)
- Replication-Controller : monitoring the status of replica sets and ensuring that the desired number of Pods
kubelet
- 각각의 노드에서 실행되는 에이전트로 kube-apiserver(스케쥴러)의 지침에 따라 노드안의 컨테이너를 배포하거나 삭제
- 각 워커노드의 Node와 POD 모니터링
- kubelet은 어떤 POD을 해당 Node에 할당할지에 대해 kube-apiserver 지침을 따르고, 해당 지침은 ETCD 데이타스토어에 저장된 kube-scheduler에 의해 결정된다.
Kube-proxy
- 서로 다른 워커노드간의 커뮤니케이션 지원
- service를 만들고 해당 service를 통해 pod으로 트래픽이 갈 수 있도록 한다.
(3) kubectl
- Remote Command Line Tool
참고 : https://samsungsds.com/kr/story/220222_kubernetes1.html
2. MiniKube와 virtualBox를 이용한 실습
1) 쿠버네티스 기본 CommandLine
(1) ssh 접속
minikube start --driver=virtualbox
minikube ip
ssh docker@ip // minikube의 기본 PW는 tcuser
(2) kubectl를 이용한 연결

kubectl get nodes // 노드 체크kubectl get pods // POD 체크kubectl get namespaces // namespace 체크
kubctl get pods --namespace=kube-system- namespace are used in Kubernetes in order to group different resources and configuration objects.
2) 도커 이미지로 POD 생성
POD 생성

// kubectl run POD명 --image=도커컨테이너명
kubectl run create-nginx --image=nginx
kubectl get pods -o wide // pod IP 포함
kubectl describe pod pod명 // POD 상세내역 조회- 위 IP 주소는 해당 Pod에 할당된 IP 주소다. 해당 ip는 도커에의 할당된 내부 ip이므로 클러스트 외부에서 연결 불가능하다.
POD 삭제
kubectl delete pod pod명 // POD 삭제tip) alias k="kubectl" // k로 kubectl 약칭
3) Deployment 생성
- POD의 수 증가/감소/수정 등 다수의 POD을 관리하기 위해 deployment 사용
Deployment 생성
k create deployment deployment명 --image=컨테이너명
k get deployments
k describe deployment deployment명
k describe pod deployment명
Deployment 스케일

k scale deployment deployment명 --replicas=레플리카수- 5개의 nginx pod 생성
4) Cluster IP / Service 생성
- Service를 통해 Deployment의 특정 POD을 노출시킬 수 있다.
k expose deployment deployment명 --port=8080 --target-port=80 // nginx 기본 80
k get services
- kubernets는 디폴트 서비스이며, 두번째 deployment로 생성한 서비스입니다.
- Cluster IP 가상 IP로 해당 IP로 POD에 연결할 수 있으며, 오직 클러스터 안에서만 이용가능하다.
- 내부에서 cluster IP로 접속 시, 레플리카 POD 중 하나에 연결된다.
k delete deployment deployment명
k delete service service명
참고 - Kubernetes Course / Bogdan Stashchuk

Pay it forward