1. Terraform Workflow

// ec2-instance.tf
terraform {
  required_providers {
    aws = {
      source  = "hashicorp/aws"
    }
  }
}

provider "aws" {
  profile = "js" # AWS Credentials Profile configured on your local desktop terminal  $HOME/.aws/credentials
  region  = "ap-northeast-2"
}

# Resource Block
resource "aws_instance" "ec2demo" {
  ami           = "ami-0195322846474ddb9" # 리소스 AMI ID
  instance_type = "t2.micro"
}
1) terraform init
- working directory 초기화 작업 수행
- provider plugin 다운로드
- terraform Provider 및 버전 관리를 위한 lock.hcl 파일 생성
2) terraform validate
- configuration file 유효성 검사
3) terraform plan
- 실행 계획 생성
- 리소스 정보 및 리소스에 대한 작업(add, change, destory)에 관한 내역 제공
4) terraform apply
- 인프라 프로비저닝
5) terraform destory
- 인프라 destory 실행
2. Terraform Basic Blocks
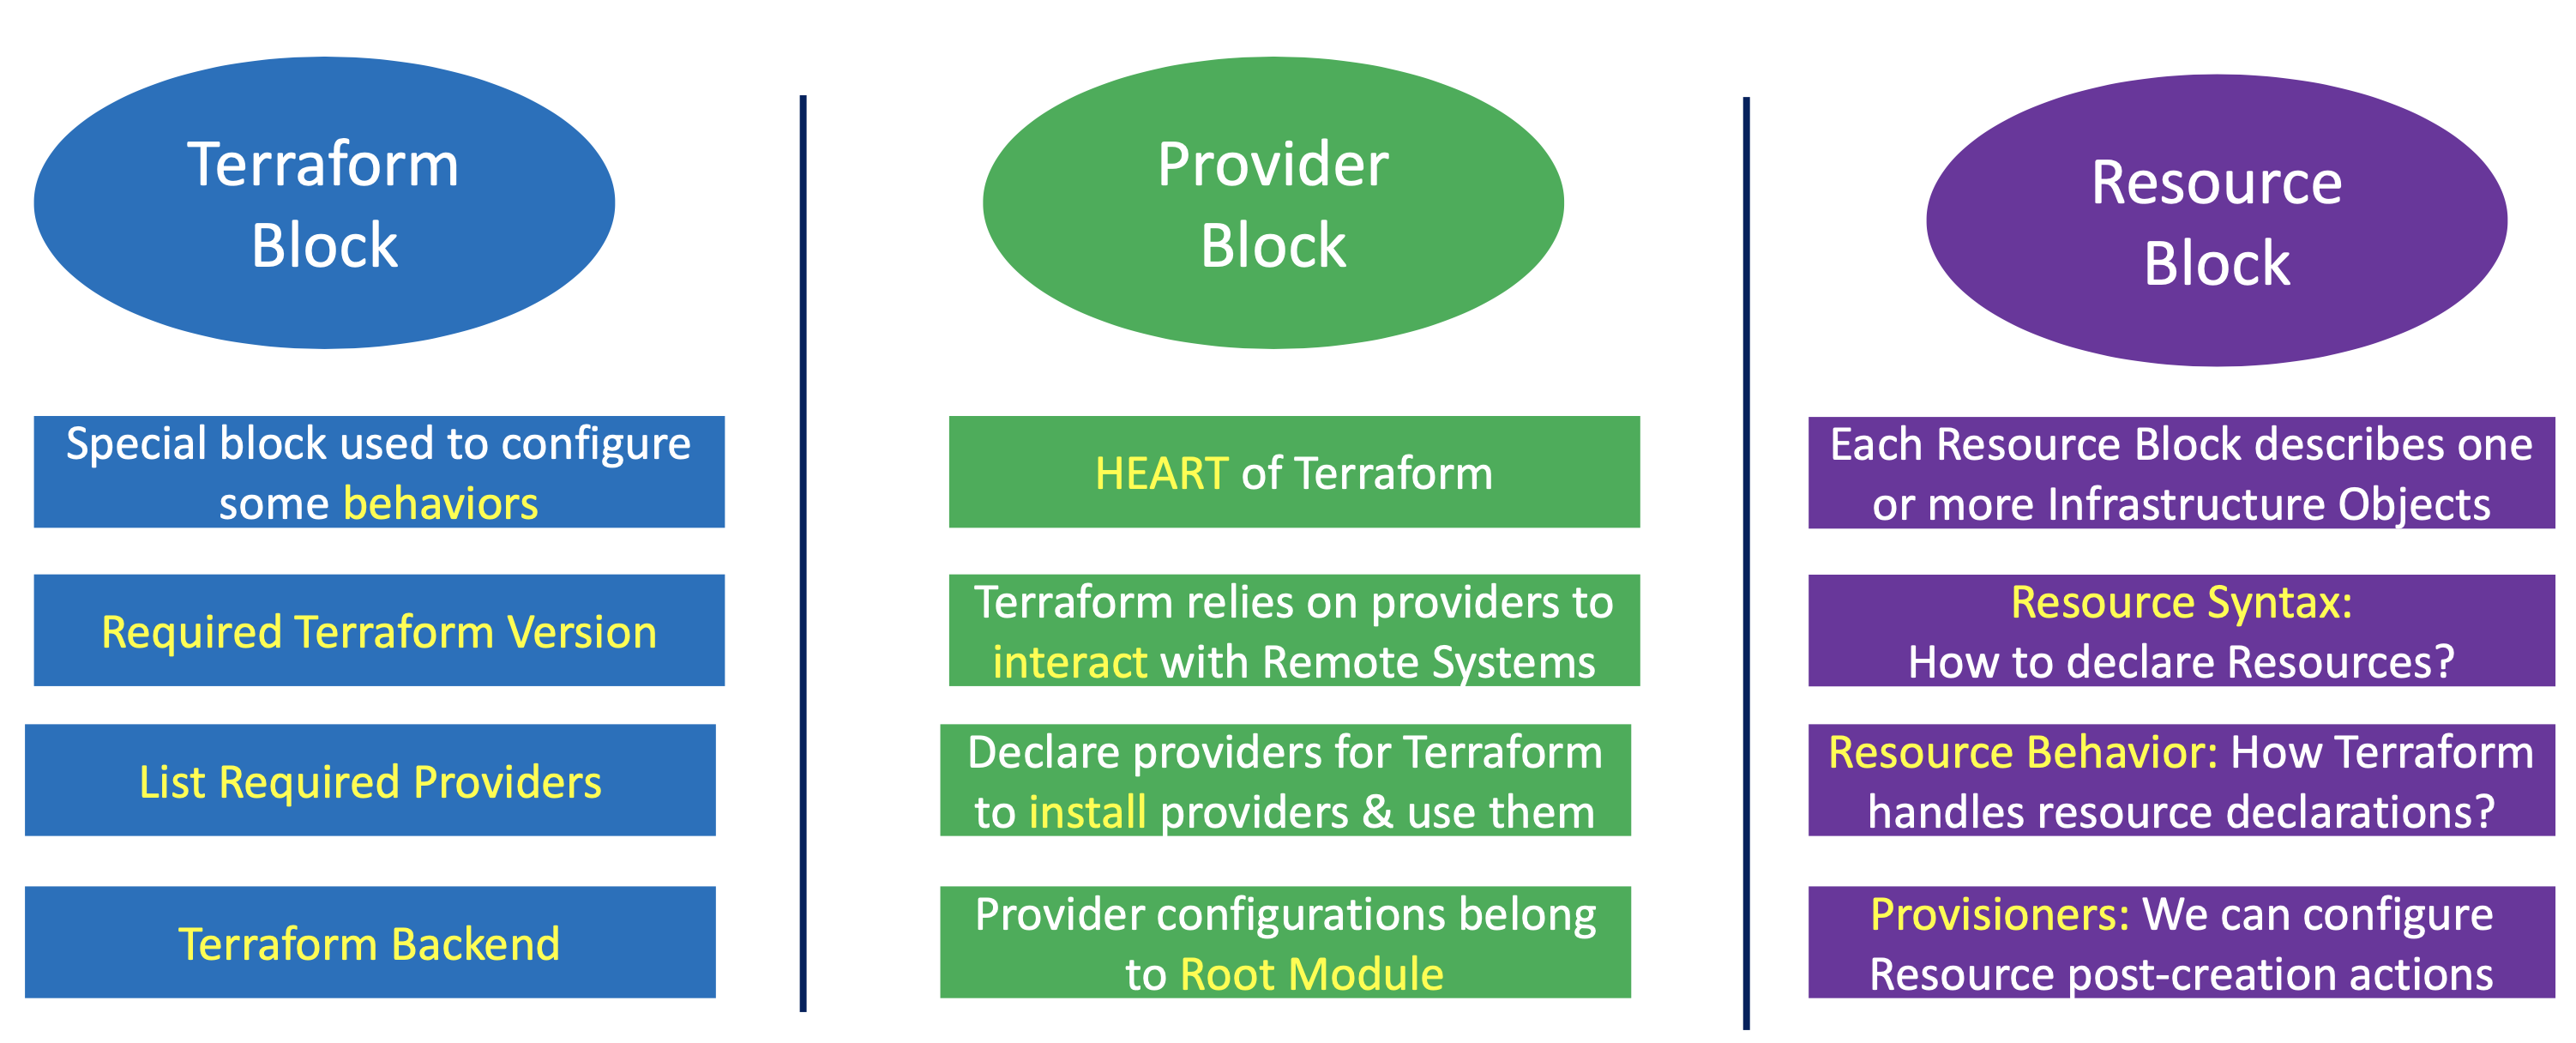
1) Terraform Block
terraform {
  required_version = "~> 1.0" # 테라폼 버전 0.14 이거나 이상 0.15, 0.16 etc and < 1.xx
  /*
  terraform aws provider
  LocalName(aws)은 argument로 = {} 사용 필요
  정의한 LocalName과 Provider Block의 provider는 일치해야 한다.
  */
  required_providers {
    aws = {
      source = "hashicorp/aws"
      version = "~> 3.0"
    }
  }
} - 각 Terraform Block은 Terraform's behavior에 대한 내용을 포함한다.
- 오직 상수 값만 사용가능하다.
2) Provider Block
provider "aws" {
  # profile or access key 사용 가능
  profile = "js"
  region  = "ap-northeast-2"
}- terramform init 실행 시, Terraform Registry에서 해당 Provider를 로컬 데스크탑에 다운로드
- terraform apply & destroy를 실행 시, terraform aws provider가 aws api에 요청을 보낸다
3) Resouce Block
/*
aws_instance -> Resource Type
myec2localname -> Resource Local Name : 같은 테라폼 모듈에서 참조되며 unique 해야함
*/
resource "aws_instance" "myec2localname" {
  ami = "ami-0195322846474ddb9"
  instance_type = "t3.micro"
  user_data = file("${path.module}/app1-install.sh") // file() 모듈 내 파일 참조
  tags = {
    // 인스턴스 명 반영
    "Name" = "EC2 Demo"
  }
}
4) 기타 Terraform State
- 리소스 프로비저닝 후, .tfstate 파일 자동 생성 되며 버전 및 리소스에 대한 정보를 담고 있다.
- 즉 클라우드 시스템의 정보를 해당파일에 기록하여 클라우드 상태와 로컬 terraform file 간의 중재자 역할을 한다.
3. Terraform Variables, DataSource, Output 사용
1) Variables
- 리전, 프로필, 인스턴스 타입 등을 변수로 지정 후 실제 생성시 var.~ 로 변수사용 가능
variables.tf
# Input Variables
# AWS Region
variable "aws_region" {
  description = "Region in which AWS Resources to be created"
  type = string
  default = "ap-northeast-2"
}

variable "aws_profile" {
  description = "Profile for AWS Account"
  type = string
  default = "js"
}

# AWS EC2 Instance Type
variable "instance_type" {
  description = "EC2 Instnace Type"
  type = string
  default = "t3.micro"
}

# AWS EC2 Instance Key Pair
variable "instance_keypair" {
  description = "AWS EC2 Key Pair that need to be associated with EC2 Instance"
  type = string
  default = "terraform-key"
}
2) DataSource
datasource.tf

- 최신 인스턴스 AMI 적용 시, AMI NAME 및 디바이스 유형, 가상화를 필터를 통해 적용가능
- 해당 datasource를 참조 시, data.~ 형태로 가능하며 attribute(id)를 기입해야 함
# Get latest AMI ID for Amazon Linux2 OS
# datasource는 data.점으로 참조 가능 data.aws_ami.amzlinux2.id (id는) 테라폼 attribute
data "aws_ami" "amzlinux2" {
  # 최신 AMI 사용
  most_recent      = true
  owners           = ["amazon"]
  filter {
    name   = "name"
    # AMI NAME
    values = ["amzn2-ami-hvm-*-gp2"]
  }
  filter {
    name   = "root-device-type"
    values = ["ebs"]
  }
  filter {
    name   = "virtualization-type"
    values = ["hvm"]
  }
  filter {
    name   = "architecture"
    values = ["x86_64"]
  }
}
3) Output

- 리소스 프로비저닝 후 위와 같이 요청한 output 정보를 즉시 확인 할 수 있다.
# EC2 Instance Public IP
output "instance_publicip" {
  description = "EC2 Instance Public IP"
  value = aws_instance.myec2vm.public_ip
}

# EC2 Instance Public DNS
output "instance_publicdns" {
  description = "EC2 Instance Public DNS"
  value = aws_instance.myec2vm.public_dns
}
4) Variables, DataSource, Output 참조 후 리소스 프로비저닝 예시
ec2instance.tf
# EC2 Instance
resource "aws_instance" "myec2vm" {
  ami = data.aws_ami.amzlinux2.id
  instance_type = var.instance_type
  user_data = file("${path.module}/app1-install.sh")
  key_name = var.instance_keypair
  # ssh & http 보안그룹 설정
  vpc_security_group_ids = [ aws_security_group.vpc-terraform-ssh.id, aws_security_group.vpc-terraform-web.id   ]
  # 생성한 EC2 Name 설정
  tags = {
    "Name" = "EC2 Demo 2"
  }
}
- terraform에 설정한 key pair 및 output 결과의 public ip로 ssh 테스트 진행
4. Terraform Loop을 활용한 멀티 프로비저닝
1) Variables Map & List
- variable 생성 시, 리스트 & 맵으로 생성 후 원하는 타입으로 생성 요청 가능
variables.tf
# AWS EC2 Instance Type - List
variable "instance_type_list" {
  description = "EC2 Instance Type"
  type = list(string)
  default = ["t3.micro", "t3.small", "t3.large"]
}

# AWS EC2 Instance Type - Map
variable "instance_type_map" {
  description = "EC2 Instance Type"
  type = map(string)
  default = {
    "dev" = "t3.micro"
    "qa" = "t3.small"
    "prod" = "t3.large"
  }
}
ec2instance.tf
  instance_type = var.instance_type_list[1]  # For List
  #nstance_type = var.instance_type_map["prod"]  # For Map
2) Multi instance 생성
- multi instance 생성 시, 카운트를 지정하고 count.index적용 시 해당 인스턴스 네임에 0,1이 자동 적용된다 (아래 사진 참고)

ec2instance.tf
resource "aws_instance" "myec2vm" {
ami = data.aws_ami.amzlinux2.id
# instance_type = var.instance_type
# LIST와 Map 사용
instance_type = var.instance_type_list[1] # For List
#nstance_type = var.instance_type_map["prod"] # For Map
user_data = file("${path.module}/app1-install.sh")
key_name = var.instance_keypair
vpc_security_group_ids = [ aws_security_group.vpc-ssh.id, aws_security_group.vpc-web.id ]
# EC2 생성 갯수
count = 2
tags = {
# count index는 0부터 시작
# Count-Demo-0 , Count-Demo-1로 ec2 Name 설정
"Name" = "Count-Demo-${count.index}"
}
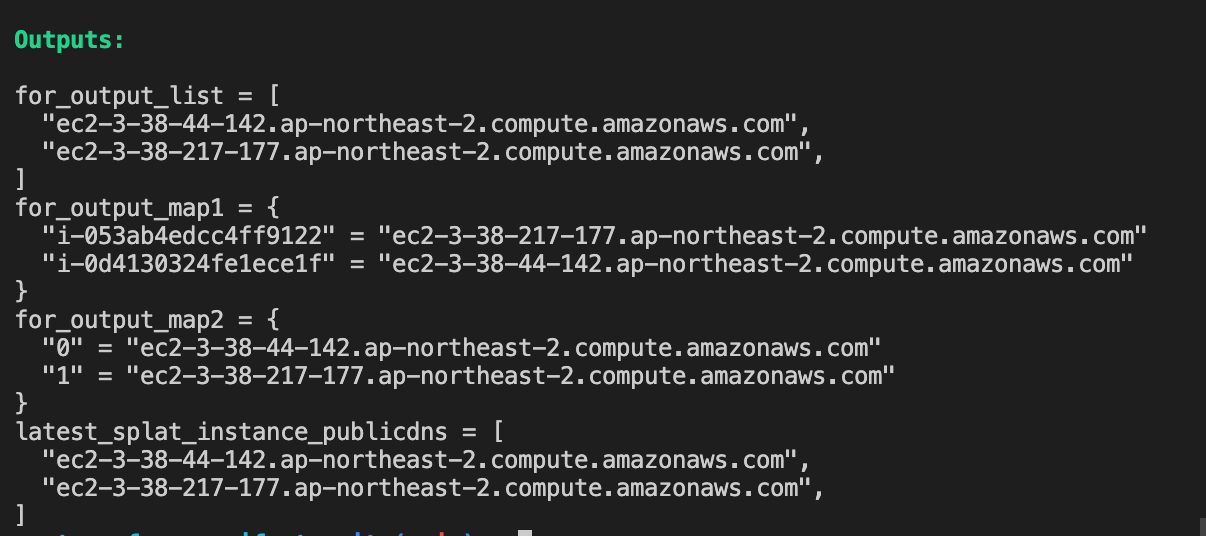
}3) Loop를 이용한 Output 출력
- Multi instance 생성 후, 이와 관련한 List & Map OUTPUT 출력을 제공한다.
output.tf
# 여러 인스턴스 생성 시 (count 적용) loop를 통해 output 출력

# Output - For Loop with List
output "for_output_list" {
  description = "For Loop with List"
  value = [for instance in aws_instance.myec2vm: instance.public_dns]
}

# Output - For Loop with Map
# id는 key pulic_dns는 value
output "for_output_map1" {
  description = "For Loop with Map"
  value = {for instance in aws_instance.myec2vm: instance.id => instance.public_dns}
}

# Output - For Loop with Map Advanced
# c ~ count
output "for_output_map2" {
  description = "For Loop with Map - Advanced"
  value = {for c, instance in aws_instance.myec2vm: c => instance.public_dns}
}

# Output Latest Generalized Splat Operator - Returns the List
output "latest_splat_instance_publicdns" {
  description = "Generalized latest Splat Operator"
  value = aws_instance.myec2vm[*].public_dns
}
결과 예시)
참고 - Terraform on AWS EKS Kubernetes IaC / Kalyan Reddy Daida

Pay it forward